Convierte documentos de Word a HTML en el navegador con JavaScript
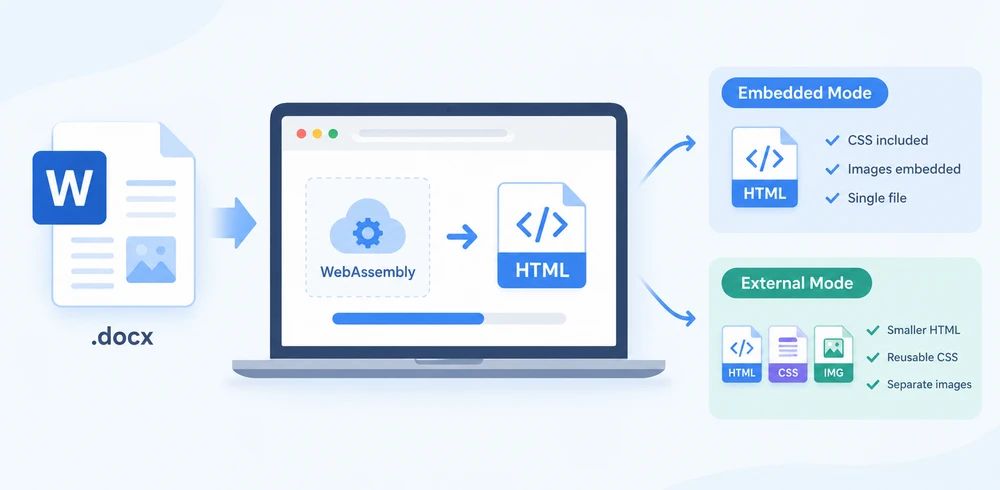
Los documentos de Word suelen ser el punto de partida para el contenido web: artículos, especificaciones de productos y documentos de cumplimiento, todo ello necesita eventualmente estar en un sitio web. Pasar de .docx a HTML limpio sin un servicio de conversión de backend es el desafío. Spire.Doc for JavaScript lo hace posible ejecutando un motor completo de procesamiento de documentos sobre WebAssembly, leyendo el archivo de Word a través de un sistema de archivos virtual (VFS), realizando la conversión localmente y permitiéndote descargar el HTML resultante, todo del lado del cliente, sin ida y vuelta al servidor.
Dos estrategias de exportación dominan el flujo de trabajo, y elegir entre ellas es la verdadera decisión:
- Modo integrado empaqueta CSS e imágenes directamente en el archivo HTML, produciendo un único documento autocontenido que se abre en cualquier lugar.
- Modo externo escribe CSS e imágenes en archivos separados, lo que te ofrece un HTML más pequeño, hojas de estilo reutilizables y recursos de imagen individuales que puedes gestionar de forma independiente.
Este artículo recorre ambos enfoques en un proyecto de React y los compara lado a lado. Para la configuración, consulta Integrar Spire.Doc for JavaScript en un proyecto de React. Los ejemplos a continuación asumen que Spire.Doc está instalado y que el módulo WebAssembly está inicializado.
Conversión básica: incrustar todo en un solo archivo
La forma más sencilla de publicar un documento de Word como página web es producir un único archivo HTML que contenga todo (marcado, estilos e imágenes) en un paquete autocontenido. Esto es ideal cuando necesitas un artefacto portátil que se represente correctamente sin importar dónde se abra, sin referencias a archivos faltantes ni enlaces rotos.
La conversión sigue tres pasos. Primero, carga el archivo de fuente y el documento de Word de origen en el sistema de archivos virtual de WASM usando FetchFileToVFS. Segundo, crea una instancia de Document, carga el archivo, configura HtmlExportOptions para incrustar tanto CSS como imágenes, y llama a SaveToFile para escribir el HTML. Tercero, lee el archivo generado desde VFS, envuélvelo en un Blob y activa una descarga del navegador.
function App() {
  const wordToHtml = async () => {
    // Get the Spire.Doc WASM module
    const docModule = window.wasmModule?.spiredoc;

    // Check if the module is ready
    if (!docModule) {
      alert('Spire.Doc is not ready yet');
      return;
    }

    // Load fonts and the Word file into VFS
    await window.spire.FetchFileToVFS('ARIALUNI.TTF', '/Library/Fonts/', `${process.env.PUBLIC_URL}/static/font/`);
    const inputFileName = 'ToHtml.docx';
    await window.spire.FetchFileToVFS(inputFileName, '', `${process.env.PUBLIC_URL}/static/data/`);

    // Load the Word document
    const wordDocument = new docModule.Document();
    wordDocument.LoadFromFile(inputFileName);

    // Embed the CSS styles into the HTML and embed images as Base64
    wordDocument.HtmlExportOptions.CssStyleSheetType = docModule.CssStyleSheetType.Internal;
    wordDocument.HtmlExportOptions.ImageEmbedded = true;

    // Convert the document to HTML
    const outputFileName = 'ToHtml-result.html';
    wordDocument.SaveToFile({ fileName: outputFileName, fileFormat: docModule.FileFormat.Html });

    // Read the converted file from VFS and trigger download
    const fileArray = window.dotnetRuntime.Module.FS.readFile(outputFileName);
    const blob = new Blob([fileArray], { type: 'text/html;charset=utf-8' });
    const url = URL.createObjectURL(blob);
    const a = window.document.createElement('a');
    a.href = url;
    a.download = outputFileName;
    a.click();
    URL.revokeObjectURL(url);

    // Release resources
    wordDocument.Dispose();
  };

  return (
    <div style={{ textAlign: 'center', height: '300px' }}>
      <h1>Convert Word To HTML</h1>
      <button onClick={wordToHtml}>
        Generate
      </button>
    </div>
  );
}

export default App;
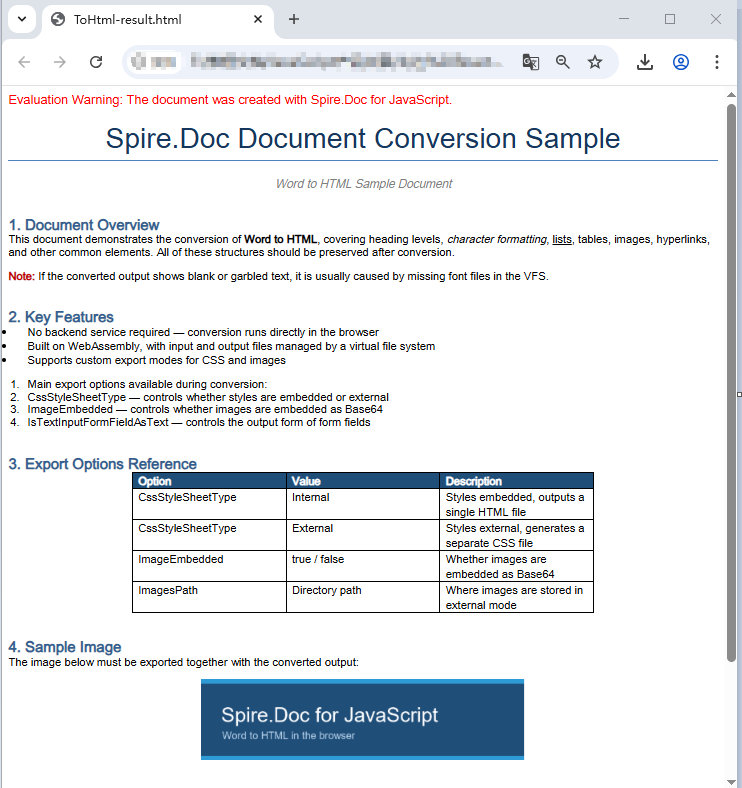
Página HTML generada a partir de un documento de Word mediante SaveToFile
Opciones de exportación: CSS e imágenes separados
Incrustar todo en un solo archivo es cómodo, pero tiene ventajas y desventajas. Un documento grande con muchas imágenes produce un archivo HTML muy grande, y cada página que comparte el mismo estilo lleva su propia copia duplicada del CSS. Cuando quieres mantener los estilos de forma centralizada, reutilizar recursos de imagen en varias páginas o mantener pequeño el contenido HTML para una representación inicial más rápida, deberías exportar CSS e imágenes como archivos separados en su lugar.
HtmlExportOptions te ofrece un control detallado sobre cómo se escribe cada tipo de recurso. Puedes dirigir el CSS a un archivo de hoja de estilos con nombre, enviar las imágenes a un directorio dedicado e incluso controlar cómo se serializan los campos de formulario. El resultado ya no es un solo archivo, sino una estructura de directorios que contiene el HTML, la hoja de estilos y los archivos de imagen.
El flujo de trabajo es similar al del enfoque integrado, con dos añadidos. Antes de la conversión, crea un directorio de salida en VFS y usa CssStyleSheetFileName y ImagesPath para indicarle a Spire.Doc dónde escribir cada tipo de recurso. Después de la conversión, lee todo el directorio de salida de forma recursiva, empaqueta todo en un archivo zip usando JSZip y descárgalo en una sola operación.
import JSZip from 'jszip';

function App() {
  const wordToHtmlWithOptions = async () => {
    // Get the Spire.Doc WASM module
    const docModule = window.wasmModule?.spiredoc;

    // Check if the module is ready
    if (!docModule) {
      alert('Spire.Doc is not ready yet');
      return;
    }

    // Load fonts and the Word file into VFS
    await window.spire.FetchFileToVFS('ARIALUNI.TTF', '/Library/Fonts/', `${process.env.PUBLIC_URL}/static/font/`);
    const inputFileName = 'ToHtml.docx';
    await window.spire.FetchFileToVFS(inputFileName, '', `${process.env.PUBLIC_URL}/static/data/`);

    // Create the output directory in VFS
    const outputDirectoryName = 'ToHTMLFolder/';
    window.dotnetRuntime.Module.FS.mkdirTree(outputDirectoryName);

    // Load the Word document
    const wordDocument = new docModule.Document();
    wordDocument.LoadFromFile(inputFileName);

    // Export the CSS styles to a separate file
    wordDocument.HtmlExportOptions.CssStyleSheetFileName = outputDirectoryName + 'sample.css';
    wordDocument.HtmlExportOptions.CssStyleSheetType = docModule.CssStyleSheetType.External;

    // Export images to a separate directory
    wordDocument.HtmlExportOptions.ImageEmbedded = false;
    wordDocument.HtmlExportOptions.ImagesPath = outputDirectoryName + 'Demo/';

    // Export form fields as plain text
    wordDocument.HtmlExportOptions.IsTextInputFormFieldAsText = true;

    // Convert the document to HTML
    const outputFileName = 'ToHtmlExportOption-out.html';
    wordDocument.SaveToFile({ fileName: outputFileName, fileFormat: docModule.FileFormat.Html });

    // Release resources
    wordDocument.Dispose();

    // Read the output directory recursively and write each level of files into the zip
    const zip = new JSZip();
    const addFilesToZip = async (folderPath, zipFolder) => {
      let items = await window.dotnetRuntime.Module.FS.readdir(folderPath);
      items = items.filter((item) => item !== '.' && item !== '..');
      for (const item of items) {
        const itemPath = `${folderPath}/${item}`;
        try {
          const fileData = await window.dotnetRuntime.Module.FS.readFile(itemPath);
          zipFolder.file(item, fileData);
        } catch (error) {
          const zipSubFolder = zipFolder.folder(item);
          await addFilesToZip(itemPath, zipSubFolder);
        }
      }
    };

    // Package the HTML file together with the resource directory
    zip.file(outputFileName, window.dotnetRuntime.Module.FS.readFile(outputFileName));
    await addFilesToZip(outputDirectoryName, zip);
    const zipBlob = await zip.generateAsync({ type: 'blob' });
    const url = URL.createObjectURL(zipBlob);

    // Trigger download
    const a = window.document.createElement('a');
    a.href = url;
    a.download = 'ToHTMLFolder.zip';
    a.click();
    URL.revokeObjectURL(url);
  };

  return (
    <div style={{ textAlign: 'center', height: '300px' }}>
      <h1>Convert Word To HTML With Export Options</h1>
      <button onClick={wordToHtmlWithOptions}>
        Generate
      </button>
    </div>
  );
}

export default App;
Archivos HTML, CSS e imágenes generados después de configurar las opciones de exportación
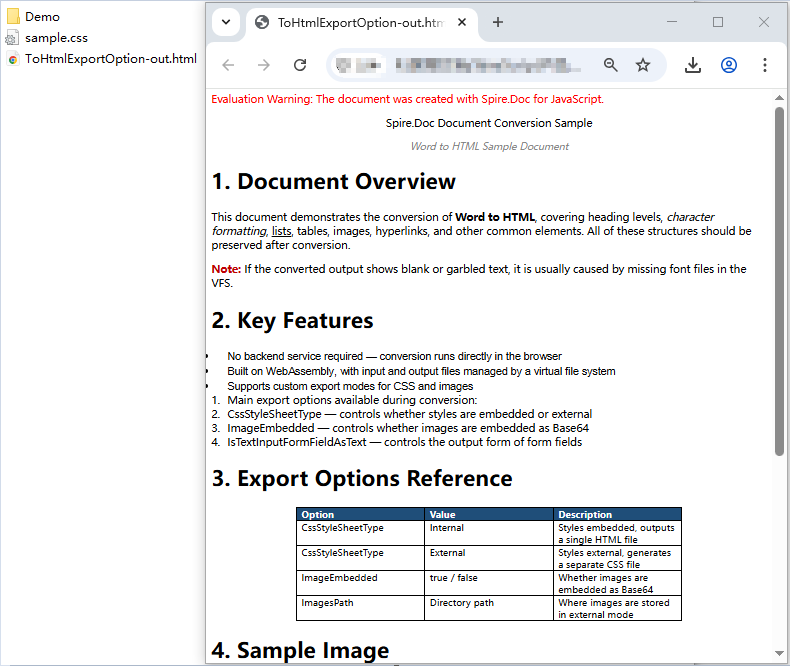
Un detalle que vale la pena señalar: Spire.Doc no coloca las imágenes directamente en el directorio especificado por ImagesPath. En su lugar, crea una subcarpeta external_images dentro de ese directorio para contener los archivos de imagen. La estructura resultante es similar a Demo/external_images/*.png, y es por eso que addFilesToZip recorre el árbol de directorios de forma recursiva en lugar de leer una lista plana de archivos.
Integrado vs. externo: elegir la estrategia adecuada
Ambos modos de exportación producen HTML válido a partir del mismo documento de Word, pero responden a necesidades de publicación diferentes. La siguiente tabla resume las diferencias clave para ayudarte a decidir qué enfoque se adapta a tu flujo de trabajo.
| Aspecto | Integrado (archivo único) | Externo (archivos separados) |
|---|---|---|
| Salida | Un archivo .html con CSS en línea e imágenes Base64 |
HTML + .css + archivos de imagen en un directorio |
| Tamaño de archivo | Más grande: todos los recursos se codifican en Base64 dentro del HTML | HTML más pequeño; el tamaño total es similar, pero los recursos son archivos individuales |
| Portabilidad | Totalmente autocontenido; se abre correctamente en cualquier lugar sin dependencias | Requiere que todos los archivos permanezcan juntos; se deben conservar las rutas relativas |
| Mecanismo de descarga | Descarga de un solo archivo mediante Blob | Descarga de archivo zip (por ejemplo, con JSZip) |
| Reutilización de estilos | Cada documento lleva su propia copia del CSS | Varias páginas pueden compartir un único archivo de hoja de estilos |
| Gestión de imágenes | Las imágenes son cadenas Base64 dentro del HTML; no se pueden referenciar ni almacenar en caché por separado | Las imágenes son archivos individuales que se pueden almacenar en caché, cargar de forma diferida o reutilizar |
| Velocidad de representación inicial | Más lenta para documentos grandes: el navegador debe analizar un archivo grande | Análisis inicial del HTML más rápido; CSS e imágenes se cargan en paralelo |
| Ideal para | Archivos adjuntos de correo electrónico, vistas previas puntuales, instantáneas de archivo, compartir un único documento | Migración de contenido de CMS, publicación de varias páginas, bases de conocimiento, sitios con estilos compartidos |
| Mantenibilidad | Baja: cambiar un estilo implica regenerar todo el archivo | Alta: edita el archivo CSS una vez y todas las páginas vinculadas se actualizan |
Guía rápida de decisión:
- Elige el modo integrado cuando necesites un artefacto único y portátil; por ejemplo, generar una vista previa que un usuario descargue y abra sin conexión, o adjuntar un documento convertido a un correo electrónico.
- Elige el modo externo cuando publiques en una plataforma web donde varios documentos compartan el mismo sistema de diseño, donde quieras almacenar en caché o cargar de forma diferida las imágenes, o donde el tamaño del archivo HTML sea importante para el rendimiento.
Preguntas frecuentes
Las fuentes en el HTML exportado no coinciden con el documento original
Si las fuentes en tu HTML convertido se ven diferentes del archivo de Word de origen, la causa casi siempre son datos de fuente faltantes en el sistema de archivos virtual de WASM. Spire.Doc depende de las fuentes cargadas en VFS para realizar cálculos precisos de diseño y resolución de nombres de fuentes durante la conversión. Cuando una fuente requerida no está disponible, el motor sustituye una fuente de reserva, y las declaraciones font-family en el CSS de salida no coincidirán con lo que especifica el documento original. En documentos que usan fuentes de símbolos como Wingdings, los caracteres afectados también pueden mostrarse como texto ilegible.
La solución es sencilla: precarga los archivos de fuente necesarios en VFS mediante FetchFileToVFS antes de ejecutar la conversión. Para documentos que contienen texto en chino, japonés o coreano, usa una fuente con amplia cobertura Unicode, como ARIALUNI.TTF:
await window.spire.FetchFileToVFS(
  'ARIALUNI.TTF', '/Library/Fonts/', '/'
);
El HTML exportado pierde sus estilos e imágenes al abrirlo
Cuando usas el modo externo (CssStyleSheetType.External con ImageEmbedded = false), los archivos CSS e imágenes se escriben en ubicaciones separadas, y el HTML los referencia mediante rutas relativas. Si descargas solo el archivo HTML sin sus recursos acompañantes, el navegador no puede resolver esas rutas y la página recurre a texto sin formato sin estilo con imágenes rotas.
Para evitar esto, empaqueta siempre el HTML junto con su directorio de recursos; el enfoque addFilesToZip que se muestra en la sección de opciones de exportación se encarga de esto al empaquetar todo en una única descarga zip. Como alternativa, si en realidad no necesitas archivos de recursos separados, cambia al modo integrado para que todo permanezca en un único archivo HTML autocontenido:
wordDocument.HtmlExportOptions.CssStyleSheetType = docModule.CssStyleSheetType.Internal;
wordDocument.HtmlExportOptions.ImageEmbedded = true;
Ver también
Word-Dokumente mit JavaScript im Browser in HTML konvertieren
Word-Dokumente sind oft der Ausgangspunkt für Webinhalte – Artikel, Produktspezifikationen und Compliance-Dokumente müssen irgendwann auf einer Website verfügbar sein. Der Weg von .docx zu sauberem HTML ohne einen Backend-Konvertierungsdienst ist die eigentliche Herausforderung. Spire.Doc for JavaScript macht dies möglich, indem eine vollständige Dokumentverarbeitungs-Engine auf WebAssembly ausgeführt wird, die Word-Datei über ein virtuelles Dateisystem (VFS) gelesen wird, die Konvertierung lokal erfolgt und Sie das resultierende HTML herunterladen können – alles clientseitig, ohne Server-Roundtrip.
Zwei Exportstrategien dominieren den Workflow, und die Entscheidung zwischen ihnen ist die eigentliche Wahl:
- Eingebetteter Modus bündelt CSS und Bilder direkt in der HTML-Datei und erzeugt ein einziges, in sich geschlossenes Dokument, das überall geöffnet werden kann.
- Externer Modus schreibt CSS und Bilder in separate Dateien und liefert Ihnen kleineres HTML, wiederverwendbare Stylesheets und einzelne Bild-Assets, die Sie unabhängig verwalten können.
Dieser Artikel führt durch beide Ansätze in einem React-Projekt und vergleicht sie direkt miteinander. Zur Einrichtung lesen Sie Spire.Doc for JavaScript in ein React-Projekt integrieren. Die folgenden Beispiele setzen voraus, dass Spire.Doc installiert und das WebAssembly-Modul initialisiert ist.
Grundlegende Konvertierung: Alles in eine Datei einbetten
Der einfachste Weg, ein Word-Dokument als Webseite zu veröffentlichen, besteht darin, eine einzelne HTML-Datei zu erzeugen, die alles enthält – Markup, Stile und Bilder – in einem in sich geschlossenen Paket. Das ist ideal, wenn Sie ein portables Artefakt benötigen, das unabhängig vom Ort des Öffnens korrekt gerendert wird, ohne fehlende Dateiverweise oder fehlerhafte Links.
Die Konvertierung erfolgt in drei Schritten. Zuerst laden Sie die Schriftdatei und das Word-Quelldokument mit FetchFileToVFS in das virtuelle Dateisystem von WASM. Zweitens erstellen Sie eine Document-Instanz, laden die Datei, konfigurieren HtmlExportOptions so, dass sowohl CSS als auch Bilder eingebettet werden, und rufen SaveToFile auf, um das HTML zu schreiben. Drittens lesen Sie die erzeugte Datei aus dem VFS zurück, verpacken sie in ein Blob und lösen einen Browser-Download aus.
function App() {
  const wordToHtml = async () => {
    // Get the Spire.Doc WASM module
    const docModule = window.wasmModule?.spiredoc;

    // Check if the module is ready
    if (!docModule) {
      alert('Spire.Doc is not ready yet');
      return;
    }

    // Load fonts and the Word file into VFS
    await window.spire.FetchFileToVFS('ARIALUNI.TTF', '/Library/Fonts/', `${process.env.PUBLIC_URL}/static/font/`);
    const inputFileName = 'ToHtml.docx';
    await window.spire.FetchFileToVFS(inputFileName, '', `${process.env.PUBLIC_URL}/static/data/`);

    // Load the Word document
    const wordDocument = new docModule.Document();
    wordDocument.LoadFromFile(inputFileName);

    // Embed the CSS styles into the HTML and embed images as Base64
    wordDocument.HtmlExportOptions.CssStyleSheetType = docModule.CssStyleSheetType.Internal;
    wordDocument.HtmlExportOptions.ImageEmbedded = true;

    // Convert the document to HTML
    const outputFileName = 'ToHtml-result.html';
    wordDocument.SaveToFile({ fileName: outputFileName, fileFormat: docModule.FileFormat.Html });

    // Read the converted file from VFS and trigger download
    const fileArray = window.dotnetRuntime.Module.FS.readFile(outputFileName);
    const blob = new Blob([fileArray], { type: 'text/html;charset=utf-8' });
    const url = URL.createObjectURL(blob);
    const a = window.document.createElement('a');
    a.href = url;
    a.download = outputFileName;
    a.click();
    URL.revokeObjectURL(url);

    // Release resources
    wordDocument.Dispose();
  };

  return (
    <div style={{ textAlign: 'center', height: '300px' }}>
      <h1>Convert Word To HTML</h1>
      <button onClick={wordToHtml}>
        Generate
      </button>
    </div>
  );
}

export default App;
Über SaveToFile aus einem Word-Dokument erzeugte HTML-Seite
Exportoptionen: CSS und Bilder separat
Alles in eine Datei einzubetten ist praktisch, hat aber Nachteile. Ein großes Dokument mit vielen Bildern erzeugt eine sehr große HTML-Datei, und jede Seite, die dasselbe Styling verwendet, trägt ihre eigene Kopie des CSS mit sich. Wenn Sie Stile zentral pflegen, Bild-Assets seitenübergreifend wiederverwenden oder die HTML-Nutzlast klein halten möchten, um ein schnelleres erstes Rendering zu erreichen, sollten Sie CSS und Bilder stattdessen als separate Dateien exportieren.
HtmlExportOptions gibt Ihnen eine feingranulare Kontrolle darüber, wie jeder Ressourcentyp geschrieben wird. Sie können das CSS in eine benannte Stylesheet-Datei leiten, Bilder in ein eigenes Verzeichnis schreiben und sogar steuern, wie Formularfelder serialisiert werden. Das Ergebnis ist keine einzelne Datei mehr, sondern eine Verzeichnisstruktur mit dem HTML, dem Stylesheet und den Bilddateien.
Der Workflow entspricht dem eingebetteten Ansatz, mit zwei Ergänzungen. Erstellen Sie vor der Konvertierung ein Ausgabeverzeichnis im VFS und legen Sie mit CssStyleSheetFileName und ImagesPath fest, wohin Spire.Doc jeden Ressourcentyp schreiben soll. Lesen Sie nach der Konvertierung das gesamte Ausgabeverzeichnis rekursiv ein, packen Sie alles mit JSZip in ein Zip-Archiv und laden Sie es in einem Vorgang herunter.
import JSZip from 'jszip';

function App() {
  const wordToHtmlWithOptions = async () => {
    // Get the Spire.Doc WASM module
    const docModule = window.wasmModule?.spiredoc;

    // Check if the module is ready
    if (!docModule) {
      alert('Spire.Doc is not ready yet');
      return;
    }

    // Load fonts and the Word file into VFS
    await window.spire.FetchFileToVFS('ARIALUNI.TTF', '/Library/Fonts/', `${process.env.PUBLIC_URL}/static/font/`);
    const inputFileName = 'ToHtml.docx';
    await window.spire.FetchFileToVFS(inputFileName, '', `${process.env.PUBLIC_URL}/static/data/`);

    // Create the output directory in VFS
    const outputDirectoryName = 'ToHTMLFolder/';
    window.dotnetRuntime.Module.FS.mkdirTree(outputDirectoryName);

    // Load the Word document
    const wordDocument = new docModule.Document();
    wordDocument.LoadFromFile(inputFileName);

    // Export the CSS styles to a separate file
    wordDocument.HtmlExportOptions.CssStyleSheetFileName = outputDirectoryName + 'sample.css';
    wordDocument.HtmlExportOptions.CssStyleSheetType = docModule.CssStyleSheetType.External;

    // Export images to a separate directory
    wordDocument.HtmlExportOptions.ImageEmbedded = false;
    wordDocument.HtmlExportOptions.ImagesPath = outputDirectoryName + 'Demo/';

    // Export form fields as plain text
    wordDocument.HtmlExportOptions.IsTextInputFormFieldAsText = true;

    // Convert the document to HTML
    const outputFileName = 'ToHtmlExportOption-out.html';
    wordDocument.SaveToFile({ fileName: outputFileName, fileFormat: docModule.FileFormat.Html });

    // Release resources
    wordDocument.Dispose();

    // Read the output directory recursively and write each level of files into the zip
    const zip = new JSZip();
    const addFilesToZip = async (folderPath, zipFolder) => {
      let items = await window.dotnetRuntime.Module.FS.readdir(folderPath);
      items = items.filter((item) => item !== '.' && item !== '..');
      for (const item of items) {
        const itemPath = `${folderPath}/${item}`;
        try {
          const fileData = await window.dotnetRuntime.Module.FS.readFile(itemPath);
          zipFolder.file(item, fileData);
        } catch (error) {
          const zipSubFolder = zipFolder.folder(item);
          await addFilesToZip(itemPath, zipSubFolder);
        }
      }
    };

    // Package the HTML file together with the resource directory
    zip.file(outputFileName, window.dotnetRuntime.Module.FS.readFile(outputFileName));
    await addFilesToZip(outputDirectoryName, zip);
    const zipBlob = await zip.generateAsync({ type: 'blob' });
    const url = URL.createObjectURL(zipBlob);

    // Trigger download
    const a = window.document.createElement('a');
    a.href = url;
    a.download = 'ToHTMLFolder.zip';
    a.click();
    URL.revokeObjectURL(url);
  };

  return (
    <div style={{ textAlign: 'center', height: '300px' }}>
      <h1>Convert Word To HTML With Export Options</h1>
      <button onClick={wordToHtmlWithOptions}>
        Generate
      </button>
    </div>
  );
}

export default App;
HTML-, CSS- und Bilddateien, die nach der Konfiguration der Exportoptionen erzeugt wurden
Ein erwähnenswertes Detail: Spire.Doc legt Bilder nicht direkt in dem durch ImagesPath angegebenen Verzeichnis ab. Stattdessen erstellt es in diesem Verzeichnis einen Unterordner external_images, der die Bilddateien enthält. Die resultierende Struktur sieht wie Demo/external_images/*.png aus, weshalb addFilesToZip den Verzeichnisbaum rekursiv durchläuft, anstatt eine flache Dateiliste zu lesen.
Eingebettet vs. extern: Die richtige Strategie wählen
Beide Exportmodi erzeugen gültiges HTML aus demselben Word-Dokument, dienen aber unterschiedlichen Anforderungen an die Veröffentlichung. Die folgende Tabelle fasst die wichtigsten Unterschiede zusammen, damit Sie entscheiden können, welcher Ansatz zu Ihrem Workflow passt.
| Aspekt | Eingebettet (einzelne Datei) | Extern (separate Dateien) |
|---|---|---|
| Ausgabe | Eine .html-Datei mit Inline-CSS und Base64-Bildern |
HTML + .css + Bilddateien in einem Verzeichnis |
| Dateigröße | Größer – alle Assets werden Base64-kodiert in das HTML eingebettet | Kleineres HTML; die Gesamtgröße ist ähnlich, aber die Assets sind einzelne Dateien |
| Portabilität | Vollständig eigenständig; öffnet überall korrekt, ohne Abhängigkeiten | Erfordert, dass alle Dateien zusammenbleiben; relative Pfade müssen erhalten bleiben |
| Download-Mechanismus | Download einer einzelnen Datei über Blob | Download eines Zip-Archivs (z. B. mit JSZip) |
| Stil-Wiederverwendung | Jedes Dokument trägt seine eigene Kopie des CSS mit sich | Mehrere Seiten können eine gemeinsame Stylesheet-Datei nutzen |
| Bildverwaltung | Bilder sind Base64-Strings innerhalb des HTML; sie können nicht separat referenziert oder zwischengespeichert werden | Bilder sind einzelne Dateien, die zwischengespeichert, lazy geladen oder wiederverwendet werden können |
| Geschwindigkeit des ersten Renderns | Langsamer bei großen Dokumenten – der Browser muss eine große Datei parsen | Schnelleres initiales HTML-Parsing; CSS und Bilder werden parallel geladen |
| Am besten geeignet für | E-Mail-Anhänge, einmalige Vorschauen, Archiv-Snapshots, Weitergabe eines einzelnen Dokuments | CMS-Inhaltsmigration, mehrseitige Veröffentlichung, Wissensdatenbanken, Websites mit gemeinsamem Styling |
| Wartbarkeit | Gering – eine Stiländerung bedeutet, die gesamte Datei neu zu erzeugen | Hoch – die CSS-Datei einmal bearbeiten und alle verlinkten Seiten werden aktualisiert |
Kurzer Entscheidungsleitfaden:
- Wählen Sie eingebettet, wenn Sie ein einzelnes, portables Artefakt benötigen – zum Beispiel, um eine Vorschau zu erzeugen, die ein Benutzer herunterlädt und offline öffnet, oder um ein konvertiertes Dokument an eine E-Mail anzuhängen.
- Wählen Sie extern, wenn Sie auf einer Webplattform veröffentlichen, auf der mehrere Dokumente dasselbe Designsystem verwenden, wenn Sie Bilder zwischenspeichern oder lazy laden möchten oder wenn die HTML-Dateigröße für die Performance relevant ist.
FAQ
Schriftarten im exportierten HTML stimmen nicht mit dem Originaldokument überein
Wenn die Schriftarten in Ihrem konvertierten HTML anders aussehen als in der Word-Quelldatei, liegt die Ursache fast immer in fehlenden Schriftdaten im virtuellen Dateisystem von WASM. Spire.Doc ist auf die in das VFS geladenen Schriftarten angewiesen, um während der Konvertierung präzise Layoutberechnungen und die Auflösung von Schriftartnamen durchzuführen. Wenn eine erforderliche Schriftart nicht verfügbar ist, ersetzt die Engine sie durch eine Ausweichschrift, und die font-family-Deklarationen im ausgegebenen CSS stimmen nicht mit denen des Originaldokuments überein. Bei Dokumenten, die Symbolschriftarten wie Wingdings verwenden, können die betroffenen Zeichen außerdem als unleserlicher Text dargestellt werden.
Die Lösung ist unkompliziert: Laden Sie die erforderlichen Schriftdateien vor der Konvertierung über FetchFileToVFS in das VFS vor. Verwenden Sie für Dokumente mit chinesischem, japanischem oder koreanischem Text eine Schriftart mit breiter Unicode-Abdeckung wie ARIALUNI.TTF:
await window.spire.FetchFileToVFS(
  'ARIALUNI.TTF', '/Library/Fonts/', '/'
);
Exportiertes HTML verliert beim Öffnen seine Stile und Bilder
Wenn Sie den externen Modus verwenden (CssStyleSheetType.External mit ImageEmbedded = false), werden die CSS- und Bilddateien an separaten Orten gespeichert, und das HTML verweist über relative Pfade darauf. Wenn Sie nur die HTML-Datei ohne die zugehörigen Ressourcen herunterladen, kann der Browser diese Pfade nicht auflösen, und die Seite fällt auf unformatierten Klartext mit defekten Bildern zurück.
Um dies zu vermeiden, sollten Sie das HTML immer zusammen mit seinem Ressourcenverzeichnis paketieren – der im Abschnitt zu den Exportoptionen gezeigte addFilesToZip-Ansatz erledigt dies, indem alles in einen einzigen Zip-Download gebündelt wird. Wenn Sie keine separaten Ressourcendateien benötigen, wechseln Sie alternativ in den eingebetteten Modus, damit alles in einer einzigen, in sich geschlossenen HTML-Datei bleibt:
wordDocument.HtmlExportOptions.CssStyleSheetType = docModule.CssStyleSheetType.Internal;
wordDocument.HtmlExportOptions.ImageEmbedded = true;
Siehe auch
Конвертация документов Word в HTML в браузере с помощью JavaScript
Документы Word часто являются отправной точкой для веб-контента — статьи, спецификации продуктов и нормативные документы рано или поздно должны быть размещены на веб-сайте. Задача — преобразовать .docx в чистый HTML без серверной службы конвертации. Spire.Doc for JavaScript делает это возможным, запуская полноценный движок обработки документов на WebAssembly, читая файл Word через виртуальную файловую систему (VFS), выполняя преобразование локально и позволяя скачать полученный HTML — всё на стороне клиента, без обращения к серверу.
В рабочем процессе преобладают две стратегии экспорта, и выбор между ними — это главное решение:
- Встроенный режим объединяет CSS и изображения непосредственно в HTML-файле, создавая единый самодостаточный документ, который открывается где угодно.
- Внешний режим записывает CSS и изображения в отдельные файлы, что даёт меньший размер HTML, переиспользуемые таблицы стилей и отдельные графические ресурсы, которыми можно управлять независимо.
В этой статье рассматриваются оба подхода в проекте React и проводится их сравнение. Для настройки обратитесь к разделу Интеграция Spire.Doc for JavaScript в проект React. Примеры ниже предполагают, что Spire.Doc установлен, а модуль WebAssembly инициализирован.
Базовое преобразование: встраивание всего в один файл
Самый простой способ опубликовать документ Word как веб-страницу — создать один HTML-файл, который содержит всё — разметку, стили и изображения — в одном самодостаточном пакете. Это идеально подходит, когда нужен переносимый артефакт, который корректно отображается независимо от того, где он открыт, без ссылок на отсутствующие файлы или неработающих ссылок.
Преобразование состоит из трёх шагов. Во-первых, загрузите файл шрифта и исходный документ Word в виртуальную файловую систему WASM с помощью FetchFileToVFS. Во-вторых, создайте экземпляр Document, загрузите файл, настройте HtmlExportOptions для встраивания как CSS, так и изображений, и вызовите SaveToFile для записи HTML. В-третьих, прочитайте созданный файл из VFS, оберните его в Blob и инициируйте загрузку в браузере.
function App() {
  const wordToHtml = async () => {
    // Get the Spire.Doc WASM module
    const docModule = window.wasmModule?.spiredoc;

    // Check if the module is ready
    if (!docModule) {
      alert('Spire.Doc is not ready yet');
      return;
    }

    // Load fonts and the Word file into VFS
    await window.spire.FetchFileToVFS('ARIALUNI.TTF', '/Library/Fonts/', `${process.env.PUBLIC_URL}/static/font/`);
    const inputFileName = 'ToHtml.docx';
    await window.spire.FetchFileToVFS(inputFileName, '', `${process.env.PUBLIC_URL}/static/data/`);

    // Load the Word document
    const wordDocument = new docModule.Document();
    wordDocument.LoadFromFile(inputFileName);

    // Embed the CSS styles into the HTML and embed images as Base64
    wordDocument.HtmlExportOptions.CssStyleSheetType = docModule.CssStyleSheetType.Internal;
    wordDocument.HtmlExportOptions.ImageEmbedded = true;

    // Convert the document to HTML
    const outputFileName = 'ToHtml-result.html';
    wordDocument.SaveToFile({ fileName: outputFileName, fileFormat: docModule.FileFormat.Html });

    // Read the converted file from VFS and trigger download
    const fileArray = window.dotnetRuntime.Module.FS.readFile(outputFileName);
    const blob = new Blob([fileArray], { type: 'text/html;charset=utf-8' });
    const url = URL.createObjectURL(blob);
    const a = window.document.createElement('a');
    a.href = url;
    a.download = outputFileName;
    a.click();
    URL.revokeObjectURL(url);

    // Release resources
    wordDocument.Dispose();
  };

  return (
    <div style={{ textAlign: 'center', height: '300px' }}>
      <h1>Convert Word To HTML</h1>
      <button onClick={wordToHtml}>
        Generate
      </button>
    </div>
  );
}

export default App;
HTML-страница, созданная из документа Word с помощью SaveToFile
Параметры экспорта: отдельные CSS и изображения
Встраивание всего в один файл удобно, но у него есть компромиссы. Большой документ с множеством изображений создаёт очень большой HTML-файл, и каждая страница, использующая одинаковое оформление, несёт собственную дублирующую копию CSS. Если вы хотите централизованно управлять стилями, повторно использовать графические ресурсы на разных страницах или уменьшить размер HTML для более быстрой первоначальной отрисовки, вместо этого следует экспортировать CSS и изображения в отдельные файлы.
HtmlExportOptions предоставляет детальный контроль над тем, как записывается каждый тип ресурсов. Вы можете направить CSS в именованный файл таблицы стилей, отправлять изображения в выделенный каталог и даже управлять сериализацией полей форм. Результатом становится уже не один файл, а структура каталогов, содержащая HTML, таблицу стилей и файлы изображений.
Рабочий процесс повторяет встроенный подход с двумя дополнениями. Перед преобразованием создайте выходной каталог в VFS и используйте CssStyleSheetFileName и ImagesPath, чтобы указать Spire.Doc, куда записывать каждый тип ресурсов. После преобразования рекурсивно прочитайте весь выходной каталог, упакуйте всё в zip-архив с помощью JSZip и скачайте его одной операцией.
import JSZip from 'jszip';

function App() {
  const wordToHtmlWithOptions = async () => {
    // Get the Spire.Doc WASM module
    const docModule = window.wasmModule?.spiredoc;

    // Check if the module is ready
    if (!docModule) {
      alert('Spire.Doc is not ready yet');
      return;
    }

    // Load fonts and the Word file into VFS
    await window.spire.FetchFileToVFS('ARIALUNI.TTF', '/Library/Fonts/', `${process.env.PUBLIC_URL}/static/font/`);
    const inputFileName = 'ToHtml.docx';
    await window.spire.FetchFileToVFS(inputFileName, '', `${process.env.PUBLIC_URL}/static/data/`);

    // Create the output directory in VFS
    const outputDirectoryName = 'ToHTMLFolder/';
    window.dotnetRuntime.Module.FS.mkdirTree(outputDirectoryName);

    // Load the Word document
    const wordDocument = new docModule.Document();
    wordDocument.LoadFromFile(inputFileName);

    // Export the CSS styles to a separate file
    wordDocument.HtmlExportOptions.CssStyleSheetFileName = outputDirectoryName + 'sample.css';
    wordDocument.HtmlExportOptions.CssStyleSheetType = docModule.CssStyleSheetType.External;

    // Export images to a separate directory
    wordDocument.HtmlExportOptions.ImageEmbedded = false;
    wordDocument.HtmlExportOptions.ImagesPath = outputDirectoryName + 'Demo/';

    // Export form fields as plain text
    wordDocument.HtmlExportOptions.IsTextInputFormFieldAsText = true;

    // Convert the document to HTML
    const outputFileName = 'ToHtmlExportOption-out.html';
    wordDocument.SaveToFile({ fileName: outputFileName, fileFormat: docModule.FileFormat.Html });

    // Release resources
    wordDocument.Dispose();

    // Read the output directory recursively and write each level of files into the zip
    const zip = new JSZip();
    const addFilesToZip = async (folderPath, zipFolder) => {
      let items = await window.dotnetRuntime.Module.FS.readdir(folderPath);
      items = items.filter((item) => item !== '.' && item !== '..');
      for (const item of items) {
        const itemPath = `${folderPath}/${item}`;
        try {
          const fileData = await window.dotnetRuntime.Module.FS.readFile(itemPath);
          zipFolder.file(item, fileData);
        } catch (error) {
          const zipSubFolder = zipFolder.folder(item);
          await addFilesToZip(itemPath, zipSubFolder);
        }
      }
    };

    // Package the HTML file together with the resource directory
    zip.file(outputFileName, window.dotnetRuntime.Module.FS.readFile(outputFileName));
    await addFilesToZip(outputDirectoryName, zip);
    const zipBlob = await zip.generateAsync({ type: 'blob' });
    const url = URL.createObjectURL(zipBlob);

    // Trigger download
    const a = window.document.createElement('a');
    a.href = url;
    a.download = 'ToHTMLFolder.zip';
    a.click();
    URL.revokeObjectURL(url);
  };

  return (
    <div style={{ textAlign: 'center', height: '300px' }}>
      <h1>Convert Word To HTML With Export Options</h1>
      <button onClick={wordToHtmlWithOptions}>
        Generate
      </button>
    </div>
  );
}

export default App;
HTML, CSS и файлы изображений, созданные после настройки параметров экспорта
Одна деталь, которую стоит отметить: Spire.Doc не размещает изображения непосредственно в каталоге, указанном в ImagesPath. Вместо этого он создаёт подпапку external_images внутри этого каталога для хранения файлов изображений. Полученная структура выглядит как Demo/external_images/*.png, и именно поэтому addFilesToZip рекурсивно обходит дерево каталогов, а не читает плоский список файлов.
Встроенный или внешний: выбор правильной стратегии
Оба режима экспорта создают корректный HTML из одного и того же документа Word, но служат разным задачам публикации. В таблице ниже приведены ключевые различия, которые помогут вам решить, какой подход подходит для вашего рабочего процесса.
| Аспект | Встроенный (один файл) | Внешний (отдельные файлы) |
|---|---|---|
| Выходные данные | Один файл .html со встроенным CSS и изображениями Base64 |
HTML + .css + файлы изображений в каталоге |
| Размер файла | Больше — все ресурсы кодируются в Base64 и встраиваются в HTML | Меньший HTML; общий размер аналогичен, но ресурсы представлены отдельными файлами |
| Портируемость | Полностью самодостаточен; корректно открывается где угодно без зависимостей | Требует, чтобы все файлы оставались вместе; относительные пути должны быть сохранены |
| Механизм загрузки | Загрузка одного файла через Blob | Загрузка zip-архива (например, с помощью JSZip) |
| Повторное использование стилей | Каждый документ несёт собственную копию CSS | Несколько страниц могут использовать один файл таблицы стилей |
| Управление изображениями | Изображения являются строками Base64 внутри HTML; на них нельзя ссылаться или кэшировать их отдельно | Изображения — отдельные файлы, которые можно кэшировать, лениво загружать или повторно использовать |
| Скорость первоначальной отрисовки | Медленнее для больших документов — браузер должен обработать один большой файл | Быстрее первоначальный разбор HTML; CSS и изображения загружаются параллельно |
| Лучше всего подходит для | Вложений в электронные письма, разовых предпросмотров, архивных снимков, обмена одним документом | Миграции контента CMS, многостраничных публикаций, баз знаний, сайтов с общим оформлением |
| Сопровождаемость | Низкая — изменение стиля означает повторное создание всего файла | Высокая — отредактируйте CSS-файл один раз, и все связанные страницы обновятся |
Краткое руководство по выбору:
- Выбирайте встроенный режим, когда вам нужен единый портируемый артефакт — например, для создания предпросмотра, который пользователь скачивает и открывает офлайн, или для прикрепления преобразованного документа к электронному письму.
- Выбирайте внешний режим, когда вы публикуете на веб-платформе, где несколько документов используют одну и ту же систему дизайна, где вы хотите кэшировать или лениво загружать изображения, или где размер HTML-файла важен для производительности.
Часто задаваемые вопросы
Шрифты в экспортированном HTML не совпадают с исходным документом
Если шрифты в преобразованном HTML выглядят иначе, чем в исходном файле Word, причина почти всегда в отсутствии данных о шрифтах в виртуальной файловой системе WASM. Spire.Doc полагается на шрифты, загруженные в VFS, для точных расчётов макета и разрешения имён шрифтов во время преобразования. Когда требуемый шрифт недоступен, движок подставляет резервный шрифт, и объявления font-family в выходном CSS не будут соответствовать тому, что указано в исходном документе. Для документов, использующих символьные шрифты, такие как Wingdings, затронутые символы также могут отображаться как искажённый текст.
Решение простое: предварительно загрузите необходимые файлы шрифтов в VFS с помощью FetchFileToVFS перед запуском преобразования. Для документов, содержащих текст на китайском, японском или корейском языках, используйте шрифт с широким покрытием Unicode, например ARIALUNI.TTF:
await window.spire.FetchFileToVFS(
  'ARIALUNI.TTF', '/Library/Fonts/', '/'
);
Экспортированный HTML теряет стили и изображения при открытии
Когда вы используете внешний режим (CssStyleSheetType.External с ImageEmbedded = false), файлы CSS и изображений записываются в отдельные места, а HTML ссылается на них через относительные пути. Если вы скачаете только HTML-файл без сопутствующих ресурсов, браузер не сможет разрешить эти пути, и страница отобразится как неоформленный простой текст с неработающими изображениями.
Чтобы избежать этого, всегда упаковывайте HTML вместе с его каталогом ресурсов — подход addFilesToZip, показанный в разделе параметров экспорта, делает это, объединяя всё в одну загрузку zip-архива. В качестве альтернативы, если вам действительно не нужны отдельные файлы ресурсов, переключитесь на встроенный режим, чтобы всё оставалось в одном самодостаточном HTML-файле:
wordDocument.HtmlExportOptions.CssStyleSheetType = docModule.CssStyleSheetType.Internal;
wordDocument.HtmlExportOptions.ImageEmbedded = true;
См. также
Impostare gli sfondi dei documenti Word con JavaScript

Ogni contratto, lettera ufficiale e materiale di brand porta con sé un'identità visiva implicita. Una semplice pagina bianca fa il suo lavoro, ma non dice nulla sull'organizzazione che vi sta dietro. Nel momento in cui aggiungi una tenue sfumatura, un sottile gradiente a due toni o un'immagine di sfondo ripetuta, l'intero documento passa da file generico ad artefatto brandizzato riconoscibile — e i lettori lo notano, anche se non sanno spiegare il perché.
Spire.Doc per JavaScript porta questo stile visivo direttamente nel browser tramite WebAssembly. Non ci sono round-trip verso il server, nessuna dipendenza da automazione Office e nessun requisito di installazione desktop. Carichi un file Word nel file system virtuale (VFS) WASM, scegli una delle tre modalità di sfondo ed esporti il documento formattato — il tutto lato client in un'applicazione React.
Questa guida illustra ciascuna delle tre opzioni di sfondo non come un catalogo di API, ma come un insieme di scelte di progettazione. Iniziamo con un rapido confronto per aiutarti ad abbinare la tecnica giusta al tuo caso d'uso, poi approfondiamo i dettagli di implementazione per ciascuna.
Tre approcci allo sfondo in sintesi
Prima di scrivere qualsiasi codice, è utile capire cosa offre ciascun tipo di sfondo da un punto di vista progettuale. La tabella seguente riassume il risultato visivo, la quantità di configurazione necessaria e gli scenari in cui ciascun approccio dà il meglio di sé.
| Approccio | Effetto visivo | Impegno di configurazione | Ideale per |
|---|---|---|---|
| Tinta unita | Un unico colore uniforme riempie ogni pagina | Basso — imposta BackgroundType.Color e assegna un colore |
Contratti, memo interni, lettere ufficiali che necessitano di una base pulita e professionale |
| Gradiente | Una miscela direzionale a due colori attraverso la pagina | Medio — definisci Color1, Color2, oltre a ShadingStyle e ShadingVariant |
Copertine, certificati, modelli di marketing che traggono vantaggio da una profondità sottile |
| Immagine | Un'immagine di sfondo ripetuta su tutta la pagina | Medio — carica l'immagine nel VFS, quindi chiama SetPicture |
Carta intestata brandizzata, carta intestata con elementi decorativi, modelli di documento a tema |
Tutti e tre condividono lo stesso flusso di lavoro generale: caricare il documento di origine nel VFS, configurare la proprietà Background su un'istanza di Document, salvare il risultato e avviare il download dal browser. Le differenze risiedono interamente nel modo in cui configuri quella proprietà Background — ed è qui che entrano in gioco le scelte di progettazione.
Per le istruzioni di configurazione e installazione del progetto, consulta Integrare Spire.Doc per JavaScript in un progetto React. Gli esempi di codice seguenti presuppongono che il modulo WASM sia già inizializzato e disponibile su window.wasmModule.
Sfondo a tinta unita
Un colore a tinta unita è la scelta di sfondo più sobria — e spesso la più efficace. Un caldo color crema o un grigio pallido dietro il testo nero riduce l'affaticamento degli occhi senza competere per l'attenzione. Per documenti formali come contratti e documenti di policy, una sfumatura discreta segnala "questo documento appartiene a un'organizzazione specifica" senza sconfinare nella decorazione.
L'implementazione segue tre semplici passaggi. Primo, usa FetchFileToVFS per caricare il file Word di destinazione (e i file dei font) nel file system virtuale WASM. Secondo, crea un Document, carica il file, imposta Background.Type su BackgroundType.Color e assegna un colore predefinito a Background.Color. Terzo, salva il documento di nuovo nel VFS con SaveToFile, leggi il file risultante come array di byte, avvolgilo in un Blob e avvia un download.
function App() {
  const SetSolidColorBackground = async () => {
    const docModule = window.wasmModule?.spiredoc;
    if (!docModule) {
      alert('Spire.Doc is not ready yet');
      return;
    }
    // Load the sample file into the virtual file system (VFS)
    let inputFileName = "ScienceTemplate.docx";
    await window.spire.FetchFileToVFS(inputFileName, "", `${process.env.PUBLIC_URL}static/data/`);

    // Create Word document
    let doc = new docModule.Document();

    // Load the file
    doc.LoadFromFile(inputFileName);

    // Set the background type as Color
    doc.Background.Type = docModule.BackgroundType.Color;

    // Set the background color
    doc.Background.Color = docModule.Color.get_LightYellow();

    // Define the output file name
    const outputFileName = "SetSolidColorBackground_out.docx";

    // Save the document to the specified path
    doc.SaveToFile({ fileName: outputFileName, fileFormat: docModule.FileFormat.Docx2013 });

    doc.Dispose();

    const modifiedFileArray = window.dotnetRuntime.Module.FS.readFile(outputFileName);
    const blob = new Blob([modifiedFileArray], { type: 'application/vnd.openxmlformats-officedocument.wordprocessingml.document' });
    const url = URL.createObjectURL(blob);
    const a = document.createElement('a');
    a.href = url;
    a.download = outputFileName;
    a.click();
    URL.revokeObjectURL(url);
  };

 return (
    <div style={{ textAlign: 'center', height: '300px' }}>
      <h1>Set a Solid Color Background for a Word Document</h1>
      <button onClick={SetSolidColorBackground}>Generate</button>
    </div>
  );
}
export default App;
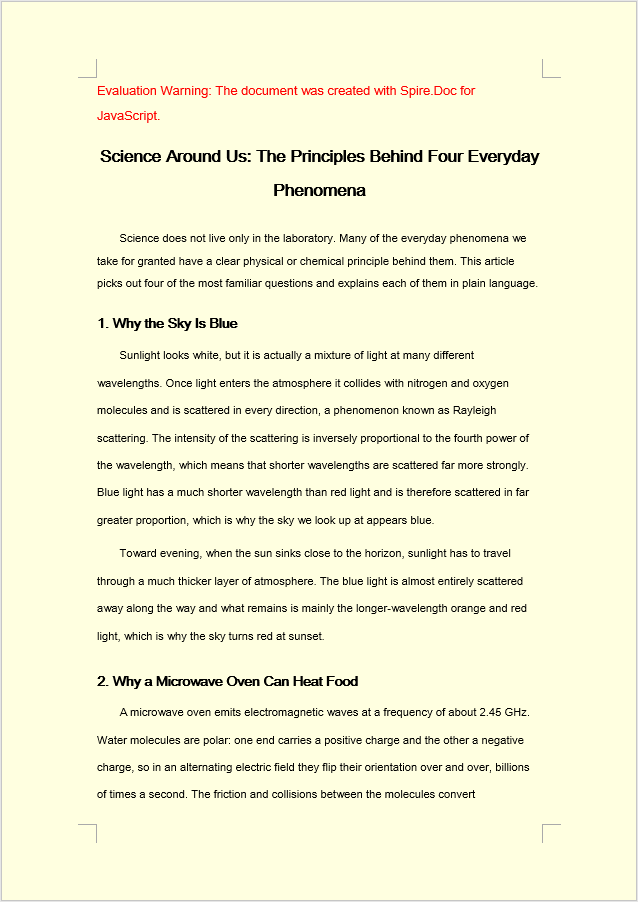
Una volta applicato Background.Color, ogni pagina del documento viene riempita con il colore predefinito scelto — in questo caso, LightYellow.
Sfondo con gradiente
I gradienti introducono un senso di dimensione che i colori piatti non possono offrire. Una transizione dall'alto verso il basso dal bianco all'azzurro pallido, per esempio, evoca cielo e apertura — utile per certificati, lettere di premiazione o qualsiasi documento in cui sia appropriato un tocco di cerimonia. La chiave è la sobrietà: scegli due colori strettamente correlati e lascia che il gradiente faccia il suo lavoro in modo discreto.
Il codice rispecchia il flusso di lavoro della tinta unita, ma il passaggio centrale si amplia. Dopo aver impostato Background.Type su BackgroundType.Gradient, recuperi l'oggetto gradiente tramite Background.Gradient e configuri quattro proprietà: Color1 (colore iniziale), Color2 (colore finale), ShadingVariant (direzione della transizione) e ShadingStyle (asse del gradiente).
function App() {
  const SetGradientBackground = async () => {
    const docModule = window.wasmModule?.spiredoc;
    if (!docModule) {
      alert('Spire.Doc is not ready yet');
      return;
    }
    // Load the sample file into the virtual file system (VFS)
    let inputFileName = "ScienceTemplate.docx";
    await window.spire.FetchFileToVFS(inputFileName, "", `${process.env.PUBLIC_URL}static/data/`);

    // Create Word document
    let doc = new docModule.Document();

    // Load the file
    doc.LoadFromFile(inputFileName);

    // Set the background type as Gradient
    doc.Background.Type = docModule.BackgroundType.Gradient;
    let gradient = doc.Background.Gradient;

    // Set the start color and the end color of the gradient
    gradient.Color1 = docModule.Color.get_White();
    gradient.Color2 = docModule.Color.get_LightBlue();

    // Set the shading style and variant of the gradient
    gradient.ShadingVariant = docModule.GradientShadingVariant.ShadingDown;
    gradient.ShadingStyle = docModule.GradientShadingStyle.Horizontal;

    // Define the output file name
    const outputFileName = "SetGradientBackground_out.docx";

    // Save the document to the specified path
    doc.SaveToFile({ fileName: outputFileName, fileFormat: docModule.FileFormat.Docx2013 });

    doc.Dispose();

    const modifiedFileArray = window.dotnetRuntime.Module.FS.readFile(outputFileName);
    const blob = new Blob([modifiedFileArray], { type: 'application/vnd.openxmlformats-officedocument.wordprocessingml.document' });
    const url = URL.createObjectURL(blob);
    const a = document.createElement('a');
    a.href = url;
    a.download = outputFileName;
    a.click();
    URL.revokeObjectURL(url);
  };

 return (
    <div style={{ textAlign: 'center', height: '300px' }}>
      <h1>Set a Gradient Background for a Word Document</h1>
      <button onClick={SetGradientBackground}>Generate</button>
    </div>
  );
}
export default App;
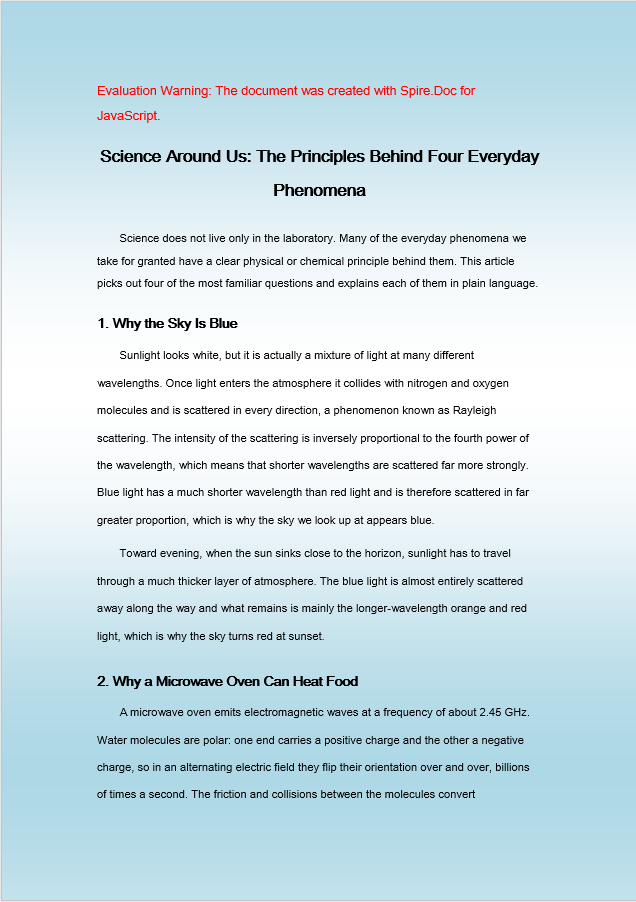
Dopo aver applicato Background.Gradient, la pagina viene riempita con una transizione orizzontale uniforme dal bianco all'azzurro chiaro, che scorre verso il basso.
Sfondo con immagine
Uno sfondo con immagine è l'opzione più espressiva. Che si tratti di un motivo filigranato discreto, di una texture aziendale o di un motivo decorativo per programmi di eventi, un'immagine ripetuta può veicolare elementi di branding che colore e gradiente semplicemente non possono trasmettere. Il compromesso è il peso del file — l'immagine deve essere caricata nel VFS insieme al documento — quindi riserva questo approccio ai modelli in cui il risultato visivo giustifica la risorsa aggiuntiva.
La configurazione differisce dai due metodi precedenti per un aspetto importante: anche l'immagine di sfondo deve essere caricata nel VFS usando FetchFileToVFS prima di poter essere referenziata. Una volta che sia il documento sia l'immagine sono nel VFS, imposta Background.Type su BackgroundType.Picture e chiama Background.SetPicture con il percorso VFS dell'immagine. L'immagine viene quindi ripetuta su ogni pagina come sfondo.
function App() {
  const SetImageBackground = async () => {
    const docModule = window.wasmModule?.spiredoc;
    if (!docModule) {
      alert('Spire.Doc is not ready yet');
      return;
    }
    // Load the sample file into the virtual file system (VFS)
    let inputFileName1 = "ScienceTemplate.docx";
    await window.spire.FetchFileToVFS(inputFileName1, "", `${process.env.PUBLIC_URL}static/data/`);

    // Load the background image into the virtual file system (VFS)
    let inputFileName2 = "Background.png";
    await window.spire.FetchFileToVFS(inputFileName2, "", `${process.env.PUBLIC_URL}static/data/`);

    // Load a Word document
    let doc = new docModule.Document();
    doc.LoadFromFile(inputFileName1);

    // Set the background type as Picture
    doc.Background.Type = docModule.BackgroundType.Picture;

    // Set the background picture
    doc.Background.SetPicture(inputFileName2);

    // Define the output file name
    const outputFileName = "SetImageBackground_out.docx";

    // Save the document to the specified path
    doc.SaveToFile({ fileName: outputFileName, fileFormat: docModule.FileFormat.Docx2013 });

    doc.Dispose();

    const modifiedFileArray = window.dotnetRuntime.Module.FS.readFile(outputFileName);
    const blob = new Blob([modifiedFileArray], { type: 'application/vnd.openxmlformats-officedocument.wordprocessingml.document' });
    const url = URL.createObjectURL(blob);
    const a = document.createElement('a');
    a.href = url;
    a.download = outputFileName;
    a.click();
    URL.revokeObjectURL(url);
  };

 return (
    <div style={{ textAlign: 'center', height: '300px' }}>
      <h1>Set a Picture Background in a Word Document</h1>
      <button onClick={SetImageBackground}>Generate</button>
    </div>
  );
}
export default App;
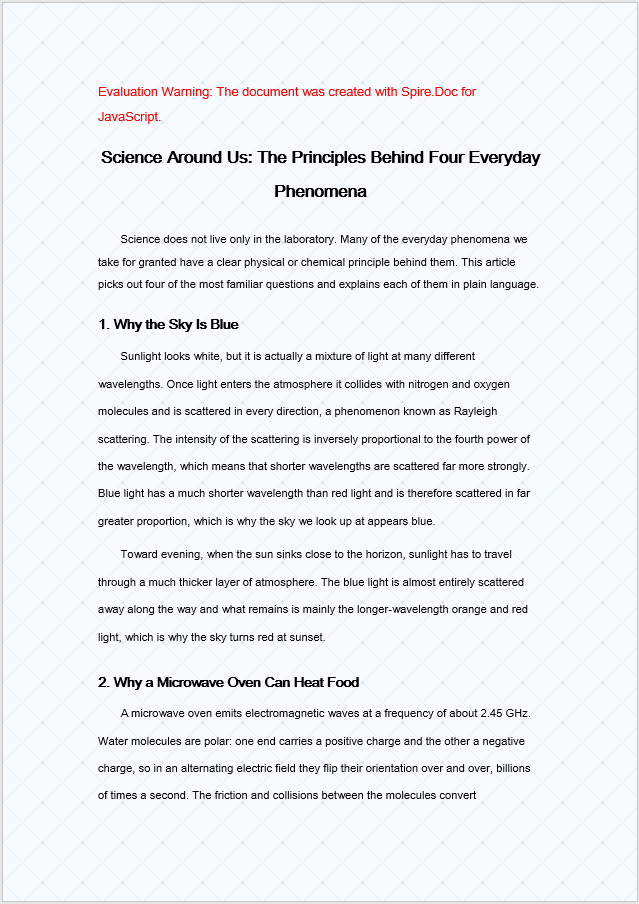
Dopo aver chiamato Background.SetPicture, l'immagine specificata viene ripetuta sull'intera superficie della pagina come sfondo del documento.
Considerazioni sulla stampa
C'è un avvertimento pratico che coglie di sorpresa molti sviluppatori: Microsoft Word non stampa gli sfondi delle pagine per impostazione predefinita. Non è un bug nel tuo codice né un limite di Spire.Doc — lo sfondo viene memorizzato correttamente nel documento e visualizzato normalmente sullo schermo. Word semplicemente lo omette dall'output di stampa, a meno che tu non gli dica esplicitamente il contrario.
Per assicurarti che gli sfondi compaiano nelle copie stampate, l'utente finale deve abilitare un'impostazione specifica nel proprio client Word:
- Apri il documento in Microsoft Word.
- Vai su File > Opzioni > Visualizza.
- Seleziona Stampa colori e immagini di sfondo.
- Stampa come al solito.
Se hai bisogno che lo sfondo venga visualizzato in ogni ambiente di output indipendentemente dalle impostazioni di Word del lettore, considera un approccio alternativo: inserisci una forma a pagina intera nell'intestazione del documento oppure usa una filigrana per simulare l'effetto di sfondo. Queste tecniche sono trattate come contenuto anziché come formattazione di pagina, quindi vengono stampate in modo affidabile in tutte le configurazioni.
FAQ
Perché lo sfondo non compare quando stampo il documento?
Questo è il comportamento previsto. Word sopprime gli sfondi delle pagine nell'output di stampa per impostazione predefinita — l'impostazione è memorizzata correttamente e viene visualizzata sullo schermo, ma le opzioni di stampa del client Word la filtrano. Lo sfondo non è andato perso; semplicemente non è incluso nel flusso di stampa.
Per risolvere, abilita Stampa colori e immagini di sfondo in File > Opzioni > Visualizza in Word prima di stampare. Per gli ambienti in cui non puoi controllare le impostazioni di stampa del lettore, usa una forma a pagina intera nell'intestazione o una filigrana per replicare l'effetto visivo, poiché tali elementi sono trattati come contenuto stampabile.
Perché lo sfondo con immagine non ha effetto?
Questo di solito accade per uno di due motivi: o Background.Type non è stato impostato su BackgroundType.Picture prima di chiamare SetPicture, oppure il file immagine non è mai stato caricato nel VFS tramite FetchFileToVFS, quindi SetPicture non riesce a trovarlo.
Assicurati di impostare prima il tipo di sfondo e di passare il nome file esatto di un'immagine già caricata nel file system virtuale:
document.Background.Type = wasmModule.BackgroundType.Picture;
document.Background.SetPicture("Background.png");
Vedi anche
Définir les arrière-plans de documents Word avec JavaScript
Chaque contrat, lettre officielle et support de marque porte une identité visuelle implicite. Une page blanche ordinaire fait l'affaire, mais elle ne dit rien de l'organisation qui se trouve derrière. Dès que vous ajoutez une teinte douce, un subtil dégradé à deux tons ou une image d'arrière-plan répétée, l'ensemble du document passe d'un fichier générique à un artefact de marque reconnaissable — et vos lecteurs le remarquent, même s'ils ne savent pas l'exprimer.
Spire.Doc pour JavaScript apporte ce style visuel directement dans le navigateur via WebAssembly. Aucun aller-retour serveur, aucune dépendance à l'automatisation Office et aucune installation de bureau requise. Vous chargez un fichier Word dans le système de fichiers virtuel (VFS) WASM, choisissez l'un des trois modes d'arrière-plan et exportez le document stylisé — le tout côté client dans une application React.
Ce guide présente chacune des trois options d'arrière-plan non pas comme un catalogue d'API, mais comme un ensemble de décisions de conception. Nous commençons par une comparaison rapide afin que vous puissiez associer la bonne technique à votre cas d'usage, puis nous examinons en détail l'implémentation de chacune.
Trois approches d'arrière-plan en un coup d'œil
Avant d'écrire du code, il est utile de comprendre ce que chaque type d'arrière-plan apporte d'un point de vue de conception. Le tableau ci-dessous résume le résultat visuel, la quantité de configuration nécessaire et les scénarios dans lesquels chaque approche se distingue.
| Approche | Effet visuel | Effort de configuration | Idéal pour |
|---|---|---|---|
| Couleur unie | Une couleur unique et uniforme remplit chaque page | Faible — définissez BackgroundType.Color et attribuez une couleur |
Contrats, notes internes, lettres officielles nécessitant une teinte de base propre et professionnelle |
| Dégradé | Un mélange directionnel de deux couleurs sur toute la page | Moyen — définissez Color1, Color2, ainsi que ShadingStyle et ShadingVariant |
Pages de couverture, certificats, modèles marketing qui bénéficient d'une profondeur subtile |
| Image | Une image d'arrière-plan répétée sur toute la page | Moyen — chargez l'image dans le VFS, puis appelez SetPicture |
Papeterie de marque, en-têtes avec éléments décoratifs, modèles de documents à thème |
Les trois partagent le même flux de travail global : chargez le document source dans le VFS, configurez la propriété Background sur une instance Document, enregistrez le résultat et déclenchez un téléchargement dans le navigateur. Les différences résident entièrement dans la manière dont vous configurez cette propriété Background — c'est là que les choix de conception entrent en jeu.
Pour la configuration du projet et les instructions d'installation, consultez Intégration de Spire.Doc pour JavaScript dans un projet React. Les exemples de code ci-dessous supposent que le module WASM est déjà initialisé et disponible sur window.wasmModule.
Arrière-plan de couleur unie
Une couleur unie est le choix d'arrière-plan le plus sobre — et souvent le plus efficace. Un crème chaud ou un gris pâle derrière un texte noir réduit la fatigue oculaire sans attirer l'attention. Pour les documents formels comme les contrats et les documents de politique, une teinte subtile signale « ce document appartient à une organisation spécifique » sans tomber dans la décoration.
L'implémentation suit trois étapes claires. Premièrement, utilisez FetchFileToVFS pour charger le fichier Word cible (et les fichiers de police) dans le système de fichiers virtuel WASM. Deuxièmement, créez un Document, chargez le fichier, définissez Background.Type sur BackgroundType.Color et attribuez une couleur intégrée à Background.Color. Troisièmement, enregistrez le document dans le VFS avec SaveToFile, lisez le fichier résultant sous forme de tableau d'octets, encapsulez-le dans un Blob et lancez un téléchargement.
function App() {
  const SetSolidColorBackground = async () => {
    const docModule = window.wasmModule?.spiredoc;
    if (!docModule) {
      alert('Spire.Doc is not ready yet');
      return;
    }
    // Load the sample file into the virtual file system (VFS)
    let inputFileName = "ScienceTemplate.docx";
    await window.spire.FetchFileToVFS(inputFileName, "", `${process.env.PUBLIC_URL}static/data/`);

    // Create Word document
    let doc = new docModule.Document();

    // Load the file
    doc.LoadFromFile(inputFileName);

    // Set the background type as Color
    doc.Background.Type = docModule.BackgroundType.Color;

    // Set the background color
    doc.Background.Color = docModule.Color.get_LightYellow();

    // Define the output file name
    const outputFileName = "SetSolidColorBackground_out.docx";

    // Save the document to the specified path
    doc.SaveToFile({ fileName: outputFileName, fileFormat: docModule.FileFormat.Docx2013 });

    doc.Dispose();

    const modifiedFileArray = window.dotnetRuntime.Module.FS.readFile(outputFileName);
    const blob = new Blob([modifiedFileArray], { type: 'application/vnd.openxmlformats-officedocument.wordprocessingml.document' });
    const url = URL.createObjectURL(blob);
    const a = document.createElement('a');
    a.href = url;
    a.download = outputFileName;
    a.click();
    URL.revokeObjectURL(url);
  };

 return (
    <div style={{ textAlign: 'center', height: '300px' }}>
      <h1>Set a Solid Color Background for a Word Document</h1>
      <button onClick={SetSolidColorBackground}>Generate</button>
    </div>
  );
}
export default App;
Une fois Background.Color appliqué, chaque page du document est remplie avec la couleur intégrée choisie — dans ce cas, LightYellow.
Arrière-plan dégradé
Les dégradés introduisent une sensation de dimension que les couleurs unies ne peuvent pas offrir. Une transition de haut en bas du blanc au bleu pâle, par exemple, évoque le ciel et l'ouverture — utile pour les certificats, les lettres de distinction ou tout document où une touche de solennité est appropriée. La clé est la retenue : choisissez deux couleurs proches et laissez le dégradé faire son travail discrètement.
Le code reprend le flux de travail de la couleur unie, mais l'étape intermédiaire s'étoffe. Après avoir défini Background.Type sur BackgroundType.Gradient, vous récupérez l'objet dégradé via Background.Gradient et configurez quatre propriétés : Color1 (couleur de début), Color2 (couleur de fin), ShadingVariant (direction de transition) et ShadingStyle (axe du dégradé).
function App() {
  const SetGradientBackground = async () => {
    const docModule = window.wasmModule?.spiredoc;
    if (!docModule) {
      alert('Spire.Doc is not ready yet');
      return;
    }
    // Load the sample file into the virtual file system (VFS)
    let inputFileName = "ScienceTemplate.docx";
    await window.spire.FetchFileToVFS(inputFileName, "", `${process.env.PUBLIC_URL}static/data/`);

    // Create Word document
    let doc = new docModule.Document();

    // Load the file
    doc.LoadFromFile(inputFileName);

    // Set the background type as Gradient
    doc.Background.Type = docModule.BackgroundType.Gradient;
    let gradient = doc.Background.Gradient;

    // Set the start color and the end color of the gradient
    gradient.Color1 = docModule.Color.get_White();
    gradient.Color2 = docModule.Color.get_LightBlue();

    // Set the shading style and variant of the gradient
    gradient.ShadingVariant = docModule.GradientShadingVariant.ShadingDown;
    gradient.ShadingStyle = docModule.GradientShadingStyle.Horizontal;

    // Define the output file name
    const outputFileName = "SetGradientBackground_out.docx";

    // Save the document to the specified path
    doc.SaveToFile({ fileName: outputFileName, fileFormat: docModule.FileFormat.Docx2013 });

    doc.Dispose();

    const modifiedFileArray = window.dotnetRuntime.Module.FS.readFile(outputFileName);
    const blob = new Blob([modifiedFileArray], { type: 'application/vnd.openxmlformats-officedocument.wordprocessingml.document' });
    const url = URL.createObjectURL(blob);
    const a = document.createElement('a');
    a.href = url;
    a.download = outputFileName;
    a.click();
    URL.revokeObjectURL(url);
  };

 return (
    <div style={{ textAlign: 'center', height: '300px' }}>
      <h1>Set a Gradient Background for a Word Document</h1>
      <button onClick={SetGradientBackground}>Generate</button>
    </div>
  );
}
export default App;
Après avoir appliqué Background.Gradient, la page est remplie d'une transition horizontale fluide du blanc au bleu clair, s'écoulant vers le bas.
Arrière-plan avec image
Un arrière-plan avec image est l'option la plus expressive. Qu'il s'agisse d'un motif de filigrane subtil, d'une texture d'entreprise ou d'un motif décoratif pour des programmes d'événements, une image répétée peut porter des éléments de marque que la couleur et le dégradé ne peuvent tout simplement pas transmettre. Le compromis est le poids du fichier — l'image doit être chargée dans le VFS en même temps que le document — alors réservez cette approche aux modèles où le rendu visuel justifie la ressource supplémentaire.
La configuration diffère des deux méthodes précédentes d'une manière importante : l'image d'arrière-plan doit également être chargée dans le VFS à l'aide de FetchFileToVFS avant de pouvoir être référencée. Une fois le document et l'image dans le VFS, définissez Background.Type sur BackgroundType.Picture et appelez Background.SetPicture avec le chemin VFS de l'image. L'image est alors répétée sur chaque page en tant qu'arrière-plan.
function App() {
  const SetImageBackground = async () => {
    const docModule = window.wasmModule?.spiredoc;
    if (!docModule) {
      alert('Spire.Doc is not ready yet');
      return;
    }
    // Load the sample file into the virtual file system (VFS)
    let inputFileName1 = "ScienceTemplate.docx";
    await window.spire.FetchFileToVFS(inputFileName1, "", `${process.env.PUBLIC_URL}static/data/`);

    // Load the background image into the virtual file system (VFS)
    let inputFileName2 = "Background.png";
    await window.spire.FetchFileToVFS(inputFileName2, "", `${process.env.PUBLIC_URL}static/data/`);

    // Load a Word document
    let doc = new docModule.Document();
    doc.LoadFromFile(inputFileName1);

    // Set the background type as Picture
    doc.Background.Type = docModule.BackgroundType.Picture;

    // Set the background picture
    doc.Background.SetPicture(inputFileName2);

    // Define the output file name
    const outputFileName = "SetImageBackground_out.docx";

    // Save the document to the specified path
    doc.SaveToFile({ fileName: outputFileName, fileFormat: docModule.FileFormat.Docx2013 });

    doc.Dispose();

    const modifiedFileArray = window.dotnetRuntime.Module.FS.readFile(outputFileName);
    const blob = new Blob([modifiedFileArray], { type: 'application/vnd.openxmlformats-officedocument.wordprocessingml.document' });
    const url = URL.createObjectURL(blob);
    const a = document.createElement('a');
    a.href = url;
    a.download = outputFileName;
    a.click();
    URL.revokeObjectURL(url);
  };

 return (
    <div style={{ textAlign: 'center', height: '300px' }}>
      <h1>Set a Picture Background in a Word Document</h1>
      <button onClick={SetImageBackground}>Generate</button>
    </div>
  );
}
export default App;
Après avoir appelé Background.SetPicture, l'image spécifiée est répétée sur toute la surface de la page comme arrière-plan du document.
Considérations d'impression
Il existe une mise en garde pratique qui prend de nombreux développeurs au dépourvu : Microsoft Word n'imprime pas les arrière-plans de page par défaut. Ce n'est pas un bug dans votre code ni une limitation de Spire.Doc — l'arrière-plan est correctement stocké dans le document et s'affiche normalement à l'écran. Word l'omet simplement de la sortie imprimée, sauf si vous lui indiquez explicitement le contraire.
Pour que les arrière-plans apparaissent sur les copies imprimées, l'utilisateur final doit activer un paramètre spécifique dans son client Word :
- Ouvrez le document dans Microsoft Word.
- Accédez à Fichier > Options > Affichage.
- Cochez Imprimer les couleurs et les images d'arrière-plan.
- Imprimez comme d'habitude.
Si vous avez besoin que l'arrière-plan s'affiche dans tous les environnements de sortie, quels que soient les paramètres Word du lecteur, envisagez une approche alternative : placez une forme pleine page dans l'en-tête du document ou utilisez un filigrane pour simuler l'effet d'arrière-plan. Ces techniques sont traitées comme du contenu plutôt que comme une mise en forme de page, de sorte qu'elles s'impriment de manière fiable dans toutes les configurations.
FAQ
Pourquoi l'arrière-plan n'apparaît-il pas lorsque j'imprime le document ?
Il s'agit d'un comportement attendu. Word supprime les arrière-plans de page dans la sortie imprimée par défaut — le paramètre est correctement stocké et s'affiche à l'écran, mais les options d'impression du client Word le filtrent. L'arrière-plan n'a pas été perdu ; il n'est simplement pas inclus dans le flux d'impression.
Pour corriger cela, activez Imprimer les couleurs et les images d'arrière-plan sous Fichier > Options > Affichage dans Word avant d'imprimer. Pour les environnements où vous ne pouvez pas contrôler les paramètres d'impression du lecteur, utilisez une forme pleine page dans l'en-tête ou un filigrane pour reproduire l'effet visuel, car ces éléments sont traités comme du contenu imprimable.
Pourquoi l'arrière-plan avec image n'a-t-il aucun effet ?
Cela se produit généralement pour l'une des deux raisons suivantes : soit Background.Type n'a pas été défini sur BackgroundType.Picture avant d'appeler SetPicture, soit le fichier image n'a jamais été chargé dans le VFS via FetchFileToVFS, de sorte que SetPicture ne peut pas le localiser.
Assurez-vous de définir d'abord le type d'arrière-plan et de transmettre le nom de fichier exact d'une image déjà chargée dans le système de fichiers virtuel :
document.Background.Type = wasmModule.BackgroundType.Picture;
document.Background.SetPicture("Background.png");
Voir aussi
Establecer fondos de documentos de Word con JavaScript
Cada contrato, carta oficial y pieza de material de marca conlleva una identidad visual implícita. Una página blanca simple cumple su función, pero no dice nada sobre la organización que la respalda. En el momento en que añades un tinte suave, un sutil degradado de dos tonos o una imagen de fondo en mosaico, todo el documento pasa de ser un archivo genérico a un artefacto de marca reconocible, y tus lectores lo notan, aunque no sepan explicar por qué.
Spire.Doc for JavaScript lleva este estilo visual directamente al navegador a través de WebAssembly. No hay ida y vuelta al servidor, ni dependencia de automatización de Office, ni requisito de instalación en el escritorio. Cargas un archivo de Word en el sistema de archivos virtual (VFS) de WASM, eliges uno de los tres modos de fondo y exportas el documento con estilo, todo del lado del cliente en una aplicación React.
Esta guía recorre cada una de las tres opciones de fondo no como un catálogo de API, sino como un conjunto de decisiones de diseño. Comenzamos con una comparación rápida para que puedas relacionar la técnica adecuada con tu caso de uso, y luego profundizamos en los detalles de implementación de cada una.
Tres enfoques de fondo de un vistazo
Antes de escribir cualquier código, ayuda entender qué aporta cada tipo de fondo desde una perspectiva de diseño. La siguiente tabla resume el resultado visual, la cantidad de configuración necesaria y los escenarios en los que destaca cada enfoque.
| Enfoque | Efecto visual | Esfuerzo de configuración | Ideal para |
|---|---|---|---|
| Color sólido | Un único color uniforme rellena cada página | Bajo: establece BackgroundType.Color y asigna un color |
Contratos, memorandos internos, cartas oficiales que necesitan un tono base limpio y profesional |
| Degradado | Una mezcla direccional de dos colores a través de la página | Medio: define Color1, Color2, además de ShadingStyle y ShadingVariant |
Portadas, certificados, plantillas de marketing que se benefician de una profundidad sutil |
| Imagen | Una imagen de fondo en mosaico por toda la página | Medio: carga la imagen en el VFS y luego llama a SetPicture |
Papelería de marca, membretes con elementos decorativos, plantillas de documentos temáticas |
Los tres comparten el mismo flujo de trabajo general: carga el documento de origen en el VFS, configura la propiedad Background en una instancia de Document, guarda el resultado y activa una descarga en el navegador. Las diferencias residen enteramente en cómo configuras esa propiedad Background, que es donde entran las decisiones de diseño.
Para obtener instrucciones de configuración e instalación del proyecto, consulta Integración de Spire.Doc for JavaScript en un proyecto de React. Los ejemplos de código a continuación asumen que el módulo WASM ya está inicializado y disponible en window.wasmModule.
Fondo de color sólido
Un color sólido es la opción de fondo más sobria, y a menudo la más eficaz. Un tono crema cálido o gris pálido detrás de texto negro reduce la fatiga visual sin competir por la atención. Para documentos formales como contratos y documentos de políticas, un tinte sutil indica "este documento pertenece a una organización específica" sin llegar a ser decorativo.
La implementación sigue tres pasos claros. Primero, usa FetchFileToVFS para cargar el archivo de Word objetivo (y los archivos de fuentes) en el sistema de archivos virtual de WASM. Segundo, crea un Document, carga el archivo, establece Background.Type en BackgroundType.Color y asigna un color integrado a Background.Color. Tercero, guarda el documento de nuevo en el VFS con SaveToFile, lee el archivo resultante como una matriz de bytes, envuélvelo en un Blob e inicia una descarga.
function App() {
  const SetSolidColorBackground = async () => {
    const docModule = window.wasmModule?.spiredoc;
    if (!docModule) {
      alert('Spire.Doc is not ready yet');
      return;
    }
    // Load the sample file into the virtual file system (VFS)
    let inputFileName = "ScienceTemplate.docx";
    await window.spire.FetchFileToVFS(inputFileName, "", `${process.env.PUBLIC_URL}static/data/`);

    // Create Word document
    let doc = new docModule.Document();

    // Load the file
    doc.LoadFromFile(inputFileName);

    // Set the background type as Color
    doc.Background.Type = docModule.BackgroundType.Color;

    // Set the background color
    doc.Background.Color = docModule.Color.get_LightYellow();

    // Define the output file name
    const outputFileName = "SetSolidColorBackground_out.docx";

    // Save the document to the specified path
    doc.SaveToFile({ fileName: outputFileName, fileFormat: docModule.FileFormat.Docx2013 });

    doc.Dispose();

    const modifiedFileArray = window.dotnetRuntime.Module.FS.readFile(outputFileName);
    const blob = new Blob([modifiedFileArray], { type: 'application/vnd.openxmlformats-officedocument.wordprocessingml.document' });
    const url = URL.createObjectURL(blob);
    const a = document.createElement('a');
    a.href = url;
    a.download = outputFileName;
    a.click();
    URL.revokeObjectURL(url);
  };

 return (
    <div style={{ textAlign: 'center', height: '300px' }}>
      <h1>Set a Solid Color Background for a Word Document</h1>
      <button onClick={SetSolidColorBackground}>Generate</button>
    </div>
  );
}
export default App;
Una vez aplicado Background.Color, cada página del documento se rellena con el color integrado elegido; en este caso, LightYellow.
Fondo degradado
Los degradados introducen una sensación de dimensión que los colores planos no pueden lograr. Una transición de arriba a abajo de blanco a azul pálido, por ejemplo, evoca el cielo y la apertura; es útil para certificados, cartas de reconocimiento o cualquier documento donde sea apropiado un toque de ceremonia. La clave está en la moderación: elige dos colores estrechamente relacionados y deja que el degradado haga su trabajo discretamente.
El código refleja el flujo de trabajo del color sólido, pero el paso intermedio se amplía. Después de establecer Background.Type en BackgroundType.Gradient, recuperas el objeto de degradado mediante Background.Gradient y configuras cuatro propiedades: Color1 (color inicial), Color2 (color final), ShadingVariant (dirección de la transición) y ShadingStyle (eje del degradado).
function App() {
  const SetGradientBackground = async () => {
    const docModule = window.wasmModule?.spiredoc;
    if (!docModule) {
      alert('Spire.Doc is not ready yet');
      return;
    }
    // Load the sample file into the virtual file system (VFS)
    let inputFileName = "ScienceTemplate.docx";
    await window.spire.FetchFileToVFS(inputFileName, "", `${process.env.PUBLIC_URL}static/data/`);

    // Create Word document
    let doc = new docModule.Document();

    // Load the file
    doc.LoadFromFile(inputFileName);

    // Set the background type as Gradient
    doc.Background.Type = docModule.BackgroundType.Gradient;
    let gradient = doc.Background.Gradient;

    // Set the start color and the end color of the gradient
    gradient.Color1 = docModule.Color.get_White();
    gradient.Color2 = docModule.Color.get_LightBlue();

    // Set the shading style and variant of the gradient
    gradient.ShadingVariant = docModule.GradientShadingVariant.ShadingDown;
    gradient.ShadingStyle = docModule.GradientShadingStyle.Horizontal;

    // Define the output file name
    const outputFileName = "SetGradientBackground_out.docx";

    // Save the document to the specified path
    doc.SaveToFile({ fileName: outputFileName, fileFormat: docModule.FileFormat.Docx2013 });

    doc.Dispose();

    const modifiedFileArray = window.dotnetRuntime.Module.FS.readFile(outputFileName);
    const blob = new Blob([modifiedFileArray], { type: 'application/vnd.openxmlformats-officedocument.wordprocessingml.document' });
    const url = URL.createObjectURL(blob);
    const a = document.createElement('a');
    a.href = url;
    a.download = outputFileName;
    a.click();
    URL.revokeObjectURL(url);
  };

 return (
    <div style={{ textAlign: 'center', height: '300px' }}>
      <h1>Set a Gradient Background for a Word Document</h1>
      <button onClick={SetGradientBackground}>Generate</button>
    </div>
  );
}
export default App;
Después de aplicar Background.Gradient, la página se rellena con una transición horizontal suave de blanco a azul claro, que fluye hacia abajo.
Fondo de imagen
Un fondo de imagen es la opción más expresiva. Ya sea un sutil patrón de marca de agua, una textura corporativa o un motivo decorativo para programas de eventos, una imagen en mosaico puede llevar elementos de marca que el color y el degradado simplemente no pueden. La contrapartida es el peso del archivo: la imagen debe cargarse en el VFS junto con el documento, así que reserva este enfoque para plantillas donde la recompensa visual justifique el recurso adicional.
La configuración difiere de los dos métodos anteriores en un aspecto importante: la imagen de fondo también debe cargarse en el VFS mediante FetchFileToVFS antes de poder referenciarla. Una vez que tanto el documento como la imagen están en el VFS, establece Background.Type en BackgroundType.Picture y llama a Background.SetPicture con la ruta de la imagen en el VFS. La imagen se coloca entonces en mosaico en todas las páginas como fondo.
function App() {
  const SetImageBackground = async () => {
    const docModule = window.wasmModule?.spiredoc;
    if (!docModule) {
      alert('Spire.Doc is not ready yet');
      return;
    }
    // Load the sample file into the virtual file system (VFS)
    let inputFileName1 = "ScienceTemplate.docx";
    await window.spire.FetchFileToVFS(inputFileName1, "", `${process.env.PUBLIC_URL}static/data/`);

    // Load the background image into the virtual file system (VFS)
    let inputFileName2 = "Background.png";
    await window.spire.FetchFileToVFS(inputFileName2, "", `${process.env.PUBLIC_URL}static/data/`);

    // Load a Word document
    let doc = new docModule.Document();
    doc.LoadFromFile(inputFileName1);

    // Set the background type as Picture
    doc.Background.Type = docModule.BackgroundType.Picture;

    // Set the background picture
    doc.Background.SetPicture(inputFileName2);

    // Define the output file name
    const outputFileName = "SetImageBackground_out.docx";

    // Save the document to the specified path
    doc.SaveToFile({ fileName: outputFileName, fileFormat: docModule.FileFormat.Docx2013 });

    doc.Dispose();

    const modifiedFileArray = window.dotnetRuntime.Module.FS.readFile(outputFileName);
    const blob = new Blob([modifiedFileArray], { type: 'application/vnd.openxmlformats-officedocument.wordprocessingml.document' });
    const url = URL.createObjectURL(blob);
    const a = document.createElement('a');
    a.href = url;
    a.download = outputFileName;
    a.click();
    URL.revokeObjectURL(url);
  };

 return (
    <div style={{ textAlign: 'center', height: '300px' }}>
      <h1>Set a Picture Background in a Word Document</h1>
      <button onClick={SetImageBackground}>Generate</button>
    </div>
  );
}
export default App;
Después de llamar a Background.SetPicture, la imagen especificada se coloca en mosaico por toda la superficie de la página como fondo del documento.
Consideraciones de impresión
Hay una advertencia práctica que toma por sorpresa a muchos desarrolladores: Microsoft Word no imprime los fondos de página de forma predeterminada. Esto no es un error en tu código ni una limitación de Spire.Doc; el fondo se almacena correctamente en el documento y se muestra normalmente en pantalla. Word simplemente lo omite en la salida impresa a menos que le indiques explícitamente lo contrario.
Para garantizar que los fondos aparezcan en las copias impresas, el usuario final debe habilitar una configuración específica en su cliente de Word:
- Abre el documento en Microsoft Word.
- Ve a Archivo > Opciones > Mostrar.
- Marca Imprimir colores e imágenes de fondo.
- Imprime como de costumbre.
Si necesitas que el fondo se represente en todos los entornos de salida, independientemente de la configuración de Word del lector, considera un enfoque alternativo: coloca una forma de página completa en el encabezado del documento o usa una marca de agua para simular el efecto de fondo. Estas técnicas se tratan como contenido en lugar de formato de página, por lo que se imprimen de forma fiable en todas las configuraciones.
Preguntas frecuentes
¿Por qué no aparece el fondo cuando imprimo el documento?
Este es el comportamiento esperado. Word suprime los fondos de página en la salida impresa de forma predeterminada; la configuración se almacena correctamente y se representa en pantalla, pero las opciones de impresión del cliente de Word la filtran. El fondo no se ha perdido; simplemente no se incluye en el flujo de impresión.
Para solucionarlo, habilita Imprimir colores e imágenes de fondo en Archivo > Opciones > Mostrar en Word antes de imprimir. En entornos donde no puedas controlar la configuración de impresión del lector, usa una forma de página completa en el encabezado o una marca de agua para replicar el efecto visual, ya que esos elementos se tratan como contenido imprimible.
¿Por qué el fondo de imagen no tiene efecto?
Esto suele ocurrir por una de dos razones: o bien Background.Type no se estableció en BackgroundType.Picture antes de llamar a SetPicture, o el archivo de imagen nunca se cargó en el VFS mediante FetchFileToVFS, por lo que SetPicture no puede localizarlo.
Asegúrate de establecer primero el tipo de fondo y pasar el nombre de archivo exacto de una imagen que ya se haya cargado en el sistema de archivos virtual:
document.Background.Type = wasmModule.BackgroundType.Picture;
document.Background.SetPicture("Background.png");
Véase también
Word-Dokument-Hintergründe mit JavaScript festlegen
Jeder Vertrag, jedes offizielle Schreiben und jedes Stück Markenkommunikation trägt eine implizite visuelle Identität. Eine schlichte weiße Seite erfüllt ihren Zweck, sagt aber nichts über die dahinterstehende Organisation aus. In dem Moment, in dem Sie eine sanfte Tönung, einen dezenten zweifarbigen Verlauf oder ein gekacheltes Hintergrundbild hinzufügen, verwandelt sich das gesamte Dokument von einer generischen Datei in ein wiedererkennbares Markenartefakt – und Ihre Leser bemerken es, auch wenn sie nicht in Worte fassen können, warum.
Spire.Doc for JavaScript bringt diese visuelle Gestaltung über WebAssembly direkt in den Browser. Es gibt keinen Server-Roundtrip, keine Abhängigkeit von Office-Automatisierung und keine Notwendigkeit einer Desktop-Installation. Sie laden eine Word-Datei in das virtuelle Dateisystem (VFS) von WASM, wählen einen von drei Hintergrundmodi und exportieren das gestaltete Dokument – alles clientseitig in einer React-Anwendung.
Dieser Leitfaden behandelt jede der drei Hintergrundoptionen nicht als API-Katalog, sondern als eine Reihe von Designentscheidungen. Wir beginnen mit einem kurzen Vergleich, damit Sie die richtige Technik für Ihren Anwendungsfall auswählen können, und tauchen dann in die Implementierungsdetails für jede einzelne ein.
Drei Hintergrundansätze auf einen Blick
Bevor Sie Code schreiben, ist es hilfreich zu verstehen, was jeder Hintergrundtyp aus Designperspektive bietet. Die folgende Tabelle fasst das visuelle Ergebnis, den Konfigurationsaufwand und die Szenarien zusammen, in denen jeder Ansatz seine Stärken ausspielt.
| Ansatz | Visueller Effekt | Konfigurationsaufwand | Am besten geeignet für |
|---|---|---|---|
| Einfarbig | Eine einzige gleichmäßige Farbe füllt jede Seite | Gering – BackgroundType.Color festlegen und eine Farbe zuweisen |
Verträge, interne Memos, offizielle Schreiben, die einen klaren, professionellen Grundton benötigen |
| Verlauf | Eine gerichtete Mischung aus zwei Farben über die Seite | Mittel – Color1, Color2 sowie ShadingStyle und ShadingVariant definieren |
Titelseiten, Zertifikate, Marketingvorlagen, die von subtiler Tiefe profitieren |
| Bild | Ein Hintergrundbild, das über die gesamte Seite gekachelt wird | Mittel – Bild in VFS laden, dann SetPicture aufrufen |
Markenbriefpapier, Briefköpfe mit dekorativen Elementen, thematische Dokumentvorlagen |
Alle drei teilen denselben Gesamtworkflow: Laden Sie das Quelldokument in das VFS, konfigurieren Sie die Eigenschaft Background einer Document-Instanz, speichern Sie das Ergebnis und lösen Sie einen Browser-Download aus. Die Unterschiede liegen ausschließlich darin, wie Sie diese Eigenschaft Background konfigurieren – und genau hier kommen die Designentscheidungen ins Spiel.
Informationen zur Projekteinrichtung und Installation finden Sie unter Integrating Spire.Doc for JavaScript in a React Project. Die folgenden Codebeispiele setzen voraus, dass das WASM-Modul bereits initialisiert und unter window.wasmModule verfügbar ist.
Einfarbiger Hintergrund
Eine einfarbige Hintergrundfarbe ist die zurückhaltendste Wahl – und oft die wirkungsvollste. Ein warmes Creme oder ein helles Grau hinter schwarzem Text reduziert die Augenbelastung, ohne um Aufmerksamkeit zu konkurrieren. Bei formellen Dokumenten wie Verträgen und Richtlinienpapieren signalisiert eine dezente Tönung: „Dieses Dokument gehört zu einer bestimmten Organisation“, ohne in Dekoration abzudriften.
Die Implementierung folgt drei klaren Schritten. Zunächst laden Sie mit FetchFileToVFS die Ziel-Word-Datei (und Schriftdateien) in das virtuelle Dateisystem von WASM. Zweitens erstellen Sie ein Document, laden die Datei, setzen Background.Type auf BackgroundType.Color und weisen Background.Color eine integrierte Farbe zu. Drittens speichern Sie das Dokument mit SaveToFile zurück in das VFS, lesen die resultierende Datei als Byte-Array ein, verpacken sie in einen Blob und starten einen Download.
function App() {
  const SetSolidColorBackground = async () => {
    const docModule = window.wasmModule?.spiredoc;
    if (!docModule) {
      alert('Spire.Doc is not ready yet');
      return;
    }
    // Load the sample file into the virtual file system (VFS)
    let inputFileName = "ScienceTemplate.docx";
    await window.spire.FetchFileToVFS(inputFileName, "", `${process.env.PUBLIC_URL}static/data/`);

    // Create Word document
    let doc = new docModule.Document();

    // Load the file
    doc.LoadFromFile(inputFileName);

    // Set the background type as Color
    doc.Background.Type = docModule.BackgroundType.Color;

    // Set the background color
    doc.Background.Color = docModule.Color.get_LightYellow();

    // Define the output file name
    const outputFileName = "SetSolidColorBackground_out.docx";

    // Save the document to the specified path
    doc.SaveToFile({ fileName: outputFileName, fileFormat: docModule.FileFormat.Docx2013 });

    doc.Dispose();

    const modifiedFileArray = window.dotnetRuntime.Module.FS.readFile(outputFileName);
    const blob = new Blob([modifiedFileArray], { type: 'application/vnd.openxmlformats-officedocument.wordprocessingml.document' });
    const url = URL.createObjectURL(blob);
    const a = document.createElement('a');
    a.href = url;
    a.download = outputFileName;
    a.click();
    URL.revokeObjectURL(url);
  };

 return (
    <div style={{ textAlign: 'center', height: '300px' }}>
      <h1>Set a Solid Color Background for a Word Document</h1>
      <button onClick={SetSolidColorBackground}>Generate</button>
    </div>
  );
}
export default App;
Sobald Background.Color angewendet wurde, wird jede Seite des Dokuments mit der gewählten integrierten Farbe gefüllt – in diesem Fall LightYellow.
Verlaufshintergrund
Verläufe vermitteln ein Gefühl von Räumlichkeit, das flache Farben nicht bieten können. Ein Übergang von Weiß zu Hellblau von oben nach unten beispielsweise weckt Assoziationen an Himmel und Offenheit – nützlich für Zertifikate, Auszeichnungsschreiben oder jedes Dokument, bei dem ein Hauch von Feierlichkeit angebracht ist. Der Schlüssel ist Zurückhaltung: Wählen Sie zwei eng verwandte Farben und lassen Sie den Verlauf die Arbeit leise erledigen.
Der Code entspricht dem Workflow für einfarbige Hintergründe, doch der mittlere Schritt wird umfangreicher. Nachdem Sie Background.Type auf BackgroundType.Gradient gesetzt haben, rufen Sie das Verlaufsobjekt über Background.Gradient ab und konfigurieren vier Eigenschaften: Color1 (Startfarbe), Color2 (Endfarbe), ShadingVariant (Übergangsrichtung) und ShadingStyle (Achse des Verlaufs).
function App() {
  const SetGradientBackground = async () => {
    const docModule = window.wasmModule?.spiredoc;
    if (!docModule) {
      alert('Spire.Doc is not ready yet');
      return;
    }
    // Load the sample file into the virtual file system (VFS)
    let inputFileName = "ScienceTemplate.docx";
    await window.spire.FetchFileToVFS(inputFileName, "", `${process.env.PUBLIC_URL}static/data/`);

    // Create Word document
    let doc = new docModule.Document();

    // Load the file
    doc.LoadFromFile(inputFileName);

    // Set the background type as Gradient
    doc.Background.Type = docModule.BackgroundType.Gradient;
    let gradient = doc.Background.Gradient;

    // Set the start color and the end color of the gradient
    gradient.Color1 = docModule.Color.get_White();
    gradient.Color2 = docModule.Color.get_LightBlue();

    // Set the shading style and variant of the gradient
    gradient.ShadingVariant = docModule.GradientShadingVariant.ShadingDown;
    gradient.ShadingStyle = docModule.GradientShadingStyle.Horizontal;

    // Define the output file name
    const outputFileName = "SetGradientBackground_out.docx";

    // Save the document to the specified path
    doc.SaveToFile({ fileName: outputFileName, fileFormat: docModule.FileFormat.Docx2013 });

    doc.Dispose();

    const modifiedFileArray = window.dotnetRuntime.Module.FS.readFile(outputFileName);
    const blob = new Blob([modifiedFileArray], { type: 'application/vnd.openxmlformats-officedocument.wordprocessingml.document' });
    const url = URL.createObjectURL(blob);
    const a = document.createElement('a');
    a.href = url;
    a.download = outputFileName;
    a.click();
    URL.revokeObjectURL(url);
  };

 return (
    <div style={{ textAlign: 'center', height: '300px' }}>
      <h1>Set a Gradient Background for a Word Document</h1>
      <button onClick={SetGradientBackground}>Generate</button>
    </div>
  );
}
export default App;
Nach dem Anwenden von Background.Gradient wird die Seite mit einem sanften horizontalen Übergang von Weiß zu Hellblau gefüllt, der nach unten fließt.
Bildhintergrund
Ein Bildhintergrund ist die ausdrucksstärkste Option. Ob es sich um ein dezentes Wasserzeichenmuster, eine Unternehmensstruktur oder ein dekoratives Motiv für Veranstaltungsprogramme handelt – ein gekacheltes Bild kann Branding-Elemente transportieren, die Farbe und Verlauf einfach nicht leisten können. Der Kompromiss ist das Dateigewicht – das Bild muss zusammen mit dem Dokument in das VFS geladen werden –, daher sollten Sie diesen Ansatz für Vorlagen reservieren, bei denen der visuelle Nutzen den zusätzlichen Ressourceneinsatz rechtfertigt.
Die Einrichtung unterscheidet sich in einem wichtigen Punkt von den beiden vorherigen Methoden: Das Hintergrundbild muss ebenfalls mit FetchFileToVFS in das VFS geladen werden, bevor es referenziert werden kann. Sobald sowohl das Dokument als auch das Bild im VFS liegen, setzen Sie Background.Type auf BackgroundType.Picture und rufen Background.SetPicture mit dem VFS-Pfad des Bildes auf. Das Bild wird dann als Hintergrund über jede Seite gekachelt.
function App() {
  const SetImageBackground = async () => {
    const docModule = window.wasmModule?.spiredoc;
    if (!docModule) {
      alert('Spire.Doc is not ready yet');
      return;
    }
    // Load the sample file into the virtual file system (VFS)
    let inputFileName1 = "ScienceTemplate.docx";
    await window.spire.FetchFileToVFS(inputFileName1, "", `${process.env.PUBLIC_URL}static/data/`);

    // Load the background image into the virtual file system (VFS)
    let inputFileName2 = "Background.png";
    await window.spire.FetchFileToVFS(inputFileName2, "", `${process.env.PUBLIC_URL}static/data/`);

    // Load a Word document
    let doc = new docModule.Document();
    doc.LoadFromFile(inputFileName1);

    // Set the background type as Picture
    doc.Background.Type = docModule.BackgroundType.Picture;

    // Set the background picture
    doc.Background.SetPicture(inputFileName2);

    // Define the output file name
    const outputFileName = "SetImageBackground_out.docx";

    // Save the document to the specified path
    doc.SaveToFile({ fileName: outputFileName, fileFormat: docModule.FileFormat.Docx2013 });

    doc.Dispose();

    const modifiedFileArray = window.dotnetRuntime.Module.FS.readFile(outputFileName);
    const blob = new Blob([modifiedFileArray], { type: 'application/vnd.openxmlformats-officedocument.wordprocessingml.document' });
    const url = URL.createObjectURL(blob);
    const a = document.createElement('a');
    a.href = url;
    a.download = outputFileName;
    a.click();
    URL.revokeObjectURL(url);
  };

 return (
    <div style={{ textAlign: 'center', height: '300px' }}>
      <h1>Set a Picture Background in a Word Document</h1>
      <button onClick={SetImageBackground}>Generate</button>
    </div>
  );
}
export default App;
Nach dem Aufruf von Background.SetPicture wird das angegebene Bild als Dokumenthintergrund über die gesamte Seitenfläche gekachelt.
Hinweise zum Drucken
Es gibt einen praktischen Vorbehalt, der viele Entwickler überrascht: Microsoft Word druckt Seitenhintergründe standardmäßig nicht. Das ist kein Fehler in Ihrem Code und keine Einschränkung von Spire.Doc – der Hintergrund wird korrekt im Dokument gespeichert und normal auf dem Bildschirm angezeigt. Word lässt ihn lediglich aus der Druckausgabe weg, es sei denn, Sie weisen es ausdrücklich anders an.
Damit Hintergründe in gedruckten Exemplaren erscheinen, muss der Endbenutzer eine bestimmte Einstellung in seinem Word-Client aktivieren:
- Öffnen Sie das Dokument in Microsoft Word.
- Gehen Sie zu Datei > Optionen > Anzeige.
- Aktivieren Sie Hintergrundfarben und -bilder drucken.
- Drucken Sie wie gewohnt.
Wenn der Hintergrund in jeder Ausgabeumgebung gerendert werden soll, unabhängig von den Word-Einstellungen des Lesers, sollten Sie einen alternativen Ansatz in Betracht ziehen: Platzieren Sie eine ganzseitige Form in der Kopfzeile des Dokuments oder verwenden Sie ein Wasserzeichen, um den Hintergrundeffekt zu simulieren. Diese Techniken werden als Inhalt und nicht als Seitenformatierung behandelt, sodass sie in allen Konfigurationen zuverlässig gedruckt werden.
FAQ
Warum wird der Hintergrund beim Drucken des Dokuments nicht angezeigt?
Dies ist das erwartete Verhalten. Word unterdrückt Seitenhintergründe standardmäßig in der Druckausgabe – die Einstellung wird korrekt gespeichert und auf dem Bildschirm gerendert, aber die Druckoptionen des Word-Clients filtern sie heraus. Der Hintergrund ist nicht verloren gegangen; er wird einfach nicht in den Druckdatenstrom aufgenommen.
Um dies zu beheben, aktivieren Sie in Word vor dem Drucken Hintergrundfarben und -bilder drucken unter Datei > Optionen > Anzeige. In Umgebungen, in denen Sie die Druckeinstellungen des Lesers nicht kontrollieren können, verwenden Sie eine ganzseitige Form in der Kopfzeile oder ein Wasserzeichen, um den visuellen Effekt nachzubilden, da diese Elemente als druckbarer Inhalt behandelt werden.
Warum hat der Bildhintergrund keine Wirkung?
Dies geschieht typischerweise aus einem von zwei Gründen: Entweder wurde Background.Type nicht auf BackgroundType.Picture gesetzt, bevor SetPicture aufgerufen wurde, oder die Bilddatei wurde nie über FetchFileToVFS in das VFS geladen, sodass SetPicture sie nicht finden kann.
Stellen Sie sicher, dass Sie zuerst den Hintergrundtyp festlegen und den exakten Dateinamen eines Bildes übergeben, das bereits in das virtuelle Dateisystem geladen wurde:
document.Background.Type = wasmModule.BackgroundType.Picture;
document.Background.SetPicture("Background.png");
Siehe auch
Настройка фона документов Word с помощью JavaScript
Каждый договор, официальное письмо и элемент фирменного стиля несёт неявную визуальную идентичность. Обычная белая страница выполняет свою задачу, но ничего не говорит об организации, стоящей за ней. Как только вы добавляете мягкий оттенок, тонкий двухцветный градиент или мозаичное фоновое изображение, весь документ превращается из безликого файла в узнаваемый брендированный артефакт — и читатели это замечают, даже если не могут объяснить почему.
Spire.Doc for JavaScript привносит это визуальное оформление прямо в браузер через WebAssembly. Здесь нет обращения к серверу, зависимости от автоматизации Office или необходимости устанавливать настольную программу. Вы загружаете файл Word в виртуальную файловую систему WASM (VFS), выбираете один из трёх режимов фона и экспортируете оформленный документ — всё на стороне клиента в приложении React.
Это руководство рассматривает каждый из трёх вариантов фона не как каталог API, а как набор дизайнерских решений. Мы начнём с краткого сравнения, чтобы вы могли подобрать подходящую технику для своего сценария, а затем перейдём к деталям реализации каждого варианта.
Три подхода к фону: краткий обзор
Прежде чем писать код, полезно понять, что каждый тип фона даёт с точки зрения дизайна. В таблице ниже обобщены визуальный результат, объём необходимой настройки и сценарии, в которых каждый подход особенно хорош.
| Подход | Визуальный эффект | Трудоёмкость настройки | Лучше всего подходит для |
|---|---|---|---|
| Сплошной цвет | Один однородный цвет заполняет каждую страницу | Низкая — установите BackgroundType.Color и назначьте один цвет |
Договоры, внутренние служебные записки, официальные письма, которым нужен чистый профессиональный базовый тон |
| Градиент | Двухцветное направленное смешение по всей странице | Средняя — задайте Color1, Color2, а также ShadingStyle и ShadingVariant |
Титульные страницы, сертификаты, маркетинговые шаблоны, которым нужна тонкая глубина |
| Изображение | Фоновое изображение, мозаично заполняющее всю страницу | Средняя — загрузите изображение в VFS, затем вызовите SetPicture |
Брендированные фирменные бланки, бланки с декоративными элементами, тематические шаблоны документов |
Все три подхода используют один и тот же общий рабочий процесс: загрузите исходный документ в VFS, настройте свойство Background у экземпляра Document, сохраните результат и запустите скачивание в браузере. Различия заключаются исключительно в том, как вы настраиваете это свойство Background — именно здесь и появляются дизайнерские решения.
Инструкции по настройке проекта и установке см. в разделе Интеграция Spire.Doc for JavaScript в проект React. Примеры кода ниже предполагают, что модуль WASM уже инициализирован и доступен в window.wasmModule.
Фон сплошного цвета
Сплошной цвет — самый сдержанный вариант фона, и часто самый эффективный. Тёплый кремовый или бледно-серый фон под чёрным текстом снижает нагрузку на глаза, не отвлекая внимание. Для официальных документов, таких как договоры и политики, лёгкий оттенок сигнализирует: «этот документ принадлежит конкретной организации», не превращаясь в украшение.
Реализация состоит из трёх чётких шагов. Сначала используйте FetchFileToVFS, чтобы загрузить целевой файл Word (и файлы шрифтов) в виртуальную файловую систему WASM. Затем создайте Document, загрузите файл, установите Background.Type в BackgroundType.Color и назначьте встроенный цвет свойству Background.Color. В-третьих, сохраните документ обратно в VFS с помощью SaveToFile, прочитайте полученный файл как массив байтов, оберните его в Blob и инициируйте скачивание.
function App() {
  const SetSolidColorBackground = async () => {
    const docModule = window.wasmModule?.spiredoc;
    if (!docModule) {
      alert('Spire.Doc is not ready yet');
      return;
    }
    // Load the sample file into the virtual file system (VFS)
    let inputFileName = "ScienceTemplate.docx";
    await window.spire.FetchFileToVFS(inputFileName, "", `${process.env.PUBLIC_URL}static/data/`);

    // Create Word document
    let doc = new docModule.Document();

    // Load the file
    doc.LoadFromFile(inputFileName);

    // Set the background type as Color
    doc.Background.Type = docModule.BackgroundType.Color;

    // Set the background color
    doc.Background.Color = docModule.Color.get_LightYellow();

    // Define the output file name
    const outputFileName = "SetSolidColorBackground_out.docx";

    // Save the document to the specified path
    doc.SaveToFile({ fileName: outputFileName, fileFormat: docModule.FileFormat.Docx2013 });

    doc.Dispose();

    const modifiedFileArray = window.dotnetRuntime.Module.FS.readFile(outputFileName);
    const blob = new Blob([modifiedFileArray], { type: 'application/vnd.openxmlformats-officedocument.wordprocessingml.document' });
    const url = URL.createObjectURL(blob);
    const a = document.createElement('a');
    a.href = url;
    a.download = outputFileName;
    a.click();
    URL.revokeObjectURL(url);
  };

 return (
    <div style={{ textAlign: 'center', height: '300px' }}>
      <h1>Set a Solid Color Background for a Word Document</h1>
      <button onClick={SetSolidColorBackground}>Generate</button>
    </div>
  );
}
export default App;
После применения Background.Color каждая страница документа заполняется выбранным встроенным цветом — в данном случае LightYellow.
Градиентный фон
Градиенты придают ощущение объёма, которого не дают плоские цвета. Например, переход сверху вниз от белого к бледно-голубому вызывает ассоциации с небом и открытостью — это полезно для сертификатов, наградных писем или любого документа, где уместна толика торжественности. Главное — сдержанность: выберите два близких цвета и позвольте градиенту делать свою работу незаметно.
Код повторяет рабочий процесс для сплошного цвета, но средний шаг расширяется. После установки Background.Type в BackgroundType.Gradient вы получаете объект градиента через Background.Gradient и настраиваете четыре свойства: Color1 (начальный цвет), Color2 (конечный цвет), ShadingVariant (направление перехода) и ShadingStyle (ось градиента).
function App() {
  const SetGradientBackground = async () => {
    const docModule = window.wasmModule?.spiredoc;
    if (!docModule) {
      alert('Spire.Doc is not ready yet');
      return;
    }
    // Load the sample file into the virtual file system (VFS)
    let inputFileName = "ScienceTemplate.docx";
    await window.spire.FetchFileToVFS(inputFileName, "", `${process.env.PUBLIC_URL}static/data/`);

    // Create Word document
    let doc = new docModule.Document();

    // Load the file
    doc.LoadFromFile(inputFileName);

    // Set the background type as Gradient
    doc.Background.Type = docModule.BackgroundType.Gradient;
    let gradient = doc.Background.Gradient;

    // Set the start color and the end color of the gradient
    gradient.Color1 = docModule.Color.get_White();
    gradient.Color2 = docModule.Color.get_LightBlue();

    // Set the shading style and variant of the gradient
    gradient.ShadingVariant = docModule.GradientShadingVariant.ShadingDown;
    gradient.ShadingStyle = docModule.GradientShadingStyle.Horizontal;

    // Define the output file name
    const outputFileName = "SetGradientBackground_out.docx";

    // Save the document to the specified path
    doc.SaveToFile({ fileName: outputFileName, fileFormat: docModule.FileFormat.Docx2013 });

    doc.Dispose();

    const modifiedFileArray = window.dotnetRuntime.Module.FS.readFile(outputFileName);
    const blob = new Blob([modifiedFileArray], { type: 'application/vnd.openxmlformats-officedocument.wordprocessingml.document' });
    const url = URL.createObjectURL(blob);
    const a = document.createElement('a');
    a.href = url;
    a.download = outputFileName;
    a.click();
    URL.revokeObjectURL(url);
  };

 return (
    <div style={{ textAlign: 'center', height: '300px' }}>
      <h1>Set a Gradient Background for a Word Document</h1>
      <button onClick={SetGradientBackground}>Generate</button>
    </div>
  );
}
export default App;
После применения Background.Gradient страница заполняется плавным горизонтальным переходом от белого к светло-синему, стекающим вниз.
Фоновое изображение
Фоновое изображение — самый выразительный вариант. Будь то тонкий узор-водяной знак, корпоративная текстура или декоративный мотив для программ мероприятий, мозаичное изображение может нести элементы брендинга, которые цвет и градиент просто не способны передать. Компромисс — вес файла: изображение необходимо загрузить в VFS вместе с документом, поэтому оставьте этот подход для шаблонов, где визуальный эффект оправдывает дополнительные ресурсы.
Настройка отличается от двух предыдущих методов в одном важном моменте: фоновое изображение также необходимо загрузить в VFS с помощью FetchFileToVFS, прежде чем на него можно будет ссылаться. Когда и документ, и изображение окажутся в VFS, установите Background.Type в BackgroundType.Picture и вызовите Background.SetPicture, указав путь к изображению в VFS. После этого изображение мозаично заполнит каждую страницу в качестве фона.
function App() {
  const SetImageBackground = async () => {
    const docModule = window.wasmModule?.spiredoc;
    if (!docModule) {
      alert('Spire.Doc is not ready yet');
      return;
    }
    // Load the sample file into the virtual file system (VFS)
    let inputFileName1 = "ScienceTemplate.docx";
    await window.spire.FetchFileToVFS(inputFileName1, "", `${process.env.PUBLIC_URL}static/data/`);

    // Load the background image into the virtual file system (VFS)
    let inputFileName2 = "Background.png";
    await window.spire.FetchFileToVFS(inputFileName2, "", `${process.env.PUBLIC_URL}static/data/`);

    // Load a Word document
    let doc = new docModule.Document();
    doc.LoadFromFile(inputFileName1);

    // Set the background type as Picture
    doc.Background.Type = docModule.BackgroundType.Picture;

    // Set the background picture
    doc.Background.SetPicture(inputFileName2);

    // Define the output file name
    const outputFileName = "SetImageBackground_out.docx";

    // Save the document to the specified path
    doc.SaveToFile({ fileName: outputFileName, fileFormat: docModule.FileFormat.Docx2013 });

    doc.Dispose();

    const modifiedFileArray = window.dotnetRuntime.Module.FS.readFile(outputFileName);
    const blob = new Blob([modifiedFileArray], { type: 'application/vnd.openxmlformats-officedocument.wordprocessingml.document' });
    const url = URL.createObjectURL(blob);
    const a = document.createElement('a');
    a.href = url;
    a.download = outputFileName;
    a.click();
    URL.revokeObjectURL(url);
  };

 return (
    <div style={{ textAlign: 'center', height: '300px' }}>
      <h1>Set a Picture Background in a Word Document</h1>
      <button onClick={SetImageBackground}>Generate</button>
    </div>
  );
}
export default App;
После вызова Background.SetPicture указанное изображение мозаично заполняет всю поверхность страницы в качестве фона документа.
Особенности печати
Есть одна практическая оговорка, которая часто застаёт разработчиков врасплох: Microsoft Word по умолчанию не печатает фон страницы. Это не ошибка в вашем коде и не ограничение Spire.Doc — фон корректно сохраняется в документе и нормально отображается на экране. Word просто опускает его при печати, если явно не указать обратное.
Чтобы фон появлялся на печатных копиях, конечному пользователю нужно включить определённую настройку в клиенте Word:
- Откройте документ в Microsoft Word.
- Перейдите в Файл > Параметры > Экран.
- Установите флажок Печатать цвета и изображения фона.
- Печатайте как обычно.
Если вам нужно, чтобы фон отображался в любой среде вывода независимо от настроек Word у читателя, рассмотрите альтернативный подход: разместите фигуру на всю страницу в колонтитуле документа или используйте водяной знак для имитации фонового эффекта. Эти приёмы считаются содержимым, а не форматированием страницы, поэтому они надёжно печатаются при любых конфигурациях.
Часто задаваемые вопросы
Почему фон не отображается при печати документа?
Это ожидаемое поведение. Word по умолчанию подавляет фон страницы при печати — настройка корректно сохраняется и отображается на экране, но параметры печати клиента Word отфильтровывают её. Фон не потерян; он просто не включается в поток печати.
Чтобы исправить это, включите Печатать цвета и изображения фона в разделе Файл > Параметры > Экран в Word перед печатью. В средах, где вы не можете управлять настройками печати читателя, используйте фигуру на всю страницу в колонтитуле или водяной знак для воспроизведения визуального эффекта, поскольку эти элементы считаются печатаемым содержимым.
Почему фоновое изображение не даёт эффекта?
Обычно это происходит по одной из двух причин: либо Background.Type не был установлен в BackgroundType.Picture перед вызовом SetPicture, либо файл изображения не был загружен в VFS через FetchFileToVFS, поэтому SetPicture не может его найти.
Убедитесь, что сначала задан тип фона, и передайте точное имя файла изображения, которое уже загружено в виртуальную файловую систему:
document.Background.Type = wasmModule.BackgroundType.Picture;
document.Background.SetPicture("Background.png");
См. также
Bloqueie áreas editáveis em documentos do Word com JavaScript
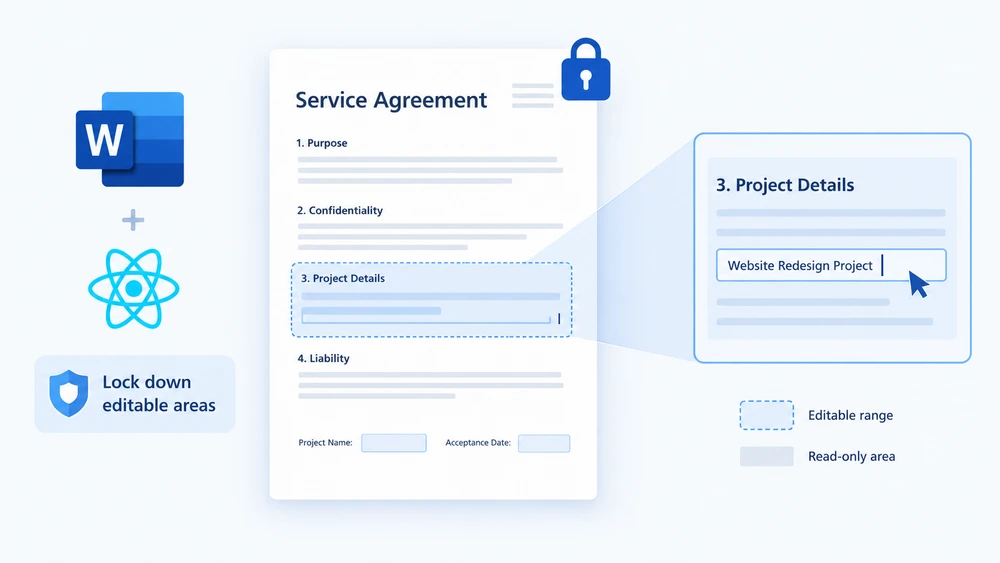
Imagine um modelo de contrato enviado para dezenas de clientes. A equipe jurídica redigiu cada cláusula com cuidado, e as únicas coisas que cada destinatário deve alterar são o bloco de assinatura, o nome do projeto e a data de aceite. Entregue a eles um arquivo Word totalmente editável e inevitavelmente alguém vai reformular uma cláusula de multa ou excluir uma seção de responsabilidade. Bloqueie o documento inteiro e ninguém conseguirá preencher os campos. O que você realmente precisa é de edição seletiva — uma forma de dizer "estes parágrafos específicos podem ser alterados, todo o resto está congelado."
É exatamente isso que os intervalos editáveis oferecem. Você protege todo o documento como somente leitura e depois insere um par de marcadores de permissão ao redor dos parágrafos que deseja manter abertos. Qualquer pessoa que abrir o arquivo no Word pode digitar dentro da região marcada, mas não pode alterar um único caractere fora dela. O Spire.Doc for JavaScript traz essa capacidade para o navegador por meio do WebAssembly, para que você possa gerar documentos protegidos a partir de um aplicativo React sem ida e volta ao servidor — as fontes e os arquivos de entrada são gerenciados por meio de um sistema de arquivos virtual (VFS) em memória.
Este guia aborda as duas metades do fluxo de trabalho:
- Definir um intervalo editável — proteger o documento e marcar a área aberta
- Remover um intervalo editável — retirar os marcadores e suspender a restrição
Caso você ainda não tenha integrado o Spire.Doc ao seu projeto, comece por Integrating Spire.Doc for JavaScript in a React Project. Os trechos abaixo pressupõem que o módulo WebAssembly esteja carregado e pronto.
Definir um Intervalo Editável
O processo tem três etapas. Primeiro, traga os arquivos de fonte e o documento Word de destino para o sistema de arquivos virtual do WASM com FetchFileToVFS. Em seguida, instancie um Document, carregue o arquivo, chame Protect para bloquear todo o documento como somente leitura e, depois, crie um par PermissionStart / PermissionEnd que compartilhe o mesmo id — esses dois marcadores delimitam o parágrafo que você deseja deixar editável. Por fim, salve o arquivo, leia-o de volta do VFS, envolva-o em um Blob e dispare o download.
function App() {
  const SetEditableRange = async () => {
    const docModule = window.wasmModule?.spiredoc;
    if (!docModule) {
      alert('Spire.Doc is not ready yet');
      return;
    }

    // Load the input document into VFS
    const inputFileName = "SetEditableRange.docx";
    await window.spire.FetchFileToVFS(inputFileName, "", `${process.env.PUBLIC_URL}static/data/`);

    // Create a document object and load the document
    const doc = new docModule.Document();
    doc.LoadFromFile(inputFileName);

    // Protect the whole document: everything outside the editable range is read-only
    doc.Protect({ type: docModule.ProtectionType.AllowOnlyReading, password: "password" });

    // Create the permission markers: a start and an end with the same id form one editable range
    const start = new docModule.PermissionStart(doc, "testID");
    const end = new docModule.PermissionEnd(doc, "testID");

    // Insert the markers into the first paragraph: the start at the beginning, the end appended at the end
    doc.Sections.get_Item(0).Paragraphs.get_Item(0).ChildObjects.Insert(0, start);
    doc.Sections.get_Item(0).Paragraphs.get_Item(0).ChildObjects.Add(end);

    // Save the document
    const outputFileName = "Set Editable Range.docx";
    doc.SaveToFile({ fileName: outputFileName, fileFormat: docModule.FileFormat.Docx2013 });
    doc.Dispose();

    const modifiedFileArray = window.dotnetRuntime.Module.FS.readFile(outputFileName);
    const blob = new Blob([modifiedFileArray], { type: 'application/vnd.openxmlformats-officedocument.wordprocessingml.document' });
    const url = URL.createObjectURL(blob);
    const a = document.createElement('a');
    a.href = url;
    a.download = outputFileName;
    a.click();
    URL.revokeObjectURL(url);
  };

 return (
    <div style={{ textAlign: 'center', height: '300px' }}>
      <h1>Set Editable Range in a Word Document</h1>
      <button onClick={SetEditableRange}>
        Generate
      </button>
    </div>
  );
}
export default App;
No arquivo de exemplo, os campos que o revisor tem permissão para preencher possuem um sombreamento claro — isso é apenas uma indicação visual para o leitor e não tem relação com a forma como o intervalo editável é definido no código. Depois que os marcadores estão posicionados, o Word trata o parágrafo sombreado como editável e todos os outros parágrafos como bloqueados.
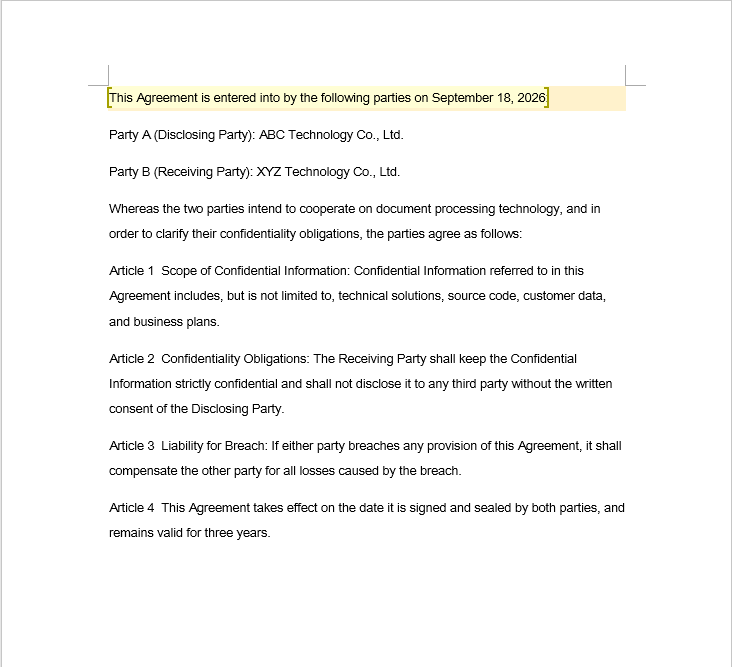
Remover um Intervalo Editável
Remover o intervalo editável é uma única travessia: percorra cada seção e cada parágrafo, inspecione cada objeto na coleção ChildObjects do parágrafo e extraia qualquer coisa que seja um PermissionStart ou PermissionEnd.
Uma sutileza pega as pessoas de surpresa: ChildObjects.Remove reduz a coleção na hora, então cada elemento após o removido avança um índice. Se você incrementar o contador do laço ao mesmo tempo em que exclui, cada remoção faz com que o marcador imediatamente seguinte seja ignorado — e quanto mais marcadores você tiver, mais sobreviventes ficarão para trás.
function App() {
  const RemoveEditableRange = async () => {
    const docModule = window.wasmModule?.spiredoc;
    if (!docModule) {
      alert('Spire.Doc is not ready yet');
      return;
    }

      // Load the input document into VFS
      const inputFileName = "RemoveEditableRange.docx";
      await window.spire.FetchFileToVFS(inputFileName, "", `${process.env.PUBLIC_URL}static/data/`);

      // Create a document object and load the document
      const doc = new docModule.Document();
      doc.LoadFromFile(inputFileName);

      // Iterate over every section and paragraph and delete the permission markers
      for (let i = 0; i < doc.Sections.Count; i++) {
        const section = doc.Sections.get_Item(i);
        for (let j = 0; j < section.Body.Paragraphs.Count; j++) {
          const paragraph = section.Body.Paragraphs.get_Item(j);

          // Remove on a match; the collection shrinks, so the index is not incremented
          for (let k = 0; k < paragraph.ChildObjects.Count;) {
            const obj = paragraph.ChildObjects.get_Item(k);
            if (obj instanceof docModule.PermissionStart || obj instanceof docModule.PermissionEnd) {
              paragraph.ChildObjects.Remove(obj);
            } else {
              k++;
            }
          }
        }
      }

      // Save the document
      const outputFileName = "Remove Editable Range.docx";
      doc.SaveToFile({ fileName: outputFileName, fileFormat: docModule.FileFormat.Docx2013 });

    // Release resources
    doc.Dispose();

    const modifiedFileArray = window.dotnetRuntime.Module.FS.readFile(outputFileName);
    const blob = new Blob([modifiedFileArray], { type: 'application/vnd.openxmlformats-officedocument.wordprocessingml.document' });
    const url = URL.createObjectURL(blob);
    const a = document.createElement('a');
    a.href = url;
    a.download = outputFileName;
    a.click();
    URL.revokeObjectURL(url);
  };

 return (
    <div style={{ textAlign: 'center', height: '300px' }}>
      <h1>Remove Editable Ranges from a Word Document</h1>
      <button onClick={RemoveEditableRange}>
        Generate
      </button>
    </div>
  );
}
export default App;
Excluir os marcadores apenas redesenha o limite do que é editável — o texto em si e toda a formatação permanecem intactos.
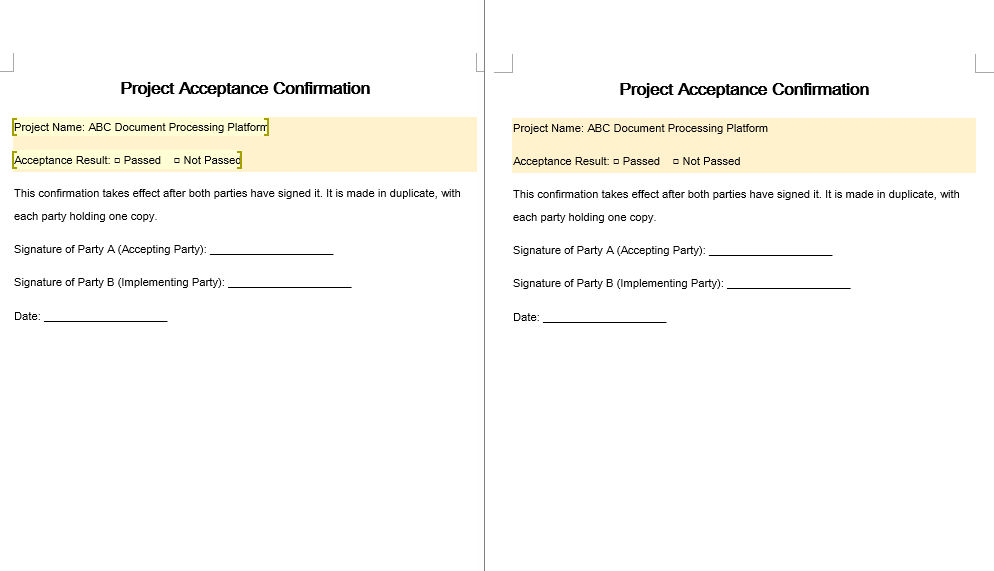
O Ciclo de Vida Completo da Proteção
Em um fluxo de aprovação real, você raramente faz apenas uma coisa. Um ciclo típico é assim:
- Proteger — Chame
doc.ProtectcomAllowOnlyReading(ouAllowOnlyFormFields) e uma senha. Todo o documento agora está bloqueado. - Marcar — Envolva cada parágrafo editável pelo revisor em um par
PermissionStart/PermissionEndque compartilhe um mesmo id. Essas regiões se tornam os únicos lugares onde o revisor pode digitar. - Desmarcar — Quando a rodada de revisão terminar, percorra o documento e remova todos os marcadores de permissão. As regiões voltam a fazer parte do corpo somente leitura.
- Desproteger — Chame
doc.Unprotect("password")para liberar o documento por completo, devolvendo-o a um estado totalmente editável para a próxima etapa do processamento.
O ponto principal é que a proteção e os intervalos editáveis são duas camadas independentes. A proteção decide se o documento está bloqueado; o par de marcadores decide quais trechos ficam isentos desse bloqueio. Você pode adicionar e remover marcadores quantas vezes quiser sem tocar no estado de proteção, e pode ativar ou desativar a proteção sem mexer nos marcadores — mas os marcadores só têm efeito enquanto a proteção estiver ativa.
Perguntas Frequentes
O intervalo editável está definido, mas o conteúdo dentro dele ainda não pode ser editado
Por que acontece: Os marcadores de permissão são inertes por si só. Eles apenas abrem exceções a uma restrição que abrange todo o documento, então, se Protect nunca foi chamado, não há restrição da qual isentar e os marcadores não fazem nada. Um segundo requisito é que PermissionStart e PermissionEnd devem carregar a mesma string de id — o Word só os trata como um par quando os ids coincidem.
Correção: Ative primeiro a restrição de edição e depois crie os dois marcadores com um id idêntico:
// Enable protection first so that the markers mean something
document.Protect({ type: wasmModule.ProtectionType.AllowOnlyReading, password: "password" });

// The start and the end must use the same id
const start = new wasmModule.PermissionStart(document, "testID");
const end = new wasmModule.PermissionEnd(document, "testID");
Alguns marcadores são ignorados ao remover intervalos editáveis
Por que acontece: Cada chamada a ChildObjects.Remove reduz a coleção em um elemento, deslocando o índice de todos os elementos seguintes para baixo. Se o contador do laço avançar na mesma iteração de uma remoção, o elemento que deslizou para a posição atual nunca é examinado — ele é ignorado, e o problema se acumula a cada marcador adicional.
Correção: Mantenha o índice fixo durante a remoção (avance-o apenas quando nenhuma remoção tiver ocorrido) ou reúna primeiro os objetos de destino e exclua-os em ordem inversa:
for (let k = 0; k < paragraph.ChildObjects.Count;) {
  const obj = paragraph.ChildObjects.get_Item(k);
  if (obj instanceof wasmModule.PermissionStart || obj instanceof wasmModule.PermissionEnd) {
    paragraph.ChildObjects.Remove(obj);
    // Do not increment k here: check the new object at the current index
  } else {
    k++;
  }
}
O documento continua somente leitura após a remoção dos marcadores
Por que acontece: Os marcadores apenas definem quais áreas ficam isentas do bloqueio — eles não são o bloqueio em si. Removê-los simplesmente remove as isenções; a proteção subjacente estabelecida por Protect continua em vigor, então o documento inteiro permanece somente leitura.
Correção: Assim que os marcadores forem removidos e você não precisar mais da restrição, chame Unprotect com a senha original:
document.Unprotect("password");
Veja Também
JavaScript로 Word 문서의 편집 가능 영역 잠그기
수십 명의 고객에게 발송되는 계약서 템플릿을 상상해 보세요. 법무팀은 모든 조항을 신중하게 작성했고, 각 수신자가 손대야 하는 것은 서명란, 프로젝트 이름, 승인 날짜뿐입니다. 완전히 편집 가능한 Word 파일을 건네면 누군가는 반드시 위약금 조항을 고쳐 쓰거나 책임 조항을 삭제할 것입니다. 문서 전체를 잠그면 아무도 필드를 채울 수 없습니다. 정말 필요한 것은 선택적 편집, 즉 “이 특정 단락은 편집해도 되고 나머지는 모두 고정된다”라고 말할 수 있는 방법입니다.
바로 이것이 편집 가능 범위가 제공하는 기능입니다. 문서 전체를 읽기 전용으로 보호한 다음, 열어 두려는 단락 주위에 한 쌍의 권한 표식을 배치합니다. Word에서 파일을 연 사람은 표시된 영역 안에서는 입력할 수 있지만 그 밖의 문자는 단 하나도 변경할 수 없습니다. Spire.Doc for JavaScript는 WebAssembly를 통해 이 기능을 브라우저로 가져오므로, 서버 왕복 없이 React 앱에서 보호된 문서를 생성할 수 있습니다. 글꼴과 입력 파일은 인메모리 가상 파일 시스템(VFS)을 통해 관리됩니다.
이 가이드에서는 워크플로의 두 부분을 모두 살펴봅니다:
- 편집 가능 범위 설정 — 문서를 보호하고 열린 영역을 표시합니다
- 편집 가능 범위 제거 — 표식을 제거하고 제한을 해제합니다
아직 프로젝트에 Spire.Doc을 연결하지 않았다면 React 프로젝트에서 Spire.Doc for JavaScript 통합하기부터 시작하세요. 아래 코드 조각은 WebAssembly 모듈이 로드되어 준비된 상태를 가정합니다.
편집 가능 범위 설정
이 프로세스는 세 단계로 구성됩니다. 먼저 FetchFileToVFS로 글꼴 파일과 대상 Word 문서를 WASM 가상 파일 시스템으로 가져옵니다. 다음으로 Document를 인스턴스화하고 파일을 로드한 뒤, Protect를 호출해 문서 전체를 읽기 전용으로 잠그고, 동일한 id를 공유하는 PermissionStart / PermissionEnd 쌍을 만듭니다. 이 두 표식이 편집 가능하게 남겨 둘 단락을 감쌉니다. 마지막으로 파일을 저장하고 VFS에서 다시 읽어 Blob으로 감싼 다음 다운로드를 트리거합니다.
function App() {
  const SetEditableRange = async () => {
    const docModule = window.wasmModule?.spiredoc;
    if (!docModule) {
      alert('Spire.Doc is not ready yet');
      return;
    }

    // Load the input document into VFS
    const inputFileName = "SetEditableRange.docx";
    await window.spire.FetchFileToVFS(inputFileName, "", `${process.env.PUBLIC_URL}static/data/`);

    // Create a document object and load the document
    const doc = new docModule.Document();
    doc.LoadFromFile(inputFileName);

    // Protect the whole document: everything outside the editable range is read-only
    doc.Protect({ type: docModule.ProtectionType.AllowOnlyReading, password: "password" });

    // Create the permission markers: a start and an end with the same id form one editable range
    const start = new docModule.PermissionStart(doc, "testID");
    const end = new docModule.PermissionEnd(doc, "testID");

    // Insert the markers into the first paragraph: the start at the beginning, the end appended at the end
    doc.Sections.get_Item(0).Paragraphs.get_Item(0).ChildObjects.Insert(0, start);
    doc.Sections.get_Item(0).Paragraphs.get_Item(0).ChildObjects.Add(end);

    // Save the document
    const outputFileName = "Set Editable Range.docx";
    doc.SaveToFile({ fileName: outputFileName, fileFormat: docModule.FileFormat.Docx2013 });
    doc.Dispose();

    const modifiedFileArray = window.dotnetRuntime.Module.FS.readFile(outputFileName);
    const blob = new Blob([modifiedFileArray], { type: 'application/vnd.openxmlformats-officedocument.wordprocessingml.document' });
    const url = URL.createObjectURL(blob);
    const a = document.createElement('a');
    a.href = url;
    a.download = outputFileName;
    a.click();
    URL.revokeObjectURL(url);
  };

 return (
    <div style={{ textAlign: 'center', height: '300px' }}>
      <h1>Set Editable Range in a Word Document</h1>
      <button onClick={SetEditableRange}>
        Generate
      </button>
    </div>
  );
}
export default App;
샘플 파일에서 검토자가 채울 수 있는 필드는 연한 음영으로 표시되어 있습니다. 이는 순전히 읽는 사람을 위한 시각적 신호일 뿐이며 코드에서 편집 가능 범위가 정의되는 방식과는 무관합니다. 표식이 배치되면 Word는 음영 처리된 단락을 편집 가능으로, 다른 모든 단락을 잠긴 것으로 처리합니다.
편집 가능 범위 제거
편집 가능 범위를 제거하는 것은 단일 순회입니다. 모든 섹션과 모든 단락을 반복하면서 단락의 ChildObjects 컬렉션에 있는 각 개체를 검사하고, PermissionStart 또는 PermissionEnd인 항목을 뽑아냅니다.
사람들이 흔히 놓치는 미묘한 점이 있습니다. ChildObjects.Remove는 컬렉션을 즉시 축소하므로 제거된 요소 뒤의 모든 요소가 인덱스 하나씩 앞으로 이동합니다. 삭제하면서 루프 카운터를 증가시키면 제거할 때마다 바로 다음 표식이 건너뛰어지고, 표식이 많을수록 더 많은 표식이 남게 됩니다.
function App() {
  const RemoveEditableRange = async () => {
    const docModule = window.wasmModule?.spiredoc;
    if (!docModule) {
      alert('Spire.Doc is not ready yet');
      return;
    }

      // Load the input document into VFS
      const inputFileName = "RemoveEditableRange.docx";
      await window.spire.FetchFileToVFS(inputFileName, "", `${process.env.PUBLIC_URL}static/data/`);

      // Create a document object and load the document
      const doc = new docModule.Document();
      doc.LoadFromFile(inputFileName);

      // Iterate over every section and paragraph and delete the permission markers
      for (let i = 0; i < doc.Sections.Count; i++) {
        const section = doc.Sections.get_Item(i);
        for (let j = 0; j < section.Body.Paragraphs.Count; j++) {
          const paragraph = section.Body.Paragraphs.get_Item(j);

          // Remove on a match; the collection shrinks, so the index is not incremented
          for (let k = 0; k < paragraph.ChildObjects.Count;) {
            const obj = paragraph.ChildObjects.get_Item(k);
            if (obj instanceof docModule.PermissionStart || obj instanceof docModule.PermissionEnd) {
              paragraph.ChildObjects.Remove(obj);
            } else {
              k++;
            }
          }
        }
      }

      // Save the document
      const outputFileName = "Remove Editable Range.docx";
      doc.SaveToFile({ fileName: outputFileName, fileFormat: docModule.FileFormat.Docx2013 });

    // Release resources
    doc.Dispose();

    const modifiedFileArray = window.dotnetRuntime.Module.FS.readFile(outputFileName);
    const blob = new Blob([modifiedFileArray], { type: 'application/vnd.openxmlformats-officedocument.wordprocessingml.document' });
    const url = URL.createObjectURL(blob);
    const a = document.createElement('a');
    a.href = url;
    a.download = outputFileName;
    a.click();
    URL.revokeObjectURL(url);
  };

 return (
    <div style={{ textAlign: 'center', height: '300px' }}>
      <h1>Remove Editable Ranges from a Word Document</h1>
      <button onClick={RemoveEditableRange}>
        Generate
      </button>
    </div>
  );
}
export default App;
표식을 삭제하면 편집 가능한 경계만 다시 그려질 뿐, 텍스트 자체와 모든 서식은 그대로 유지됩니다.
전체 보호 수명 주기
실제 승인 워크플로에서는 한 가지 작업만 하는 경우가 거의 없습니다. 일반적인 왕복 과정은 다음과 같습니다:
- 보호 —
AllowOnlyReading(또는AllowOnlyFormFields)와 암호를 사용해doc.Protect를 호출합니다. 이제 문서 전체가 잠깁니다. - 표시 — 검토자가 편집할 수 있는 각 단락을 하나의 id를 공유하는
PermissionStart/PermissionEnd쌍으로 감쌉니다. 해당 영역만 검토자가 입력할 수 있는 곳이 됩니다. - 표시 해제 — 검토 라운드가 끝나면 문서를 순회하며 모든 권한 표식을 제거합니다. 해당 영역은 다시 읽기 전용 본문에 포함됩니다.
- 보호 해제 —
doc.Unprotect("password")를 호출해 문서를 완전히 해제하고, 다음 처리 단계를 위해 완전히 편집 가능한 상태로 되돌립니다.
핵심은 보호와 편집 가능 범위가 서로 독립적인 두 계층이라는 점입니다. 보호는 문서가 잠기는지 여부를 결정하고, 표식 쌍은 그 잠금에서 어떤 부분이 예외인지를 결정합니다. 보호 상태를 건드리지 않고 표식을 원하는 만큼 추가하거나 제거할 수 있으며, 표식을 어지럽히지 않고 보호를 켜거나 끌 수 있습니다. 다만 표식은 보호가 활성화되어 있을 때만 효력을 발휘합니다.
자주 묻는 질문
편집 가능 범위를 설정했지만 그 안의 내용을 여전히 편집할 수 없습니다
원인: 권한 표식은 그 자체로는 아무 효과가 없습니다. 문서 전체 제한에 대한 예외를 만들어 줄 뿐이므로 Protect를 호출한 적이 없다면 예외를 적용할 제한 자체가 없어 표식은 아무 일도 하지 않습니다. 두 번째 요구 사항은 PermissionStart와 PermissionEnd가 동일한 id 문자열을 가져야 한다는 점입니다. Word는 id가 일치할 때만 이들을 한 쌍으로 취급합니다.
해결 방법: 먼저 편집 제한을 켠 다음, 동일한 id로 두 표식을 모두 만드세요:
// Enable protection first so that the markers mean something
document.Protect({ type: wasmModule.ProtectionType.AllowOnlyReading, password: "password" });

// The start and the end must use the same id
const start = new wasmModule.PermissionStart(document, "testID");
const end = new wasmModule.PermissionEnd(document, "testID");
편집 가능 범위를 제거할 때 일부 표식이 누락됩니다
원인: ChildObjects.Remove를 호출할 때마다 컬렉션이 하나씩 줄어들어 이후 모든 요소의 인덱스가 앞으로 이동합니다. 제거와 같은 반복에서 루프 카운터가 증가하면 현재 위치로 밀려온 요소를 검사하지 않게 되어 건너뛰게 되고, 표식이 추가될수록 문제가 더 커집니다.
해결 방법: 제거하는 동안 인덱스를 고정하거나(제거가 없을 때만 증가), 대상 개체를 먼저 모은 뒤 역순으로 삭제합니다:
for (let k = 0; k < paragraph.ChildObjects.Count;) {
  const obj = paragraph.ChildObjects.get_Item(k);
  if (obj instanceof wasmModule.PermissionStart || obj instanceof wasmModule.PermissionEnd) {
    paragraph.ChildObjects.Remove(obj);
    // Do not increment k here: check the new object at the current index
  } else {
    k++;
  }
}
표식을 제거한 후에도 문서가 여전히 읽기 전용입니다
원인: 표식은 잠금에서 어떤 영역이 예외인지만 정의할 뿐, 잠금 자체가 아닙니다. 표식을 제거하면 예외만 사라지고, Protect가 설정한 기본 보호는 여전히 유효하므로 문서 전체가 읽기 전용으로 남습니다.
해결 방법: 표식이 사라지고 더 이상 제한이 필요하지 않으면 원래 암호로 Unprotect를 호출하세요:
document.Unprotect("password");