Como Ocultar Fórmulas do Excel: 5 Maneiras de Proteger Fórmulas no Excel
Índice
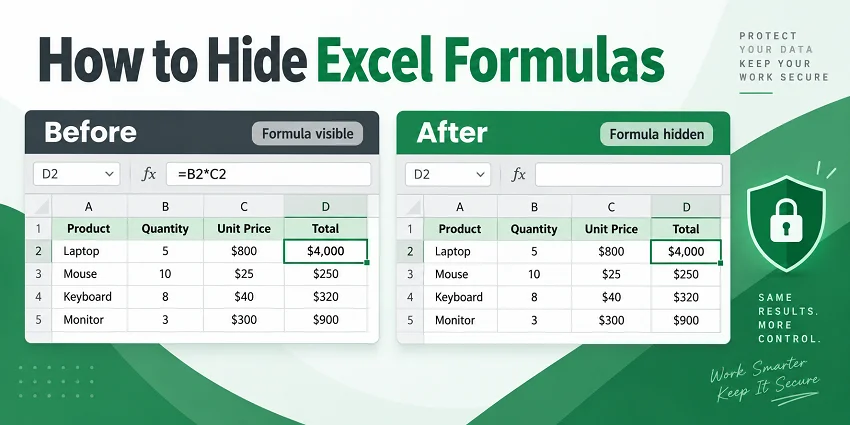
- Guia de Seleção Rápida
- Método 1: Ocultar Fórmulas Usando o Recurso Proteger Planilha do Excel
- Método 2: Converter Fórmulas em Valores Estáticos
- Método 3: Ocultar Fórmulas Desativando a Barra de Fórmulas
- Método 4: Usar VBA para Ocultar Fórmulas do Excel Automaticamente
- Método 5: Ocultar Fórmulas do Excel Programaticamente com C#
- Problemas Comuns e Correções Rápidas
- Conclusão
- Perguntas Frequentes (FAQs)
Se você compartilha relatórios financeiros, modelos de negócios ou planilhas de análise de dados, talvez não queira que outros usuários visualizem ou modifiquem facilmente as fórmulas por trás dos resultados. Ocultar fórmulas ajuda a manter os cálculos subjacentes fora de vista enquanto ainda exibe seus resultados.
Neste artigo, você aprenderá cinco maneiras práticas de ocultar fórmulas do Excel, desde opções integradas para correções manuais rápidas até VBA e C# para processamento automatizado.
Guia de Seleção Rápida
O Excel oferece várias maneiras de ocultar fórmulas dependendo do seu objetivo. Use a tabela abaixo para escolher o método mais adequado:
| O que você deseja fazer | Método Recomendado | Limitação |
|---|---|---|
| Ocultar fórmulas, mas manter os cálculos funcionando | Proteger Planilha | As células de entrada devem ser desbloqueadas antes da proteção |
| Remover fórmulas antes de compartilhar um arquivo final | Converter em Valores | As fórmulas originais não podem ser restauradas |
| Ocultar fórmulas temporariamente durante uma apresentação ao vivo | Desativar Barra de Fórmulas | Oculta as fórmulas apenas na sua tela |
| Automatizar a ocultação ou remoção de fórmulas dentro do Excel | Macro VBA | Requer um arquivo habilitado para macros (.xlsm) |
| Processar fórmulas do Excel programaticamente sem o Microsoft Office | Automação em C# | Requer conhecimento de programação |
Método 1: Ocultar Fórmulas Usando o Recurso Proteger Planilha do Excel
Ideal para: Planilhas em que os usuários precisam inserir dados, mas você deseja impedi-los de visualizar as fórmulas subjacentes ou editar as células de fórmula.
Instruções Passo a Passo
Selecione as células de fórmula que deseja ocultar.
Dica profissional: pressione Ctrl + G > Especial > marque Fórmulas > OK para selecionar todas as células de fórmula instantaneamente.Vá para Página Inicial > Formatar > Formatar Células ou pressione Ctrl + 1 para abrir Formatar Células.
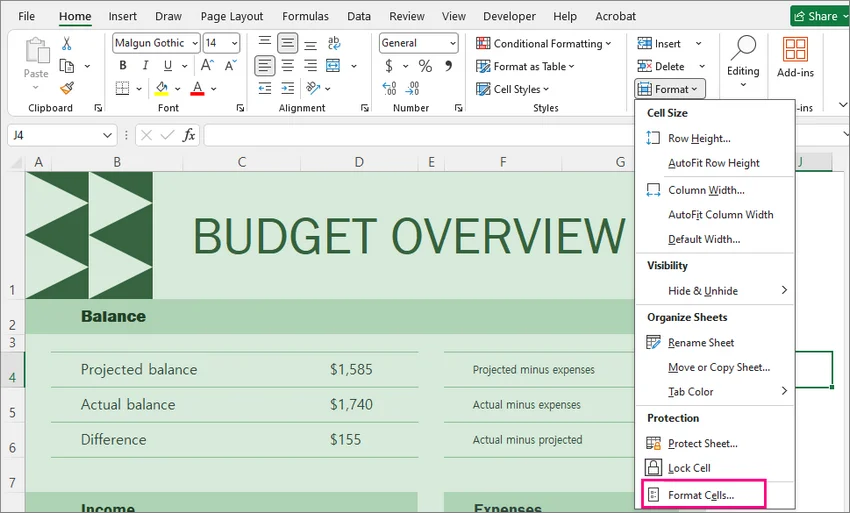
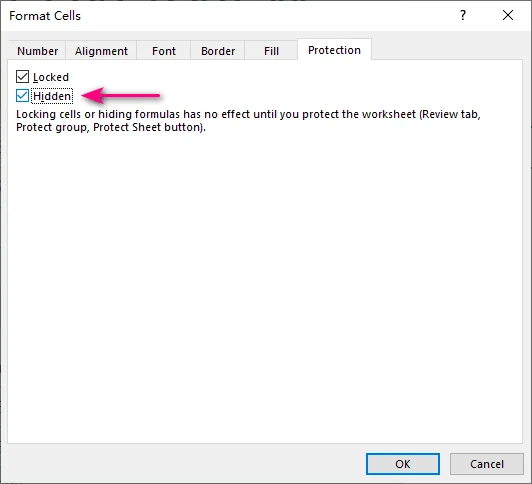
Na guia Proteção, marque Ocultas e clique em OK.
Vá para Revisão > Proteger Planilha, defina uma senha (opcional) e clique em OK.
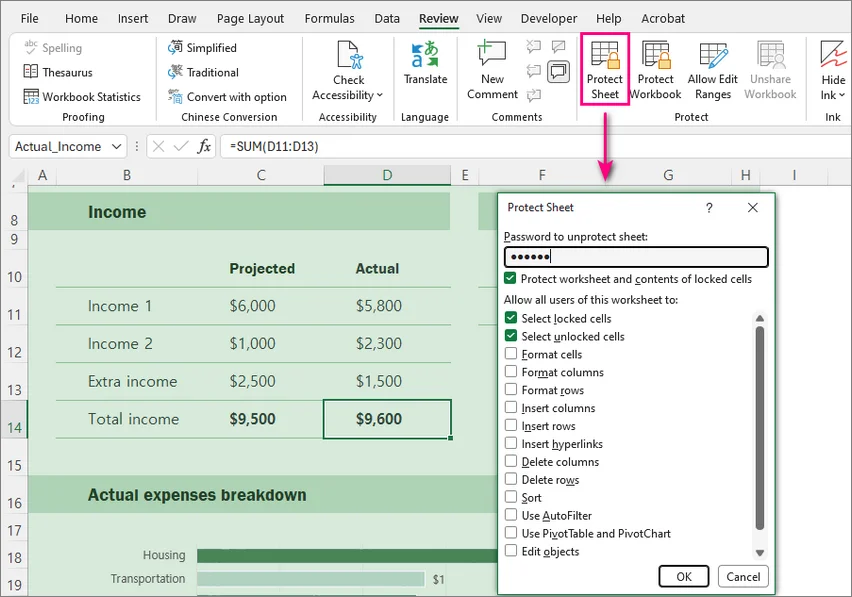
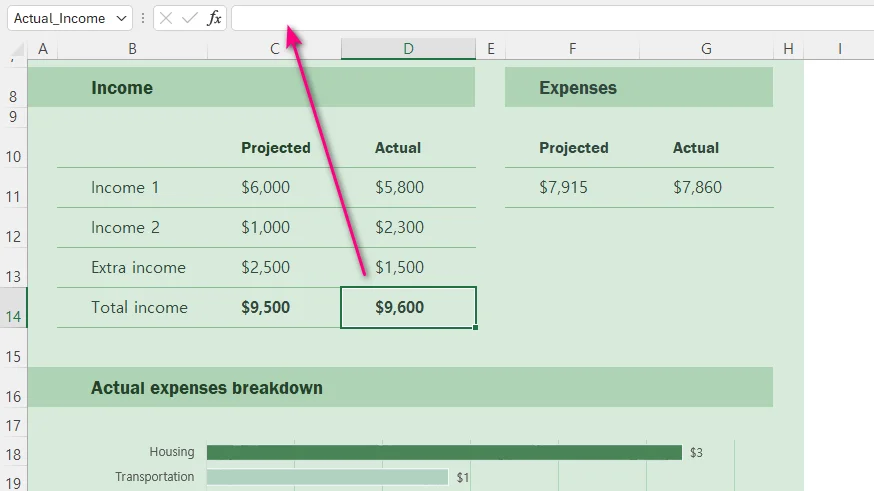
Depois que a planilha estiver protegida, os valores calculados permanecem visíveis, mas a Barra de Fórmulas fica em branco quando uma célula de fórmula oculta é selecionada.
⚠️ Observação:
Proteger uma planilha no Excel bloqueia todas as células por padrão. Se seus clientes precisarem inserir dados em células específicas que não contenham fórmulas, selecione essas células de entrada antes de proteger a planilha e, em seguida, pressione Ctrl + 1 para abrir Formatar Células, alterne para a guia Proteção e desmarque Bloqueadas.
A proteção de planilha tem como objetivo controlar a edição da planilha e a visibilidade das fórmulas, em vez de fornecer criptografia forte de arquivo.
Método 2: Converter Fórmulas em Valores Estáticos
Ideal para: Relatórios finalizados em que os cálculos estão concluídos e os usuários não precisam mais de atualizações dinâmicas em tempo real.
Instruções Passo a Passo
Selecione as células de fórmula que deseja converter.
Copie as células pressionando Ctrl + C.
Clique com o botão direito na mesma área selecionada.
Em Opções de Colagem, selecione o ícone Valores (parece uma área de transferência com 123).
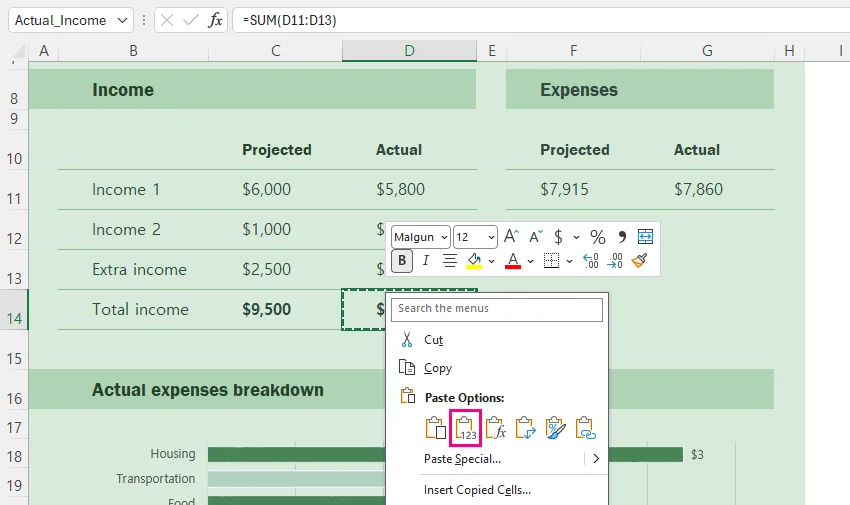
Você também pode usar o atalho de teclado:
Ctrl + C > Ctrl + Alt + V > V > Enter
Após a conversão, os resultados exibidos permanecem os mesmos, mas as fórmulas são removidas.
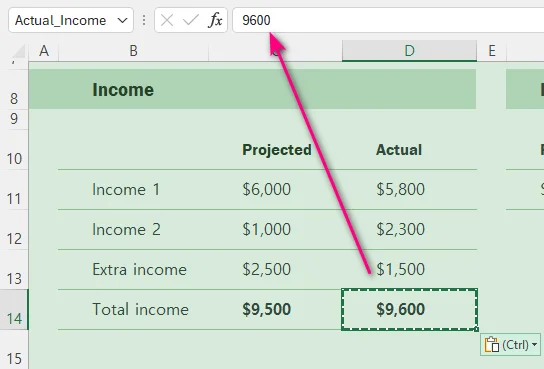
⚠️ Observação: Este método exclui permanentemente as fórmulas das células selecionadas e deixa apenas seus valores atuais. Se a pasta de trabalho puder precisar ser recalculada posteriormente, mantenha uma cópia original antes de substituir as fórmulas.
Método 3: Ocultar Fórmulas Desativando a Barra de Fórmulas
Ideal para: Ocultar temporariamente as fórmulas da visualização durante compartilhamentos de tela, apresentações ao vivo ou gravações de vídeo, sem alterar a proteção da planilha ou as propriedades das células.
Etapas
Clique na guia Exibir na faixa de opções superior.
Desmarque Barra de Fórmulas.
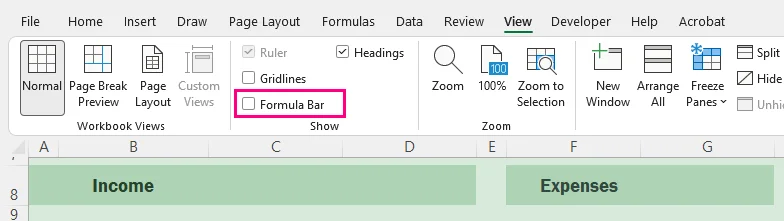
Observe que isso, na verdade, não oculta as fórmulas armazenadas na pasta de trabalho. Isso altera apenas a interface do Excel no seu computador. Se você compartilhar a pasta de trabalho, outros usuários ainda poderão visualizar as fórmulas ativando a Barra de Fórmulas novamente.
Método 4: Usar VBA para Ocultar Fórmulas do Excel Automaticamente
Ideal para: Automatizar tarefas de ocultação ou remoção de fórmulas diretamente no Excel, sem atualizar manualmente cada planilha.
Etapas de Configuração
Pressione Alt + F11 para abrir o Editor do VBA.
Clique em Inserir > Módulo no menu superior.
Adicione uma das seguintes macros à janela do módulo.
Pressione F5 para executar a macro.
Salve a pasta de trabalho como Pasta de Trabalho Habilitada para Macros (.xlsm) se precisar manter as macros.
Opção A: Ocultar fórmulas e proteger todas as planilhas
Sub HideFormulasAllSheets()

    Dim ws As Worksheet

    For Each ws In ActiveWorkbook.Worksheets
        ws.Cells.FormulaHidden = True
        ws.Protect Password:="YourPasswordHere"
    Next ws

End Sub
Isso oculta as fórmulas, mantendo-as funcionais.
Opção B: Converter Fórmulas em Valores
Como esta operação não pode ser desfeita depois que a pasta de trabalho é salva e fechada, trabalhe em uma cópia se precisar das fórmulas originais posteriormente.
Sub ConvertFormulasToValues()

    Dim ws As Worksheet

    For Each ws In ActiveWorkbook.Worksheets
        ws.UsedRange.Value = ws.UsedRange.Value
    Next ws

End Sub
Isso substitui permanentemente as fórmulas por seus valores calculados.
Método 5: Ocultar Fórmulas do Excel Programaticamente com C#
Ideal para: Desenvolvedores que precisam automatizar a ocultação, a remoção de fórmulas do Excel ou o processamento de pastas de trabalho sem instalar o Microsoft Office.
Pré-requisitos
Os exemplos a seguir usam o Free Spire.XLS for .NET para manipular pastas de trabalho do Excel programaticamente, sem depender do Microsoft Office ou do Excel Interop.
Instale o pacote por meio do Console do Gerenciador de Pacotes NuGet antes de executar os exemplos:
Install-Package FreeSpire.XLS
Opção A: Ocultar Fórmulas e Proteger Planilhas
O exemplo a seguir mostra como ocultar fórmulas e proteger planilhas em C#:
using Spire.Xls;

namespace HideFormulas
{
    class Program
    {
        static void Main(string[] args)
        {
            using (Workbook workbook = new Workbook())
            {
                workbook.LoadFromFile("Report.xlsx");

                foreach (Worksheet sheet in workbook.Worksheets)
                {
                    sheet.AllocatedRange.IsFormulaHidden = true;
                    sheet.Protect("YourPassword");
                }

                workbook.SaveToFile("Report_Protected.xlsx", ExcelVersion.Version2016);
            }
        }
    }
}
Opção B: Substituir fórmulas por valores calculados
O exemplo a seguir mostra como remover fórmulas mantendo os valores calculados em C#:
using System;
using Spire.Xls;

namespace ReplaceFormulas
{
    class Program
    {
        static void Main(string[] args)
        {
            using (Workbook workbook = new Workbook())
            {
                workbook.LoadFromFile("FinancialModel.xlsx");

                // Recalculate all formulas before replacing them with static values
                workbook.CalculateAllValue();

                foreach (Worksheet sheet in workbook.Worksheets)
                {
                    foreach (CellRange cell in sheet.AllocatedRange)
                    {
                        if (cell.HasFormula)
                        {
                            // Store the calculated result
                            Object value = cell.FormulaValue;
                            // Remove the formula while preserving formatting
                            cell.Clear(ExcelClearOptions.ClearContent);
                            // Write the calculated value back to the cell
                            cell.Value2 = value;
                        }
                    }
                }

                workbook.SaveToFile("FinancialModel_Flattened.xlsx", ExcelVersion.Version2016);
            }
        }
    }
}
Observação: A versão gratuita pode ser usada para cenários básicos de processamento do Excel. Para recursos avançados, como converter grandes pastas de trabalho do Excel em PDF, consulte o pacote completo do Spire.XLS.
Problemas Comuns e Correções Rápidas
A caixa Ocultas está marcada, mas as fórmulas ainda estão visíveis:
Vá para Revisão > Proteger Planilha. A propriedade Ocultas não entra em vigor até que a proteção da planilha seja ativada.Os usuários não conseguem inserir dados após proteger a planilha:
Desproteja a planilha em Revisão > Desproteger Planilha, selecione suas células de entrada, pressione Ctrl + 1 para abrir Formatar Células > Proteção e desmarque Bloqueadas. Se o botão Desproteger Planilha não estiver disponível, desative o recurso Pasta de Trabalho Compartilhada.As fórmulas ainda estão visíveis após compartilhar a pasta de trabalho:
Ocultar a Barra de Fórmulas apenas alterna as configurações de exibição locais. Proteja a planilha ou converta as fórmulas em valores estáticos antes de compartilhar externamente.
Considerações Finais
Ocultar fórmulas no Excel permite exibir os resultados calculados enquanto mantém a lógica subjacente oculta da Barra de Fórmulas.
Lembre-se de que a propriedade Ocultas da célula só entra em vigor depois que a proteção da planilha é ativada. Se as fórmulas não forem mais necessárias, elas podem ser convertidas em valores estáticos.
Para processamento repetido em várias planilhas ou arquivos, as mesmas tarefas podem ser automatizadas com VBA ou C#.
Perguntas Frequentes (FAQs)
P: Ocultar fórmulas afetará os cálculos do Excel?
R: Não. As fórmulas ocultas continuam funcionando normalmente em segundo plano. O Excel ainda calculará as equações, atualizará os resultados e exibirá os valores atualizados quando as células de entrada forem alteradas.
P: Como exibo novamente as fórmulas ocultas no Excel?
R: Para restaurar a visibilidade das fórmulas:
Vá para a guia Revisão na faixa de opções superior.
Selecione Desproteger Planilha e insira sua senha se solicitado.
Selecione suas células de fórmula e pressione Ctrl + 1 para abrir Formatar Células.
Vá para a guia Proteção, desmarque a caixa Ocultas e clique em OK.
P: Posso ocultar fórmulas sem proteger uma planilha?
R: Não com a configuração Ocultas no nível da célula do Excel. A propriedade Ocultas só entra em vigor depois que a proteção da planilha é ativada. Você pode ocultar a Barra de Fórmulas sem proteger a planilha, mas isso altera apenas a interface local do Excel e não protege as fórmulas.
P: As fórmulas do Excel podem ser ocultadas sem removê-las?
R: Sim. As fórmulas do Excel podem ser ocultadas sem remover sua funcionalidade. O método mais comum é usar Proteger Planilha com a opção Ocultas ativada. Se você precisar remover permanentemente as fórmulas, pode convertê-las em valores estáticos.
엑셀 수식 숨기기: 엑셀에서 수식을 보호하는 5가지 방법
- 빠른 선택 가이드
- 방법 1: Excel의 시트 보호 기능을 사용하여 수식 숨기기
- 방법 2: 수식을 정적 값으로 변환
- 방법 3: 수식 입력줄을 비활성화하여 수식 숨기기
- 방법 4: VBA를 사용하여 Excel 수식 자동으로 숨기기
- 방법 5: C#으로 프로그래밍 방식으로 Excel 수식 숨기기
- 일반적인 문제 및 빠른 해결 방법
- 결론
- 자주 묻는 질문(FAQ)
재무 보고서, 비즈니스 템플릿 또는 데이터 분석 워크시트를 공유하는 경우, 다른 사용자가 결과 뒤에 있는 수식을 쉽게 보거나 수정하는 것을 원하지 않을 수 있습니다. 수식을 숨기면 결과는 그대로 표시하면서 내부 계산을 보이지 않게 유지할 수 있습니다.
이 글에서는 빠른 수동 수정을 위한 기본 제공 옵션부터 자동 처리를 위한 VBA 및 C#에 이르기까지, Excel 수식을 숨기는 다섯 가지 실용적인 방법을 알아봅니다.
빠른 선택 가이드
Excel은 목적에 따라 수식을 숨기는 여러 가지 방법을 제공합니다. 아래 표를 참고하여 가장 적합한 방법을 선택하세요:
| 원하는 작업 | 권장 방법 | 제한 사항 |
|---|---|---|
| 수식을 숨기되 계산은 계속 작동하게 유지 | 시트 보호 | 보호하기 전에 입력 셀의 잠금을 해제해야 함 |
| 최종 파일을 공유하기 전에 수식 제거 | 값으로 변환 | 원본 수식을 복원할 수 없음 |
| 라이브 프레젠테이션 중 일시적으로 수식 숨기기 | 수식 입력줄 비활성화 | 사용자 화면에서만 수식이 숨겨짐 |
| Excel 내에서 수식 숨기기 또는 제거 자동화 | VBA 매크로 | 매크로 사용 통합 문서(.xlsm) 파일 필요 |
| Microsoft Office 없이 프로그래밍 방식으로 Excel 수식 처리 | C# 자동화 | 프로그래밍 지식 필요 |
방법 1: Excel의 시트 보호 기능을 사용하여 수식 숨기기
적합한 경우: 사용자가 데이터를 입력해야 하지만 기본 수식을 보거나 수식 셀을 편집하지 못하게 하려는 워크시트.
단계별 지침
숨기려는 수식 셀을 선택합니다.
팁: Ctrl + G > Special > Formulas를 선택하고 > OK를 누르면 모든 수식 셀을 즉시 선택할 수 있습니다.홈 > 서식 > 셀 서식으로 이동하거나 Ctrl + 1을 눌러 셀 서식을 엽니다.
보호 탭에서 숨김을 선택한 다음 확인을 클릭합니다.
검토 > 시트 보호로 이동하여 암호를 설정하고(선택 사항) 확인을 클릭합니다.
시트가 보호되면 계산된 값은 계속 표시되지만, 숨겨진 수식 셀을 선택하면 수식 입력줄이 비어 있게 표시됩니다.
⚠️ 참고:
Excel에서 시트를 보호하면 기본적으로 모든 셀이 잠깁니다. 사용자가 특정 비수식 셀에 데이터를 입력해야 하는 경우, 시트를 보호하기 전에 해당 입력 셀을 선택한 다음 Ctrl + 1을 눌러 셀 서식을 열고 보호 탭으로 전환하여 잠금을 선택 해제하세요.
워크시트 보호는 강력한 파일 암호화를 제공하기 위한 것이 아니라 워크시트 편집과 수식 표시를 제어하기 위한 것입니다.
방법 2: 수식을 정적 값으로 변환
적합한 경우: 계산이 완료되어 사용자가 더 이상 실시간 동적 업데이트가 필요하지 않은 최종 보고서.
단계별 지침
변환하려는 수식 셀을 선택합니다.
Ctrl + C를 눌러 셀을 복사합니다.
선택한 동일한 영역을 마우스 오른쪽 버튼으로 클릭합니다.
붙여넣기 옵션에서 값 아이콘(123이 표시된 클립보드 모양)을 선택합니다.
키보드 단축키를 사용할 수도 있습니다:
Ctrl + C > Ctrl + Alt + V > V > Enter
변환 후에는 표시되는 결과는 동일하지만 수식은 제거됩니다.
⚠️ 참고: 이 방법은 선택한 셀에서 수식을 영구적으로 삭제하고 현재 값만 남깁니다. 나중에 통합 문서를 다시 계산해야 할 수 있다면 수식을 바꾸기 전에 원본 복사본을 보관하세요.
방법 3: 수식 입력줄을 비활성화하여 수식 숨기기
적합한 경우: 시트 보호나 셀 속성을 변경하지 않고 화면 공유, 라이브 프레젠테이션 또는 동영상 녹화 중에 수식 문자열을 일시적으로 보이지 않게 숨길 때.
단계
상단 리본에서 보기 탭을 클릭합니다.
수식 입력줄을 선택 해제합니다.
이 방법은 실제로 통합 문서에 저장된 수식을 숨기지 않습니다. 컴퓨터의 Excel 인터페이스만 변경할 뿐입니다. 통합 문서를 공유하면 다른 사용자가 수식 입력줄을 다시 활성화하여 수식을 볼 수 있습니다.
방법 4: VBA를 사용하여 Excel 수식 자동으로 숨기기
적합한 경우: 각 워크시트를 수동으로 업데이트하지 않고 Excel 내에서 직접 수식 숨기기 또는 수식 제거 작업을 자동화할 때.
설정 단계
Alt + F11을 눌러 VBA 편집기를 엽니다.
상단 메뉴에서 삽입 > 모듈을 클릭합니다.
다음 매크로 중 하나를 모듈 창에 추가합니다.
F5를 눌러 매크로를 실행합니다.
매크로를 유지해야 하는 경우 통합 문서를 매크로 사용 통합 문서(.xlsm)로 저장합니다.
옵션 A: 수식을 숨기고 모든 워크시트 보호
Sub HideFormulasAllSheets()

    Dim ws As Worksheet

    For Each ws In ActiveWorkbook.Worksheets
        ws.Cells.FormulaHidden = True
        ws.Protect Password:="YourPasswordHere"
    Next ws

End Sub
이 방법은 수식을 숨기면서도 계속 작동하게 유지합니다.
옵션 B: 수식을 값으로 변환
이 작업은 통합 문서를 저장하고 닫은 후에는 실행 취소할 수 없으므로, 나중에 원본 수식이 필요할 수 있다면 복사본에서 작업하세요.
Sub ConvertFormulasToValues()

    Dim ws As Worksheet

    For Each ws In ActiveWorkbook.Worksheets
        ws.UsedRange.Value = ws.UsedRange.Value
    Next ws

End Sub
이 방법은 수식을 계산된 값으로 영구적으로 대체합니다.
방법 5: C#으로 프로그래밍 방식으로 Excel 수식 숨기기
적합한 경우: Microsoft Office를 설치하지 않고 Excel 수식 숨기기, 제거 또는 통합 문서 처리를 자동화해야 하는 개발자.
필수 구성 요소
다음 예제는 Microsoft Office 또는 Excel Interop에 의존하지 않고 프로그래밍 방식으로 Excel 통합 문서를 조작하기 위해 Free Spire.XLS for .NET을 사용합니다.
예제를 실행하기 전에 NuGet 패키지 관리자 콘솔을 통해 패키지를 설치하세요:
Install-Package FreeSpire.XLS
옵션 A: 수식 숨기기 및 워크시트 보호
다음 예제는 C#에서 수식을 숨기고 워크시트를 보호하는 방법을 보여줍니다:
using Spire.Xls;

namespace HideFormulas
{
    class Program
    {
        static void Main(string[] args)
        {
            using (Workbook workbook = new Workbook())
            {
                workbook.LoadFromFile("Report.xlsx");

                foreach (Worksheet sheet in workbook.Worksheets)
                {
                    sheet.AllocatedRange.IsFormulaHidden = true;
                    sheet.Protect("YourPassword");
                }

                workbook.SaveToFile("Report_Protected.xlsx", ExcelVersion.Version2016);
            }
        }
    }
}
옵션 B: 수식을 계산된 값으로 바꾸기
다음 예제는 C#에서 계산된 값을 유지하면서 수식을 제거하는 방법을 보여줍니다:
using System;
using Spire.Xls;

namespace ReplaceFormulas
{
    class Program
    {
        static void Main(string[] args)
        {
            using (Workbook workbook = new Workbook())
            {
                workbook.LoadFromFile("FinancialModel.xlsx");

                // Recalculate all formulas before replacing them with static values
                workbook.CalculateAllValue();

                foreach (Worksheet sheet in workbook.Worksheets)
                {
                    foreach (CellRange cell in sheet.AllocatedRange)
                    {
                        if (cell.HasFormula)
                        {
                            // Store the calculated result
                            Object value = cell.FormulaValue;
                            // Remove the formula while preserving formatting
                            cell.Clear(ExcelClearOptions.ClearContent);
                            // Write the calculated value back to the cell
                            cell.Value2 = value;
                        }
                    }
                }

                workbook.SaveToFile("FinancialModel_Flattened.xlsx", ExcelVersion.Version2016);
            }
        }
    }
}
참고: 무료 버전은 기본적인 Excel 처리 시나리오에 사용할 수 있습니다. 대용량 Excel 통합 문서를 PDF로 변환하는 것과 같은 고급 기능이 필요하면 전체 Spire.XLS 패키지를 확인하세요.
일반적인 문제 및 빠른 해결 방법
숨김 상자를 선택했는데도 수식이 계속 표시되는 경우:
검토 > 시트 보호로 이동하세요. 숨김 속성은 시트 보호가 활성화되어야 적용됩니다.시트를 보호한 후 사용자가 데이터를 입력할 수 없는 경우:
검토 > 시트 보호 해제를 통해 시트 보호를 해제하고 입력 셀을 선택한 다음 Ctrl + 1을 눌러 셀 서식 > 보호를 열고 잠금을 선택 해제하세요. 시트 보호 해제 버튼을 사용할 수 없다면 공유 통합 문서 기능을 해제하세요.통합 문서를 공유한 후에도 수식이 계속 표시되는 경우:
수식 입력줄 숨기기는 로컬 보기 설정만 전환합니다. 외부에 공유하기 전에 시트를 보호하거나 수식을 정적 값으로 변환하세요.
마무리하며
Excel에서 수식을 숨기면 계산된 결과를 표시하면서도 수식 입력줄에서 내부 논리를 숨길 수 있습니다.
숨김 셀 속성은 워크시트 보호가 활성화된 후에만 적용된다는 점을 기억하세요. 수식이 더 이상 필요하지 않다면 대신 정적 값으로 변환할 수 있습니다.
여러 워크시트나 파일에 걸쳐 반복 처리해야 하는 경우, 동일한 작업을 VBA 또는 C#으로 자동화할 수 있습니다.
자주 묻는 질문(FAQ)
Q: 수식을 숨기면 Excel 계산에 영향을 주나요?
A: 아닙니다. 숨겨진 수식은 백그라운드에서 정상적으로 계속 작동합니다. Excel은 여전히 수식을 계산하고, 출력을 업데이트하며, 입력 셀이 변경되면 업데이트된 값을 표시합니다.
Q: Excel에서 숨겨진 수식을 다시 표시하려면 어떻게 하나요?
A: 수식 표시를 복원하려면:
상단 리본에서 검토 탭으로 이동합니다.
시트 보호 해제를 선택하고 메시지가 표시되면 암호를 입력합니다.
수식 셀을 선택하고 Ctrl + 1을 눌러 셀 서식을 엽니다.
보호 탭으로 이동하여 숨김 상자를 선택 해제하고 확인을 클릭합니다.
Q: 워크시트를 보호하지 않고 수식을 숨길 수 있나요?
A: Excel의 셀 수준 숨김 설정으로는 불가능합니다. 숨김 속성은 워크시트 보호가 활성화된 후에만 적용됩니다. 시트를 보호하지 않고 수식 입력줄을 숨길 수는 있지만, 이는 로컬 Excel 인터페이스만 변경할 뿐 수식을 보호하지는 않습니다.
Q: Excel 수식을 제거하지 않고 숨길 수 있나요?
A: 예. Excel 수식은 기능을 제거하지 않고 숨길 수 있습니다. 가장 일반적인 방법은 숨김 옵션을 활성화한 상태에서 시트 보호를 사용하는 것입니다. 수식을 영구적으로 제거해야 한다면 대신 정적 값으로 변환할 수 있습니다.
Come nascondere le formule di Excel: 5 modi per proteggere le formule in Excel
Indice
- Guida rapida alla selezione
- Metodo 1: Utilizzare la funzione Proteggi foglio di Excel
- Metodo 2: Convertire le formule in valori statici
- Metodo 3: Disabilitare la barra della formula
- Metodo 4: Utilizzare VBA
- Metodo 5: Utilizzare C#
- Problemi comuni e soluzioni rapide
- Conclusione
- Domande frequenti (FAQ)
- Guida rapida alla selezione
- Metodo 1: Nascondere le formule utilizzando la funzione Proteggi foglio di Excel
- Metodo 2: Convertire le formule in valori statici
- Metodo 3: Nascondere le formule disabilitando la barra della formula
- Metodo 4: Utilizzare VBA per nascondere automaticamente le formule di Excel
- Metodo 5: Nascondere le formule di Excel a livello di codice con C#
- Problemi comuni e soluzioni rapide
- Conclusione
- Domande frequenti (FAQ)
Se condividi report finanziari, modelli aziendali o fogli di analisi dei dati, potresti non volere che altri utenti visualizzino o modifichino facilmente le formule alla base dei risultati. Nascondere le formule aiuta a mantenere i calcoli sottostanti fuori dalla vista pur continuando a mostrarne i risultati.
In questo articolo imparerai cinque modi pratici per nascondere le formule di Excel, dalle opzioni integrate per rapide correzioni manuali a VBA e C# per l'elaborazione automatizzata.
Guida rapida alla selezione
Excel fornisce diversi modi per nascondere le formule a seconda del tuo obiettivo. Usa la tabella seguente per scegliere il metodo più adatto:
| Cosa vuoi fare | Metodo consigliato | Limitazione |
|---|---|---|
| Nascondi le formule ma mantieni attivi i calcoli | Proteggi foglio | Le celle di input devono essere sbloccate prima della protezione |
| Rimuovi le formule prima di condividere un file finale | Converti in valori | Le formule originali non possono essere ripristinate |
| Nascondi temporaneamente le formule durante una presentazione dal vivo | Disabilita barra della formula | Nasconde le formule solo sulla tua schermata |
| Automatizza l'occultamento o la rimozione delle formule in Excel | Macro VBA | Richiede un file abilitato alle macro (.xlsm) |
| Elabora le formule di Excel a livello di codice senza Microsoft Office | Automazione C# | Richiede conoscenze di programmazione |
Metodo 1: Nascondere le formule utilizzando la funzione Proteggi foglio di Excel
Ideale per: fogli di lavoro in cui gli utenti devono inserire dati, ma vuoi impedire loro di visualizzare le formule sottostanti o modificare le celle delle formule.
Istruzioni passo passo
Seleziona le celle delle formule che vuoi nascondere.
Consiglio da professionista: premi Ctrl + G > Speciale > seleziona Formule > OK per selezionare istantaneamente tutte le celle delle formule.Vai su Home > Formato > Formato celle o premi Ctrl + 1 per aprire Formato celle.
Nella scheda Protezione, seleziona Nascosta, quindi fai clic su OK.
Vai su Revisione > Proteggi foglio, imposta una password (facoltativo) e fai clic su OK.
Una volta protetto il foglio, i valori calcolati rimangono visibili, ma la barra della formula è vuota quando viene selezionata una cella con formula nascosta.
⚠️ Nota:
Proteggere un foglio in Excel blocca tutte le celle per impostazione predefinita. Se i tuoi clienti devono inserire dati in celle specifiche non di formula, seleziona quelle celle di input prima di proteggere il foglio, quindi premi Ctrl + 1 per aprire Formato celle, passa alla scheda Protezione e deseleziona Bloccata.
La protezione del foglio di lavoro è intesa a controllare la modifica del foglio e la visibilità delle formule, piuttosto che fornire una forte crittografia del file.
Metodo 2: Convertire le formule in valori statici
Ideale per: report finalizzati in cui i calcoli sono completi e gli utenti non hanno più bisogno di aggiornamenti dinamici in tempo reale.
Istruzioni passo passo
Seleziona le celle delle formule che vuoi convertire.
Copia le celle premendo Ctrl + C.
Fai clic con il pulsante destro del mouse sulla stessa area selezionata.
In Opzioni incolla, seleziona l'icona Valori (sembra un blocco appunti con 123).
Puoi anche usare la scorciatoia da tastiera:
Ctrl + C > Ctrl + Alt + V > V > Enter
Dopo la conversione, i risultati visualizzati rimangono gli stessi, ma le formule vengono rimosse.
⚠️ Nota: Questo metodo elimina definitivamente le formule dalle celle selezionate e lascia solo i loro valori correnti. Se la cartella di lavoro potrebbe dover essere ricalcolata in seguito, conserva una copia originale prima di sostituire le formule.
Metodo 3: Nascondere le formule disabilitando la barra della formula
Ideale per: nascondere temporaneamente le stringhe delle formule alla vista durante condivisioni dello schermo, presentazioni dal vivo o registrazioni video senza modificare la protezione del foglio o le proprietà delle celle.
Passaggi
Fai clic sulla scheda Visualizza nella barra multifunzione superiore.
Deseleziona Barra della formula.
Nota che questo in realtà non nasconde le formule memorizzate nella cartella di lavoro. Cambia solo l'interfaccia di Excel sul tuo computer. Se condividi la cartella di lavoro, altri utenti possono ancora visualizzare le formule abilitando di nuovo la barra della formula.
Metodo 4: Utilizzare VBA per nascondere automaticamente le formule di Excel
Ideale per: automatizzare le attività di occultamento o rimozione delle formule direttamente in Excel senza aggiornare manualmente ogni foglio di lavoro.
Passaggi di configurazione
Premi Alt + F11 per aprire l'editor VBA.
Fai clic su Inserisci > Modulo nel menu in alto.
Aggiungi una delle seguenti macro nella finestra del modulo.
Premi F5 per eseguire la macro.
Salva la cartella di lavoro come cartella di lavoro abilitata alle macro (.xlsm) se devi conservare le macro.
Opzione A: Nascondere le formule e proteggere tutti i fogli di lavoro
Sub HideFormulasAllSheets()

    Dim ws As Worksheet

    For Each ws In ActiveWorkbook.Worksheets
        ws.Cells.FormulaHidden = True
        ws.Protect Password:="YourPasswordHere"
    Next ws

End Sub
Questo nasconde le formule mantenendole funzionanti.
Opzione B: Convertire le formule in valori
Poiché questa operazione non può essere annullata dopo che la cartella di lavoro è stata salvata e chiusa, lavora su una copia se potresti aver bisogno delle formule originali in seguito.
Sub ConvertFormulasToValues()

    Dim ws As Worksheet

    For Each ws In ActiveWorkbook.Worksheets
        ws.UsedRange.Value = ws.UsedRange.Value
    Next ws

End Sub
Questo sostituisce definitivamente le formule con i loro valori calcolati.
Metodo 5: Nascondere le formule di Excel a livello di codice con C#
Ideale per: sviluppatori che devono automatizzare l'occultamento, la rimozione o l'elaborazione delle formule di Excel senza installare Microsoft Office.
Prerequisiti
Gli esempi seguenti utilizzano Free Spire.XLS for .NET per manipolare le cartelle di lavoro Excel a livello di codice senza affidarsi a Microsoft Office o Excel Interop.
Installa il pacchetto tramite la console di Gestione pacchetti NuGet prima di eseguire gli esempi:
Install-Package FreeSpire.XLS
Opzione A: Nascondere le formule e proteggere i fogli di lavoro
L'esempio seguente mostra come nascondere le formule e proteggere i fogli di lavoro in C#:
using Spire.Xls;

namespace HideFormulas
{
    class Program
    {
        static void Main(string[] args)
        {
            using (Workbook workbook = new Workbook())
            {
                workbook.LoadFromFile("Report.xlsx");

                foreach (Worksheet sheet in workbook.Worksheets)
                {
                    sheet.AllocatedRange.IsFormulaHidden = true;
                    sheet.Protect("YourPassword");
                }

                workbook.SaveToFile("Report_Protected.xlsx", ExcelVersion.Version2016);
            }
        }
    }
}
Opzione B: Sostituire le formule con valori calcolati
L'esempio seguente mostra come rimuovere le formule mantenendo i valori calcolati in C#:
using System;
using Spire.Xls;

namespace ReplaceFormulas
{
    class Program
    {
        static void Main(string[] args)
        {
            using (Workbook workbook = new Workbook())
            {
                workbook.LoadFromFile("FinancialModel.xlsx");

                // Recalculate all formulas before replacing them with static values
                workbook.CalculateAllValue();

                foreach (Worksheet sheet in workbook.Worksheets)
                {
                    foreach (CellRange cell in sheet.AllocatedRange)
                    {
                        if (cell.HasFormula)
                        {
                            // Store the calculated result
                            Object value = cell.FormulaValue;
                            // Remove the formula while preserving formatting
                            cell.Clear(ExcelClearOptions.ClearContent);
                            // Write the calculated value back to the cell
                            cell.Value2 = value;
                        }
                    }
                }

                workbook.SaveToFile("FinancialModel_Flattened.xlsx", ExcelVersion.Version2016);
            }
        }
    }
}
Nota: La versione gratuita può essere utilizzata per scenari di elaborazione Excel di base. Per funzionalità avanzate come convertire grandi cartelle di lavoro Excel in PDF, consulta il pacchetto completo Spire.XLS.
Problemi comuni e soluzioni rapide
La casella Nascosta è selezionata, ma le formule sono ancora visibili:
Vai su Revisione > Proteggi foglio. La proprietà Nascosta non ha effetto finché la protezione del foglio non è attivamente abilitata.Gli utenti non possono inserire dati dopo aver protetto il foglio:
Rimuovi la protezione del foglio tramite Revisione > Rimuovi protezione foglio, seleziona le celle di input, premi Ctrl + 1 per aprire Formato celle > Protezione e deseleziona Bloccata. Se il pulsante Rimuovi protezione foglio non è disponibile, disattiva la funzione Cartella di lavoro condivisa.Le formule sono ancora visibili dopo aver condiviso la cartella di lavoro:
Nascondere la barra della formula modifica solo le impostazioni di visualizzazione locali. Proteggi il foglio o converti le formule in valori statici prima di condividere esternamente.
Riepilogo
Nascondere le formule in Excel ti consente di visualizzare i risultati calcolati mantenendo la logica sottostante nascosta dalla barra della formula.
Ricorda che la proprietà Nascosta della cella ha effetto solo dopo che la protezione del foglio di lavoro è abilitata. Se le formule non sono più necessarie, possono invece essere convertite in valori statici.
Per l'elaborazione ripetuta su più fogli di lavoro o file, le stesse attività possono essere automatizzate con VBA o C#.
Domande frequenti (FAQ)
D: Nascondere le formule influirà sui calcoli di Excel?
R: No. Le formule nascoste continuano a funzionare normalmente in background. Excel calcolerà comunque le equazioni, aggiornerà i risultati e visualizzerà i valori aggiornati quando le celle di input cambiano.
D: Come posso mostrare di nuovo le formule nascoste in Excel?
R: Per ripristinare la visibilità delle formule:
Vai alla scheda Revisione nella barra multifunzione superiore.
Seleziona Rimuovi protezione foglio e inserisci la password se richiesto.
Seleziona le celle delle formule e premi Ctrl + 1 per aprire Formato celle.
Vai alla scheda Protezione, deseleziona la casella Nascosta e fai clic su OK.
D: Posso nascondere le formule senza proteggere un foglio di lavoro?
R: Non con l'impostazione Nascosta a livello di cella di Excel. La proprietà Nascosta ha effetto solo dopo che la protezione del foglio di lavoro è abilitata. Puoi nascondere la barra della formula senza proteggere il foglio, ma questo cambia solo l'interfaccia locale di Excel e non protegge le formule.
D: Le formule di Excel possono essere nascoste senza rimuoverle?
R: Sì. Le formule di Excel possono essere nascoste senza rimuovere la loro funzionalità. Il metodo più comune è usare Proteggi foglio con l'opzione Nascosta abilitata. Se devi rimuovere permanentemente le formule, puoi invece convertirle in valori statici.
Comment masquer les formules Excel : 5 méthodes pour protéger les formules dans Excel
Table des matières
- Guide de sélection rapide
- Méthode 1 : Utiliser la fonction Protéger la feuille d’Excel
- Méthode 2 : Convertir les formules en valeurs statiques
- Méthode 3 : Désactiver la barre de formule
- Méthode 4 : Utiliser VBA
- Méthode 5 : Utiliser C#
- Problèmes courants et correctifs rapides
- Conclusion
- Questions fréquentes (FAQ)
- Guide de sélection rapide
- Méthode 1 : Masquer les formules à l’aide de la fonction Protéger la feuille d’Excel
- Méthode 2 : Convertir les formules en valeurs statiques
- Méthode 3 : Masquer les formules en désactivant la barre de formule
- Méthode 4 : Utiliser VBA pour masquer automatiquement les formules Excel
- Méthode 5 : Masquer les formules Excel par programmation avec C#
- Problèmes courants et correctifs rapides
- Conclusion
- Questions fréquentes (FAQ)
Si vous partagez des rapports financiers, des modèles d’entreprise ou des feuilles de calcul d’analyse de données, vous ne souhaitez peut-être pas que d’autres utilisateurs puissent facilement consulter ou modifier les formules à l’origine des résultats. Le masquage des formules permet de garder les calculs sous-jacents hors de vue tout en affichant leurs résultats.
Dans cet article, vous découvrirez cinq méthodes pratiques pour masquer les formules Excel, des options intégrées pour des corrections manuelles rapides à VBA et C# pour un traitement automatisé.
Guide de sélection rapide
Excel propose plusieurs façons de masquer les formules selon votre objectif. Utilisez le tableau ci-dessous pour choisir la méthode la plus appropriée :
| Ce que vous voulez faire | Méthode recommandée | Limitation |
|---|---|---|
| Masquer les formules tout en conservant le fonctionnement des calculs | Protéger la feuille | Les cellules de saisie doivent être déverrouillées avant la protection |
| Supprimer les formules avant de partager un fichier final | Convertir en valeurs | Les formules d’origine ne peuvent pas être restaurées |
| Masquer temporairement les formules pendant une présentation en direct | Désactiver la barre de formule | Masque uniquement les formules sur votre écran |
| Automatiser le masquage ou la suppression des formules dans Excel | Macro VBA | Nécessite un fichier prenant en charge les macros (.xlsm) |
| Traiter les formules Excel par programmation sans Microsoft Office | Automatisation C# | Nécessite des connaissances en programmation |
Méthode 1 : Masquer les formules à l’aide de la fonction Protéger la feuille d’Excel
Idéal pour : les feuilles de calcul dans lesquelles les utilisateurs doivent saisir des données, mais dont vous souhaitez les empêcher de consulter les formules sous-jacentes ou de modifier les cellules contenant des formules.
Instructions étape par étape
Sélectionnez les cellules de formule que vous souhaitez masquer.
Astuce de pro : appuyez sur Ctrl + G > Spécial > cochez Formules > OK pour sélectionner instantanément toutes les cellules de formule.Accédez à Accueil > Format > Format de cellule ou appuyez sur Ctrl + 1 pour ouvrir Format de cellule.
Sous l’onglet Protection, cochez Masqué, puis cliquez sur OK.
Accédez à Révision > Protéger la feuille, définissez un mot de passe (facultatif), puis cliquez sur OK.
Une fois la feuille protégée, les valeurs calculées restent visibles, mais la barre de formule est vide lorsqu’une cellule de formule masquée est sélectionnée.
⚠️ Remarque :
Protéger une feuille dans Excel verrouille toutes les cellules par défaut. Si vos clients doivent saisir des données dans des cellules spécifiques sans formule, sélectionnez ces cellules de saisie avant de protéger la feuille, puis appuyez sur Ctrl + 1 pour ouvrir Format de cellule, passez à l’onglet Protection et décochez Verrouillé.
La protection d’une feuille de calcul est destinée à contrôler la modification de la feuille et la visibilité des formules, plutôt qu’à fournir un chiffrement fort du fichier.
Méthode 2 : Convertir les formules en valeurs statiques
Idéal pour : les rapports finalisés dont les calculs sont terminés et pour lesquels les utilisateurs n’ont plus besoin de mises à jour dynamiques en direct.
Instructions étape par étape
Sélectionnez les cellules de formule que vous souhaitez convertir.
Copiez les cellules en appuyant sur Ctrl + C.
Cliquez avec le bouton droit sur la même zone sélectionnée.
Sous Options de collage, sélectionnez l’icône Valeurs (qui ressemble à un presse-papiers avec 123).
Vous pouvez également utiliser le raccourci clavier :
Ctrl + C > Ctrl + Alt + V > V > Entrée
Après la conversion, les résultats affichés restent identiques, mais les formules sont supprimées.
⚠️ Remarque : Cette méthode supprime définitivement les formules des cellules sélectionnées et ne conserve que leurs valeurs actuelles. Si le classeur peut nécessiter un nouveau calcul ultérieur, conservez une copie originale avant de remplacer les formules.
Méthode 3 : Masquer les formules en désactivant la barre de formule
Idéal pour : masquer temporairement les chaînes de formule pendant des partages d’écran, des présentations en direct ou des enregistrements vidéo, sans modifier la protection de la feuille ni les propriétés des cellules.
Étapes
Cliquez sur l’onglet Affichage du ruban supérieur.
Décochez Barre de formule.
Notez que cela ne masque pas réellement les formules stockées dans le classeur. Cela modifie uniquement l’interface Excel sur votre ordinateur. Si vous partagez le classeur, les autres utilisateurs peuvent toujours consulter les formules en réactivant la barre de formule.
Méthode 4 : Utiliser VBA pour masquer automatiquement les formules Excel
Idéal pour : automatiser les tâches de masquage ou de suppression de formules directement dans Excel, sans mettre à jour manuellement chaque feuille de calcul.
Étapes de configuration
Appuyez sur Alt + F11 pour ouvrir l’éditeur VBA.
Cliquez sur Insertion > Module dans le menu supérieur.
Ajoutez l’une des macros suivantes dans la fenêtre du module.
Appuyez sur F5 pour exécuter la macro.
Enregistrez le classeur au format Classeur prenant en charge les macros (.xlsm) si vous devez conserver les macros.
Option A : Masquer les formules et protéger toutes les feuilles de calcul
Sub HideFormulasAllSheets()

    Dim ws As Worksheet

    For Each ws In ActiveWorkbook.Worksheets
        ws.Cells.FormulaHidden = True
        ws.Protect Password:="YourPasswordHere"
    Next ws

End Sub
Cela masque les formules tout en les gardant fonctionnelles.
Option B : Convertir les formules en valeurs
Comme cette opération ne peut pas être annulée après l’enregistrement et la fermeture du classeur, travaillez sur une copie si vous risquez d’avoir besoin des formules d’origine plus tard.
Sub ConvertFormulasToValues()

    Dim ws As Worksheet

    For Each ws In ActiveWorkbook.Worksheets
        ws.UsedRange.Value = ws.UsedRange.Value
    Next ws

End Sub
Cela remplace définitivement les formules par leurs valeurs calculées.
Méthode 5 : Masquer les formules Excel par programmation avec C#
Idéal pour : les développeurs qui doivent automatiser le masquage, la suppression ou le traitement de formules Excel sans installer Microsoft Office.
Prérequis
Les exemples suivants utilisent Free Spire.XLS for .NET pour manipuler des classeurs Excel par programmation sans dépendre de Microsoft Office ni d’Excel Interop.
Installez le package via la console du gestionnaire de packages NuGet avant d’exécuter les exemples :
Install-Package FreeSpire.XLS
Option A : Masquer les formules et protéger les feuilles de calcul
L’exemple suivant montre comment masquer les formules et protéger les feuilles de calcul en C# :
using Spire.Xls;

namespace HideFormulas
{
    class Program
    {
        static void Main(string[] args)
        {
            using (Workbook workbook = new Workbook())
            {
                workbook.LoadFromFile("Report.xlsx");

                foreach (Worksheet sheet in workbook.Worksheets)
                {
                    sheet.AllocatedRange.IsFormulaHidden = true;
                    sheet.Protect("YourPassword");
                }

                workbook.SaveToFile("Report_Protected.xlsx", ExcelVersion.Version2016);
            }
        }
    }
}
Option B : Remplacer les formules par des valeurs calculées
L’exemple suivant montre comment supprimer les formules tout en conservant les valeurs calculées en C# :
using System;
using Spire.Xls;

namespace ReplaceFormulas
{
    class Program
    {
        static void Main(string[] args)
        {
            using (Workbook workbook = new Workbook())
            {
                workbook.LoadFromFile("FinancialModel.xlsx");

                // Recalculate all formulas before replacing them with static values
                workbook.CalculateAllValue();

                foreach (Worksheet sheet in workbook.Worksheets)
                {
                    foreach (CellRange cell in sheet.AllocatedRange)
                    {
                        if (cell.HasFormula)
                        {
                            // Store the calculated result
                            Object value = cell.FormulaValue;
                            // Remove the formula while preserving formatting
                            cell.Clear(ExcelClearOptions.ClearContent);
                            // Write the calculated value back to the cell
                            cell.Value2 = value;
                        }
                    }
                }

                workbook.SaveToFile("FinancialModel_Flattened.xlsx", ExcelVersion.Version2016);
            }
        }
    }
}
Remarque : La version gratuite peut être utilisée pour des scénarios de traitement Excel de base. Pour des fonctionnalités avancées comme la conversion de grands classeurs Excel en PDF, consultez le package complet Spire.XLS.
Problèmes courants et correctifs rapides
La case Masqué est cochée, mais les formules sont toujours visibles :
Accédez à Révision > Protéger la feuille. La propriété Masqué ne prend effet qu’une fois la protection de la feuille activée.Les utilisateurs ne peuvent pas saisir de données après la protection de la feuille :
Annulez la protection de la feuille via Révision > Ôter la protection de la feuille, sélectionnez vos cellules de saisie, appuyez sur Ctrl + 1 pour ouvrir Format de cellule > Protection, puis décochez Verrouillé. Si le bouton Ôter la protection de la feuille n’est pas disponible, désactivez la fonctionnalité Classeur partagé.Les formules sont toujours visibles après le partage du classeur :
Masquer la barre de formule ne modifie que vos paramètres d’affichage locaux. Protégez la feuille ou convertissez les formules en valeurs statiques avant de partager le fichier en externe.
En résumé
Masquer les formules dans Excel vous permet d’afficher les résultats calculés tout en gardant la logique sous-jacente cachée dans la barre de formule.
N’oubliez pas que la propriété de cellule Masqué ne prend effet qu’après l’activation de la protection de la feuille de calcul. Si les formules ne sont plus nécessaires, elles peuvent plutôt être converties en valeurs statiques.
Pour un traitement répété sur plusieurs feuilles de calcul ou fichiers, ces mêmes tâches peuvent être automatisées avec VBA ou C#.
Questions fréquentes (FAQ)
Q : Le masquage des formules affecte-t-il les calculs Excel ?
R : Non. Les formules masquées continuent de fonctionner normalement en arrière-plan. Excel continuera de calculer les équations, de mettre à jour les sorties et d’afficher les valeurs mises à jour lorsque les cellules de saisie changent.
Q : Comment réafficher les formules masquées dans Excel ?
R : Pour restaurer la visibilité des formules :
Accédez à l’onglet Révision du ruban supérieur.
Sélectionnez Ôter la protection de la feuille et saisissez votre mot de passe si vous y êtes invité.
Sélectionnez vos cellules de formule et appuyez sur Ctrl + 1 pour ouvrir Format de cellule.
Accédez à l’onglet Protection, décochez la case Masqué, puis cliquez sur OK.
Q : Puis-je masquer des formules sans protéger une feuille de calcul ?
R : Pas avec le paramètre Masqué au niveau des cellules d’Excel. La propriété Masqué ne prend effet qu’après l’activation de la protection de la feuille de calcul. Vous pouvez masquer la barre de formule sans protéger la feuille, mais cela ne modifie que l’interface Excel locale et ne protège pas les formules.
Q : Les formules Excel peuvent-elles être masquées sans les supprimer ?
R : Oui. Les formules Excel peuvent être masquées sans supprimer leur fonctionnalité. La méthode la plus courante consiste à utiliser Protéger la feuille avec l’option Masqué activée. Si vous devez supprimer définitivement les formules, vous pouvez plutôt les convertir en valeurs statiques.
Cómo ocultar fórmulas de Excel: 5 formas de proteger fórmulas en Excel
Tabla de contenido
- Guía de selección rápida
- Método 1: Ocultar fórmulas usando la función Proteger hoja de Excel
- Método 2: Convertir fórmulas en valores estáticos
- Método 3: Ocultar fórmulas deshabilitando la barra de fórmulas
- Método 4: Usar VBA para ocultar fórmulas de Excel automáticamente
- Método 5: Ocultar fórmulas de Excel mediante programación con C#
- Problemas comunes y soluciones rápidas
- Conclusión
- Preguntas frecuentes (FAQ)
Si compartes informes financieros, plantillas de negocio o hojas de cálculo de análisis de datos, es posible que no quieras que otros usuarios puedan ver o modificar fácilmente las fórmulas que hay detrás de los resultados. Ocultar las fórmulas ayuda a mantener los cálculos subyacentes fuera de la vista mientras se siguen mostrando sus resultados.
En este artículo, aprenderás cinco formas prácticas de ocultar fórmulas de Excel, desde opciones integradas para soluciones manuales rápidas hasta VBA y C# para el procesamiento automatizado.
Guía de selección rápida
Excel ofrece varias formas de ocultar fórmulas según tu objetivo. Usa la tabla a continuación para elegir el método más adecuado:
| Qué quieres hacer | Método recomendado | Limitación |
|---|---|---|
| Ocultar fórmulas pero mantener el funcionamiento de los cálculos | Proteger hoja | Las celdas de entrada deben desbloquearse antes de proteger |
| Eliminar fórmulas antes de compartir un archivo final | Convertir en valores | Las fórmulas originales no se pueden restaurar |
| Ocultar fórmulas temporalmente durante una presentación en vivo | Deshabilitar la barra de fórmulas | Solo oculta las fórmulas en tu pantalla |
| Automatizar la ocultación o eliminación de fórmulas dentro de Excel | Macro de VBA | Requiere un archivo habilitado para macros (.xlsm) |
| Procesar fórmulas de Excel mediante programación sin Microsoft Office | Automatización con C# | Requiere conocimientos de programación |
Método 1: Ocultar fórmulas usando la función Proteger hoja de Excel
Ideal para: Hojas de cálculo donde los usuarios necesitan introducir datos, pero quieres evitar que vean las fórmulas subyacentes o editen las celdas de fórmulas.
Instrucciones paso a paso
Selecciona las celdas de fórmulas que quieras ocultar.
Consejo profesional: presiona Ctrl + G > Especial > marca Fórmulas > Aceptar para seleccionar todas las celdas de fórmulas al instante.Ve a Inicio > Formato > Formato de celdas o presiona Ctrl + 1 para abrir Formato de celdas.
En la pestaña Protección, marca Oculta y luego haz clic en Aceptar.
Ve a Revisar > Proteger hoja, establece una contraseña (opcional) y haz clic en Aceptar.
Una vez protegida la hoja, los valores calculados permanecen visibles, pero la barra de fórmulas aparece vacía cuando se selecciona una celda de fórmula oculta.
⚠️ Nota:
Proteger una hoja en Excel bloquea todas las celdas de forma predeterminada. Si tus clientes necesitan introducir datos en celdas específicas que no contienen fórmulas, selecciona esas celdas de entrada antes de proteger la hoja, luego presiona Ctrl + 1 para abrir Formato de celdas, cambia a la pestaña Protección y desmarca Bloqueada.
La protección de hojas está destinada a controlar la edición de la hoja y la visibilidad de las fórmulas, más que a proporcionar un cifrado sólido del archivo.
Método 2: Convertir fórmulas en valores estáticos
Ideal para: Informes finalizados en los que los cálculos están completos y los usuarios ya no necesitan actualizaciones dinámicas en vivo.
Instrucciones paso a paso
Selecciona las celdas de fórmulas que quieras convertir.
Copia las celdas presionando Ctrl + C.
Haz clic derecho en la misma área seleccionada.
En Opciones de pegado, selecciona el icono Valores (parece un portapapeles con 123).
También puedes usar el atajo de teclado:
Ctrl + C > Ctrl + Alt + V > V > Enter
Después de la conversión, los resultados mostrados siguen siendo los mismos, pero las fórmulas se eliminan.
⚠️ Nota: Este método elimina permanentemente las fórmulas de las celdas seleccionadas y deja solo sus valores actuales. Si es posible que el libro tenga que recalcularse más adelante, conserva una copia original antes de reemplazar las fórmulas.
Método 3: Ocultar fórmulas deshabilitando la barra de fórmulas
Ideal para: Ocultar temporalmente las cadenas de fórmulas de la vista durante compartir pantalla, presentaciones en vivo o grabaciones de video, sin cambiar la protección de la hoja ni las propiedades de las celdas.
Pasos
Haz clic en la pestaña Vista en la cinta de opciones superior.
Desmarca Barra de fórmulas.
Ten en cuenta que esto en realidad no oculta las fórmulas almacenadas en el libro. Solo cambia la interfaz de Excel en tu equipo. Si compartes el libro, otros usuarios aún pueden ver las fórmulas volviendo a habilitar la barra de fórmulas.
Método 4: Usar VBA para ocultar fórmulas de Excel automáticamente
Ideal para: Automatizar tareas de ocultación o eliminación de fórmulas directamente dentro de Excel sin actualizar manualmente cada hoja de cálculo.
Pasos de configuración
Presiona Alt + F11 para abrir el Editor de VBA.
Haz clic en Insertar > Módulo en el menú superior.
Agrega una de las siguientes macros en la ventana del módulo.
Presiona F5 para ejecutar la macro.
Guarda el libro como Libro habilitado para macros (.xlsm) si necesitas conservar las macros.
Opción A: Ocultar fórmulas y proteger todas las hojas de cálculo
Sub HideFormulasAllSheets()

    Dim ws As Worksheet

    For Each ws In ActiveWorkbook.Worksheets
        ws.Cells.FormulaHidden = True
        ws.Protect Password:="YourPasswordHere"
    Next ws

End Sub
Esto oculta las fórmulas manteniéndolas funcionales.
Opción B: Convertir fórmulas en valores
Debido a que esta operación no se puede deshacer después de guardar y cerrar el libro, trabaja sobre una copia si es posible que necesites las fórmulas originales más adelante.
Sub ConvertFormulasToValues()

    Dim ws As Worksheet

    For Each ws In ActiveWorkbook.Worksheets
        ws.UsedRange.Value = ws.UsedRange.Value
    Next ws

End Sub
Esto reemplaza permanentemente las fórmulas por sus valores calculados.
Método 5: Ocultar fórmulas de Excel mediante programación con C#
Ideal para: Desarrolladores que necesitan automatizar la ocultación o eliminación de fórmulas de Excel, o el procesamiento de libros, sin instalar Microsoft Office.
Requisitos previos
Los siguientes ejemplos usan Free Spire.XLS for .NET para manipular libros de Excel mediante programación sin depender de Microsoft Office ni de Excel Interop.
Instala el paquete mediante la consola del Administrador de paquetes NuGet antes de ejecutar los ejemplos:
Install-Package FreeSpire.XLS
Opción A: Ocultar fórmulas y proteger hojas de cálculo
El siguiente ejemplo muestra cómo ocultar fórmulas y proteger hojas de cálculo en C#:
using Spire.Xls;

namespace HideFormulas
{
    class Program
    {
        static void Main(string[] args)
        {
            using (Workbook workbook = new Workbook())
            {
                workbook.LoadFromFile("Report.xlsx");

                foreach (Worksheet sheet in workbook.Worksheets)
                {
                    sheet.AllocatedRange.IsFormulaHidden = true;
                    sheet.Protect("YourPassword");
                }

                workbook.SaveToFile("Report_Protected.xlsx", ExcelVersion.Version2016);
            }
        }
    }
}
Opción B: Reemplazar fórmulas por valores calculados
El siguiente ejemplo muestra cómo eliminar fórmulas y conservar los valores calculados en C#:
using System;
using Spire.Xls;

namespace ReplaceFormulas
{
    class Program
    {
        static void Main(string[] args)
        {
            using (Workbook workbook = new Workbook())
            {
                workbook.LoadFromFile("FinancialModel.xlsx");

                // Recalculate all formulas before replacing them with static values
                workbook.CalculateAllValue();

                foreach (Worksheet sheet in workbook.Worksheets)
                {
                    foreach (CellRange cell in sheet.AllocatedRange)
                    {
                        if (cell.HasFormula)
                        {
                            // Store the calculated result
                            Object value = cell.FormulaValue;
                            // Remove the formula while preserving formatting
                            cell.Clear(ExcelClearOptions.ClearContent);
                            // Write the calculated value back to the cell
                            cell.Value2 = value;
                        }
                    }
                }

                workbook.SaveToFile("FinancialModel_Flattened.xlsx", ExcelVersion.Version2016);
            }
        }
    }
}
Nota: La versión gratuita se puede usar para escenarios básicos de procesamiento de Excel. Para funciones avanzadas como convertir libros grandes de Excel a PDF, consulta el paquete completo Spire.XLS.
Problemas comunes y soluciones rápidas
La casilla Oculta está marcada, pero las fórmulas siguen visibles:
Ve a Revisar > Proteger hoja. La propiedad Oculta no surte efecto hasta que la protección de la hoja se habilita activamente.Los usuarios no pueden introducir datos después de proteger la hoja:
Desprotege la hoja mediante Revisar > Desproteger hoja, selecciona tus celdas de entrada, presiona Ctrl + 1 para abrir Formato de celdas > Protección y desmarca Bloqueada. Si el botón Desproteger hoja no está disponible, desactiva la función Libro compartido.Las fórmulas siguen visibles después de compartir el libro:
Ocultar la barra de fórmulas solo cambia la configuración de vista local. Protege la hoja o convierte las fórmulas en valores estáticos antes de compartir externamente.
Para terminar
Ocultar fórmulas en Excel te permite mostrar los resultados calculados mientras mantienes la lógica subyacente oculta de la barra de fórmulas.
Recuerda que la propiedad de celda Oculta solo surte efecto después de habilitar la protección de la hoja. Si ya no se necesitan las fórmulas, se pueden convertir en valores estáticos.
Para el procesamiento repetido en varias hojas o archivos, las mismas tareas se pueden automatizar con VBA o C#.
Preguntas frecuentes (FAQ)
P: ¿Ocultar fórmulas afectará a los cálculos de Excel?
R: No. Las fórmulas ocultas siguen funcionando normalmente en segundo plano. Excel seguirá calculando las ecuaciones, actualizando los resultados y mostrando los valores actualizados cuando cambien las celdas de entrada.
P: ¿Cómo vuelvo a mostrar las fórmulas ocultas en Excel?
R: Para restaurar la visibilidad de las fórmulas:
Ve a la pestaña Revisar en la cinta de opciones superior.
Selecciona Desproteger hoja e introduce tu contraseña si se te solicita.
Selecciona tus celdas de fórmulas y presiona Ctrl + 1 para abrir Formato de celdas.
Ve a la pestaña Protección, desmarca la casilla Oculta y haz clic en Aceptar.
P: ¿Puedo ocultar fórmulas sin proteger una hoja de cálculo?
R: No con la configuración Oculta a nivel de celda de Excel. La propiedad Oculta solo surte efecto después de habilitar la protección de la hoja. Puedes ocultar la barra de fórmulas sin proteger la hoja, pero esto solo cambia la interfaz local de Excel y no protege las fórmulas.
P: ¿Se pueden ocultar las fórmulas de Excel sin eliminarlas?
R: Sí. Las fórmulas de Excel se pueden ocultar sin eliminar su funcionalidad. El método más común es usar Proteger hoja con la opción Oculta habilitada. Si necesitas eliminar permanentemente las fórmulas, puedes convertirlas en valores estáticos en su lugar.
Excel-Formeln ausblenden: 5 Möglichkeiten zum Schutz von Formeln in Excel
Inhaltsverzeichnis
- Schnellauswahl-Leitfaden
- Methode 1: Formeln mithilfe von Excels Funktion „Blatt schützen“ ausblenden
- Methode 2: Formeln in statische Werte umwandeln
- Methode 3: Formeln durch Deaktivieren der Bearbeitungsleiste ausblenden
- Methode 4: VBA verwenden, um Excel-Formeln automatisch auszublenden
- Methode 5: Excel-Formeln programmgesteuert mit C# ausblenden
- Häufige Probleme und schnelle Lösungen
- Fazit
- Häufig gestellte Fragen (FAQs)
Wenn Sie Finanzberichte, Geschäftsvorlagen oder Arbeitsblätter für Datenanalysen weitergeben, möchten Sie möglicherweise nicht, dass andere Benutzer die hinter den Ergebnissen stehenden Formeln einfach anzeigen oder ändern können. Das Ausblenden von Formeln trägt dazu bei, die zugrunde liegenden Berechnungen aus dem Blickfeld zu halten, während ihre Ergebnisse weiterhin angezeigt werden.
In diesem Artikel lernen Sie fünf praktische Möglichkeiten kennen, Excel-Formeln auszublenden, von integrierten Optionen für schnelle manuelle Korrekturen bis hin zu VBA und C# für die automatisierte Verarbeitung.
Schnellauswahl-Leitfaden
Excel bietet je nach Ziel mehrere Möglichkeiten, Formeln auszublenden. Wählen Sie anhand der folgenden Tabelle die am besten geeignete Methode aus:
| Was Sie tun möchten | Empfohlene Methode | Einschränkung |
|---|---|---|
| Formeln ausblenden, aber Berechnungen weiterhin funktionieren lassen | Blatt schützen | Eingabezellen müssen vor dem Schutz entsperrt werden |
| Formeln entfernen, bevor eine endgültige Datei weitergegeben wird | In Werte umwandeln | Ursprüngliche Formeln können nicht wiederhergestellt werden |
| Formeln während einer Live-Präsentation vorübergehend ausblenden | Bearbeitungsleiste deaktivieren | Blendet Formeln nur auf Ihrem Bildschirm aus |
| Automatisieren des Ausblendens oder Entfernens von Formeln in Excel | VBA-Makro | Erfordert eine makrofähige Datei (.xlsm) |
| Excel-Formeln programmgesteuert ohne Microsoft Office verarbeiten | C#-Automatisierung | Erfordert Programmierkenntnisse |
Methode 1: Formeln mithilfe von Excels Funktion „Blatt schützen“ ausblenden
Am besten geeignet für: Arbeitsblätter, in denen Benutzer Daten eingeben müssen, aber Sie verhindern möchten, dass sie die zugrunde liegenden Formeln anzeigen oder die Formelzellen bearbeiten.
Schritt-für-Schritt-Anleitung
Wählen Sie die Formelzellen aus, die Sie ausblenden möchten.
Profi-Tipp: Drücken Sie Ctrl + G > Inhalt > aktivieren Sie Formeln > OK, um alle Formelzellen sofort auszuwählen.Wechseln Sie zu Start > Format > Zellen formatieren oder drücken Sie Ctrl + 1, um Zellen formatieren zu öffnen.
Aktivieren Sie auf der Registerkarte Schutz das Kontrollkästchen Ausgeblendet, und klicken Sie dann auf OK.
Wechseln Sie zu Überprüfen > Blatt schützen, legen Sie ein Kennwort fest (optional), und klicken Sie auf OK.
Sobald das Blatt geschützt ist, bleiben die berechneten Werte sichtbar, aber die Bearbeitungsleiste ist leer, wenn eine Zelle mit ausgeblendeter Formel ausgewählt wird.
⚠️ Hinweis:
Beim Schutz eines Blatts in Excel werden standardmäßig alle Zellen gesperrt. Wenn Ihre Kunden Daten in bestimmte Nicht-Formel-Zellen eingeben müssen, wählen Sie diese Eingabezellen aus, bevor Sie das Blatt schützen, drücken Sie dann Ctrl + 1, um Zellen formatieren zu öffnen, wechseln Sie zur Registerkarte Schutz, und deaktivieren Sie Gesperrt.
Der Arbeitsblattschutz soll die Bearbeitung von Arbeitsblättern und die Sichtbarkeit von Formeln steuern und nicht eine starke Dateiverschlüsselung bieten.
Methode 2: Formeln in statische Werte umwandeln
Am besten geeignet für: Fertiggestellte Berichte, bei denen die Berechnungen abgeschlossen sind und Benutzer keine Live-, dynamischen Aktualisierungen mehr benötigen.
Schritt-für-Schritt-Anleitung
Wählen Sie die Formelzellen aus, die Sie umwandeln möchten.
Kopieren Sie die Zellen, indem Sie Ctrl + C drücken.
Klicken Sie mit der rechten Maustaste auf denselben ausgewählten Bereich.
Wählen Sie unter Einfügeoptionen das Symbol Werte aus (sieht aus wie eine Zwischenablage mit 123).
Sie können auch die Tastenkombination verwenden:
Ctrl + C > Ctrl + Alt + V > V > Enter
Nach der Umwandlung bleiben die angezeigten Ergebnisse gleich, aber die Formeln werden entfernt.
⚠️ Hinweis: Diese Methode löscht die Formeln dauerhaft aus den ausgewählten Zellen und hinterlässt nur ihre aktuellen Werte. Wenn die Arbeitsmappe später möglicherweise neu berechnet werden muss, bewahren Sie vor dem Ersetzen der Formeln eine Originalkopie auf.
Methode 3: Formeln durch Deaktivieren der Bearbeitungsleiste ausblenden
Am besten geeignet für: Formelzeichenfolgen während Bildschirmfreigaben, Live-Präsentationen oder Videoaufzeichnungen vorübergehend auszublenden, ohne den Blattschutz oder Zelleneigenschaften zu ändern.
Schritte
Klicken Sie auf die Registerkarte Ansicht im oberen Menüband.
Deaktivieren Sie Bearbeitungsleiste.
Beachten Sie, dass dadurch die in der Arbeitsmappe gespeicherten Formeln nicht tatsächlich ausgeblendet werden. Es ändert nur die Excel-Oberfläche auf Ihrem Computer. Wenn Sie die Arbeitsmappe weitergeben, können andere Benutzer die Formeln weiterhin anzeigen, indem sie die Bearbeitungsleiste wieder aktivieren.
Methode 4: VBA verwenden, um Excel-Formeln automatisch auszublenden
Am besten geeignet für: Automatisieren von Aufgaben zum Ausblenden oder Entfernen von Formeln direkt in Excel, ohne jedes Arbeitsblatt manuell aktualisieren zu müssen.
Einrichtungsschritte
Drücken Sie Alt + F11, um den VBA-Editor zu öffnen.
Klicken Sie im oberen Menü auf Einfügen > Modul.
Fügen Sie eines der folgenden Makros in das Modulfenster ein.
Drücken Sie F5, um das Makro auszuführen.
Speichern Sie die Arbeitsmappe als makrofähige Arbeitsmappe (.xlsm), wenn Sie die Makros behalten möchten.
Option A: Formeln ausblenden und alle Arbeitsblätter schützen
Sub HideFormulasAllSheets()

    Dim ws As Worksheet

    For Each ws In ActiveWorkbook.Worksheets
        ws.Cells.FormulaHidden = True
        ws.Protect Password:="YourPasswordHere"
    Next ws

End Sub
Dadurch werden Formeln ausgeblendet, bleiben aber funktionsfähig.
Option B: Formeln in Werte umwandeln
Da dieser Vorgang nach dem Speichern und Schließen der Arbeitsmappe nicht rückgängig gemacht werden kann, arbeiten Sie mit einer Kopie, wenn Sie die ursprünglichen Formeln später möglicherweise benötigen.
Sub ConvertFormulasToValues()

    Dim ws As Worksheet

    For Each ws In ActiveWorkbook.Worksheets
        ws.UsedRange.Value = ws.UsedRange.Value
    Next ws

End Sub
Dadurch werden Formeln dauerhaft durch ihre berechneten Werte ersetzt.
Methode 5: Excel-Formeln programmgesteuert mit C# ausblenden
Am besten geeignet für: Entwickler, die das Ausblenden oder Entfernen von Excel-Formeln oder die Verarbeitung von Arbeitsmappen automatisieren müssen, ohne Microsoft Office zu installieren.
Voraussetzungen
Die folgenden Beispiele verwenden Free Spire.XLS for .NET, um Excel-Arbeitsmappen programmgesteuert zu bearbeiten, ohne auf Microsoft Office oder Excel Interop angewiesen zu sein.
Installieren Sie das Paket über die NuGet-Paket-Manager-Konsole, bevor Sie die Beispiele ausführen:
Install-Package FreeSpire.XLS
Option A: Formeln ausblenden und Arbeitsblätter schützen
Das folgende Beispiel zeigt, wie Sie Formeln ausblenden und Arbeitsblätter in C# schützen:
using Spire.Xls;

namespace HideFormulas
{
    class Program
    {
        static void Main(string[] args)
        {
            using (Workbook workbook = new Workbook())
            {
                workbook.LoadFromFile("Report.xlsx");

                foreach (Worksheet sheet in workbook.Worksheets)
                {
                    sheet.AllocatedRange.IsFormulaHidden = true;
                    sheet.Protect("YourPassword");
                }

                workbook.SaveToFile("Report_Protected.xlsx", ExcelVersion.Version2016);
            }
        }
    }
}
Option B: Formeln durch berechnete Werte ersetzen
Das folgende Beispiel zeigt, wie Sie Formeln entfernen und berechnete Werte in C# beibehalten:
using System;
using Spire.Xls;

namespace ReplaceFormulas
{
    class Program
    {
        static void Main(string[] args)
        {
            using (Workbook workbook = new Workbook())
            {
                workbook.LoadFromFile("FinancialModel.xlsx");

                // Recalculate all formulas before replacing them with static values
                workbook.CalculateAllValue();

                foreach (Worksheet sheet in workbook.Worksheets)
                {
                    foreach (CellRange cell in sheet.AllocatedRange)
                    {
                        if (cell.HasFormula)
                        {
                            // Store the calculated result
                            Object value = cell.FormulaValue;
                            // Remove the formula while preserving formatting
                            cell.Clear(ExcelClearOptions.ClearContent);
                            // Write the calculated value back to the cell
                            cell.Value2 = value;
                        }
                    }
                }

                workbook.SaveToFile("FinancialModel_Flattened.xlsx", ExcelVersion.Version2016);
            }
        }
    }
}
Hinweis: Die kostenlose Version kann für grundlegende Excel-Verarbeitungsszenarien verwendet werden. Für erweiterte Funktionen wie das Konvertieren großer Excel-Arbeitsmappen in PDF sehen Sie sich das vollständige Spire.XLS-Paket an.
Häufige Probleme und schnelle Lösungen
Das Kontrollkästchen Ausgeblendet ist aktiviert, aber Formeln sind weiterhin sichtbar:
Wechseln Sie zu Überprüfen > Blatt schützen. Die Eigenschaft Ausgeblendet wird erst wirksam, wenn der Blattschutz aktiviert wurde.Benutzer können nach dem Schutz des Blatts keine Daten eingeben:
Heben Sie den Schutz des Blatts über Überprüfen > Blattschutz aufheben auf, wählen Sie Ihre Eingabezellen aus, drücken Sie Ctrl + 1, um Zellen formatieren > Schutz zu öffnen, und deaktivieren Sie Gesperrt. Wenn die Schaltfläche Blattschutz aufheben nicht verfügbar ist, deaktivieren Sie die Funktion Freigegebene Arbeitsmappe.Formeln sind nach dem Freigeben der Arbeitsmappe weiterhin sichtbar:
Das Ausblenden der Bearbeitungsleiste ändert nur Ihre lokalen Ansichtseinstellungen. Schützen Sie das Blatt oder wandeln Sie Formeln in statische Werte um, bevor Sie extern freigeben.
Zusammenfassung
Durch das Ausblenden von Formeln in Excel können Sie berechnete Ergebnisse anzeigen und gleichzeitig die zugrunde liegende Logik vor der Bearbeitungsleiste verbergen.
Denken Sie daran, dass die Zelleneigenschaft Ausgeblendet erst wirksam wird, nachdem der Arbeitsblattschutz aktiviert wurde. Wenn Formeln nicht mehr benötigt werden, können sie stattdessen in statische Werte umgewandelt werden.
Für wiederholte Verarbeitung über mehrere Arbeitsblätter oder Dateien hinweg können dieselben Aufgaben mit VBA oder C# automatisiert werden.
Häufig gestellte Fragen (FAQs)
F: Beeinflusst das Ausblenden von Formeln die Excel-Berechnungen?
A: Nein. Ausgeblendete Formeln funktionieren im Hintergrund weiterhin normal. Excel berechnet weiterhin Gleichungen, aktualisiert Ausgaben und zeigt aktualisierte Werte an, wenn sich Eingabezellen ändern.
F: Wie zeige ich ausgeblendete Formeln in Excel wieder an?
A: So stellen Sie die Sichtbarkeit von Formeln wieder her:
Wechseln Sie zur Registerkarte Überprüfen im oberen Menüband.
Wählen Sie Blattschutz aufheben und geben Sie Ihr Kennwort ein, wenn Sie dazu aufgefordert werden.
Wählen Sie Ihre Formelzellen aus, und drücken Sie Ctrl + 1, um Zellen formatieren zu öffnen.
Wechseln Sie zur Registerkarte Schutz, deaktivieren Sie das Kontrollkästchen Ausgeblendet, und klicken Sie auf OK.
F: Kann ich Formeln ausblenden, ohne ein Arbeitsblatt zu schützen?
A: Nicht mit Excels zellbasierter Einstellung „Ausgeblendet“. Die Eigenschaft Ausgeblendet wird erst wirksam, nachdem der Arbeitsblattschutz aktiviert wurde. Sie können die Bearbeitungsleiste ausblenden, ohne das Blatt zu schützen, aber dies ändert nur die lokale Excel-Oberfläche und schützt die Formeln nicht.
F: Können Excel-Formeln ausgeblendet werden, ohne sie zu entfernen?
A: Ja. Excel-Formeln können ausgeblendet werden, ohne ihre Funktionalität zu entfernen. Die gebräuchlichste Methode ist die Verwendung von „Blatt schützen“ mit aktivierter Option „Ausgeblendet“. Wenn Sie Formeln dauerhaft entfernen müssen, können Sie sie stattdessen in statische Werte umwandeln.
Как скрыть формулы Excel: 5 способов защитить формулы в Excel
Содержание
- Краткое руководство по выбору
- Метод 1: Использование функции защиты листа Excel
- Метод 2: Преобразование формул в статические значения
- Метод 3: Скрытие формул путем отключения строки формул
- Метод 4: Использование VBA для автоматического скрытия формул Excel
- Метод 5: Программное скрытие формул Excel с помощью C#
- Распространенные проблемы и быстрые решения
- Заключение
- Часто задаваемые вопросы (FAQ)
- Краткое руководство по выбору
- Метод 1: Скрытие формул с помощью функции защиты листа Excel
- Метод 2: Преобразование формул в статические значения
- Метод 3: Скрытие формул путем отключения строки формул
- Метод 4: Использование VBA для автоматического скрытия формул Excel
- Метод 5: Программное скрытие формул Excel с помощью C#
- Распространенные проблемы и быстрые решения
- Заключение
- Часто задаваемые вопросы (FAQ)
Если вы делитесь финансовыми отчетами, бизнес-шаблонами или рабочими листами анализа данных, вы можете не хотеть, чтобы другие пользователи могли легко просматривать или изменять формулы, стоящие за результатами. Скрытие формул помогает держать основные вычисления вне поля зрения, при этом по-прежнему отображая их результаты.
В этой статье вы узнаете пять практических способов скрыть формулы Excel, от встроенных параметров для быстрого ручного исправления до VBA и C# для автоматизированной обработки.
Краткое руководство по выбору
Excel предоставляет несколько способов скрыть формулы в зависимости от вашей цели. Используйте таблицу ниже, чтобы выбрать наиболее подходящий метод:
| Что вы хотите сделать | Рекомендуемый метод | Ограничение |
|---|---|---|
| Скрыть формулы, но сохранить работу вычислений | Защита листа | Ячейки для ввода должны быть разблокированы перед защитой |
| Удалить формулы перед отправкой итогового файла | Преобразование в значения | Исходные формулы невозможно восстановить |
| Временно скрыть формулы во время живой презентации | Отключение строки формул | Скрывает формулы только на вашем экране |
| Автоматизировать скрытие или удаление формул в Excel | Макрос VBA | Требуется файл с поддержкой макросов (.xlsm) |
| Программно обрабатывать формулы Excel без Microsoft Office | Автоматизация на C# | Требуются знания программирования |
Метод 1: Скрытие формул с помощью функции защиты листа Excel
Лучше всего подходит для: рабочих листов, где пользователям нужно вводить данные, но вы хотите запретить им просматривать основные формулы или редактировать ячейки с формулами.
Пошаговые инструкции
Выберите ячейки с формулами, которые вы хотите скрыть.
Совет: нажмите Ctrl + G > Выделить группу ячеек > установите флажок Формулы > OK, чтобы мгновенно выбрать все ячейки с формулами.Перейдите на вкладку Главная > Формат > Формат ячеек или нажмите Ctrl + 1, чтобы открыть окно Формат ячеек.
На вкладке Защита установите флажок Скрыть формулы, затем нажмите OK.
Перейдите на вкладку Рецензирование > Защитить лист, задайте пароль (необязательно) и нажмите OK.
После защиты листа вычисленные значения остаются видимыми, но строка формул пуста, когда выбрана ячейка со скрытой формулой.
⚠️ Примечание:
Защита листа в Excel по умолчанию блокирует все ячейки. Если вашим клиентам нужно вводить данные в определенные ячейки без формул, выберите эти ячейки для ввода перед защитой листа, затем нажмите Ctrl + 1, чтобы открыть окно Формат ячеек, перейдите на вкладку Защита и снимите флажок Защищаемая ячейка.
Защита листа предназначена для управления редактированием листа и видимостью формул, а не для обеспечения надежного шифрования файла.
Метод 2: Преобразование формул в статические значения
Лучше всего подходит для: завершенных отчетов, в которых вычисления выполнены, и пользователям больше не нужны живые динамические обновления.
Пошаговые инструкции
Выберите ячейки с формулами, которые вы хотите преобразовать.
Скопируйте ячейки, нажав Ctrl + C.
Щелкните правой кнопкой мыши ту же выделенную область.
В разделе Параметры вставки выберите значок Значения (выглядит как буфер обмена с 123).
Вы также можете использовать сочетание клавиш:
Ctrl + C > Ctrl + Alt + V > V > Enter
После преобразования отображаемые результаты остаются прежними, но формулы удаляются.
⚠️ Примечание: этот метод безвозвратно удаляет формулы из выбранных ячеек и оставляет только их текущие значения. Если книгу может потребоваться пересчитать позже, сохраните исходную копию перед заменой формул.
Метод 3: Скрытие формул путем отключения строки формул
Лучше всего подходит для: временного скрытия строк формул из вида во время демонстрации экрана, живых презентаций или видеозаписей без изменения защиты листа или свойств ячеек.
Шаги
Откройте вкладку Вид на верхней ленте.
Снимите флажок Строка формул.
Обратите внимание: на самом деле это не скрывает формулы, хранящиеся в книге. Это изменяет только интерфейс Excel на вашем компьютере. Если вы поделитесь книгой, другие пользователи по-прежнему смогут просмотреть формулы, снова включив строку формул.
Метод 4: Использование VBA для автоматического скрытия формул Excel
Лучше всего подходит для: автоматизации задач скрытия или удаления формул непосредственно в Excel без ручного обновления каждого рабочего листа.
Шаги настройки
Нажмите Alt + F11, чтобы открыть редактор VBA.
В верхнем меню выберите Вставка > Модуль.
Добавьте один из следующих макросов в окно модуля.
Нажмите F5, чтобы запустить макрос.
Сохраните книгу как книгу с поддержкой макросов (.xlsm), если вам нужно сохранить макросы.
Вариант A: Скрыть формулы и защитить все рабочие листы
Sub HideFormulasAllSheets()

    Dim ws As Worksheet

    For Each ws In ActiveWorkbook.Worksheets
        ws.Cells.FormulaHidden = True
        ws.Protect Password:="YourPasswordHere"
    Next ws

End Sub
Это скрывает формулы, сохраняя их работоспособность.
Вариант B: Преобразовать формулы в значения
Поскольку эту операцию нельзя отменить после сохранения и закрытия книги, работайте с копией, если исходные формулы могут понадобиться позже.
Sub ConvertFormulasToValues()

    Dim ws As Worksheet

    For Each ws In ActiveWorkbook.Worksheets
        ws.UsedRange.Value = ws.UsedRange.Value
    Next ws

End Sub
Это безвозвратно заменяет формулы их вычисленными значениями.
Метод 5: Программное скрытие формул Excel с помощью C#
Лучше всего подходит для: разработчиков, которым нужно автоматизировать скрытие, удаление формул Excel или обработку книг без установки Microsoft Office.
Предварительные требования
В следующих примерах используется Free Spire.XLS for .NET для программной работы с книгами Excel без зависимости от Microsoft Office или Excel Interop.
Установите пакет через консоль диспетчера пакетов NuGet перед запуском примеров:
Install-Package FreeSpire.XLS
Вариант A: Скрыть формулы и защитить рабочие листы
В следующем примере показано, как скрыть формулы и защитить рабочие листы в C#:
using Spire.Xls;

namespace HideFormulas
{
    class Program
    {
        static void Main(string[] args)
        {
            using (Workbook workbook = new Workbook())
            {
                workbook.LoadFromFile("Report.xlsx");

                foreach (Worksheet sheet in workbook.Worksheets)
                {
                    sheet.AllocatedRange.IsFormulaHidden = true;
                    sheet.Protect("YourPassword");
                }

                workbook.SaveToFile("Report_Protected.xlsx", ExcelVersion.Version2016);
            }
        }
    }
}
Вариант B: Заменить формулы вычисленными значениями
В следующем примере показано, как удалить формулы, сохранив вычисленные значения, в C#:
using System;
using Spire.Xls;

namespace ReplaceFormulas
{
    class Program
    {
        static void Main(string[] args)
        {
            using (Workbook workbook = new Workbook())
            {
                workbook.LoadFromFile("FinancialModel.xlsx");

                // Recalculate all formulas before replacing them with static values
                workbook.CalculateAllValue();

                foreach (Worksheet sheet in workbook.Worksheets)
                {
                    foreach (CellRange cell in sheet.AllocatedRange)
                    {
                        if (cell.HasFormula)
                        {
                            // Store the calculated result
                            Object value = cell.FormulaValue;
                            // Remove the formula while preserving formatting
                            cell.Clear(ExcelClearOptions.ClearContent);
                            // Write the calculated value back to the cell
                            cell.Value2 = value;
                        }
                    }
                }

                workbook.SaveToFile("FinancialModel_Flattened.xlsx", ExcelVersion.Version2016);
            }
        }
    }
}
Примечание: бесплатную версию можно использовать для базовых сценариев обработки Excel. Для расширенных возможностей, таких как преобразование больших книг Excel в PDF, ознакомьтесь с полным пакетом Spire.XLS.
Распространенные проблемы и быстрые решения
Флажок «Скрыть формулы» установлен, но формулы все еще видны:
Перейдите в Рецензирование > Защитить лист. Свойство Скрыть формулы не вступает в силу, пока защита листа не включена.Пользователи не могут вводить данные после защиты листа:
Снимите защиту листа через Рецензирование > Снять защиту листа, выберите ячейки для ввода, нажмите Ctrl + 1, чтобы открыть Формат ячеек > Защита, и снимите флажок Защищаемая ячейка. Если кнопка «Снять защиту листа» недоступна, отключите функцию Общая книга.Формулы все еще видны после предоставления доступа к книге:
Скрытие строки формул изменяет только локальные параметры просмотра. Защитите лист или преобразуйте формулы в статические значения перед внешним предоставлением доступа.
Заключение
Скрытие формул в Excel позволяет отображать вычисленные результаты, сохраняя при этом основную логику скрытой от строки формул.
Помните, что свойство скрытия формул ячейки вступает в силу только после включения защиты листа. Если формулы больше не нужны, их можно вместо этого преобразовать в статические значения.
Для повторяющейся обработки на нескольких листах или в файлах те же задачи можно автоматизировать с помощью VBA или C#.
Часто задаваемые вопросы (FAQ)
Вопрос: Повлияет ли скрытие формул на вычисления Excel?
Ответ: Нет. Скрытые формулы продолжают нормально работать в фоновом режиме. Excel по-прежнему будет вычислять уравнения, обновлять выходные данные и отображать обновленные значения при изменении ячеек для ввода.
Вопрос: Как снова показать скрытые формулы в Excel?
Ответ: Чтобы восстановить видимость формул:
Перейдите на вкладку Рецензирование на верхней ленте.
Выберите Снять защиту листа и введите пароль, если появится запрос.
Выберите ячейки с формулами и нажмите Ctrl + 1, чтобы открыть окно Формат ячеек.
Перейдите на вкладку Защита, снимите флажок Скрыть формулы и нажмите OK.
Вопрос: Можно ли скрыть формулы без защиты рабочего листа?
Ответ: Нет, с помощью настройки Скрыть формулы на уровне ячейки Excel. Свойство Скрыть формулы вступает в силу только после включения защиты листа. Вы можете скрыть строку формул без защиты листа, но это изменяет только локальный интерфейс Excel и не защищает формулы.
Вопрос: Можно ли скрыть формулы Excel, не удаляя их?
Ответ: Да. Формулы Excel можно скрыть, не удаляя их функциональность. Самый распространенный метод — использовать защиту листа с включенным параметром Скрыть формулы. Если вам нужно навсегда удалить формулы, вместо этого их можно преобразовать в статические значения.
How to Hide Excel Formulas: 5 Ways to Protect Formulas in Excel
Table of Contents
- Quick Selection Guide
- Method 1: Hide Formulas Using Excel’s Protect Sheet Feature
- Method 2: Convert Formulas to Static Values
- Method 3: Hide Formulas by Disabling the Formula Bar
- Method 4: Use VBA to Hide Excel Formulas Automatically
- Method 5: Programmatically Hide Excel Formulas with C#
- Common Issues and Quick Fixes
- Conclusion
- Frequently Asked Questions (FAQs)
If you share financial reports, business templates, or data analysis worksheets, you may not want other users to easily view or modify the formulas behind the results. Hiding formulas helps keep the underlying calculations out of view while still displaying their results.
In this article, you will learn five practical ways to hide Excel formulas, from built-in options for quick manual fixes to VBA and C# for automated processing.
Quick Selection Guide
Excel provides several ways to hide formulas depending on your goal. Use the table below to choose the most suitable method:
| What you want to do | Recommended Method | Limitation |
|---|---|---|
| Hide formulas but keep calculations working | Protect Sheet | Input cells must be unlocked before protection |
| Remove formulas before sharing a final file | Convert to Values | Original formulas cannot be restored |
| Temporarily hide formulas during live presentation | Disable Formula Bar | Only hides formulas on your screen |
| Automate formula hiding or removal inside Excel | VBA Macro | Requires a macro-enabled (.xlsm) file |
| Programmatically process Excel formulas without Microsoft Office | C# Automation | Requires programming knowledge |
Method 1: Hide Formulas Using Excel’s Protect Sheet Feature
Best for: Worksheets where users need to input data, but you want to prevent them from viewing the underlying formulas or editing the formula cells.
Step-by-Step Instructions
Select the formula cells you want to hide.
Pro-Tip: Press Ctrl + G > Special > check Formulas > OK to select all formula cells instantly.Go to Home > Format > Format Cells or press Ctrl + 1 to open Format Cells.
Under the Protection tab, check Hidden, then click OK.
Go to Review > Protect Sheet, set a password (optional), and click OK.
Once the sheet is protected, the calculated values remain visible, but the Formula Bar is blank when a hidden formula cell is selected.
⚠️ Note:
Protecting a sheet in Excel locks all cells by default. If your clients need to enter data in specific non-formula cells, select those input cells before protecting the sheet, then press Ctrl + 1 to open Format Cells, switch to the Protection tab, and uncheck Locked.
Worksheet protection is intended to control worksheet editing and formula visibility rather than provide strong file encryption.
Method 2: Convert Formulas to Static Values
Best for: Finalized reports where calculations are complete, and users no longer need live, dynamic updates.
Step-by-Step Instructions
Select the formula cells you want to convert.
Copy the cells by pressing Ctrl + C.
Right-click the same selected area.
Under Paste Options, select the Values icon (looks like a clipboard with 123).
You can also use the keyboard shortcut:
Ctrl + C > Ctrl + Alt + V > V > Enter
After conversion, the displayed results remain the same, but the formulas are removed.
⚠️ Note: This method permanently deletes the formulas from the selected cells and leaves only their current values. If the workbook may need to be recalculated later, keep an original copy before replacing the formulas.
Method 3: Hide Formulas by Disabling the Formula Bar
Best for: Temporarily hide formula strings from view during screen shares, live presentations, or video recordings without changing sheet protection or cell properties.
Steps
Click the View tab on the top ribbon.
Uncheck Formula Bar.
Note that this actually does not hide the formulas stored in the workbook. It only changes the Excel interface on your computer. If you share the workbook, other users can still view the formulas by enabling the Formula Bar again.
Method 4: Use VBA to Hide Excel Formulas Automatically
Best for: Automating formula hiding or formula removal tasks directly inside Excel without manually updating each worksheet.
Setup Steps
Press Alt + F11 to open the VBA Editor.
Click Insert > Module in the top menu.
Add one of the following macros into the module window.
Press F5 to run the macro.
Save the workbook as a Macro-Enabled Workbook (.xlsm) if you need to keep the macros.
Option A: Hide formulas and protect all worksheets
Sub HideFormulasAllSheets()

    Dim ws As Worksheet

    For Each ws In ActiveWorkbook.Worksheets
        ws.Cells.FormulaHidden = True
        ws.Protect Password:="YourPasswordHere"
    Next ws

End Sub
This hides formulas while keeping them functional.
Option B: Convert Formulas to Values
Because this operation cannot be undone after the workbook is saved and closed, work on a copy if you may need the original formulas later.
Sub ConvertFormulasToValues()

    Dim ws As Worksheet

    For Each ws In ActiveWorkbook.Worksheets
        ws.UsedRange.Value = ws.UsedRange.Value
    Next ws

End Sub
This permanently replaces formulas with their calculated values.
Method 5: Programmatically Hide Excel Formulas with C#
Best for: Developers who need to automate Excel formula hiding, removal, or workbook processing without installing Microsoft Office.
Prerequisites
The following examples use Free Spire.XLS for .NET to manipulate Excel workbooks programmatically without relying on Microsoft Office or Excel Interop.
Install the package through the NuGet Package Manager Console before running the examples:
Install-Package FreeSpire.XLS
Option A: Hide Formulas and Protect Worksheets
The following example shows how to hide formulas and protect worksheets in C#:
using Spire.Xls;

namespace HideFormulas
{
    class Program
    {
        static void Main(string[] args)
        {
            using (Workbook workbook = new Workbook())
            {
                workbook.LoadFromFile("Report.xlsx");

                foreach (Worksheet sheet in workbook.Worksheets)
                {
                    sheet.AllocatedRange.IsFormulaHidden = true;
                    sheet.Protect("YourPassword");
                }

                workbook.SaveToFile("Report_Protected.xlsx", ExcelVersion.Version2016);
            }
        }
    }
}
Option B: Replace formulas with calculated values
The following example shows how to remove formulas while keeping calculated values in C#:
using System;
using Spire.Xls;

namespace ReplaceFormulas
{
    class Program
    {
        static void Main(string[] args)
        {
            using (Workbook workbook = new Workbook())
            {
                workbook.LoadFromFile("FinancialModel.xlsx");

                // Recalculate all formulas before replacing them with static values
                workbook.CalculateAllValue();

                foreach (Worksheet sheet in workbook.Worksheets)
                {
                    foreach (CellRange cell in sheet.AllocatedRange)
                    {
                        if (cell.HasFormula)
                        {
                            // Store the calculated result
                            Object value = cell.FormulaValue;
                            // Remove the formula while preserving formatting
                            cell.Clear(ExcelClearOptions.ClearContent);
                            // Write the calculated value back to the cell
                            cell.Value2 = value;
                        }
                    }
                }

                workbook.SaveToFile("FinancialModel_Flattened.xlsx", ExcelVersion.Version2016);
            }
        }
    }
}
Note: The free version can be used for basic Excel processing scenarios. For advanced features like converting large Excel workbooks to PDF, check the full Spire.XLS package.
Common Issues and Quick Fixes
The Hidden box is checked, but formulas are still visible:
Go to Review > Protect Sheet. The Hidden property does not take effect until sheet protection is actively enabled.Users cannot enter data after protecting the sheet:
Unprotect the sheet via Review > Unprotect Sheet, select your input cells, press Ctrl + 1 to open Format Cells > Protection, and uncheck Locked. If the Unprotect Sheet button is unavailable, turn off the Shared Workbook feature.Formulas are still visible after sharing the workbook:
Hiding the Formula Bar only toggles your local view settings. Protect the sheet or convert formulas to static values before sharing externally.
Wrapping Up
Hiding formulas in Excel lets you display calculated results while keeping underlying logic hidden from the Formula Bar.
Remember that the Hidden cell property only takes effect after worksheet protection is enabled. If formulas are no longer needed, they can instead be converted to static values.
For repeated processing across worksheets or files, the same tasks can be automated with VBA or C#.
Frequently Asked Questions (FAQs)
Q: Will hiding formulas affect Excel calculations?
A: No. Hidden formulas continue working normally in the background. Excel will still calculate equations, update outputs, and display updated values when input cells change.
Q: How do I show hidden formulas again in Excel?
A: To restore formula visibility:
Go to the Review tab on the top ribbon.
Select Unprotect Sheet and enter your password if prompted.
Select your formula cells and press Ctrl + 1 to open Format Cells.
Go to the Protection tab, uncheck the Hidden box, and click OK.
Q: Can I hide formulas without protecting a worksheet?
A: Not with Excel's cell-level Hidden setting. The Hidden property only takes effect after worksheet protection is enabled. You can hide the Formula Bar without protecting the sheet, but this only changes the local Excel interface and does not protect the formulas.
Q: Can Excel formulas be hidden without removing them?
A: Yes. Excel formulas can be hidden without removing their functionality. The most common method is to use Protect Sheet with the Hidden option enabled. If you need to permanently remove formulas, you can convert them to static values instead.
Convert Markdown to PDF with JavaScript in React

Markdown is convenient for writing documentation, README files, notes, and other structured content. But when the content needs to be printed, archived, or shared in a fixed-layout format, PDF is often more practical.
In a React application, you can convert Markdown to PDF using Spire.Doc for JavaScript. The library runs through WebAssembly (WASM), allowing Markdown content to be processed and PDF files to be generated locally in the browser without sending files to a server.
This tutorial covers three common conversion scenarios:
- Convert a Markdown file to PDF with JavaScript
- Convert Markdown to PDF with custom page settings
- Convert a Markdown string to PDF with JavaScript
Set Up Spire.Doc for JavaScript in React
Before converting Markdown files, you need to integrate Spire.Doc for JavaScript into your React project and prepare the required WebAssembly runtime files.
For a detailed setup guide, see How to Integrate Spire.Doc for JavaScript in a React Project.
Step 1: Install the Package
Run the following command in your React project directory to install the required package from npm:
npm i spire.office
Step 2: Add the Required Runtime Files
Copy the following files and folders from node_modules/spire.office to your project's public directory:
_framework
spire.doc.js
Spire.Doc.Wasm.zip
spire.common.js
Spire.Common.Wasm.zip
The examples below also use CALIBRI.ttf for PDF text rendering. Place the font under:
public/static/font/
For file-based conversion, place the sample Markdown file under:
public/static/data/
The relevant project structure should look like this:
public/
├── _framework/
├── spire.doc.js
├── Spire.Doc.Wasm.zip
├── spire.common.js
├── Spire.Common.Wasm.zip
└── static/
    ├── data/
    │   └── MarkdownExample.md
    └── font/
        └── CALIBRI.ttf
Note: The examples use process.env.PUBLIC_URL, which follows the Create React App convention. If your project uses Vite or another build tool, adjust the public asset paths accordingly.
Convert a Markdown File to PDF with JavaScript
Converting a Markdown file to PDF involves 4 main steps:
- Load the required font and Markdown file into the WASM virtual file system (VFS).
- Call
Document.LoadFromFile()withFileFormat.Markdownto load the Markdown file into aDocumentobject. - Call
Document.SaveToFile()withFileFormat.PDFto save the loaded document as a PDF file. - Read the generated PDF from the VFS and download it in the browser.
The following JavaScript example loads a .md file and saves it as a .pdf file:
import React, { useEffect, useState } from 'react';

function App() {
  const [wasmModule, setWasmModule] = useState(null);

  // Initialize the Spire.Doc WebAssembly module
  useEffect(() => {
    (async () => {
      try {
        const publicUrl = process.env.PUBLIC_URL || '';

        const spireModule = await import(
          /* webpackIgnore: true */
          `${publicUrl}/spire.doc.js`
        );

        const rawModule = spireModule.default || spireModule;

        window.wasmModule =
          typeof rawModule === 'function'
            ? await rawModule({
                locateFile: (path) =>
                  path.endsWith('.wasm')
                    ? `${publicUrl}/${path}`
                    : path
              })
            : rawModule;

        setWasmModule(window.wasmModule);
      } catch (error) {
        console.error(
          'Failed to load the Spire.Doc WASM module:',
          error
        );
      }
    })();
  }, []);

  // Download a file generated in the WASM virtual file system
  const downloadVfsFile = (fileName, mimeType) => {
    const fileData =
      window.dotnetRuntime.Module.FS.readFile(fileName);

    const blob = new Blob(
      [fileData],
      { type: mimeType }
    );

    const url = URL.createObjectURL(blob);
    const link = document.createElement('a');

    link.href = url;
    link.download = fileName;

    document.body.appendChild(link);
    link.click();
    document.body.removeChild(link);

    URL.revokeObjectURL(url);
  };

  const convertMarkdownToPdf = async () => {
    const docModule = window.wasmModule?.spiredoc;

    if (!docModule) return;

    const publicUrl = process.env.PUBLIC_URL || '';

    // Load the font into the VFS
    await window.spire.FetchFileToVFS(
      'CALIBRI.ttf',
      '/Library/Fonts/',
      `${publicUrl}/static/font/`
    );

    const inputFileName = 'MarkdownExample.md';
    const outputFileName = 'MarkdownToPDF.pdf';

    // Load the Markdown file into the VFS
    await window.spire.FetchFileToVFS(
      inputFileName,
      '',
      `${publicUrl}/static/data/`
    );

    const doc = new docModule.Document();

    try {
      // Load the Markdown file
      doc.LoadFromFile({
        fileName: inputFileName,
        fileFormat: docModule.FileFormat.Markdown
      });

      // Save the document as PDF
      doc.SaveToFile({
        fileName: outputFileName,
        fileFormat: docModule.FileFormat.PDF
      });

      // Download the generated PDF
      downloadVfsFile(
        outputFileName,
        'application/pdf'
      );
    } finally {
      doc.Dispose();
    }
  };

  return (
    <div style={{ textAlign: 'center', padding: '40px' }}>
      <h1>Convert Markdown to PDF</h1>

      <button
        onClick={convertMarkdownToPdf}
        disabled={!wasmModule}
      >
        Convert and Download PDF
      </button>
    </div>
  );
}

export default App;
Run the application and wait for the WASM module to finish loading. Then click Convert and Download PDF. The application will load MarkdownExample.md, convert it to MarkdownToPDF.pdf, and download the generated PDF in the browser.
Output
The generated PDF preserves the main Markdown structure, including headings, paragraphs, lists, and tables:

Convert Markdown to PDF with Custom Page Settings
The default page layout may not suit every document. A Markdown report containing a wide table, for example, may work better in landscape orientation, while printable documentation may require specific page sizes or margins.
After loading the Markdown file, you can access the document section and adjust its PageSetup properties before generating the PDF.
The following example sets the first section to A4 size, landscape orientation, and 50-point margins:
const section = doc.Sections.get_Item(0);

// Set page size
section.PageSetup.PageSize =
  docModule.PageSize.A4();

// Set page orientation
section.PageSetup.Orientation =
  docModule.PageOrientation.Landscape;

// Set page margins
section.PageSetup.Margins.All = 50;
To apply these settings during Markdown-to-PDF conversion, use the following function:
const convertMarkdownToPdfWithPageSettings = async () => {
  const docModule = window.wasmModule?.spiredoc;

  if (!docModule) return;

  const publicUrl = process.env.PUBLIC_URL || '';

  // Load the font into the VFS
  await window.spire.FetchFileToVFS(
    'CALIBRI.ttf',
    '/Library/Fonts/',
    `${publicUrl}/static/font/`
  );

  const inputFileName = 'MarkdownExample.md';
  const outputFileName =
    'MarkdownToPDFWithPageSettings.pdf';

  // Load the Markdown file into the VFS
  await window.spire.FetchFileToVFS(
    inputFileName,
    '',
    `${publicUrl}/static/data/`
  );

  const doc = new docModule.Document();

  try {
    // Load the Markdown file
    doc.LoadFromFile({
      fileName: inputFileName,
      fileFormat: docModule.FileFormat.Markdown
    });

    // Get the first section
    const section = doc.Sections.get_Item(0);

    // Set page size
    section.PageSetup.PageSize =
      docModule.PageSize.A4();

    // Set landscape orientation
    section.PageSetup.Orientation =
      docModule.PageOrientation.Landscape;

    // Set all margins to 50 points
    section.PageSetup.Margins.All = 50;

    // Save the document as PDF
    doc.SaveToFile({
      fileName: outputFileName,
      fileFormat: docModule.FileFormat.PDF
    });

    // Download the generated PDF
    downloadVfsFile(
      outputFileName,
      'application/pdf'
    );
  } finally {
    doc.Dispose();
  }
};
You can adjust the page size, orientation, and margins according to the content of your Markdown document.
Convert a Markdown String to PDF with JavaScript
Markdown does not always come from a physical .md file. In a React application, the content may already exist as a string from a Markdown editor, textarea, CMS, API response, or application state.
In this case, write the Markdown string to the WASM virtual file system using FS.writeFile(), then load the virtual .md file and convert it to PDF.
const convertMarkdownStringToPdf = async () => {
  const docModule = window.wasmModule?.spiredoc;

  if (!docModule) return;

  const publicUrl = process.env.PUBLIC_URL || '';

  // Load the font into the VFS
  await window.spire.FetchFileToVFS(
    'CALIBRI.ttf',
    '/Library/Fonts/',
    `${publicUrl}/static/font/`
  );

  const markdownString = `# Project Notes

This PDF was generated from **Markdown stored in a React string**.

## Tasks

- Review the draft
- Export the final copy
- Share the PDF

## Task Status

| Item | Status |
| --- | --- |
| Draft | Done |
| Review | Pending |
`;

  const inputFileName = 'MarkdownInput.md';
  const outputFileName = 'MarkdownStringToPDF.pdf';

  // Write the Markdown string to the VFS
  window.dotnetRuntime.Module.FS.writeFile(
    inputFileName,
    markdownString,
    { encoding: 'utf8' }
  );

  const doc = new docModule.Document();

  try {
    // Load the virtual Markdown file
    doc.LoadFromFile({
      fileName: inputFileName,
      fileFormat: docModule.FileFormat.Markdown
    });

    // Save the document as PDF
    doc.SaveToFile({
      fileName: outputFileName,
      fileFormat: docModule.FileFormat.PDF
    });

    // Download the generated PDF
    downloadVfsFile(
      outputFileName,
      'application/pdf'
    );
  } finally {
    doc.Dispose();
  }
};
In an actual application, replace the sample string with the Markdown content from your existing data source:
const markdownString = editorValue;
or:
const markdownString = apiResponse.content;
The rest of the PDF conversion workflow remains the same.
Output

Why Are Fonts Loaded into the VFS?
PDF generation requires font data to render text correctly. In the examples above, CALIBRI.ttf is loaded into the WASM virtual file system before the Markdown document is processed:
await window.spire.FetchFileToVFS(
  'CALIBRI.ttf',
  '/Library/Fonts/',
  `${publicUrl}/static/font/`
);
If the Markdown contains characters that are not supported by the selected font, load an appropriate font into /Library/Fonts/ as well.
This is particularly important when generating PDFs containing Chinese, Japanese, Korean, Arabic, or other multilingual text.
FAQs
Can I Convert a User-Uploaded Markdown File to PDF?
Yes. Instead of loading a fixed .md file from the public directory, you can read the uploaded Markdown file in the browser, write its content to the WASM virtual file system, and then load it with FileFormat.Markdown. This allows users to select and convert their own Markdown files directly in a React application.
Why Are Some Characters Missing from the Generated PDF?
This usually happens when the font required to display those characters is not available in the WASM environment. Load a font that supports the characters used in your Markdown into /Library/Fonts/ before generating the PDF. This is especially important for multilingual content.
What Should I Do If a Wide Markdown Table Is Cut Off?
Try switching the page to landscape orientation, reducing the margins, or using a larger page size before saving the document as PDF.
Why Are Images in My Markdown Missing from the PDF?
Markdown usually references images through a file path or URL rather than embedding the image data directly. Make sure the image files referenced in the Markdown are available during conversion and that their paths can be resolved by the conversion environment. Relative image paths may require additional handling depending on where the Markdown and image files are stored.
Does the Markdown-to-PDF Conversion Run Locally in the Browser?
Yes. In this React implementation, Spire.Doc for JavaScript runs through WebAssembly, while the Markdown input and generated PDF are processed through the browser-side virtual file system. A backend is not required for the conversion itself, although your application may still use one for file storage, authentication, or other server-side operations.
Conclusion
This article demonstrated how to convert Markdown to PDF with JavaScript in a React application, including basic file conversion, custom page settings, and conversion from Markdown strings.
With Spire.Doc for JavaScript, developers can load Markdown content, control PDF page layout, and generate PDF files directly in the browser through WebAssembly. This approach can be used for documentation tools, Markdown editors, reporting systems, and other applications that need to export Markdown content as PDF.
Get a Free License
To fully experience the capabilities of Spire.Doc for JavaScript without any evaluation limitations, you can request a free 30-day trial license.
Converter PowerPoint para Markdown: 4 formas de transformar apresentações em texto estruturado
Índice
- Comparação Rápida: Qual Método de Conversão de PPT para Markdown Atende às Suas Necessidades?
- Método 1: Conversores Online de PPT para Markdown
- Método 2: Usar a Exibição de Tópicos do PowerPoint
- Método 3: Ferramenta de CLI pptx2md
- Método 4: Automação em C#
- Solução de Problemas Comuns de Conversão
- Perguntas Frequentes

O PowerPoint funciona muito bem para apresentações visuais, mas o conteúdo dos slides pode ser mais difícil de reutilizar em documentação técnica, wikis de equipe, bases de conhecimento pesquisáveis ou pipelines de LLM. Converter PowerPoint para Markdown transforma o conteúdo dos slides em texto estruturado que é fácil de editar, pesquisar, rastrear no Git e reutilizar em diferentes fluxos de trabalho.
Neste guia, mostraremos 4 formas práticas de converter arquivos PPT e PPTX para Markdown — desde a conversão online rápida até o processamento em lote por CLI local e a automação em C#.
- Comparação Rápida: Qual Método de Conversão de PPT para Markdown Atende às Suas Necessidades?
- Método 1: Conversores Online de PPT para Markdown
- Método 2: Usar a Exibição de Tópicos do PowerPoint
- Método 3: Ferramenta de CLI pptx2md
- Método 4: Automação em C#
- Solução de Problemas Comuns de Conversão
- Perguntas Frequentes
Comparação Rápida: Qual Método de Conversão de PPT para Markdown Atende às Suas Necessidades?
A melhor abordagem depende do que você precisa extrair dos seus slides, de quão sensíveis são seus dados e se você está convertendo um único arquivo ou processando arquivos do PowerPoint em lote.
| Método | Melhor Para | Privacidade | Configuração | Imagens |
|---|---|---|---|---|
| Conversores Online | Conversões rápidas e pontuais | Varia conforme a ferramenta | Nenhuma (baseado em navegador) | Varia conforme a ferramenta |
| Exibição de Tópicos do PowerPoint | Extração de títulos de slides e texto principal | Totalmente offline | Integrado ao PowerPoint | Somente texto (sem imagens) |
| pptx2md Python CLI | Conversão em lote local | Execução local | Requer Python | Extraídas para uma pasta |
| Automação em C# | Pipelines de RAG e integração com aplicações | Execução local | Requer desenvolvimento em .NET | Disponível via API |
1. Conversores Online de PPT para Markdown (Melhor para Conversões Rápidas e Pontuais)
Ferramentas baseadas em navegador costumam ser a opção mais rápida se você só precisa converter alguns arquivos sem instalar software ou escrever código.
Ferramentas Que Vale a Pena Experimentar
- GetMarkdown PowerPoint Converter – Processa arquivos
.pptxlocalmente no seu navegador (sem upload para um servidor) e pode empacotar as imagens extraídas em um ZIP junto com o arquivo Markdown. O plano gratuito suporta até 10 MB por arquivo e 8 arquivos por lote. - CloudConvert PPT to MD – Suporta tanto o formato legado
.pptquanto o.pptx. Os arquivos são processados nos servidores remotos do CloudConvert.
Como Usá-las
Abra o conversor online escolhido (por exemplo, GetMarkdown).

Faça upload da sua apresentação do PowerPoint.
Inicie a conversão e baixe o arquivo
.mdgerado (ou o arquivo ZIP, caso imagens incorporadas tenham sido extraídas).
⚠️ Coisas a Ter em Mente
- Limites de Formatação: Texto simples e listas com marcadores geralmente convertem bem, enquanto elementos complexos como células de tabela mescladas, SmartArt e layouts de múltiplas colunas podem exigir alguma limpeza manual.
- Privacidade dos Dados: Para apresentações confidenciais, prefira uma ferramenta que processe arquivos localmente no navegador, ou revise a política de retenção de dados do serviço antes de fazer o upload.
2. Usar a Exibição de Tópicos do PowerPoint (Melhor para Apresentações Limpas, Somente Texto)
Se você deseja manter os dados da sua apresentação completamente offline e só precisa extrair os títulos dos slides e o texto principal, a Exibição de Tópicos integrada do Microsoft PowerPoint oferece uma opção direta sem exigir um conversor adicional.

Como Fazer
- Abra a apresentação no PowerPoint, vá até a guia Exibir e selecione Exibição de Tópicos.
- Clique dentro do painel de Tópicos e pressione
Ctrl + A(Cmd + Ano Mac) para selecionar o texto do tópico, depois copie-o. - Cole o texto copiado no VS Code, Typora, Obsidian ou outro editor de texto.
- Formate manualmente os títulos dos slides como cabeçalhos (
#ou##) e os pontos principais como listas com marcadores. - Salve o arquivo como um arquivo
.md.
Alternativa Rápida de Exportação: Para apresentações mais longas, você pode pular a cópia e colagem manual. Vá até Arquivo > Salvar Como e escolha Tópicos/RTF (*.rtf). Isso salva o tópico inteiro como um arquivo de texto que você pode abrir, limpar e salvar como Markdown.
⚠️ Limitações: A Exibição de Tópicos captura apenas texto escrito nos títulos de slides padrão e nos espaços reservados do corpo. Caixas de texto flutuantes, tabelas, SmartArt e elementos gráficos podem ser omitidos ou precisam ser copiados manualmente.
3. Ferramenta de CLI pptx2md (Melhor para Conversão em Lote Local)
Se você precisa converter arquivos .pptx localmente e em lote, o pptx2md oferece um fluxo de trabalho de linha de comando leve e de código aberto. Ele processa os arquivos totalmente offline e preserva títulos de slides, listas aninhadas, tabelas, notas do apresentador e imagens extraídas.

Instalação
Certifique-se de ter o Python 3.10 ou superior instalado, depois execute o seguinte comando no terminal:
pip install pptx2md
Converter um Único Arquivo PPTX para Markdown
Navegue até a pasta que contém sua apresentação e execute o comando:
pptx2md project_deck.pptx -o output.md -i images
-o output.mdespecifica o nome do arquivo Markdown gerado.-i imagesextrai e salva as imagens incorporadas em um diretório dedicado.
Outros sinalizadores de comando úteis:
--disable-notes: Exclui as notas do apresentador da saída final em Markdown.--enable-slides: Adiciona linhas horizontais (---) para separar os limites dos slides.--try-multi-column: Tenta detectar layouts de múltiplas colunas. Observação: Isso pode tornar o processamento significativamente mais lento.
Para obter uma lista completa das opções de configuração, consulte a página oficial do pptx2md no GitHub.
Converter Arquivos PPTX em Lote para MD
Para converter todos os arquivos .pptx na pasta atual, execute:
Get-ChildItem *.pptx | ForEach-Object {
    $name = $_.BaseName
    pptx2md $_.FullName -o "$name.md" -i "${name}_images"
}
Esse loop converte cada apresentação em um arquivo Markdown separado e armazena suas imagens extraídas em uma pasta correspondente.
⚠️ Limitação de Formato: O pptx2md só suporta arquivos .pptx modernos. Se você tiver arquivos .ppt legados, salve-os como .pptx antes de executar a ferramenta.
Dica de Layout: Os slides do PowerPoint dependem de posicionamento espacial, enquanto o Markdown é estritamente linear. Após converter apresentações com layouts complexos, caixas de texto flutuantes ou colunas paralelas, revise manualmente o arquivo gerado para garantir que a ordem de leitura do texto flua corretamente.
4. Automação em C# (Melhor para Integração com Aplicações)
Se a conversão de PowerPoint para Markdown precisar ser integrada a uma aplicação .NET, serviço de backend ou pipeline de processamento de documentos, a automação em C# oferece uma forma programática de realizar a conversão diretamente dentro da sua aplicação.
Os exemplos a seguir usam o Spire.Presentation for .NET para converter arquivos .pptx ou .ppt para Markdown sem exigir que o Microsoft PowerPoint esteja instalado ou que a estrutura subjacente do arquivo seja analisada manualmente.
Passo 1: Instalar o Pacote Necessário
Instale o pacote pelo Gerenciador de Pacotes NuGet:
Install-Package Spire.Presentation
Ou com a CLI do .NET:
dotnet add package Spire.Presentation
Passo 2: Converter PowerPoint para Markdown com C#
O exemplo a seguir carrega uma apresentação .pptx e a salva como um arquivo Markdown. O mesmo código também funciona com arquivos .ppt legados, bastando alterar o caminho do arquivo de entrada.
using Spire.Presentation;

namespace PowerPointToMarkdown
{
    internal class Program
    {
        static void Main(string[] args)
        {
            // Create a Presentation instance
            Presentation presentation = new Presentation();

            // Load a .pptx or .ppt PowerPoint file
            presentation.LoadFromFile(
                @"C:\Presentations\project_deck.pptx"
            );

            // Convert the presentation to Markdown
            presentation.SaveToFile(
                @"C:\Presentations\project_deck.md",
                FileFormat.Markdown
            );

            // Release resources
            presentation.Dispose();
        }
    }
}
Dica: Você também pode converter um slide específico para Markdown:
ISlide slide = presentation.Slides[1];
slide.SaveToFile("slide_2.md", FileFormat.Markdown);
Slides[1] refere-se ao segundo slide porque a coleção de slides usa indexação baseada em zero.
Captura de Tela da Saída:

Observação sobre Licença: A versão de avaliação da biblioteca adiciona uma mensagem de avaliação à saída gerada caso nenhuma licença válida seja aplicada. Você pode obter uma licença temporária para removê-la, se necessário.
Solução de Problemas Comuns de Conversão
- O Texto Aparece na Ordem Errada – Slides com várias caixas de texto ou colunas podem não converter na ordem de leitura esperada. Reorganize o conteúdo afetado manualmente, ou tente o sinalizador
--try-multi-columnao usar opptx2md. - As Imagens Estão Faltando – Nem todos os métodos de conversão extraem imagens. Escolha uma ferramenta com suporte à extração de imagens se precisar preservar as imagens dos slides.
- O Layout de Células Mescladas Não é Preservado – As tabelas Markdown padrão não suportam células mescladas. Simplifique a tabela antes da conversão, ajuste a saída manualmente, ou mantenha tabelas complexas como imagens.
- O Conversor Não Suporta
.ppt– Converta o arquivo para.pptxprimeiro, ou use um conversor que suporte arquivos.pptdiretamente.
Considerações Finais
Não existe uma única melhor forma de converter PowerPoint para Markdown.
- Para conversões rápidas, use um conversor online ou a Exibição de Tópicos do PowerPoint.
- Para processamento em lote local, use o
pptx2md. - Para integração com aplicações ou backend, use a automação em C#.
Perguntas Frequentes (FAQs)
P1: O PowerPoint pode exportar apresentações diretamente para Markdown?
R1: Não. O Microsoft PowerPoint não possui uma opção integrada de exportação ou Salvar Como Markdown, então você precisa extrair o conteúdo manualmente ou usar um conversor externo.
P2: Imagens e notas do orador podem ser preservadas ao converter PowerPoint para Markdown?
R2: Depende do método escolhido. A Exibição de Tópicos do PowerPoint extrai apenas texto, enquanto o pptx2md pode extrair imagens e incluir notas do apresentador.
P3: Posso converter arquivos PPT legados para Markdown?
R3: Sim. O CloudConvert e o método em C# deste guia suportam arquivos .ppt legados, enquanto o GetMarkdown e o pptx2md suportam apenas .pptx.