Как конвертировать PowerPoint в Markdown: 4 способа превратить презентации в структурированный текст
Содержание

PowerPoint отлично подходит для визуальных презентаций, но содержимое слайдов может быть сложнее повторно использовать в технической документации, командных вики, базах знаний с поиском или конвейерах LLM. Конвертация PowerPoint в Markdown превращает содержимое слайдов в структурированный текст, который легко редактировать, искать, отслеживать в Git и повторно использовать в различных рабочих процессах.
В этом руководстве мы покажем 4 практических способа конвертировать файлы PPT и PPTX в Markdown — от быстрой онлайн-конвертации до локальной пакетной обработки через CLI и автоматизации на C#.
- Быстрое сравнение: какой метод конвертации PPT в Markdown подходит вам?
- Метод 1: Онлайн-конвертеры PPT в Markdown
- Метод 2: Использование режима структуры PowerPoint
- Метод 3: CLI-инструмент pptx2md
- Метод 4: Автоматизация на C#
- Устранение распространённых проблем конвертации
- Часто задаваемые вопросы
Быстрое сравнение: какой метод конвертации PPT в Markdown подходит вам?
Лучший подход зависит от того, что вам нужно извлечь из слайдов, насколько конфиденциальны ваши данные и конвертируете ли вы один файл или обрабатываете файлы PowerPoint массово.
| Метод | Лучше всего подходит для | Конфиденциальность | Настройка | Изображения |
|---|---|---|---|---|
| Онлайн-конвертеры | Быстрые разовые конвертации | Зависит от инструмента | Не требуется (работает в браузере) | Зависит от инструмента |
| Режим структуры PowerPoint | Извлечение заголовков слайдов и основного текста | Полностью офлайн | Встроено в PowerPoint | Только текст (без изображений) |
| pptx2md Python CLI | Локальная пакетная конвертация | Локальное выполнение | Требуется Python | Извлекаются в папку |
| Автоматизация на C# | Конвейеры RAG и интеграция с приложениями | Локальное выполнение | Требуется разработка на .NET | Доступно через API |
1. Онлайн-конвертеры PPT в Markdown (лучше всего для быстрых разовых конвертаций)
Браузерные инструменты обычно являются самым быстрым вариантом, если вам нужно конвертировать всего несколько файлов без установки программного обеспечения или написания кода.
Инструменты, которые стоит попробовать
- Конвертер PowerPoint от GetMarkdown – обрабатывает файлы
.pptxлокально в вашем браузере (без загрузки на сервер) и может упаковать извлечённые изображения в ZIP вместе с файлом Markdown. Бесплатный тариф поддерживает до 10 МБ на файл и 8 файлов за пакет. - CloudConvert PPT в MD – поддерживает как устаревший формат
.ppt, так и.pptx. Файлы обрабатываются на удалённых серверах CloudConvert.
Как их использовать
Откройте выбранный онлайн-конвертер (например, GetMarkdown).

Загрузите презентацию PowerPoint.
Запустите конвертацию, затем скачайте созданный файл
.md(или ZIP-архив, если были извлечены встроенные изображения).
⚠️ На что обратить внимание
- Ограничения форматирования: обычный текст и маркированные списки обычно конвертируются хорошо, тогда как сложные элементы, такие как объединённые ячейки таблиц, SmartArt и многоколоночные макеты, могут потребовать ручной доработки.
- Конфиденциальность данных: для конфиденциальных презентаций предпочитайте инструмент, который обрабатывает файлы локально в браузере, или ознакомьтесь с политикой хранения данных сервиса перед загрузкой.
2. Использование режима структуры PowerPoint (лучше всего для чистых презентаций только с текстом)
Если вы хотите полностью держать данные презентации офлайн и вам нужно только извлечь заголовки слайдов и основной текст, встроенный в Microsoft PowerPoint режим структуры предоставляет прямой вариант без дополнительного конвертера.

Как это сделать
- Откройте презентацию в PowerPoint, затем перейдите на вкладку Вид и выберите Режим структуры.
- Щёлкните внутри панели структуры и нажмите
Ctrl + A(Cmd + Aна Mac), чтобы выделить текст структуры, затем скопируйте его. - Вставьте скопированный текст в VS Code, Typora, Obsidian или другой текстовый редактор.
- Вручную отформатируйте заголовки слайдов как заголовки (
#или##), а основные пункты — как маркированные списки. - Сохраните файл как
.md.
Альтернатива для быстрого экспорта: для длинных презентаций можно не копировать и вставлять вручную. Перейдите в Файл > Сохранить как и выберите Структура/RTF (*.rtf). Это сохранит всю структуру как текстовый файл, который можно открыть, очистить и сохранить как Markdown.
⚠️ Ограничения: режим структуры захватывает только текст, написанный в стандартных заголовках слайдов и заполнителях основного текста. Плавающие текстовые поля, таблицы, SmartArt и графические элементы могут быть пропущены или их потребуется скопировать вручную.
3. CLI-инструмент pptx2md (лучше всего для локальной пакетной конвертации)
Если вам нужно конвертировать файлы .pptx локально и массово, pptx2md предлагает лёгкий рабочий процесс командной строки с открытым исходным кодом. Он обрабатывает файлы полностью офлайн и сохраняет заголовки слайдов, вложенные списки, таблицы, заметки докладчика и извлечённые изображения.

Установка
Убедитесь, что у вас установлен Python 3.10 или более поздней версии, затем выполните следующую команду в терминале:
pip install pptx2md
Преобразование одного файла PPTX в Markdown
Перейдите в папку с вашей презентацией и выполните команду:
pptx2md project_deck.pptx -o output.md -i images
-o output.mdуказывает имя создаваемого файла Markdown.-i imagesизвлекает и сохраняет встроенные изображения в отдельный каталог.
Другие полезные флаги командной строки:
--disable-notes: исключает заметки докладчика из итогового вывода Markdown.--enable-slides: добавляет горизонтальные разделители (---) для разделения границ слайдов.--try-multi-column: пытается обнаружить многоколоночные макеты. Примечание: это может значительно замедлить обработку.
Полный список параметров конфигурации смотрите на официальной странице pptx2md на GitHub.
Пакетное преобразование файлов PPTX в MD
Чтобы преобразовать каждый файл .pptx в текущей папке, выполните:
Get-ChildItem *.pptx | ForEach-Object {
    $name = $_.BaseName
    pptx2md $_.FullName -o "$name.md" -i "${name}_images"
}
Этот цикл преобразует каждую презентацию в отдельный файл Markdown и сохраняет её извлечённые изображения в соответствующую папку.
⚠️ Ограничение формата: pptx2md поддерживает только современные файлы .pptx. Если у вас есть устаревшие файлы .ppt, сохраните их как .pptx перед запуском инструмента.
Совет по макету: слайды PowerPoint зависят от пространственного расположения, тогда как Markdown строго линеен. После конвертации презентаций со сложными макетами, плавающими текстовыми полями или параллельными колонками вручную проверьте созданный файл, чтобы убедиться, что порядок чтения текста соблюдается правильно.
4. Автоматизация на C# (лучше всего для интеграции с приложениями)
Если конвертацию PowerPoint в Markdown необходимо интегрировать в приложение .NET, серверную службу или конвейер обработки документов, автоматизация на C# предоставляет программный способ выполнить конвертацию непосредственно в вашем приложении.
В следующих примерах используется Spire.Presentation for .NET для преобразования файлов .pptx или .ppt в Markdown без необходимости устанавливать Microsoft PowerPoint или вручную разбирать базовую структуру файла.
Шаг 1: Установите необходимый пакет
Установите пакет из диспетчера пакетов NuGet:
Install-Package Spire.Presentation
Или с помощью .NET CLI:
dotnet add package Spire.Presentation
Шаг 2: Преобразование PowerPoint в Markdown с помощью C#
В следующем примере загружается презентация .pptx и сохраняется как файл Markdown. Тот же код также работает с устаревшими файлами .ppt при изменении пути к входному файлу.
using Spire.Presentation;

namespace PowerPointToMarkdown
{
    internal class Program
    {
        static void Main(string[] args)
        {
            // Create a Presentation instance
            Presentation presentation = new Presentation();

            // Load a .pptx or .ppt PowerPoint file
            presentation.LoadFromFile(
                @"C:\Presentations\project_deck.pptx"
            );

            // Convert the presentation to Markdown
            presentation.SaveToFile(
                @"C:\Presentations\project_deck.md",
                FileFormat.Markdown
            );

            // Release resources
            presentation.Dispose();
        }
    }
}
Совет: Вы также можете преобразовать конкретный слайд в Markdown:
ISlide slide = presentation.Slides[1];
slide.SaveToFile("slide_2.md", FileFormat.Markdown);
Slides[1] относится ко второму слайду, поскольку коллекция слайдов использует индексацию с нуля.
Снимок экрана с результатом:

Примечание о лицензии: пробная версия библиотеки добавляет оценочное сообщение в создаваемый вывод, если не применена действующая лицензия. При необходимости вы можете получить временную лицензию, чтобы удалить его.
Устранение распространённых проблем конвертации
- Текст отображается в неправильном порядке — слайды с несколькими текстовыми полями или колонками могут конвертироваться не в ожидаемом порядке чтения. Переставьте затронутое содержимое вручную или попробуйте флаг
--try-multi-columnпри использованииpptx2md. - Изображения отсутствуют — не все методы конвертации извлекают изображения. Выберите инструмент с поддержкой извлечения изображений, если вам нужно сохранить изображения слайдов.
- Макет объединённых ячеек не сохраняется — стандартные таблицы Markdown не поддерживают объединённые ячейки. Упростите таблицу перед конвертацией, скорректируйте вывод вручную или сохраните сложные таблицы как изображения.
- Конвертер не поддерживает
.ppt— сначала преобразуйте файл в.pptxили используйте конвертер, который напрямую поддерживает файлы.ppt.
Заключение
Не существует единственного лучшего способа конвертировать PowerPoint в Markdown.
- Для быстрых конвертаций используйте онлайн-конвертер или режим структуры PowerPoint.
- Для локальной пакетной обработки используйте
pptx2md. - Для интеграции с приложениями или серверной частью используйте автоматизацию на C#.
Часто задаваемые вопросы (FAQ)
Вопрос 1: Может ли PowerPoint напрямую экспортировать презентации в Markdown?
Ответ 1: Нет. Microsoft PowerPoint не имеет встроенного экспорта или параметра «Сохранить как Markdown», поэтому вам нужно извлечь содержимое вручную или использовать внешний конвертер.
Вопрос 2: Можно ли сохранить изображения и заметки докладчика при конвертации PowerPoint в Markdown?
Ответ 2: Это зависит от выбранного метода. Режим структуры PowerPoint извлекает только текст, тогда как pptx2md может извлекать изображения и включать заметки докладчика.
Вопрос 3: Можно ли конвертировать устаревшие файлы PPT в Markdown?
Ответ 3: Да. CloudConvert и метод на C# из этого руководства поддерживают устаревшие файлы .ppt, тогда как GetMarkdown и pptx2md поддерживают только .pptx.
PowerPoint를 마크다운으로 변환: 프레젠테이션을 구조화된 텍스트로 바꾸는 4가지 방법
PowerPoint는 시각적 프레젠테이션에 매우 적합하지만, 슬라이드 콘텐츠는 기술 문서, 팀 위키, 검색 가능한 지식 베이스 또는 LLM 파이프라인에서 재사용하기 어려울 수 있습니다. PowerPoint to Markdown 변환은 슬라이드 콘텐츠를 구조화된 텍스트로 바꾸어 편집, 검색, Git 추적 및 다양한 워크플로에서 재사용하기 쉽게 만듭니다.
이 가이드에서는 PPT 및 PPTX 파일을 Markdown으로 변환하는 4가지 실용적인 방법을 보여줍니다. 빠른 온라인 변환부터 로컬 CLI 일괄 처리 및 C# 자동화까지 다룹니다.
- 빠른 비교: 어떤 PPT-to-Markdown 변환 방법이 필요에 맞을까요?
- 방법 1: 온라인 PPT to Markdown 변환기
- 방법 2: PowerPoint 개요 보기 사용
- 방법 3: pptx2md CLI 도구
- 방법 4: C# 자동화
- 일반적인 변환 문제 해결
- 자주 묻는 질문
빠른 비교: 어떤 PPT-to-Markdown 변환 방법이 필요에 맞을까요?
최선의 접근 방식은 슬라이드에서 무엇을 추출해야 하는지, 데이터가 얼마나 민감한지, 단일 파일을 변환하는지 아니면 PowerPoint 파일을 대량으로 처리하는지에 따라 달라집니다.
| 방법 | 최적 용도 | 개인정보 보호 | 설정 | 이미지 |
|---|---|---|---|---|
| 온라인 변환기 | 빠른 일회성 변환 | 도구에 따라 다름 | 없음(브라우저 기반) | 도구에 따라 다름 |
| PowerPoint 개요 보기 | 슬라이드 제목 및 본문 텍스트 추출 | 완전 오프라인 | PowerPoint에 내장 | 텍스트만(이미지 없음) |
| pptx2md Python CLI | 로컬 일괄 변환 | 로컬 실행 | Python 필요 | 폴더로 추출됨 |
| C# 자동화 | RAG 파이프라인 및 애플리케이션 통합 | 로컬 실행 | .NET 개발 필요 | API를 통해 사용 가능 |
1. 온라인 PPT to Markdown 변환기(빠른 일회성 변환에 최적)
소프트웨어를 설치하거나 코드를 작성하지 않고 몇 개의 파일만 변환해야 한다면 브라우저 기반 도구가 보통 가장 빠른 옵션입니다.
시도해 볼 만한 도구
- GetMarkdown PowerPoint Converter – 브라우저에서 로컬로
.pptx파일을 처리하며(서버에 업로드하지 않음) 추출된 이미지를 Markdown 파일과 함께 ZIP으로 패키징할 수 있습니다. 무료 등급은 파일당 최대 10MB, 배치당 8개 파일을 지원합니다. - CloudConvert PPT to MD – 레거시
.ppt및.pptx형식을 모두 지원합니다. 파일은 CloudConvert의 원격 서버에서 처리됩니다.
사용 방법
선택한 온라인 변환기(예: GetMarkdown)를 엽니다.
PowerPoint 프레젠테이션을 업로드합니다.
변환을 시작한 다음 생성된
.md파일(또는 포함된 이미지가 추출된 경우 ZIP 아카이브)을 다운로드합니다.
⚠️ 유의할 점
- 서식 제한: 일반 텍스트와 글머리 기호 목록은 보통 잘 변환되지만, 병합된 표 셀, SmartArt, 다단 레이아웃과 같은 복잡한 요소는 수동 정리가 필요할 수 있습니다.
- 데이터 개인정보 보호: 기밀 프레젠테이션의 경우 브라우저에서 파일을 로컬로 처리하는 도구를 선호하거나, 업로드하기 전에 서비스의 데이터 보존 정책을 검토하세요.
2. PowerPoint 개요 보기 사용(깔끔한 텍스트 전용 프레젠테이션에 최적)
프레젠테이션 데이터를 완전히 오프라인으로 유지하면서 슬라이드 제목과 본문 텍스트만 추출하려는 경우, Microsoft PowerPoint에 내장된 개요 보기는 추가 변환기 없이 바로 사용할 수 있는 옵션을 제공합니다.
수행 방법
- PowerPoint에서 프레젠테이션을 연 다음 보기 탭으로 이동하여 개요 보기를 선택합니다.
- 개요 창 내부를 클릭하고
Ctrl + A(Mac에서는Cmd + A)를 눌러 개요 텍스트를 선택한 다음 복사합니다. - 복사한 텍스트를 VS Code, Typora, Obsidian 또는 다른 텍스트 편집기에 붙여넣습니다.
- 슬라이드 제목을 헤더(
#또는##)로, 주요 요점을 글머리 기호 목록으로 수동 서식 지정합니다. - 파일을
.md파일로 저장합니다.
빠른 내보내기 대안: 긴 프레젠테이션의 경우 수동으로 복사하여 붙여넣는 것을 건너뛸 수 있습니다. 파일 > 다른 이름으로 저장으로 이동하여 개요/RTF(*.rtf)를 선택합니다. 그러면 전체 개요가 텍스트 파일로 저장되며, 이를 열고 정리한 뒤 Markdown으로 저장할 수 있습니다.
⚠️ 제한 사항: 개요 보기는 표준 슬라이드 제목 및 본문 자리 표시자에 작성된 텍스트만 캡처합니다. 떠 있는 텍스트 상자, 표, SmartArt 및 그래픽 요소는 누락되거나 수동으로 복사해야 할 수 있습니다.
3. pptx2md CLI 도구(로컬 일괄 변환에 최적)
.pptx 파일을 로컬에서 대량으로 변환해야 하는 경우 pptx2md는 가볍고 오픈 소스인 명령줄 워크플로를 제공합니다. 파일을 완전히 오프라인으로 처리하며 슬라이드 제목, 중첩 목록, 표, 발표자 노트 및 추출된 이미지를 보존합니다.
설치
Python 3.10 이상이 설치되어 있는지 확인한 다음 터미널에서 다음 명령을 실행합니다:
pip install pptx2md
단일 PPTX 파일을 Markdown으로 변환
프레젠테이션이 포함된 폴더로 이동하여 다음 명령을 실행합니다:
pptx2md project_deck.pptx -o output.md -i images
-o output.md는 생성된 Markdown 파일 이름을 지정합니다.-i images는 포함된 이미지를 추출하여 전용 디렉터리에 저장합니다.
기타 유용한 명령 플래그:
--disable-notes: 최종 Markdown 출력에서 발표자 노트를 제외합니다.--enable-slides: 슬라이드 경계를 구분하기 위해 가로줄(---)을 추가합니다.--try-multi-column: 다단 레이아웃 감지를 시도합니다. 참고: 처리 속도가 크게 느려질 수 있습니다.
전체 구성 옵션 목록은 공식 pptx2md GitHub 페이지를 확인하세요.
PPTX 파일을 MD로 일괄 변환
현재 폴더의 모든 .pptx 파일을 변환하려면 다음을 실행합니다:
Get-ChildItem *.pptx | ForEach-Object {
    $name = $_.BaseName
    pptx2md $_.FullName -o "$name.md" -i "${name}_images"
}
이 루프는 각 프레젠테이션을 별도의 Markdown 파일로 변환하고 추출된 이미지를 해당 폴더에 저장합니다.
⚠️ 형식 제한: pptx2md는 최신 .pptx 파일만 지원합니다. 레거시 .ppt 파일이 있는 경우 도구를 실행하기 전에 .pptx로 저장하세요.
레이아웃 팁: PowerPoint 슬라이드는 공간적 위치 지정에 의존하는 반면 Markdown은 엄격하게 선형적입니다. 복잡한 레이아웃, 떠 있는 텍스트 상자 또는 병렬 열이 있는 프레젠테이션을 변환한 후에는 생성된 파일을 수동으로 검토하여 텍스트 읽기 순서가 올바르게 이어지는지 확인하세요.
4. C# 자동화(애플리케이션 통합에 최적)
PowerPoint-to-Markdown 변환을 .NET 애플리케이션, 백엔드 서비스 또는 문서 처리 파이프라인에 통합해야 하는 경우, C# 자동화는 애플리케이션 내에서 직접 변환을 수행하는 프로그래밍 방식의 방법을 제공합니다.
다음 예제에서는 Microsoft PowerPoint를 설치하거나 기본 파일 구조를 수동으로 구문 분석할 필요 없이 Spire.Presentation for .NET을 사용하여 .pptx 또는 .ppt 파일을 Markdown으로 변환합니다.
1단계: 필수 패키지 설치
NuGet 패키지 관리자에서 패키지를 설치합니다:
Install-Package Spire.Presentation
또는 .NET CLI 사용:
dotnet add package Spire.Presentation
2단계: C#으로 PowerPoint를 Markdown으로 변환
다음 예제는 .pptx 프레젠테이션을 로드하고 Markdown 파일로 저장합니다. 동일한 코드는 입력 파일 경로를 변경하여 레거시 .ppt 파일에서도 작동합니다.
using Spire.Presentation;

namespace PowerPointToMarkdown
{
    internal class Program
    {
        static void Main(string[] args)
        {
            // Create a Presentation instance
            Presentation presentation = new Presentation();

            // Load a .pptx or .ppt PowerPoint file
            presentation.LoadFromFile(
                @"C:\Presentations\project_deck.pptx"
            );

            // Convert the presentation to Markdown
            presentation.SaveToFile(
                @"C:\Presentations\project_deck.md",
                FileFormat.Markdown
            );

            // Release resources
            presentation.Dispose();
        }
    }
}
팁: 특정 슬라이드를 Markdown으로 변환할 수도 있습니다:
ISlide slide = presentation.Slides[1];
slide.SaveToFile("slide_2.md", FileFormat.Markdown);
Slides[1]은 슬라이드 컬렉션이 0부터 시작하는 인덱싱을 사용하므로 두 번째 슬라이드를 나타냅니다.
출력 스크린샷:
라이선스 참고: 라이브러리의 평가판 버전은 유효한 라이선스가 적용되지 않은 경우 생성된 출력에 평가 메시지를 추가합니다. 필요한 경우 임시 라이선스 받기로 이를 제거할 수 있습니다.
일반적인 변환 문제 해결
- 텍스트 순서가 잘못됨 – 여러 텍스트 상자나 열이 있는 슬라이드는 예상한 읽기 순서로 변환되지 않을 수 있습니다. 영향을 받은 콘텐츠를 수동으로 재배치하거나
pptx2md사용 시--try-multi-column플래그를 사용해 보세요. - 이미지 누락 – 모든 변환 방법이 이미지를 추출하는 것은 아닙니다. 슬라이드 이미지를 보존해야 하는 경우 이미지 추출을 지원하는 도구를 선택하세요.
- 병합된 셀 레이아웃이 유지되지 않음 – 표준 Markdown 표는 병합된 셀을 지원하지 않습니다. 변환 전에 표를 단순화하거나, 출력을 수동으로 조정하거나, 복잡한 표를 이미지로 유지하세요.
- 변환기가
.ppt를 지원하지 않음 – 파일을 먼저.pptx로 변환하거나.ppt파일을 직접 지원하는 변환기를 사용하세요.
마무리
PowerPoint를 Markdown으로 변환하는 단 하나의 최선의 방법은 없습니다.
- 빠른 변환에는 온라인 변환기나 PowerPoint 개요 보기를 사용하세요.
- 로컬 일괄 처리에는
pptx2md를 사용하세요. - 애플리케이션 또는 백엔드 통합에는 C# 자동화를 사용하세요.
자주 묻는 질문(FAQ)
질문 1: PowerPoint에서 프레젠테이션을 Markdown으로 직접 내보낼 수 있나요?
답변 1: 아니요. Microsoft PowerPoint에는 기본 제공 내보내기 또는 Markdown으로 저장 옵션이 없으므로 콘텐츠를 수동으로 추출하거나 외부 변환기를 사용해야 합니다.
질문 2: PowerPoint를 Markdown으로 변환할 때 이미지와 발표자 노트를 보존할 수 있나요?
답변 2: 선택한 방법에 따라 다릅니다. PowerPoint 개요 보기는 텍스트만 추출하는 반면, pptx2md는 이미지를 추출하고 발표자 노트를 포함할 수 있습니다.
질문 3: 레거시 PPT 파일을 Markdown으로 변환할 수 있나요?
답변 3: 예. CloudConvert와 이 가이드의 C# 방법은 레거시 .ppt 파일을 지원하는 반면, GetMarkdown과 pptx2md는 .pptx만 지원합니다.
Convertire PowerPoint in Markdown: 4 modi per trasformare le presentazioni in testo strutturato
Indice
- Confronto rapido: quale metodo di conversione da PPT a Markdown fa al caso tuo?
- Metodo 1: convertitori online da PPT a Markdown
- Metodo 2: usare la visualizzazione Struttura di PowerPoint
- Metodo 3: strumento CLI pptx2md
- Metodo 4: automazione C#
- Risoluzione dei problemi di conversione più comuni
- Domande frequenti
PowerPoint è ottimo per le presentazioni visive, ma il contenuto delle diapositive può essere più difficile da riutilizzare nella documentazione tecnica, nei wiki di team, nelle basi di conoscenza ricercabili o nelle pipeline LLM. Convertire PowerPoint in Markdown trasforma il contenuto delle diapositive in testo strutturato, facile da modificare, cercare, tracciare con Git e riutilizzare in flussi di lavoro diversi.
In questa guida mostreremo 4 modi pratici per convertire file PPT e PPTX in Markdown, dalla conversione online rapida all'elaborazione batch locale tramite CLI e all'automazione C#.
- Confronto rapido: quale metodo di conversione da PPT a Markdown fa al caso tuo?
- Metodo 1: convertitori online da PPT a Markdown
- Metodo 2: usare la visualizzazione Struttura di PowerPoint
- Metodo 3: strumento CLI pptx2md
- Metodo 4: automazione C#
- Risoluzione dei problemi di conversione più comuni
- Domande frequenti
Confronto rapido: quale metodo di conversione da PPT a Markdown fa al caso tuo?
L'approccio migliore dipende da ciò che devi estrarre dalle diapositive, da quanto sono sensibili i tuoi dati e dal fatto che tu stia convertendo un singolo file o elaborando file PowerPoint in blocco.
| Metodo | Ideale per | Privacy | Configurazione | Immagini |
|---|---|---|---|---|
| Convertitori online | Conversioni rapide e occasionali | Varia in base allo strumento | Nessuna (basato su browser) | Varia in base allo strumento |
| Visualizzazione Struttura di PowerPoint | Estrarre i titoli delle diapositive e il testo principale | Completamente offline | Integrata in PowerPoint | Solo testo (nessuna immagine) |
| CLI Python pptx2md | Conversione batch locale | Esecuzione locale | Richiede Python | Estratte in una cartella |
| Automazione C# | Pipeline RAG e integrazione applicativa | Esecuzione locale | Richiede lo sviluppo .NET | Disponibili tramite API |
1. Convertitori online da PPT a Markdown (ideali per conversioni rapide e occasionali)
Gli strumenti basati su browser sono di solito l'opzione più rapida se devi convertire solo pochi file senza installare software o scrivere codice.
Strumenti che vale la pena provare
- GetMarkdown PowerPoint Converter – Elabora i file
.pptxlocalmente nel tuo browser (nessun caricamento su un server) e può raccogliere le immagini estratte in un archivio ZIP insieme al file Markdown. Il piano gratuito supporta fino a 10 MB per file e 8 file per batch. - CloudConvert PPT to MD – Supporta sia il formato legacy
.pptsia.pptx. I file vengono elaborati sui server remoti di CloudConvert.
Come usarli
Apri il convertitore online che hai scelto (ad es. GetMarkdown).
Carica la tua presentazione PowerPoint.
Avvia la conversione, quindi scarica il file
.mdgenerato (o l'archivio ZIP se sono state estratte immagini incorporate).
⚠️ Cose da tenere presente
- Limiti di formattazione: il testo semplice e gli elenchi puntati di solito si convertono bene, mentre elementi complessi come celle di tabella unite, SmartArt e layout a più colonne potrebbero richiedere una pulizia manuale.
- Privacy dei dati: per presentazioni riservate, preferisci uno strumento che elabori i file localmente nel browser, oppure consulta l'informativa sulla conservazione dei dati del servizio prima di caricare.
2. Usare la visualizzazione Struttura di PowerPoint (ideale per presentazioni pulite di solo testo)
Se vuoi mantenere i dati della presentazione completamente offline e devi solo estrarre i titoli delle diapositive e il testo principale, la visualizzazione Struttura integrata in Microsoft PowerPoint offre un'opzione diretta senza richiedere un convertitore aggiuntivo.
Come procedere
- Apri la presentazione in PowerPoint, poi vai alla scheda Visualizza e seleziona Struttura.
- Fai clic all'interno del riquadro Struttura e premi
Ctrl + A(Cmd + Asu Mac) per selezionare il testo della struttura, quindi copialo. - Incolla il testo copiato in VS Code, Typora, Obsidian o un altro editor di testo.
- Formatta manualmente i titoli delle diapositive come intestazioni (
#o##) e i punti principali come elenchi puntati. - Salva il file come file
.md.
Alternativa di esportazione rapida: per presentazioni più lunghe puoi evitare di copiare e incollare manualmente. Vai su File > Salva con nome e scegli Struttura/RTF (*.rtf). In questo modo salvi l'intera struttura come file di testo che puoi aprire, ripulire e salvare come Markdown.
⚠️ Limitazioni: la visualizzazione Struttura cattura solo il testo scritto nei titoli standard delle diapositive e nei segnaposto del corpo. Le caselle di testo mobili, le tabelle, SmartArt e gli elementi grafici potrebbero essere omessi o dover essere copiati manualmente.
3. Strumento CLI pptx2md (ideale per la conversione batch locale)
Se devi convertire file .pptx localmente e in blocco, pptx2md offre un flusso di lavoro da riga di comando leggero e open source. Elabora i file interamente offline e conserva i titoli delle diapositive, gli elenchi nidificati, le tabelle, le note del relatore e le immagini estratte.
Installazione
Assicurati di avere installato Python 3.10 o versione successiva, quindi esegui il seguente comando nel terminale:
pip install pptx2md
Convertire un singolo file PPTX in Markdown
Spostati nella cartella che contiene la presentazione ed esegui il comando:
pptx2md project_deck.pptx -o output.md -i images
-o output.mdspecifica il nome del file Markdown generato.-i imagesestrae e salva le immagini incorporate in una cartella dedicata.
Altre opzioni utili del comando:
--disable-notes: esclude le note del relatore dall'output Markdown finale.--enable-slides: aggiunge righe orizzontali (---) per separare i confini delle diapositive.--try-multi-column: tenta di rilevare i layout a più colonne. Nota: questo può rallentare notevolmente l'elaborazione.
Per un elenco completo delle opzioni di configurazione, consulta la pagina GitHub ufficiale di pptx2md.
Conversione batch di file PPTX in MD
Per convertire ogni file .pptx nella cartella corrente, esegui:
Get-ChildItem *.pptx | ForEach-Object {
    $name = $_.BaseName
    pptx2md $_.FullName -o "$name.md" -i "${name}_images"
}
Questo ciclo converte ogni presentazione in un file Markdown separato e memorizza le immagini estratte in una cartella corrispondente.
⚠️ Limitazione di formato: pptx2md supporta solo i file .pptx moderni. Se hai file .ppt legacy, salvali come .pptx prima di eseguire lo strumento.
Suggerimento sul layout: le diapositive di PowerPoint si basano sul posizionamento spaziale, mentre Markdown è rigorosamente lineare. Dopo aver convertito presentazioni con layout complessi, caselle di testo mobili o colonne parallele, rivedi manualmente il file generato per assicurarti che l'ordine di lettura del testo scorra correttamente.
4. Automazione C# (ideale per l'integrazione applicativa)
Se la conversione da PowerPoint a Markdown deve essere integrata in un'applicazione .NET, in un servizio backend o in una pipeline di elaborazione documenti, l'automazione C# offre un modo programmatico per eseguire la conversione direttamente all'interno della tua applicazione.
Gli esempi seguenti utilizzano Spire.Presentation for .NET per convertire file .pptx o .ppt in Markdown senza richiedere l'installazione di Microsoft PowerPoint né l'analisi manuale della struttura del file sottostante.
Passaggio 1: installare il pacchetto richiesto
Installa il pacchetto da NuGet Package Manager:
Install-Package Spire.Presentation
Oppure con la CLI .NET:
dotnet add package Spire.Presentation
Passaggio 2: convertire PowerPoint in Markdown con C#
L'esempio seguente carica una presentazione .pptx e la salva come file Markdown. Lo stesso codice funziona anche con file .ppt legacy cambiando il percorso del file di input.
using Spire.Presentation;

namespace PowerPointToMarkdown
{
    internal class Program
    {
        static void Main(string[] args)
        {
            // Create a Presentation instance
            Presentation presentation = new Presentation();

            // Load a .pptx or .ppt PowerPoint file
            presentation.LoadFromFile(
                @"C:\Presentations\project_deck.pptx"
            );

            // Convert the presentation to Markdown
            presentation.SaveToFile(
                @"C:\Presentations\project_deck.md",
                FileFormat.Markdown
            );

            // Release resources
            presentation.Dispose();
        }
    }
}
Suggerimento: puoi anche convertire una diapositiva specifica in Markdown:
ISlide slide = presentation.Slides[1];
slide.SaveToFile("slide_2.md", FileFormat.Markdown);
Slides[1] fa riferimento alla seconda diapositiva perché la raccolta di diapositive usa l'indicizzazione a base zero.
Screenshot dell'output:
Nota sulla licenza: la versione di prova della libreria aggiunge un messaggio di valutazione all'output generato se non viene applicata una licenza valida. Se necessario, puoi ottenere una licenza temporanea per rimuoverlo.
Risoluzione dei problemi di conversione più comuni
- Il testo appare nell'ordine sbagliato – Le diapositive con più caselle di testo o colonne potrebbero non convertirsi nell'ordine di lettura previsto. Riordina manualmente il contenuto interessato oppure prova l'opzione
--try-multi-columnquando usipptx2md. - Mancano le immagini – Non tutti i metodi di conversione estraggono le immagini. Scegli uno strumento con supporto all'estrazione delle immagini se devi conservare le immagini delle diapositive.
- Il layout con celle unite non viene preservato – Le tabelle Markdown standard non supportano le celle unite. Semplifica la tabella prima della conversione, regola manualmente l'output oppure mantieni le tabelle complesse come immagini.
- Il convertitore non supporta
.ppt– Converti prima il file in.pptxoppure usa un convertitore che supporta direttamente i file.ppt.
Conclusione
Non esiste un unico modo migliore per convertire PowerPoint in Markdown.
- Per le conversioni rapide, usa un convertitore online o la visualizzazione Struttura di PowerPoint.
- Per l'elaborazione batch locale, usa
pptx2md. - Per l'integrazione applicativa o backend, usa l'automazione C#.
Domande frequenti (FAQ)
D1: PowerPoint può esportare direttamente le presentazioni in Markdown?
R1: No. Microsoft PowerPoint non dispone di un'opzione integrata di esportazione o Salva con nome in Markdown, quindi devi estrarre il contenuto manualmente o usare un convertitore esterno.
D2: Le immagini e le note del relatore possono essere preservate durante la conversione da PowerPoint a Markdown?
R2: Dipende dal metodo che scegli. La visualizzazione Struttura di PowerPoint estrae solo il testo, mentre pptx2md può estrarre le immagini e includere le note del relatore.
D3: Posso convertire file PPT legacy in Markdown?
R3: Sì. CloudConvert e il metodo C# descritto in questa guida supportano i file .ppt legacy, mentre GetMarkdown e pptx2md supportano solo .pptx.
Convertir PowerPoint en Markdown : 4 méthodes pour transformer des présentations en texte structuré
Table des matières
- Comparaison rapide : quelle méthode de conversion PPT en Markdown correspond à vos besoins ?
- Méthode 1 : Convertisseurs PPT en Markdown en ligne
- Méthode 2 : Utiliser le mode Plan de PowerPoint
- Méthode 3 : Outil CLI pptx2md
- Méthode 4 : Automatisation C#
- Résolution des problèmes de conversion courants
- Foire aux questions
PowerPoint est excellent pour les présentations visuelles, mais le contenu des diapositives peut être plus difficile à réutiliser dans la documentation technique, les wikis d'équipe, les bases de connaissances consultables ou les pipelines LLM. La conversion de PowerPoint en Markdown transforme le contenu des diapositives en texte structuré facile à modifier, à rechercher, à suivre dans Git et à réutiliser dans différents flux de travail.
Dans ce guide, nous allons vous montrer 4 méthodes pratiques pour convertir des fichiers PPT et PPTX en Markdown, allant de la conversion en ligne rapide au traitement par lots en CLI local et à l'automatisation C#.
- Comparaison rapide : quelle méthode de conversion PPT en Markdown correspond à vos besoins ?
- Méthode 1 : Convertisseurs PPT en Markdown en ligne
- Méthode 2 : Utiliser le mode Plan de PowerPoint
- Méthode 3 : Outil CLI pptx2md
- Méthode 4 : Automatisation C#
- Résolution des problèmes de conversion courants
- Foire aux questions
Comparaison rapide : quelle méthode de conversion PPT en Markdown correspond à vos besoins ?
La meilleure approche dépend de ce que vous devez extraire de vos diapositives, de la sensibilité de vos données et du fait que vous convertissiez un seul fichier ou que vous traitiez des fichiers PowerPoint en masse.
| Méthode | Idéal pour | Confidentialité | Configuration | Images |
|---|---|---|---|---|
| Convertisseurs en ligne | Conversions rapides et ponctuelles | Varie selon l'outil | Aucune (basé sur le navigateur) | Varie selon l'outil |
| Mode Plan de PowerPoint | Extraction des titres de diapositives et du texte principal | Entièrement hors ligne | Intégré à PowerPoint | Texte uniquement (pas d'images) |
| pptx2md Python CLI | Conversion par lots locale | Exécution locale | Nécessite Python | Extraites dans un dossier |
| Automatisation C# | Pipelines RAG et intégration d'applications | Exécution locale | Nécessite le développement .NET | Disponibles via API |
1. Convertisseurs PPT en Markdown en ligne (Idéal pour les conversions rapides et ponctuelles)
Les outils basés sur le navigateur sont généralement l'option la plus rapide si vous n'avez que quelques fichiers à convertir sans installer de logiciel ni écrire de code.
Outils à essayer
- GetMarkdown PowerPoint Converter – Traite les fichiers
.pptxlocalement dans votre navigateur (aucun envoi vers un serveur) et peut empaqueter les images extraites dans un ZIP aux côtés du fichier Markdown. La version gratuite prend en charge jusqu'à 10 Mo par fichier et 8 fichiers par lot. - CloudConvert PPT to MD – Prend en charge les formats
.ppthérités et.pptx. Les fichiers sont traités sur les serveurs distants de CloudConvert.
Comment les utiliser
Ouvrez le convertisseur en ligne de votre choix (par exemple, GetMarkdown).
Téléversez votre présentation PowerPoint.
Lancez la conversion, puis téléchargez le fichier
.mdgénéré (ou l'archive ZIP si des images intégrées ont été extraites).
⚠️ Points à garder à l'esprit
- Limites de formatage : Le texte brut et les listes à puces se convertissent généralement bien, tandis que les éléments complexes tels que les cellules de tableau fusionnées, SmartArt et les mises en page multicolonnes peuvent nécessiter un nettoyage manuel.
- Confidentialité des données : Pour les présentations confidentielles, préférez un outil qui traite les fichiers localement dans le navigateur, ou consultez la politique de conservation des données du service avant de téléverser.
2. Utiliser le mode Plan de PowerPoint (Idéal pour les présentations propres, uniquement textuelles)
Si vous souhaitez garder les données de votre présentation entièrement hors ligne et que vous avez seulement besoin d'extraire les titres des diapositives et le texte principal, le mode Plan intégré de Microsoft PowerPoint offre une option directe sans nécessiter de convertisseur supplémentaire.
Comment procéder
- Ouvrez la présentation dans PowerPoint, puis accédez à l'onglet Affichage et sélectionnez Mode Plan.
- Cliquez dans le volet Plan et appuyez sur
Ctrl + A(Cmd + Asur Mac) pour sélectionner le texte du plan, puis copiez-le. - Collez le texte copié dans VS Code, Typora, Obsidian ou un autre éditeur de texte.
- Formatez manuellement les titres des diapositives en tant qu'en-têtes (
#ou##) et les points principaux en listes à puces. - Enregistrez le fichier avec l'extension
.md.
Alternative d'exportation rapide : Pour les présentations plus longues, vous pouvez éviter le copier-coller manuel. Allez dans Fichier > Enregistrer sous et choisissez Plan/RTF (*.rtf). Cela enregistre tout le plan sous forme de fichier texte que vous pouvez ouvrir, nettoyer et enregistrer au format Markdown.
⚠️ Limitations : Le mode Plan ne capture que le texte écrit dans les titres de diapositives standard et les espaces réservés du corps. Les zones de texte flottantes, les tableaux, SmartArt et les éléments graphiques peuvent être omis ou doivent être copiés manuellement.
3. Outil CLI pptx2md (Idéal pour la conversion par lots locale)
Si vous devez convertir des fichiers .pptx localement et en masse, pptx2md offre un flux de travail en ligne de commande léger et open source. Il traite les fichiers entièrement hors ligne et préserve les titres des diapositives, les listes imbriquées, les tableaux, les notes du présentateur et les images extraites.
Installation
Assurez-vous que Python 3.10 ou une version ultérieure est installé, puis exécutez la commande suivante dans le terminal :
pip install pptx2md
Convertir un seul fichier PPTX en Markdown
Naviguez vers le dossier contenant votre présentation et exécutez la commande :
pptx2md project_deck.pptx -o output.md -i images
-o output.mdspécifie le nom du fichier Markdown généré.-i imagesextrait et enregistre les images intégrées dans un répertoire dédié.
Autres options de commande utiles :
--disable-notes: Exclut les notes du présentateur de la sortie Markdown finale.--enable-slides: Ajoute des règles horizontales (---) pour séparer les limites des diapositives.--try-multi-column: Tente de détecter les mises en page multicolonnes. Remarque : Cela peut considérablement ralentir le traitement.
Pour une liste complète des options de configuration, consultez la page GitHub officielle de pptx2md.
Convertir par lots des fichiers PPTX en MD
Pour convertir chaque fichier .pptx du dossier courant, exécutez :
Get-ChildItem *.pptx | ForEach-Object {
    $name = $_.BaseName
    pptx2md $_.FullName -o "$name.md" -i "${name}_images"
}
Cette boucle convertit chaque présentation en un fichier Markdown distinct et stocke ses images extraites dans un dossier correspondant.
⚠️ Limitation de format : pptx2md ne prend en charge que les fichiers .pptx modernes. Si vous avez des fichiers .ppt hérités, enregistrez-les au format .pptx avant d'exécuter l'outil.
Astuce de mise en page : Les diapositives PowerPoint reposent sur un positionnement spatial, tandis que Markdown est strictement linéaire. Après avoir converti des présentations avec des mises en page complexes, des zones de texte flottantes ou des colonnes parallèles, examinez manuellement le fichier généré pour vous assurer que l'ordre de lecture du texte est correct.
4. Automatisation C# (Idéal pour l'intégration d'applications)
Si la conversion PowerPoint en Markdown doit être intégrée dans une application .NET, un service backend ou un pipeline de traitement de documents, l'automatisation C# fournit un moyen programmatique d'effectuer la conversion directement dans votre application.
Les exemples suivants utilisent Spire.Presentation for .NET pour convertir des fichiers .pptx ou .ppt en Markdown sans nécessiter l'installation de Microsoft PowerPoint ni l'analyse manuelle de la structure de fichier sous-jacente.
Étape 1 : Installer le package requis
Installez le package depuis le gestionnaire de packages NuGet :
Install-Package Spire.Presentation
Ou avec l'interface de ligne de commande .NET :
dotnet add package Spire.Presentation
Étape 2 : Convertir PowerPoint en Markdown avec C#
L'exemple suivant charge une présentation .pptx et l'enregistre en tant que fichier Markdown. Le même code fonctionne également avec les fichiers .ppt hérités en modifiant le chemin du fichier d'entrée.
using Spire.Presentation;

namespace PowerPointToMarkdown
{
    internal class Program
    {
        static void Main(string[] args)
        {
            // Create a Presentation instance
            Presentation presentation = new Presentation();

            // Load a .pptx or .ppt PowerPoint file
            presentation.LoadFromFile(
                @"C:\Presentations\project_deck.pptx"
            );

            // Convert the presentation to Markdown
            presentation.SaveToFile(
                @"C:\Presentations\project_deck.md",
                FileFormat.Markdown
            );

            // Release resources
            presentation.Dispose();
        }
    }
}
Astuce : Vous pouvez également convertir une diapositive spécifique en Markdown :
ISlide slide = presentation.Slides[1];
slide.SaveToFile("slide_2.md", FileFormat.Markdown);
Slides[1] fait référence à la deuxième diapositive car la collection de diapositives utilise une indexation basée sur zéro.
Capture d'écran de sortie :
Remarque sur la licence : La version d'essai de la bibliothèque ajoute un message d'évaluation à la sortie générée si aucune licence valide n'est appliquée. Vous pouvez obtenir une licence temporaire pour le supprimer si nécessaire.
Résolution des problèmes de conversion courants
- Le texte apparaît dans le mauvais ordre – Les diapositives avec plusieurs zones de texte ou colonnes peuvent ne pas se convertir dans l'ordre de lecture attendu. Réorganisez manuellement le contenu concerné, ou essayez l'option
--try-multi-columnlors de l'utilisation depptx2md. - Images manquantes – Toutes les méthodes de conversion n'extraient pas les images. Choisissez un outil prenant en charge l'extraction d'images si vous devez préserver les images des diapositives.
- La mise en page des cellules fusionnées n'est pas préservée – Les tableaux Markdown standard ne prennent pas en charge les cellules fusionnées. Simplifiez le tableau avant la conversion, ajustez la sortie manuellement, ou conservez les tableaux complexes sous forme d'images.
- Le convertisseur ne prend pas en charge
.ppt– Convertissez d'abord le fichier en.pptx, ou utilisez un convertisseur qui prend en charge directement les fichiers.ppt.
En résumé
Il n'existe pas de méthode unique optimale pour convertir PowerPoint en Markdown.
- Pour des conversions rapides, utilisez un convertisseur en ligne ou le mode Plan de PowerPoint.
- Pour le traitement par lots local, utilisez
pptx2md. - Pour l'intégration d'applications ou de backends, utilisez l'automatisation C#.
Foire aux questions (FAQ)
Q1 : PowerPoint peut-il exporter directement des présentations en Markdown ?
R1 : Non. Microsoft PowerPoint n'a pas d'option intégrée d'exportation ou d'enregistrement au format Markdown, vous devez donc extraire le contenu manuellement ou utiliser un convertisseur externe.
Q2 : Les images et les notes du présentateur peuvent-elles être préservées lors de la conversion de PowerPoint en Markdown ?
R2 : Cela dépend de la méthode choisie. Le mode Plan de PowerPoint n'extrait que le texte, tandis que pptx2md peut extraire les images et inclure les notes du présentateur.
Q3 : Puis-je convertir des fichiers PPT hérités en Markdown ?
R3 : Oui. CloudConvert et la méthode C# de ce guide prennent en charge les fichiers .ppt hérités, tandis que GetMarkdown et pptx2md ne prennent en charge que les .pptx.
Convertir PowerPoint a Markdown: 4 formas de convertir presentaciones en texto estructurado
Tabla de contenido
- Comparación rápida: ¿Qué método de conversión de PPT a Markdown se adapta a tus necesidades?
- Método 1: Convertidores online de PPT a Markdown
- Método 2: Usar la vista Esquema de PowerPoint
- Método 3: Herramienta CLI pptx2md
- Método 4: Automatización con C#
- Solución de problemas comunes de conversión
- Preguntas frecuentes
PowerPoint funciona muy bien para presentaciones visuales, pero el contenido de las diapositivas puede ser más difícil de reutilizar en documentación técnica, wikis de equipo, bases de conocimiento con búsqueda o pipelines de LLM. Convertir PowerPoint a Markdown transforma el contenido de las diapositivas en texto estructurado que es fácil de editar, buscar, rastrear en Git y reutilizar en distintos flujos de trabajo.
En esta guía, mostraremos 4 formas prácticas de convertir archivos PPT y PPTX a Markdown, desde la conversión online rápida hasta el procesamiento por lotes con CLI local y la automatización con C#.
- Comparación rápida: ¿Qué método de conversión de PPT a Markdown se adapta a tus necesidades?
- Método 1: Convertidores online de PPT a Markdown
- Método 2: Usar la vista Esquema de PowerPoint
- Método 3: Herramienta CLI pptx2md
- Método 4: Automatización con C#
- Solución de problemas comunes de conversión
- Preguntas frecuentes
Comparación rápida: ¿Qué método de conversión de PPT a Markdown se adapta a tus necesidades?
El mejor enfoque depende de lo que necesites extraer de las diapositivas, de lo sensible que sean tus datos y de si conviertes un solo archivo o procesas archivos de PowerPoint por lotes.
| Método | Ideal para | Privacidad | Configuración | Imágenes |
|---|---|---|---|---|
| Convertidores online | Conversiones rápidas y puntuales | Varía según la herramienta | Ninguna (basada en navegador) | Varía según la herramienta |
| Vista Esquema de PowerPoint | Extraer títulos de diapositivas y texto principal | Totalmente offline | Integrada en PowerPoint | Solo texto (sin imágenes) |
| pptx2md CLI de Python | Conversión por lotes local | Ejecución local | Requiere Python | Se extraen a una carpeta |
| Automatización con C# | Pipelines de RAG e integración de aplicaciones | Ejecución local | Requiere desarrollo en .NET | Disponible mediante API |
1. Convertidores online de PPT a Markdown (mejor para conversiones rápidas y puntuales)
Las herramientas basadas en navegador suelen ser la opción más rápida si solo necesitas convertir unos pocos archivos sin instalar software ni escribir código.
Herramientas que vale la pena probar
- Convertidor de PowerPoint de GetMarkdown – Procesa archivos
.pptxlocalmente en tu navegador (sin subirlos a un servidor) y puede empaquetar las imágenes extraídas en un ZIP junto con el archivo Markdown. El plan gratuito admite hasta 10 MB por archivo y 8 archivos por lote. - CloudConvert PPT a MD – Admite tanto el formato heredado
.pptcomo.pptx. Los archivos se procesan en los servidores remotos de CloudConvert.
Cómo usarlas
Abre el convertidor online que elijas (p. ej., GetMarkdown).
Sube tu presentación de PowerPoint.
Inicia la conversión y luego descarga el archivo
.mdgenerado (o el archivo ZIP si se extrajeron imágenes incrustadas).
⚠️ Cosas que debes tener en cuenta
- Límites de formato: El texto sin formato y las listas con viñetas suelen convertirse bien, mientras que elementos complejos como celdas de tabla combinadas, SmartArt y diseños de varias columnas pueden requerir algo de limpieza manual.
- Privacidad de datos: Para presentaciones confidenciales, prefiere una herramienta que procese los archivos localmente en el navegador, o revisa la política de retención de datos del servicio antes de subirlos.
2. Usar la vista Esquema de PowerPoint (mejor para presentaciones limpias, solo texto)
Si quieres mantener los datos de tu presentación completamente offline y solo necesitas extraer los títulos de las diapositivas y el texto principal, la vista Esquema integrada de Microsoft PowerPoint ofrece una opción directa sin necesidad de un convertidor adicional.
Cómo hacerlo
- Abre la presentación en PowerPoint, luego ve a la pestaña Vista y selecciona Vista Esquema.
- Haz clic dentro del panel Esquema y pulsa
Ctrl + A(Cmd + Aen Mac) para seleccionar el texto del esquema, luego cópialo. - Pega el texto copiado en VS Code, Typora, Obsidian u otro editor de texto.
- Formatea manualmente los títulos de las diapositivas como encabezados (
#o##) y los puntos principales como listas con viñetas. - Guarda el archivo como un archivo
.md.
Alternativa de exportación rápida: Para presentaciones más largas, puedes omitir el copiado y pegado manual. Ve a Archivo > Guardar como y elige Esquema/RTF (*.rtf). Esto guarda todo el esquema como un archivo de texto que puedes abrir, limpiar y guardar como Markdown.
⚠️ Limitaciones: La vista Esquema solo captura el texto escrito en los títulos estándar de diapositivas y en los marcadores de posición del cuerpo. Los cuadros de texto flotantes, las tablas, SmartArt y los elementos gráficos pueden omitirse o necesitar copiarse manualmente.
3. Herramienta CLI pptx2md (mejor para conversión por lotes local)
Si necesitas convertir archivos .pptx localmente y por lotes, pptx2md ofrece un flujo de trabajo de línea de comandos ligero y de código abierto. Procesa los archivos completamente offline y conserva los títulos de las diapositivas, las listas anidadas, las tablas, las notas del presentador y las imágenes extraídas.
Instalación
Asegúrate de tener Python 3.10 o posterior instalado, luego ejecuta el siguiente comando en la terminal:
pip install pptx2md
Convertir un solo archivo PPTX a Markdown
Ve a la carpeta que contiene tu presentación y ejecuta el comando:
pptx2md project_deck.pptx -o output.md -i images
-o output.mdespecifica el nombre del archivo Markdown generado.-i imagesextrae y guarda las imágenes incrustadas en un directorio dedicado.
Otras opciones útiles del comando:
--disable-notes: Excluye las notas del presentador de la salida final de Markdown.--enable-slides: Añade reglas horizontales (---) para separar los límites de las diapositivas.--try-multi-column: Intenta detectar diseños de varias columnas. Nota: Esto puede ralentizar significativamente el procesamiento.
Para obtener una lista completa de opciones de configuración, consulta la página oficial de pptx2md en GitHub.
Convertir por lotes archivos PPTX a MD
Para convertir todos los archivos .pptx de la carpeta actual, ejecuta:
Get-ChildItem *.pptx | ForEach-Object {
    $name = $_.BaseName
    pptx2md $_.FullName -o "$name.md" -i "${name}_images"
}
Este bucle convierte cada presentación en un archivo Markdown separado y almacena sus imágenes extraídas en una carpeta correspondiente.
⚠️ Limitación de formato: pptx2md solo admite archivos .pptx modernos. Si tienes archivos .ppt heredados, guárdalos como .pptx antes de ejecutar la herramienta.
Consejo de diseño: Las diapositivas de PowerPoint dependen del posicionamiento espacial, mientras que Markdown es estrictamente lineal. Después de convertir presentaciones con diseños complejos, cuadros de texto flotantes o columnas paralelas, revisa manualmente el archivo generado para asegurarte de que el orden de lectura del texto fluya correctamente.
4. Automatización con C# (mejor para integración de aplicaciones)
Si la conversión de PowerPoint a Markdown necesita integrarse en una aplicación .NET, un servicio backend o un pipeline de procesamiento de documentos, la automatización con C# proporciona una forma programática de realizar la conversión directamente dentro de tu aplicación.
Los siguientes ejemplos usan Spire.Presentation for .NET para convertir archivos .pptx o .ppt a Markdown sin necesidad de tener Microsoft PowerPoint instalado ni de analizar manualmente la estructura del archivo subyacente.
Paso 1: Instalar el paquete requerido
Instala el paquete desde el Administrador de paquetes NuGet:
Install-Package Spire.Presentation
O con la CLI de .NET:
dotnet add package Spire.Presentation
Paso 2: Convertir PowerPoint a Markdown con C#
El siguiente ejemplo carga una presentación .pptx y la guarda como un archivo Markdown. El mismo código también funciona con archivos .ppt heredados si cambias la ruta del archivo de entrada.
using Spire.Presentation;

namespace PowerPointToMarkdown
{
    internal class Program
    {
        static void Main(string[] args)
        {
            // Create a Presentation instance
            Presentation presentation = new Presentation();

            // Load a .pptx or .ppt PowerPoint file
            presentation.LoadFromFile(
                @"C:\Presentations\project_deck.pptx"
            );

            // Convert the presentation to Markdown
            presentation.SaveToFile(
                @"C:\Presentations\project_deck.md",
                FileFormat.Markdown
            );

            // Release resources
            presentation.Dispose();
        }
    }
}
Consejo: También puedes convertir una diapositiva específica a Markdown:
ISlide slide = presentation.Slides[1];
slide.SaveToFile("slide_2.md", FileFormat.Markdown);
Slides[1] se refiere a la segunda diapositiva porque la colección de diapositivas usa indexación basada en cero.
Captura de pantalla de salida:
Nota sobre la licencia: La versión de prueba de la biblioteca añade un mensaje de evaluación a la salida generada si no se aplica una licencia válida. Puedes obtener una licencia temporal para eliminarlo si es necesario.
Solución de problemas comunes de conversión
- El texto aparece en el orden incorrecto: las diapositivas con varios cuadros de texto o columnas pueden no convertirse en el orden de lectura esperado. Reorganiza manualmente el contenido afectado o prueba la opción
--try-multi-columnal usarpptx2md. - Faltan imágenes: no todos los métodos de conversión extraen imágenes. Elige una herramienta con soporte para extracción de imágenes si necesitas conservar las imágenes de las diapositivas.
- El diseño de celdas combinadas no se conserva: las tablas Markdown estándar no admiten celdas combinadas. Simplifica la tabla antes de la conversión, ajusta la salida manualmente o mantén las tablas complejas como imágenes.
- El convertidor no admite
.ppt: convierte primero el archivo a.pptx, o usa un convertidor que admita archivos.pptdirectamente.
Conclusión
No hay una única mejor manera de convertir PowerPoint a Markdown.
- Para conversiones rápidas, usa un convertidor online o la vista Esquema de PowerPoint.
- Para procesamiento por lotes local, usa
pptx2md. - Para integración de aplicaciones o backend, usa la automatización con C#.
Preguntas frecuentes (FAQ)
P1: ¿PowerPoint puede exportar presentaciones directamente a Markdown?
R1: No. Microsoft PowerPoint no tiene una opción integrada de exportar ni de Guardar como Markdown, por lo que debes extraer el contenido manualmente o usar un convertidor externo.
P2: ¿Se pueden conservar las imágenes y las notas del orador al convertir PowerPoint a Markdown?
R2: Depende del método que elijas. La vista Esquema de PowerPoint solo extrae texto, mientras que pptx2md puede extraer imágenes e incluir notas del presentador.
P3: ¿Puedo convertir archivos PPT heredados a Markdown?
R3: Sí. CloudConvert y el método con C# de esta guía admiten archivos .ppt heredados, mientras que GetMarkdown y pptx2md solo admiten .pptx.
PowerPoint in Markdown konvertieren: 4 Wege, Präsentationen in strukturierten Text umzuwandeln
Inhaltsverzeichnis
- Schneller Vergleich: Welche PPT-zu-Markdown-Konvertierungsmethode passt zu Ihren Anforderungen?
- Methode 1: Online-PPT-zu-Markdown-Konverter
- Methode 2: PowerPoint-Gliederungsansicht verwenden
- Methode 3: pptx2md-CLI-Tool
- Methode 4: C#-Automatisierung
- Behebung häufiger Konvertierungsprobleme
- Häufig gestellte Fragen
PowerPoint eignet sich hervorragend für visuelle Präsentationen, aber Folieninhalte lassen sich in technischer Dokumentation, Team-Wikis, durchsuchbaren Wissensdatenbanken oder LLM-Pipelines oft schwerer wiederverwenden. Die Konvertierung von PowerPoint zu Markdown verwandelt die Folieninhalte in strukturierten Text, der leicht zu bearbeiten, zu durchsuchen, in Git zu verfolgen und in verschiedenen Workflows wiederzuverwenden ist.
In diesem Leitfaden zeigen wir 4 praktische Möglichkeiten, PPT- und PPTX-Dateien in Markdown zu konvertieren – von der schnellen Online-Konvertierung über die lokale CLI-Stapelverarbeitung bis hin zur C#-Automatisierung.
- Schneller Vergleich: Welche PPT-zu-Markdown-Konvertierungsmethode passt zu Ihren Anforderungen?
- Methode 1: Online-PPT-zu-Markdown-Konverter
- Methode 2: PowerPoint-Gliederungsansicht verwenden
- Methode 3: pptx2md-CLI-Tool
- Methode 4: C#-Automatisierung
- Behebung häufiger Konvertierungsprobleme
- Häufig gestellte Fragen
Schneller Vergleich: Welche PPT-zu-Markdown-Konvertierungsmethode passt zu Ihren Anforderungen?
Der beste Ansatz hängt davon ab, was Sie aus Ihren Folien extrahieren müssen, wie sensibel Ihre Daten sind und ob Sie eine einzelne Datei konvertieren oder PowerPoint-Dateien in großen Mengen verarbeiten.
| Methode | Am besten geeignet für | Datenschutz | Einrichtung | Bilder |
|---|---|---|---|---|
| Online-Konverter | Schnelle Einmal-Konvertierungen | Je nach Tool unterschiedlich | Keine (browserbasiert) | Je nach Tool unterschiedlich |
| PowerPoint-Gliederungsansicht | Extrahieren von Folientiteln und Haupttext | Vollständig offline | In PowerPoint integriert | Nur Text (keine Bilder) |
| pptx2md Python-CLI | Lokale Stapelkonvertierung | Lokale Ausführung | Erfordert Python | In Ordner extrahiert |
| C#-Automatisierung | RAG-Pipelines und Anwendungsintegration | Lokale Ausführung | Erfordert .NET-Entwicklung | Verfügbar über API |
1. Online-PPT-zu-Markdown-Konverter (am besten für schnelle Einmal-Konvertierungen)
Browserbasierte Tools sind in der Regel die schnellste Option, wenn Sie nur ein paar Dateien konvertieren müssen, ohne Software zu installieren oder Code zu schreiben.
Tools, die einen Versuch wert sind
- GetMarkdown PowerPoint-Konverter – Verarbeitet
.pptx-Dateien lokal in Ihrem Browser (kein Upload auf einen Server) und kann extrahierte Bilder zusammen mit der Markdown-Datei in eine ZIP-Datei packen. Die kostenlose Version unterstützt bis zu 10 MB pro Datei und 8 Dateien pro Stapel. - CloudConvert PPT to MD – Unterstützt sowohl ältere
.ppt- als auch.pptx-Formate. Dateien werden auf den Remote-Servern von CloudConvert verarbeitet.
Verwendung
Öffnen Sie den ausgewählten Online-Konverter (z. B. GetMarkdown).
Laden Sie Ihre PowerPoint-Präsentation hoch.
Starten Sie die Konvertierung und laden Sie anschließend die generierte
.md-Datei herunter (oder das ZIP-Archiv, wenn eingebettete Bilder extrahiert wurden).
⚠️ Wichtige Hinweise
- Formatierungsgrenzen: Einfacher Text und Aufzählungslisten lassen sich in der Regel gut konvertieren, während komplexe Elemente wie verbundene Tabellenzellen, SmartArt und mehrspaltige Layouts möglicherweise manuell bereinigt werden müssen.
- Datenschutz: Bevorzugen Sie für vertrauliche Präsentationen ein Tool, das Dateien lokal im Browser verarbeitet, oder prüfen Sie die Datenaufbewahrungsrichtlinie des Dienstes, bevor Sie etwas hochladen.
2. PowerPoint-Gliederungsansicht verwenden (am besten für saubere, reine Textpräsentationen)
Wenn Sie Ihre Präsentationsdaten vollständig offline halten möchten und nur Folientitel und Haupttext extrahieren müssen, bietet die in Microsoft PowerPoint integrierte Gliederungsansicht eine direkte Option, ohne dass ein zusätzlicher Konverter erforderlich ist.
Vorgehensweise
- Öffnen Sie die Präsentation in PowerPoint, wechseln Sie zur Registerkarte Ansicht und wählen Sie Gliederungsansicht.
- Klicken Sie in den Gliederungsbereich und drücken Sie
Ctrl + A(Cmd + Aunter Mac), um den Gliederungstext auszuwählen, und kopieren Sie ihn anschließend. - Fügen Sie den kopierten Text in VS Code, Typora, Obsidian oder einen anderen Texteditor ein.
- Formatieren Sie Folientitel manuell als Überschriften (
#oder##) und Hauptpunkte als Aufzählungslisten. - Speichern Sie die Datei als
.md-Datei.
Schnelle Export-Alternative: Bei längeren Präsentationen können Sie das manuelle Kopieren und Einfügen überspringen. Gehen Sie zu Datei > Speichern unter und wählen Sie Gliederung/RTF (*.rtf). Dadurch wird die gesamte Gliederung als Textdatei gespeichert, die Sie öffnen, bereinigen und als Markdown speichern können.
⚠️ Einschränkungen: Die Gliederungsansicht erfasst nur Text, der in standardmäßigen Folientiteln und Textplatzhaltern geschrieben wurde. Schwebende Textfelder, Tabellen, SmartArt und grafische Elemente werden möglicherweise ausgelassen oder müssen manuell kopiert werden.
3. pptx2md-CLI-Tool (am besten für lokale Stapelkonvertierung)
Wenn Sie .pptx-Dateien lokal und in großen Mengen konvertieren müssen, bietet pptx2md einen leichtgewichtigen, quelloffenen Kommandozeilen-Workflow. Es verarbeitet Dateien vollständig offline und bewahrt Folientitel, verschachtelte Listen, Tabellen, Referentennotizen und extrahierte Bilder.
Installation
Stellen Sie sicher, dass Python 3.10 oder höher installiert ist, und führen Sie dann den folgenden Befehl im Terminal aus:
pip install pptx2md
Eine einzelne PPTX-Datei in Markdown konvertieren
Navigieren Sie zu dem Ordner, der Ihre Präsentation enthält, und führen Sie den Befehl aus:
pptx2md project_deck.pptx -o output.md -i images
-o output.mdgibt den Namen der generierten Markdown-Datei an.-i imagesextrahiert eingebettete Bilder und speichert sie in einem eigenen Verzeichnis.
Weitere nützliche Befehlsflags:
--disable-notes: Schließt Referentennotizen aus der endgültigen Markdown-Ausgabe aus.--enable-slides: Fügt horizontale Linien (---) hinzu, um Foliengrenzen zu trennen.--try-multi-column: Versucht, mehrspaltige Layouts zu erkennen. Hinweis: Dies kann die Verarbeitung erheblich verlangsamen.
Eine vollständige Liste der Konfigurationsoptionen finden Sie auf der offiziellen pptx2md GitHub-Seite.
PPTX-Dateien im Stapel in MD konvertieren
Um jede .pptx-Datei im aktuellen Ordner zu konvertieren, führen Sie Folgendes aus:
Get-ChildItem *.pptx | ForEach-Object {
    $name = $_.BaseName
    pptx2md $_.FullName -o "$name.md" -i "${name}_images"
}
Diese Schleife konvertiert jede Präsentation in eine separate Markdown-Datei und speichert die extrahierten Bilder in einem entsprechenden Ordner.
⚠️ Formatbeschränkung: pptx2md unterstützt nur moderne .pptx-Dateien. Wenn Sie ältere .ppt-Dateien haben, speichern Sie sie als .pptx, bevor Sie das Tool ausführen.
Layout-Tipp: PowerPoint-Folien basieren auf räumlicher Positionierung, während Markdown streng linear ist. Überprüfen Sie nach der Konvertierung von Präsentationen mit komplexen Layouts, schwebenden Textfeldern oder parallelen Spalten die generierte Datei manuell, um sicherzustellen, dass die Lesereihenfolge des Textes korrekt verläuft.
4. C#-Automatisierung (am besten für Anwendungsintegration)
Wenn die PowerPoint-zu-Markdown-Konvertierung in eine .NET-Anwendung, einen Backend-Dienst oder eine Dokumentverarbeitungspipeline integriert werden muss, bietet die C#-Automatisierung eine programmatische Möglichkeit, die Konvertierung direkt in Ihrer Anwendung durchzuführen.
Die folgenden Beispiele verwenden Spire.Presentation for .NET, um .pptx- oder .ppt-Dateien in Markdown zu konvertieren, ohne dass Microsoft PowerPoint installiert werden muss oder die zugrunde liegende Dateistruktur manuell analysiert werden muss.
Schritt 1: Erforderliches Paket installieren
Installieren Sie das Paket über den NuGet-Paket-Manager:
Install-Package Spire.Presentation
Oder mit der .NET-CLI:
dotnet add package Spire.Presentation
Schritt 2: PowerPoint mit C# in Markdown konvertieren
Das folgende Beispiel lädt eine .pptx-Präsentation und speichert sie als Markdown-Datei. Derselbe Code funktioniert auch mit älteren .ppt-Dateien, wenn Sie den Eingabedateipfad ändern.
using Spire.Presentation;

namespace PowerPointToMarkdown
{
    internal class Program
    {
        static void Main(string[] args)
        {
            // Create a Presentation instance
            Presentation presentation = new Presentation();

            // Load a .pptx or .ppt PowerPoint file
            presentation.LoadFromFile(
                @"C:\Presentations\project_deck.pptx"
            );

            // Convert the presentation to Markdown
            presentation.SaveToFile(
                @"C:\Presentations\project_deck.md",
                FileFormat.Markdown
            );

            // Release resources
            presentation.Dispose();
        }
    }
}
Tipp: Sie können auch eine bestimmte Folie in Markdown konvertieren:
ISlide slide = presentation.Slides[1];
slide.SaveToFile("slide_2.md", FileFormat.Markdown);
Slides[1] bezieht sich auf die zweite Folie, da die Foliensammlung eine nullbasierte Indizierung verwendet.
Ausgabescreenshot:
Lizenzhinweis: Die Testversion der Bibliothek fügt der generierten Ausgabe eine Evaluierungsmeldung hinzu, wenn keine gültige Lizenz angewendet wird. Sie können eine temporäre Lizenz erhalten, um sie bei Bedarf zu entfernen.
Behebung häufiger Konvertierungsprobleme
- Text erscheint in der falschen Reihenfolge – Folien mit mehreren Textfeldern oder Spalten werden möglicherweise nicht in der erwarteten Lesereihenfolge konvertiert. Ordnen Sie den betroffenen Inhalt manuell neu an, oder probieren Sie das Flag
--try-multi-columnbei der Verwendung vonpptx2mdaus. - Bilder fehlen – Nicht alle Konvertierungsmethoden extrahieren Bilder. Wählen Sie ein Tool mit Unterstützung für die Bildextraktion, wenn Sie Folienbilder beibehalten müssen.
- Layout verbundener Zellen wird nicht beibehalten – Standard-Markdown-Tabellen unterstützen keine verbundenen Zellen. Vereinfachen Sie die Tabelle vor der Konvertierung, passen Sie die Ausgabe manuell an oder behalten Sie komplexe Tabellen als Bilder bei.
- Der Konverter unterstützt
.pptnicht – Konvertieren Sie die Datei zuerst in.pptx, oder verwenden Sie einen Konverter, der.ppt-Dateien direkt unterstützt.
Zusammenfassung
Es gibt keinen einzigen besten Weg, PowerPoint in Markdown zu konvertieren.
- Für schnelle Konvertierungen verwenden Sie einen Online-Konverter oder die PowerPoint-Gliederungsansicht.
- Für die lokale Stapelverarbeitung verwenden Sie
pptx2md. - Für die Anwendungs- oder Backend-Integration verwenden Sie die C#-Automatisierung.
Häufig gestellte Fragen (FAQs)
F1: Kann PowerPoint Präsentationen direkt nach Markdown exportieren?
A1: Nein. Microsoft PowerPoint verfügt über keine integrierte Export- oder „Speichern unter“-Markdown-Option, daher müssen Sie den Inhalt manuell extrahieren oder einen externen Konverter verwenden.
F2: Können Bilder und Referentennotizen bei der Konvertierung von PowerPoint in Markdown beibehalten werden?
A2: Das hängt von der gewählten Methode ab. Die PowerPoint-Gliederungsansicht extrahiert nur Text, während pptx2md Bilder extrahieren und Referentennotizen einbeziehen kann.
F3: Kann ich ältere PPT-Dateien in Markdown konvertieren?
A3: Ja. CloudConvert und die C#-Methode in diesem Leitfaden unterstützen ältere .ppt-Dateien, während GetMarkdown und pptx2md nur .pptx unterstützen.
Convert PowerPoint to Markdown: 4 Ways to Turn Presentations into Structured Text
Table of Contents
PowerPoint works great for visual presentations, but slide content can be harder to reuse in technical documentation, team wikis, searchable knowledge bases, or LLM pipelines. Converting PowerPoint to Markdown turns the slide content into structured text that is easy to edit, search, track in Git, and reuse across different workflows.
In this guide, we will show 4 practical ways to convert PPT and PPTX files to Markdown—ranging from quick online conversion to local CLI batch processing and C# automation.
- Quick Comparison: Which PPT-to-Markdown Conversion Method Fits Your Needs?
- Method 1: Online PPT to Markdown Converters
- Method 2: Use PowerPoint Outline View
- Method 3: pptx2md CLI Tool
- Method 4: C# Automation
- Troubleshooting Common Conversion Issues
- Frequently Asked Questions
Quick Comparison: Which PPT-to-Markdown Conversion Method Fits Your Needs?
The best approach depends on what you need to extract from your slides, how sensitive your data is, and whether you're converting a single file or processing PowerPoint files in bulk.
| Method | Best For | Privacy | Setup | Images |
|---|---|---|---|---|
| Online Converters | Quick, one-off conversions | Varies by tool | None (browser-based) | Varies by tool |
| PowerPoint Outline View | Extracting slide titles and main text | Fully offline | Built into PowerPoint | Text only (no images) |
| pptx2md Python CLI | Local batch conversion | Local execution | Requires Python | Extracted to folder |
| C# Automation | RAG pipelines and application integration | Local execution | Requires .NET development | Available via API |
1. Online PPT to Markdown Converters (Best for Quick, One-Off Conversions)
Browser-based tools are usually the quickest option if you only need to convert a few files without installing software or writing code.
Tools Worth Trying
- GetMarkdown PowerPoint Converter – Processes
.pptxfiles locally in your browser (no upload to a server) and can package extracted images into a ZIP alongside the Markdown file. The free tier supports up to 10 MB per file and 8 files per batch. - CloudConvert PPT to MD – Supports both legacy
.pptand.pptxformats. Files are processed on CloudConvert's remote servers.
How to Use Them
-
Open your chosen online converter (e.g., GetMarkdown).
-
Upload your PowerPoint presentation.
-
Start the conversion, then download the generated
.mdfile (or ZIP archive if embedded images were extracted).
⚠️ Things to Keep in Mind
- Formatting Limits: Plain text and bullet lists usually convert well, while complex elements such as merged table cells, SmartArt, and multi-column layouts may require some manual cleanup.
- Data Privacy: For confidential presentations, prefer a tool that processes files locally in the browser, or review the service's data retention policy before uploading.
2. Use PowerPoint Outline View (Best for Clean, Text-Only Presentations)
If you want to keep your presentation data completely offline and only need to extract slide titles and main text, Microsoft PowerPoint's built-in Outline View provides a direct option without requiring an additional converter.
How to Do It
- Open the presentation in PowerPoint, then go to the View tab and select Outline View.
- Click inside the Outline pane and press
Ctrl + A(Cmd + Aon Mac) to select the outline text, then copy it. - Paste the copied text into VS Code, Typora, Obsidian, or another text editor.
- Manually format slide titles as headers (
#or##) and main points as bullet lists. - Save the file as a
.mdfile.
Quick Export Alternative: For longer presentations, you can skip copying and pasting manually. Go to File > Save As and choose Outline/RTF (*.rtf). This saves the entire outline as a text file that you can open, clean up, and save as Markdown.
⚠️ Limitations: Outline View only captures text written in standard slide titles and body placeholders. Floating text boxes, tables, SmartArt, and graphical elements may be omitted or need to be copied manually.
3. pptx2md CLI Tool (Best for Local Batch Conversion)
If you need to convert .pptx files locally and in bulk, pptx2md offers a lightweight, open-source command-line workflow. It processes files entirely offline and preserves slide titles, nested lists, tables, presenter notes, and extracted images.
Installation
Ensure you have Python 3.10 or later installed, then run the following command in the terminal:
pip install pptx2md
Convert a Single PPTX File to Markdown
Navigate to the folder containing your presentation and execute the command:
pptx2md project_deck.pptx -o output.md -i images
-o output.mdspecifies the generated Markdown file name.-i imagesextracts and saves embedded images into a dedicated directory.
Other useful command flags:
--disable-notes: Excludes presenter notes from the final Markdown output.--enable-slides: Adds horizontal rules (---) to separate slide boundaries.--try-multi-column: Attempts to detect multi-column layouts. Note: This can significantly slow down processing.
For a full list of configuration options, check the official pptx2md GitHub page.
Batch Convert PPTX Files to MD
To convert every .pptx file in the current folder, run:
Get-ChildItem *.pptx | ForEach-Object {
    $name = $_.BaseName
    pptx2md $_.FullName -o "$name.md" -i "${name}_images"
}
This loop converts each presentation into a separate Markdown file and stores its extracted images in a corresponding folder.
⚠️ Format Limitation: pptx2md only supports modern .pptx files. If you have legacy .ppt files, save them as .pptx before running the tool.
Layout Tip: PowerPoint slides rely on spatial positioning, whereas Markdown is strictly linear. After converting presentations with complex layouts, floating text boxes, or parallel columns, manually review the generated file to ensure the text reading order flows correctly.
4. C# Automation (Best for Application Integration)
If PowerPoint-to-Markdown conversion needs to be integrated into a .NET application, backend service, or document-processing pipeline, C# automation provides a programmatic way to perform the conversion directly within your application.
The following examples use Spire.Presentation for .NET to convert .pptx or .ppt files to Markdown without requiring Microsoft PowerPoint to be installed or manually parsing the underlying file structure.
Step 1: Install the Required Package
Install the package from NuGet Package Manager:
Install-Package Spire.Presentation
Or with the .NET CLI:
dotnet add package Spire.Presentation
Step 2: Convert PowerPoint to Markdown with C#
The following example loads a .pptx presentation and saves it as a Markdown file. The same code also works with legacy .ppt files by changing the input file path.
using Spire.Presentation;

namespace PowerPointToMarkdown
{
    internal class Program
    {
        static void Main(string[] args)
        {
            // Create a Presentation instance
            Presentation presentation = new Presentation();

            // Load a .pptx or .ppt PowerPoint file
            presentation.LoadFromFile(
                @"C:\Presentations\project_deck.pptx"
            );

            // Convert the presentation to Markdown
            presentation.SaveToFile(
                @"C:\Presentations\project_deck.md",
                FileFormat.Markdown
            );

            // Release resources
            presentation.Dispose();
        }
    }
}
Tip: You can also convert a specific slide to Markdown:
ISlide slide = presentation.Slides[1];
slide.SaveToFile("slide_2.md", FileFormat.Markdown);
Slides[1] refers to the second slide because the slide collection uses zero-based indexing.
Output Screenshot:
License Note: The trial version of the library adds an evaluation message to the generated output if no valid license is applied. You can get a temporary license to remove it if needed.
Troubleshooting Common Conversion Issues
- Text Appears in the Wrong Order – Slides with multiple text boxes or columns may not convert in the expected reading order. Rearrange the affected content manually, or try the
--try-multi-columnflag when usingpptx2md. - Images Are Missing – Not all conversion methods extract images. Choose a tool with image extraction support if you need to preserve slide images.
- Merged Cell Layout Is Not Preserved – Standard Markdown tables do not support merged cells. Simplify the table before conversion, adjust the output manually, or keep complex tables as images.
- The Converter Doesn't Support
.ppt– Convert the file to.pptxfirst, or use a converter that supports.pptfiles directly.
Wrapping Up
There is no single best way to convert PowerPoint to Markdown.
- For quick conversions, use an online converter or PowerPoint Outline View.
- For local batch processing, use
pptx2md. - For application or backend integration, use C# automation.
Frequently Asked Questions (FAQs)
Q1: Can PowerPoint directly export presentations to Markdown?
A1: No. Microsoft PowerPoint does not have a built-in export or Save As Markdown option, so you need to extract the content manually or use an external converter.
Q2: Can images and speaker notes be preserved when converting PowerPoint to Markdown?
A2: It depends on the method you choose. PowerPoint Outline View extracts text only, while pptx2md can extract images and include presenter notes.
Q3: Can I convert legacy PPT files to Markdown?
A3: Yes. CloudConvert and the C# method in this guide support legacy .ppt files, while GetMarkdown and pptx2md only support .pptx.
Convert Markdown to HTML with JavaScript in React

TL;DR: Learn how to convert Markdown files and strings into HTML directly inside the browser using JavaScript and Spire.Doc WebAssembly (WASM) in React. No server-side processing required.
Markdown is commonly used for README files, documentation, technical articles, and other structured content. However, some applications need the content as an actual HTML file—for example, to publish it as a web page or pass it to another HTML-based workflow.
This article shows how to convert Markdown to HTML with JavaScript in a React application using Spire.Doc for JavaScript. It covers two common scenarios:
Prerequisites & Project Setup
Step 1: Install Spire.Doc for JavaScript
Open a terminal in the root directory of your React project and install the Spire.Doc package through NPM:
npm i spire.office
Step 2: Copy the Runtime Resources
After installation, copy the following runtime resources from node_modules/spire.office to the public directory of your React project:
- _framework
- spire.doc.js
- Spire.Doc.Wasm.zip
- spire.common.js
- Spire.Common.Wasm.zip
The examples also use CALIBRI.ttf for text rendering. Place the font file under public/static/font/.
For the file-based example, place the source Markdown document in public/static/data/MarkdownExample.md.
For detailed setup instructions, see How to Integrate Spire.Doc for JavaScript in a React Project.
Note: The examples use
process.env.PUBLIC_URL, which follows the Create React App convention. If your project uses Vite or another build tool, adjust the public asset paths accordingly.
Convert a Markdown File to HTML with JavaScript in React
If the Markdown content already exists as a .md file, it can be loaded into the WebAssembly virtual file system (VFS) and opened directly with Document.LoadFromFile(). The document can then be exported as HTML using Document.SaveToFile().
The file-based conversion follows four main stages:
- Module Initialization: Load and initialize the Spire.Doc WebAssembly module when the React component mounts.
- Input Loading: Add the required font and source Markdown file to the VFS using
FetchFileToVFS(). - Document Conversion: Load the
.mdfile withFileFormat.Markdownand save it withFileFormat.Html. - Output Handling: Read the generated HTML from the VFS and download it in the browser.
The following example converts MarkdownExample.md to MarkdownToHtml.html.
import React, { useState, useEffect } from 'react';

function App() {
  const [wasmModule, setWasmModule] = useState(null);

  // Load Spire.Doc
  useEffect(() => {
    (async () => {
      try {
        const publicUrl = process.env.PUBLIC_URL || '';

        const spireModule = await import(
          /* webpackIgnore: true */
          `${publicUrl}/spire.doc.js`
        );

        const rawModule = spireModule.default || spireModule;

        window.wasmModule =
          typeof rawModule === 'function'
            ? await rawModule({
                locateFile: (path) =>
                  path.endsWith('.wasm')
                    ? `${publicUrl}/${path}`
                    : path
              })
            : rawModule;

        setWasmModule(window.wasmModule);
      } catch (error) {
        console.error(
          'Failed to load spire.doc.js WASM module:',
          error
        );
      }
    })();
  }, []);

  // Convert Markdown file to HTML
  const convertMarkdownFileToHtml = async () => {
    const wasmModule = window.wasmModule?.spiredoc;

    if (!wasmModule) return;

    // Load the required font into the VFS
    await window.spire.FetchFileToVFS(
      'CALIBRI.ttf',
      '/Library/Fonts/',
      `${process.env.PUBLIC_URL}/static/font/`
    );

    // Load the Markdown file into the VFS
    const inputFileName = 'MarkdownExample.md';

    await window.spire.FetchFileToVFS(
      inputFileName,
      '',
      `${process.env.PUBLIC_URL}/static/data/`
    );

    // Create a Document instance
    const doc = new wasmModule.Document();

    try {
      // Load the Markdown document
      doc.LoadFromFile({
        fileName: inputFileName,
        fileFormat: wasmModule.FileFormat.Markdown
      });

      // Set HTML export options
      doc.HtmlExportOptions.CssStyleSheetType = wasmModule.CssStyleSheetType.Internal;
      doc.HtmlExportOptions.ImageEmbedded = true;

      // Save the document as HTML
      const outputFileName = 'MarkdownToHtml.html';

      doc.SaveToFile({
        fileName: outputFileName,
        fileFormat: wasmModule.FileFormat.Html
      });

      // Read the generated HTML from the VFS
      const htmlBytes =
        window.dotnetRuntime.Module.FS.readFile(
          outputFileName
        );

      // Download the HTML file
      const blob = new Blob(
        [htmlBytes],
        { type: 'text/html;charset=utf-8' }
      );

      const url = URL.createObjectURL(blob);
      const link = document.createElement('a');

      link.href = url;
      link.download = outputFileName;

      document.body.appendChild(link);
      link.click();
      document.body.removeChild(link);

      URL.revokeObjectURL(url);
    } finally {
      doc.Dispose();
    }
  };

  return (
    <div style={{ textAlign: 'center', height: '300px' }}>
      <h1>Convert Markdown File to HTML</h1>

      <button
        onClick={convertMarkdownFileToHtml}
        disabled={!wasmModule}
      >
        Convert and Download
      </button>
    </div>
  );
}

export default App;
Once the WebAssembly module has loaded, click Convert and Download. The application loads MarkdownExample.md from public/static/data/, converts it to HTML, and downloads the generated MarkdownToHtml.html file.
Here, FetchFileToVFS() loads the source Markdown file into the WebAssembly virtual file system, and Document.LoadFromFile() reads the file from the VFS. CssStyleSheetType.Internal and ImageEmbedded embed styles and images directly in the HTML, while Document.SaveToFile() exports the document as HTML.
Output:
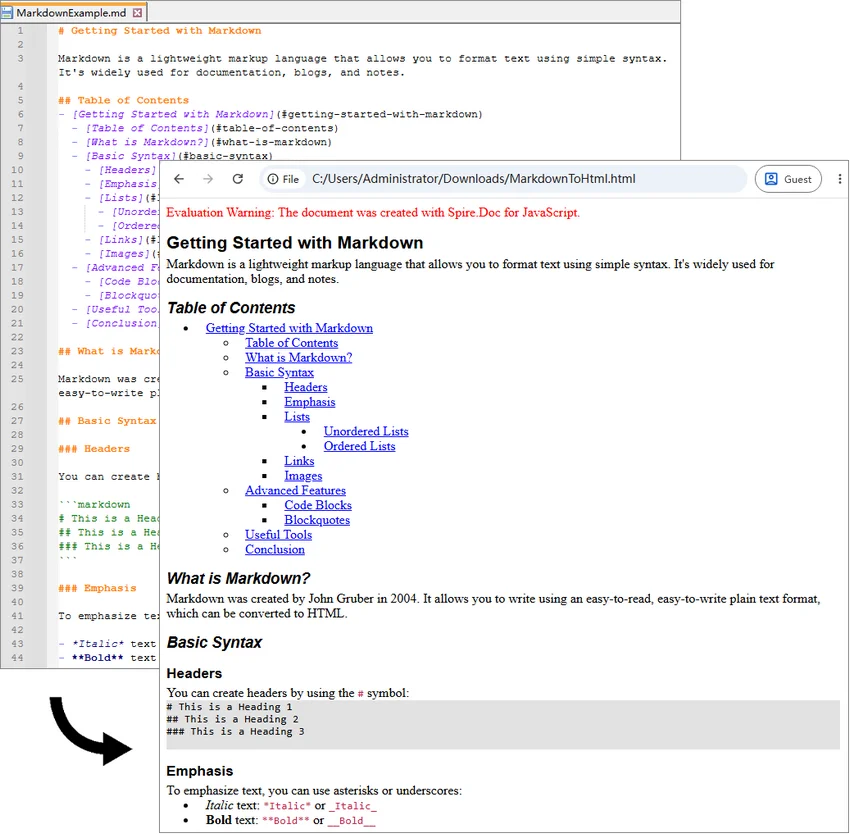
Convert a Markdown String to HTML with JavaScript in React
Markdown is also frequently generated or edited directly inside an application. Content returned by an API or CMS, for example, may already be available as a JavaScript string rather than an existing .md file.
Since Document.LoadFromFile() works with files available in the WebAssembly virtual file system, a Markdown string can first be written to a temporary .md file with FS.writeFile(). The temporary file can then be processed in the same way as a regular Markdown document.
The string-based conversion follows five main steps:
- Module Initialization: Load and initialize the Spire.Doc WebAssembly module.
- Content Preparation: Define or retrieve the Markdown string.
- VFS Creation: Write the Markdown string to a temporary
.mdfile usingFS.writeFile(). - Document Conversion: Load the virtual Markdown file and save it as HTML.
- Output Handling: Read the HTML file from the VFS and download or process it as needed.
The following example converts a Markdown string containing headings, lists, code, links, and a table.
import React, { useState, useEffect } from 'react';

function App() {
  const [wasmModule, setWasmModule] = useState(null);

  // Load Spire.Doc
  useEffect(() => {
    (async () => {
      try {
        const publicUrl = process.env.PUBLIC_URL || '';

        const spireModule = await import(
          /* webpackIgnore: true */
          `${publicUrl}/spire.doc.js`
        );

        const rawModule = spireModule.default || spireModule;

        window.wasmModule =
          typeof rawModule === 'function'
            ? await rawModule({
                locateFile: (path) =>
                  path.endsWith('.wasm')
                    ? `${publicUrl}/${path}`
                    : path
              })
            : rawModule;

        setWasmModule(window.wasmModule);
      } catch (error) {
        console.error(
          'Failed to load spire.doc.js WASM module:',
          error
        );
      }
    })();
  }, []);

  // Convert Markdown string to HTML
  const convertMarkdownStringToHtml = async () => {
    const wasmModule = window.wasmModule?.spiredoc;

    if (!wasmModule) return;

    // Load the required font into the VFS
    await window.spire.FetchFileToVFS(
      'CALIBRI.ttf',
      '/Library/Fonts/',
      `${process.env.PUBLIC_URL}/static/font/`
    );

    // Define the Markdown string
    const markdownString = `# Project Documentation

This project provides a **browser-based document converter**.

## Features

- Convert Markdown to HTML
- Process content in the browser
- Export the generated HTML

## Code Example

\`\`\`javascript
function greet(name) {
  console.log(\`Hello, \${name}!\`);
}

greet("World");
\`\`\`

## Supported Content

| Feature | Supported |
|---------|-----------|
| Headings | Yes |
| Lists | Yes |
| Tables | Yes |
| Links | Yes |

Visit [Example.com](https://example.com) for more information.
`;

    const inputFileName = 'MarkdownString.md';
    const outputFileName = 'MarkdownStringToHtml.html';

    // Write the Markdown string to the VFS
    window.dotnetRuntime.Module.FS.writeFile(
      inputFileName,
      markdownString,
      { encoding: 'utf8' }
    );

    // Create a Document instance
    const doc = new wasmModule.Document();

    try {
      // Load the Markdown document
      doc.LoadFromFile({
        fileName: inputFileName,
        fileFormat: wasmModule.FileFormat.Markdown
      });

      // Set HTML export options
      doc.HtmlExportOptions.CssStyleSheetType = wasmModule.CssStyleSheetType.Internal;
      doc.HtmlExportOptions.ImageEmbedded = true;

      // Save the document as HTML
      doc.SaveToFile({
        fileName: outputFileName,
        fileFormat: wasmModule.FileFormat.Html
      });

      // Read the generated HTML from the VFS
      const htmlBytes =
        window.dotnetRuntime.Module.FS.readFile(
          outputFileName
        );

      // Download the HTML file
      const blob = new Blob(
        [htmlBytes],
        { type: 'text/html;charset=utf-8' }
      );

      const url = URL.createObjectURL(blob);
      const link = document.createElement('a');

      link.href = url;
      link.download = outputFileName;

      document.body.appendChild(link);
      link.click();
      document.body.removeChild(link);

      URL.revokeObjectURL(url);
    } finally {
      doc.Dispose();
    }
  };

  return (
    <div style={{ textAlign: 'center', height: '300px' }}>
      <h1>Convert Markdown String to HTML</h1>

      <button
        onClick={convertMarkdownStringToHtml}
        disabled={!wasmModule}
      >
        Convert and Download
      </button>
    </div>
  );
}

export default App;
Unlike the previous example, there is no source .md file to load. The Markdown content is written directly to the VFS with FS.writeFile().
window.dotnetRuntime.Module.FS.writeFile(
  inputFileName,
  markdownString,
  { encoding: 'utf8' }
);
This approach also works with Markdown returned from an API, database, CMS, or text editor. Instead of defining markdownString directly in the code, pass the retrieved Markdown content to FS.writeFile().
Output:
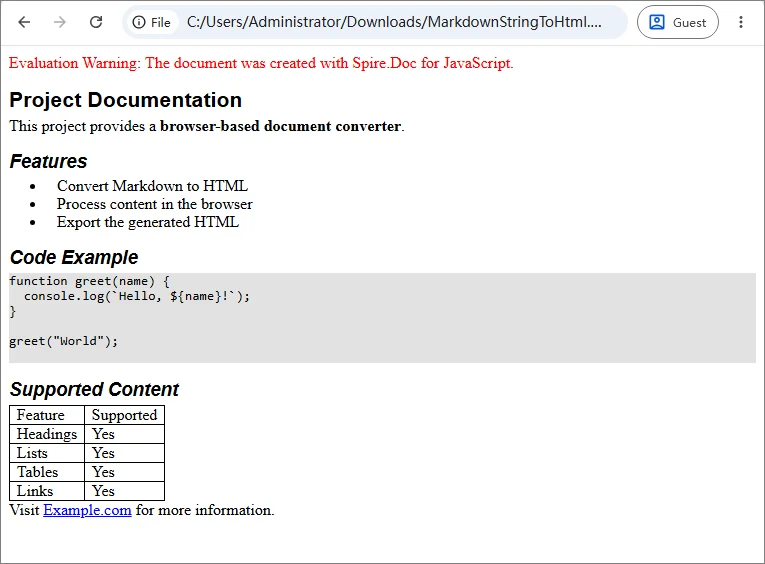
Troubleshooting Common MD to HTML Issues
Most conversion problems in a React JavaScript project relate to WebAssembly initialization, public asset paths, or files not loaded into the VFS correctly. The table below lists the most common issues and what to check first.
| Issue | Possible Cause | What to Check |
|---|---|---|
spiredoc is undefined |
The conversion starts before WASM initialization finishes | Keep the conversion button disabled until wasmModule is available |
| 404 when loading runtime files | One or more Spire.Doc assets are missing or the public path is incorrect | Check spire.doc.js, _framework/, WASM resources, and the browser Network panel |
MarkdownExample.md cannot be loaded |
The source file path passed to FetchFileToVFS() is incorrect |
Verify that the file is available under public/static/data/ |
| Font loading fails | CALIBRI.ttf is missing or the font path is incorrect |
Confirm that the font is accessible under public/static/font/ |
| Conversion works locally but fails after deployment | The deployed application uses a different public base path | Verify the generated URLs and adjust process.env.PUBLIC_URL or the equivalent build-tool setting |
| Browser memory increases after repeated conversions | Document objects are not released | Call doc.Dispose() after each conversion, preferably in a finally block |
FAQs
Q: How do I convert a user-selected Markdown file to HTML?
A: A file selected through <input type="file"> is different from a Markdown file stored in the application's public assets.
Read the selected file with the browser File API:
const markdownString = await file.text();
Then write the string to the VFS with FS.writeFile() and use the same conversion process shown in the Markdown string example.
Q: Can I preview the generated HTML instead of downloading it?
A: Yes. Read the generated HTML from the VFS and decode the returned bytes:
const htmlBytes = window.dotnetRuntime.Module.FS.readFile(outputFileName);
const html = new TextDecoder('utf-8').decode(htmlBytes);
The resulting string can then be displayed with an iframe:
<iframe
  title="HTML Preview"
  srcDoc={html}
/>
Security Note: If the Markdown comes from untrusted users or external sources, treat the generated HTML as untrusted content as well and sanitize or isolate it before rendering it in a production application.
Q: Does Markdown-to-HTML conversion require a backend?
A: No. In the examples above, document processing runs through WebAssembly in the browser. The source Markdown and generated HTML are handled through the client-side virtual file system.
A backend may still be needed if your application needs to store the generated file, retrieve protected source content, or perform other server-side operations.
Conclusion
This article showed how to convert Markdown to HTML with JavaScript in React, covering both Markdown files and Markdown strings. By running the conversion through WebAssembly in the browser, content from files, editors, APIs, or CMS platforms can be turned into HTML for download, preview, or further processing. The same core conversion logic can be reused across different Markdown sources.
How to Remove Hyperlinks in Word (Desktop, Online & C#)
Table of Contents
- Remove a Hyperlink in Microsoft Word
- Remove All Hyperlinks in a Word Document at Once
- Remove Hyperlinks from Word Online
- Batch Delete Hyperlinks from Word Documents with C#
- Bonus: Prevent Word from Creating Hyperlinks Automatically
- Things to Check After Removing Word Hyperlinks
- Frequently Asked Questions
Quick Summary (TL;DR):
-
One or a few hyperlinks: Right-click the linked text and select Remove Hyperlink.
-
All hyperlinks in one document:
-
Windows: Press Ctrl + A, then Ctrl + Shift + F9.
-
Mac: Press Cmd + A, then Cmd + Shift + F9. If F9 is assigned to a macOS system function, use Cmd + Fn + Shift + F9 or press Cmd + 6.
-
-
No Word installed: Use Word for the web to remove hyperlinks in a browser.
-
Multiple Word files: Use C# batch processing to remove hyperlinks automatically.
Hyperlinks are useful for sharing websites, references, and other resources in a Word document. But when you’re preparing a document for printing, publishing, or reuse, those links can become unnecessary—or leave behind formatting you no longer want.
This guide shows how to remove hyperlinks in Word, from removing individual and all links in Microsoft Word to automating cleanup across multiple DOCX files with C#.
What you will learn:
- Remove a Hyperlink in Microsoft Word
- Remove All Hyperlinks in a Word Document at Once
- Remove Hyperlinks from Word Online
- Batch Delete Hyperlinks from Word Documents with C#
- Bonus: Prevent Word from Creating Hyperlinks Automatically
- Things to Check After Removing Word Hyperlinks
- Frequently Asked Questions
Remove a Hyperlink in Microsoft Word
Best for: Removing one or a few hyperlinks without affecting other document content.
If only a small number of links need to be removed, Word's built-in Remove Hyperlink command is the safest and most straightforward option. It removes the clickable destination while keeping the displayed text in place.
This method is especially useful in documents containing tables of contents, citations, cross-references, or other dynamic fields because only the selected hyperlink is affected.
Step-by-Step Instructions
-
Open the document in Microsoft Word.
-
Locate the hyperlink you want to remove.
-
Right-click the linked text.
-
Select Remove Hyperlink.
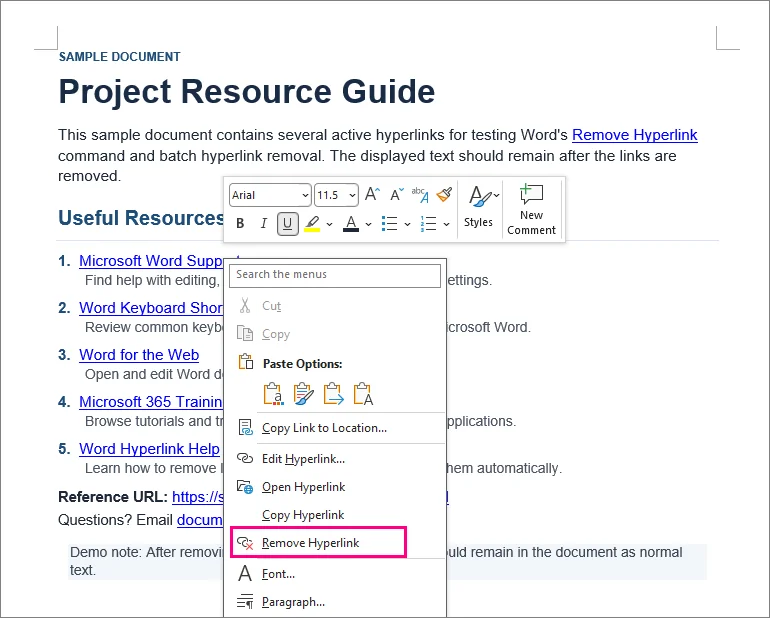
Result: The selected text remains in the document, but it is no longer clickable.
⚡ Tip: If you want to delete both the hyperlink and its displayed text, select the text and press Delete or Backspace instead.
Remove All Hyperlinks in a Word Document at Once
Best for: Quickly removing many hyperlinks from a relatively simple Word document.
Removing dozens of links one by one is time-consuming. Word provides a keyboard shortcut that can strip hyperlinks from the selected content in a single operation.
Remove All Hyperlinks on Windows
-
Press Ctrl + A to select all content in the document. You can also manually select only the section you want to process.
-
Press Ctrl + Shift + F9.
Remove All Hyperlinks on Mac
-
Press Cmd + A to select the document content.
-
Press Cmd + Shift + F9.
⚡ Tip: If your Mac uses F9 for a system or media function, use Cmd + Fn + Shift + F9 instead, or press Cmd + 6 to run Word's UnlinkFields command without relying on the F9 key.
Result: All selected hyperlinks are converted into plain text while preserving the original wording.
⚠️ Important: Check Dynamic Fields Before Using This Shortcut
Ctrl + Shift + F9 is not a hyperlink-specific command. It is Word's general Unlink Field command.
That means other fields included in the selection can also be converted to static text. These may include:
-
Automatically generated tables of contents
-
Cross-references
-
Citation fields
-
Other dynamic Word fields
For reports, theses, manuals, or other documents that rely on dynamic fields, save a backup before using the shortcut. Also note that Ctrl + A normally selects the main document text. Hyperlinks in headers and footers may need to be handled separately.
Remove Hyperlinks from Word Online
Best for: Occasional hyperlink removal when the desktop version of Microsoft Word is unavailable.
If you don't have Word installed, you can open your document in Word for the Web to edit hyperlinks directly in a browser. This is convenient for a small number of links and requires zero software installation.
Option A: The Pop-up Toolbar (Fastest)
-
Click on the hyperlinked text.
-
Click the Unlink icon (a chain link with a small "X") on the right side of the pop-up toolbar.
Option B: The Right-Click Menu
-
Right-click on the hyperlinked text.
-
Select Remove Hyperlink from the context menu.
Can't Remove a Hyperlink in Word for the Web?
Some links in Word for the Web may appear gray or be non-editable. Common causes include:
-
Track Changes: The link was created or edited while Track Changes was enabled.
-
Multi-paragraph links: The link spans multiple paragraphs and was created in the desktop version of Word.
Solution: Click Open in Desktop App (located in the Editing drop-down menu on the top ribbon) and remove the links in desktop Word.
Batch Delete Hyperlinks from Word Documents with C#
Best for: Developers automating backend document processing, cleaning up imported files, or processing large collections of Word documents.
Manual methods become inefficient when the same cleanup needs to be applied across many Word files. This is common when processing imported documents, preparing reports for publishing or archiving, or cleaning files generated by another system.
In these cases, hyperlink removal can be incorporated into a C# workflow. The following example uses Spire.Doc for .NET to batch remove hyperlinks from multiple DOCX files without requiring Microsoft Word to be installed.
Step 1: Install the .NET Word Library
Install Spire.Doc for .NET through NuGet using either the Package Manager Console or the .NET CLI.
NuGet Package Manager Console:
Install-Package Spire.Doc
.NET CLI:
dotnet add package Spire.Doc
After installation, the required namespaces can be referenced directly in your C# project.
Step 2: Write C# Code to Batch Remove Hyperlinks from DOCX Files
The following example scans an input folder for .docx files, identifies hyperlink fields in each document, removes the hyperlink fields while preserving the displayed text, and saves the processed files to a separate output folder.
using Spire.Doc;
using Spire.Doc.Documents;
using Spire.Doc.Fields;
using System;
using System.Collections.Generic;
using System.Drawing;
using System.IO;

namespace Remove_Hyperlinks
{
    class Program
    {
        static void Main(string[] args)
        {
            string inputFolder = @"C:\WordFiles\Input";
            string outputFolder = @"C:\WordFiles\Output";

            // Create the output folder if it does not exist
            Directory.CreateDirectory(outputFolder);

            // Process all DOCX files in the input folder
            foreach (string inputFile in Directory.GetFiles(inputFolder, "*.docx"))
            {
                // Skip temporary Word files
                if (Path.GetFileName(inputFile).StartsWith("~$"))
                    continue;

                // Create a Document instance
                Document doc = new Document();

                // Load a Word document
                doc.LoadFromFile(inputFile);

                // Find all hyperlinks
                List<Field> hyperlinks = FindAllHyperlinks(doc);

                // Flatten all hyperlinks
                for (int i = hyperlinks.Count - 1; i >= 0; i--)
                {
                    FlattenHyperlinks(hyperlinks[i]);
                }

                // Save the processed document
                string outputFile = Path.Combine(
                    outputFolder,
                    Path.GetFileName(inputFile));

                doc.SaveToFile(outputFile, FileFormat.Docx);
                doc.Close();

                Console.WriteLine(
                    $"Processed: {Path.GetFileName(inputFile)}");
            }
        }

        // Get all hyperlinks from the document body
        private static List<Field> FindAllHyperlinks(Document document)
        {
            List<Field> hyperlinks = new List<Field>();

            foreach (Section section in document.Sections)
            {
                foreach (DocumentObject sec in section.Body.ChildObjects)
                {
                    if (sec.DocumentObjectType == DocumentObjectType.Paragraph)
                    {
                        foreach (DocumentObject para
                                 in (sec as Paragraph).ChildObjects)
                        {
                            if (para.DocumentObjectType ==
                                DocumentObjectType.Field)
                            {
                                Field field = para as Field;

                                if (field.Type == FieldType.FieldHyperlink)
                                {
                                    hyperlinks.Add(field);
                                }
                            }
                        }
                    }
                }
            }

            return hyperlinks;
        }

        // Flatten a hyperlink field while retaining its displayed text
        private static void FlattenHyperlinks(Field field)
        {
            int ownerParaIndex =
                field.OwnerParagraph.OwnerTextBody.ChildObjects
                    .IndexOf(field.OwnerParagraph);

            int fieldIndex =
                field.OwnerParagraph.ChildObjects.IndexOf(field);

            Paragraph sepOwnerPara =
                field.Separator.OwnerParagraph;

            int sepOwnerParaIndex =
                field.Separator.OwnerParagraph.OwnerTextBody.ChildObjects
                    .IndexOf(field.Separator.OwnerParagraph);

            int sepIndex =
                field.Separator.OwnerParagraph.ChildObjects
                    .IndexOf(field.Separator);

            int endIndex =
                field.End.OwnerParagraph.ChildObjects
                    .IndexOf(field.End);

            int endOwnerParaIndex =
                field.End.OwnerParagraph.OwnerTextBody.ChildObjects
                    .IndexOf(field.End.OwnerParagraph);

            FormatFieldResultText(
                field.Separator.OwnerParagraph.OwnerTextBody,
                sepOwnerParaIndex,
                endOwnerParaIndex,
                sepIndex,
                endIndex);

            // Remove the field end marker
            field.End.OwnerParagraph.ChildObjects.RemoveAt(endIndex);

            // Remove the field code and separator
            for (int i = sepOwnerParaIndex; i >= ownerParaIndex; i--)
            {
                if (i == sepOwnerParaIndex && i == ownerParaIndex)
                {
                    for (int j = sepIndex; j >= fieldIndex; j--)
                    {
                        field.OwnerParagraph.ChildObjects.RemoveAt(j);
                    }
                }
                else if (i == ownerParaIndex)
                {
                    for (int j =
                            field.OwnerParagraph.ChildObjects.Count - 1;
                         j >= fieldIndex;
                         j--)
                    {
                        field.OwnerParagraph.ChildObjects.RemoveAt(j);
                    }
                }
                else if (i == sepOwnerParaIndex)
                {
                    for (int j = sepIndex; j >= 0; j--)
                    {
                        sepOwnerPara.ChildObjects.RemoveAt(j);
                    }
                }
                else
                {
                    field.OwnerParagraph.OwnerTextBody.ChildObjects
                        .RemoveAt(i);
                }
            }
        }

        // Set the retained hyperlink text to black and remove the underline
        private static void FormatFieldResultText(
            Body ownerBody,
            int sepOwnerParaIndex,
            int endOwnerParaIndex,
            int sepIndex,
            int endIndex)
        {
            for (int i = sepOwnerParaIndex;
                 i <= endOwnerParaIndex;
                 i++)
            {
                Paragraph para =
                    ownerBody.ChildObjects[i] as Paragraph;

                if (i == sepOwnerParaIndex &&
                    i == endOwnerParaIndex)
                {
                    for (int j = sepIndex + 1; j < endIndex; j++)
                    {
                        FormatText(para.ChildObjects[j] as TextRange);
                    }
                }
                else if (i == sepOwnerParaIndex)
                {
                    for (int j = sepIndex + 1;
                         j < para.ChildObjects.Count;
                         j++)
                    {
                        FormatText(para.ChildObjects[j] as TextRange);
                    }
                }
                else if (i == endOwnerParaIndex)
                {
                    for (int j = 0; j < endIndex; j++)
                    {
                        FormatText(para.ChildObjects[j] as TextRange);
                    }
                }
                else
                {
                    for (int j = 0;
                         j < para.ChildObjects.Count;
                         j++)
                    {
                        FormatText(para.ChildObjects[j] as TextRange);
                    }
                }
            }
        }

        // Set retained hyperlink text to black with no underline
        private static void FormatText(TextRange textRange)
        {
            if (textRange == null)
                return;

            textRange.CharacterFormat.TextColor = Color.Black;
            textRange.CharacterFormat.UnderlineStyle =
                UnderlineStyle.None;
        }
    }
}
Step 3: Run the Program
Update the input and output folder paths, place the DOCX files in the input folder, and run the application. The cleaned copies will be saved to the output folder with their original file names.
For a large batch, test the program on a few representative documents first.
Output:
⚠️ Technical Note: This C# snippet targets top-level body paragraphs. If your documents contain hyperlinks nested within tables, text boxes, or headers/footers, the traversal logic should be extended to scan those child elements recursively.
The code also resets the retained hyperlink text to black and removes its underline. If you only need to change the color or remove the underline from hyperlinks without removing the links, you can modify the hyperlink formatting separately.
Bonus: Prevent Word from Creating Hyperlinks Automatically
If the real problem is that Word keeps turning URLs and email addresses into links as you type, you can disable automatic hyperlink creation instead of repeatedly removing them afterward.
In Word for Windows
-
Click File in the top-left corner, then choose Options at the bottom of the sidebar.
-
Select the Proofing category from the left pane.
-
Click the AutoCorrect Options... button near the top.
-
Switch to the AutoFormat As You Type tab.
-
Uncheck the box next to Internet and network paths with hyperlinks.
-
Click OK to apply.
In Word for Mac
-
Click Word in the top Apple menu bar and select Preferences.
-
Open the AutoCorrect tool under the Authoring section.
-
Switch over to the AutoFormat As You Type tab.
-
Uncheck Internet and network paths with hyperlinks.
Changing this setting stops Word from formatting future links as you type. It will not touch or clean up hyperlinks that are already saved inside your current document.
Things to Check After Removing Word Hyperlinks
Removing hyperlinks is usually straightforward, but a few details are worth checking afterward, especially formatting, dynamic fields, and links in separate document areas.
-
Check Text Color and Underlines: If the text remains blue or underlined, set the font color to Automatic or match the surrounding text, then remove the underline if needed.
-
Verify Dynamic Fields: If you used the Ctrl + Shift + F9 shortcut, check your Table of Contents, cross-references, and citations. Ensure they weren't accidentally converted into un-updatable plain text.
-
Check Headers and Footers: Ctrl + A does not select text inside headers and footers. Double-click inside these specific areas manually to clear remaining hidden links.
Frequently Asked Questions
Q: Does removing a hyperlink delete the display text?
A: No. The Remove Hyperlink command removes the link while keeping the displayed text in place.
Q: How can I remove the blue underline without breaking the link?
A: Highlight the hyperlink, go to the Home tab, set the font color to Automatic or match the surrounding text, and then click the Underline button (or press Ctrl + U) to turn off the underline.
Q: How do I remove a hyperlink from an image in Word?
A: Right-click the hyperlinked image and select Remove Hyperlink. In automated document workflows, image hyperlinks can also be managed programmatically.
Q: Can I remove hyperlinks from Word without installing Word?
A: Yes. You can open and edit the file in a browser using Word for the web. For multiple files, you can also use C# with a software library like Spire.Doc to automate the removal.
Final Thoughts
Choosing the best way to remove hyperlinks depends on your editing context. For quick manual edits, Word's built-in commands and keyboard shortcuts are ideal. For automated document workflows or large DOCX file collections, C# script automation provides a reliable and scalable solution.
Clear or Remove Filters in Excel: 6 Ways (Manual & Automated)
- Clear vs. Remove Filters in Excel
- Part 1: Quick Solutions for Daily Excel Users (Desktop & Web)
- Part 2: Automation Solutions for Power Users & Developers
- Summary: Which Method Should You Choose?
- FAQs
Filters in Excel make it easier to focus on specific records in a large worksheet. But when a report is ready to share, a filtered workbook is reused, or you need to review the complete dataset, active filters can hide important rows or leave unnecessary filter arrows in place.
Clearing or removing filters in Excel is straightforward, but the right method depends on what you want to keep. You may only need to reset one column, clear all active filters while keeping the filter controls, remove the filter arrows completely, or clean filters from multiple workbooks at once. This guide covers six practical methods to achieve these using desktop Excel, Excel for the web, VBA, and C#.
Clear vs. Remove Filters in Excel
Clearing filters and removing filters in Excel are not the same action. Understanding the difference helps you reset your data views efficiently without disrupting your workflow:
| Action | What It Does | Filter Arrows |
|---|---|---|
| Clear Filter | Removes active filter criteria and shows the data hidden by those filters | Remain |
| Remove Filter | Turns filtering off and removes the filter controls completely | Removed |
When to Use Which
- Use Clear when you want to reset your current view and continue filtering.
- Use Remove when you no longer need filtering on the range and want a clean presentation view.
Part 1: Quick Solutions for Daily Excel Users (Desktop & Web)
If you are currently working inside the desktop or web version of Excel, use the manual methods below to clear or remove filters.
Important Note: The operations described below apply to standard cell ranges and Tables.
Method 1: Clear a Filter from a Single Column
Use this method when you have active filters across multiple columns (e.g., Country and Year) but only want to reset the criteria for one column without changing the filters applied to the others.
Step-by-Step Instructions
- Click the filter icon in the header of the filtered column.
- Select Clear Filter From "[Column Name]".
Keyboard Shortcuts
- Windows: Click the header cell of the filtered column, press Alt + Down Arrow to open the filter menu, then press C.
- Mac: Select the header cell, press Option + Down Arrow to open the filter menu, then select Clear Filter.
Result: Excel redisplays rows hidden by that column’s filter, while filters on other columns remain active.
Tip: If you cannot select the filter icon, check whether your worksheet is protected. Sheet protection can block filter-reset actions.
Method 2: Clear All Filters within a Worksheet
Use this method when multiple columns are filtered, and you need to restore the full dataset at once, without turning off the filtering feature.
Step-by-Step Instructions
- Go to the Data tab on the Excel Ribbon.
- In the Sort & Filter group, click the Clear button.
(Alternatively, go to the Home tab > Sort & Filter (in the Editing group) > Clear).
Keyboard Shortcuts
- Windows: Press Alt + A + C in sequence.
- Mac: Excel for Mac does not have a native shortcut for clearing filters. Use the ribbon method above.
Result: Excel redisplays rows hidden by active filters across the worksheet while keeping the filter dropdown arrows on the header row.
Method 3: Remove Filters and Filter Arrows Completely
If you want to turn off the filtering feature entirely and remove the dropdown arrows from your dataset headers, this is the method for you.
Step-by-Step Instructions
- Click any cell inside your data range.
- Go to the Data tab on the Excel Ribbon.
- In the Sort & Filter group, click the Filter button (the large funnel icon) to toggle it off.
(Alternatively, go to the Home tab > Sort & Filter > Filter).
Keyboard Shortcuts
- Windows: Press Ctrl + Shift + L (or Alt + A + T) in sequence.
- Mac: Press Cmd + Shift + F.
Result: Excel removes all active filter criteria, redisplays rows hidden by those filters, and removes the filter dropdown arrows from the header row.
Notes:
- Removing filters only affects the filtering setup; it does not remove cell formatting or conditional formatting. If you also want to clean up visual rules in the worksheet, see how to remove conditional formatting in Excel.
- Removing filters only toggles the AutoFilter feature. It will not delete, hide, or modify your source cell data. Hidden rows created manually (not by filters) will stay hidden.
Method 4: Clear or Remove Filters in Excel for the Web
If you don’t have the Excel application installed or are working in a web browser, you can clear filter criteria or turn filtering off using Excel for the Web.
Step-by-Step Instructions
- Click any cell inside your filtered dataset.
- Go to the Data tab on the ribbon.
- Choose your action:
- To clear criteria: Click Clear.
- To remove filters entirely: Click the Filter button to toggle the feature off.
Collaboration Note:
If you are working on a shared workbook stored in OneDrive or SharePoint, Excel may ask whether you want the filtering change to apply just to you or to everyone. Select "See Just Mine" to work in a separate Sheet View without changing what other users see.
Part 2: Automation Solutions for Power Users & Developers
Manual methods work well for individual workbooks. If you need to clear filters repeatedly across multiple worksheets or files, the automated VBA and C# solutions below can drastically reduce your repetitive work.
Method 5: Clear Filters Across All Worksheets (VBA Macro)
This VBA macro checks each worksheet in the workbook and clears active filter criteria from cell ranges and tables while keeping the existing AutoFilter controls in place:
Sub ClearFiltersFromAllWorksheets()
    Dim ws As Worksheet
    Dim tbl As ListObject

    For Each ws In ThisWorkbook.Worksheets
        ' Clear filters from a standard cell range
        If ws.FilterMode Then
            ws.ShowAllData
        End If

        ' Clear filters from Excel Tables
        For Each tbl In ws.ListObjects
            If Not tbl.AutoFilter Is Nothing Then
                tbl.AutoFilter.ShowAllData
            End If
        Next tbl
    Next ws
End Sub
How to Implement It
- Press Alt + F11 (Windows) or Option + F11 (Mac) to open the VBA Editor.
- Click Insert > Module from the top menu.
- Paste the macro code above into the window.
- Press F5 to execute, or close the editor and press Alt + F8 (Windows) / Option + F8 (Mac) to run it directly from Excel.
⚠️ Important Warning
Running a VBA macro clears Excel's Undo history, so changes made by the macro generally cannot be reversed with Ctrl + Z. Always test the macro on a backup copy of your data first. If you want to keep the VBA code in the workbook, save it as an Excel Macro-Enabled Workbook (.xlsm).
If you no longer need the VBA code after running the macro, you can also remove macros from the Excel workbook before sharing it.
Method 6: Batch Remove Filters from Multiple Excel Files with C#
VBA is useful when you are already working in Excel, but it still requires an Excel desktop environment and manual execution.
For batch processing or server-side workflows, opening each workbook manually is impractical. The following C# example uses Spire.XLS for .NET to remove AutoFilters from every worksheet in multiple Excel files without launching Microsoft Excel or using Office Interop.
Step 1: Install the Excel Library
Integrate the package into your project via the NuGet Package Manager:
Install-Package Spire.XLS
Or via the .NET CLI:
dotnet add package Spire.XLS
Step 2: C# Code to Batch Remove Filters Automatically
The following C# program reads all Excel files from an input directory, iterates through each worksheet, removes AutoFilters and filter arrows from both standard cell ranges and Excel Tables, and saves the processed workbooks to a target folder.
using System;
using System.IO;
using Spire.Xls;

class Program
{
    static void Main(string[] args)
    {
        // Define input and output directory paths
        string inputFolder = @"C:\ExcelFiles\Input";
        string outputFolder = @"C:\ExcelFiles\Output";

        // Ensure the output directory exists
        if (!Directory.Exists(outputFolder))
        {
            Directory.CreateDirectory(outputFolder);
        }

        // Get Excel files from the input folder
        string[] excelFiles = Directory.GetFiles(inputFolder, "*.xl*");

        Console.WriteLine($"Found {excelFiles.Length} files to process.");

        foreach (string file in excelFiles)
        {
            Workbook workbook = new Workbook();

            try
            {
                // Load the Excel file
                workbook.LoadFromFile(file);

                // Iterate through each worksheet
                foreach (Worksheet sheet in workbook.Worksheets)
                {
                    // Remove AutoFilters from standard cell ranges
                    sheet.AutoFilters.Clear();

                    // Remove AutoFilters from Excel Tables
                    for (int i = 0; i < sheet.ListObjects.Count; i++)
                    {
                        var table = sheet.ListObjects[i];
                        table.AutoFilters.Clear();
                    }
                }

                // Construct the output path and save the file
                string fileName = Path.GetFileName(file);
                string outputPath = Path.Combine(outputFolder, fileName);

                workbook.SaveToFile(outputPath);

                Console.WriteLine(
                    $"Successfully removed filters from: {fileName}");
            }
            catch (Exception ex)
            {
                Console.WriteLine(
                    $"Error processing file {Path.GetFileName(file)}: {ex.Message}");
            }
            finally
            {
                workbook.Dispose();
            }
        }

        Console.WriteLine("Batch processing completed.");
    }
}
Troubleshooting:
- Password-protected / encrypted Excel files will throw loading exceptions; you need to supply workbook passwords during
LoadFromFile.
License Note: The trial version of the library may add an Evaluation Warning sheet to generated workbooks. You can get a temporary license to remove it.
Summary: Which Method Should You Choose?
The right method depends on what you need to clear, whether you want to keep the filtering controls, and how many worksheets or files you need to process.
| Method | Best Used For | Keeps Dropdown Arrows? | Skill Level |
|---|---|---|---|
| 1. Clear a Single Column Filter | Column-specific adjustments without disturbing other filters | ✅ Yes | Beginner |
| 2. Clear All Filters | Returning the worksheet to a complete data view | ✅ Yes | Beginner |
| 3. Remove Filters Completely | Preparing a clean report without filter controls | ❌ No | Beginner |
| 4. Excel for the Web | Working in a browser or collaborating on shared workbooks | Depends on action | Beginner |
| 5. VBA Macro | Repetitive filter cleanup within an active workbook | ✅ Yes | Intermediate |
| 6. C# Batch Processing | Batch or server-side Excel processing | ❌ No | Advanced |
For most everyday Excel tasks, Methods 1–4 are usually enough. VBA and C# are better suited to repetitive operations across multiple worksheets or files, especially when manual processing becomes inefficient.
FAQs
Q: Why is my "Data > Clear" button greyed out?
A: The Data > Clear command is unavailable when no active filter criteria need to be cleared. Filter arrows may still be visible because filtering itself is still enabled.
Q: Can I hide filter arrows in an Excel Table?
A: Yes. Click inside the table, go to the Table Design tab at the top, and uncheck Filter Button. This only hides the dropdown arrow. Existing filter criteria remain active, and filtered-out rows stay hidden. Use Data > Clear beforehand if you need to show all table rows.
Q: Will clearing a filter delete my hidden rows?
A: No. Filtering hides rows that do not match the active criteria; it does not delete them. Clearing or removing filters redisplays those rows. Manually hidden rows remain hidden.
Q: Can I remove filtering from only one column in Excel?
A: No. You can clear the filter criteria from an individual column, but you cannot turn off filtering for just one column within a filtered range. Filters are applied to the entire range. If you do not want a particular column to be available for filtering, you can consider hiding it.