Convert ODP to PDF: 5 Reliable Ways (Desktop, Online & C#)
Table of Contents
ODP (OpenDocument Presentation) files are widely used in open-source environments for creating and collaborating on presentations. However, sharing ODP files can be tricky, as not everyone has the software required to view them. Converting ODP to PDF ensures your slides are viewable everywhere and ready for sharing, printing, or archiving.
In this guide, we will walk you through 5 proven and reliable methods to convert ODP to PDF while preserving formatting, ranging from desktop applications and online tools to automated batch processing using C#.
ODP to PDF Methods Overview
- Method 1 - LibreOffice / OpenOffice (High-Accuracy Desktop Conversion)
- Method 2 - Microsoft PowerPoint (Office-Based Conversion)
- Method 3 - Online Tools (No Installation Required)
- Method 4 - Command-Line Tools (Automation & Scripting)
- Method 5 - C# Batch Processing (Developer Solution)
What Is an ODP File?
An ODP file is an editable presentation format that belongs to the OpenDocument standard. It is mainly created and edited using open office suites like:
- LibreOffice Impress
- Apache OpenOffice Impress
Unlike the universal PDF format, which freezes content for distribution, ODP files are built for ongoing modification and require a compatible viewer or editor to open.
Why Convert ODP to PDF?
Converting ODP to PDF helps solve several practical issues in real use:
- Ensure your slides look consistent on Windows, macOS, Linux, and mobile devices.
- Open presentations without installing LibreOffice or OpenOffice.
- Prevent layout shifts when opened on different devices.
- Create professional, print-ready presentations with consistent formatting.
- Store presentations in a stable, non-editable format for archiving or documentation.
With these benefits in mind, let's explore the most reliable methods for achieving this conversion.
Method 1 - Convert ODP to PDF via LibreOffice / OpenOffice (High-Accuracy Desktop Conversion)
If you want to convert ODP to PDF without formatting issues, using LibreOffice or OpenOffice is the most reliable approach. These applications natively support the OpenDocument format, which means they can render your slides exactly as designed-avoiding the layout shifts or font errors often found in third-party converters.
Step-by-Step Guide (Using LibreOffice Impress as an example):
-
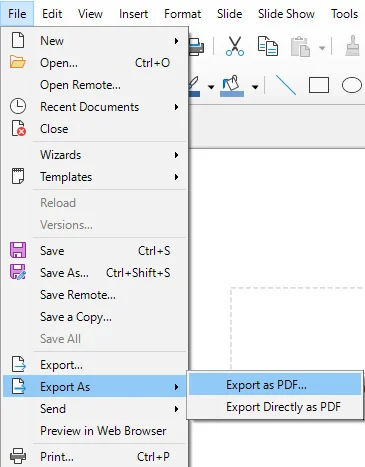
Open your ODP file in LibreOffice Impress.
-
Navigate to the top menu and select File > Export As > Export as PDF.
-
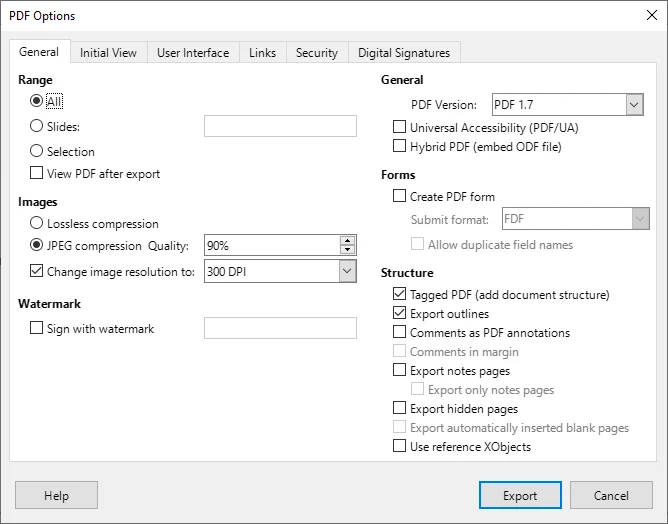
In the pop-up dialog, customize PDF settings like image compression, watermarks, and page range.
-
Click Export, choose a destination folder, and hit Save.
Pro Tips:
- Use File > Export As > Export Directly as PDF for faster conversion if no customization is needed.
- This method works identically on Windows, macOS, and Linux.
When to Use:
Best for cases where layout accuracy is critical, such as business presentations, reports, or client-facing documents.
Method 2 - Export ODP as PDF with Microsoft PowerPoint (Office-Based Conversion)
If you're an Office user, Microsoft PowerPoint provides an easy solution to export ODP files to PDFs. This method is available in PowerPoint 2010 and newer versions, as well as Microsoft PowerPoint 365. It’s a great choice for those who frequently use PowerPoint and want to convert ODP files without external tools.
Steps:
-
Launch Microsoft PowerPoint, go to File > Open, and select your .odp file.
- Pro Tip: If the file is not visible, toggle the file type filter to All Files.
-
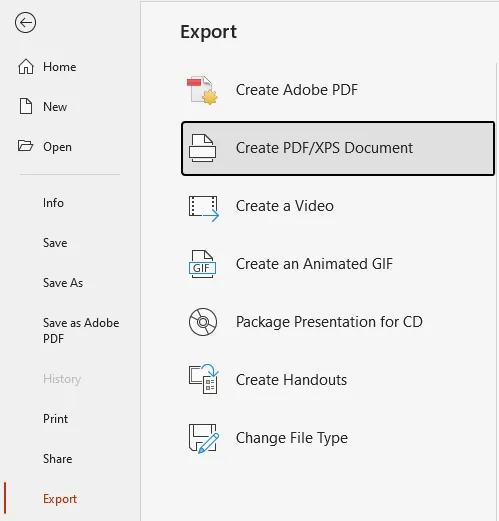
Go to File > Export > Create PDF/XPS Document.
- Alternative: Press F12, then select PDF (*.pdf) for a faster save.
-
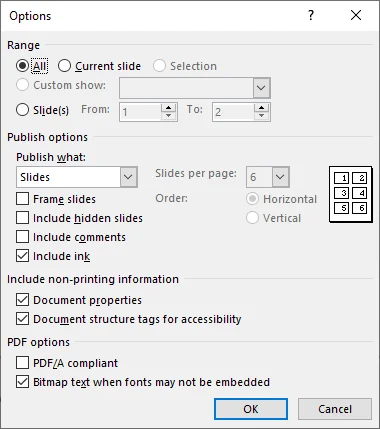
Click the Options... button to configure settings like:
- Include non-printing information (preserve document properties or structure tags)
- Bitmap text when fonts may not be embedded (this ensures the PDF looks consistent on all devices).
-
Choose the destination folder and click Publish to export your presentation as a PDF.
Tips and Notes:
- Advanced styles or specific ODF-only shapes might require minor manual adjustment after opening in PowerPoint.
- PowerPoint 2024 and Microsoft 365 support ODF 1.4, while PowerPoint 2013–2019 supports ODF 1.2. Older versions such as PowerPoint 2010 only support ODF 1.1, which offers limited compatibility with newer ODP files.
When to Use:
When you prefer the PowerPoint interface for conversion and don't need perfect layout accuracy.
Want to convert ODP to PPTX? Read our conversion guide.
Method 3 - Convert ODP to PDF Using Online Tools (No Installation Required)
For users who want a software-free solution, online ODP-to-PDF converters are a quick and convenient option. They work across devices and require no setup.
Recommended Online Converters:
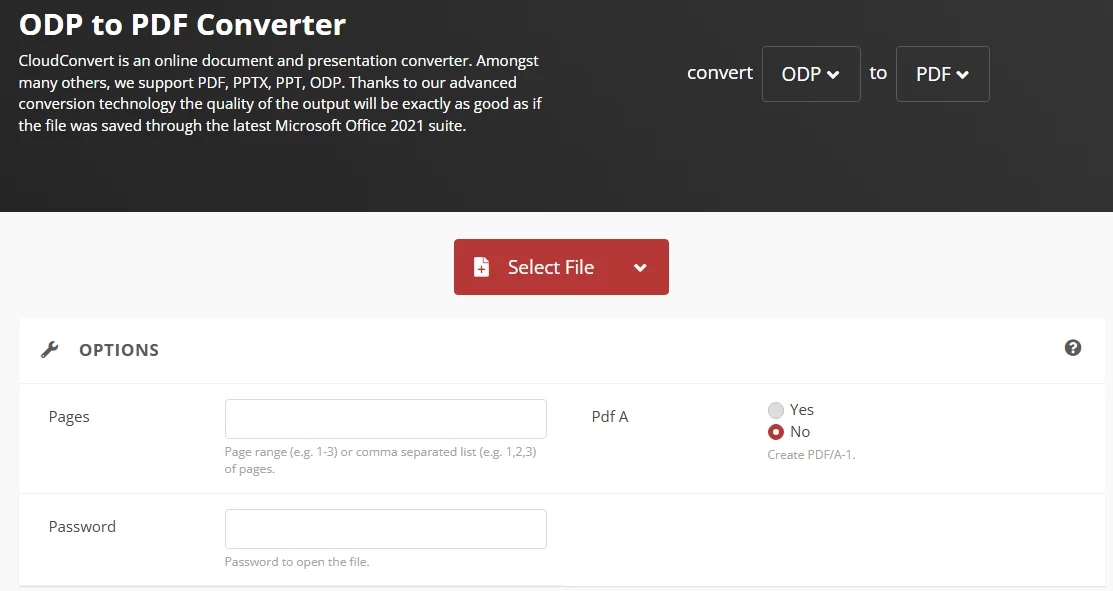
- CloudConvert - Supports ODP to PDF conversion along with a wide range of other file formats. Offers customization options like page range and password encryption.
- Google Slides - A cloud-based platform that can open ODP files and export them as PDFs, maintaining most layout and font formatting.
- Zamzar - A user-friendly online converter that easily converts presentations, including ODP files, into PDFs. No installation required.
Steps to Convert ODP to PDF Online:
-
Go to the website of your chosen online converter (e.g., CloudConvert).
-
Upload your ODP file.
-
Select PDF as the output format.
-
Click Convert and wait for the process to complete.
-
Download your converted PDF once the process finishes.
Security Warning and Tips:
- While convenient, online tools are not ideal for sensitive or proprietary content. Always verify the privacy policies of the platform before uploading your files.
- Some online converters have file size limits (usually 50-100M). If necessary, split large PowerPoint presentations before uploading.
When to Use:
Ideal for quick, occasional conversions, especially when you're on the go and need to convert files from any device.
Method 4 - Automate ODP File to PDF Conversion with Command-Line Tools
For users who want to automate ODP to PDF conversion in scripts or scheduled workflows, LibreOffice provides a command-line interface that runs in headless mode. This allows the conversion process to run in the background without opening the application, making it suitable for integration into automated systems and scheduled tasks.
Steps:
-
Install LibreOffice:
Ensure LibreOffice is installed and accessible from the command line.
-
Open Terminal / Command Prompt:
Navigate to the folder where your ODP file is located.
-
Run the conversion command:
Use LibreOffice in headless mode to convert your ODP file:
soffice --headless --convert-to pdf "yourfile.odp" -
Integrate into automation scripts:
You can include this command in Bash scripts, PowerShell scripts, or scheduled tasks to trigger conversion automatically based on time or system events. -
Verify the PDF output:
After execution, check the generated PDF to ensure formatting and layout are preserved correctly.
When to Use:
Ideal for developers and IT professionals who need automated conversion in script-based or scheduled environments.
Method 5 - Batch Convert ODP to PDF Using C# (Developer Solution)
For developers and technical teams managing large volumes of ODP files, manual conversion is inefficient. Using C# with an independent presentation library like Spire.Presentation for .NET, you can handle bulk ODP to PDF conversions quickly and seamlessly without installing LibreOffice or PowerPoint.
Steps:
-
Install Spire.Presentation for .NET:
Install Spire.Presentation from NuGet via the following command, or download it from the official website.
Install-Package Spire.Presentation -
Write C# Code for Batch Conversion:
Below is an example of how to batch convert multiple ODP files to PDFs in one go:
using Spire.Presentation;
using System.IO;

class Program
{
    static void Main()
    {
        string[] files = Directory.GetFiles(@"C:\Path\To\ODP_Folder", "*.odp"); // Replace the path with your folder path
        foreach (string file in files)
        {
            Presentation presentation = new Presentation();
            presentation.LoadFromFile(file);
            string pdfOutput = Path.ChangeExtension(file, ".pdf");
            presentation.SaveToFile(pdfOutput, FileFormat.PDF);
        }
    }
}
This script processes all ODP files in the specified folder and save them as PDFs under the same folder. Just place your ODP files in one directory, and the program will handle the conversion.
Output:
Tip:
You can further customize the script to include error handling, logging, or additional file processing as needed.
When to Use:
Ideal for developers or teams needing to perform bulk ODP-to-PDF conversions, especially when handling large volumes of files on a server.
Comparison of All ODP to PDF Methods
| Method | Best For | Ease of Use | Accuracy | Automation |
|---|---|---|---|---|
| LibreOffice/OpenOffice | High-quality conversion | Easy | ★★★★★ | Low |
| PowerPoint | Office users | Easy | ★★★☆ | Low |
| Online Tools | Quick conversion | Very easy | ★★★ | None |
| Command Line Tools | Power users | Medium | ★★★★ | High |
| C# Automation | Developers / batch processing | Advanced | ★★★★ | Very High |
Which method should you choose?
Choose the right ODP to PDF method according to your needs and workflow:
- For accuracy, desktop applications like LibreOffice are ideal.
- For quick usage, online tools are sufficient.
- For automation or bulk processing, command-line and C# solutions provide the most flexibility.
Tips for Better ODP to PDF Conversion
- Test the output on different devices to ensure layout integrity.
- Avoid overly complex animations if aiming for universal compatibility.
- For automation, validate input files to prevent crashes during batch processing.
- Delete uploaded files from online services after download to maintain security.
Common Conversion Issues & Solutions
- Fonts Not Displaying Correctly: Embed or outline fonts in LibreOffice/OpenOffice. In PowerPoint, enable "Bitmap text when fonts may not be embedded."
- Large File Sizes After Conversion: Use image compression during export or configure compression settings in online converters.
- PDF Layout Shifts: Use native ODP converters (LibreOffice/OpenOffice) and avoid advanced animations or ODF-only shapes in PowerPoint.
- Unable to Open ODP File in PowerPoint: Ensure your PowerPoint version supports ODP 1.4+. Otherwise, save as PPTX in LibreOffice/OpenOffice first.
- Batch Conversion Fails or Skips Files: Check file paths and extensions. Include error handling in scripts.
- Online Converter Upload Fails: Split large files or use a desktop tool. Ensure stable internet connection.
Frequently Asked Questions
Q1: Can I convert ODP to PDF for free?
A1: Yes, online converters like CloudConvert, Zamzar, and Online2PDF offer free services to convert ODP files to PDF. However, some free tools may have file size limitations.
Q2: Will animations or transitions be preserved when converting ODP to PDF?
A2: No. PDF format doesn't support animations. Use notes or video exports if animations are important.
Q3: Can I convert multiple ODP files to PDF at once?
A3: Yes. For bulk conversion, use C# automation. Online converters generally only support one file at a time or limit batch sizes.
Q4: Why do some ODP elements look different in PowerPoint?
A4: PowerPoint does not fully support all OpenDocument-specific features, such as custom shapes or advanced styles. Use LibreOffice/OpenOffice for the most accurate conversion.
Q5: How can I reduce PDF size during conversion?
A5: Reduce image resolution, remove unnecessary objects, or enable compression options in the PDF export dialog. Some online converters also provide PDF optimization settings.
See Also
How to Remove Background in PowerPoint: 5 Easy Ways
Table of Contents
- Quick Answer: How to Remove Background in PowerPoint
- Method 1. Remove Background from PowerPoint Slide (Format Background)
- Method 2. Delete Background from All PowerPoint Slides Quickly (Slide Master)
- Method 3. Remove Image Background in PowerPoint (Remove Background Tool)
- Method 4. Clear Background in PowerPoint Automatically with VBA
- Method 5. Batch Remove Background in PowerPoint with Python
- Comparison: Which Method Should You Choose?
- Why Remove Background in PowerPoint
- Common Background Removal Issues and Solutions
- FAQs: How to Remove Background in PowerPoint

Cluttered or distracting backgrounds in PowerPoint can sometimes make your presentations look unprofessional, hard to read, and reduce audience engagement. Learning how to remove background in PowerPoint helps you quickly clean up slides, improve readability, and maintain a consistent, professional look.
In this guide, we'll show you 5 practical methods to remove background in PowerPoint - covering single slides, images, entire presentations, and even multiple files-so you can create clean, polished slides more efficiently.
Contents Overview
- Quick Answer: How to Remove Background in PowerPoint
- Method 1. Remove Background from PowerPoint Slide (Format Background)
- Method 2. Delete Background from All PowerPoint Slides Quickly (Slide Master)
- Method 3. Remove Image Background in PowerPoint (Remove Background Tool)
- Method 4. Clear Background in PowerPoint Automatically with VBA
- Method 5. Batch Remove Background in PowerPoint with Python
- Comparison: Which Method Should You Choose?
- Why Remove Background in PowerPoint
- Common Background Removal Issues and Solutions
- FAQs: How to Remove Background in PowerPoint
Quick Answer: How to Remove Background in PowerPoint
If you want to remove background in PowerPoint quickly, here are the easiest methods:
- Use Format Background - best for single slides.
- Use Slide Master - best for all slides.
- Use Remove Background - best for images.
Keep reading for step-by-step instructions and advanced methods like VBA and Python.
Method 1. Remove Background from PowerPoint Slide (Format Background)
If you want to remove the background from a slide quickly, the Format Background feature is the most straightforward option. It allows you to clear the existing background without affecting text or other elements. This method works best when you need to clean up one or a few slides.
Steps:
-
Select the slide you want to remove background from.
-
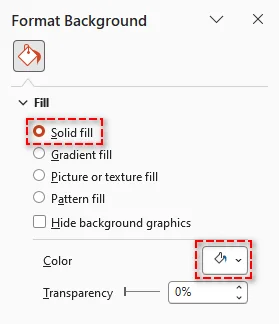
Go to the Design tab and click Format Background (or right-click the slide and choose Format Background).

-
In the Format Background pane, select Solid fill.
-
Click the Color button and choose white color from the dropdown. The background is now removed from the selected slides.
Pro Tip: If you want this change to apply to all slides in your presentation, click Apply to All at the bottom of the Format Background pane.
When to use: Use it when you only need to clean up individual slides without affecting the rest of the presentation.
If you want to change or customize backgrounds instead of removing them, see our guide on changing PowerPoint slide backgrounds.
Method 2. Delete Background from All PowerPoint Slides Quickly (Slide Master)
When you need to remove background from all slides in PowerPoint, using Slide Master is the most efficient approach. It lets you clear background settings across multiple slides at once from a single place. This method is ideal for eliminating unwanted backgrounds while keeping slides consistent without editing them one by one.
Steps:
-
Navigate to the View tab and select Slide Master in the Master Views group.
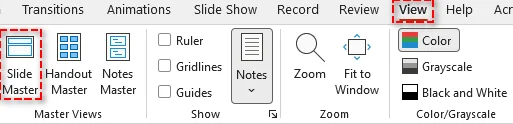
-
In the left pane, choose the master slide or specific layout you want to edit.
-
In the Background group, click Background Styles > Format Background.
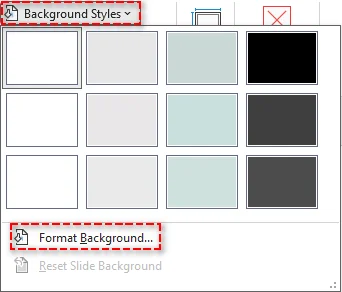
-
In the Format Background pane, select Solid fill and choose white color from the color picker.
-
Click Close Slide Master to apply the changes to all related slides.
Tip: If you have multiple layouts using the same background, be sure to update each layout in the Slide Master.
When to use: Use it for applying consistent background removal across an entire presentation.
Troubleshooting Stubborn Backgrounds
If background elements still appear after removal, they are usually part of the slide theme or stored in the Slide Master. Use the methods below to hide or remove them.
1. Hide Theme Background Graphics
-
Open the Format Background pane.
-
Check the Hide background graphics box to hide theme-based elements such as decorative lines, shapes, or logos.
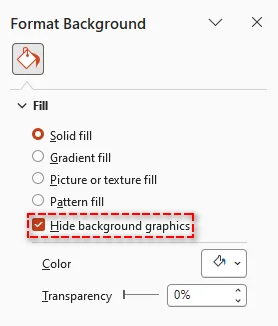
Note: This only hides elements inherited from the Slide Master. It does not remove images or objects that were manually added to the slide.
2. Remove Background Elements via Slide Master
- Go to the View tab and select Slide Master.
- In the left pane, select the top (parent) master slide or specific layout.
- Click the background graphic or logo you want to remove and press Delete.
- Click Close Master View to apply the changes.
Method 3. Remove Image Background in PowerPoint (Remove Background Tool)
If you need to remove background from an image in PowerPoint, the built-in Remove Background tool provides a quick and effective solution. It automatically detects the main subject and removes unwanted areas with minimal manual adjustment. This method is ideal for cleaning up images directly in your slides without using external tools.
Steps:
-
Select the image you want to remove the background from.
-
Go to the Picture Format tab.
-
Select Remove Background. PowerPoint will highlight the background in purple.

-
Adjust the selection using Mark Areas to Keep or Mark Areas to Remove if needed.

-
Click Keep Changes to apply the background removal.
Tips and Notes:
- This method works best when there is a clear contrast between the subject and the background.
- The Remove Background feature is available in recent desktop versions, like PowerPoint for Microsoft 365, 2024, and 2021, but may not be supported in some web versions.
- For images with a solid color background, go to Picture Format > Color > Set Transparent Color, then click the background to make it transparent quickly.
When to use: Use it for removing backgrounds from images while keeping the main subject.
Method 4. Clear Background in PowerPoint Automatically with VBA
If you need to perform repetitive background removal tasks, VBA offers a way to automate the process inside PowerPoint. By running a simple macro, you can update multiple slides without manual work. This method is useful for users familiar with basic scripting.
VBA Macro to Remove Backgrounds from All Slides
This script loops through each slide in the active presentation, disables the master background, and clears background elements automatically.
Sub RemoveAllBackgrounds()
    Dim sld As Slide

    ' Loop through each slide in the presentation
    For Each sld In ActivePresentation.Slides
        ' Follow Master Background: Set to False to customize
        sld.FollowMasterBackground = msoFalse

        ' Set the background fill to visible = false (Transparent/No Fill)
        sld.Background.Fill.Visible = msoFalse

        ' Alternatively, hide background graphics (like logos/themes)
        sld.DisplayMasterShapes = msoFalse
    Next sld

    MsgBox "All slide backgrounds have been removed!", vbInformation
End Sub
Key Properties Explained:
- FollowMasterBackground: Set to msoFalse to override the Slide Master background.
- DisplayMasterShapes: Hides background elements like logos or design shapes from the Slide Master.
- Background.Fill.Visible: Controls whether the background fill is visible.
How to use the script:
- Press Alt + F11 to open the VBA Editor.
- Go to Insert > Module.
- Paste the code into the module window.
- Press F5 or click the Run button to execute the macro.
Notes:
- This method does not remove images inserted as shapes. If your background is a picture object, you'll need a separate script to delete those shapes.
- Always save a copy of your presentation before running macros, as VBA actions cannot be undone.
- If macros are disabled, go to File > Options > Trust Center > Trust Center Settings > Macro Settings to enable them.
When to Use: Ideal for automating repetitive background removal tasks within PowerPoint.
Method 5. Batch Remove Background in PowerPoint with Python
For large-scale tasks involving multiple PowerPoint files, using Python can significantly improve efficiency. With the right library like Spire.Presentation for Python, you can automate background removal across presentations without opening PowerPoint manually. This method is ideal for batch processing and backend workflows.
Step-by-Step Guide:
-
Install the library via pip:
pip install spire.presentation -
Write Python Script:
The following example shows how to batch remove slide background from multiple PowerPoint .pptx files:
from spire.presentation import *
import os

# Folder containing the PPTX files to process
input_folder = "presentations"      # Folder with all the PPTX files
output_folder = "processed"         # Folder to save processed files

# Create output folder if it doesn't exist
if not os.path.exists(output_folder):
    os.makedirs(output_folder)

# Loop through all PPTX files in the input folder
for filename in os.listdir(input_folder):
    if filename.lower().endswith(".pptx"):
        input_path = os.path.join(input_folder, filename)
        output_path = os.path.join(output_folder, f"RemoveBackground_{filename}")

        # Load the presentation
        presentation = Presentation()
        presentation.LoadFromFile(input_path)

        # Loop through each slide and remove background
        for slide in presentation.Slides:
            slide.SlideBackground.Type = BackgroundType.none

        # Save the modified presentation
        presentation.SaveToFile(output_path, FileFormat.Pptx2010)
        presentation.Dispose()

        print(f"Processed: {filename} → {output_path}")

print("All presentations have been processed successfully.")
Tip: In addition to removing background from slides, you can also remove background from slide masters.
When to use: Ideal for batch processing multiple PowerPoint files efficiently.
Comparison: Which Method Should You Choose?
Choosing the right way to remove background in PowerPoint depends on how many slides you're working with and whether you need automation.
Here's a quick comparison of the five methods:
| Method | Best for | Scope | Skill Level |
|---|---|---|---|
| Format Background | Quick slide cleanup | Single / few slides | Beginner |
| Slide Master | Presentation-wide consistency | Entire presentation | Beginner |
| Remove Background (Image) | Image editing | Individual images | Beginner |
| VBA | Repetitive tasks inside PowerPoint | Multiple slides | Intermediate |
| Python | Batch processing | Multiple presentations | Advanced |
Quick Recommendation:
- For most users, Format Background and Slide Master are enough for everyday tasks.
- Use VBA if you need to automate repeated actions within PowerPoint.
- Choose Python if you need to process multiple files or build automated workflows.
Why Remove Background in PowerPoint
Removing backgrounds in PowerPoint is not just about visual cleanup-it can significantly improve how your presentation looks and performs. Here are the main benefits:
- Enhanced Visual Clarity: Remove distracting elements that compete with your content.
- Brand Consistency: Eliminate inconsistent or unwanted backgrounds.
- Improved Readability: Clear backgrounds help text stand out more clearly.
- Simplified Design: Strip away unnecessary visuals and focus on key information.
- Professional Quality: Create clean, distraction-free presentations.
Common Background Removal Issues and Solutions
- Background graphics or logos still visible - These elements are often part of the Slide Master. To remove them, go to View > Slide Master, select the parent slide or affected layouts, delete the elements, and then close Master View.
- Cannot remove background - The presentation may be protected or restricted. Check the file's editing permissions and enable editing if needed before making changes.
- Changes do not apply to all slides - Removing the background on one slide does not affect others. Use Apply to All in the Format Background pane or update the Slide Master to apply changes across the entire presentation.
FAQs: How to Remove Background in PowerPoint
Q1: Can I remove backgrounds from all slides at once?
A1: Yes, using Slide Master, VBA, or Python automation, you can remove backgrounds across an entire presentation or multiple files.
Q2: Can I remove backgrounds without PowerPoint?
A2: Yes, Python libraries like Spire.Presentation allows removal of backgrounds without Microsoft PowerPoint installed.
Q3: Will removing the background affect images or text on my slides?
A3: No, removing the slide background typically does not affect other slide content like text boxes or images. However, always create a backup before using automated tools like VBA or Python scripts to prevent accidental changes.
Q4: Is VBA safe to use for PowerPoint background removal?
A4: Yes, as long as you enable macros only from trusted sources and save a backup before running the script.
See Also
Convert Excel to Markdown: 4 Easy Methods for Any Workflow
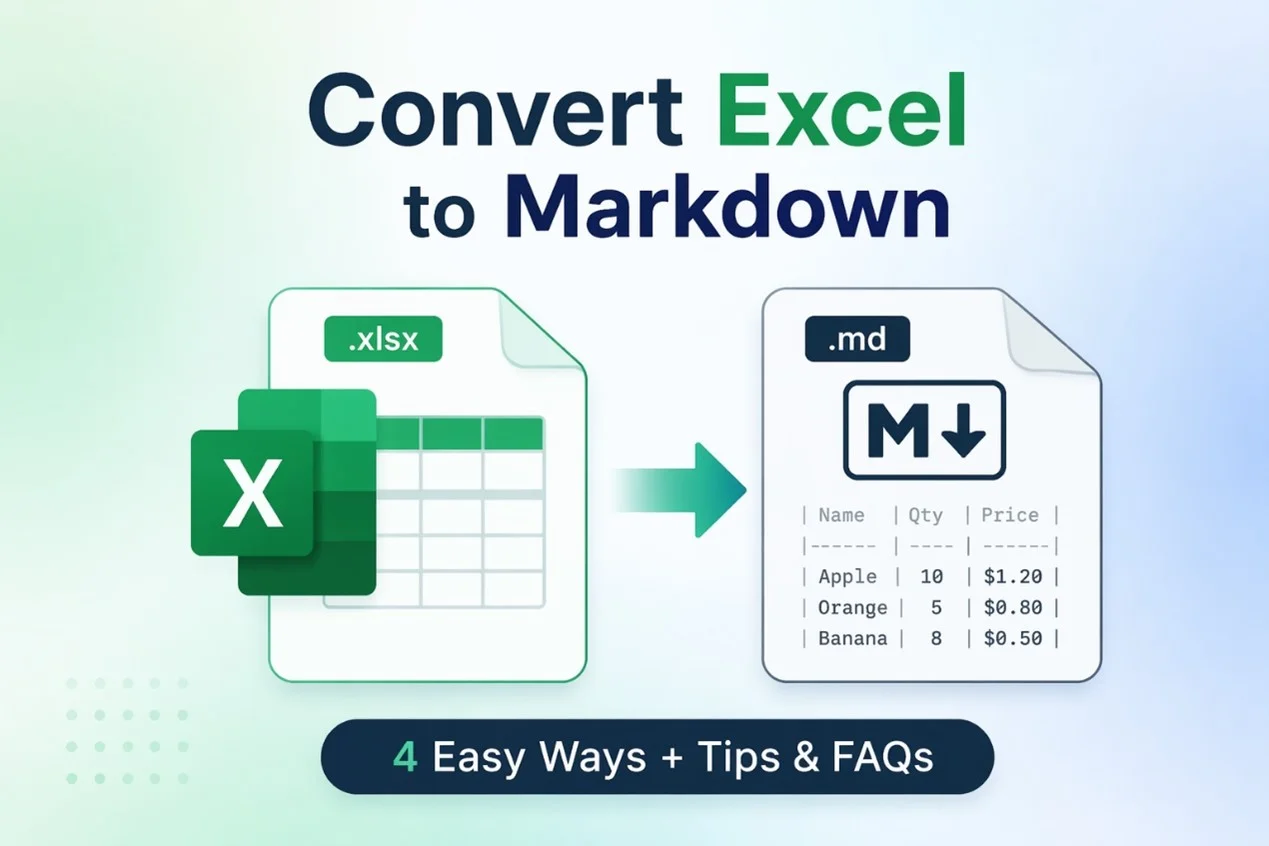
Excel is a powerful tool for managing and analyzing data, but sharing spreadsheets in blogs, documentation, or cross-platform note-taking apps often causes formatting issues and compatibility problems. Converting Excel to Markdown preserves table structure, making your data lightweight, readable, and easy to share across platforms.
In this guide, we'll walk you through 4 practical ways to convert Excel to Markdown, including online tools, editor plugins or extensions, and Python automation. Whether you're a student, blogger, or developer, you'll find the method that fits your workflow.
Why Convert Excel to Markdown?
Converting Excel to Markdown is especially useful when you need to publish or share structured data in a clean, readable format—without relying on spreadsheet files.
Here are some common scenarios where this conversion makes sense:
- Writing technical blogs: Convert Excel tables into Markdown to embed clean, formatted tables directly into blog posts without screenshots or file downloads.
- Creating GitHub README files: Markdown tables work natively on GitHub, making it easier to present datasets, comparisons, or configurations.
- Maintaining documentation: Use Markdown tables in documentation systems or knowledge bases for consistent formatting across platforms.
- Working with version control: Markdown files can be tracked in Git, allowing teams to monitor data changes over time.
- Sharing lightweight data: Markdown is plain text, which makes it easier to share, edit, and reuse compared to Excel files.
Can You Convert Excel to Markdown Directly?
No, Microsoft Excel does not provide a built-in option to export data as Markdown format. This is because Markdown tables use a plain-text structure based on pipes (|) and separator rows, while Excel stores data in a structured spreadsheet format.
To convert Excel to Markdown, you can use one of the following methods:
- Convert Excel to Markdown Online Quickly (No Installation)
- Use Obsidian Excel to Markdown Table Plugin
- Convert Excel to Markdown in VS Code with Extensions
- Automate Excel to Markdown Conversion with Python
Now, let's break down each method step-by-step.
Method 1: Convert Excel to Markdown Online Quickly (No Installation)
One of the fastest methods to convert Excel to Markdown is to use online converters. These tools work across any platform (Windows, Mac, Linux), require no installation, and are ideal for users who want a quick, browser-based solution.
Popular Online Free Excel to Markdown Converters:
- TableConvert: Supports uploading .xlsx files or pasting Excel data, with a built-in editor for preview and edits.
- Table to Markdown: A simple interface where you paste copied Excel tables to generate a formatted Markdown table.
- CloudxDocs: Useful for converting entire Excel files into downloadable Markdown files.
Steps to Convert Excel to Markdown Online:
-
Go to the website of your chosen online converter, like TableConvert.
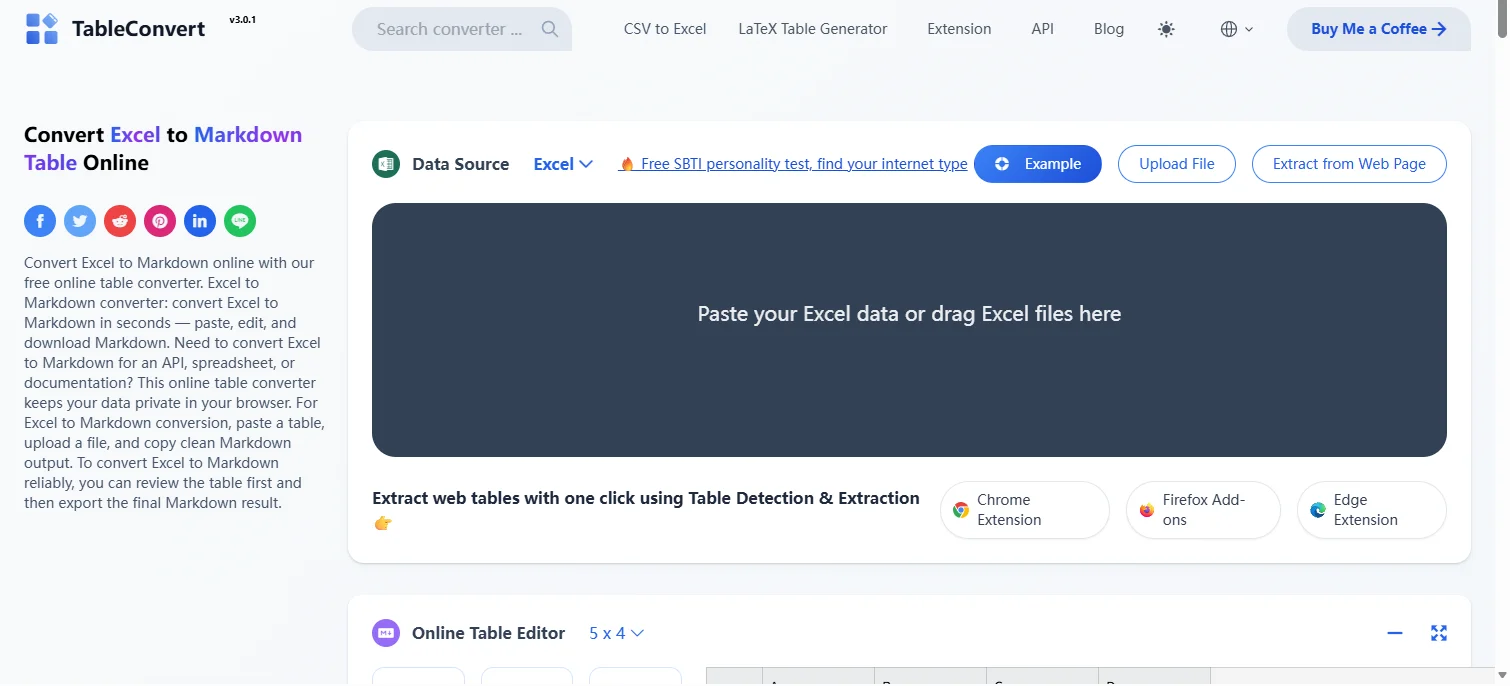
-
Drag your .xlsx file or paste your Excel data into the designated area.
-
Select Markdown as the output format. The tool will automatically convert your Excel file or data.
-
Copy the generated Markdown code and paste it into your Markdown file.
After conversion, your Excel data will appear as a Markdown table like this:
| Product | Price | Stock |
|---------|-------|-------|
| Apple | 1.2 | 50 |
| Orange | 0.8 | 100 |
Tip: Some online tools may have file size or table length limits. If necessary, you can split Excel sheets into smaller parts before uploading.
Security Warning: Online Excel to Markdown tools require uploading your data to third-party servers. Avoid using them for sensitive or confidential data—consider using an offline method instead.
When to Use: Suitable for quick, one-off conversions, especially for small tables or when no installation is preferred.
If you need to convert Markdown back to Excel, see our guide on how to convert Markdown to Excel.
Method 2: Use Obsidian Excel to Markdown Table Plugin
Obsidian is a free, cross-platform (Windows, macOS, and Linux) Markdown note-taking app. With its community plugin Excel to Markdown Table, you can quickly convert and paste Excel data as standard Markdown tables for seamless integration into your notes.
Step-by-Step Guide:
-
Download and install Obsidian from the official website for your operating system (Windows, Mac, or Linux).
-
Install the Excel to Markdown Table plugin:
- Open Obsidian and go to Settings > Community Plugins > Browse.
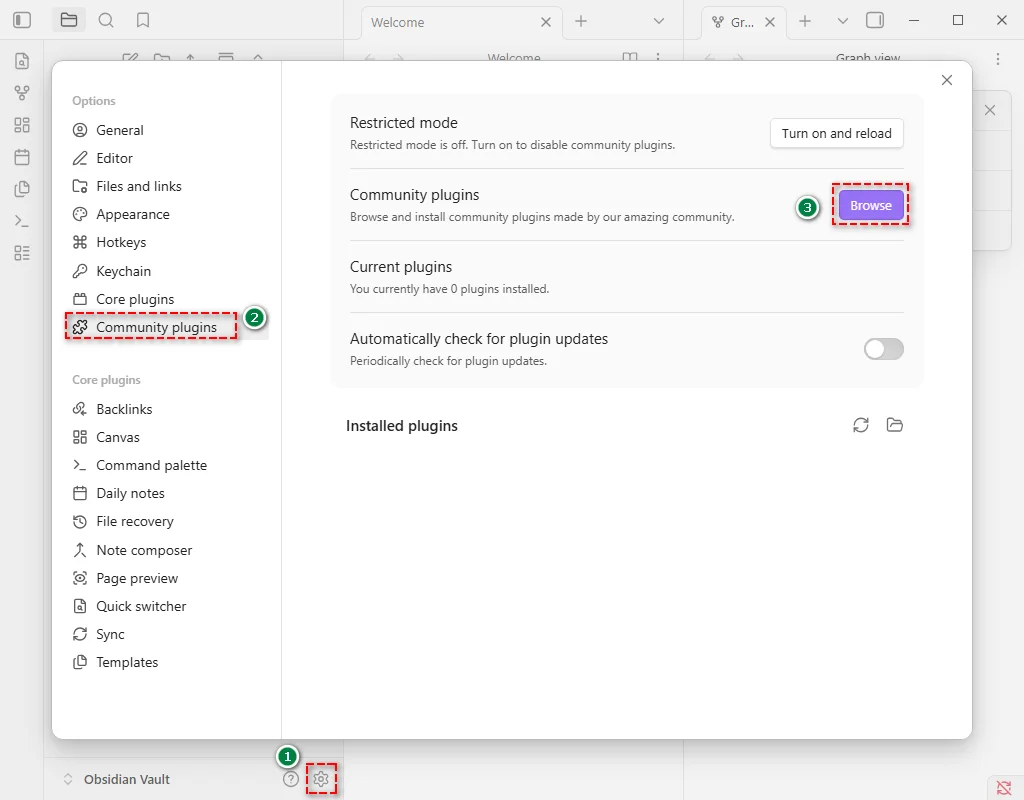
- Search for Excel to Markdown Table.
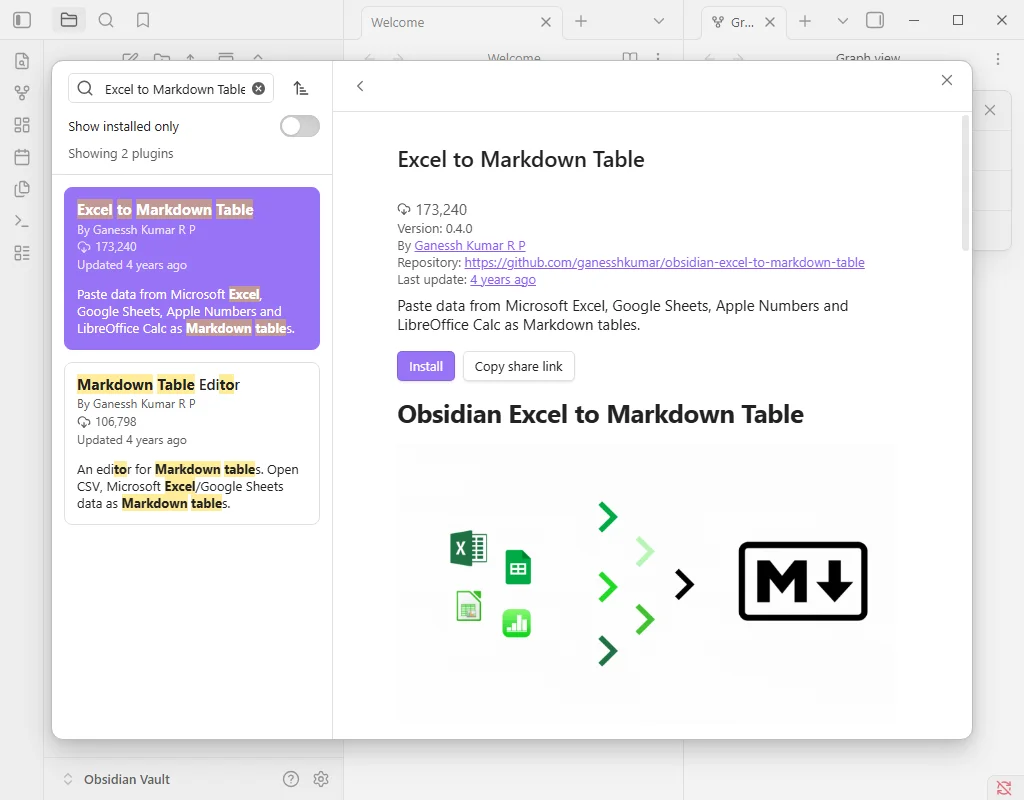
- Click Install and then Enable.
-
Copy your Excel table using Ctrl+C (Windows) or Cmd+C (Mac).
-
Paste into your Obsidian note using Ctrl+V (Windows) or Cmd+V (Mac). The plugin will automatically format it as a Markdown table.
-
Adjust alignment or formatting in Obsidian if needed.
Tips and Notes:
- This plugin focuses on converting table structures. It may not perfectly carry over complex formatting within Excel cells (like bold or italic). After conversion, verify and make manual adjustments if needed.
- Keep the plugin updated via the Obsidian community plugins directory for best performance and security.
When to Use: Ideal for embedding Excel tables directly into Markdown notes for blogs, documentation, or knowledge bases.
Method 3: Convert Excel to Markdown in VS Code with Extensions
For developers or power users using Visual Studio Code (VS Code), the Excel to Markdown Table extension provides a fast and integrated way to convert Excel data into Markdown without leaving your development environment.
Step-by-Step Instructions:
-
Open VS Code, go to Extensions (Ctrl+Shift+X), search for Excel to Markdown Table, and click Install.
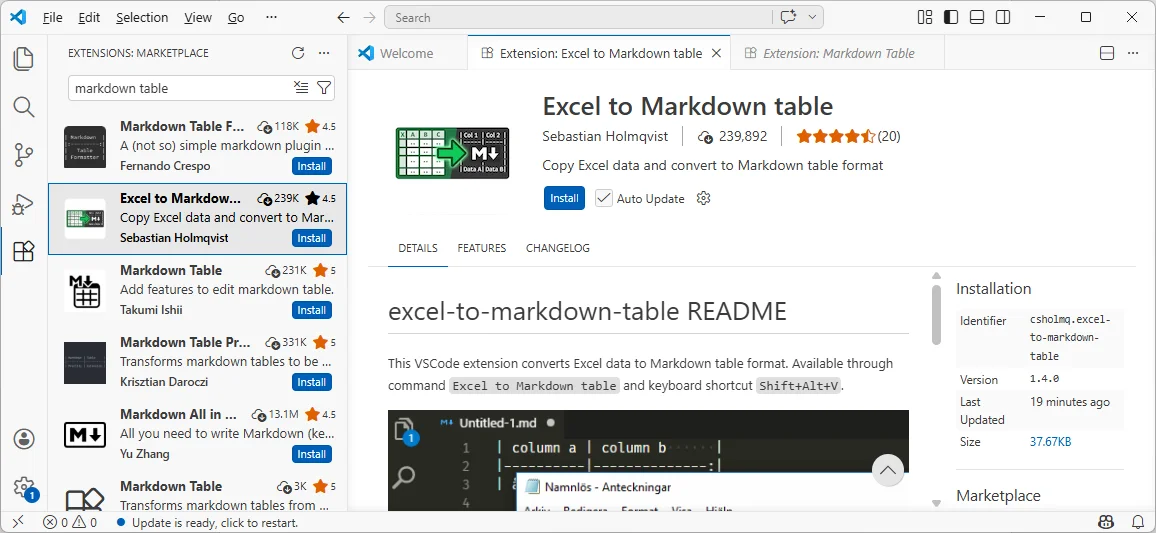
-
Copy the Excel data (Ctrl+C / Cmd+C).
-
Open your .md file in VS Code and press Shift + Alt + V to paste the table in Markdown format.
-
Optional: Adjust table alignment using header prefixes:
- ^l - left align
- ^c - center align
- ^r - right align
-
Copy or use the Markdown table as needed.
Tips:
- The extension handles Excel cell line breaks by automatically inserting <br> tags into the Markdown table.
- Manual tweaks may be needed if data formatting is inconsistent.
When to Use: Ideal for developers or power users working within VS Code who want a faster, integrated workflow.
Method 4: Automate Excel to Markdown Conversion with Python
For programmers and businesses who need a fast, efficient, and batch solution, Python automation provides a scalable solution for Excel to Markdown conversion. By using libraries like Spire.XLS for Python, you can quickly transform dozens or hundreds of Excel files into clean, structured Markdown tables while preserving formatting.
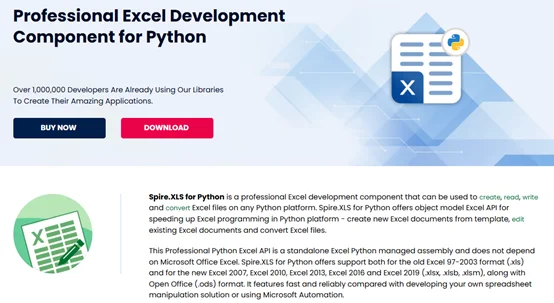
Why Spire.XLS for Python
Spire.XLS is a robust Python library that simplifies Excel automation and Markdown conversion:
- Preserves formatting: Maintains text styles and links during Excel to Markdown conversion.
- Supports multiple Excel formats: Handle .xls, .xlsx, and .xlsm files seamlessly.
- Create and write Excel files easily: Create new Excel files or modify existing ones programmatically.
- Cross-platform: Works on Windows, Mac, and Linux.
- Independence: Does not require Microsoft Excel to be installed on the machine.
Installation
To get started, install Spire.XLS for Python from PyPI by running the following command:
pip install spire.xls
Python Script for Batch Excel to Markdown Conversion
Here's a simple example of how to convert multiple Excel files to Markdown tables:
import os
from spire.xls import *
# Specify input and output folder paths
input_folder = "path/to/your/excel_folder" # Replace with your folder containing Excel files
output_folder = "path/to/output_markdown" # Replace with your desired output folder for Markdown files
# Get all the Excel files from the input folder
excel_files = [f for f in os.listdir(input_folder) if f.endswith('.xlsx')]
# Check if the output folder exists, if not, create it
if not os.path.exists(output_folder):
os.makedirs(output_folder)
# Process each Excel file in the folder
for file in excel_files:
input_file_path = os.path.join(input_folder, file)
# Create a Workbook instance and load the Excel file
workbook = Workbook()
workbook.LoadFromFile(input_file_path)
# Extract the file name without extension
file_name_without_extension = os.path.splitext(file)[0]
# Generate the output Markdown file path
output_file_path = os.path.join(output_folder, f"{file_name_without_extension}.md")
# Save the Excel file as a .md file
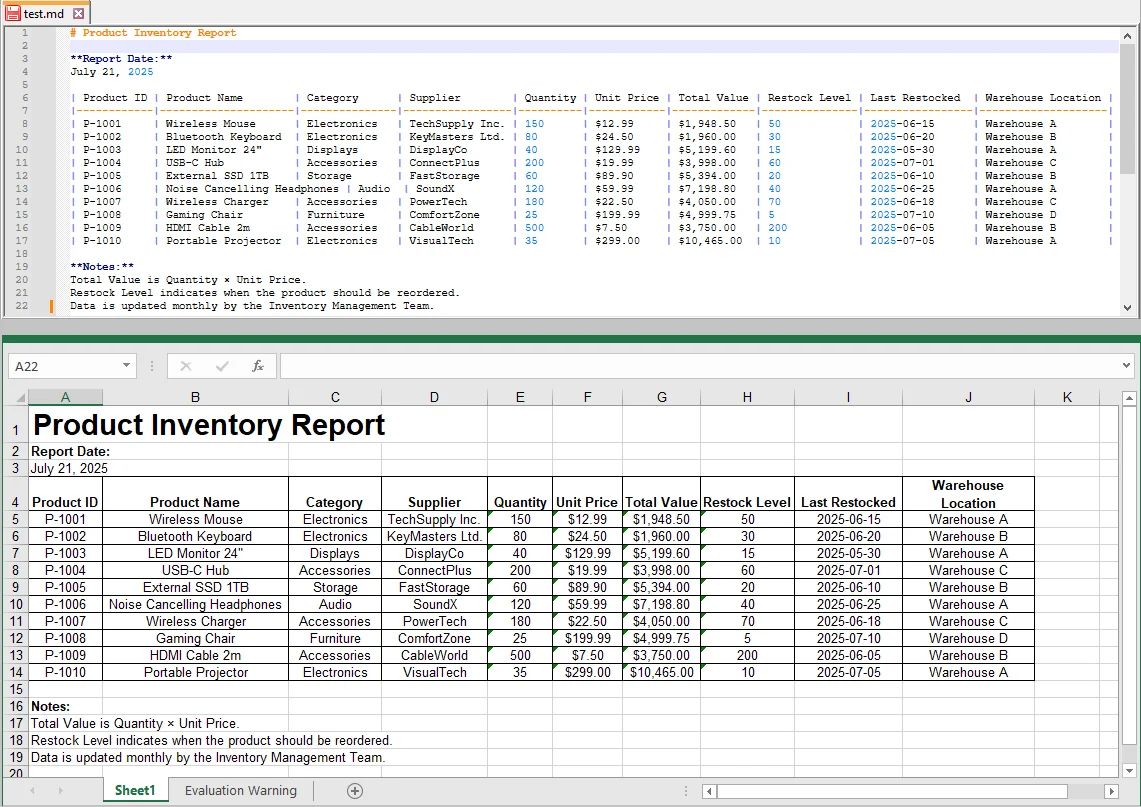
workbook.SaveToMarkdown(output_file_path)
# Dispose of the workbook object to release resources
workbook.Dispose()
print(f"Converted {file} to {output_file_path}")
This script scans all .xlsx files in the specified input folder and saves them as Markdown files in the output folder.
Tips for Customization
-
Customizing Markdown Rendering Options:
You can customize how the Markdown file is converted by adjusting rendering options like this:
# Create MarkdownOptions markdownOptions = MarkdownOptions() # Control how images are stored markdownOptions.SavePicInRelativePath = False # Control how hyperlinks are rendered markdownOptions.SaveHyperlinkAsRef = True # Save as Markdown workbook.SaveToMarkdown(output_file_path, markdownOptions) -
Processing .xls Files:
The script can be modified to process .xls files by simply adding a check for both .xlsx and .xls extensions:
excel_files = [f for f in os.listdir(input_folder) if f.endswith(('.xlsx', '.xls'))]
When to Use: Best for developers, data engineers, or teams needing automated batch processing of multiple Excel files.
Excel to Markdown Method Comparison
To help you choose the right method for converting Excel to Markdown, here's a quick comparison of the four approaches:
| Method | Best For | Speed | Customization | Skill Level |
|---|---|---|---|---|
| Online Tools | Quick, one-off conversions | Fast | Limited | Beginner |
| Obsidian Plugin | Notes & documentation | Medium | Medium | Beginner |
| VS Code Extension | Developer workflow | Fast | Medium | Intermediate |
| Python Automation | Batch processing | Very Fast | High | Advanced |
Recommendations:
- Need a quick, no-setup solution? Online tools are the fastest option.
- For note-taking workflows, Obsidian plugin provides a smooth and intuitive experience.
- Already working in a VS Code development environment? VS Code extensions reduce friction and improve efficiency.
- For large datasets or repetitive tasks, Python automation is the most scalable approach.
In most cases, developers and teams handling frequent conversions will benefit more from automation, while casual users can rely on simpler tools.
Troubleshooting Common Excel to Markdown Issues
Even though converting Excel to Markdown is usually straightforward, you may encounter some common problems. Here are practical solutions:
| Issue | Solution |
|---|---|
| One cell turns into multiple rows | Line breaks in Excel cells are treated as new rows in Markdown. Replace them with <br> tags before converting (find Ctrl+J, replace with <br>). |
| Data shifts after conversion (columns moved) | Merged cells in Excel break the table structure. Unmerge all cells first, then fill missing values so each row is complete. |
| Empty cells show as NaN | Some converters replace empty values with NaN. Use Find & Replace after conversion to remove or replace them with blanks. |
| Extra rows or columns appear unexpectedly | Hidden rows or columns in Excel are included. Unhide or delete them before conversion. |
Pro Tip: Always preview your Markdown table after conversion to check alignment and formatting.
Frequently Asked Questions about Excel to Markdown
Q1: Can I convert Excel to Markdown for free?
A1: Yes, online tools like TableConvert allow free Excel to Markdown conversion, though they may have limitations on file size or features.
Q2: Can I convert Excel formulas to Markdown?
A2: No, Markdown only supports static values. Formulas are converted to their calculated results.
Q3: Can I convert multiple Excel files at once?
A3: Yes, you can use Python with libraries like Spire.XLS to batch convert multiple Excel files efficiently.
Q4: Can I keep images when converting Excel to Markdown?
A4: Markdown uses image links instead of embedding Excel images directly.
Q5: What is the easiest way to convert Excel to Markdown?
A5: Using an online converter is the easiest method since it requires no installation.
See Also
Convert ODP to PPTX (4 Easy Ways)
If you've ever worked with presentations, you've probably encountered ODP files-the OpenDocument Presentation format commonly used in open-source office suites like LibreOffice and OpenOffice. While ODP files are perfect for editing in these platforms, they aren't always compatible with Microsoft PowerPoint, which relies on the PPTX format. Converting ODP to PPTX ensures that your slides retain their formatting, while making them fully compatible with PowerPoint for smooth collaboration and professional presentation delivery.
In this step-by-step guide, we'll show you 4 easy ways to convert ODP to PPTX, from offline software to online tools and Python automation, so you can choose the best method for your workflow.
Methods Overview
- Method 1: Convert ODP to PPTX Using LibreOffice Impress
- Method 2: Transform ODP to PPTX Using Microsoft PowerPoint
- Method 3: Use Online ODP to PPTX Converters
- Method 4: Use Python for Batch ODP to PPTX Conversion
Understanding the Formats: ODP vs. PPTX
Before converting, it's helpful to know the key differences between ODP and PPTX:
- ODP (OpenDocument Presentation): An open-standard format used mainly in LibreOffice Impress and OpenOffice. Supports slides, text, images, charts, tables, and basic animations.
- PPTX (PowerPoint Presentation): Microsoft PowerPoint's standard format. Widely supported and offers advanced features like SmartArt, transitions, multimedia, and full compatibility with the Microsoft 365 ecosystem.
Converting ODP to PPTX is essential when collaborating in environments where PowerPoint is the standard, ensuring presentations stay accessible while preserving formatting and functionality.
Method 1: Convert ODP to PPTX Using LibreOffice Impress
LibreOffice Impress natively supports ODP files and includes a built-in Save As function that allows conversion from ODP to PPTX. This method is ideal for users who prefer offline solutions without relying on Microsoft Office.
Step-by-Step Instructions:
-
Launch LibreOffice Impress.
-
Click File > Open and select your .odp file.
-
Navigate to File > Save As… or press Ctrl + Shift + S.
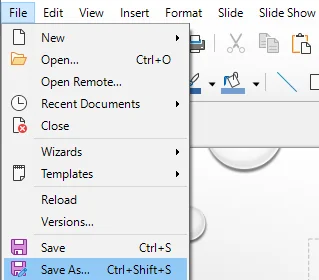
-
In the Save as type dropdown, select PowerPoint 2007-365 (.pptx).
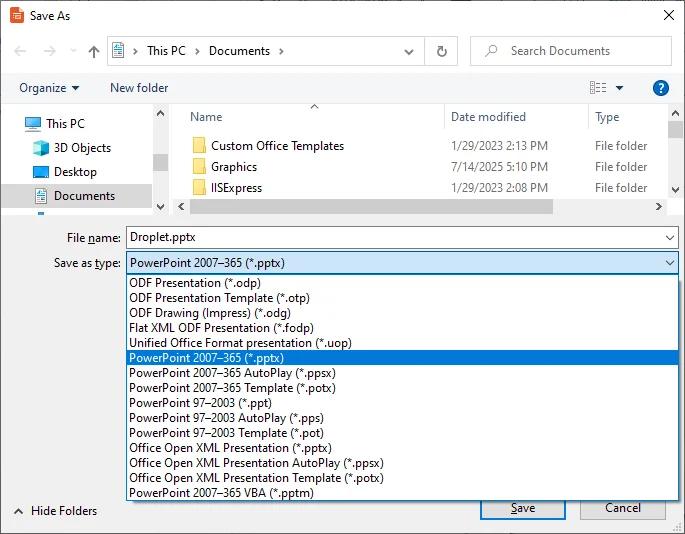
-
Choose a destination folder, name your file, and click Save.
-
LibreOffice may warn you that some formatting or content may not be fully compatible in the selected format. Click Use PowerPoint 2007-365 (.pptx) to proceed.
Pros:
- Free and offline, no internet needed.
- Preserves most formatting, including images, tables, and slide layout.
Cons:
- Complex animations or SmartArt may not transfer perfectly.
- Batch conversion requires scripting or manual effort.
Method 2: Transform ODP to PPTX Using Microsoft PowerPoint
Modern versions of Microsoft PowerPoint (2013+) can open ODP files directly and save them as PPTX format. This method is ideal for users who already use PowerPoint for editing and presenting slides.
Step-by-Step Instructions:
-
Open Microsoft PowerPoint.
-
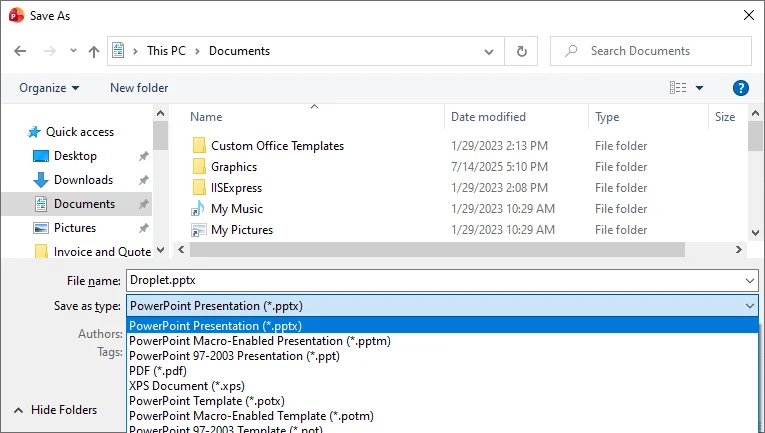
Click File > Open, then select your .odp file. PowerPoint will load your slides automatically.
-
Review your slides for any formatting or multimedia issues.
-
Click File > Save As, select PowerPoint Presentation (*.pptx), and save.
Pros:
- Native PowerPoint support ensures high compatibility.
- Allows immediate editing before saving.
Cons:
- Requires a licensed version of Microsoft PowerPoint.
- Certain ODP features may not render exactly in PowerPoint.
Method 3: Use Online ODP to PPTX Converters
For users seeking a quick, platform-agnostic solution without the hassle of software installation, online ODP to PPTX converters offer a free and efficient alternative. These tools are particularly useful for one-off conversions on shared computers or mobile devices.
Reputable services in this space include Convertio, Zamzar, and OnlineConvert, which are known for their reliability and broad format support.
Steps to Convert ODP to PPTX Online:
-
Open your chosen online free ODP to PPTX converter website, e.g., Convertio.
-
Upload your .odp file.
-
Select PPTX as the target format.
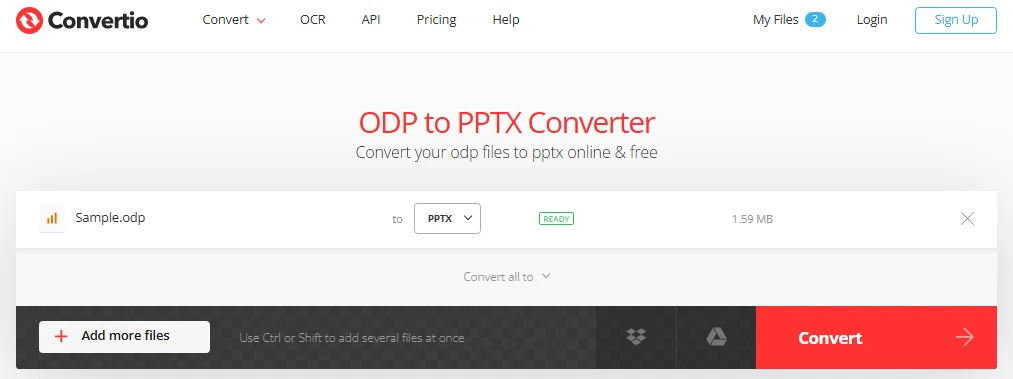
-
Click Convert, then download the resulting .pptx file.
Note: Always verify the website's privacy policy. For confidential business presentations, it is safer to use offline desktop software (like LibreOffice or Microsoft PowerPoint) to ensure data remains on your local machine.
Pros:
- No installation required, works across devices.
- Quick for single-file conversion.
Cons:
- Requires a stable internet connection to function.
- Free tiers often restrict file size (e.g., max 50MB) or daily usage.
- Sensitive or confidential files may raise privacy concerns.
Method 4: Use Python for Batch ODP to PPTX Conversion
For developers or teams handling multiple presentations, Python provides a powerful and automated solution. Using libraries like Spire.Presentation for Python, you can perform batch conversion from ODP to PPTX efficiently, saving hours of manual work. This method is ideal for enterprise workflows or recurring conversion tasks.
What is Spire.Presentation and Why Choose It?
Spire.Presentation is a Python library that allows developers to create, read, and convert presentation files programmatically. Its advantages for ODP to PPTX conversion include:
- Batch processing: Convert multiple ODP files at once with minimal code.
- Preserves formatting: Retains slides, images, tables, and basic animations.
- Cross-platform: Works on Windows, Linux, or macOS.
- Automation-friendly: Can be integrated into scripts, scheduled tasks, or CI/CD pipelines.
- No dependency: Works independently without requiring MS Office, LibreOffice, or similar software to be installed.

Installation Requirements
To use Spire.Presentation in Python, install it via pip:
pip install spire-presentation
Ensure that Python 3.7 + is installed on your system.
Python Example for Batch Convert ODP to PPTX
Once the library is installed, add the following code to batch convert multiple ODP files to PPTX:
from spire.presentation import *
import os

def BatchConvertOdpToPptx(InputFolder, OutputFolder):
    """
    Batch converts all ODP files in the InputFolder to PPTX format in OutputFolder.
    Uses Spire.Presentation for Python.
    """
    # Create the output folder if it doesn't exist
    if not os.path.exists(OutputFolder):
        os.makedirs(OutputFolder)

    # Iterate over all files in the input folder
    for file in os.listdir(InputFolder):
        # Check if the file has an ODP extension (case-insensitive)
        if file.lower().endswith(".odp"):
            # Build the full input path
            InputPath = os.path.join(InputFolder, file)

            # Build the output path by replacing the file extension with .pptx
            OutputPath = os.path.join(OutputFolder, os.path.splitext(file)[0] + ".pptx")

            # Create a Presentation instance
            presentation = Presentation()

            # Load the ODP file
            presentation.LoadFromFile(InputPath, FileFormat.ODP)

            # Convert and save as PPTX
            presentation.SaveToFile(OutputPath, FileFormat.PPTX)

            print(f"Converted '{file}' to PPTX successfully.")

# Example usage
BatchConvertOdpToPptx("C:/ODP_Files", "C:/PPTX_Output")
Tip: After conversion, you can further customize the output PPTX files, such as adjusting its slide size and applying animations.
Pros:
- Ideal for batch conversions.
- Fully automated, reduces manual effort.
Cons:
- Requires Python setup and some scripting knowledge.
- Initial configuration can be technical for beginners.
Comparison: Which ODP to PPTX Method Should You Choose
Here is a quick comparison of the 4 ODP to PPTX methods:
| Method | Quality | Speed | Privacy | Best For |
|---|---|---|---|---|
| LibreOffice Impress | Excellent | Fast | High | Free offline conversion |
| Microsoft PowerPoint | Excellent | Fast | High | Editing & native conversion |
| Online Converters | Good | Depends on the Internet | Low | Quick single-file conversion |
| Python Script | Excellent | Very Fast (Batch) | High | Batch conversion & automation |
Troubleshooting Common ODP to PPTX Issues
Although converting ODP to PPTX is usually straightforward, some complex files can still cause issues. Here are the most common problems and how to address them:
- Formatting Loss: Complex animations, charts, or SmartArt may not convert perfectly. Review your slides and adjust content as needed.
- Missing Fonts: Make sure all fonts used in the ODP file are installed on your system to avoid layout changes.
- Corrupted Files: Check that the ODP files are not corrupted or partially downloaded before conversion.
- Unsupported Media: Videos or audio may not carry over. Re-embed or add media directly in PowerPoint if necessary.
Conclusion
You now have a complete toolkit for converting ODP to PPTX. The best method depends on your needs:
- For occasional offline conversions: Use LibreOffice or Microsoft PowerPoint for reliable results that preserve most formatting.
- For quick, one-off conversions: Online converters are convenient when you don't want to install any software.
- For batch or enterprise workflows: Python automation is the fastest and most scalable solution for handling multiple files consistently.
Pick the method that suits your workflow and ensure your presentations remain professional, compatible, and ready to share.
FAQs about ODP to PPTX
Q1: Can I convert ODP to PPTX without losing animations?
A1: Simple animations usually transfer, but complex or custom animations may require manual adjustment.
Q2: Are online ODP to PPTX converters safe for sensitive presentations?
A2: Not always. For confidential files, offline tools like LibreOffice or PowerPoint are recommended.
Q3: Can I batch convert multiple ODP files to PPTX?
A3: Yes, Python with Spire.Presentation enables automated batch conversion.
Q4: Will the converted PPTX open on all PowerPoint versions?
A4: PPTX files are compatible with PowerPoint 2007 and later, though some advanced features may differ on older versions.
See Also
Convert Text to QR Code (3 Free & Easy Ways)
Table of Contents
- Static vs. Dynamic QR Codes: What's the Differences
- Can You Convert Text to QR Code
- Method 1: Generate QR Code from Text in Microsoft Word
- Method 2: Use an Online Text to QR Code Generator
- Method 3: Batch Convert Text to QR Code with Python Automation
- Tips and Common Text to QR Code Issues
- Why You Should Convert Text to QR Code
- Conclusion and Recommendations

QR codes are everywhere these days-from product packaging to event tickets, they make sharing information faster and smarter. Converting text to QR code is a quick way to share website links, contact details, or special promotions without the hassle of typing or copying.
In this guide, we'll show you 3 free and easy ways to convert text to QR code, ranging from local software and online tools to automated scripts for batch generation. By the end, you'll be able to turn any text into a QR code ready to scan, share, and use.
Contents Overview
- Static vs. Dynamic QR Codes: What's the Differences
- Can You Convert Text to QR Code
- Method 1: Generate QR Code from Text in Microsoft Word
- Method 2: Use an Online Text to QR Code Generator
- Method 3: Batch Convert Text to QR Code with Python Automation
- Tips and Common Text to QR Code Issues
- Why You Should Convert Text to QR Code
- Conclusion and Recommendations
Static vs. Dynamic QR Codes: What's the Differences
Before you convert text to QR code, it's important to understand the differences between static and Dynamic QR Codes, so you can choose the right type for your needs.
| Feature | Static QR Code | Dynamic QR Code |
|---|---|---|
| Editability | Permanent (cannot be changed) | Editable (change URL without reprinting) |
| Scan Tracking | None | Track the number of scans, location, and time. |
| Cost | Usually free | Free or paid |
| Best For | Documents, business cards, permanent info | Marketing campaigns, event tickets |
Recommendations:
- Use static QR codes for personal or internal use where the content doesn't change.
- Use dynamic QR codes for marketing, events, or scenarios where you want to update content or track performance.
Can You Convert Text to QR Code?
Yes. Almost any text-URLs, instructions, Wi-Fi passwords, or vCard contacts-can be converted into a scannable QR code. You have a variety of options, such as the native Microsoft Word APP, online text to QR code generators, and automated scripts like Python.
When choosing a method, consider:
- Do you need a static or dynamic QR code?
- How many QR codes will you generate?
- Your technical skills and tools available.
Here is a quick overview of the 3 Text to QR methods we'll cover:
| Method | Best For | Limitations |
|---|---|---|
| Microsoft Word | A few static QR codes in reports or flyers. | Requires Office; limited customization; no batch support. |
| Online Text to QR Code Generators | Quick generation of static or dynamic QR codes without software installation. | Requires internet; privacy concerns; advanced features may require a subscription. |
| Python Automation | Bulk QR code creation or automated workflows. | Requires coding skills and setup. |
Now, let's go through the detailed steps of each method.
Method 1: Generate QR Code from Text Using Microsoft Word
If you are already working in Word, converting text to QR Code directly inside the application is the most seamless solution. It allows you to embed the code without leaving your document. You have 2 options to achieve this.
Option A: Using a Built-in Field Code
This feature is available in Word 2013 and later versions. It uses a simple line of DISPLAYBARCODE Field code to generate a QR code from text or a URL.
Step-by-Step Instructions:
-
Position Cursor: Click where you want the QR code to appear in your document.
-
Insert Field: Press Ctrl + F9 (Windows) or Cmd + F9 (Mac) to insert a pair of gray curly brackets { }.
-
Enter Command: Inside the brackets, type the following code:
DISPLAYBARCODE "Your Text Here" QR \q 3- Replace "Your Text Here" with your text or URL.
- "\q 3" sets the error correction level to "High" (Quartile), ensuring the code scans even if slightly damaged.
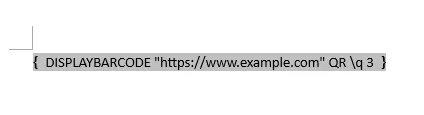
-
Generate QR Code: Right-click on the code and select Toggle Field Codes. The code will appear instantly.
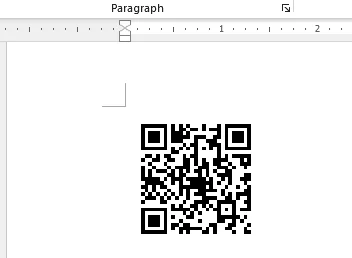
Pro Tip: To edit text later, right-click on the code and select Toggle Field Codes again to switch back to field code view. Remember, QR codes generated this way are static and cannot be styled (they are always black and white).
Option B: Using an Office Add-in
For users who prefer a visual interface with customization options (like changing colors), using a dedicated free Office add-in like QR4Office is a more user-friendly alternative.
Steps:
-
Open the Add-in Store: Go to the Insert tab and click Store in the Add-ins group.
Note: In some versions, like Word for Office 365, the Add-ins option may be located under the Home tab.
-
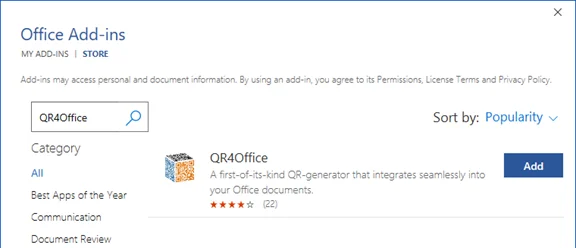
Search and Install: Type QR4Office into the search bar. Click the Add button to install it.
-
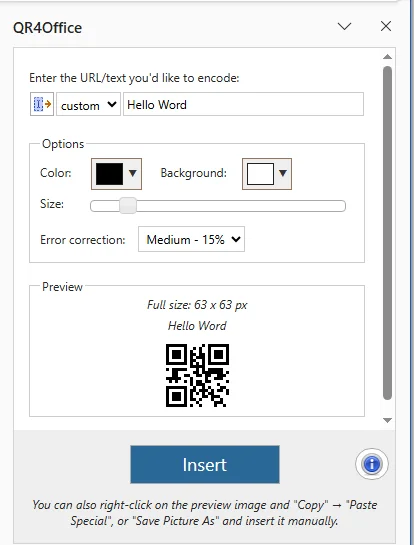
Generate QR Code: Once installed, the QR4Office panel will appear on the right side of your document.
- Enter Content: Enter your text or URL in the panel's input box.
- Customize: Use the sliders and color pickers to adjust the appearance if desired.
- Insert: Click the Insert button to add the styled QR code to your document.
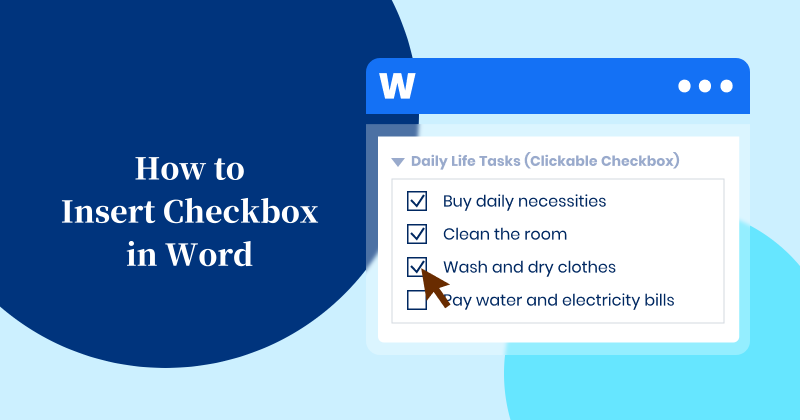
You may also like: How to Insert Checkbox in Word (4 Easy Methods)
Method 2: Use an Online Text to QR Code Generator
If you don't have Word or prefer a web-based option, using an online text to QR code generator is the most flexible approach. These tools are ideal for users who need to generate high-quality QR codes on any device instantly.
Why Use an Online QR Generator?
- Zero Setup: Perfect for beginners who need a free text to QR code solution without installing apps.
- Cross-Platform: Works seamlessly on Windows, Mac, iOS, and Android devices.
- High Customization: Most tools allow you to add logos, change colors, choose multiple output formats like SVG or PNG, and even dynamic QR codes that can be updated later.
Recommended Online Free Text to QR Code Tool
- QRCode Monkey: A versatile tool for creating high-resolution static QR codes for text, URLs, and contact info.
- ME-QR: Supports multiple QR code types with a simple, user-friendly interface.
- QRCodeKIT: Offers dynamic QR codes with a free plan that allows 2 codes that never expire.
Steps to Convert Text to QR Code Online:
-
Open your preferred online text to QR code generator website (e.g., QRCode Monkey).
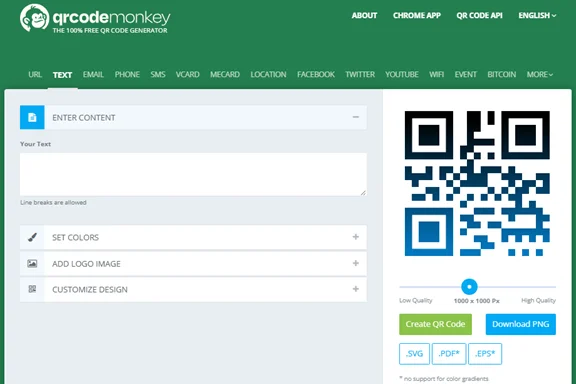
-
Navigate to the TEXT tab, paste or type your text into the input box.
-
Customize the QR code appearance (e.g., color, logo, and style).
-
Click Create QR Code to generate the QR code from text.
-
Preview the QR code and adjust settings if needed.
-
Download the QR code in the desired format: PNG, SVG, EPS, or PDF.
Tips and Security Notes:
- Privacy and Security: Avoid entering sensitive personal or financial data into public online generators. For confidential information, use an offline or self-hosted solution.
- Use Vector Formats for Print: SVG or EPS remain sharp at any size and won't pixelate.
- Check Limits: Always check free plan restrictions for dynamic codes (such as scan limits or total codes allowed) before finalizing your design.
Method 3: Batch Convert Text to QR Code with Python Automation
For teams and enterprises handling large volumes of text, manually creating QR codes can be slow and error-prone. By using Python and libraries like Free Spire.Barcode for Python, you can automate QR code generation, customize design, and generate multiple codes quickly. This approach is valuable for product labels, marketing campaigns, or any high-volume scenario.
About Free Spire.Barcode for Python
Free Spire.Barcode for Python is a free, popular library for creating and scanning various barcodes, including QR codes. It supports customization of QR code size, color, logo, error correction level, and more.

Step-by-Step Guide:
-
Install the library: First, ensure you have the library installed via pip:
pip install spire.barcode.free -
Write a Python Script: Here is an example of how to batch generate multiple QR codes from a list of data:
from spire.barcode import *

# List of strings you want to convert to QR codes
data_list = ["https://google.com", "User_ID_12345", "Internal_Document_Ref"]

# Helper to write bytes to file
def write_bytes(filename, data):
    with open(filename, "wb") as f:
        f.write(data)

def generate_qr_codes(data_items):
    # Initialize settings object
    settings = BarcodeSettings()
    # Set the symbology type to QR Code
    settings.Type = BarCodeType.QRCode
    # Optional: Set Error Correction Level (L, M, Q, or H)
    settings.QRCodeECL = QRCodeECL.M
    # Optional: Set the width/size of the module
    settings.X = 2.0
    settings.ShowText = False

    for index, item in enumerate(data_items):
        # Assign the text for the current QR code
        settings.Data2D = item
        settings.Data = item

        # Initialize the generator with settings
        generator = BarCodeGenerator(settings)
        # Create the image
        image_bytes = generator.GenerateImage()

        # Save the image with a unique filename
        filename = f"qrcode_{index}.png"
        write_bytes(filename, image_bytes)
        print(f"Generated: {filename} for data: {item}")

if __name__ == "__main__":
    generate_qr_codes(data_list)
Advanced QR Code Customization:
For more polished or branded QR codes, you can apply these optional settings:
-
Remove Borders: Create a clean look without margins by setting
settings.HasBorder = False -
Change Colors: Customize the QR code colors to match your brand or design.
settings.ForeColor = Color.Black # QR code color settings.BackColor = Color.White # Background color -
Add a Logo: Embed a logo in the center of the QR code for branding.
settings.SetQRCodeLogoImage("path_to_logo.png")
Tips and Common Text to QR Code Issues
Creating reliable text QR codes isn't just about generating the code-it's about making sure it scans correctly in all scenarios. Follow these practical tips to ensure a smooth process, and see solutions for common issues that users encounter.
Tips for Successful Text QR Codes
- Choose the Right Error Correction: Use Medium by default. If you plan to add a logo or print the QR code outdoors, select High (Level H) to make it more durable.
- Maintain Proper Size and Resolution: For print, keep the QR code at least 2x2 cm (0.8x0.8 inches). For digital use, export at 300 DPI or higher.
- Ensure High Contrast: Dark foreground on a light background works best. Black-on-white is universally reliable.
- Keep a Quiet Zone: Leave a blank margin of at least 4 modules around the QR code so scanners can read it accurately.
- Test Before Printing: Always test the QR code with multiple scanners before printing or sharing to ensure it works.
Common Text QR Code Issues & Solutions
| Issue | Likely Cause | Solution |
|---|---|---|
| Blurry QR Codes | Low-resolution image format | Regenerate as PNG or SVG. Avoid JPG due to compression artifacts. |
| QR Code not working after adding a logo | Logo too large or blocking patterns | Keep the logo under 30% of the QR code area. Set Error Correction to High (H). |
| QR code not working or not readable on some devices | Compatibility differences between scanner apps or cameras | Test with multiple devices and use standard encoding with simple text. |
| QR code text not showing correctly | Encoding issues or unsupported characters | Avoid special symbols and ensure the text is encoded in UTF-8 format. |
| QR code not scanning after printing | Print distortion or quality issues affecting the pattern | Use high-quality printing settings and test the printed version in real conditions. |
Why You Should Convert Text to QR Code
Turning text into QR code offers significant advantages for efficiency and connectivity:
- Instant Sharing: Share complex information immediately with a single scan.
- Streamlined Access: Simplify how users access URLs, digital contacts (vCards), or Wi-Fi credentials.
- Error-Free Data: Eliminate manual typing mistakes associated with long or complicated strings of text.
- Interactive Print: Bridge the gap between offline and online by making printed materials scannable and interactive.
- Accelerated Engagement: Speed up information exchange at marketing events or on product packaging.
Conclusion and Recommendations
That's all you need to know about converting text to QR code. The next step is to pick the method that best fits your needs:
- For occasional document-based QR codes: Use Microsoft Word.
- For quick generation or dynamic codes: Use free online QR code generators.
- For bulk QR code creation or automated tasks: Use Python automation.
Choose the method that fits your workflow and start generating scannable QR codes from text instantly!
FAQs
Q1: Can any text be converted into a QR code?
A1: Yes. URLs, instructions, contact info, Wi-Fi passwords, or even plain text can be encoded into a QR code.
Q2: What is the difference between static and dynamic QR codes?
A2: Static QR codes cannot be edited once created, while dynamic QR codes allow content updates and scan tracking.
Q3: Are QR codes safe to use online?
A3: Generally yes, but avoid sharing sensitive information on public online generators. For private data, use offline or secure software.
Q4: Can I customize the color or design of my QR code?
A4: Yes. Online generators and libraries like Spire.Barcode for Python allow customization of colors, size, logos, and error correction levels.
Q5: What size should I use for printing a QR code?
A5: For print, use at least 2 x 2 cm (0.8 x 0.8 inches) for small codes and higher resolution or vector formats for large prints to ensure scannability.
See Also
Convert Markdown to Excel (3 Easy Ways)
Table of Contents
- Use Cases: When You Should Convert Markdown to Excel
- Method 1: Copy Markdown Table and Paste into Excel
- Method 2: Use an Online Markdown to Excel Converter
- Method 3: Batch Convert MD to Excel with C# Automation
- Comparison: Which Markdown to Excel Method is Right for You
- Troubleshooting Common Markdown to Excel Issues
Markdown (MD) is a favorite tool for writers, developers, and project managers due to its simplicity. But when you need to analyze data, generate reports, or collaborate with teams, Markdown can fall short-especially when it comes to tables. Converting Markdown tables to Excel unlocks the power of Excel's features like sorting, filtering, and complex calculations.
In this guide, we'll explore 3 practical methods to quickly and easily convert Markdown to Excel, whether you're working with a single table or need to automate the process for large datasets.
- Use Cases: When You Should Convert Markdown to Excel
- Method 1: Copy Markdown Table and Paste into Excel
- Method 2: Use an Online Markdown to Excel Converter
- Method 3: Batch Convert MD to Excel with C# Automation
- Comparison: Which Markdown to Excel Method is Right for You
- Troubleshooting Common Markdown to Excel Issues
Use Cases: When You Should Convert Markdown to Excel
Markdown is excellent for documentation, but Excel excels at data manipulation. Converting Markdown tables to Excel is useful in scenarios such as:
- Data Analysis: You have survey results, research data, or metrics in Markdown format and need to perform statistical analysis in Excel.
- Team Collaboration: You need to share structured data with teammates who prefer working in Excel for editing, commenting, or collaborating on datasets.
- Reporting: Convert Markdown tables into professional Excel reports, complete with charts, pivot tables, and graphs for data visualization.
- Database Migration: Preparing Markdown data for importing into databases or CRM systems that accept Excel or CSV formats.
Method 1: Copy Markdown Table and Paste into Excel
A simple way to convert Markdown table to Excel is to copy the table from a Markdown editor's preview mode and paste it directly into Excel. This approach works best for small tables or quick, one-off conversions and preserves the table's structure for easy editing in Excel.
Quick Conversion Steps:
-
Open your Markdown file in a Markdown editor that supports table rendering (e.g., Typora).
-
Switch to Preview Mode so the table appears as a formatted grid.
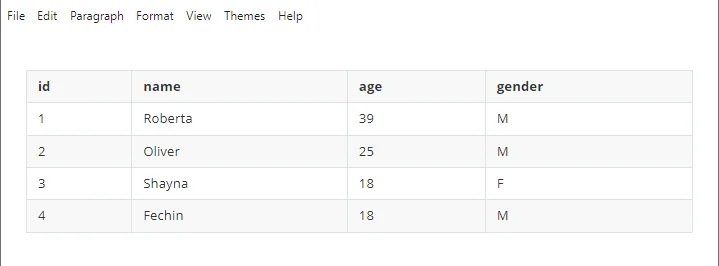
-
Select the table and copy it (Ctrl+C on Windows, Cmd+C on Mac).
-
Open Excel and select the starting cell for the table.
-
Paste the table (Ctrl+V on Windows, Cmd+V on Mac).
-
Adjust column widths and row heights if needed.
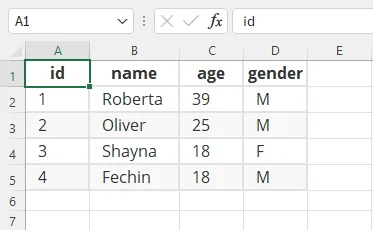
Important Notes:
- Ensure your editor allows copying as a table. Some editors only copy plain text.
- If the layout looks off, try using "Match Destination Formatting" or "Paste Special" in Excel to ensure the data aligns correctly.
Pros & Cons:
- ✅ Pros: Maintains table structure without complex steps; quick for small datasets.
- ❌ Cons: Not suitable for very large or complex tables; manual copy-paste is inefficient for repetitive tasks.
Method 2: Use an Online Markdown to Excel Converter
If you prefer a fast, software-free approach, an online Markdown to Excel converter is the fastest solution. These tools are perfect for cross-platform users who need to convert MD files quickly without installing a dedicated editor.
Recommended Online Free Markdown to Excel Converters:
- TableConvert: A versatile tool that supports Markdown to Excel, JSON, CSV, PDF with a live preview.
- Markdown to Excel Converter: A service specifically optimized for Markdown to Excel.
- CoolUtils MD to Excel Converter: Supports Markdown to XLSX with advanced options like custom headers and footers.
How to Convert Markdown to Excel Online:
-
Open a trusted online Markdown to Excel converter (e.g., TableConvert).
-
Paste your Markdown table into the input area, or upload your .md file.

-
The tool will automatically parse the data and show a spreadsheet preview.
-
Download the Excel file or copy the generated table to your clipboard.
Security Tip: While convenient, avoid uploading sensitive or confidential data to third-party online converters to protect your privacy.
Pros & Cons:
- ✅ Pros: Zero setup; works on any device (Windows, Mac, Mobile).
- ❌ Cons: Privacy risks for sensitive data; free versions may have file size limits.
Method 3: Batch Convert MD to Excel with C# Automation
For developers or organizations that frequently need to convert multiple Markdown files to Excel, an automated solution using C# can save significant time. By leveraging libraries like Spire.XLS for .NET, you can automatically convert hundreds of Markdown files to Excel in seconds.
Prerequisites:
- C# IDE: Visual Studio.
- Framework: .NET Framework or .NET Core / .NET 5+.
- Library: Spire.XLS (available via NuGet)
Step-by-Step Guide:
-
Install the Library: Open your NuGet Package Manager Console and run the following command:
PM> Install-Package Spire.XLS -
Write the Conversion Code: Use the following example to batch convert MD files to Excel:
using Spire.Xls; using System; using System.IO; namespace MarkdownToExcel { class Program { static void Main(string[] args) { // Path to your Markdown directory string mdDir = @"C:\MarkdownFiles\"; string[] files = Directory.GetFiles(mdDir, "*.md"); foreach (var file in files) { // Initialize a new Workbook Workbook workbook = new Workbook(); // Load the Markdown file workbook.LoadFromMarkdown(file); // Optional: Auto-fit sheet to one page workbook.ConverterSetting.SheetFitToPage = true; // Define the output path string output = Path.Combine(mdDir, Path.GetFileNameWithoutExtension(file) + ".xlsx"); // Save as Excel (Version 2016 or higher) workbook.SaveToFile(output, ExcelVersion.Version2016); Console.WriteLine($"Successfully converted: {file}"); } } } } -
Run the Script: The application will iterate through all .md files in the folder, parse the Markdown syntax, and generate corresponding .xlsx files automatically.
Advanced Customization Options:
- Version Compatibility: You can easily change the Excel version by modifying the SaveToFile method, for example, ExcelVersion.Version97to2003 for legacy systems.
- Adjust Page Setup: If you need more specific formatting adjustments, such as margins, column widths, or row heights, Spire.XLS provides a range of page setup options that can be configured programmatically.
- Data Cleaning: You can add extra logic to remove blank rows or handle empty cells programmatically.
Pros & Cons:
- ✅ Pros: High-speed batch processing; fully customizable formatting; ideal for enterprise-level automation.
- ❌ Cons: Requires programming knowledge (C#); initial environment setup takes more time than manual methods.
Comparison: Which Markdown to Excel Method is Right for You?
To help you choose the best approach, here's a quick comparison of the three Markdown to Excel methods:
| Feature | Copy & Paste | Online Converters | C# Automation |
|---|---|---|---|
| Difficulty | Easy | Easy | Moderate |
| Batch Support | No | No | Yes |
| Customization | Low | Limited | High |
| Security | High | Low | High |
How to Choose the Right Conversion Method?
- For simple, small-scale table conversion → Copy & Paste
- For quick, software-free conversions → Online Converters
- For a large volume of files or automated workflows → C# Automation
Troubleshooting Common Markdown to Excel Issues
- Table Misalignment: Ensure your Markdown uses the standard pipe syntax (|---|) with a header separator row.
- Missing Images: Excel does not natively embed Markdown images; manually reinsert them or use relative file paths to link images in Excel.
- Garbled Characters: Always save your source Markdown file with UTF-8 encoding before conversion to avoid font issues.
FAQs about Markdown to Excel
Q1: Can I convert Markdown to Excel on my mobile device?
A1: Yes. Online converters like TableConvert let you convert Markdown to Excel directly from a mobile browser. However, avoid uploading sensitive or confidential data to public websites.
Q2: Why does my Excel table show extra or missing columns after conversion?
A2: This often happens when the Markdown table contains inconsistent pipes (|) or missing header separators. Ensure each row has the same number of columns, and the header row uses proper pipe syntax (|---|).
Q3: How do I convert multiple Markdown files to Excel at once?
A3: Manual copy-paste is inefficient for batch operations. Use C# automation with libraries like Spire.XLS to batch convert Markdown files to Excel, saving time and preserving formatting.
Q4: Can I preserve table headers and formatting when converting Markdown to Excel?
A4: Yes, basic headers and table structure are preserved when using Copy-Paste or online converters. For advanced formatting, like custom column widths or page setup, using C# with libraries like Spire.XLS gives full control over the Excel output.
How to Insert Checkbox in Word (4 Easy Methods)
Table of Contents
- Understand the Types of Checkboxes in Word
- Method 1: Insert a Checkbox in Word (Interactive)
- Method 2: Create a Static Checkbox in Word (Print-Only)
- Method 3: Insert Checkbox in Word for the Web (Online)
- Method 4: Add Checkboxes to Word Automatically Using C#
- Why Insert Checkbox in Word Documents
- Troubleshooting Common Checkbox Issues
Creating a professional checklist or form in Microsoft Word often requires inserting checkboxes. Whether you need interactive, clickable checkboxes for digital forms or static symbols for printed documents, Word offers versatile solutions. In this guide, we'll walk you through 4 easy and practical ways to insert checkbox in Word-from built-in features to advanced automation using C#.
By the end, you'll be able to turn any plain document into a structured, professional checklist that improves clarity, accuracy, and user experience. Let's dive in!
Table of Contents
- Understand the Types of Checkboxes in Word
- Method 1: Insert a Checkbox in Word (Interactive)
- Method 2: Create a Static Checkbox in Word (Print-Only)
- Method 3: Insert Checkbox in Word for the Web (Online)
- Method 4: Add Checkboxes to Word Automatically Using C#
- Why Insert Checkbox in Word Documents
- Troubleshooting Common Checkbox Issues
Understand the Types of Checkboxes in Word
Before inserting a checkbox in your Word document, it's important to understand the different types available and their typical use cases. Word provides two primary options, each suited for specific needs:
| Checkbox Type | Description | Best Use Cases |
|---|---|---|
| Clickable Checkboxes | Interactive content controls that users can click to check/uncheck. | Digital forms, surveys, electronic task lists, interactive templates. |
| Static Checkboxes | Visual symbols (like ☑, ✓) that look like checkboxes but cannot be clicked. | Printed manuals, hand-filled forms, visual lists, PDF exports. |
Knowing the differences helps you pick the most suitable checkbox type for your document. Let's explore the methods below to create both types.
Method 1: Insert a Checkbox in Word (Interactive)
To insert a checkbox in Word that users can check or uncheck directly, follow these steps using the Checkbox Content Control feature. This method is ideal for creating electronic forms and checklists shared via email or Teams.
Prerequisite:
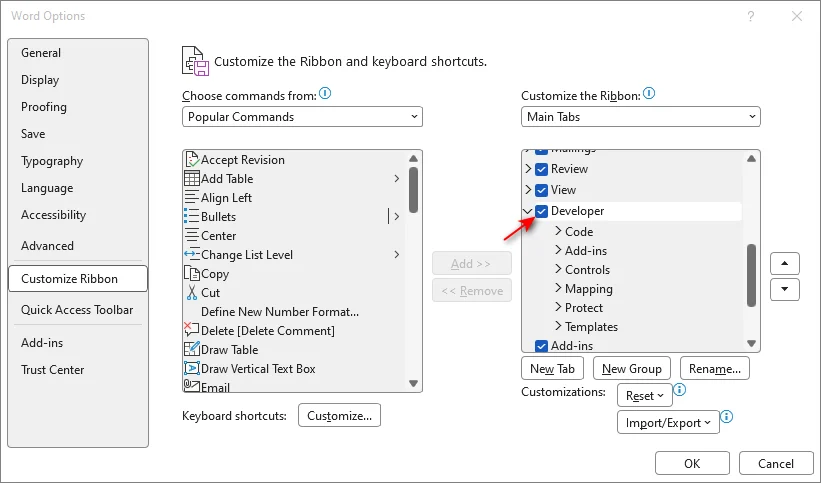
Before proceeding, ensure the Developer Tab is enabled in your ribbon. If not, go to File > Options > Customize Ribbon, check the box next to Developer, and click OK.
Step-by-Step Instructions:
-
Place your cursor where you want the checkbox to appear.
-
Navigate to the Developer tab on the top ribbon.
-
In the Controls group, click the Check Box Content Control icon (looks like a square with a checkmark inside).
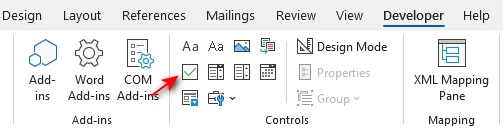
Compatibility Tip: If you need compatibility with very old versions of Word (pre-2007), you can choose Legacy Tools > Check Box Form Field. However, Content Control is recommended for all modern versions (Word 2010-2024) as it offers better formatting and security options.
Result: An interactive checkbox now appears in your document. Clicking it will instantly toggle between checked and unchecked states.

Note for Mac Users
The process to insert a checkbox in Word on Mac is similar, but the interface layout differs slightly:
- Enable Developer Tab: Click Word in the top menu bar > select Preferences > Ribbon & Toolbar > Check the box next to Developer.
- Insert the Checkbox: Go to the Developer tab in the ribbon and click the Check Box icon.
Pro Tips
- Change the Checkbox Symbol (X to ✓): By default, Word uses an "X". To switch to a checkmark: Select the checkbox, go to Developer > Properties, click Change next to Checked symbol, choose ✓ (usually found in the Wingdings font), and hit OK.
- Create a Quick Checklist: Don't re-insert every time. Simply copy your first checkbox (Ctrl+C / Cmd+C) and paste it (Ctrl+V / Cmd+V) at the start of other lines.
- Protect the Form: To stop users from typing over your text, go to Developer > Restrict Editing. Check Allow only this type of editing, select Filling in forms from the dropdown, then click Yes, Start Enforcing Protection (you can set a password if desired).
Method 2: Insert a Static Checkbox in Word (Print-Only)
If you are creating a document intended to be printed and filled out by hand (such as a physical checklist or survey), you can insert a static checkbox symbol. This method creates a visual box that looks perfect on paper, but cannot be clicked digitally.
You have two quick options depending on your needs:
Option A: The Symbol Method (Best for Single or Custom Placement)
Use this if you need to place checkboxes randomly or want full control over the symbol style.
-
Navigate to the Insert tab > Click Symbol > More Symbols...
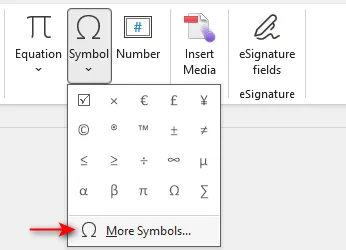
-
In the dialog box, change the Font dropdown to Wingdings or Wingdings 2.
-
Select your preferred square symbol (like □) and click Insert.
Option B: The Bullet List Method (Best for Long Checklists)
Use this if you have a long list of items and want a checkbox automatically at the start of each line.
-
Select your list of text items.
-
Go to the Home tab > Click the arrow next to the Bullets icon.
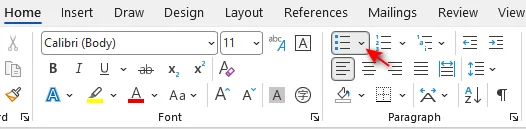
-
Select Define New Bullet... > Symbol.
-
Choose Wingdings, pick the square box (□), and click OK.
Result: Your entire list instantly transforms into a printable checklist.
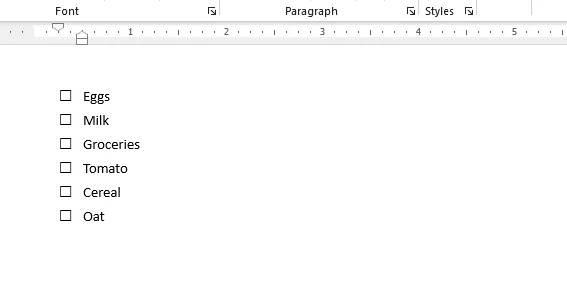
Method 3: Insert Checkbox in Word for the Web (Online)
If you don't have the desktop version of Word installed or prefer cloud-based collaboration, you can still create documents with interactive checkboxes or checklists using Word for the Web. This method is native to the browser and requires no software installation.
Steps to Insert Checkbox in Word Online:
-
Open your document in Word for the Web.
-
Place your cursor where you want the checkbox (or highlight a list of items).
-
Go to the Home tab on the ribbon.
-
Click the Checklist icon in the Paragraph group.
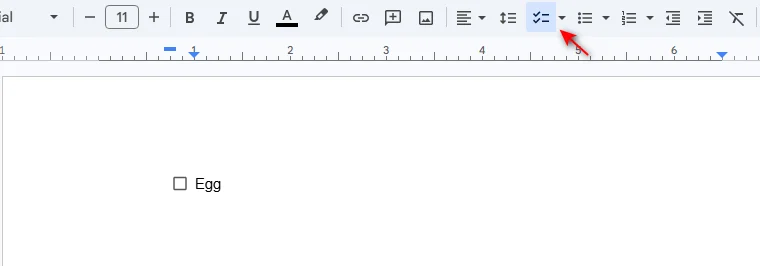
Keyboard Shortcut: You can also press Ctrl + , (Control + Comma) to instantly create a check list.
Best for Collaboration:
Unlike static symbols, checkboxes inserted here are fully interactive. If you share this document via OneDrive or SharePoint, team members can check/uncheck boxes simultaneously, and the status updates in real-time for everyone.
Method 4: Add Checkboxes to Word Automatically Using C#
For developers or IT professionals who need to generate hundreds of forms dynamically (e.g., surveys, contracts, or checklists), manually inserting checkboxes is inefficient. You can automate this process using C# and a .NET library like Spire.Doc for .NET.
This method allows you to programmatically create Word documents and insert interactive checkbox content controls - all without opening the Microsoft Word UI.
Prerequisites
Before you begin, ensure you have:
- Visual Studio (or another C# IDE).
- The Spire.Doc for .NET library.
Step-by-Step C# Implementation
-
Install the Library.
First, install Spire.Doc via NuGet by running the following command in Package Manager Console (Recommended):
PM> Install-Package Spire.DocAlternatively, you can also download the library from the official website and manually reference the DLL in your project.
-
Write The C# Code:
The following code demonstrates how to create a new document, add a paragraph of text, and insert an interactive checkbox content control next to it.
using Spire.Doc;
using Spire.Doc.Documents;
using Spire.Doc.Fields;

namespace CheckboxAutomation
{
    class Program
    {
        static void Main(string[] args)
        {
            // Create a new Word document instance
            Document document = new Document();
            Section section = document.AddSection();
            // Add some descriptive text
            Paragraph headerPara = section.AddParagraph();
            headerPara.AppendText("Please accept the terms below:");
            headerPara.ApplyStyle(BuiltinStyle.Heading5); // Optional styling
            headerPara.Format.AfterSpacing = 10;

            // Create a paragraph to hold the checkbox and label
            Paragraph checkPara = section.AddParagraph();

            // Create a StructureDocumentTagInline (SDT)
            // This is the container for the Content Control
            StructureDocumentTagInline sdt = new StructureDocumentTagInline(document);

            // Add the SDT to the paragraph's child objects
            checkPara.ChildObjects.Add(sdt);

            // Set the SDT type to CheckBox
            sdt.SDTProperties.SDTType = SdtType.CheckBox;

            // Configure the Checkbox Properties
            SdtCheckBox checkBox = new SdtCheckBox();
            sdt.SDTProperties.ControlProperties = checkBox;
            TextRange tr = new TextRange(document);
            sdt.ChildObjects.Add(tr);

            // Set default state (false = unchecked)
            checkBox.Checked = false;

            // Add text after the checkbox
            TextRange textRange = checkPara.AppendText(" I agree to the Terms and Conditions.");
            textRange.CharacterFormat.FontName = "Calibri";
            textRange.CharacterFormat.FontSize = 12;

            // Save the document
            document.SaveToFile("AutomatedForm.docx", FileFormat.Docx2013);
        }
    }
}
Developer Tips:
-
Legacy vs. Content Control: The code above creates a modern Content Control. If you need to support Word 2003 or older, you would use Form Field (Legacy Tools) instead, though this is rarely needed in modern development.
-
Insert Static Symbols: If you do not need interactivity and just want a printed symbol, you can insert it directly into the text range using Unicode characters:
TextRange tr = paragraph.AppendText('\u2611'.ToString()); // Unicode for ☑Reference: How to Insert Symbol in Word in C#.
-
Server-Side Automation: Since this library does not require Microsoft Office to be installed on the server, it is safe to use in ASP.NET web applications or Azure Functions for backend document generation.
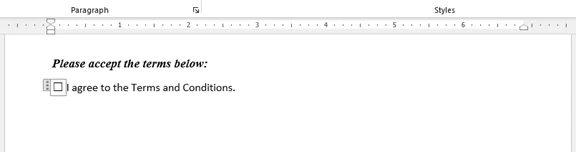
When to Use C# Automation?
- Bulk Generation: Creating 1,000+ employee onboarding forms.
- Dynamic Data: Filling forms based on database entries before adding checkboxes.
- Server-Side Processing: Generating documents on a backend server without Microsoft Office installed.
Why Insert Checkbox in Word Documents
While text documents are great for information, adding checkboxes transforms them into interactive tools that drive efficiency and accuracy. They are essential for:
- Streamline Forms & Surveys: Enabling users to select options quickly without typing, which standardizes data collection and reduces input errors in feedback forms or registration sheets.
- Enhance Task Management: Providing a visual and satisfying way to track progress in to-do lists, daily planners, or project roadmaps.
- Ensure Compliance & Safety: Creating clear, verifiable records in inspection logs, safety audits, or cleaning schedules where specific steps must be confirmed.
- Simplify Agreements: Offering a distinct, user-friendly method for users to accept terms and conditions or acknowledge policies in HR and legal documents.
Troubleshooting Common Checkbox Issues
Even with the right method, you might encounter a few hiccups when inserting a checkbox in your Word document. Here are solutions to the most common problems:
| Issue | Possible Cause | Solution |
|---|---|---|
| Can't Click the Checkbox | Document is in "Design Mode" or protected. | Go to Developer tab > Toggle off Design Mode. Or stop Restrict Editing. |
| Checkmark looks like a weird square or question mark | The font changed from Wingdings to a standard font. | Select the symbol and change the font back to Wingdings or Wingdings 2. |
| Can't find the Developer Tab | It is hidden by default in the ribbon. | Right-click the ribbon > Customize the Ribbon > Check Developer. |
| Checkbox moves text around | The object alignment is set to "In Line with Text". | Right-click the checkbox > Wrap Text > Select Square or In Front of Text. |
Conclusion
You now have four practical ways to insert checkboxes in Word, ranging from simple manual tools to advanced automated workflows. Choosing the right method depends on your specific scenario:
- For Digital Forms: Use the Developer Tab (Content Control) to create interactive, clickable fields that users can toggle on and off.
- For Printed Lists: Use the Symbol Method to insert static boxes (like ☐) that are perfect for physical checklists.
- For Quick Collaboration: Use the Word for the Web Checklist feature for real-time shared to-do lists.
- For Bulk Generation: Use C# Automation (with Spire.Doc) to programmatically generate hundreds of forms without opening Word.
By selecting the method that aligns with your goals, you can create professional, organized, and highly functional documents in minutes.
FAQs: How to Insert Checkbox in Word
Q1: How do I insert a checkbox without the Developer tab?
A1: Go to Insert > Symbol, select Wingdings, and choose the square box (☐). Note that this creates a static image for printing, not a clickable box.
Q2: Why does my checkbox show an "X" instead of a checkmark (✓)?
A2: This is the default setting. To fix it, go to Developer > Properties and change the "Checked symbol" to a checkmark (found in the Wingdings 2 font).
Q3: Can I insert a checkbox in Word for the Web?
A3: Yes. Go to the Home tab and click the Checklist button. This creates an interactive checkbox perfect for online collaboration.
Q4: How do I stop users from typing next to the checkbox?
A4: Go to Developer > Restrict Editing, select Filling in forms, and click Yes, Start Enforcing Protection.
Q5: Can I automate checkbox insertion for multiple documents?
A5: Yes. You can use C# automation with libraries like Spire.Doc to programmatically insert checkboxes into hundreds of documents simultaneously.
See Also
How to Highlight Text in Word (5 Fast Ways)
Table of Contents
- Method 1 — Highlight Text in Word with the Text Highlight Color Tool
- Method 2 — Highlight All Instances of a Word Quickly via Find & Replace
- Method 3 — Highlight Keywords Temporarily Using Navigation Pane
- Method 4 — Highlight Text in Word Online
- Method 5 — Automate Text Highlighting in Word Document with C#

When working with long Word documents, important information can easily get lost in dense text. Manually scanning pages is time-consuming and error-prone, and missing key points can impact reports, collaboration, or decision-making. Highlighting text in Word is a simple yet effective way to emphasize important content, improve readability, and speed up document review.
In this guide, we’ll cover 5 practical methods to highlight text in Word —from simple manual tools to automated techniques. By the end, you’ll know how to highlight single words, phrases, or all instances of a keyword across your documents efficiently.
Methods Overview
- Method 1 — Highlight Text in Word with the Text Highlight Color Tool
- Method 2 — Highlight All Instances of a Word Quickly via Find & Replace
- Method 3 — Highlight Keywords Temporarily Using Navigation Pane
- Method 4 — Highlight Text in Word Online
- Method 5 — Automate Text Highlighting in Word Document with C#
Understanding Text Highlighting in Word
Text highlighting in Microsoft Word is a simple yet powerful feature used to draw attention to specific parts of your document. It works like a virtual highlighter pen, letting you mark words, phrases, or entire sections with color so they stand out from the surrounding text.
Why Highlight Text in Word
Highlighting isn’t just for decoration. It serves several practical purposes:
- Emphasize important content – Key points, deadlines, or instructions are easy to spot.
- Improve readability – Helps readers scan long documents quickly.
- Organize information – Different colors can categorize topics, priorities, or stages in a project.
- Facilitate collaboration – Reviewers or team members can quickly see important or edited sections.
By applying highlighting thoughtfully, you ensure readers can focus on the most important information without feeling overwhelmed. Below, we’ll explore 5 methods for this purpose.
Method 1 — Highlight Text in Word with the Text Highlight Color Tool
One of the simplest ways to highlight text in Word documents is using the built-in Text Highlight Color tool. This method works like a digital marker and is ideal for emphasizing single or few keywords in short documents.
Step-by-Step Instructions:
-
Select the text or phrase you want to highlight.
-
Navigate to the Home tab on the ribbon.
-
In the Font group, click the arrow next to the Text Highlight Color tool (looks like a marker pen).
-
Choose a color from the palette (e.g., Yellow, Green, Blue) to apply the highlight instantly.
Tips:
- To highlight multiple areas, select a highlight color first to turn your cursor into a highlighter pen. Then click and drag over multiple non-contiguous sections without re-selecting the tool.
- If you want a faster workflow, simply select your text and press Ctrl + Alt + H together. This applies the last used highlight color (or the default color if you haven’t used one yet) immediately.
✅Pros:
- Easy and intuitive for all users.
- Works for almost all Word versions (including Word for Microsoft Office 365, Word 2024, 2019, 2016, 2013 and 2010).
⚠️Limitations:
- Requires manual selection for each instance.
- Time-consuming for long documents with repeated keywords.
You may also like: How to Find and Replace Text in Word
Method 2 — Highlight All Instances of a Word Quickly via Find & Replace
When you need to highlight all occurrences of a specific text across a long Word document, the Find and Replace tool is more efficient. It automatically scans the document for all instances and applies highlighting to them.
Steps:
-
Go to the Home tab, then click Replace in the Editing group to open the Find and Replace dialog. You can also press Ctrl + H.
-
In the dialog, type the word or phrase you want to highlight (e.g., Budget) in the Find what box.
-
Click More >> to expand advanced options.
-
Ensure your cursor is in the Replace with box, then click Format (bottom left) > Highlight.
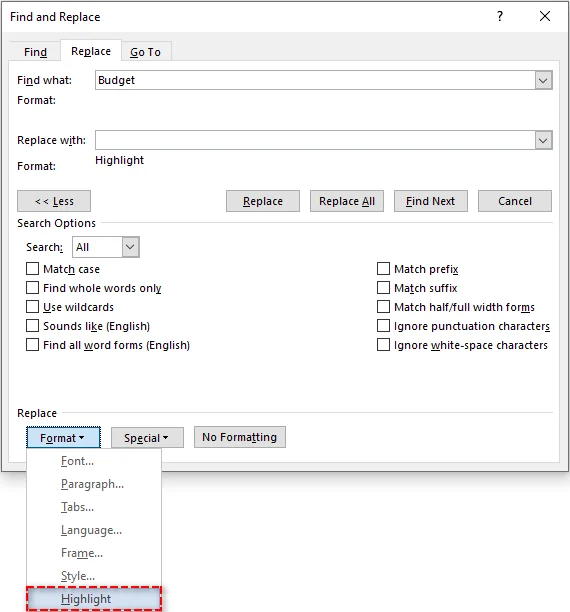
Note: You should see "Highlight" appear below the "Replace with" field.
-
Click Replace All. Word will confirm the number of replacements made, and every instance of the word will now be highlighted.
Tips for Accurate Highlighting:
- To prevent partial matches (e.g., highlighting “cat” in “category”), check the Find whole words only option in the "More" menu.
- In case you want to distinguish between capital and lowercase letters, select Match case in the "More" menu.
✅Pros:
- Fast way to highlight all instances of a word.
- Ensures 100% consistency, no missed occurrences.
⚠️Limitations:
- Only works for one keyword at a time.
- Cannot select a highlight color unless you set it beforehand with the Text Highlight Color tool.
Method 3 — Highlight Keywords Temporarily Using Navigation Pane
If your goal is to scan a Word document for keywords during a review meeting without permanently altering the file’s formatting, the Navigation Pane is ideal. It provides temporary visual cues that disappear when cleared.
Steps:
- Press Ctrl + F to open the Navigation Pane on the left.
- Type your search term in the search box.
- Word temporarily highlights all matches in the document body in yellow.
- Use the list in the pane to jump between occurrences.
✅Pros:
- Great for quick scanning and navigation.
- Zero risk of messing up the final document format.
⚠️Limitations:
- These highlights do not print or save. They are screen-only.
- Disappears as soon as you clear the search box.
Method 4 — Highlight Text in Word Online
When you don’t have Microsoft Word installed or need to collaborate in real time, Word for the web (Word 365 Online) is an ideal option. It lets you highlight text quickly while keeping changes synchronized with your team.
How to Highlight Text in Word Online:
- Open your document in Word for the web (Word 365 Online).
- Select the text you want to highlight.
- Go to the Home tab in the top menu.
- Click the Text Highlight Color icon.
- Choose a color to apply the highlight.
Tip:
- If you don’t see the highlight option, make sure the document isn’t in view-only mode.
✅Pros:
- Highlights are synced quickly for collaborators.
- Works on any device (laptop, mobile and more).
- No software installation required.
⚠️Limitations:
- Find & Replace with formatting/highlight rules is not supported (or may be limited) in Word for the web.
- Depending on your document permissions, some editing/highlighting features may be limited.
Method 5 — Automate Text Highlighting in Word Document with C#
For developers, data analysts, and enterprises needing to process multiple keywords or hundreds of documents, manual highlighting is inefficient and unsustainable. By using C# with the Spire.Doc for .NET library, you can:
- Batch process hundreds of instances or documents in seconds.
- Apply different colors to specific terms automatically.
- Ensure 100% consistency without missing a single match.
About Spire.Doc for .NET
Spire.Doc is a standalone Word manipulation library that allows developers to create and update Word documents including applying text highlighting without relying on Microsoft Office. This makes it the ideal choice for server-side automation and cloud environments.
Installation Requirements
Before proceeding, install the library via NuGet or download it via the official website:
PM> Install-Package Spire.Doc
C# Code Example: Highlight Multiple Keywords with Distinct Colors
The example below demonstrates how to load a Word document, search for multiple keywords, and highlight them with distinct colors (e.g., "Budget" in Yellow, "Risk" in Red) efficiently.
using Spire.Doc;
using Spire.Doc.Documents;
using System;
using System.Collections.Generic;
using System.Drawing;

namespace HighlightMultipleKeywords
{
    internal class Program
    {
        static void Main(string[] args)
        {
            // Load the Word document
            Document doc = new Document();
            doc.LoadFromFile("Report_2026.docx");

            // Define keywords and different highlight colors
            // You can customize this list to match your specific needs
            Dictionary<string, Color> keywords = new Dictionary<string, Color>()
            {
                { "Budget", Color.Yellow },
                { "Risk", Color.Red },
                { "Revenue", Color.Green }
            };

            // Highlight all occurrences of each keyword
            foreach (var kvp in keywords)
            {
                TextSelection[] selections = doc.FindAllString(kvp.Key, false, true); // Parameters: searchText, matchCase, wholeWord
                foreach (TextSelection selection in selections)
                {
                    selection.GetAsOneRange().CharacterFormat.HighlightColor = kvp.Value;
                }
            }

            // Save the highlighted document
            doc.SaveToFile("Report_2026_Highlighted.docx", FileFormat.Docx);
            doc.Close();
            Console.WriteLine("Keyword highlighting completed!");
        }
    }
}
Tips for Developers:
- You can extend this single-file workflow to batch processing by wrapping the same highlighting logic in a loop over all .docx files in an input folder (e.g., foreach (var file in Directory.GetFiles(...))).
- If your keywords follow patterns (for example, partial codes or variable phrases), consider using regular expressions to enhance matching accuracy — see Find and Replace Text by Regular Expressions in Word in C# for more details.
✅Pros:
- Easily highlight different terms with different colors in one execution without manual effort.
- Eliminates human error and ensures uniform formatting.
- Runs on any machine or server without Microsoft Word installed.
⚠️Limitations:
- Requires basic C# programming knowledge.
- Configuring the project and library may be challenging for beginners.
Conclusion and Recommendations
You now have 5 practical ways to highlight text in Word, ranging from quick manual tools to advanced automated workflows. Choosing the right method depends on your specific scenario:
- For single documents & few terms: Use the Text Highlight Color tool or the Find & Replace feature.
- For temporary review: Use the Navigation Pane to scan without altering formatting.
- For remote collaboration: Use Word for the web (Word 365 Online) for real-time syncing without desktop installation.
- For batch processing & automation: Use C# automation (with Spire.Doc) to handle hundreds of files and multiple colors instantly.
Final Thought:
Start with the built-in tools for everyday tasks. But if you find yourself repeating the same highlighting steps across dozens of files, it’s time to level up with automation to save hours of manual work.
Troubleshooting Common Highlighting Issues
Even with simple tools, users often encounter specific problems when trying to highlight text in Word. Here are the solutions to the most common issues.
| Issue | Likely Cause | Solution |
|---|---|---|
| Highlights do not print | You used the Navigation Pane (temporary highlights). | Use the Text Highlight Color tool or Find & Replace method to apply permanent highlights that print. |
| Partial words highlighted | "Find whole words only" was not selected. | In Find & Replace, click More >> and check Find whole words only to avoid highlighting substrings. |
| Highlight color not applied | The text selection was incorrect or cursor was not in highlighter mode. | Select the text properly, or if highlighting multiple areas, first choose the color so the cursor becomes a highlighter, then click and drag over text. |
FAQs: How to Highlight Text in Word
Q1: What is the keyboard shortcut to highlight text in Word?
A1: After selecting the text, press Ctrl + Alt + H to instantly apply the last used or the default highlight color if you haven’t used one yet.
Q2: Can I highlight text in Word Online?
A2: Yes, you can highlight text in Word online just like in the desktop version by using the Text Highlight Color tool. However, advanced features like Find & Replace with formatting are unsupported in the web version.
Q3: Why can’t I remove highlighting from some text?
A3: The color might be Paragraph Shading, not text highlighting. To fix it: Go to Home > Paragraph > Shading and select No Color.
Q4: How do I highlight text in a protected/read-only Word document?
A4: You cannot edit or highlight text in a strictly read-only or protected file directly. You have two options:
- Enable Editing: If you see a yellow bar at the top saying "Protected View," click Enable Editing.
- Save a Copy: If the file is restricted, go to File > Save As and save a new copy to your local drive. You can then highlight text in this new editable version.
Q5: Can I highlight text in multiple Word documents at once?
A5: You can use C# with libraries like Spire.Doc to highlight text across multiple files simultaneously.
See Also
How to Import Excel File in Python (List, Dict, Database)
Importing an Excel file in Python typically involves more than just reading the file. In most cases, the data needs to be converted into Python structures such as lists, dictionaries, or other formats that can be directly used in your application.
This transformation step is important because Excel data is usually stored in a tabular format, while Python applications often require structured data for processing, integration, or storage. Depending on how the data will be used, it may be represented as a list for sequential processing, a dictionary for field-based access, custom objects for structured modeling, or a database for persistent storage.
This guide demonstrates how to import Excel file in Python and convert the data into multiple structures using Spire.XLS for Python, with practical examples for each approach.
Overall Implementation Approach and Quick Example
Importing Excel data into Python is essentially a two-step process:
- Load Excel file – Load the Excel file and access its raw data
- Transform data – Convert the data into Python structures such as lists, dictionaries, or objects
This separation is important because in real-world applications, simply reading Excel is not enough—the data must be transformed into a format that can be processed, stored, or integrated into systems.
Key Components
When importing Excel data using Spire.XLS for Python, the following components are involved:
- Workbook – Represents the entire Excel file and is responsible for loading data from disk
- Worksheet – Represents a single sheet within the Excel file
- CellRange – Represents a group of cells that contain actual data
- Data Transformation Layer – Your Python logic that converts cell values into target structures
Data Flow Overview
The typical workflow looks like this:
Excel File → Workbook → Worksheet → CellRange → Python Data Structure
Understanding this pipeline helps you design flexible import logic for different scenarios.
Quick Example: Import Excel File in Python
Before running the example, install Spire.XLS for Python using pip:
pip install spire.xls
If needed, you can also download Spire.XLS for Python manually and include it in your project.
The following example shows the simplest way to import Excel data into Python:
from spire.xls import *

workbook = Workbook()
workbook.LoadFromFile("SalesReport.xlsx")

data = []
sheet = workbook.Worksheets[0]

# Get the used cell range
cellRange = sheet.AllocatedRange

# Get the data from the first row
for col in range(cellRange.Columns.Count):
    data.append(sheet.Range[1, col +1].Value)

print(data)

workbook.Dispose()
Below is a preview of the data imported from the Excel file:
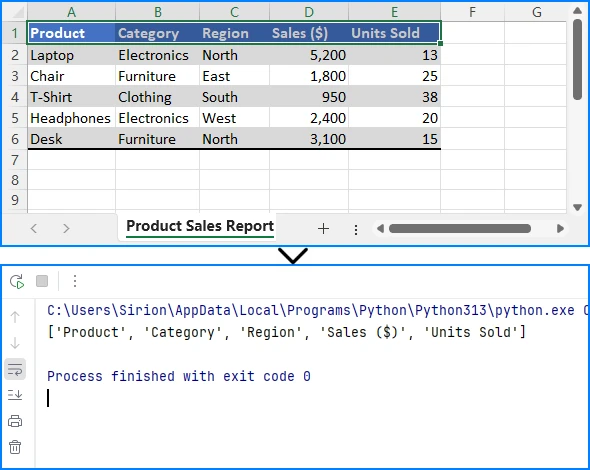
This minimal example demonstrates the fundamental workflow: initialize a workbook, load the Excel file, access the worksheet and cell data, and then dispose of the workbook to release resources.
For more advanced scenarios, such as reading Excel files from memory or handling file streams, see how to import Excel data from a stream in Python.
Import Excel Data in Python as a List
One of the simplest ways to import Excel data in Python is to convert it into a list of rows. This structure is useful for iteration and basic data processing.
Example
from spire.xls import *

# Load the Workbook
workbook = Workbook()
workbook.LoadFromFile("SalesReport.xlsx")

# Get the used range in the first worksheet
sheet = workbook.Worksheets[0]
cellRange = sheet.AllocatedRange

# Create a list to store the data
data = []
for row_index in range(cellRange.RowCount):
    row_data = []
    for cell_index in range(cellRange.ColumnCount):
        row_data.append(cellRange[row_index + 1, cell_index + 1].Value)
    data.append(row_data)

workbook.Dispose()
Technical Explanation
Importing Excel data as a list treats each row in the worksheet as a Python list, preserving the original row order.
How the code works:
- A nested loop is used to traverse the worksheet in a row-first (row-major) pattern
- The outer loop iterates through rows, while the inner loop accesses each cell
- Index offsets (
+1) are applied because Spire.XLS uses 1-based indexing
Why this design works:
- AllocatedRange limits iteration to only populated cells, improving efficiency
- Row-by-row extraction keeps the structure consistent with Excel’s layout
- The intermediate row_data list ensures clean aggregation before appending
This structure is ideal for sequential processing, simple transformations, or as a base format before converting into dictionaries or objects.
If you want to load more than just text and numeric data, see How to Read Excel Files in Python for more data types.
Import Excel Data as a Dictionary in Python
If your Excel file contains headers, importing it as a dictionary provides better data organization and access by column names.
Example
from spire.xls import *

workbook = Workbook()
workbook.LoadFromFile("SalesReport.xlsx")

sheet = workbook.Worksheets[0]
cellRange = sheet.AllocatedRange

rows = list(cellRange.Rows)

headers = [cellRange[1, cell_index + 1].Value for cell_index in range(cellRange.ColumnCount)]

data_dict = []
for row in rows[1:]:
    row_dict = {}
    for i, cell in enumerate(row.Cells):
        row_dict[headers[i]] = cell.Value
    data_dict.append(row_dict)

workbook.Dispose()
Technical Explanation
Importing Excel data as a dictionary converts each row into a key-value structure using column headers.
How the code works:
- The first row is extracted as headers
- Each subsequent row is iterated and processed
- Cell values are mapped to headers using their column index
Why this design works:
- Both headers and row cells follow the same column order, enabling simple index-based mapping
- This removes reliance on fixed column positions
- The result is a self-descriptive structure with named fields
This method is useful when you need structured data access, such as working with JSON, APIs, or labeled datasets.
Import Excel Data into Custom Objects
For structured applications, you may need to import Excel data into Python objects to maintain type safety and encapsulate business logic.
Example
class Employee:
    def __init__(self, name, age, department):
        self.name = name
        self.age = age
        self.department = department

from spire.xls import *
from spire.xls.common import *

workbook = Workbook()
workbook.LoadFromFile("EmployeeData.xlsx")

sheet = workbook.Worksheets[0]
cellRange = sheet.AllocatedRange

employees = []
for row in list(cellRange.Rows)[1:]:
    name = row.Cells[0].Value
    age = int(row.Cells[1].Value) if row.Cells[1].Value else None
    department = row.Cells[2].Value

    emp = Employee(name, age, department)
    employees.append(emp)

workbook.Dispose()
Technical Explanation
Importing Excel data into objects maps each row to a structured class instance.
How the code works:
- A class is defined to represent the data model
- Each row is read and its values are extracted
- Values are passed into the class constructor to create objects
Why this design works:
- The constructor acts as a controlled transformation point
- It allows validation, type conversion, or preprocessing
- Data is no longer loosely structured, but aligned with domain logic
This is ideal for applications with clear data models, such as backend systems or business logic layers.
Import Excel Data to Database in Python
In many applications, Excel data needs to be stored in a database for persistent storage and querying.
Example
import sqlite3
from spire.xls import *

# Connect to SQLite database
conn = sqlite3.connect("sales.db")
cursor = conn.cursor()

# Create table matching the Excel structure
cursor.execute("""
CREATE TABLE IF NOT EXISTS sales (
    product TEXT,
    category TEXT,
    region TEXT,
    sales REAL,
    units_sold INTEGER
)
""")

# Load the Excel file
workbook = Workbook()
workbook.LoadFromFile("Sales.xlsx")

# Access the first worksheet
sheet = workbook.Worksheets[0]
rows = list(sheet.AllocatedRange.Rows)

# Iterate through rows (skip header row)
for row in rows[1:]:
    product = row.Cells[0].Value
    category = row.Cells[1].Value
    region = row.Cells[2].Value

    # Remove thousand-separators and convert to float
    sales_text = row.Cells[3].Value
    sales = float(str(sales_text).replace(",", "")) if sales_text else 0

    # Convert units sold to integer
    units_text = row.Cells[4].Value
    units_sold = int(units_text) if units_text else 0

    # Insert data into the database
    cursor.execute(
        "INSERT INTO sales VALUES (?, ?, ?, ?, ?)",
        (product, category, region, sales, units_sold)
    )

# Commit changes and close connection
conn.commit()
conn.close()

# Release Excel resources
workbook.Dispose()
Here is a preview of the Excel data and the SQLite database structure:
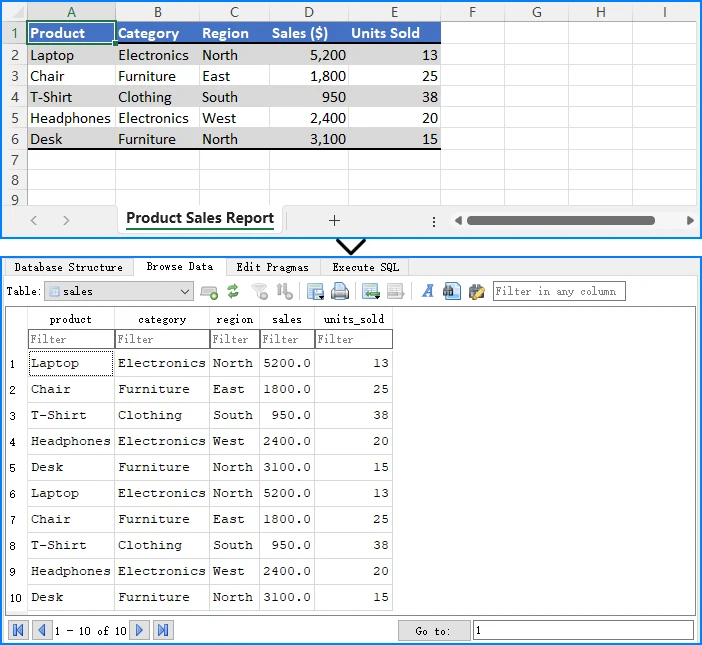
Technical Explanation
Importing Excel data into a database converts each row into a persistent record.
How the code works:
- A database connection is established and a table is created
- The table schema is aligned with the Excel structure
- Each row is read and inserted using parameterized SQL queries
Why this design works:
- Schema alignment ensures consistent data mapping
- Data normalization (e.g., numeric conversion) improves compatibility
- Parameterized queries provide safety and proper type handling
When to use this approach:
This approach is suitable for data storage, querying, and integration into larger data pipelines.
For a more detailed guide on importing Excel data into Databases, check out How to Transfer Data Between Excel Files and Databases.
Why Use Spire.XLS for Importing Excel Data
The examples in this guide use Spire.XLS for Python because it provides a clear and consistent way to access and transform Excel data. The main advantages in this context include:
-
Structured Object Model The library exposes components such as Workbook, Worksheet, and CellRange, which align directly with how Excel data is organized. This makes the data flow easier to understand and implement. See more details on Spire.XLS for Python API Reference.
-
Focused Data Access Layer Instead of handling low-level file parsing, you can work directly with cell values and ranges, allowing the import logic to focus on data transformation rather than file structure.
-
Format Compatibility It supports common Excel formats, such as XLS and XLSX, and other spreadsheet formats, such as CSV, ODS, and OOXML, enabling the same import logic to be applied across different file types.
-
No External Dependencies Excel files can be processed without requiring Microsoft Excel to be installed, which is important for backend services and automated environments.
Common Pitfalls
Incorrect File Path
Ensure the Excel file path is correct and accessible from your script. Use absolute paths or verify the current working directory.
import os
print(os.getcwd())  # Check current directory
Missing Headers
When importing as a dictionary, verify that your Excel file has headers in the first row. Otherwise, the keys will be incorrect.
Memory Management
Always dispose of the workbook object after processing to release resources, especially when processing large files.
workbook.Dispose()
Data Type Conversion
Excel cells may return different data types than expected. Validate and convert data types as needed for your application.
Import vs Read Excel in Python
In Python, "reading" and "importing" Excel files refer to related but distinct steps in data processing.
Read Excel focuses on accessing raw file content. This typically involves retrieving cell values, rows, or specific ranges without changing how the data is structured.
Import Excel includes both reading and transformation. After extracting the data, it is converted into structures such as lists, dictionaries, objects, or database records so that it can be used directly within an application.
In practice, reading is a subset of importing. The distinction lies in the goal—reading retrieves data, while importing prepares it for use.
Conclusion
Importing Excel file in Python is not just about reading data—it's about converting it into structures that your application can use effectively. In this guide, you learned how to import Excel file in Python as a list, convert Excel data into dictionaries, map Excel data into Python objects, and import Excel data into a database.
With Spire.XLS for Python, you can easily import Excel data into different structures with minimal code. The library provides a consistent API for handling various Excel formats and complex content, making it suitable for a wide range of data processing scenarios.
To evaluate the full performance of Spire.XLS for Python, you can apply for a 30 day trial license.
FAQ
What does it mean to import Excel file in Python?
Importing Excel means converting Excel data into Python structures such as lists, dictionaries, or databases for further processing and integration into your applications.
How do I import Excel data into Python?
You can use libraries like Spire.XLS for Python to load Excel files and convert their content into usable Python data structures. The process involves loading the workbook, accessing the worksheet, and iterating through cells to extract data.
Can I import Excel data into a database using Python?
Yes, you can read Excel data and insert it into databases like SQLite, MySQL, or PostgreSQL using Python. This approach is commonly used for data migration and backend system integration.
What is the best structure for importing Excel data?
The best structure depends on your use case. Lists are suitable for simple iteration, dictionaries for structured data access by column names, objects for type safety and business logic, and databases for persistent storage and querying.
Do I need Microsoft Excel installed to import Excel files in Python?
No, libraries like Spire.XLS for Python work independently and do not require Microsoft Excel to be installed on the system.
How to Remove Watermark in Word (3 Easy Ways)
Table of Contents

A watermark in Microsoft Word is an essential tool for corporate documents, marking drafts as confidential or protecting intellectual property. However, when it's time to finalize a report, repurpose a template, or share a polished version with clients, that watermark can become an obstacle.
Fortunately, removing a watermark from Word doesn't have to be complicated. With the right methods and tools, cleaning up your document is a cakewalk. In this guide, we'll walk you through 3 easy ways to remove watermark in Word - without altering your original document formatting!
- Part 1: Can You Remove a Watermark from Word
- Part 2: How to Delete Watermark from Word
- Part 3: Why Remove Watermarks from Word Documents
- Part 4: Tips and Common Issues When Removing Watermark in Word
- Conclusion and Recommendations
Part 1: Can You Remove a Watermark from Word?
The answer is YES! You have a variety of options, ranging from built-in Microsoft Word features, online tools like Google Docs, to automation scripts using C#. The choice of the preferred method depends on your specific requirements, such as the number of files (single vs. batch), your access to software (desktop vs. web), and your technical comfort level.
3 Practical Ways to Remove Watermark in Word
- Via Microsoft Word: The native and most reliable way to remove watermarks directly within the application without external tools.
- Via Online Tools: Online tools like Google Docs offer a convenient, software-free workaround for clearing watermarks in Word documents.
- Via C# Automation: C# provides a more efficient solution for batch watermark removal from large volumes of Word documents.
Here's a brief overview of these methods:
| Method | Best For | Limitations |
|---|---|---|
| Microsoft Word |
|
|
| Google Docs |
|
|
| C# Automation |
|
|
Part 2: How to Delete Watermark from Word
Now, let us go through the detailed steps of each method.
Method 1: Using Microsoft Word (The Native Approach)
Microsoft Word offers a built-in watermark removal feature, which lets you delete watermark from a Word document in just a few clicks. It's available in most versions, including Word for Microsoft 365, Word 2021, 2019, 2016, 2013, 2010, and 2007.
Step-by-Step Instructions:
-
Open the Document: Launch Microsoft Word and open the file containing the watermark.
-
Navigate to the Design Tab:
-
In Word 2013 and later, click on the Design tab in the top ribbon.
-
Note: In older versions like Word 2010 and 2007, go to the Page Layout tab instead.
-
-
Click Watermark: Hit the Watermark button on the far right of the ribbon in the Page Background group.
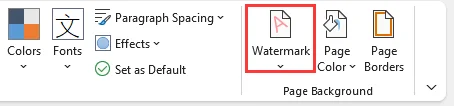
-
Select Remove Watermark: From the dropdown menu, choose Remove Watermark at the bottom.
Note for Mac Users
The process to remove watermarks from Word documents on Mac is very similar to the Windows version, although the menu layout may be slightly different:
- Go to the Design tab and click the Watermark button.
- In the Insert Watermark dialog box, select No Watermark.
Troubleshooting Stubborn Watermarks
If the watermark is still there after using the built-in remove method, it might be manually inserted in the Header/Footer as an image or text box. In this case, you need to delete it from the header or footer area manually:
-
Double-click the very top of the page to open the Header & Footer view.
-
Move your cursor over the watermark image or text until it changes to a four-arrow pointer.
-
Click on the watermark to select it, then press the Delete key on your keyboard.
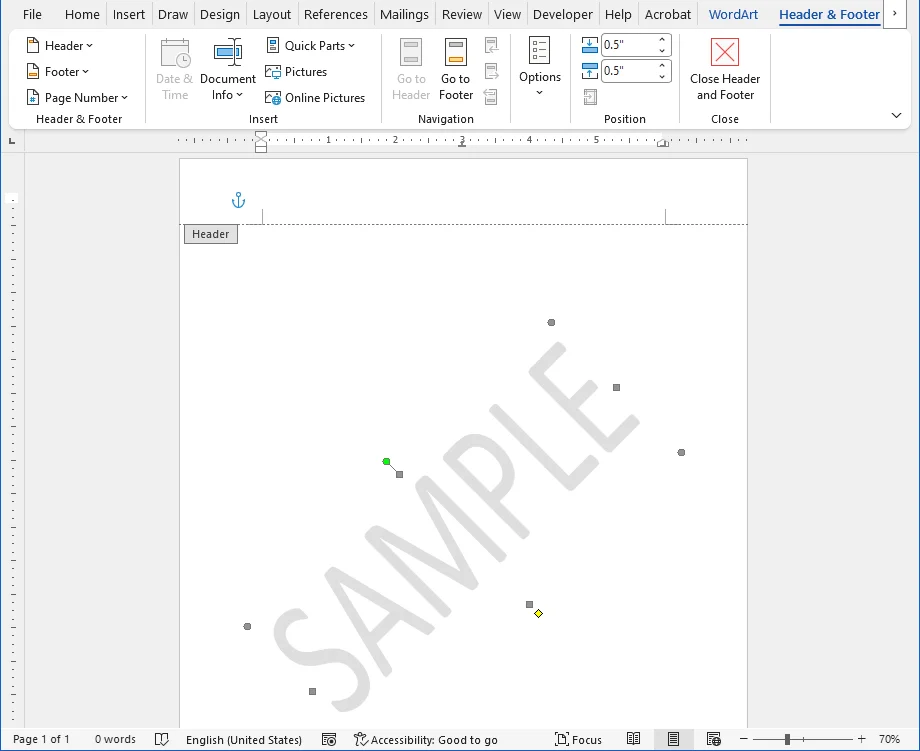
-
Exit the Header & Footer editing mode by clicking Close Header and Footer on the ribbon or double-clicking the main body text.
The watermark should now be gone from every page that shared the same header. This manual method works identically on both Windows and Mac.
Tip: If your document has multiple sections, check each section's header. For any header that is not "Linked to Previous", repeat these steps to remove the watermark.
You may also like: How to Remove Blank Lines in Word Quickly
Method 2: Using Online Tools (Web-based Solution)
If you don't have Word installed or prefer a web-based solution, online tools like Google Docs serve as a good alternative for removing watermarks in Word documents. It works entirely in your browser and does not require any software installation.
How to Remove Watermark in Word Online:
-
Sign in to Google and go to Google Docs.
-
Click Blank document to start a new document.
-
Click File (top left) > Open > Upload, then browse and select your .docx or .doc file to open it in Google Docs.
-
Once the file is open, doublie-click on the watermark to select it and hit the Delete key.
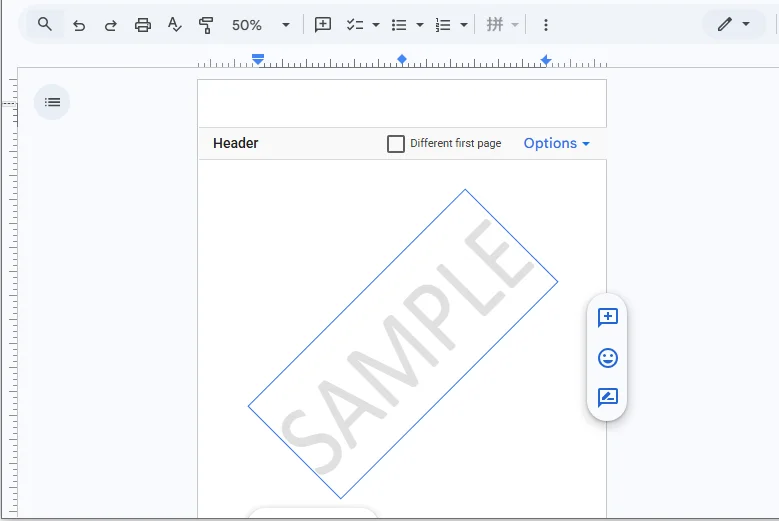
-
Go to File > Download > Microsoft Word (.docx) to save the clean document to your device.
Security Consideration:
While Google has robust security, avoid uploading highly confidential or legally privileged documents to third-party cloud services. Use the desktop Microsoft Word method or local C# scripts for sensitive data.
Method 3: Using C# Automation (Batch Processing)
For developers or businesses handling thousands of Word documents, manual removal is inefficient. You can remove watermarks in Word automatically using C# and the Spire.Doc for .NET library. This method allows you to process batches of files without needing Microsoft Word installed on the server.
What is Spire.Doc for .NET and why choose it?
Spire.Doc for .NET is a comprehensive, standalone library designed for creating, reading, editing, and converting Word documents programmatically. Unlike traditional automation methods that rely on Microsoft Office, Spire.Doc operates independently.
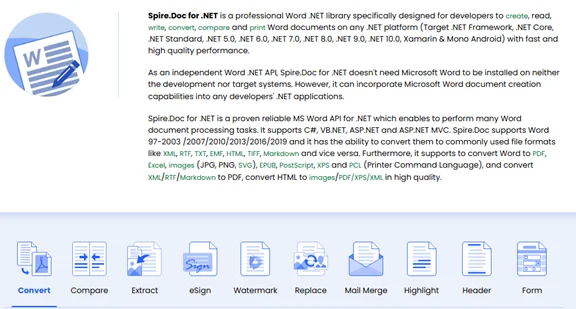
Key Benefits:
- High Performance: Optimized engine for rapid batch processing of hundreds or thousands of files.
- Server-Safe: No dependency on MS Office, making it ideal for headless server environments (e.g., Azure, AWS, Linux containers).
- Broad Format Support: Seamlessly handles .doc, .docx, .docm, and .dotx formats.
Prerequisites
Before running the code, ensure you have the following:
-
Development Environment: Visual Studio with the .NET SDK installed.
-
Library Installation: Install the Spire.Doc package via NuGet Package Manager using the following command or download it from the official website:
PM> Install-Package Spire.Doc
C# Code Example to Batch Remove Watermarks from Word Documents
using System;
using System.IO;
using Spire.Doc;

namespace RemoveWordWatermarkBatch
{
    class Program
    {
        static void Main(string[] args)
        {
            // Input folder containing Word files to process
            string inputFolder = @"C:\Documents\Input";
            // Output folder for the processed files
            string outputFolder = @"C:\Documents\Output";

            // Ensure the output folder exists
            if (!Directory.Exists(outputFolder))
            {
                Directory.CreateDirectory(outputFolder);
            }

            // Get all .docx files in the folder
            string[] files = Directory.GetFiles(inputFolder, "*.docx");

            foreach (string filePath in files)
            {
                try
                {
                    // Create a Document instance
                    Document doc = new Document();
                    doc.LoadFromFile(filePath);

                    // Remove the watermark
                    doc.Watermark = null;

                    // Build the output file path
                    string fileName = Path.GetFileName(filePath);
                    string outputPath = Path.Combine(outputFolder, fileName);

                    // Save the cleaned document
                    doc.SaveToFile(outputPath, FileFormat.Docx2013);

                    Console.WriteLine($"Successfully processed: {fileName}");
                }
                catch (Exception ex)
                {
                    Console.WriteLine($"Failed to process: {filePath}");
                    Console.WriteLine($"Error: {ex.Message}");
                }
            }

            Console.WriteLine("Batch processing completed!");
            Console.ReadLine();
        }
    }
}
This script loops through all Word documents in the input folder, removes the watermark from each file, and then saves the updated file to the output folder.
Result:
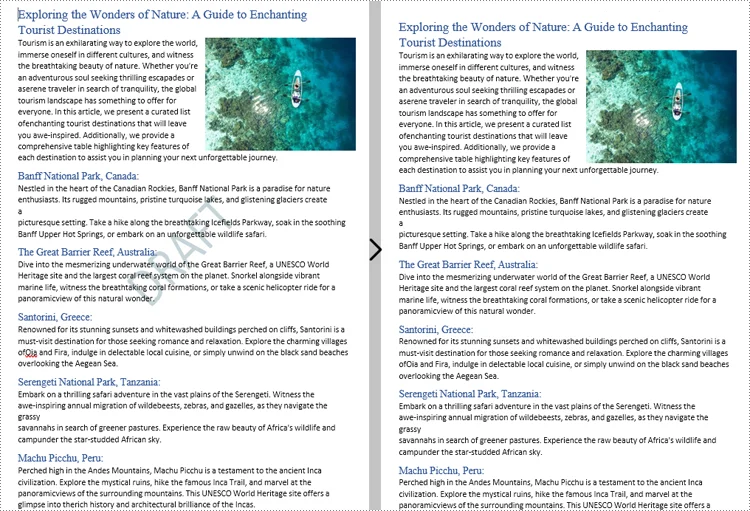
Part 3: Why Remove Watermarks from Word Documents?
While watermarks protect data and brand identity, removing them is often necessary for:
- Finalizing Drafts: Clearing "DRAFT" or "REVIEW" markers to present a polished, professional final document.
- Customizing Templates: Removing sample logos or placeholder text to adapt templates for specific clients or projects.
- Improving Accessibility: Eliminating low-contrast backgrounds that hinder readability for visually impaired users or interfere with screen readers.
- Optimizing Printing: Preventing background noise and reducing unnecessary ink/toner consumption for cleaner, cost-effective prints.
⚠️Legal Warning: Never remove watermarks from copyrighted, confidential, or proprietary documents without explicit permission. Doing so may violate copyright laws, NDAs, and security policies. Ensure you have the legal right to modify the file before proceeding.
Part 4: Tips and Common Issues When Removing Watermark in Word
Removing watermarks in Word is usually straightforward, but certain scenarios can cause problems. Follow these tips to ensure a smooth process, and see solutions for common issues that users encounter.
Tips
- Always Backup First – Save a copy before removing watermarks, especially when using scripts or batch processing.
- Check the Entire Document – Scroll through all pages after removal to confirm the watermark is gone everywhere.
- Inspect for Residual Objects – Some watermarks are inserted as shapes, images, or text boxes; check and remove any floating objects.
- Verify Headers and Sections – Ensure all headers and sections are accounted for before removal to avoid missing watermarks.
Common Issues and Solutions
- Remove Watermark Button Doesn’t Work – The watermark was manually added as an image, shape, or text box in the header/footer. Open the header, select the watermark, and press Delete. Check all sections if multiple headers exist.
- Watermark Reappears After Deleting – The document is protected or the watermark is embedded in a style/template. Go to Review > Restrict Editing > Stop Protection (password may be required).
- Faint Background Color Remains – This is a page fill rather than a watermark. Go to Design > Page Color > No Color.
- Watermark Still Appears on Specific Pages – Different First Page or Odd/Even Page settings are enabled. Edit each header type individually and delete the watermark object.
Conclusion and Recommendations
You now have a complete toolkit for removing watermarks in Word documents. The key is selecting the method that aligns with your specific needs:
- For most users: Stick with the native Microsoft Word watermark removal feature. It is the fastest, safest, and most reliable option for individual files.
- For non-Office users: Google Docs is an excellent free alternative without software installation.
- For enterprises & developers handling a large number of files: C# automation is the most efficient and scalable solution.
Choose wisely and enjoy clean, professional documents!
Frequently Asked Questions
Q: Why won't the watermark disappear when I click "Remove Watermark"?
A: The watermark was likely inserted manually as an image or text box in the Header/Footer. Double-click the top of the page to open the Header & Footer view, select the Watermark directly, and press Delete.
Q: Can I remove watermarks from multiple Word files at once?
A: Manual removal is too slow for batches. For 100+ files, use C# automation with libraries like Spire.Doc to loop through folders and strip watermarks instantly without opening Word.
Q: Will removing a watermark mess up my formatting?
A: Using the native Word Remove Watermark tool preserves your layout perfectly. Third-party converters (like Google Docs) may slightly shift margins or fonts, so always proofread.
Q: Is it legal to remove a watermark in Word?
A: Yes, if you own the document or have permission. However, removing "Confidential," "Draft," or copyright marks from files you do not own may violate NDAs or copyright laws.