How to Insert Sparklines in Excel (4 Easy Methods)
Table of Contents
- What are Sparklines and Why Use Them
- Understand the Types of Sparklines in Excel
- Method 1. Insert Sparklines through the Excel Ribbon (Quick and Simple)
- Method 2. Create Sparklines with Google Sheets (Cloud-based Solution)
- Method 3. Add Sparklines with Excel VBA (Automated Approach)
- Method 4. Insert Sparklines in Multiple Excel Files with C# (Batch Processing)
- Comparison Summary: Which Method Should You Choose
- Practical Tips for Better Sparklines
Data visualization doesn't always require a massive, screen-filling chart. Sometimes, the most powerful insights come from seeing a trend right next to the data point it represents. This is where Excel Sparklines-miniature charts that fit inside a single cell-become invaluable.
This article explains how to insert sparklines in Excel using both manual and automated techniques, so you can choose the method that best fits your workflow and environment.
- What are Sparklines and Why Use Them
- Understand the Types of Sparklines in Excel
- Method 1. Insert Sparklines through the Excel Ribbon (Quick and Simple)
- Method 2. Create Sparklines with Google Sheets (Cloud-based Solution)
- Method 3. Add Sparklines with Excel VBA (Automated Approach)
- Method 4. Insert Sparklines in Multiple Excel Files with C# (Batch Processing)
- Comparison Summary: Which Method Should You Choose
- Practical Tips for Better Sparklines
What are Sparklines and Why Use Them?
Introduced by data visualization pioneer Edward Tufte, Sparklines are "intense, simple, word-sized graphics." In Excel, they live within the background of a cell, allowing you to see data patterns without losing sight of the raw numbers.
Key Benefits:
- Contextual Clarity: Spot trends (seasonal spikes, steady declines) instantly.
- Space Efficiency: Ideal for large tables where a standard chart would be too cluttered.
- Data Integrity: Because they are linked to specific cells, they update automatically when your data changes.
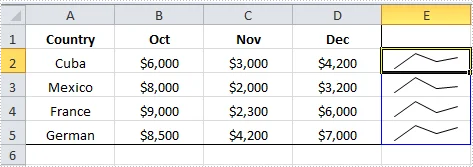
Understand the Types of Sparklines in Excel
Excel offers three distinct Sparkline styles, each suited for different data stories:
| Sparkline Type | Visual Representation | Best For | Example Use Case |
|---|---|---|---|
| Line | Continuous line graph | Showing trends over time | Stock prices, temperature, or monthly sales |
| Column | Bar chart within each cell | Comparing discrete values | Monthly sales, quarterly performance |
| Win/Loss | Bars showing win (positive) vs. loss (negative) | Visualizing binary outcomes (positive/negative) | Financial performance, sports results |
Understanding these options helps you choose the right type for your needs.
Method 1. Insert Sparklines through the Excel Ribbon (Quick and Simple)
Inserting sparklines through the Excel ribbon is the most straightforward and intuitive method. It requires no advanced skills and is widely used.
How to Insert a Sparkline in Excel:
-
Launch Microsoft Excel, click File > Open, then browse and select your Excel file.
-
Click the destination cell where you want to insert the sparkline.
-
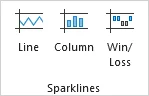
In the Excel Ribbon at the top, click on the Insert tab.
-
In the Sparklines group, choose your preferred sparkline style: Line, Column, or Win/Loss.
-
In the Create Sparklines dialog box, select the data range you want to visualize (e.g., B2:G2).
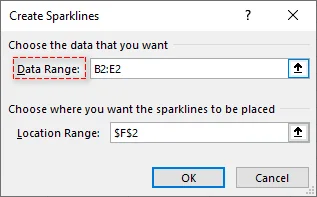
-
Click OK. Excel will insert the sparkline into the destination cell.
-
(Optional) Once inserted, the Sparkline tab will appear in the ribbon. Here you can adjust the color, style, and highlight specific points like "High Point" or "Negative Point".
Pro Tip:
- To apply the sparkline to multiple rows, simply click and drag the Fill Handle (the small square at the bottom-right of the cell) downward to instantly populate the rest of the cells.
When to use: This method is ideal for beginners or anyone who has Excel installed and works great for small-to-medium-sized datasets.
You may also like: How to Insert Objects in Excel: Embedding and Linking Files
Method 2. Create Sparklines with Google Sheets (Cloud-based Solution)
If you're working in a cloud environment or collaborating with others on the web, Google Sheets can be a good alternative to Excel for creating sparklines. Unlike Excel, Google Sheets works directly in web browsers and does not require installation.
How to Create Sparklines via Google Sheets:
-
Open your Excel file in Google Sheets.
-
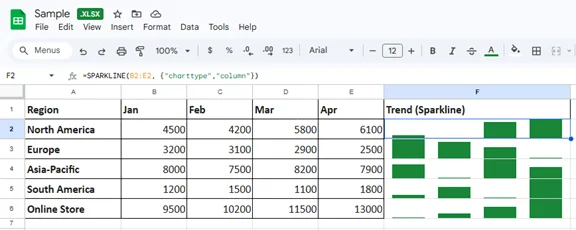
Click the cell where you want the sparkline to appear, type the following SPARKLINE formula:
=SPARKLINE(B2:E2, {"charttype","column"})This formula generates a column sparkline based on the data in B2:E2.
-
Press Enter, and the sparkline will appear in the selected cell.
-
(Optional) Auto-fill the formula in other cells by dragging the Handle.
Tips:
- Remember to replace "B2:E2" with your own data range.
- You can also change "column" to "line" or "winloss" depending on your preferred sparkline type, and customize the appearance by adding additional arguments for colors, axis visibility, etc. See SPARKLINE - Google Docs Editors Help for more details.
When to use: Ideal for collaborative teams and remote organizations that require real-time, shared data trends visualization.
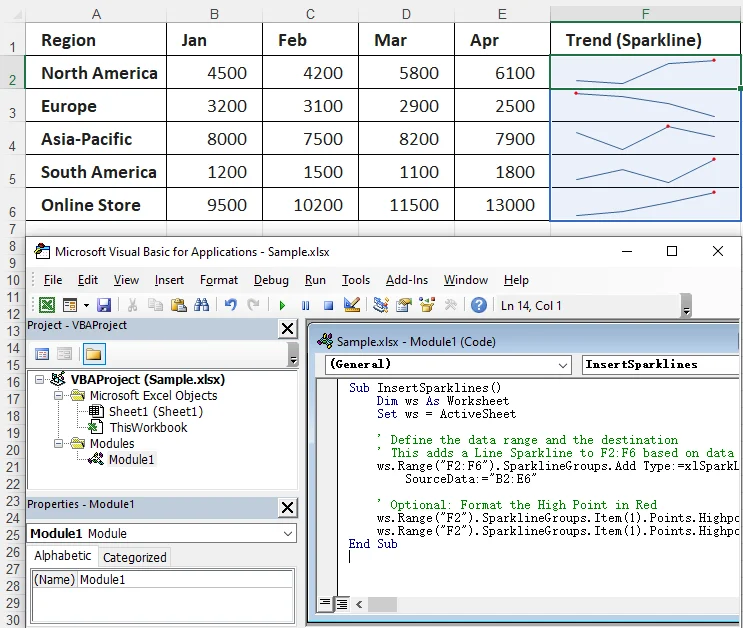
Method 3. Add Sparklines with Excel VBA (Automated Approach)
For analysts dealing with hundreds of rows, manual insertion is tedious. You can use a simple VBA macro to loop through a dataset and apply sparklines to an entire column at once.
Example VBA Code to Insert Sparklines in Excel:
Sub InsertSparklines()
    Dim ws As Worksheet
    Set ws = ActiveSheet

    ' Define the data range and the destination
    ' This adds a Line Sparkline to F2:F6 based on data in B2:E6
    ws.Range("F2:F6").SparklineGroups.Add Type:=xlSparkLine, _
        SourceData:="B2:E6"

    ' Optional: Format the High Point in Red
    ws.Range("F2").SparklineGroups.Item(1).Points.Highpoint.Visible = True
    ws.Range("F2").SparklineGroups.Item(1).Points.Highpoint.Color.Color = RGB(255, 0, 0)
End Sub
This script adds line-type sparklines to the range F2:F6 based on the data in B2:E6. You can adjust the sparkline type and data ranges as needed. For more details on the SparklineGroups.Add method, check the official Microsoft documentation.
How to use:
-
Press Alt + F11 to open the VBA Editor.
-
Go to Insert > Module to insert a new module.
-
Paste the code into the module and press F5 to run.
Important Notes:
- This approach requires saving the file as an .xlsm (Macro-Enabled) file, which can be blocked by corporate security settings.
- Macro operations cannot be undone, so be sure to back up your files before executing a macro to avoid unexpected updates.
When to use: Ideal for large datasets or recurring reports where the data structure is identical every time.
Method 4. Insert Sparklines in Multiple Excel Files with C# (Batch Processing)
For developers or enterprise users who need to insert sparklines into multiple Excel files at once, C# offers an efficient solution. Using the Spire.XLS for .NET library, you can batch create sparklines for a large volume of Excel files without installing and opening the Excel application.
What is Spire.XLS for .NET?
Spire.XLS for .NET is a versatile library designed for creating, modifying, and converting Excel files (.xlsx, .xls, and more) in .NET applications.
Key Features:
- Create and Edit Excel Files: Easily create new workbooks or modify existing ones, including support for inserting sparklines and complex formulas.
- Convert Excel to Multiple Formats: Convert Excel files to PDF, TXT, HTML, and more.
- No Dependency on Microsoft Excel: does not require Excel to be installed, which makes it suitable for server-side environments where Excel is unavailable or impractical.
How to Batch Insert Sparklines in Excel with C# and Spire.XLS
-
First, create a C# console application in an IDE like Visual Studio.
-
Next, install the required library via NuGet:
Install-Package Spire.XLSThis command will automatically download and reference the DLL of the library into your project.
-
Add the following code to batch insert sparklines into multiple Excel files:
using Spire.Xls;
using System;

namespace InsertSparkline
{
    class Program
    {
        static void Main(string[] args)
        {
            // Specify the input and output folder paths
            string inputFolder = @"C:\YourFolderPath";  // Modify the input folder path as needed
            string outputFolder = @"C:\YourOutputFolder"; // Modify the output folder path as needed

            // Loop through all Excel files in the input folder
            foreach (var file in Directory.GetFiles(inputFolder, "*.xlsx"))
            {
                // Load each file
                var wb = new Workbook();
                wb.LoadFromFile(file);

                // Get the first sheet
                var ws = wb.Worksheets[0];

                // Add a sparkline group to the sheet
                var sparklineGroup = ws.SparklineGroups.AddGroup(SparklineType.Line);
                // Set the data ranges for the sparklines and the destination cells where the sparklines will be placed
                string[,] ranges = { { "A2:D2", "E2" }, { "A3:D3", "E3" }, { "A4:D4", "E4" }, { "A5:D5", "E5" } };

                // Add sparklines using a loop
                for (int i = 0; i < ranges.GetLength(0); i++)
                    sparklineGroup.Add(ws[ranges[i, 0]], ws[ranges[i, 1]]);

                // Save the modified workbook to the output folder
                wb.SaveToFile(Path.Combine(outputFolder, Path.GetFileName(file)), ExcelVersion.Version2010);
                wb.Dispose();
            }
        }
    }
}
This script iterates over all Excel files in the specified input folder, inserts sparklines in the first sheet, and saves the modified files in the output folder.
-
Press F5 to run the code.
Considerations:
- This method requires proper environment setup and basic knowledge of C# programming, which may be challenging for beginners.
When to use: Ideal for developers or enterprise teams who need to automate Sparkline insertion tasks or process multiple Excel files in bulk in environments where Excel is not available.
Comparison Summary: Which Method Should You Choose
Choosing the right method for inserting sparklines in Excel depends on your specific needs, such as ease of use, batch processing requirements, and technical skill level. Here's a brief comparison to help you decide:
| Method | Ease of Use | Software Installation Needs | Batch Support | Skill Requirements |
|---|---|---|---|---|
| Excel Ribbon | Very Easy | Yes (Excel) | No | Low |
| Google Sheets | Easy | No | No | Moderate |
| Excel VBA | Moderate | Yes (Excel) | Yes | High |
| C# (Spire.XLS) | Moderate | No (but requires spire.xls.dll) | Yes | High |
Quick Selection Guide:
- For simplicity and small datasets: Use the Excel Ribbon method.
- For cloud-based or collaborative work: Try Google Sheets.
- For repetitive tasks or large datasets: Go with Excel VBA.
- For batch processing across multiple files in environments without Excel: C# with Spire.XLS is the most efficient solution.
Practical Tips for Better Sparklines
- Standardize the Axis: By default, Excel scales each Sparkline to its own data. If you are comparing different departments, go to Sparkline Design > Axis and select Same for All Sparklines so the relative heights are accurate.
- Handle Empty Cells: Use the Hidden & Empty Cells settings to decide if gaps in data should be shown as zero or as a connected line.
- Color Strategy: Use a neutral color (grey/blue) for the line and a high-contrast color (red) only for the High Point or Negative Point.
Frequently Asked Questions about Inserting Sparklines in Excel
Q1: Can I put multiple sparklines in one cell?
A1: No, a single cell can only host one sparkline group. However, you can merge cells to create more space for a larger sparkline.
Q2: Why are my sparklines not showing up?
A2: Check if your data range contains "Numbers stored as Text." Sparklines require actual numerical values to render.
Q3: Can I insert sparklines into multiple sheets at once?
A3: Yes, using VBA or C#, you can automate the process of adding sparklines to multiple sheets or files.
Q4: What's the difference between sparklines and charts?
A4: Sparklines are miniature charts embedded in a cell, without axes or labels, making them ideal for compact data visualization. Charts, on the other hand, are larger and come with axes, labels, and titles.
Q5: Are sparklines available in all versions of Excel?
A5: Sparklines are available in Excel 2010 and later versions. If you are using Excel 2007 or earlier, you'll need to upgrade to access sparklines.
See Also
How to Convert Word to HTML (4 Easy Methods)
Table of Contents
- Why Convert Word to HTML
- Method 1: Save Word as HTML Using Microsoft Word (Quick and Simple)
- Method 2: Copy Word Content and Paste into an HTML Editor (Clean HTML Code)
- Method 3: Use Online Word to HTML Converters (Fast and Accessible)
- Method 4: Batch Convert Word to HTML Using C# (Automated Process)
- Comparison: Which Word to HTML Conversion Method Should You Choose
- Practical Tips for Word to HTML Conversion
- Common Issues and Solutions
Word (.docx and .doc) is perfect for creating documents and business reports, but it is not optimized for the web. Copying Word content directly can cause broken tables, misaligned text, or missing images. Converting Word to HTML ensures your text, tables, images, and formatting display correctly across all browsers and devices.
In this guide, we'll show four practical ways to convert Word to HTML - from quick manual steps to developer-friendly automated solutions - so you can produce web-ready HTML content efficiently, whether for a single document or multiple files.
- Why Convert Word to HTML
- Method 1: Save Word as HTML Using Microsoft Word (Quick and Simple)
- Method 2: Copy Word Content and Paste into an HTML Editor (Clean HTML Code)
- Method 3: Use Online Word to HTML Converters (Fast and Accessible)
- Method 4: Batch Convert Word to HTML Using C# (Automated Process)
- Comparison: Which Word to HTML Conversion Method Should You Choose
- Practical Tips for Word to HTML Conversion
- Common Issues and Solutions
Why Convert Word to HTML?
Converting Word documents to HTML is essential for:
- Web Compatibility: HTML files are universally supported in all web browsers, while Word files are not natively rendered.
- Preserve Formatting: HTML preserves headings, paragraphs, tables, lists, images, and links, keeping your content structured and readable.
- Responsive Design: HTML adapts seamlessly across desktop, tablet, and mobile devices.
- CMS Integration: WordPress, Joomla, and other platforms require HTML for formatting and content consistency.
- SEO Optimization: Semantic HTML tags, headings, meta descriptions, and links improve search engine discoverability.
Common Use Cases
- Publishing reports, manuals, or guides online.
- Converting blog drafts or articles into CMS-ready HTML content.
- Creating email templates with consistent formatting.
- Integrating documentation or content into web-based applications.
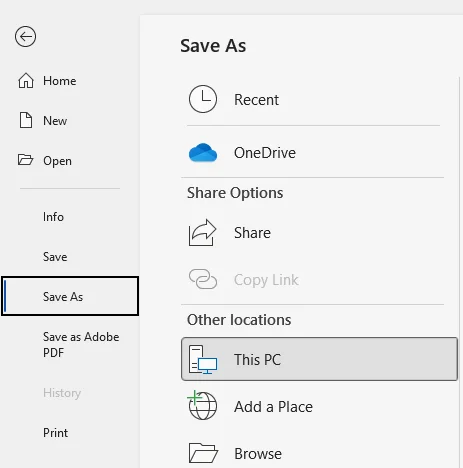
Method 1: Save Word as HTML Using Microsoft Word (Quick and Simple)
Microsoft Word's built-in Save As feature is the easiest way to convert a Word document to HTML. It requires no extra tools and works well for single documents.
Step-by-Step Guide:
-
Open your Word document in Microsoft Word.
-
Click File > Save As.
-
Choose the folder where you want the HTML file saved.
-
In the Save as type dropdown, select either:
- Web Page (.htm, .html) - preserves most formatting but includes extra Word-specific tags.
- Web Page, Filtered (.htm, .html) - produces cleaner HTML with minimal unnecessary tags (recommended).
-
Click Save. Word will create an HTML file along with a folder containing any embedded images, CSS, and scripts.
Pros & Cons:
- Pros: Very easy and fast; preserves layout and images.
- Cons: Generates extra Word-specific markup; Filtered HTML is cleaner but still verbose.
Best For: Quick, single-file conversions where you don't need clean HTML.
You may also be interested in: How to Convert HTML to Word
Method 2: Copy Word Content and Paste into an HTML Editor (Clean HTML Code)
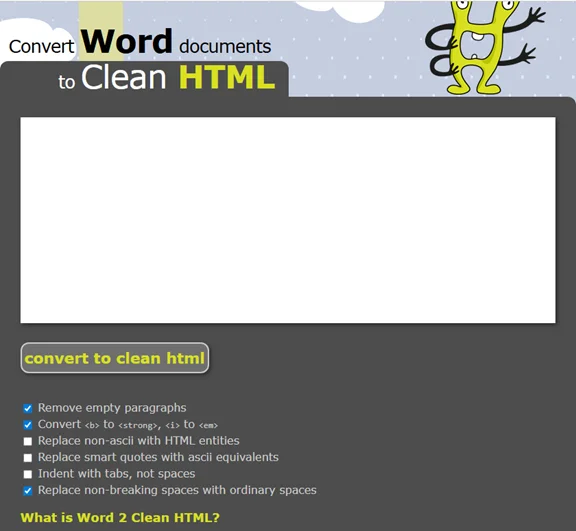
If you want clean, web-ready HTML or only need to convert part of a Word document, copying the content into an HTML editor like Word2CleanHTML is a practical solution.
Step-by-Step Guide:
- Open your Word document and select the content you want to convert.
- Press Ctrl + C (Windows) or Cmd + C (Mac) to copy.
- Open the Word2CleanHTML HTML editor.
- Press Ctrl + V (Windows) or Cmd + V (Mac) to paste the content into the editor.
- Click the convert to clean HTML button. The converter will process and generate clean HTML code from your Word content.
- Copy and save the HTML code as an .html file.
Important Note:
- This method works best for text and basic formatting. Images will not be transferred. You will need to manually re-insert them into your final HTML page using
tags.
Pros & Cons:
- Pros: Produces cleaner, more maintainable HTML; ideal for partial documents or custom formatting.
- Cons: Manual process; may take longer for full documents or multiple files.
When to Use: Best for selective content conversion or projects requiring clean, web-ready HTML with precise control over formatting.
Method 3: Use Online Word to HTML Converters (Fast and Accessible)
If you don't have Word installed or prefer a web-based solution, free online converters provide a quick and convenient solution to turn Word documents into HTML.
Recommended Online Word to HTML Converters:
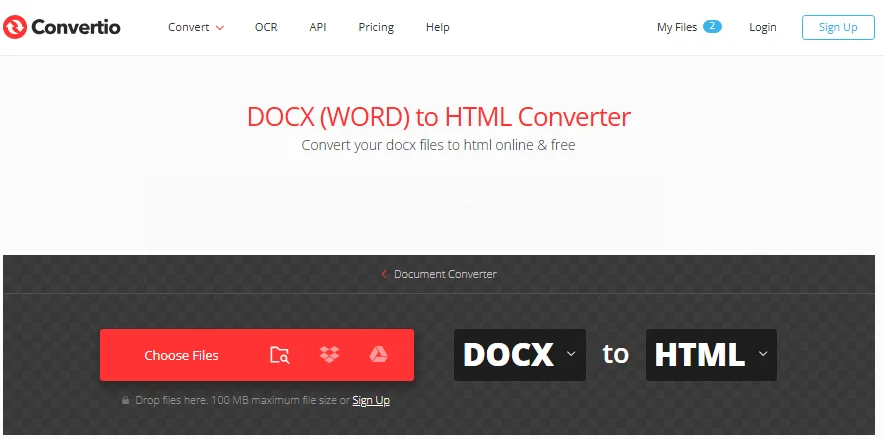
- Convertio: A user-friendly tool for converting DOC/DOCX to HTML.
- FreeConvert: Simple and popular service that converts Word documents to HTML.
Steps to Convert Word to HTML Online:
-
Go to the website of the chosen online converter (e.g. Convertio).
-
Upload your Word document.
-
Click the Convert button and wait for the conversion process to complete.
-
Download the converted HTML file to your device.
Security Warning:
- Public online converters may store your data in third-party servers. For sensitive documents, always use offline methods.
Pros & Cons:
- Pros: Fast, convenient, no software installation needed; works from any device.
- Cons: Not suitable for confidential or large documents.
When to Use: Best for quick conversions of non-sensitive data, or when you need a fast web solution without software installation.
Method 4: Batch Convert Word to HTML Using C# (Automated Process)
For developers or teams handling multiple Word documents, C# automation provides an efficient way to convert DOC/DOCX files to HTML in batch. This method is ideal for repetitive tasks, large projects, or integrating Word-to-HTML conversion into workflows.
What You Need:
- A C# development environment (Visual Studio or similar).
- Spire.Doc for .NET: a .NET library that supports Word file manipulation and conversion, including Word to HTML, PDF and more.
Installation Requirements:
Before proceeding, install Spire.Doc for .NET via NuGet or download it from the official website:
Install-Package Spire.Doc
Code Example:
Once the library is installed, add the following code to your C# project to batch convert Word files to HTML files:
using Spire.Doc;
using System;
using System.IO;

namespace WordToHTMLBatch
{
    class Program
    {
        static void Main(string[] args)
        {
            // Specify the folder path containing Word files
            string folderPath = @"C:\WordFiles\";

            // Get all .docx files from the folder
            string[] wordFiles = Directory.GetFiles(folderPath, "*.docx");

            // Loop through each Word file
            foreach (var file in wordFiles)
            {
                // Create a Document object to load the Word file
                Document doc = new Document();
                // Load the Word document from the file
                doc.LoadFromFile(file);

                // Build the output HTML file path based on the original file name
                string outputFile = Path.Combine(
                    folderPath,
                    Path.GetFileNameWithoutExtension(file) + ".html"
                );

                // Save the Word document as an HTML file
                doc.SaveToFile(outputFile, FileFormat.Html);
            }
        }
    }
}
This code iterates through multiple Word files in the specified folder and saves each file as an HTML file. The output files are saved with the same name as the original Word file but with an .html extension.

Customization Options:
-
Handling .doc Files:
If you need to process .doc files instead of .docx, simply modify the file extension filter:
string[] wordFiles = Directory.GetFiles(folderPath, "*.doc"); -
Advanced Export Options:
You can configure HTML export settings using the HtmlExportOptions class to control styles, images, headers, and more:
HtmlExportOptions htmlExportOptions = doc.HtmlExportOptions;

// Export document styles
htmlExportOptions.IsExportDocumentStyles = true;

// Embed images directly in the HTML
htmlExportOptions.ImageEmbedded = true;

// Choose CSS style sheet type (Internal, External, or Inline)
htmlExportOptions.CssStyleSheetType = CssStyleSheetType.Internal;

// Include headers and footers in the HTML output
htmlExportOptions.HasHeadersFooters = true;

// Export form fields as text or keep as input fields
htmlExportOptions.IsTextInputFormFieldAsText = false;

// Save the document as an HTML file with custom settings
doc.SaveToFile("AdvancedWordToHtmlConversion.html", FileFormat.Html);
Pros & Cons:
- Pros: Efficient for multiple files; fully automated; consistent output.
- Cons: Requires programming skills; setup takes time.
When to Use: Best for developers, teams, or enterprises that need to convert multiple Word files to HTML reliably and automatically.
Comparison: Which Word to HTML Conversion Method Should You Choose
Choosing the right Word to HTML conversion method depends on your needs, the size of your project, and your technical skills. The table below summarizes the main options:
| Method | Ease of Use | Batch Support | Security | Technical Skill Requirements |
|---|---|---|---|---|
| Word Save As HTML | Very Easy | No | High | Low |
| Copy & Paste to HTML Editor | Easy | No | Moderate | Low |
| Online Converters | Easy | No | Low | Low |
| C# Automation | Moderate | Yes | High | Advanced |
Quick Selection Guide:
- Quick one-off conversions → Word Save As HTML
- Clean, semantic HTML → Copy & Paste into HTML Editor
- Mobile or web-based conversion → Online Converters
- Multiple files or automation → C# Automation
Practical Tips for Word to HTML Conversion
- Back up your Word files before conversion.
- Use styles in Word to make headings and lists more structured.
- Check images and links after conversion to ensure paths are correct.
- Clean code for SEO: remove unnecessary tags, add meta descriptions, and use semantic HTML.
- Test on multiple browsers to confirm rendering consistency.
Common Issues and Solutions
- Messy HTML with too many tags → Use Word Save As and Choose "Web Page, Filtered" or copy and paste the content into an HTML editor for clean HTML code.
- Images not displaying → Ensure the images folder is kept alongside HTML files and update paths.
- Lost formatting → Some complex layouts may need manual adjustment in HTML.
- Tables or headers misaligned → Reformat using CSS for responsive design.
- Multiple documents not processed → Use batch automation via C#.
FAQs about Word to HTML
Q1: Can I convert multiple Word files to HTML at once?
A1: Yes, but you'll need C# automation or batch processing tools to handle multiple documents efficiently.
Q2: Which method produces the cleanest HTML?
A2: Copying Word content into an HTML editor or using Word Save As "Web Page, Filtered" generates cleaner, more semantic HTML.
Q3: Are online Word to HTML converters safe for confidential documents?
A3: For sensitive data, avoid public online converters. Use local solutions like Word Save As, HTML editors, or C# automation.
Q4: Will my converted HTML work on mobile devices?
A4: HTML output is generally compatible, but you may need CSS adjustments for fully responsive layouts.
See Also
How to Convert Excel to TXT (4 Easy Methods)
Table of Contents
- Understanding the Differences Between Common Text Formats
- Method 1: Copy Excel Data and Paste It into a Text Editor (Quick and Simple)
- Method 2: Save Excel as Text Using Microsoft Excel (Native and Reliable)
- Method 3: Convert Excel to TXT Using Free Online Tools (No Software Needed)
- Method 4: Batch Convert Excel to TXT with C# (Automated Process)
- Comparison: Which Excel to TXT Method is right for you
- Practical Tips for Excel to Text Conversion
- Common Issues and Solutions
Watch this video to learn how to perform Excel to TXT conversion programmatically in C#, making large-scale or repetitive file processing easier to automate.
Excel files (.xlsx or .xls) are widely used for organizing and analyzing large datasets, but they can be difficult to share or use in systems that only accept plain text formats. Converting Excel to TXT increases compatibility, making it easier to share and automate processing. In this article, we'll walk you through 4 simple methods to help you easily achieve Excel to Text conversion — whether you're looking for a quick, manual solution or an automated batch process.
- Understanding the Differences Between Common Text Formats
- Method 1: Copy Excel Data and Paste It into a Text Editor (Quick and Simple)
- Method 2: Save Excel as Text Using Microsoft Excel (Native and Reliable)
- Method 3: Convert Excel to TXT Using Free Online Tools (No Software Needed)
- Method 4: Batch Convert Excel to TXT with C# (Automated Process)
- Comparison: Which Excel to TXT Method is right for you
- Practical Tips for Excel to Text Conversion
- Common Issues and Solutions
Understanding the Differences Between Common Text Formats
When converting Excel files to text, selecting the right text format is crucial to ensure data compatibility and integrity. Below are several common text formats used for this conversion:
- Tab-Delimited Text (.txt): Uses tabs (\t) as delimiters, suitable for most Windows applications.
- Unicode Text (.txt): Uses Unicode encoding (e.g., UTF-16), ideal for handling multilingual data, especially non-Latin characters like Chinese and Arabic.
- CSV (Comma-Separated Values) (.csv): A text format that uses commas as delimiters, commonly used for data exchange between databases and spreadsheets.
Each format has its strengths. Understanding these options can help you choose the right format for your needs.
Method 1: Copy Excel Data and Paste It into a Text Editor (Quick and Simple)
Copying Excel data and pasting it into a text editor is among the easiest ways to convert Excel to TXT. This method is ideal when you only need a specific range of Excel cells converted to text, not entire worksheets.
Quick Conversion Steps:
-
Highlight the data range you want to convert in your Excel spreadsheet.
-
Press Ctrl+C (Windows) or Cmd+C (Mac) to copy.
-
Open a text editor (Notepad, TextEdit, etc.).
-
Press Ctrl+V (Windows) or Cmd+V (Mac) to paste.
-
Save the file as .txt.
Important Notes:
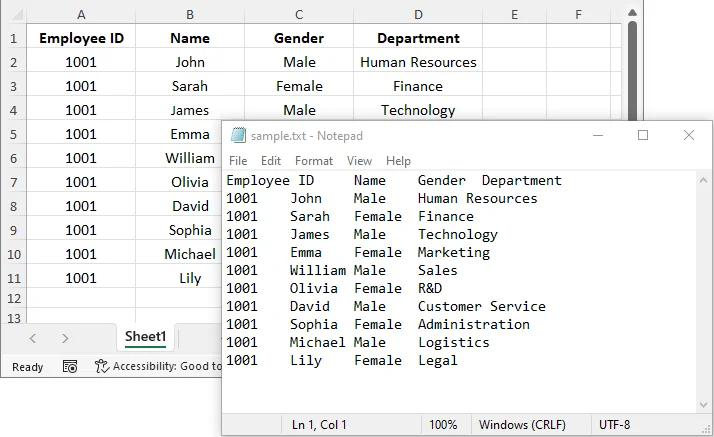
- Data pasted into text editors typically uses tab delimiters, so columns are separated by tabs.
- Large datasets may experience formatting issues or truncation depending on your system's clipboard capacity. Consider splitting large datasets into smaller chunks if needed.
When to Use: Best for small, one-off conversions, or when you only need part of the spreadsheet.
Method 2: Save Excel as Text Using Microsoft Excel (Native and Reliable)
Microsoft Excel offers a built-in Save As feature to directly save an Excel file as text, which is reliable and widely used.
Step-by-Step Guide:
-
Launch Microsoft Excel. Click File > Open, then browse and select your Excel file.
-
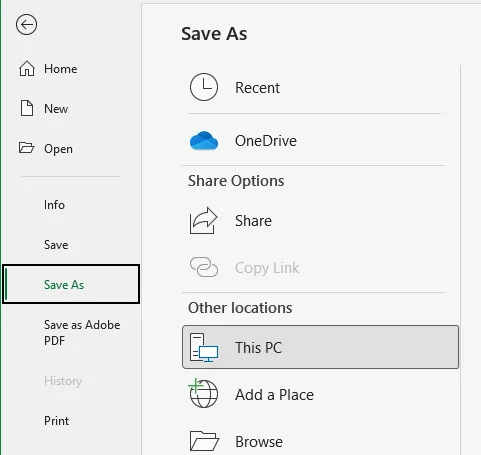
Navigate to the sheet you want to convert and click File > Save As.
-
Choose the preferred text format:
- From the Save as type drop-down menu, select the desired text or CSV format, such as Text (Tab-delimited) (.txt)", Unicode Text (.txt), or CSV (Comma-delimited) (.csv) (CSV is also a plain text format).
- If you choose Text (Tab-delimited), data will be separated by tabs; if you select CSV, it will be comma-separated. For multilingual documents, choose Unicode Text.
-
Select where you'd like to save the text file and click Save.
Considerations:
- This method saves only the active worksheet. If your workbook has multiple sheets, repeat the process for each one.
- Excel will warn you that some features might be lost (e.g., formatting, formulas). This is expected, as TXT files contain only raw text.
When to Use: This method is perfect for users who have Excel installed and want a reliable, straightforward solution for single-sheet conversions.
You might also like: How to Convert TXT Files to Excel Spreadsheets Quickly
Method 3: Convert Excel to TXT Using Free Online Tools (No Software Needed)
For users without Excel or those who prefer a mobile-friendly solution, many free online tools offer the flexibility to convert Excel files to TXT from any device with an internet connection.
Recommended Online Excel to TXT Converters:
- CloudConvert: Supports a wide range of file conversions, including Excel to TXT.
- Convertio: A user-friendly, popular tool for converting XLS/XLSX to TXT.
- Cloudxdocs: Fast and reliable, it supports Excel to TXT conversion and more.
Steps to Convert Excel to TXT Online:
-
Go to the website of your chosen online converter (e.g., Cloudxdocs).
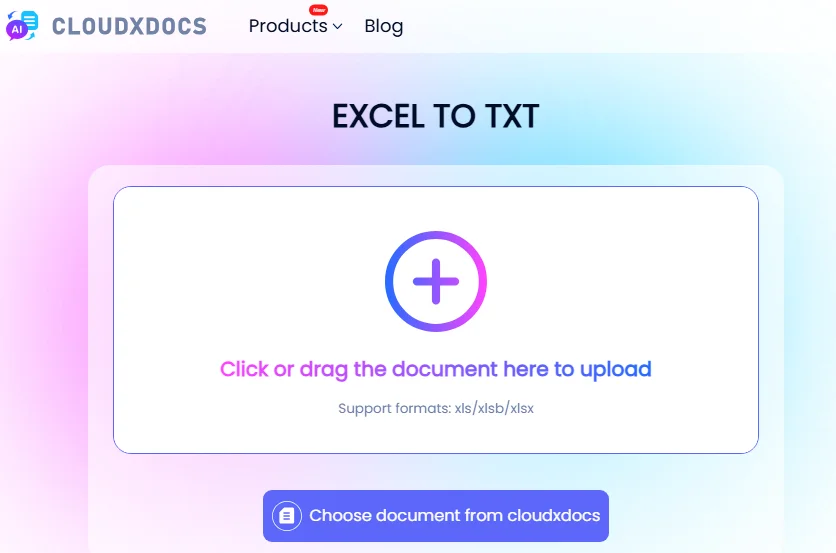
-
Upload the Excel file you want to convert or drag and drop it to the designated area.
-
The tool will automatically process and convert your Excel file.
-
Download the TXT file to your device once the conversion is complete.
Security Warning:
Be cautious about uploading files containing sensitive or proprietary data to public online converters, as they may store or process your data on third-party servers. For confidential business data, always use offline methods or enterprise-grade solutions with proper data protection.
When to Use: Best for personal use or non-sensitive data that needs quick conversion without software installation.
Method 4: Batch Convert Excel to TXT with C# (Automated Process)
For developers or teams looking to convert multiple Excel files at once, C# provides an efficient solution through libraries like Spire.XLS for .NET. This method is well-suited for batch conversions, automation, and integration into larger data processing workflows.
What is Spire.XLS for .NET?
Spire.XLS for .NET is a .NET library for creating, modifying, and converting Excel XLSX or XLS files into multiple formats, including TXT and PDF — without the need for Microsoft Excel.

Installation Requirements:
Before proceeding, install the necessary library via NuGet or download it from the official website:
Install-Package Spire.XLS
Code Example:
Once the library is installed, add the following code to your C# project to batch convert Excel files to text files:
using Spire.Xls;
using System;
using System.IO;
using System.Text;

namespace ExcelToTXT
{
    class Program
    {
        static void Main(string[] args)
        {
            // Specify the directory containing the Excel files
            string inputDirectory = @"C:\ExcelFiles\";

            // Get all Excel files in the directory
            string[] excelFiles = Directory.GetFiles(inputDirectory, "*.xlsx");

            foreach (var file in excelFiles)
            {
                // Create a Workbook instance
                Workbook workbook = new Workbook();

                // Load the Excel file
                workbook.LoadFromFile(file);

                // Access the first sheet
                Worksheet sheet = workbook.Worksheets[0];

                // Generate output file name based on the input file name
                string outputFileName = Path.Combine(inputDirectory, Path.GetFileNameWithoutExtension(file) + ".txt");

                // Save the worksheet as a comma-delimited text file
                sheet.SaveToFile(outputFileName, ",", Encoding.UTF8);

                Console.WriteLine($"Converted {file} to {outputFileName}");
            }
        }
    }
}
This script loads multiple Excel files from a specified directory and converts the first sheet of each file into a text file. The output files are saved with the same name as the original Excel sheet but with a .txt extension.
Code Customization Options:
-
Handling .xls Files:
If you need to process .xls files instead of .xlsx, simply modify the file extension filter:
string[] excelFiles = Directory.GetFiles(inputDirectory, "*.xls"); -
Converting All Sheets:
To convert all sheets, use a loop to iterate over each worksheet:
foreach (Worksheet sheet in workbook.Worksheets) { string outputFileName = Path.Combine(inputDirectory, Path.GetFileNameWithoutExtension(file) + "_" + sheet.Name + ".txt"); sheet.SaveToFile(outputFileName, ",", Encoding.UTF8); } -
Changing the Delimiter:
The code uses a comma as the delimiter. You can change it to other delimiters like tab or pipe:
sheet.SaveToFile(outputFileName, "\t", Encoding.UTF8); // For tab-delimited sheet.SaveToFile(outputFileName, "|", Encoding.UTF8); // For pipe-delimited -
Converting a Specific Cell Range:
If you only want to convert a specific range of cells (e.g., A1:D10), you can set the print area:
sheet.PageSetup.PrintArea = "A1:D10";  // Define the range
sheet.SaveToFile(outputFileName, ",", Encoding.UTF8);  // Convert the range to txt
When to Use: This method is ideal for developers, data engineers, or teams that need to automate the conversion of multiple Excel files in batch processes.
Comparison: Which Excel to TXT Method is right for you?
Below is a comparison table that contrasts the four Excel to TXT conversion methods based on factors like ease of use, batch processing, customization options, security, and skill requirements:
| Method | Ease of Use | Batch Processing | Customization | Security | Technical Skill Required |
|---|---|---|---|---|---|
| Copy & Paste | Easy | No | No customization | High | Low |
| Excel Save As Feature | Easy | No | High | High | Low |
| Online Converters | Easy | No | Low | Low | Low |
| C# Automation | Moderate | Yes | Excellent | High | High (C# knowledge required) |
Quick Guide to Choose the Right Conversion Method
- For quick and small-scale data conversion → Copy & Paste
- For reliable single-sheet conversion → Excel Save As Feature
- For quick conversion without software installation → Online Converters
- For bulk conversion or automation needs → C# Automation
Practical Tips for Excel to Text Conversion
- Backup Your Original Excel Files: Before starting any conversion, ensure you have a backup of your original file to avoid losing critical data.
- Choose the Correct Delimiter: Make sure to choose the correct delimiter based on the intended use. For instance, use tab-delimited for better readability in text editors or comma-delimited for compatibility with data import tools.
- Avoid Large Files with Online Tools: Many online converters have size limits (typically 50MB-100MB). For large files, consider using offline methods or batch processing through C# automation.
- Verify the Converted Data: After conversion, always open the text file and check for data integrity, especially for important datasets.
Common Issues and Solutions
- Special Characters Are Displaying Incorrectly: Use Unicode encoding to preserve special characters like Chinese, Arabic, or other non-Latin alphabets. This can be done easily when exporting through Excel or automated C# conversion.
- Extra Blank Lines in TXT File: If blank rows appear, you can remove them using Find & Replace in a text editor like Notepad++ to delete extra line breaks.
- Formulas Showing Instead of Values: To avoid this, copy the cells and paste them as values only before converting. This ensures that calculated values (not formulas) are saved in the TXT file.
- Multiple Sheets Not Converting: If you're manually saving from Excel, only one sheet will be saved at a time. Use C# automation to convert multiple sheets in batch.
Frequently Asked Questions
Q1: Can I convert Excel to TXT on my mobile device?
A1: Yes, online tools like Cloudxdocs allow you to convert Excel files on mobile devices. However, be cautious when uploading sensitive data to public websites.
Q2: Why does my Excel data look garbled after conversion?
A2: This is usually a character encoding issue. When dealing with non-ASCII characters, ensure you select Unicode encoding text format to ensure proper conversion.
Q3: Can I convert Excel to TXT with specific delimiters?
A3: Yes, you can customize the delimiter when converting Excel to TXT, depending on the method or tool you use. For example, you can use Excel's Save As feature to save the Excel as CSV (comma-delimited) and then change the file extension to .txt or automate the process in C# for more control over the delimiters.
Q4: What is the difference between CSV and TXT file formats?
A4: Both are text-based formats, but CSV files separate data with commas, making them ideal for tabular data. TXT files can use a variety of delimiters (e.g., tabs, spaces, or pipes) and are often used for simpler or more flexible data storage.
Q5: Can I convert multiple sheets to TXT at once in Excel?
A5: Excel's built-in "Save As" feature only converts the active sheet. To convert multiple sheets, you need to either repeat the process or automate the conversion using C#.
Final Words
That's all you need to know about converting Excel to TXT! If you have any questions, tips, or tricks of your own for converting Excel files, feel free to share them with our community — we'd love to hear from you and learn together!
See Also
Convert PDF to HTML: 5 Easy Ways (Free & Batch Options)
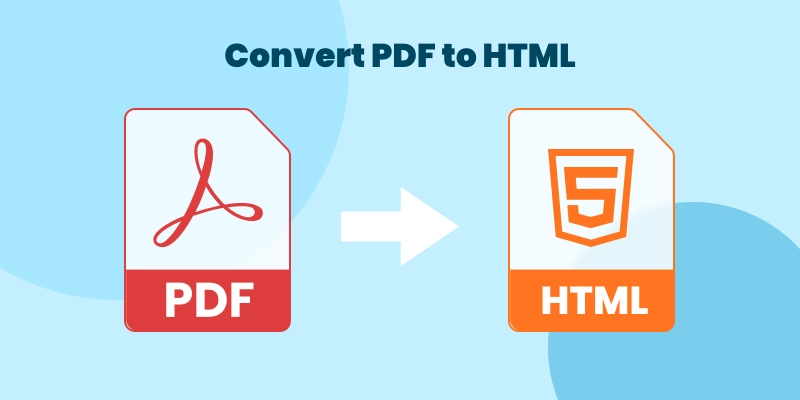
PDF files are widely used because they preserve layout and formatting across devices. However, when you need to publish content online, improve SEO visibility, or integrate documents into a website, you’ll need to convert PDF to HTML.
HTML is the native format of the web. Turning a PDF into a HTML web page makes the content searchable, editable, and responsive across devices.
In this guide, we will walk you through 5 easy and practical ways to convert PDF files to HTML without altering the original formatting.
- Why Convert PDF to HTML
- How to Convert PDF to HTML
- Which PDF to HTML Method Should You Choose
- Best Practices and Troubleshooting for PDF to HTML Conversion
Why Convert PDF to HTML?
Before choosing a method, it helps to understand why PDF to HTML conversion is useful:
- Better SEO – Search engines index HTML content more effectively than PDF files.
- Web Integration – HTML can be embedded directly into websites or CMS platforms.
- Improved Accessibility – HTML supports screen readers and responsive layouts.
- Content Reuse – HTML makes editing and repurposing content easier.
- Mobile Compatibility – HTML adapts better to different screen sizes.
If your goal is publishing content online or improving discoverability, converting PDF to web page is often the better option.
How to Convert PDF to HTML
There are various options to convert PDF to HTML, ranging from simple online tools, desktop software (like Adobe Acrobat, Word), and browser extensions to advanced techniques using Python automation. Now, let’s explore each conversion method in detail.
Method 1: Convert PDF to HTML Using Online Tools
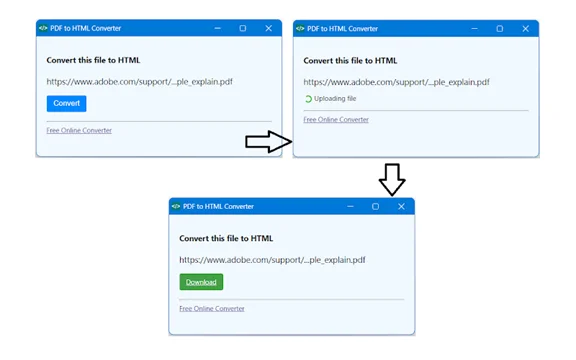
Online PDF to HTML converters are the fastest and easiest way to convert PDF to HTML for free without installing any software. They work directly in your web browser, so you can access them from any device—Windows, Mac, or even mobile.
These tools are perfect for one-time or occasional conversions, allowing you to turn PDFs into web pages in just a few clicks.
How to Convert PDF to HTML Online:
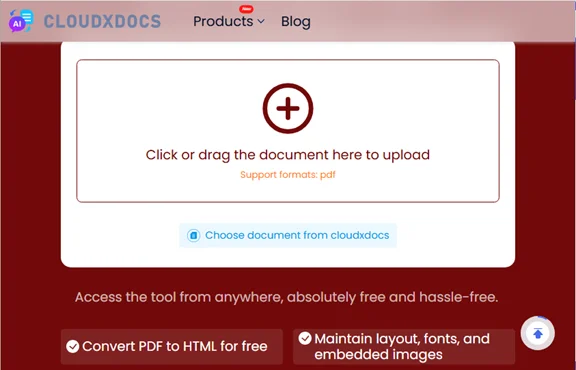
- Open an online PDF to HTML converter, such as Cloudxdocs or Zamzar.
- Upload your PDF file.
- The tool will automatically process and convert your PDF.
- Download the HTML file once the conversion is complete.
Pros:
- Free and easy to use.
- No software installation required.
- Fast conversion process.
Cons:
- Limited customization options.
- May have file size limits.
- Privacy concerns when uploading sensitive documents.
Tip: Always check the privacy policy of online tools before uploading your document. For confidential files, consider using offline tools like Adobe Acrobat or Python automation described below.
Method 2: Export PDF to HTML Using Adobe Acrobat Pro
For PDFs with complex layouts, images, or detailed formatting, Adobe Acrobat Pro is a professional solution for converting PDF to HTML. It delivers high-quality, accurate conversions with minimal formatting loss, making it ideal for business reports, eBooks, or any document where precision matters.
Adobe Acrobat Pro also supports OCR (Optical Character Recognition), so you can convert scanned PDFs into editable HTML pages without losing text or structure. This makes it a reliable choice for both text-based and image-heavy PDFs.
How to Convert PDF to HTML with Adobe Acrobat Pro:
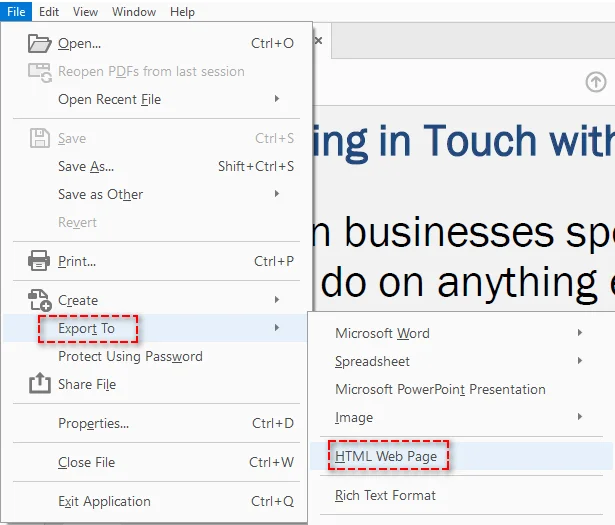
- Launch Adobe Acrobat Pro and open your PDF file.
- Go to File > Export To > HTML Web Page.
- Customize export settings (e.g., include images or exclude headers/footers).
- Save the file as HTML.
Pros:
- High-quality conversion for PDFs with complex layouts, images, and tables.
- Converts scanned PDFs using OCR for accurate text recognition.
- Offers precise control over output formatting.
Cons:
- Paid tool requiring a subscription.
- Not designed for large-scale batch conversions.
Method 3: Convert PDF to HTML Using Microsoft Word
Microsoft Word offers a free and simple way to convert PDF to HTML, especially for text-based PDFs. It’s ideal for users who are already working in Word and need a quick conversion without extra software.
While Word can handle basic formatting and images, it may struggle with multi-column layouts, tables, or highly styled PDFs, so it’s not recommended for intricate designs.
How to Convert PDF to HTML with Microsoft Word:
- Open the PDF file in Microsoft Word (Word will automatically convert the PDF into an editable format).
- Make any necessary adjustments to the content to ensure it looks correct.
- Go to File > Save As and select Web Page(.htm;.html) as the file format.
- Choose a destination folder and save the HTML file.
Pros:
- Free and widely accessible.
- Good for basic PDF documents with minimal formatting.
Cons:
- Formatting may be lost, especially with complex layouts or images.
- Not suitable for PDFs with intricate designs.
Method 4: Quick PDF to HTML Conversion with Browser Extensions
A browser extension is a quick and convenient way to convert PDFs to HTML directly in your browser. It works with local PDFs or those linked on web pages—no extra software required. This method is ideal for users who need fast, on-the-go conversions without relying on online tools.
How to Use a Browser Extension to Convert PDF to HTML:
- Search and install a PDF to HTML extension from your browser extension store, such as the PDF to HTML Converter in the Chrome Web Store.
- Click the extension in your browser toolbar, then either upload a local PDF or let the extension automatically detect PDF links on the webpage you visit.
- Follow the prompts to convert your PDF, wait for the process to finish, and then download the HTML file.
Pros:
- Convenient and fast.
- Easy to use with minimal setup.
Cons:
- Limited control over output quality.
- May not support large or complex files.
- Dependent on the browser you're using (e.g., Chrome, Edge, Firefox).
Tip: Not all extensions support automatic PDF link detection, and conversion quality can vary. Always check user reviews and developer information before installing any extension.
Method 5: Batch Convert PDF to HTML Using Python Automation
For developers or enterprise users who need to convert large volumes of PDFs into HTML, Python provides an efficient, automated solution. Using libraries like Spire.PDF for Python, you can batch convert PDF to HTML and other formats such as Word and Excel —saving time and boosting productivity when handling multiple files.
How to Batch Convert PDF to HTML with Python:
- Install Spire.PDF for Python via pip:
- Create a Python script to batch convert PDFs from a specified folder to HTML:
- Run the script to convert all PDFs in the specified folder. The HTML files will be saved in the same directory.
pip install Spire.PDF
import os
from spire.pdf import *

# Define the folder containing PDF files
pdf_folder = '/path/to/pdf_folder'

# Loop through each PDF file in the folder
for filename in os.listdir(pdf_folder):
    if filename.endswith('.pdf'):
        file_path = os.path.join(pdf_folder, filename)
        output_path = os.path.join(pdf_folder, f'{filename[:-4]}.html')

        # Initialize the PdfDocument object
        doc = PdfDocument()

        # Load the PDF file
        doc.LoadFromFile(file_path)

        # Convert and save the PDF as HTML
        doc.SaveToFile(output_path, FileFormat.HTML)

        # Close the document
        doc.Close()
Pros:
- Convert hundreds or thousands of PDFs with a single script.
- No internet or cloud upload required; ideal for confidential or internal documents.
- Runs on Windows, Linux, macOS, and server environments (including Docker and headless Linux servers).
- Easily embed into Python workflows
Cons:
- Requires basic Python programming knowledge.
- Initial setup takes slightly longer than manual tools.
Tip: You can adjust the script to adjust conversion settings, such as handling images or splitting pages. For more details, refer to the official guide: Convert PDF to HTML Using Python.
Which PDF to HTML Method Should You Choose
There isn’t a single best way to convert PDF to HTML. The right method depends on how often you convert files, how complex your documents are, and whether you need batch processing.
Here’s a quick recap to help you decide:
| Scenario | Recommended Approach |
|---|---|
| Convert one file quickly | Online PDF to HTML tool |
| Preserve layout accuracy and images | Adobe Acrobat Pro |
| Convert a simple, text-based document | Microsoft Word |
| Convert directly inside your browser | Browser extension |
| Convert multiple PDFs at scale | Python automation |
Choose the method that fits your workflow and make your PDFs searchable, responsive, and ready to publish online.
Best Practices and Troubleshooting for PDF to HTML Conversion
When converting PDF to HTML, following best practices and addressing common issues are essential for a smooth and efficient process. Below, we highlight key practices and solutions to common challenges during conversion.
Best Practices
-
Choose the Right Tool:
Select a reliable conversion tool for accurate results. While free tools work well for simple PDFs, professional tools like Adobe Acrobat offer better control over formatting and complex documents.
-
Keep the Layout Simple:
PDFs with complex layouts may not convert well into HTML. For cleaner results, try to simplify the layout in the original document.
-
Optimize Images for Web:
Resize or compress images before conversion to reduce file size and improve page load times. High-resolution images can slow down web performance.
-
Test Across Different Browsers:
After converting, check how your HTML renders in multiple browsers (e.g., Chrome, Firefox). This ensures consistent presentation and functionality across platforms.
Troubleshooting Common Problems
-
Broken Layout After Conversion:
Complex multi-column PDFs may not convert cleanly. Try exporting with structured HTML options if available.
-
Images Become Misaligned:
Some converters extract images separately. Check export settings to embed images correctly.
-
Scanned PDFs Don’t Convert Properly:
If your PDF is image-based, use a tool that supports OCR before converting to HTML.
-
Messy Inline CSS:
Some tools generate heavy inline styles. You may need to clean up the HTML for production use.
Conclusion
By now, you’ve learned about the five different methods for converting PDFs to HTML, each suited for different needs and scenarios. Whether you’re looking for a quick online solution, a high-quality conversion tool, or a more automated batch process, there’s a method that will work for you.
Looking for more high-quality PDF tutorials? Check out our free PDF resources.
FAQs
Q1: What’s the easiest way to convert a PDF to HTML?
A1: Online conversion tools are the quickest and easiest method for converting PDF to HTML Web Page without any software installation.
Q2: Can I convert scanned PDFs to HTML?
A2: Yes, Adobe Acrobat Pro can convert scanned PDFs to HTML using OCR (Optical Character Recognition) technology, preserving text and layout accurately.
Q3: How can I batch convert multiple PDFs to HTML?
A3: Python automation with libraries like Spire.PDF allows you to perform batch PDF to HTML conversions efficiently, saving time when handling large numbers of files.
Q4: Which method is best for complex PDFs with images and formatting?
A4: Desktop software like Adobe Acrobat provides the most accurate results for PDFs with complex layouts, images, or tables, ensuring minimal formatting loss during conversion.
See Also
How to Convert Markdown to PDF: 3 Easy and Reliable Ways

Markdown (MD) has become one of the most widely used formats for writing documentation, technical blogs, README files, and reports. However, when it comes to sharing finalized documents, printing reports, or distributing professional materials, Markdown files are not always ideal. This is why many users need to convert Markdown to PDF - a format that preserves layout, ensures consistent display across devices, and is universally accepted.
This guide will explore how to convert Markdown files to PDF while maintaining your content's structure and formatting. Whether you are a developer, technical writer, researcher, or content creator, you will find the suitable Markdown to PDF conversion method for your needs.
We'll cover:
- What is Markdown
- Why Convert Markdown to PDF
- How to Convert Markdown to PDF: 3 Reliable Methods
- Best Practices for High-Quality Conversion Result
What Is Markdown?
Markdown is a lightweight markup language created by John Gruber in 2004. It allows you to format plain text using simple symbols rather than complex formatting tools. This makes it ideal for writing documentation, notes, blog posts, and even academic papers.
Some basic Markdown elements include:
- # Heading creates a title
- _italic_ produces italicized text
- - list items generate bullet lists
Markdown files typically use .md or .markdown extensions and can be converted to other formats like HTML, PDF, Word documents, and even eBooks.
Why Convert Markdown to PDF
While Markdown is ideal for drafting and editing content, PDF is the preferred format for sharing, printing, and professional distribution. Converting your Markdown files to PDF offers several key benefits:
- Professional Presentation: PDFs provide a clean, polished format that's perfect for reports, guides, and technical documentation.
- Seamless Sharing and Printing: PDFs are universally supported and maintain formatting integrity when shared or printed.
- Consistent Formatting: Unlike plain text, PDFs maintain the structure, headings, bullet points, and other elements of your Markdown file, ensuring the content looks the same across all devices.
By converting Markdown to PDF, you ensure that your content is both professional and accessible to a wider audience.
How to Convert Markdown to PDF
There are various ways to convert Markdown to PDF, each catering to different needs. In this section, we'll explore three reliable methods-ranging from online tools to desktop applications and automated Python scripts-comparing their pros, cons, and ideal use cases to help you choose the best solution.
1. Convert Markdown to PDF Using Free Online Tools
Online Markdown to PDF converters offer the fastest and most convenient way to convert a Markdown file into PDF. These tools allow you to simply paste or upload your Markdown content and generate a PDF within moments. They are ideal for quick conversions, occasional users, or when installing local software is not an option.
Popular Online Markdown to PDF Converters:
- MarkdowntoPDF: A straightforward online tool that allows you to paste your Markdown content and download the PDF version instantly.
- CloudConvert: A versatile platform supporting a variety of file conversions, including Markdown to PDF.
Steps to Convert Markdown to PDF Online (Using MarkdowntoPDF as an Example):
-
Open the Online Markdown to PDF Converter.
-
Paste your markdown content into the designated area at the left side of the webpage.
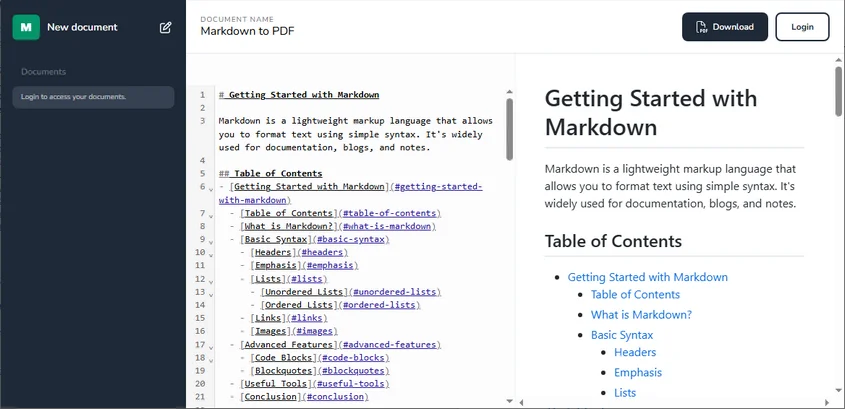
-
Click on the Download button in the top-right to download the PDF file.
Pros:
- Quick & Simple: No software installation or complicated setup required-perfect for on-the-go conversions.
- Device-Friendly: Accessible from any device with an internet connection, offering convenience wherever you are.
- Free of Charge: Most online tools provide free conversions with no hidden fees or subscriptions.
Cons:
- Limited Customization: These tools generally offer minimal formatting options, which may restrict control over the final PDF appearance.
- Privacy Risks: Uploading sensitive or confidential documents to third-party websites can pose potential security and privacy concerns.
Best For:
- Quick, small document conversions that don't require advanced formatting.
- Users looking for a straightforward, browser-based solution without the need for additional software.
2. Convert Markdown to PDF Using Desktop Markdown Editors
If you need more control over the formatting of your document or prefer working offline, desktop Markdown editors like Typora and Visual Studio Code (VS Code) are excellent choices. These tools allow for more customization and are ideal for larger or more complex documents.
a. Using Typora
Typora is a well-known Markdown editor with a clean interface and a real-time preview feature. It enables users to easily edit and export Markdown content to PDF. Typora is an excellent choice for developers, technical writers, and content creators who seek a simple, distraction-free writing environment without complicated setups.
Steps to Convert Markdown to PDF with Typora:
-
Install Typora: Download Typora from its official website (available for Windows, macOS, and Linux) and install it.
-
Open Your Markdown File: Launch Typora and open your Markdown file by selecting File → Open or dragging and dropping the .md file into the editor window.
-
Export to PDF: Once your document is ready, go to File → Export → PDF, then choose a destination folder and save the PDF.
Pros:
- Live Preview: Instant preview of how the final PDF will look.
- Simple Interface: Distraction-free and simple design, perfect for writing.
- Offline Use: Works without an internet connection.
Cons:
- No Batch Support: You can only convert one file at a time.
Best for:
- Quick, single-file conversions.
- Users looking for a simple, distraction-free writing experience.
- Offline work with no need for an internet connection.
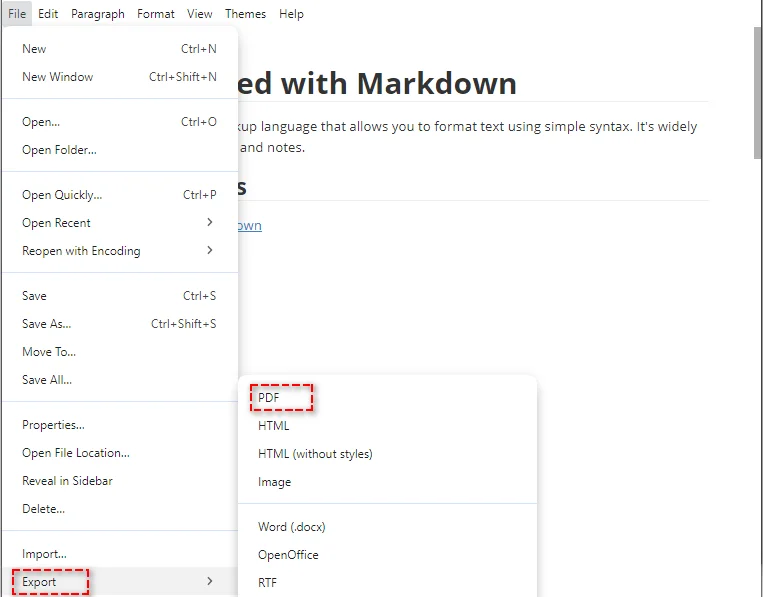
b. Using Visual Studio Code (VS Code)
VS Code is a highly versatile code editor that can also be used for Markdown editing and conversion with the help of extensions like Markdown PDF. It's particularly suitable for developers or advanced users who need more control over the conversion process.
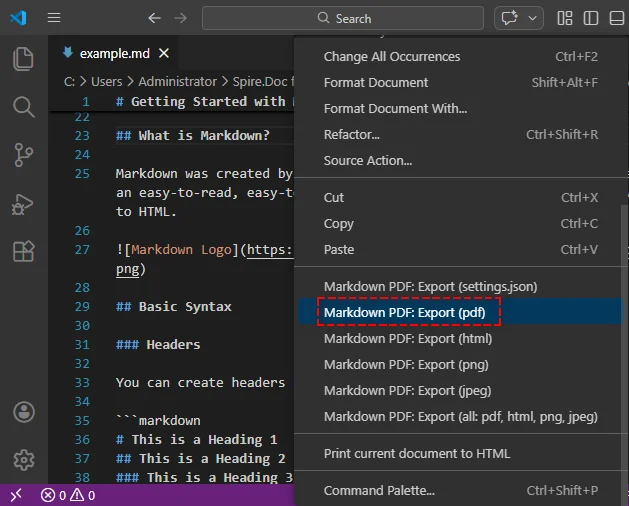
Steps to Export Markdown to PDF Using VS Code:
-
Install VS Code: Download and install Visual Studio Code if you haven't already.
-
Install the Markdown PDF Extension: Go to the Extensions Marketplace, search for the Markdown PDF extension, and install it.
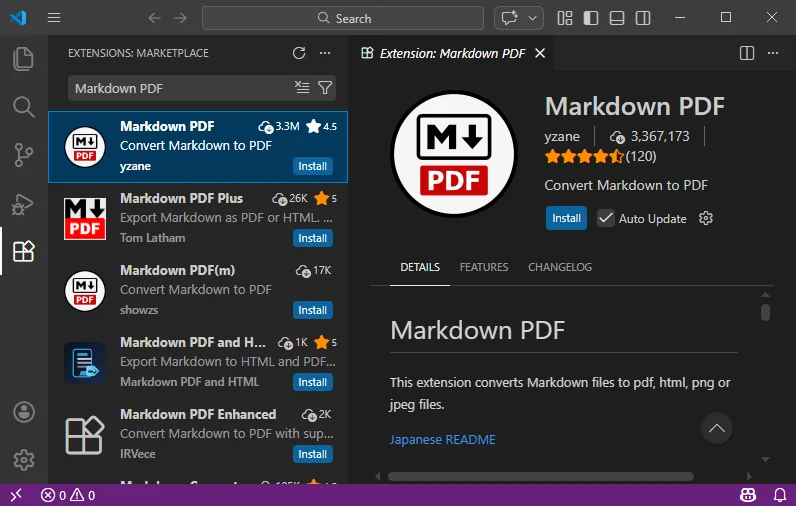
-
Open Your Markdown File: Open your Markdown file in VS Code.
-
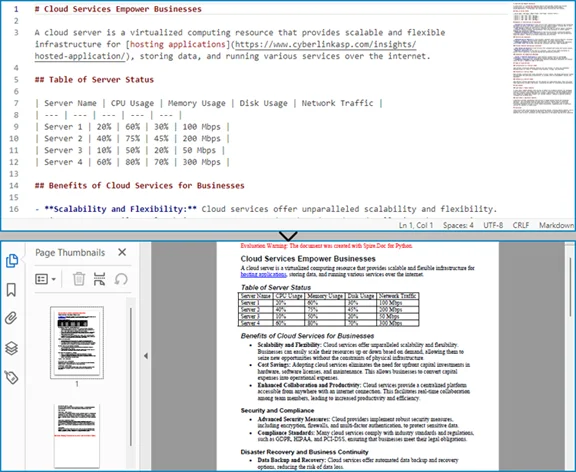
Export to PDF: Right-click inside the editor window, then select Markdown PDF: Export (pdf) from the context menu. The PDF will be generated and saved in the same folder as your Markdown file.
Pros:
- Highly Customizable: Offers detailed control over the PDF output format, including additional settings and templates.
- Supports Multiple Formats: In addition to PDF, VS Code can convert Markdown to other formats like HTML, PNG and JPEG images, making it a versatile tool for different content needs.
- Ideal for Developers: If you're already using VS Code for development, it seamlessly integrates Markdown conversion without needing to switch tools.
Cons:
- Extension Required: You must install the Markdown PDF extension and possibly configure extra settings.
- Complex for Beginners: VS Code can be overwhelming if you're only using it for Markdown-to-PDF conversion, as it's primarily a development tool.
- No Built-in Batch Processing: Like Typora, VS Code does not natively support batch conversions, though this can be accomplished with custom scripting.
Best For:
- Developers or frequent Markdown users who are already using VS Code.
- Users needing advanced customization and control over the PDF output.
3. Automate Bulk Markdown to PDF Conversion Using Python
For developers or teams dealing with large volumes of Markdown files, manually converting each document can be inefficient. Automating this process with Python not only saves time but also ensures consistency across your documents. Python libraries like Spire.Doc for Python allow you to batch convert Markdown files to PDF, making it ideal for automated documentation pipelines or report generation.
Steps to Batch Convert Markdown to PDF Using Python:
-
Install the Required Library:
First, install spire.doc from PyPI using pip:
pip install spire.doc -
Write a Python Script:
Create a Python script to convert multiple markdown files. Here's a simple example that converts all MD files under a specific directory to PDF:
import os from spire.doc import * # Create an object of the Document class doc = Document() # Define the directory where your Markdown files are stored input_directory = "input_directory_path" # Replace with your input folder path output_directory = "output_directory_path" # Replace with your output folder path # Ensure output directory exists if not os.path.exists(output_directory): os.makedirs(output_directory) # Loop through all files in the input directory for filename in os.listdir(input_directory): if filename.endswith(".md"): # Check if the file is a Markdown file input_file_path = os.path.join(input_directory, filename) # Create output file path with .pdf extension output_file_path = os.path.join(output_directory, f"{os.path.splitext(filename)[0]}.pdf") # Load the Markdown file doc.LoadFromFile(input_file_path, FileFormat.Markdown) # Save the file to a PDF document doc.SaveToFile(output_file_path, FileFormat.PDF) # Dispose of the Document object doc.Dispose() print("Batch conversion completed successfully!") -
Run the Script:
Run your script in your Python environment. The Markdown file will be converted to PDF and saved to the specified output location.
Pros:
- Batch Processing: Automate the conversion of multiple files at once, saving time and effort.
- Advanced Features: Easily integrate into larger workflows or automated systems for more complex document processing.
Cons:
- Technical Skills Required: Requires knowledge of Python and the library involved.
- Setup Time: Takes some time to install dependencies and write the conversion script.
- No GUI: Lacks a graphical user interface, making it less user-friendly for non-developers.
Best For:
- Developers or enterprises who need to convert large numbers of Markdown files to PDF without manual effort.
Best Practices for High-Quality Markdown to PDF Conversion
To ensure your Markdown to PDF conversion is smooth and the final PDF looks professional, consider the following best practices:
- Use clean Markdown syntax: Ensure all headings, lists, and code blocks are formatted correctly to prevent issues during conversion.
- Preview the output: Always check the PDF preview to ensure the document looks the way you want it to before finalizing the conversion.
- Optimize images: If your document includes images, make sure they are the right size and resolution for printing.
- Consider page breaks: In longer documents, use page breaks to ensure the layout remains neat in the PDF version.
Real-World Use Cases of Markdown to PDF Conversion
Markdown to PDF conversion is widely used in various scenarios, including:
- Technical Documentation: Developers and engineers often convert Markdown files into PDFs for manuals and guides.
- Reports and Academic Papers: Many researchers and students use Markdown for writing papers, then convert them to PDF for submission.
- Books and eBooks: Authors can draft content in Markdown and later convert it to PDF for printing or distribution.
Final Thoughts and Recommendations
Now that you understand how to convert Markdown to PDF, here's a quick guide to help you choose the right method for your needs:
- Online tools: Best for quick, one-off conversions when you need a fast and easy solution without installing software.
- Desktop editors: Ideal for users who need more control over formatting or who work with larger or more complex documents.
- Python automation: Perfect for those who need to convert multiple files at once or integrate the conversion process into a larger automated workflow.
Select the method that aligns with your needs to save time, improve efficiency, and streamline your Markdown-to-PDF process.
FAQs About Converting Markdown to PDF
Q1: How do I convert Markdown to PDF?
A1: To convert Markdown to PDF, you can use online tools like MarkdowntoPDF, desktop editors like Typora, or automate the process with Python scripts.
Q2: What is the easiest way to convert Markdown to PDF?
A2: The easiest way is by using free online converters like MarkdowntoPDF, where you paste your Markdown and download the PDF instantly.
Q3: Can I convert multiple Markdown files to PDF at once?
A3: Yes, using Python with libraries like Spire.Doc, you can automate the batch conversion of Markdown files to PDF with a simple script.
Q4: Why should I convert Markdown to PDF?
A4: Converting Markdown to PDF ensures your content is consistently displayed across devices, making it ideal for sharing, printing, and professional distribution.
See Also
How to Convert Word to EPUB (3 Easy Ways)
In today's digital age, eBooks have become one of the most popular ways to share information, stories, and professional content. While Word documents are perfect for drafting and editing text, they are not ideal for digital reading on eReaders and mobile devices. To make your content accessible, readable, and visually appealing, converting Word files into EPUB format is a necessary step for authors, publishers, and content creators.
In this guide, we'll cover three practical ways to convert Word to EPUB, along with tips to optimize your eBook for maximum readability and compatibility.
What You'll Learn
- What is EPUB
- Why Convert Word to EPUB
- How to Convert Word to EPUB
- Best Practices for Word to EPUB Conversion
- Conclusion
- Frequently Asked Questions about Word to EPUB
What is EPUB
EPUB, short for Electronic Publication, is an open-standard digital book format widely used in eBook publishing. Unlike Word files, EPUB is designed specifically for professional-quality eBooks, offering a flexible structure that allows content to be organized and presented consistently across devices.
As the industry standard for digital publishing, EPUB is widely adopted by authors, publishers, and educational institutions to create digital books that are easy to distribute, maintain, and manage. Its structured format ensures that eBooks meet professional publishing requirements while remaining versatile for a range of devices and platforms.
Why Convert Word to EPUB
Although Word files are commonly used for creating content, they are not structured for professional eBook distribution across multiple devices. Converting Word to EPUB provides multiple benefits:
- Improved Readability Across Devices: EPUB adjusts text flow, making your content readable on small screens like smartphones.
- Professional Presentation: Headings, lists, tables, images, and hyperlinks are preserved and formatted for eReaders.
- Wider Compatibility: EPUB works on Kindle, Nook, Kobo, Apple Books, and other popular eReaders.
- Smaller File Size: EPUB files are lightweight and easier to distribute online.
- Accessibility: Supports features such as text-to-speech and font resizing for readers with visual impairments.
In short, converting Word to EPUB turns a basic document into a reader-friendly, professional-quality eBook that is ready for publishing or distribution.
How to Convert Word to EPUB
There are several methods you can use to convert Word to EPUB, ranging from quick online converters to desktop software and automated Python solutions. Below, we'll explore each method in detail.
Method 1: Convert Word to EPUB Using Online Tools
Online conversion tools are the fastest and easiest way to turn Word documents into EPUB. They are perfect for one-off conversions, small files, or users who prefer not to install software.
Websites like Zamzar, Convertio, and Online-Convert offer free services to convert Word to EPUB. Here, we will use Convertio for demonstration.
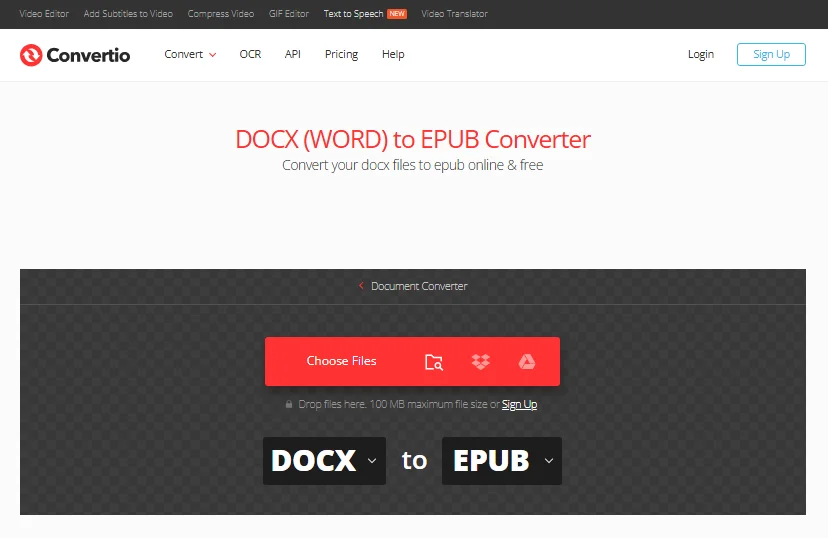
Steps to Convert Word to EPUB Online:
- Go to Convertio: Open the Convertio Online Word to EPUB Converter.
- Upload Your Word Document: Click on the "Choose Files" button and select the Word file (DOCX or DOC) you want to convert.
- Select EPUB as Output Format: Choose EPUB from the list of available output formats.
- Convert and Download: Click on "Convert" and wait for the tool to process your file. Once the conversion is complete, you can download the EPUB file.
Pros:
- Free and easy to use.
- No software installation required.
- Accessible from any device (laptops, mobiles & more) with an internet connection.
Cons:
- Limited control over formatting and metadata.
- Most free conversion tools often have file size restrictions.
- Not ideal for sensitive content due to privacy concerns.
You may also like: Convert Word to ODT: 4 Easy & Reliable Methods
Method 2: Convert Word to EPUB Using Free Desktop Software (Calibre)
For greater control over formatting and offline conversion, desktop software is the ideal choice. Calibre, a free and open-source eBook management tool, is one of the most popular options for converting Word documents to EPUB. It offers a wide range of customization options, making it a versatile solution for users who need to adjust formatting, metadata, and more during the conversion process.
Steps to Convert Word to EPUB with Calibre:
-
Download and Install Calibre: Visit Calibre's website to download and install the software.
-
Add Your Word Document: Launch Calibre and click on "Add books" to import your Word file.
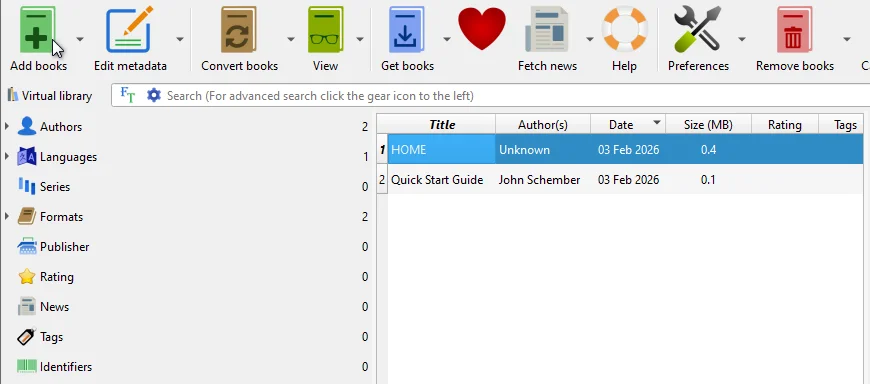
-
Convert the File: Once your file is added, select it, then click on "Convert books" and choose EPUB as the output format.
-
Adjust Conversion Settings (Optional): Calibre allows you to tweak settings like fonts, margins, and metadata. If you're looking for more control over the appearance of your eBook, this is a great place to customize.
-
Save the EPUB File: Click "OK" to start the conversion. Once it's finished, the converted EPUB file will be saved in the same directory as your original Word file.
Pros:
- Free and open-source.
- Works offline, no internet connection required.
- Provides full control over eBook appearance and metadata.
Cons:
- Slight learning curve for beginners.
- The user interface may seem overwhelming at first.
Method 3: Batch Convert Word to EPUB Automatically with Python
If you need to frequently convert multiple Word documents to EPUB, Python automation is an efficient solution. With Python libraries, you can easily automate batch conversions without the need for manual intervention.
Spire.Doc for Python is a popular library for this task. It allows users to create, manipulate, and convert Word documents into various formats, including EPUB. It offers robust features such as:
- Formatting retention: Ensures your document's structure remains intact.
- Metadata editing: Customize author, title, and other properties.
- Batch processing: Convert multiple files at once, saving time and effort.
This makes Spire.Doc an ideal choice for automating Word to EPUB conversion, especially for businesses or content publishers handling large volumes of documents.
Steps to Batch Convert Word to EPUB with Python:
-
Install Spire.Doc for Python:
To get started, first install the Spire.Doc for Python library using pip. Run the following command:
pip install spire.doc -
Write the Python Script:
Once the library is installed, create a Python script to automate the conversion process. Here's the basic script to convert all Word DOC or DOCX files in a folder to EPUB:
from spire.doc import * import os # Define the input and output directories input_dir = 'path_to_input_files' output_dir = 'path_to_output_files' # Get a list of all Word files in the input directory word_files = [f for f in os.listdir(input_dir) if f.endswith('.docx') or f.endswith('.doc')] # Process each Word file for word_file in word_files: input_file = os.path.join(input_dir, word_file) output_file = os.path.join(output_dir, os.path.splitext(word_file)[0] + '.epub') # Create a Document object doc = Document() # Load the Word document doc.LoadFromFile(input_file) # Save the Word document as EPUB doc.SaveToFile(output_file, FileFormat.EPub) # Close the Document object doc.Close() print("Batch conversion completed successfully!") -
Run the Python Script:
After saving the script, run it from your terminal or IDE. The script will automatically process all Word files in the input folder and save them as EPUB files in the output folder.
Notes:
- You need to modify the input_dir and output_dir variables in this example to point to the appropriate folders on your system.
- You can customize the appearance of the EPUB file during conversion, such as adding a cover image for it. Refer to the official guide: Python: Convert Word to EPUB
Pros:
- Ideal for handling large volumes of documents.
- Fully automated once the script is set up, saving time and effort.
- Can be easily integrated into existing workflows or automated publishing systems.
Cons:
- Requires some programming knowledge to set up the script.
- Not as user-friendly as online converters or desktop software for non-technical users.
- Initial setup might take time to configure and test the automation process.
Best Practices for Word to EPUB Conversion
To create high-quality EPUB eBooks from Word documents, follow these essential best practices:
- Use Word Styles Consistently: Apply heading styles, lists, and paragraphs to preserve formatting in the EPUB file.
- Optimize Images: Resize and compress images to reduce file size without sacrificing quality.
- Include Metadata: Add key information such as author, title, language, and cover image to improve presentation and discoverability.
- Validate EPUB Files: Use EPUBCheck to ensure your file meets EPUB standards and works across devices.
- Preview on Multiple Devices: Check readability and layout on various eReaders, tablets, and smartphones.
- Keep Formatting Simple: Avoid complex Word layouts that may not convert well to EPUB.
By following these best practices, you'll ensure your Word to EPUB conversion results in a polished, professional eBook ready for any device.
Conclusion
Converting Word to EPUB is a crucial step in creating professional, reader-friendly, and widely compatible eBooks. Depending on your needs and technical expertise, you can choose the method that best suits your workflow.
- Online Converters: Ideal for quick, single-file conversions with minimal effort. These tools are perfect for personal projects or occasional use.
- Desktop Software (e.g., Calibre): Best suited for users who need precise control over formatting and metadata. Calibre is a powerful tool that allows you to customize your eBook's appearance and structure.
- Python Automation: The best option for large-scale, repeatable workflows. Python is perfect for content publishers or teams who need to automate bulk conversions efficiently.
The right method depends on your specific requirements, technical skills, and the volume of documents you need to process. By choosing the appropriate conversion tool and following best practices, you can ensure your eBooks are polished, professional, and ready for distribution.
Looking for more high-quality Word tutorials? Check out our free Word resources.
Frequently Asked Questions about Word to EPUB
Q1: What is the easiest way to convert Word documents to EPUB?
A1: The easiest way to convert Word to EPUB is by using an online converter, such as Convertio or Zamzar. However, avoid using them for sensitive or large documents.
Q2: Can I convert Word to EPUB for free?
A2: Yes, you can convert Word to EPUB for free using online converters or free desktop software like Calibre. While online tools are convenient for quick conversions, Calibre offers more control over formatting and metadata for offline use.
Q3: How do I preserve formatting when converting Word to EPUB?
A3: To preserve formatting, use tools like Calibre, which maintain document structure, headings, tables, and images during conversion.
Q4: Is EPUB the best format for eBooks?
A4: Yes, EPUB is the best format for eBooks due to its reflowable content, wide compatibility with eReaders, and support for multimedia and interactive features.
Q5: How do I batch convert multiple Word files to EPUB?
A5: You can batch convert multiple Word files to EPUB using Python and the Spire.Doc for Python library. This method allows you to efficiently process large volumes of documents, saving time and ensuring consistent conversion results.
See Also
How to Compress Images in PowerPoint (3 Effective Ways)
Images make PowerPoint presentations more engaging, professional, and easier to understand. Screenshots, photos, and graphics help convey complex ideas visually, whether for business reports, classroom lectures, or project documentation. However, despite the benefits, images also increase the file size and cause issues when sharing via email.
Many users search for ways to compress images in PowerPoint. Follow this guide to learn three proven methods to reduce PPT file size efficiently while keeping quality.
- Why Compressing Images in PowerPoint Helps
- How to Compress Images in PowerPoint - 3 Effective Ways
- Extra Tips to Compress Images in PowerPoint
- Final Thoughts: Choose the Best Way for PowerPoint Image Compression
- FAQs
Why Compressing Images in PowerPoint Helps?
Large presentations are a common challenge in education, business, and software development. For example:
- Teachers and students sending lecture slides may encounter email attachment limits.
- Office workers sharing project presentations may experience slow uploads or download times.
- Developers or IT administrators managing multiple presentations may face storage or system performance issues.
In all these cases, compressing images in PowerPoint is an effective approach to make files smaller and easier to handle while maintaining visual quality.
How to Compress Images in PowerPoint?
In the following section, we'll share three basic to advanced techniques to compress images in PowerPoint. These methods help you reduce PPT file size, improve performance, and make your PPT easier to share via email or cloud platforms.
Below are the best possible ways to compress images in PowerPoint:
- Use PowerPoint's Built-in Compress Pictures Feature - Best for everyday users.
- Use an Online PowerPoint Compressor - Quick and requires no installation.
- Use C# Batch Compression for Multiple Files - Ideal for developers and enterprises.
Now, let's walk through each method one by one.
Compress Images in PowerPoint Using the Built-in Tool
To compress images in PowerPoint, you can use the built-in Compress Pictures tool. This method is available in the desktop version of PowerPoint and is particularly useful for users who are already working with PowerPoint and want to quickly optimize the file size of a single PowerPoint presentation.
Steps to Compress Images in PowerPoint:
-
Open your PowerPoint presentation in Microsoft PowerPoint.
-
Select any picture on a slide to enable the Picture Format tab.
-
Click Compress Pictures under the Adjust group.

-
Uncheck Apply only to this picture to compress all images in the presentation.
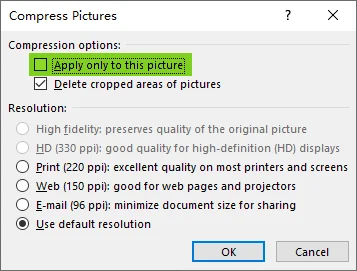
-
Choose a resolution under Compression options:
- 220 ppi - Excellent quality for most prints and screens. Keeps images sharp with minimal quality loss.
- 150 ppi - Good for web pages and projectors. Balances image quality and file size.
- 96 ppi - Minimizes document size for sharing via email or online. Ideal for quick distribution.
-
Click OK and save the presentation.
Note:
- The Compress Pictures tool is only available in the desktop version of PowerPoint, not in the web version.
- You can delete image editing data to further shrink the PPT file, refer to the official Microsoft guide.
Pros of Built-in PowerPoint Image Compression:
- The official way to compress single or all images in PowerPoint
- Only PowerPoint, no extra software needed
- Useful for professional and casual users
Cons:
- It can be time-consuming when processing multiple presentations
You may also like: How to Convert Images to PPT - 3 Easy Methods
Compress Images in PowerPoint Using an Online Compressor
If you don't have access to the desktop PowerPoint application or prefer a cross-platform solution, you can compress images in PowerPoint online using a free web-based tool like Choladeck. This method is ideal for beginners or occasional users who simply want to shrink PPT file size without installing or configuring any software.
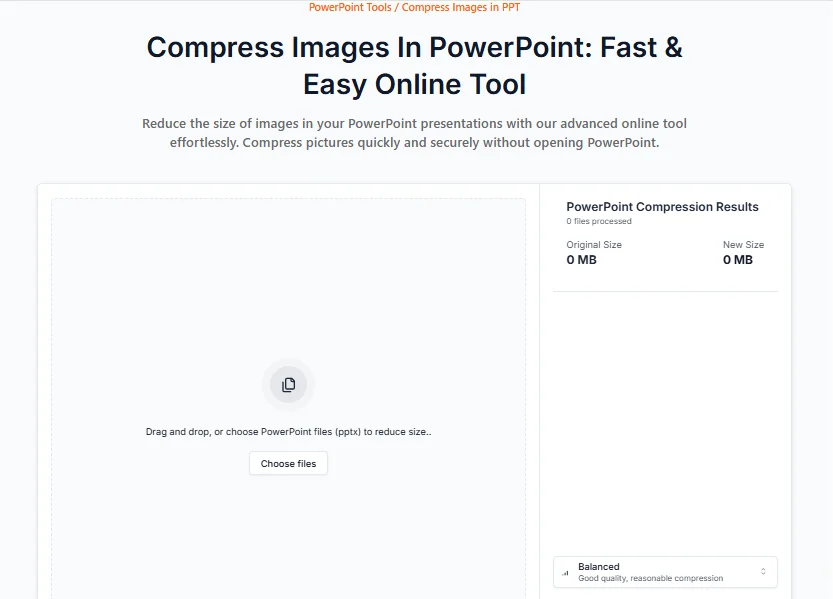
Steps to Compress Images in PowerPoint Online:
- Open the Choladeck online PowerPoint compressor in your browser.
- Select the desired compression level (Small Size, Balanced, or High Quality) for the images.
- Upload your PowerPoint file using drag-and-drop.
- Once the process is complete, download the optimized presentation with compressed images.
Pros of Online PowerPoint Image Compression:
- Completely free and very easy to use
- Simply use your browser-no installation needed
- Works on Windows, Mac, or mobile devices
Cons:
- Must be connected to the internet to use the service
- Potential privacy risks when uploading confidential files to online platforms
- Not ideal for batch compression of multiple presentations
Batch Compress PowerPoint Images Using C# Automation
If you're an enterprise, developer, or anyone who needs to process large volumes of PowerPoint presentations, batch compressing images with C# automation is the ideal solution. This method allows you to efficiently compress images across many presentations in just a few simple steps, saving time and effort compared to manual methods.
The stepwise guide below shows you how to automate the PowerPoint Image compression process using C# and Spire.Presentation - a .NET PowerPoint library for creating, updating, and converting PowerPoint presentations.
Steps to Batch Compress PowerPoint Images Using C#:
-
Install Spire.Presentation for .NET from NuGet:
-
Open your NuGet Package Manager Console.
-
Run the following command to install the Spire.Presentation library.
Install-Package Spire.Presentation
-
-
Write C# Code:
-
Create a new C# Console Application project.
-
Add the following code to perform batch compression of PowerPoint images.
using Spire.Presentation;
using System;
using System.IO;

namespace CompressImages
{
    internal class Program
    {
        static void Main(string[] args)
        {
            string inputDirectory = @"C:\path\to\input\folder";  // Specify your input directory
            string outputDirectory = @"C:\path\to\output\folder"; // Specify your output directory

            // Get all .pptx files in the input directory
            string[] files = Directory.GetFiles(inputDirectory, "*.pptx");

            foreach (string inputFile in files)
            {
                // Create output file path
                string outputFile = Path.Combine(outputDirectory, Path.GetFileName(inputFile));

                // Load presentation from file
                Presentation presentation = new Presentation();
                presentation.LoadFromFile(inputFile);

                // Iterate over all slides in the presentation
                foreach (ISlide slide in presentation.Slides)
                {
                    // Iterate over all shapes in each slide
                    foreach (IShape shape in slide.Shapes)
                    {
                        // Check if the shape is an image
                        if (shape is SlidePicture)
                        {
                            SlidePicture ps = shape as SlidePicture;
                            // Compress the image: remove cropped areas (true) and set target resolution to 150 DPI
                            ps.PictureFill.CompressImage(true, 150f);
                        }
                    }
                }

                // Save the compressed presentation to the output file
                presentation.SaveToFile(outputFile, FileFormat.Pptx2013);
                Console.WriteLine($"Compressed: {inputFile} -> {outputFile}");
            }

            Console.WriteLine("Batch compression completed.");
        }
    }
}
-
-
Press F5 to run the Code. You will find the optimized presentations with compressed images under the specified output directory.
Notes:
- You need to modify the inputDirectory and outputDirectory variables in this example to point to the appropriate folders on your system.
- This example assumes .pptx files. If you also have .ppt files, you can adjust the file filter in Directory.GetFiles() to include them as well.
- The target resolution in this case is set to 150 DPI (suitable for web display). You can change this to any desired value.
Pros of Batch Compression Using C#:
- Ideal for developers, IT administrators, or enterprises
- Allows handling of large numbers of presentations at once
- Customizable options for image resolution and compression settings
Cons:
- Requires programming knowledge and setup
- Setup is more complex than manual methods
Reference: Spire.Presentation Official Guide
Extra Tips to Compress Images in PowerPoint
- Delete Unused Images: Remove any images that aren't essential to reduce overall file size.
- Use Vector Graphics: Whenever possible, opt for vector-based graphics (like SVGs), which tend to have smaller file sizes than raster images.
- Resize Before Inserting: Resize images in a photo editing tool before inserting them into PowerPoint to avoid large, unneeded files.
- Embed Fonts Wisely: If you use custom fonts, make sure you embed them only when necessary to avoid bloating your file size.
Final Thoughts: Choose the Best Way for PowerPoint Image Compression
Compressing images in PowerPoint doesn't have to be complicated. The right method mainly depends on how many files you have and how often you need to reduce PPT file size.
Here's a quick way to decide:
- Working on one presentation only?
Use PowerPoint's built-in Compress Pictures tool. It's fast, reliable, and requires no extra tools. - Need a quick fix without installing software? Try an online PowerPoint image compressor. It's convenient for occasional use or when you're on a different device.
- Managing dozens or hundreds of PPT files?
Use C# Automation for batch compression. This approach saves significant time and is ideal for developers, IT teams, and enterprise workflows.
By choosing the right method, you can easily compress images in PowerPoint, shrink PPT file size, speed up sharing, and keep presentations professional without noticeable quality loss.
Looking for more high-quality PowerPoint tutorials? Check out our free PPT resources.
FAQs
Q1: What is the easiest way to compress images in PowerPoint and reduce file size?
A1: The easiest way is to use PowerPoint's Compress Pictures tool. Select any image → Picture Format → Compress Pictures → Uncheck Apply only to this picture → Choose Resolution → Click OK → Save. This can instantly optimize your PPT file size.
Q2: Does compressing images in PowerPoint reduce quality?
A2: Only slightly if you choose the right resolution. For most presentations, 150 ppi keeps images clear while significantly reducing file size. Viewers usually won't notice any difference on screens or projectors.
Q3: Can I compress images in PowerPoint online without installing software?
A3: Yes. You can use an online PowerPoint compressor to upload and optimize your PPT or PPTX file directly in your browser. This method is great for quick tasks but may not be suitable for confidential or sensitive files.
Q4: What is the best way to batch compress images in multiple PowerPoint presentations?
A4: For multiple files, C# automation is the most efficient solution. They allow you to compress images across dozens or hundreds of presentations automatically, saving hours of manual work.
Q5: Why is my PowerPoint file still large after compressing images?
Images aren't the only factor affecting size. Your PPT may still be large due to:
- Embedded fonts
- Videos or audio files
- Cropped image data not deleted
- Unused slides or media
Try deleting unused assets and enabling Delete cropped areas of pictures during compression for better results.
See Also
Convert Word to ODT: 4 Easy & Reliable Methods
Table of Contents
- What is ODT
- Why Convert Word to ODT
- Method 1: Convert Word to ODT Using Microsoft Word
- Method 2: Convert Word to ODT with LibreOffice Writer
- Method 3: Convert Word to ODT Using Online Tools
- Method 4: Batch Convert Word to ODT with Python
- Practical Tips to Avoid Formatting and Compatibility Issues for Word to ODT
When working with open-source office suites like LibreOffice or OpenOffice, you may often need to convert Word documents to the ODT (OpenDocument Text) format. Although Word (DOC/DOCX) files are widely used, they don't always provide the best cross-platform compatibility — especially in Linux environments, government systems, or organizations that rely on open standards.
This guide walks you through four easy and reliable methods to convert Word to ODT, including desktop tools, online converters, and automated batch solutions. Whether you need a quick one-time conversion or a scalable workflow for multiple files, you'll find the most efficient approach here.
- What is ODT
- Why Convert Word to ODT
- Method 1: Convert Word to ODT Using Microsoft Word
- Method 2: Convert Word to ODT with LibreOffice Writer
- Method 3: Convert Word to ODT Using Online Tools
- Method 4: Batch Convert Word to ODT with Python
- Practical Tips to Avoid Formatting and Compatibility Issues for Word to ODT
What Is ODT?
ODT (OpenDocument Text) is the default word processing file format of LibreOffice and Apache OpenOffice. It is part of the OpenDocument Format (ODF) standard, maintained by OASIS and recognized as an ISO standard.
Advantages of ODT over DOCX:
- Open, vendor-neutral specification
- Native support in Linux and open-source environments
- Better long-term archival compatibility
Why Convert Word to ODT?
Converting Word documents to ODT offers several practical benefits:
- Open-source workflow: Required for LibreOffice or OpenOffice users
- Cross-platform compatibility: Works well on Linux and macOS
- Vendor independence: Avoid relying solely on Microsoft Word
- Archiving and compliance: Preferred in certain government or institutional workflows
Important Note:
Microsoft states that when saving Word documents as ODT, most core features are supported, but some like Track Changes, document protection, themes, watermarks, and VBA macros may not transfer fully. Always review your converted documents.
Method 1: Convert Word to ODT Using Microsoft Word
For users who occasionally need to convert Word documents to ODT, Microsoft Word provides a simple and reliable solution. This method is ideal for single or small batches of files.
Steps to Save a Word Document as ODT in Microsoft Word:
-
Open your Word document (.doc or .docx) in Microsoft Word.
-
Click File > Save As.

-
Choose the destination folder for your ODT file.
-
In the Save as type dropdown, select ODF Text Document (*.odt).
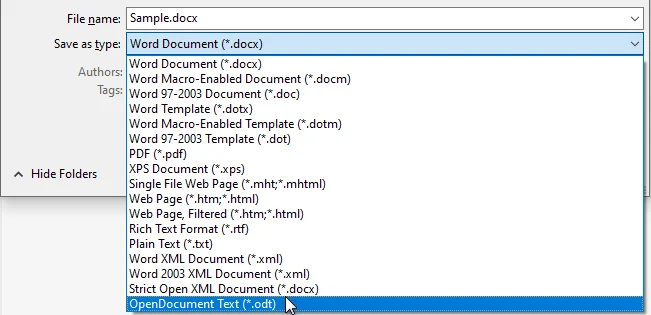
-
Click Save and confirm any compatibility prompts.
Pros:
- Simple and fast for occasional conversions
- Maintains most formatting and layout
- No additional software needed
Cons:
- Not ideal for large numbers of files
- Manual process can be time-consuming
You might also like: Convert ODT to Word: 4 Simple Ways (Desktop, Online & Python)
Method 2: Convert Word to ODT with LibreOffice Writer
LibreOffice Writer is an open-source solution for converting Word documents to ODT. It offers excellent compatibility and flexibility, making it ideal for both single conversions and small batches, especially for users preferring free software.
Steps to Convert DOCX to ODT with LibreOffice Writer:
-
Open LibreOffice Writer.
-
Go to File > Open and select your Word document.
-
Review the document to ensure layout and formatting appear correctly.
-
Click File > Save As.
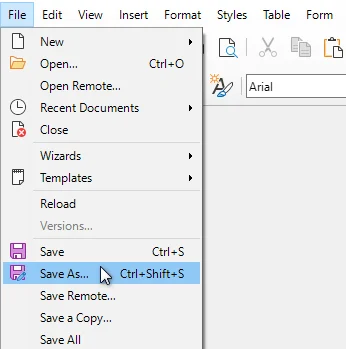
-
Choose ODF Text Document (.odt) as the file type.
-
Click Save to complete the conversion.
Pros:
- Free and open-source
- Reliable formatting and style preservation
- Compatible with both DOC and DOCX
Cons:
- Slight learning curve for new users unfamiliar with LibreOffice interface
Method 3: Convert Word to ODT Using Online Tools
Online converters provide the fastest way to convert Word documents to ODT without installing any software. This method is ideal for quick, one-off conversions and for users who need access from multiple devices.
Popular free online converters like Zamzar and CloudConvert let you convert DOC or DOCX to ODT online directly in your browser in just a few simple steps.
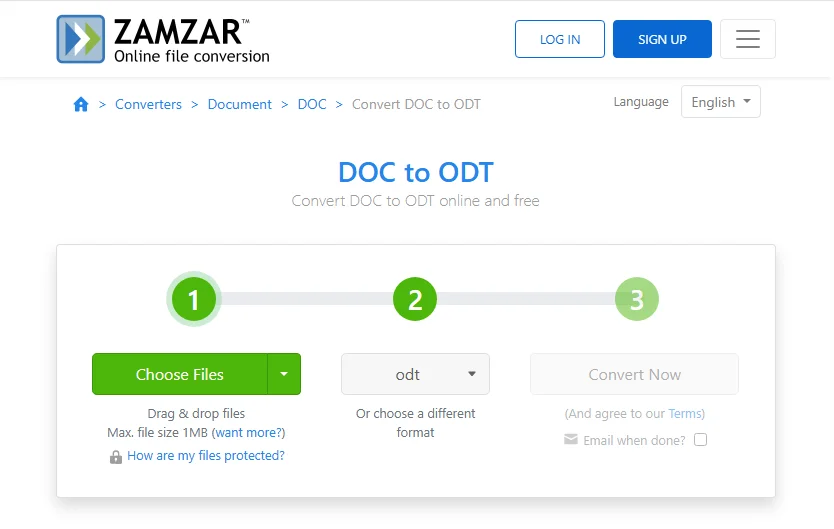
Steps to Convert Word to ODT Online (Using Zamzar as an Example):
- Open the Zamzar online Word to ODT converter.
- Click Choose Files to upload the Word document you want to convert.
- Click Convert Now and wait for the conversion process to complete.
- Download the converted ODT file.
Pros:
- No software installation required
- Works across devices and platforms
- Quick and convenient for single documents
Cons:
- File size and number of documents may be limited
- Internet connection required
- Privacy concerns for sensitive documents
Method 4: Batch Convert Word to ODT with Python
For developers and enterprises, automating Word to ODT conversion with Python is a scalable, consistent, and highly efficient solution for processing hundreds or thousands of Word files. This is particularly useful when standardizing archives, migrating systems, or integrating document conversion into automated workflows.
This example uses the Spire.Doc for Python library. It supports converting Word files to ODT and other formats such as PDF and HTML, making it ideal for batch processing and integration into automated workflows.
Steps to Batch Convert Word Files to ODT with Python:
-
Install the Required Library from PyPI:
pip install spire.doc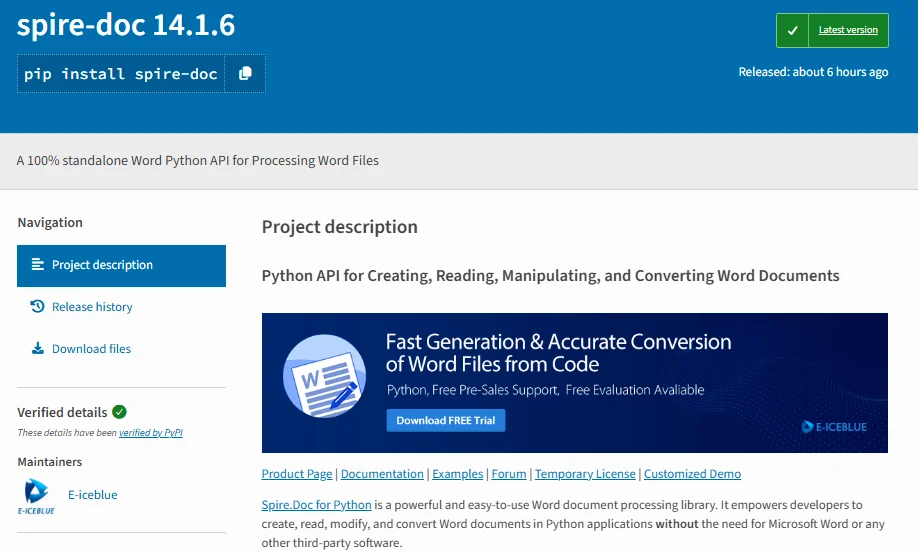
-
Prepare the Python Script.
from spire.doc import * import os # Input folder containing Word files input_folder = "C:/WordFiles" # Output folder for ODT files output_folder = "C:/ODTFiles" # Ensure the output folder exists os.makedirs(output_folder, exist_ok=True) # Loop through all Word files in the input folder for filename in os.listdir(input_folder): if filename.endswith(".docx") or filename.endswith(".doc"): # Load the Word document doc = Document(os.path.join(input_folder, filename)) # Set the output ODT file path output_path = os.path.join(output_folder, filename.rsplit(".", 1)[0] + ".odt") # Save as ODT doc.saveToFile(output_path, FileFormat.Odt) print(f"Converted {filename} to {output_path}") -
Run the Script.
The script will process all Word files in the input folder and save the converted ODT files in the output folder.
Pros:
- Scalable: Can process large numbers of files automatically
- Flexible: Supports multiple output formats including ODT, PDF, and HTML
- Integrable: Can be incorporated into Python automation pipelines
- Consistent: Provides repeatable, reliable conversion results
Cons:
- Requires basic Python knowledge to set up and run
- Needs to install a third-party library
Practical Tips to Avoid Formatting and Compatibility Issues for Word to ODT
To ensure smooth Word to ODT conversion and maintain document integrity, follow these key tips:
- Avoid unsupported elements: Features like macros, Track Changes, watermarks, and certain header/footer elements may not transfer fully to ODT.
- Simplify formatting: Use standard fonts and avoid overly complex tables or nested objects to reduce compatibility issues.
- Test a sample file first: Convert one document to identify layout or formatting problems before batch conversion.
- Backup and review: Always keep the original Word file and check the converted ODT to ensure tables, images, and styles appear correctly.
Final Thoughts: Choose the Best Method to Convert Word to ODT
With multiple ways to convert Word to ODT, it's important to pick the method that matches your workflow, file volume, and platform. Here's a quick comparison of the four main Word to ODT conversion methods:
| Method | Pros | Cons |
|---|---|---|
| Microsoft Word | Simple, no extra tools | Manual, not batch-friendly |
| LibreOffice | Free, good compatibility | Manual, small batches |
| Online Tools | Fast, cross-device | Internet required, privacy concerns |
| Python | Scalable, flexible | Requires Python knowledge |
Choosing the right method:
- Single files: Microsoft Word is easiest and fastest.
- Open-source workflows: LibreOffice ensures maximum compatibility.
- Quick one-off tasks: Online converters provide convenience.
- Enterprise or developer pipelines: Python batch conversion is efficient, scalable, and reliable.
Frequently Asked Questions
Q1: Will converting Word to ODT lose formatting?
A1: Most standard formatting like fonts, headings, and tables is preserved. Advanced features like macros or Track Changes may not fully transfer. Always check the converted ODT in LibreOffice or Microsoft Word.
Q2: Can I batch convert multiple Word files to ODT?
A2: Yes. You can batch convert Word to ODT using LibreOffice scripting or Python libraries like Spire.Doc for fast, automated conversion.
Q3: Is ODT better than DOCX?
A3: ODT is open-standard, cross-platform, and ideal for long-term archival. DOCX is proprietary but widely supported. ODT is preferred for open-source workflows and vendor independence.
Q4: Are online Word to ODT converters safe?
A4: For confidential documents, avoid public online converters. Use offline tools like Microsoft Word, LibreOffice, or Python scripts for secure Word to ODT conversion.
Q5: Which method is fastest for single Word files?
A5: Microsoft Word or online converters are the quickest for individual Word to ODT conversions, maintaining layout with minimal effort.
Q6: Can ODT files open on Mac or Google Docs?
A6: Yes. ODT files work on macOS via LibreOffice/OpenOffice and can be opened in Google Docs, though some complex formatting may vary.
See Also
How to Change Slide Size in PowerPoint (Without Breaking Layouts)
Table of Contents
Changing the slide size in PowerPoint is necessary when preparing presentations for different screens, formats, and output requirements. Using the wrong slide size can cause content to be cut off, stretched, or misaligned, while adjusting it properly ensures your slides look polished, professional, and well-aligned.
In this guide, you'll learn three practical ways to change slide size in PowerPoint — from manual adjustments to automation with VBA and Python — without affecting your existing layouts.
- Why Change Slide Size in PowerPoint
- Understand Common PowerPoint Slide Sizes
- Change Slide Size in PowerPoint Manually
- Change Slide Size in PowerPoint Automatically Using VBA
- Batch Resize PowerPoint Slides Using Python
- Troubleshooting and Best Practices for Changing Slide Size in PowerPoint
Why Change Slide Size in PowerPoint?
PowerPoint uses default slide dimensions, which don't always fit real-world presentation needs. Changing slide size helps you:
- Display correctly on different screens - ensure slides look perfect on widescreen monitors, projectors, or laptops.
- Prevent content issues - avoid text, images, or charts being cut off, stretched, or misaligned.
- Prepare for printing or PDF export - optimize slides for handouts, reports, or digital sharing.
- Adapt for digital platforms - design slides for video presentations, websites, or social media posts.
- Maintain consistency across devices - keep layouts intact when sharing presentations with colleagues or clients.
By starting with the right slide size, you can reduce formatting problems and ensure your content looks professional in every scenario.
Understand Common PowerPoint Slide Sizes
Before you change the slide size, it's important to understand the most commonly used PowerPoint slide sizes and their typical use cases.
| Slide Size | Aspect Ratio | Dimensions | Typical Use Cases |
|---|---|---|---|
| Standard | 4:3 | 10 × 7.5 in | Older projectors, printed handouts, legacy presentations |
| Widescreen | 16:9 | 13.333 × 7.5 in | Modern monitors, laptops, TVs, online presentations |
| Custom Slide Size | Custom | Any width × height | Posters, social media graphics, digital signage, video content |
Tip: For most modern screens and online sharing, the 16:9 widescreen format is recommended.
Change Slide Size in PowerPoint Manually
If you want full control over your presentation's layout, PowerPoint lets you manually change slide size to fit screens, print formats, or digital platforms. Here's how to do it.
Steps to change slide size in PowerPoint manually:
-
Open your presentation in PowerPoint and select any slide.
-
Navigate to the Design tab on the ribbon and click Slide Size on the far right.

-
Choose a size option:
- Preset Sizes: Select Standard (4:3) or Widescreen (16:9) for common formats.
- Custom Slide Size: Enter your desired width and height for specialized layouts, such as posters, social media slides, or video content.
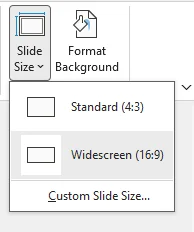
-
Choose how to scale your content when prompted:
- Maximize: Enlarges your content to fill the new slide size (may cause some objects to overflow).
- Ensure Fit: Scales content down to fit the slide safely (recommended for most layouts).
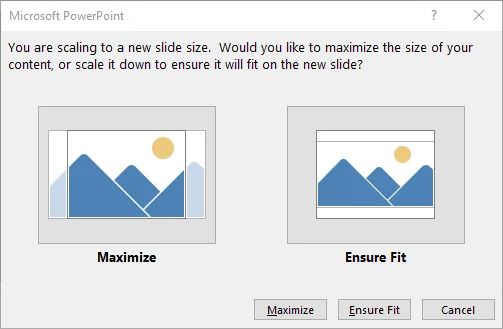
-
PowerPoint applies the new slide size and scales content immediately. Review each slide for alignment, text, and images.
Pros:
- Quick and fast for a single presentation
- Full control over slide dimensions
- No additional software required
Cons:
- Can be time-consuming if you need to resize multiple presentations
Tip: Using Ensure Fit provides the best results without breaking your layout.
For official guidance, see Change the size of your PowerPoint slides from Microsoft.
Change Slide Size in PowerPoint Automatically Using VBA
If you are comfortable with VBA, you can run a script directly within PowerPoint to automate slide resizing. This method is ideal for users handling repeated resizing tasks who prefer not to rely on external libraries.
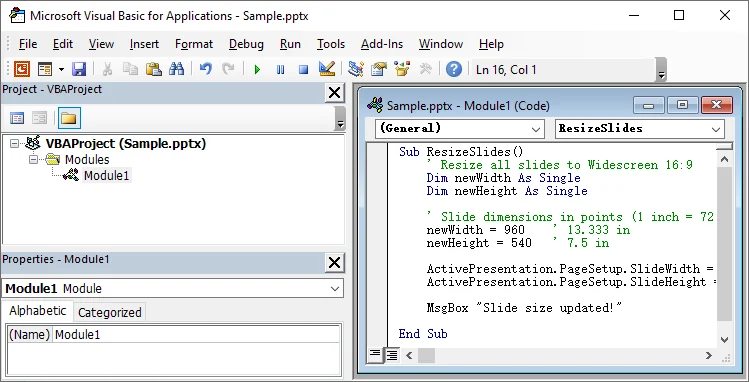
Steps to change slide size in PowerPoint automatically using VBA:
-
Open your PowerPoint presentation.
-
Press Alt + F11 to open the VBA Editor.
-
Click Insert → Module to insert a new module.
-
Paste the following code:
Sub ResizeSlides() ' Resize all slides to Widescreen 16:9 Dim newWidth As Single Dim newHeight As Single ' Slide dimensions in points (1 inch = 72 points) newWidth = 960 ' 13.333 in newHeight = 540 ' 7.5 in ActivePresentation.PageSetup.SlideWidth = newWidth ActivePresentation.PageSetup.SlideHeight = newHeight MsgBox "Slide size updated!" End Sub -
Press F5 to execute the macro.
-
Review all slides to ensure content is aligned and layouts are intact.
Pros:
- Automates resizing for all slides directly in PowerPoint
- No need for additional software or external scripts
Cons:
- Requires basic knowledge of VBA
- Slide content may still need minor adjustments after resizing
Tip: Always back up your presentation before running macros, as changes cannot be undone.
You might also be interested in: How to Split PPT - 3 Easy Methods (Manual, Online & Python)
Batch Resize PowerPoint Slides Using Python
For batch operations across multiple presentations, Python lets you automatically change slide size in PowerPoint, saving time and ensuring consistent formatting across all files. This method is especially useful for large-scale projects where manual adjustment would be impractical.
Using libraries like Spire.Presentation for Python, you can quickly resize slides in dozens or hundreds of presentations in one go. Beyond resizing, it also lets you add, delete, reorder, or copy slides, giving you full control over slide content and layout management.
Steps to batch change slide size in PowerPoint:
-
Install Spire.Presentation for Python from PyPI:
pip install spire.presentation -
Place all PowerPoint files to resize in a folder, e.g., presentations/.
-
Create a Python script to loop through all PowerPoint files in the folder and batch resize slides for each.
from spire.presentation import * import os import glob # Set input and output folder paths input_folder = "presentations/" output_folder = "resized_presentations/" # Create output folder if it doesn't exist os.makedirs(output_folder, exist_ok=True) # Loop through all PPTX files in the input folder for file_path in glob.glob(os.path.join(input_folder, "*.pptx")): # Create a Presentation instance presentation = Presentation() # Load the presentation presentation.LoadFromFile(file_path) # Set slide size to Widescreen 16:9 presentation.SlideSize.Type = SlideSizeType.Screen16x9 # Save the resized presentation output_file = os.path.join(output_folder, "resized_" + os.path.basename(file_path)) presentation.SaveToFile(output_file, FileFormat.Pptx2016) # Release resources presentation.Dispose() print("Batch resizing completed.") -
Run the script to resize all presentations automatically.
Pros:
- Efficient for multiple presentations
Cons:
- Requires basic Python knowledge
- Additional library installation needed
- Slide content may require minor manual adjustment
Tips:
- The script can be modified to use custom slide dimensions instead of standard Widescreen (16:9), see Spire.Presentation's official support document.
- Test on one or two presentations first before running a full batch to ensure layouts scale correctly.
Troubleshooting and Best Practices for Changing Slide Size in PowerPoint
No matter which method you choose to change slide size in PowerPoint, you may still encounter layout issues or unexpected content misalignment. Knowing how to troubleshoot common problems and follow best practices helps ensure your presentation displays correctly across devices without scaling or alignment problems.
Common Issues and How to Fix Them
- Text cut off: Content exceeds new slide margins → Reduce font size or adjust text boxes.
- Images stretched: Aspect ratio not locked → Lock the aspect ratio before resizing.
- Misaligned objects: Auto-scaling changes spacing → Use Align tools or adjust in Slide Master.
- Inconsistent layouts: Slides use different masters → Apply changes consistently in Slide Master.
Best Practices to Change Slide Size in PowerPoint
- Decide slide dimensions early: Choose the correct slide size before adding most of your content.
- Use 16:9 for modern displays: Ideal for widescreens, laptops, and online presentations.
- Keep important content within safe margins: Prevents objects from being cut off after resizing.
- Test on the target device or screen: Ensures the presentation displays correctly.
Tip: Before resizing an existing presentation, always save a backup copy-especially when using VBA macros or Python scripts.
Conclusion
Changing slide size in PowerPoint can be done in several ways, and the best method depends on your workflow and presentation needs:
- Manual resizing - Best for quick edits or single presentations.
- VBA automation - Ideal for repeatable resizing tasks within PowerPoint.
- Python batch resizing - Perfect for large-scale projects or automated workflows.
By selecting the right method, you can confidently resize PowerPoint slides without breaking layouts, maintain consistent formatting, and save time when working with multiple files.
Looking for more high-quality PowerPoint tutorials? Check out our free PPT resources.
FAQs: Change Slide Size in PowerPoint
Q1: What is the best slide size for PowerPoint presentations?
A1: For most modern presentations, Widescreen (16:9) is recommended. It works best on laptops, monitors, TVs, and online meeting platforms. Standard (4:3) is mainly used for older projectors or printed handouts.
Q2: Does changing slide size affect animations or transitions in PowerPoint?
A2: Changing slide size does not remove animations or transitions, but it may affect their visual positioning or timing. Review slides after resizing to ensure everything plays correctly.
Q3: How to change slide size in PowerPoint without breaking layouts?
A3: Use the Ensure Fit option when resizing, keep important content within safe margins, and review slides after resizing. Minor manual adjustments may still be needed for complex layouts.
Q4: How to resize slides across multiple PowerPoint presentations at once?
A4: Use Python along with libraries like Spire.Presentation to batch resize multiple PowerPoint files automatically.
Q5: Can I change slide size in PowerPoint for only one slide?
A5: No. PowerPoint applies slide size to the entire presentation, not individual slides. If you need different slide sizes, create separate presentations or adjust content visually on a single slide.
See Also
Convert PPT to PPTX - 3 Easy Ways (Offline, Online & Python)

Converting old PPT files to the modern PPTX format is essential for smooth editing, full compatibility, and better performance in today's PowerPoint versions. Many users face issues like animations not rendering correctly, embedded media failing to play, or unnecessarily large file sizes when using legacy PPT files.
PPTX solves these problems: it loads faster, compresses files efficiently, supports advanced animations, and integrates seamlessly with Microsoft 365 collaboration tools. In this step-by-step guide, you'll learn 3 easy ways to convert PPT to PPTX using Microsoft PowerPoint, online converters, and Python automation, so you can choose the method that fits your workflow best.
- Why Convert PPT to PPTX
- Method 1. Convert PPT to PPTX Using Microsoft PowerPoint
- Method 2. Convert PPT to PPTX Online
- Method 3. Batch Convert PPT to PPTX with Python
- Best Practices for PPT to PPTX Conversion
Why Convert PPT to PPTX?
PPTX has replaced the old PPT format because it is based on the Office Open XML (OOXML) standard, unlike the legacy binary PPT format. This modern structure provides better file management and ensures compatibility with future PowerPoint versions.
Key reasons to convert PPT to PPTX:
- Modern compatibility: Fully supported in current and upcoming PowerPoint versions.
- Long-term reliability: Reduces the risk of file corruption and is safer for archiving.
- Workflow integration: Compatible with modern tools and processes, making presentations easier to manage over time.
Method 1. Convert PPT to PPTX Using Microsoft PowerPoint
This is the easiest and most reliable method to convert a PPT file to PPTX, because PowerPoint supports both formats natively. The conversion process is smooth, and formatting is usually preserved.
Steps to Convert in PowerPoint:
-
Open your .ppt file in Microsoft PowerPoint.
-
Click File → Save As.
-
In the Save as type dropdown, choose PowerPoint Presentation (*.pptx).
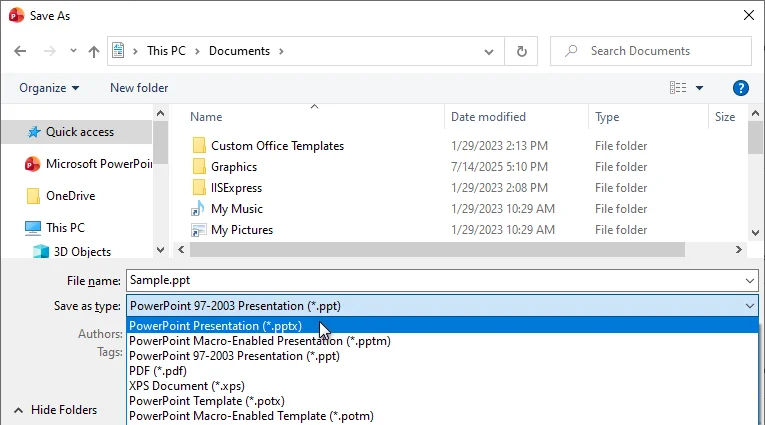
-
Select a location and click Save.
PowerPoint will automatically convert the file to PPTX, keeping slide layouts, fonts, charts, animations, and transitions intact.
Best for: Important presentations where accuracy matters.
Limitations: Manual conversion can be slow for multiple files.
Method 2. Convert PPT to PPTX Online
Online PPT to PPTX converters are convenient when you don't have PowerPoint installed. They work in any browser on Windows, macOS, Linux, or even mobile devices.
Popular online converters include:
- Convertio
- Zamzar
- CloudConvert
Steps to Convert PPT to PPTX Online (Using Convertio as an Example):
-
Open the Convertio online PPT to PPTX converter.
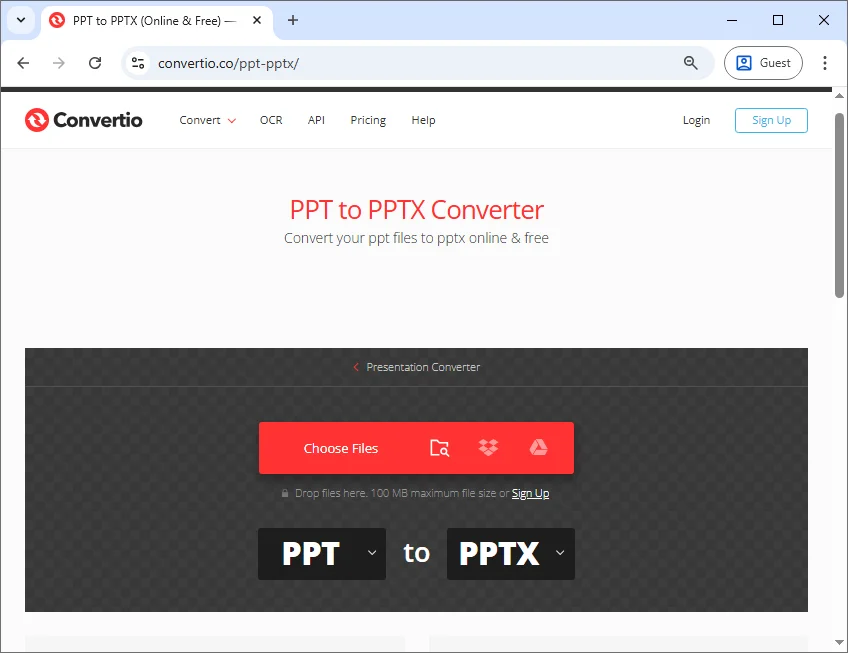
-
Click Choose Files to upload your .ppt file.
-
Click Convert and wait for the conversion process to finish.
-
Download the converted PPTX file.
Best for: Quick, occasional conversions without installing software.
Limitations: File size limits, potential formatting issues with complex presentations, not ideal for sensitive data.
Method 3. Batch Convert PPT to PPTX with Python
If you need to convert multiple PPT files regularly, Python automation is a game-changer. It allows you to batch convert dozens or hundreds of files in a single workflow without manual interaction with PowerPoint.
Example: Batch Convert PPT to PPTX in Python
The following example uses Spire.Presentation for Python, a PowerPoint processing library that supports creating and editing both PPT and PPTX formats, to batch convert multiple .ppt files to .pptx:
from spire.presentation import *
import os

# Set input and output folders
input_folder = "ppt_files"
output_folder = "pptx_files"

# Create the output folder if it doesn't exist
if not os.path.exists(output_folder):
    os.makedirs(output_folder)

# Loop through all files in the input folder
for filename in os.listdir(input_folder):
    # Process only files with .ppt or .PPT extension
    if filename.lower().endswith(".ppt"):
        # Construct the full input file path
        input_path = os.path.join(input_folder, filename)

        # Create a Presentation object and load the PPT file
        presentation = Presentation()
        presentation.LoadFromFile(input_path)

        # Safely create the output filename by replacing the extension
        name, ext = os.path.splitext(filename)
        output_path = os.path.join(output_folder, f"{name}.pptx")

        # Save the presentation as PPTX
        presentation.SaveToFile(output_path, FileFormat.Pptx2016)

        # Release the resources
        presentation.Dispose()
Steps:
-
Install the library from PyPI:
pip install spire.presentation -
Place your .ppt files in a folder named ppt_files.
-
Run the script to convert all .ppt files to .pptx automatically.

Best for: Enterprises, internal content systems, or automated reporting workflows where batch conversion saves time and reduces errors.
Limitations: Requires basic Python knowledge and environment setup. Some third-party libraries may require a commercial license for production use. Not suitable for users who only need one-time conversions.
Reference: Python: Convert PPS and PPT to PPTX
Best Practices for PPT to PPTX Conversion
To ensure a smooth and reliable PPT to PPTX conversion, it's important to follow a few best practices, especially when working with important presentations or converting large numbers of files.
- Backup original files before converting, in case adjustments are needed.
- Check fonts, animations, and embedded media after conversion to ensure they display correctly.
- Use batch automation for large numbers of files to save time.
- Avoid online converters for sensitive or confidential presentations.
- Keep software updated to reduce compatibility issues.
Conclusion: Choose the Right PPT to PPTX Conversion Method
There is no one-size-fits-all way to convert PPT to PPTX-the best method depends on how often you convert files and how many presentations you manage.
- Microsoft PowerPoint is the most accurate option for manual and important PPT to PPTX conversions.
- Online PPT to PPTX converters are fast and convenient for occasional use, but often come with file size and privacy limitations.
- Python automation is ideal for batch PPT to PPTX conversion in professional and automated workflows.
By choosing the right approach to convert PPT to PPTX, you can ensure better compatibility with modern PowerPoint versions, reduce file size, and enjoy smoother presentation playback across devices.
Looking for more high-quality PowerPoint tutorials? Check out our free PPT resources.
FAQs: PPT to PPTX
Q1. Can modern PowerPoint open PPT files?
A1: Yes. Modern versions of Microsoft PowerPoint can open legacy PPT files and convert them to PPTX automatically when you save the presentation.
Q2. Will converting PPT to PPTX change formatting?
A2: In most cases, no. When using Microsoft PowerPoint, formatting, layouts, animations, and transitions are preserved. Very old PPT files may require minor manual adjustments.
Q3. Is PPTX better than PPT for modern PowerPoint?
A3: Yes. PPTX offers better compatibility with modern PowerPoint versions, improved stability, smaller file sizes, and better support for cloud collaboration.
Q4. How can I batch convert multiple PPT files to PPTX?
A4: You can batch convert PPT to PPTX using Python automation, which is ideal for processing large numbers of files efficiently and reducing manual effort.
Q5. Are online PPT to PPTX converters safe?
A5: Not always. Online converters may have file size limits and privacy risks. For sensitive or confidential presentations, local conversion using PowerPoint or Python automation is recommended.