Convert PPT to PPTX - 3 Easy Ways (Offline, Online & Python)

Converting old PPT files to the modern PPTX format is essential for smooth editing, full compatibility, and better performance in today's PowerPoint versions. Many users face issues like animations not rendering correctly, embedded media failing to play, or unnecessarily large file sizes when using legacy PPT files.
PPTX solves these problems: it loads faster, compresses files efficiently, supports advanced animations, and integrates seamlessly with Microsoft 365 collaboration tools. In this step-by-step guide, you'll learn 3 easy ways to convert PPT to PPTX using Microsoft PowerPoint, online converters, and Python automation, so you can choose the method that fits your workflow best.
- Why Convert PPT to PPTX
- Method 1. Convert PPT to PPTX Using Microsoft PowerPoint
- Method 2. Convert PPT to PPTX Online
- Method 3. Batch Convert PPT to PPTX with Python
- Best Practices for PPT to PPTX Conversion
Why Convert PPT to PPTX?
PPTX has replaced the old PPT format because it is based on the Office Open XML (OOXML) standard, unlike the legacy binary PPT format. This modern structure provides better file management and ensures compatibility with future PowerPoint versions.
Key reasons to convert PPT to PPTX:
- Modern compatibility: Fully supported in current and upcoming PowerPoint versions.
- Long-term reliability: Reduces the risk of file corruption and is safer for archiving.
- Workflow integration: Compatible with modern tools and processes, making presentations easier to manage over time.
Method 1. Convert PPT to PPTX Using Microsoft PowerPoint
This is the easiest and most reliable method to convert a PPT file to PPTX, because PowerPoint supports both formats natively. The conversion process is smooth, and formatting is usually preserved.
Steps to Convert in PowerPoint:
-
Open your .ppt file in Microsoft PowerPoint.
-
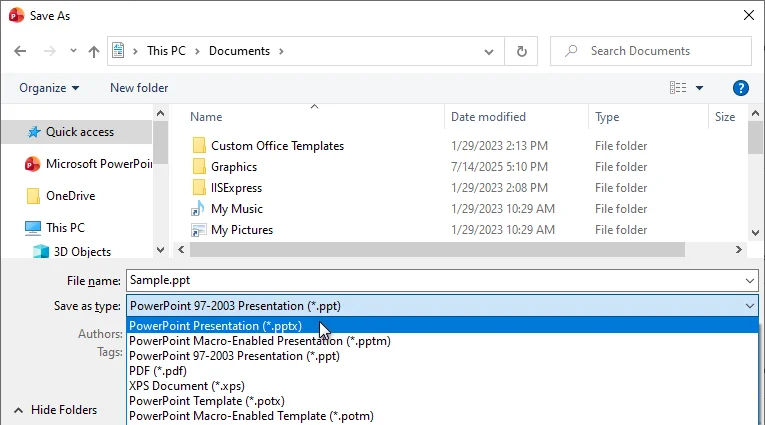
Click File → Save As.
-
In the Save as type dropdown, choose PowerPoint Presentation (*.pptx).
-
Select a location and click Save.
PowerPoint will automatically convert the file to PPTX, keeping slide layouts, fonts, charts, animations, and transitions intact.
Best for: Important presentations where accuracy matters.
Limitations: Manual conversion can be slow for multiple files.
Method 2. Convert PPT to PPTX Online
Online PPT to PPTX converters are convenient when you don't have PowerPoint installed. They work in any browser on Windows, macOS, Linux, or even mobile devices.
Popular online converters include:
- Convertio
- Zamzar
- CloudConvert
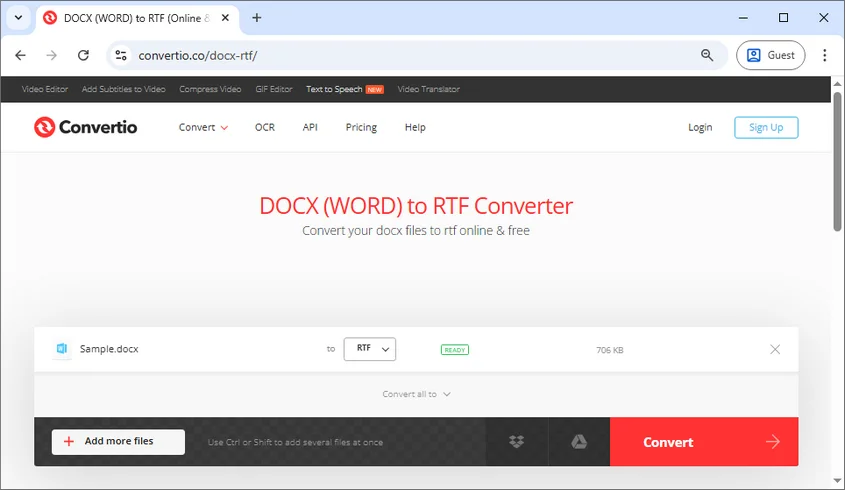
Steps to Convert PPT to PPTX Online (Using Convertio as an Example):
-
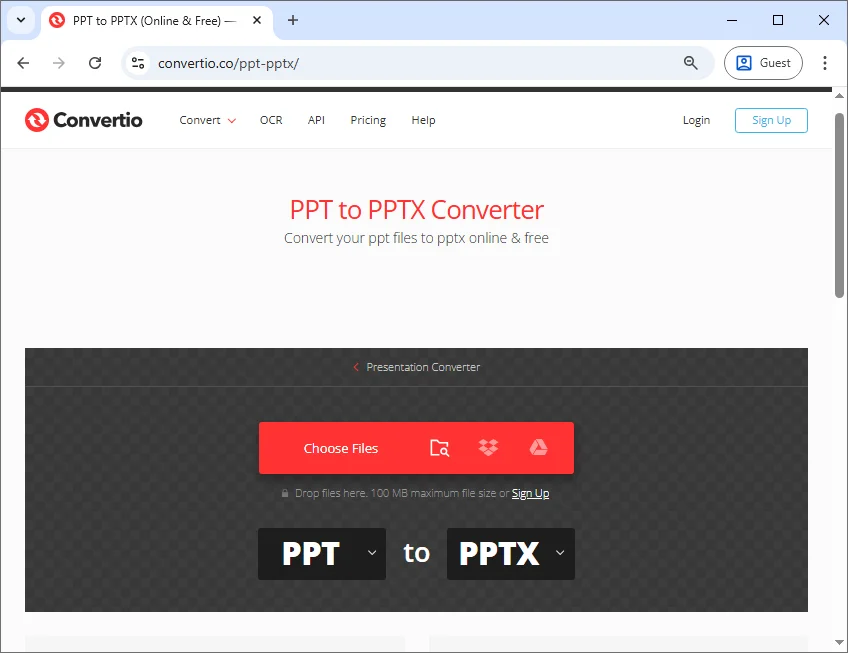
Open the Convertio online PPT to PPTX converter.
-
Click Choose Files to upload your .ppt file.
-
Click Convert and wait for the conversion process to finish.
-
Download the converted PPTX file.
Best for: Quick, occasional conversions without installing software.
Limitations: File size limits, potential formatting issues with complex presentations, not ideal for sensitive data.
Method 3. Batch Convert PPT to PPTX with Python
If you need to convert multiple PPT files regularly, Python automation is a game-changer. It allows you to batch convert dozens or hundreds of files in a single workflow without manual interaction with PowerPoint.
Example: Batch Convert PPT to PPTX in Python
The following example uses Spire.Presentation for Python, a PowerPoint processing library that supports creating and editing both PPT and PPTX formats, to batch convert multiple .ppt files to .pptx:
from spire.presentation import *
import os

# Set input and output folders
input_folder = "ppt_files"
output_folder = "pptx_files"

# Create the output folder if it doesn't exist
if not os.path.exists(output_folder):
    os.makedirs(output_folder)

# Loop through all files in the input folder
for filename in os.listdir(input_folder):
    # Process only files with .ppt or .PPT extension
    if filename.lower().endswith(".ppt"):
        # Construct the full input file path
        input_path = os.path.join(input_folder, filename)

        # Create a Presentation object and load the PPT file
        presentation = Presentation()
        presentation.LoadFromFile(input_path)

        # Safely create the output filename by replacing the extension
        name, ext = os.path.splitext(filename)
        output_path = os.path.join(output_folder, f"{name}.pptx")

        # Save the presentation as PPTX
        presentation.SaveToFile(output_path, FileFormat.Pptx2016)

        # Release the resources
        presentation.Dispose()
Steps:
-
Install the library from PyPI:
pip install spire.presentation -
Place your .ppt files in a folder named ppt_files.
-
Run the script to convert all .ppt files to .pptx automatically.

Best for: Enterprises, internal content systems, or automated reporting workflows where batch conversion saves time and reduces errors.
Limitations: Requires basic Python knowledge and environment setup. Some third-party libraries may require a commercial license for production use. Not suitable for users who only need one-time conversions.
Reference: Python: Convert PPS and PPT to PPTX
Best Practices for PPT to PPTX Conversion
To ensure a smooth and reliable PPT to PPTX conversion, it's important to follow a few best practices, especially when working with important presentations or converting large numbers of files.
- Backup original files before converting, in case adjustments are needed.
- Check fonts, animations, and embedded media after conversion to ensure they display correctly.
- Use batch automation for large numbers of files to save time.
- Avoid online converters for sensitive or confidential presentations.
- Keep software updated to reduce compatibility issues.
Conclusion: Choose the Right PPT to PPTX Conversion Method
There is no one-size-fits-all way to convert PPT to PPTX-the best method depends on how often you convert files and how many presentations you manage.
- Microsoft PowerPoint is the most accurate option for manual and important PPT to PPTX conversions.
- Online PPT to PPTX converters are fast and convenient for occasional use, but often come with file size and privacy limitations.
- Python automation is ideal for batch PPT to PPTX conversion in professional and automated workflows.
By choosing the right approach to convert PPT to PPTX, you can ensure better compatibility with modern PowerPoint versions, reduce file size, and enjoy smoother presentation playback across devices.
Looking for more high-quality PowerPoint tutorials? Check out our free PPT resources.
FAQs: PPT to PPTX
Q1. Can modern PowerPoint open PPT files?
A1: Yes. Modern versions of Microsoft PowerPoint can open legacy PPT files and convert them to PPTX automatically when you save the presentation.
Q2. Will converting PPT to PPTX change formatting?
A2: In most cases, no. When using Microsoft PowerPoint, formatting, layouts, animations, and transitions are preserved. Very old PPT files may require minor manual adjustments.
Q3. Is PPTX better than PPT for modern PowerPoint?
A3: Yes. PPTX offers better compatibility with modern PowerPoint versions, improved stability, smaller file sizes, and better support for cloud collaboration.
Q4. How can I batch convert multiple PPT files to PPTX?
A4: You can batch convert PPT to PPTX using Python automation, which is ideal for processing large numbers of files efficiently and reducing manual effort.
Q5. Are online PPT to PPTX converters safe?
A5: Not always. Online converters may have file size limits and privacy risks. For sensitive or confidential presentations, local conversion using PowerPoint or Python automation is recommended.
See Also
Convert ODT to Word: 4 Simple Ways (Desktop, Online & Python)
Converting ODT files to Word documents is often necessary for anyone working across different platforms. ODT (OpenDocument Text) files are native to open-source suites like LibreOffice and OpenOffice, but Microsoft Word's DOCX and DOC formats remain the industry standard for editing, reviewing, and collaborating on documents professionally.
This guide explains four practical ways to convert ODT to Word, including desktop software, online tools, and automated Python scripts. Whether you're a student, professional, or developer, you will find the most suitable method for your workflow.
- Why Convert ODT to Word
- Convert ODT to Word Using LibreOffice
- Convert ODT to Word Using Microsoft Word
- Convert ODT to Word Online
- Automate ODT to Word Conversion Using Python
- ODT to DOCX vs. ODT to DOC: How to Choose?
Related Reads:
Convert RTF to Word: 3 Easy Methods (Online, Word, Python)
Convert Markdown to Word Fast: 4 Proven Expert Methods
Convert TXT to Word: 4 Easy & Free Methods
Why Convert ODT to Word?
Converting ODT to Word offers several practical benefits:
- Better Compatibility: DOCX is the default format in business, education, and enterprise environments.
- Easier Collaboration: Track Changes, comments, and formatting consistency are handled more reliably in Word documents than in ODT files.
- Professional Submission: Government agencies, publishers, and employers often request DOC or DOCX files instead of ODT.
- Workflow integration: Word documents work seamlessly with Microsoft 365, SharePoint, and OneDrive.
Convert ODT to Word Using LibreOffice
LibreOffice is one of the most reliable tools for ODT to Word conversion because it natively supports both formats. This free, offline solution preserves formatting well and works across Windows, macOS, and Linux.
Steps to Convert ODT to Word with LibreOffice:
-
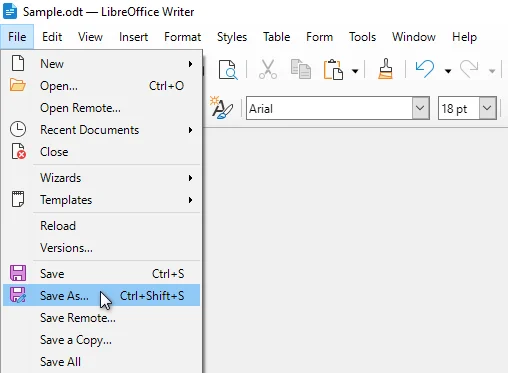
Open your ODT document in LibreOffice Writer.
-
Click File > Save As from the top menu.
-
In the Save as type dropdown, select one of the following Word formats:
- Word 2010-365 (.docx)
- Microsoft Word 97-2003 (.doc)
-
Choose a destination folder and click Save to complete the conversion.
LibreOffice will convert the document while preserving most formatting, styles, tables, and images.
Best for:
- Free desktop conversion
- Maintaining document structure and formatting
- Individual or occasional conversions
Convert ODT to Word Using Microsoft Word
Microsoft Word (2010 and later) can open ODT files directly and save them as DOCX or DOC format, making it a convenient option for users who already work in Word for editing and reviewing.
Steps to Save ODT as Word in Microsoft Word:
-
Launch Microsoft Word on your computer.
-
Click File > Open, browse to your ODT file, and open it.
-
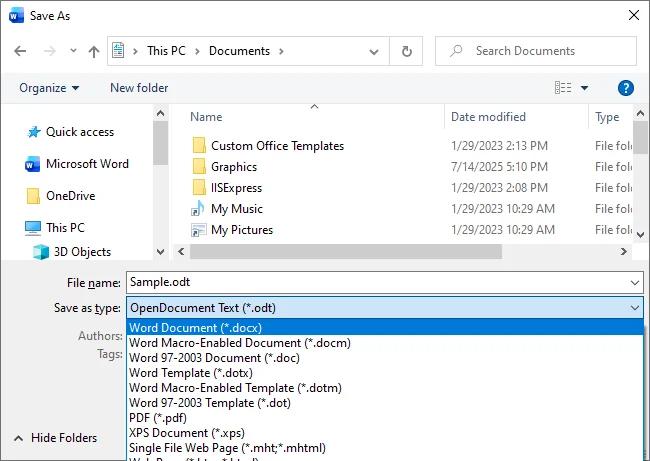
Click File > Save As.
-
Choose Word Document(*.docx) or Word 97-2003 document (*.doc).
-
Save the file to your preferred location.
Microsoft Word handles standard ODT formatting well; however, some advanced ODT styles, complex layouts, or custom formatting may be simplified or lost during the conversion. For details, refer to the official Microsoft support documentation.
Best for:
- Microsoft Word users
- Editing and converting at the same time
- Small to medium document volumes
Convert ODT to Word Online
Online ODT to Word converters offer a fast, installation-free way to convert ODT to Word online. These tools run entirely in your browser and are suitable for quick, one-off tasks, especially when you don't have access to desktop software like LibreOffice or Word.
Popular Online Converters include:
- Convertio
- Zamzar
- FreeConvert
Steps to Convert ODT to Word Online (Using Convertio as an Example):
-
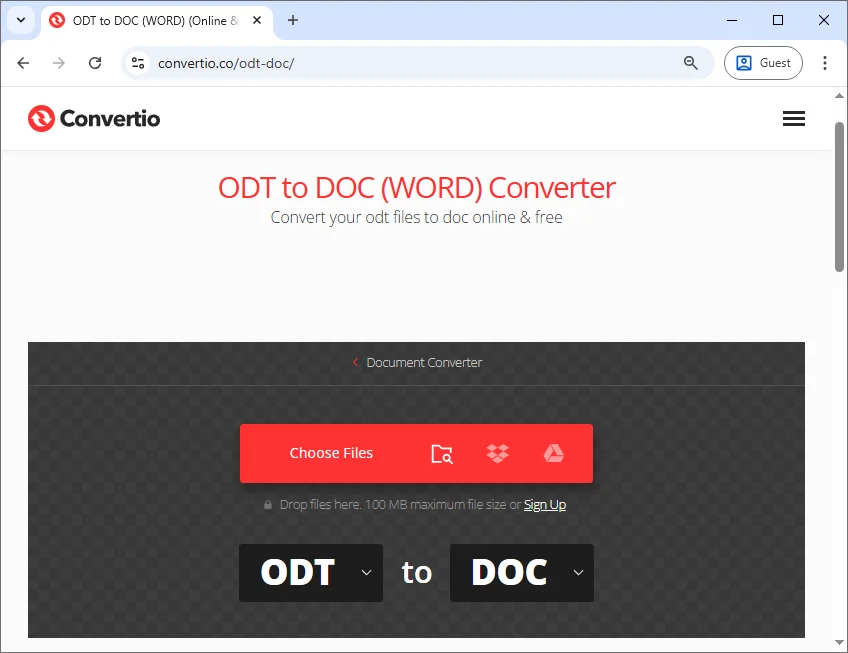
Open the Convertio ODT to Word converter.
-
Click Choose Files to upload your ODT file or drag and drop the file to the upload area.
-
Select DOCX or DOC as the output format.
-
Click Convert and download the Word file.
While convenient, online tools require uploading documents to third-party servers and may have file size limits. For confidential, sensitive, or large files, offline methods are recommended for better security and reliability.
Best for:
- Quick, one-off conversions
- Users without desktop software
- Non-sensitive documents
Automate ODT to Word Conversion Using Python
For users who need to convert multiple ODT files or integrate document conversion into automated workflows, Python offers a flexible and scalable solution. With Python, you can automate ODT to Word conversion in batches, making it ideal for backend services, scripts, and CI pipelines without manual interaction.
Example: Convert ODT to Word Using Python
Below is a simple example using Spire.Doc, a Python Word document-processing library that supports both ODT and Word formats:
from spire.doc import *

# Load the ODT document
document = Document()
document.LoadFromFile("input.odt")

# Save as Word document
document.SaveToFile("output.docx", FileFormat.Docx)

# Close the document to release resources
document.Close()
Steps to Use This Script:
-
Install the required Python library from PyPI using the following command:
pip install spire.doc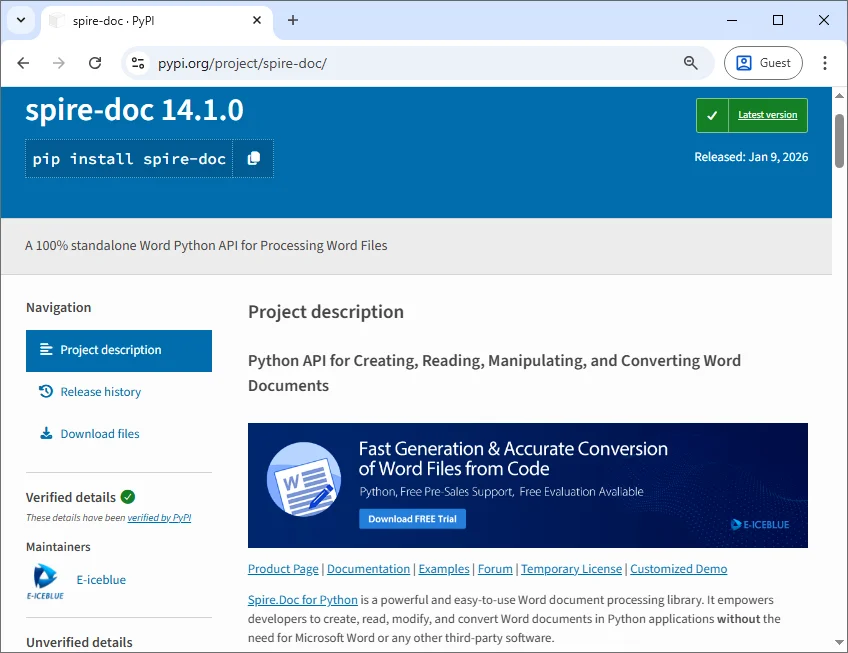
-
Replace the input and output file paths
-
Run the script to convert ODT to Word automatically
Tip: This approach works on Python 3.7 or higher and supports Windows, Linux, and macOS environments. You can easily extend this example with a loop to process multiple ODT files in a directory.
Best for:
- Developers and technical users
- Batch or scheduled conversions
- Enterprise and automated workflows
Reference: Spire.Doc for Python Official Documentation
ODT to DOCX vs. ODT to DOC: How to Choose?
When converting ODT files to Word, your choice of format affects compatibility and workflow efficiency:
- ODT to DOCX - Best for most users. Works with modern Word versions, preserves formatting, supports collaborative editing, and handles advanced features.
- ODT to DOC - Suitable only for older Word versions or legacy systems. Limited in formatting and feature support.
Tip: For most workflows, convert ODT files to DOCX format for a future-proof, fully editable document. Only use DOC if recipients are using older versions of Microsoft Word.
Conclusion
Converting ODT files to Word can be done in several ways, and the best approach depends on your workflow and file volume:
- For small, occasional conversions, desktop tools like LibreOffice or Microsoft Word are simple and reliable.
- For fast, one-time tasks without installing software, online converters offer a quick solution.
- For large-scale, automated, or batch conversions, Python scripting provides maximum efficiency and control.
By selecting the appropriate method and format, you can ensure your documents remain fully editable and compatible across Word-based platforms.
Looking for more high-quality Word tutorials? Check out our free Word resources.
FAQs: Convert ODT to Word
Q1: What is the best way to convert ODT to Word?
A1: LibreOffice is the most reliable free option, while Microsoft Word is convenient if you already use it for editing.
Q2: Will formatting be preserved when converting ODT to Word?
A2: Most formatting, images, and tables are preserved. Complex layouts or custom styles may require review.
Q3: Can I convert ODT to Word without installing software?
A3: Yes. Online converters allow browser-based conversion, but avoid them for sensitive or large files.
Q4: How do I convert multiple ODT files at once?
A4: Python automation is best for bulk conversions, enabling fully automated, repeatable workflows.
Q5: Is ODT better than Word?
A5: ODT is open and standardized, but Word formats offer better collaboration, editing, and compatibility. Choose based on your workflow and audience.
See Also
How to Rotate Text in Excel: 7 Easy Ways
In Excel worksheets with many narrow columns, long header text often forces rows to become taller or makes tables harder to scan. Simply wrapping or shrinking text doesn't always solve the problem-and can even reduce readability. Rotating text in Excel offers a cleaner solution by letting you display labels vertically or at an angle, saving space while keeping your layout clear and professional.
In this guide, you'll learn 7 practical ways to rotate text in Excel, from built-in formatting tools to automated solutions using VBA and Python, so you can choose the right method for any scenario.
- Why Rotating Text in Excel?
- How to Rotate Text in Excel Manually
- How to Rotate Text in Excel Automatically
- Best Practices for Rotating Text in Excel
Also Read:
How to Shrink Text or Cells to Fit Cell Content
How to Add Watermarks to Excel (4 Easy Ways)
Why Rotating Text in Excel?
Rotating text in Excel helps you:
- Fit longer headers into narrow columns without enlarging the sheet
- Make more rows visible on screen, improving overall readability
- Organize dashboards and reports with a cleaner, more professional look
- Highlight key labels or sections for easier analysis
How to Rotate Text in Excel Manually
Excel provides multiple built-in ways to rotate text in cells without writing any code. These methods are best suited for quick formatting tasks, small datasets, or one-time layout adjustments.
Rotate Text Using the Format Cells Dialog Box
The Format Cells dialog box is the most flexible option to rotate text in Excel. It allows you to set an exact angle, which is especially useful for custom layouts or non-standard header orientations.
Steps:
-
Click the cell containing the text you want to rotate.
-
Right-click the selected cell and choose Format Cells… from the context menu.
-
In the Format Cells dialog box, switch to the Alignment tab.
-
In the Orientation section, drag the rotation slider or enter a value between -90° and 90° in the Degrees box.
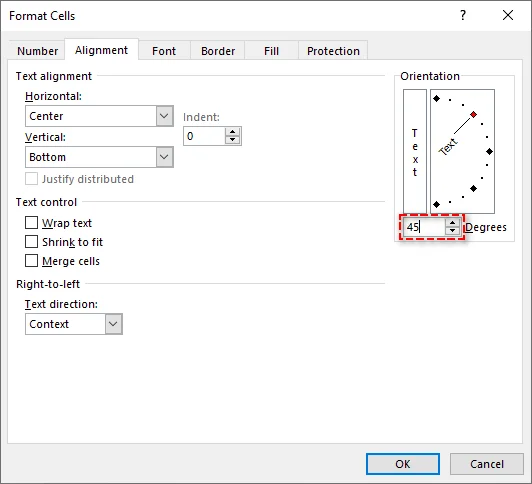
-
Click OK to rotate the text.
Rotate Text Using the Ribbon (Home Tab)
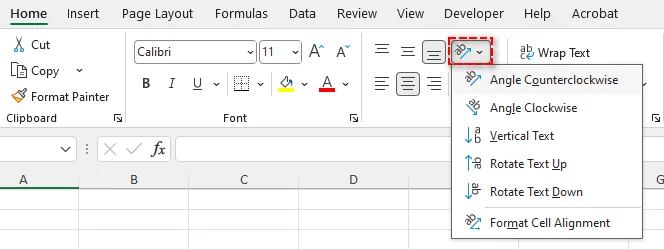
The Ribbon provides a convenient way to rotate text using predefined orientation styles. This method is best for users who want quick results without adjusting custom angles.
Steps:
-
Highlight the cell with the text you want to rotate.
-
On the Excel Ribbon, go to the Home tab.
-
In the Alignment group, click the Orientation icon (displayed as a slanted "ab" symbol).
-
From the drop-down menu, select a preset style such as Rotate Text Up, Rotate Text Down, or Vertical Text.
Use Keyboard Shortcuts to Rotate Text
For users who prefer keyboard navigation, shortcuts provide a quicker way to rotate text in Excel. This method is especially useful for quickly formatting headers, tables, or dashboards without opening additional dialogs.
Shortcut keys for rotating text in Excel:
- ALT > H > F > Q > L: Rotate text clockwise
- ALT > H > F > Q > O: Rotate text counterclockwise
- ALT > H > F > Q > V: Rotate text vertically
- ALT > H > F > Q > U: Rotate text up
- ALT > H > F > Q > D: Rotate text down
Steps:
- Select the cell or range you want to rotate.
- Press one of the keyboard shortcuts above in sequence to apply the desired text rotation.
- Text rotates immediately according to the selected shortcut.
Rotate Text with Text Box
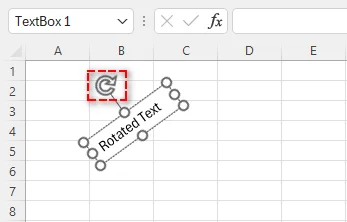
Text boxes allow you to rotate text independently of cell formatting. This method is useful when text needs to be positioned freely or placed on top of charts and shapes.
Steps:
-
Go to the Insert tab and click Text Box.
-
Click and drag on the worksheet to create the text box.
-
Type the desired text inside the text box.
-
Select the text box, then drag the rotation handle at the top to rotate it to any angle.
Rotate Text with WordArt
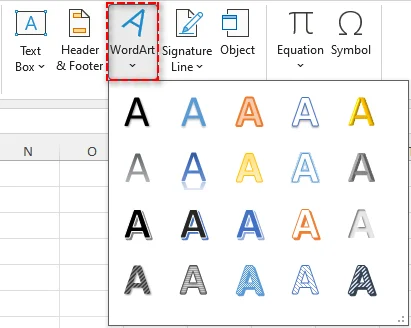
WordArt is designed for decorative purposes, but it can also be used to rotate text in Excel while applying visual effects like outlines, colors, or transformations.
Steps:
-
Go to Insert > WordArt and choose a style.
-
Replace the placeholder text with your own.
-
Click the WordArt to activate formatting options.
-
Drag the rotation handle or use the Shape Format tab to set rotation values.
WordArt works best for headings, section labels, or presentation-style Excel files.
How to Rotate Text in Excel Automatically
For larger datasets or repeated tasks, automating the rotation of text using VBA or Python is far more efficient than manual methods.
Rotate Text with VBA
VBA (Visual Basic for Applications) provides a built-in way to automate text rotation directly within Excel. This method is ideal when text rotation needs to be applied dynamically based on user actions, worksheet conditions, or predefined rules inside a workbook.
Steps to rotate text in Excel using VBA:
-
Press Alt + F11 to open the VBA editor.
-
In the editor, click Insert > Module to create a new module.
-
Add the following VBA Code to automatically rotate text in selected cells:
Sub RotateText()
    Dim rng As Range
    Set rng = Selection

    ' Rotate text for all selected cells
    rng.Orientation = 45
End Sub
-
Close the editor, press Alt + F8, select RotateText, and click Run.
Tip: Once created, this macro can be reused at any time. You can also modify it to target a specific range or assign it to a Ribbon button for faster access.
Reference: Range.Orientation property (Excel)
Rotate Text with Python
Python automation is well-suited for rotating text in Excel files at scale, such as when processing multiple workbooks or applying consistent formatting as part of a data-processing workflow. This approach runs without manual interaction with Excel, making it ideal for batch operations, automated scripts, and server-side environments where Excel is not opened interactively.
Using libraries like Spire.XLS for Python, you can rotate text programmatically across worksheets and save the updated files automatically.

Steps to rotate text in Excel using Python:
-
Install the Spire.XLS for Python Library from PyPI:
pip install spire.xls -
Write the Python Script to automatically rotate text in specifiied cell:
from spire.xls import * # Load Excel file workbook = Workbook() workbook.LoadFromFile("example.xlsx") # Access the first worksheet sheet = workbook.Worksheets[0] # Rotate text in cell A1 sheet.Range["A1"].Style.Rotation = 45 # Save the updated workbook workbook.SaveToFile("example_rotated.xlsx", FileFormat.Version2016) workbook.Dispose() -
Save and run the script.
Tip: You can loop through multiple sheets or workbooks to apply rotation in batch operations.
Related Article: Python: Set Text Alignment and Orientation in Excel
Best Practices for Rotating Text in Excel
After learning the different methods to rotate text in Excel, it's important to follow a few best practices to ensure your formatting remains clear and professional.
- Use Rotation Sparingly: Rotating text in Excel can help fit content and improve layout, but overusing it may make your spreadsheet look cluttered and harder to read.
- Align Text Properly: After rotating text, ensure it is correctly aligned within the cell or table. You may need to adjust row height, column width, or text alignment to maintain a neat appearance.
- Prioritize Readability: Consider the orientation of the content when rotating text. Vertical text can be more difficult to read than horizontal text, so use it mainly for space-saving or special layout needs.
Conclusion
Rotating text in Excel helps manage space and improve clarity in Excel worksheets. For occasional adjustments, Excel's built-in rotation features are usually sufficient. When formatting needs to be applied repeatedly or across multiple files, VBA and Python automation offer more efficient and scalable solutions. Choosing the right approach depends on how often you need to rotate text and how complex your workflow is.
FAQs
Q1: How do I rotate text vertically in Excel?
A1: You can use the Format Cells dialog box, the Ribbon Orientation tool, or VBA/Python automation to rotate text vertically in Excel.
Q2: Can I rotate text automatically for multiple Excel sheets?
A2: Yes. Using VBA or Python, you can apply rotation across multiple worksheets or workbooks in batch mode.
Q3: What is the difference between VBA and Python for text rotation in Excel?
A3: VBA works inside Excel and is ideal for workbook-specific macros, while Python handles multiple files, batch operations, and server-side automation without opening Excel interactively.
Q4: Can I rotate text in Excel without affecting other cell formatting?
A4: Yes. Using Text Boxes or WordArt allows rotation independent of cell formatting.
See Also
How to Split PPT - 3 Easy Methods (Manual, Online & Python)
Table of Contents
Large PowerPoint presentations can be hard to manage, especially when they contain many slides or cover multiple topics. Splitting PPT into smaller, more manageable files makes it easier to edit, share, and collaborate.
This guide covers 3 effective ways to split PowerPoint presentation while preserving formatting, including manual methods in PowerPoint, free online tools, and Python automation. Whether you’re a business professional, educator, or developer, you’ll find a practical solution that fits your needs.
Contents Overview
- Why Split PPT
- Method 1. Split PPT Manually in PowerPoint
- Method 2. Split PPT Online Using Free Tools
- Method 3. Split PPT Automatically with Python
- Best Practices for Splitting PPT
- Conclusion
- FAQs: Splitting PowerPoint Presentation
Want to merge the split presentations back into one file? See our Merge PowerPoint Presentations guide.
Why Split PPT
Splitting PowerPoint presentations offers multiple benefits:
- Share Relevant Slides - Send only the necessary slides without overwhelming recipients with the entire presentation.
- Reuse Slides - Easily incorporate slides into new presentations without duplicating content.
- Reduce File Size - Split large PPT files into smaller, more manageable files suitable for email or cloud storage.
- Improve Team Collaboration - Allow different team members to work on separate sections simultaneously without conflicts.
- Organize Multi-Topic Presentations - Separate slides by topic, project, or department for better organization and clarity.
Method 1. Split PPT Manually in PowerPoint
PowerPoint provides built-in methods to manually split a presentation into separate PPT files without using additional software. Here is a step-by-step guide for both methods.
Option 1: Using the Copy and Paste Method
Copying and pasting slides is the simplest way to split a PowerPoint presentation. This method works best for occasional splits or smaller presentations but may be time-consuming for large files.
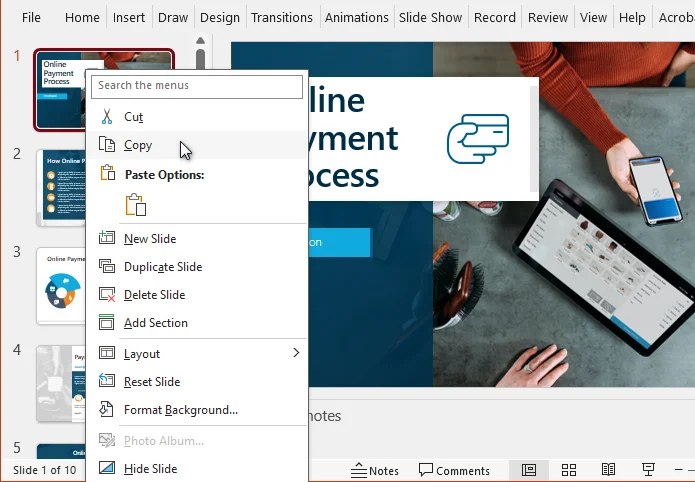
Steps to Split PowerPoint Presentation Using Copy & Paste:
-
Open the PowerPoint presentation you want to split.
-
In the slide thumbnail pane, hold Ctrl (or Cmd on Mac) and select the slides to extract.
-
Right-click any of the selected slides and choose Copy.
-
Click File → New → Blank Presentation to create a new presentation.
-
Right-click the slide thumbnail pane in the new presentation, then choose one of the Paste Options:
- Use Destination Theme - Apply the new presentation's theme.
- Keep Source Formatting - Retain the original formatting.
-
Save the new presentation to your desired location.
Option 2: Using the Reuse Slides Feature
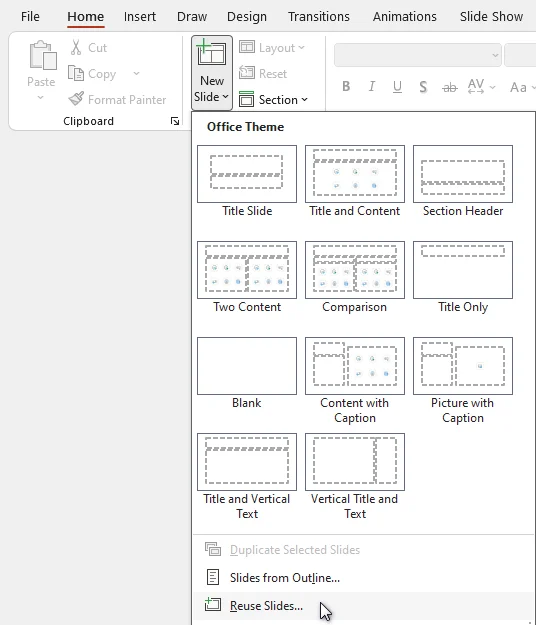
If you want to split a PowerPoint presentation more efficiently, the Reuse Slides feature in PowerPoint is a better choice. It allows importing slides to a new presentation while keeping formatting intact, all without opening the original file. Compared with copy-and-paste, it saves more time, especially when working with large presentations.
Steps to Split PPT using Reuse Slides:
-
Open a new PowerPoint presentation.
-
Navigate to Home > New Slide > Reuse Slides.
-
Click Browse and select the original presentation.
-
Choose the slides to import and check Keep source formatting if needed.
-
Save the new presentation with your split slides.
Also Read: Extract Images from PowerPoint - 4 Easy Ways
Method 2. Split PPT Online Using Free Tools
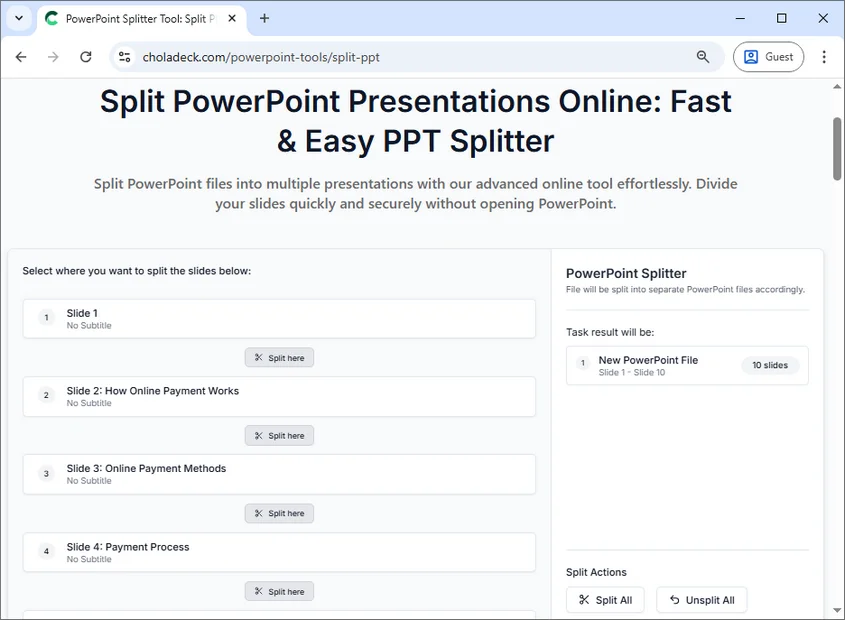
For users without Microsoft PowerPoint installed, free online PPT splitters are an easy alternative. Tools like Choladeck PPT Splitter allow you to split presentations without software installation.
Steps to Split PPT Online:
- Visit the Choladeck online PPT Splitter website.
- Upload your presentation by dragging it into the upload area or browsing your device.
- Choose how to split the presentation:
- If splitting into individual slides, click Split All.
- If splitting into custom groups, click the Split here icon below the desired slides.
- Click Split files to process the presentation.
- Download the split files.
Note: Online tools require file upload. Some tools may also limit file size. Avoid using them for sensitive or very large presentations.
Method 3. Split PPT Automatically with Python
For developers or teams dealing with multiple presentations, Python automation provides a fast, repeatable, and reliable way to split PowerPoint presentations. Libraries such as Spire.Presentation for Python allow you to extract and split slides programmatically, even when Microsoft PowerPoint is not installed.
Steps to Split PPT Automatically Using Python:
-
Install the Spire.Presentation library from PyPI:
pip install spire.presentation -
Create a Python script to split your PPT into multiple files.
from spire.presentation import * import os # Specify the input PowerPoint file input_file = "original_presentation.pptx" # Specify the output folder for split slides output_folder = "output/Presentations" # Create the output folder if it doesn't exist if not os.path.exists(output_folder): os.makedirs(output_folder) # Load the original PowerPoint presentation presentation = Presentation() presentation.LoadFromFile(input_file) # Loop through all slides in the presentation for i in range(presentation.Slides.Count): # Get the current slide slide = presentation.Slides[i] # Create a new PowerPoint presentation new_ppt = Presentation() # Remove the default slide in the new presentation new_ppt.Slides.RemoveAt(0) # Append the current slide to the new presentation new_ppt.Slides.AppendBySlide(slide) # Construct the output file path output_file = os.path.join(output_folder, f"slide-{i + 1}.pptx") # Save the new presentation new_ppt.SaveToFile(output_file, FileFormat.Pptx2013) # Dispose the new presentation to release memory new_ppt.Dispose() # Dispose the original presentation to release memory presentation.Dispose() -
Run the script to generate new presentations automatically.
Benefits:
- Ideal for batch processing large PowerPoint presentations.
- Reduces manual effort and minimizes errors.
- Preserves original formatting, transitions, and animations.
Tip: This Python script can be customized to split slides by ranges, sections, topics, or other criteria.
Related Article: Python: Split PowerPoint Presentations
Best Practices for Splitting PPT
Regardless of which method you choose, following a few best practices can help ensure your split PowerPoint presentations remain well-organized and easy to use.
- Backup Original Files - Always keep a copy of the full presentation.
- Use Clear File Names - Include topic, date, or version to avoid confusion.
- Preserve Themes - Decide whether to maintain the source formatting or apply a new theme.
- Check Slide Dependencies - Verify animations, transitions, and hyperlinks still function after splitting.
- Organize by Section or Topic - Group slides logically to improve readability and workflow.
Conclusion
Learning how to split PPT efficiently helps you manage presentations more effectively, share content selectively, and reduce file size.
If you only need to split a presentation occasionally, manual methods in PowerPoint are usually sufficient. For quick tasks without PowerPoint installed, free online split tools offer a convenient alternative. When you need to batch process files or split presentations frequently, Python automation provides the most efficient and scalable solution.
Choosing the right method based on your workflow, file size, and frequency of use ensures that your PowerPoint presentations remain organized, readable, and ready for collaboration or presentation.
Looking for more high-quality PowerPoint tutorials? Check out our free PPT resources.
FAQs: Splitting PowerPoint Presentation
Q1: What is the easiest way to split PPT?
A1: The easiest way for a few slides is the Copy Method in PowerPoint. For larger presentations, use Reuse Slides or Python automation.
Q2: Can I split PowerPoint Presentation without losing animations or transitions?
A2: Yes. Use the Reuse Slides feature in PowerPoint or Python libraries like Spire.Presentation, which preserve all formatting and animations.
Q3: Are there free online PPT split tools?
A3: Yes. Tools like Choladeck PPT Splitter allow you to split presentations without PowerPoint.
Q4: How to split large PowerPoint presentation efficiently?
A4: For large files, Python automation or the Reuse Slides method is recommended. They save time, maintain formatting, and reduce errors.
Q5: Can I split PPT by topic or section?
A5: Yes. Both Python scripts and online splitters often allow splitting by custom slide ranges or sections.
See Also
Convert ODS to Excel: 4 Easy Ways (Desktop, Online & Python)
Table of Contents
- Why Convert ODS to Excel
- Method 1. Convert ODS to Excel Using LibreOffice or OpenOffice
- Method 2. Convert ODS to Excel Using Microsoft Excel
- Method 3. Convert ODS to Excel Online for Free
- Method 4. Automate ODS to Excel Conversion with Python
- How to Avoid Common Issues During the Conversion
- ODS to XLSX vs. ODS to XLS: Which Format Should You Choose?
ODS (OpenDocument Spreadsheet) is the default format used by LibreOffice and Apache OpenOffice, while Excel formats (XLSX and XLS) remain dominant in business, reporting, and data analysis environments. When spreadsheets need to be shared, reviewed, or integrated into Excel-based workflows, converting ODS to Excel becomes unavoidable.
This guide covers four practical ways to convert ODS files to Excel, including desktop software, online tools, and Python automation. Whether you're a casual user, a business professional, or a developer, you'll find the right solution here.
- Why Convert ODS to Excel
- Method 1. Convert ODS to Excel Using LibreOffice or OpenOffice
- Method 2. Convert ODS to Excel Using Microsoft Excel
- Method 3. Convert ODS to Excel Online for Free
- Method 4. Automate ODS to Excel Conversion with Python
- How to Avoid Common Issues During the Conversion
- ODS to XLSX vs. ODS to XLS: Which Format Should You Choose?
Tip: Need to revert the process? Check out our Excel to ODS conversion guide to convert your Excel files back to ODS format efficiently.
Why Convert ODS to Excel?
Converting ODS to Excel (XLSX or XLS) is often necessary for the following reasons:
- Better compatibility with Microsoft Excel: Most organizations use Excel for reporting, dashboards, and analytics.
- Easier collaboration: Share spreadsheets seamlessly with colleagues or clients who rely on Excel.
- Advanced Excel features: Full support for PivotTables, macros, charts, and data analysis tools.
- Integration with workflows: Ensure ODS data works in Excel-based reporting and enterprise systems.
For a detailed comparison of feature support between ODS and Excel formats, see this Microsoft support document.
Method 1. Convert ODS to Excel Using LibreOffice or OpenOffice
LibreOffice and Apache OpenOffice are free and open-source office suites that allow you to convert ODS files to Excel formats. This method is reliable for users who prefer desktop tools and want full control over their data.
Steps:
-
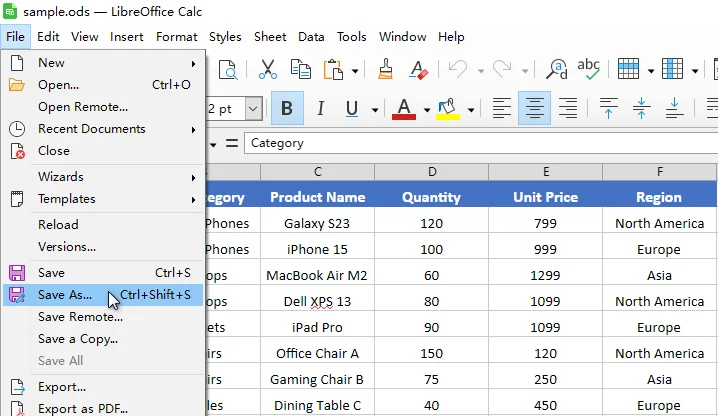
Open your ODS file in LibreOffice Calc or OpenOffice Calc.
-
Go to File > Save As.
-
In the Save as type dropdown, select Microsoft Excel 2007-365 (*.xlsx) or Excel 97-2003 (*.xls).
-
Choose a destination folder and click Save.
This approach preserves most formulas and formatting and works entirely offline, making it suitable for sensitive or internal files.
You might also be interested in: 4 Proven Ways to Convert CSV to Excel (Free & Automated)
Method 2. Convert ODS to Excel Using Microsoft Excel
Modern versions of Microsoft Excel (2010 and later) can directly open ODS files and save them as XLSX or XLS formats. This method is convenient for users who already work in Excel and need to convert individual files quickly.
Steps:
-
Open Microsoft Excel.
-
Click File > Open and select your ODS file.
-
After the file loads, click File > Save As.
-
Choose Excel Workbook (*.xlsx) or Excel 97-2003 Workbook (*.xls).

-
Save the file to your preferred location.
Tip: While Excel handles standard ODS content well, features specific to the ODS specification-such as certain styles or functions-may need to be reviewed after conversion.
Method 3. Convert ODS to Excel Online for Free
Online ODS to Excel converters let you upload an ODS file and download the converted Excel file directly from your browser. This method is convenient for quick, one-time conversions when you don't want to install any software.
Popular online converters include:
- Zamzar
- CloudConvert
- FreeConvert
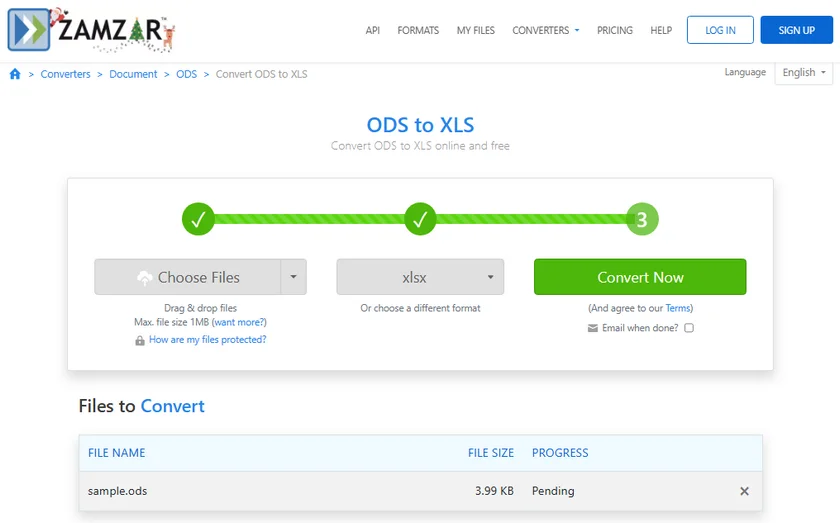
Steps to Convert ODS to Excel Online (Using Zamzar as an Example):
-
Open the Zamzar ODS to Excel converter.
-
Click Choose Files to upload the ODS file you want to convert.
-
Select xls or xlsx as the output format.
-
Click Convert Now and wait for the conversion process to finish.
-
Download the converted Excel file.
Note: Online converters require file uploads, so they are not recommended for confidential data or very large spreadsheets.
Method 4. Automate ODS to Excel Conversion Using Python
For large numbers of files or regular conversions, automation with Python is the most efficient method. Libraries such as Spire.XLS for Python provides a reliable way to programmatically read ODS files and export them to Excel formats, especially when LibreOffice or Microsoft Excel is not available.

Steps to Batch Convert ODS to Excel:
-
Install Spire.XLS for Python from PyPI using pip:
pip install spire.xls -
Create a Python script to loop through a folder of ODS files and save each as Excel.
from spire.xls import * import os # Input and output folder paths input_folder = "path_to_ods_files" output_folder = "path_to_excel_files" # Create output folder if it doesn't exist os.makedirs(output_folder, exist_ok=True) # Loop through all ODS files in the input folder for file_name in os.listdir(input_folder): if file_name.lower().endswith(".ods"): # Create a workbook object wb = Workbook() # Load the ODS file wb.LoadFromFile(os.path.join(input_folder, file_name)) # Save the ODS file as an XLSX file wb.SaveToFile(os.path.join(output_folder, os.path.splitext(file_name)[0] + ".xlsx"), FileFormat.Version2013) # Or save it as an XLS file # wb.SaveToFile(os.path.join(output_folder, os.path.splitext(file_name)[0] + ".xls"), FileFormat.Version97to2003) # Release resources wb.Dispose() -
Run the script to convert all files automatically.
This approach is typically chosen by developers and data teams who need consistent, repeatable ODS to Excel conversion as part of an automated workflow.
Reference: Spire.XLS for Python Official Documentation
How to Avoid Common Issues During the Conversion
To achieve better ODS to Excel conversion results, consider the following best practices:
-
Avoid unsupported features
Advanced elements such as macros, external links, or complex charts may not fully translate between formats.
-
Use standard fonts
Widely supported fonts reduce layout changes after conversion.
-
Review formulas carefully
While most formulas convert correctly, function compatibility may vary.
-
Test with a sample file
Always validate the output before converting large batches.
ODS to XLSX vs. ODS to XLS: Which Format Should You Choose?
When converting ODS to Excel, you typically choose between two formats:
-
ODS to XLSX
Recommended for modern versions of Excel. Supports larger datasets, better formatting, and newer Excel features.
-
ODS to XLS
Intended for older Excel versions. Limited in size and functionality.
In most cases, ODS to XLSX is the preferred and future-proof option.
Conclusion
There is no one-size-fits-all solution for converting ODS to Excel. Choose the method based on your needs:
- For occasional or manual conversions, LibreOffice or Microsoft Excel provides a simple and reliable solution.
- For quick, one-time tasks, online ODS to Excel converters are convenient.
- For professional, large-scale, or automated scenarios, using Python to batch convert ODS to Excel offers the highest efficiency and control.
By choosing the appropriate method, you can ensure accurate ODS to XLSX or XLS conversion while maintaining productivity and data integrity.
FAQs: ODS to Excel
Q1: What's the difference between ODS and Excel formats?
A1: ODS is a file format developed as part of the OpenDocument standard, primarily used by open-source spreadsheet applications like LibreOffice Calc and OpenOffice Calc. While Excel (XLSX/XLS) is Microsoft's proprietary format, it's widely used in business and supports advanced features such as PivotTables, macros, and large datasets.
Q2: Can I convert ODS to Excel without installing any software?
A2: Yes, free online tools like Zamzar, Convertio, and CloudConvert allow you to convert ODS to XLSX/XLS directly in your browser.
Q3: Will formulas in ODS files work in Excel after conversion?
A3: Most standard formulas are preserved, but complex formulas or macros may require manual adjustment.
Q4: Can I convert multiple ODS files to Excel at once?
A4: Yes, using Python with libraries like Spire.XLS for Python, you can automate batch conversions efficiently.
See Also
How to Hide Sheets in Excel (Manual, VBA & Python)
Table of Contents
As Excel workbooks grow in size, managing worksheets can become challenging. Unnecessary sheets may clutter navigation, confuse users, or expose sensitive data. Hiding sheets in Excel is a simple yet effective way to keep workbooks organized and controlled.
This guide covers all practical ways to hide Excel sheets, including manual methods, Very Hidden sheets using VBA, advanced workbook-level hiding, and automated batch hiding with Python.
Why Hide Sheets in Excel
Hiding sheets in Excel is not just about visual cleanup-it plays an important role in usability, data protection, and workflow control.
Key benefits include:
-
Simplify navigation
Hide irrelevant or intermediate sheets to help users focus on key data and reports.
-
Protect sensitive data
Keep internal calculations, raw data, or supporting tables out of sight.
-
Prevent accidental edits
Reduce the risk of users modifying formulas, references, or backend logic.
-
Improve workflow efficiency
Present a clean, purpose-driven workbook layout for dashboards and shared files.
How to Hide Sheets in Excel
With these benefits in mind, let's take a closer look at the different ways to hide sheets in Excel.
Hide a Single Sheet in Excel
You can hide a single worksheet when you want to temporarily remove it from view without affecting other sheets in the workbook. Excel provides several quick ways to do this.
Hide a Sheet by Right-Clicking
This is the fastest and most commonly used method for hiding a worksheet during everyday work.
Steps:
-
Select the sheet tab you want to hide.
-
Right-click the tab and choose Hide.
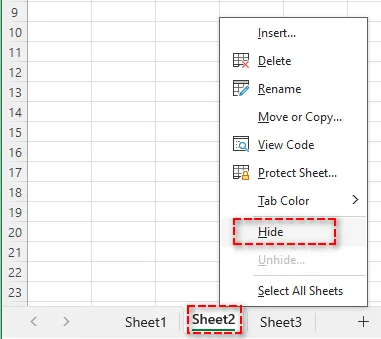
The worksheet is immediately removed from the tab bar but can be easily restored later by right-clicking any visible sheet and selecting Unhide.
Also Read: Copy a Worksheet in Excel (Manual, VBA & Python)
Hide a Sheet Using the Ribbon
If you prefer a menu-driven approach or need clearer visual guidance, you can hide a worksheet using the Ribbon.
Steps:
-
Select the sheet tab you want to hide.
-
Go to the Home tab.
-
In the Cells group, click Format, and choose Hide & Unhide under Visibility.
-
Select Hide Sheet from the context menu.
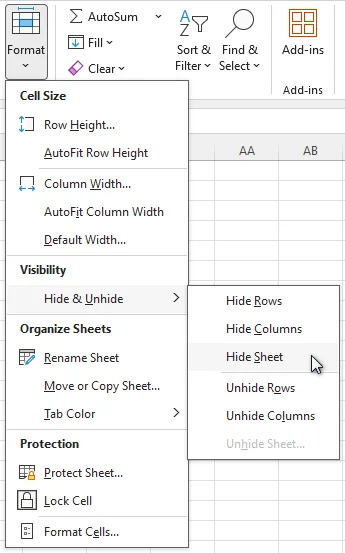
This method produces the same result as right-click hiding and is useful in structured or instructional workflows.
Hide a Sheet Using a Keyboard Shortcut
For users who prefer keyboard navigation, Excel provides a built-in shortcut that allows you to hide the active worksheet instantly, without opening any menus.
Steps:
-
Select the sheet tab you want to hide.
-
Press the following keys in sequence: Alt → H → O → U → S.

Note: This shortcut hides only the active sheet in Excel. Make sure the sheet you want to hide is active before using it.
Hide Multiple Sheets in Excel at Once
You can hide multiple worksheets at the same time when organizing large workbooks or preparing files for sharing.
Steps:
- Select the sheet tabs you want to hide:
- Adjacent sheets: Click the first tab, hold Shift, then click the last tab.
- Non-adjacent sheets: Hold Ctrl and click each tab.
- Right-click one of the selected tabs and choose Hide.
Note: At least one worksheet must remain visible in the workbook, as Excel does not allow all sheets to be hidden at the same time.
Make a Sheet Very Hidden in Excel with VBA
When standard hiding is not sufficient, you can make a worksheet Very Hidden using VBA. A Very Hidden sheet does not appear in Excel's Unhide dialog and can only be made visible again through VBA or code.
Steps:
-
Press Alt + F11 to open the VBA Editor.
-
In the Project Explorer, select the worksheet you want to hide.
-
Open the Properties window (F4).
-
Set Visible to xlSheetVeryHidden.
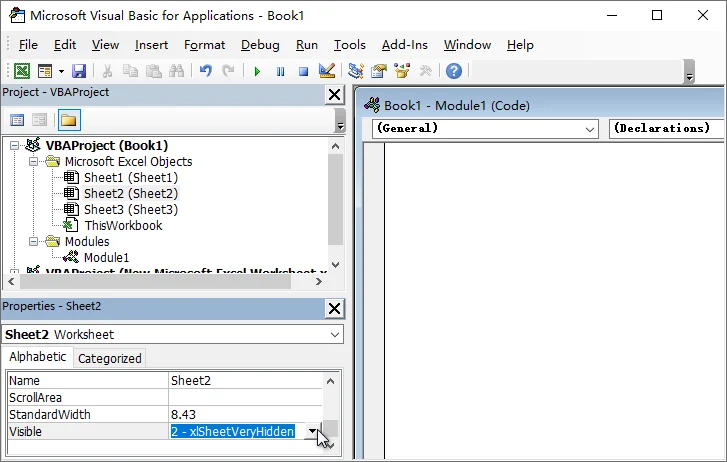
Note: Very Hidden sheets can still be referenced by Excel formulas and macros. To restore the sheet, change the Visible property back to xlSheetVisible.
This method is commonly used for templates, internal calculations, and supporting data that should not be exposed to end users.
Hide the Workbook Window in Excel
In advanced scenarios, you may want to hide the entire workbook window while keeping the workbook open in the background.
Steps:
-
Open the workbook you want to hide.
-
Go to the View tab.
-
In the Window group, click Hide.
Tip: Hidden workbooks can be unhidden via View > Unhide.
Hide Sheets Automatically with Python
When you need to hide worksheets across multiple Excel files, doing it manually can be time-consuming and error-prone. By using Python with Spire.XLS for Python, you can efficiently manage worksheets, including automating sheet visibility, across large numbers of workbooks.

Steps to Batch Hide Excel Sheets with Python:
-
Install Spire.XLS for Python
Install the library from PyPI using the following command:
pip install spire.xls -
Hide Sheets Automatically with Python
The following example hides all worksheets except specified ones in every Excel file within a folder:
from spire.xls import *
import os

# Define input and output folders
input_folder = "input_excels"
output_folder = "output_excels"

# Iterate through all Excel files in the input folder
for file_name in os.listdir(input_folder):
    if file_name.endswith((".xlsx", ".xls")):
        workbook = Workbook()
        workbook.LoadFromFile(os.path.join(input_folder, file_name))

        # Loop through worksheets in each file
        for sheet in workbook.Worksheets:
            # Hide all worksheets except the specified ones
            if sheet.Name not in ["Dashboard", "Summary"]:
                sheet.Visibility = WorksheetVisibility.Hidden

        # Save the updated workbook
        workbook.SaveToFile(os.path.join(output_folder, file_name), ExcelVersion.Version2013)

        # Release resources
        workbook.Dispose()
Tip: If you need to prevent users from unhiding sheets through Excel's interface, use WorksheetVisibility.StrongHidden to create Very Hidden sheets.
Related Article: Python: Hide or Unhide Excel Worksheets
Conclusion
Hiding sheets in Excel keeps workbooks organized, protects sensitive data, and reduces user confusion. Choosing the right method depends on your control needs, how often the task is performed, and the scale of your workbook:
- For quick, temporary hiding of individual sheets, manual methods are sufficient.
- For sheets that should never be unhidden through Excel's interface, use Very Hidden sheets with VBA.
- To restrict user interaction while keeping a workbook open, hiding the workbook window is ideal.
- For consistent rules across multiple Excel files, Python automation provides the most efficient solution.
Looking for more high-quality Excel tutorials? Check out our free Excel resources.
FAQs
Q1: What is the difference between Hidden and Very Hidden sheets in Excel?
A1: Hidden sheets can be unhidden through Excel, while Very Hidden sheets can only be made visible again using VBA or automation.
Q2: Can users unhide hidden sheets in Excel?
A2: Yes. Sheets hidden using standard methods can be unhidden through Excel's Unhide option.
Q3: Can I hide an entire Excel workbook without closing it?
A3: Yes. Go to the View tab and click Hide in the Window group to hide the workbook window while keeping it open.
Q4: How can I hide sheets in multiple Excel files in a batch?
A4: By using Python with libraries such as Spire.XLS for Python, you can apply the same worksheet visibility rules across multiple Excel files in a folder and hide sheets in bulk.
See Also
Convert Word to RTF: 4 Easy Ways (Free & Batch Options)
Table of Contents
When sharing documents across platforms, Word files can encounter compatibility issues-especially between different operating systems or office applications. Converting Word documents to RTF (Rich Text Format) preserves essential text formatting while ensuring broad cross-platform support, making it ideal for seamless sharing. This guide provides a complete overview of how to convert Word to RTF, explaining what RTF is, why it matters, and four practical methods to perform the conversion efficiently.
- What is RTF
- Why Convert Word to RTF
- How to Convert Word to RTF
- How to Avoid Formatting Issues During Word to RTF Conversion
Tip: If you need to reverse the process, our tutorial on converting RTF to Word shows simple ways to convert back.
What is RTF?
RTF (Rich Text Format) is a document format developed by Microsoft in the 1980s to enable the exchange of formatted text between different platforms and applications.
Unlike plain text, RTF supports basic formatting such as fonts, font sizes, bold and italic styles, text colors, and paragraph alignment. At the same time, it avoids many of the advanced and complex features found in modern Word formats, making it more stable and widely compatible across environments.
Why Convert Word to RTF?
Compared with DOC or DOCX formats, RTF offers several practical advantages:
-
Better compatibility
RTF files can be opened by almost all word processing applications, including older or lightweight editors.
-
Smaller file size
Without complex elements, RTF files are often more compact than DOCX documents.
-
Simpler structure
Ideal for systems that require basic formatting but do not support advanced Word features.
-
Email-friendly format
Many email systems and document platforms handle RTF files more reliably than DOCX.
How to Convert Word to RTF?
There are multiple ways to convert Word documents to RTF, ranging from manual desktop tools to online services and automated batch processing. Below are four commonly used methods, each suitable for different scenarios.
Convert Word to RTF Using Microsoft Word
Using Microsoft Word itself is the most straightforward and reliable way to convert Word documents to RTF. Almost all versions of Word-including 2010, 2013, 2016, 2019, 2021, and Microsoft 365-support exporting documents to RTF format.
Steps:
-
Open the DOC or DOCX file in Microsoft Word.
-
Click File > Save As.
-
Choose a destination folder.
-
In the Save as type dropdown, select Rich Text Format (*.rtf).
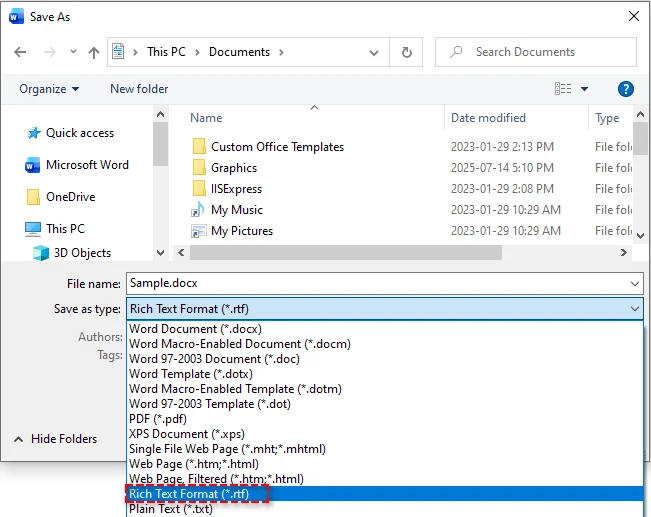
-
Click Save.
Pros:
- High formatting accuracy
- No additional software required
- Simple and reliable
Cons:
- Not suitable for batch processing
Best for:
- One-time conversions
- Documents requiring high formatting fidelity
Convert Word to RTF Using LibreOffice
LibreOffice is a free, open-source office suite that supports saving Word documents as RTF on Windows, macOS, and Linux. It is an excellent alternative when Microsoft Word is not available.
Steps:
-
Download and install LibreOffice from the official website.
-
Open the Word file in LibreOffice Writer.
-
Go to File > Save As.
-
Select Rich Text (*.rtf) as the output format.
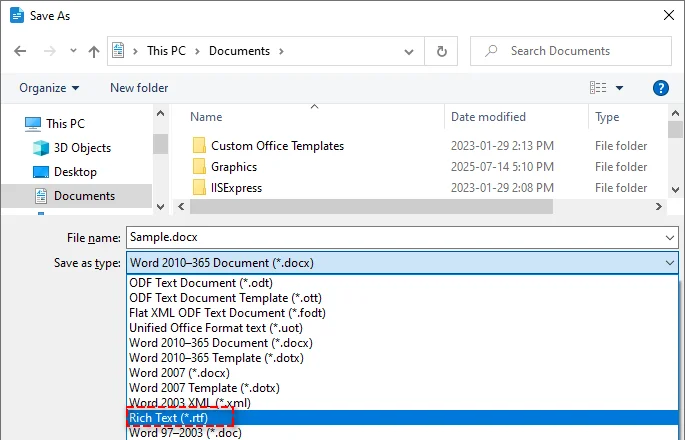
-
Click Save.
Pros:
- Free and open-source
- Cross-platform support
- No dependency on Microsoft Word
Cons:
- Minor differences may appear in complex layouts
- Interface may feel unfamiliar to Word users
Best for:
- Users without Microsoft Word
- Open-source or Linux-based environments
Convert Word to RTF Using Free Online Tools
If you prefer not to install desktop software or need to convert Word documents to RTF on mobile services, online tools are a convenient solution.
Popular online converters include:
- Convertio - Supports batch conversion and cloud storage (Google Drive or Dropbox) imports
- CloudConvert - Offers multiple formats and API access
- Zamzar - Allows converted files to be delivered via email
Steps (Using Convertio as an Example):
- Open the Convertio online Word to RTF converter.
- Click Choose Files to upload your Word file, or drag it into the upload area.
- Select RTF as the target format.
- Click Convert to start the conversion process.
- Download the converted RTF file.
Pros:
- No software installation required
- Accessible from any device with a browser
- Easy to use
Cons:
- File size or usage limits may apply
- Privacy concerns when uploading sensitive documents
- Less control over advanced formatting
Best for:
- Quick, one-time conversions
- Small files without sensitive content
Batch Convert Word Files to RTF Using C#
For large-scale or recurring document conversions, manual methods become inefficient. Using C# and the Spire.Doc for .NET library, you can automatically batch convert hundreds of Word DOC/DOCX files to RTF or other file formats like PDF and HTML effortlessly.

Steps to Batch Convert Word to RTF:
-
Prepare Word Files
Place all DOC or DOCX files you want to convert into a single folder.
-
Create a New C# Project
Open Visual Studio and create a Console App.
-
Install Spire.Doc for .NET
Install the library via NuGet in your C# project using the following command:
Install-Package Spire.Doc -
Add the code to batch convert DOC/DOCX files to RTF
The following code demonstrates how to loop through each Word document in the folder and save it in RTF format:
using Spire.Doc; using System; using System.IO; namespace BatchWordToRtf { class Program { static void Main() { // Input folder path: where your Word files are stored string inputFolder = @"C:\WordFiles\"; // Output folder path: where converted RTF files will be saved string outputFolder = @"C:\RtfFiles\"; // Loop through all files in the input folder foreach (string file in Directory.EnumerateFiles(inputFolder)) { // Get the file extension and convert to lowercase string extension = Path.GetExtension(file).ToLower(); // Only process .doc and .docx files if (extension == ".doc" || extension == ".docx") { // Create a Document object and load the Word file Document doc = new Document(); doc.LoadFromFile(file); // Get the file name without extension string fileName = Path.GetFileNameWithoutExtension(file); // Save the file as RTF to the output folder doc.SaveToFile(Path.Combine(outputFolder, fileName + ".rtf"), FileFormat.Rtf); } } Console.WriteLine("Batch conversion completed!"); } } } -
Run the Program
Execute the program to perform the batch conversion. After running, RTF files will be automatically generated in the output folder specified in the code.
Pros:
- High efficiency for bulk conversions
- No Microsoft Word installation required
- Easily integrated into automated workflows or server environments
Cons:
- Requires programming knowledge
- Depends on third-party .NET libraries
Best for:
- Enterprises and developers
- Automated document processing systems
Related Article: C#/VB.NET: Convert RTF to Word Doc/Docx and Vice Versa
How to Avoid Formatting Issues During Word to RTF Conversion
To minimize formatting problems during Word to RTF conversion, consider the following best practices:
-
Avoid advanced Word features
Macros, SmartArt, embedded objects, and complex tables may not convert correctly. Converting them to images can help preserve their appearance.
-
Use standard fonts
Choose widely supported fonts such as Arial, Times New Roman, or Calibri to ensure consistent text display across different platforms.
-
Check cross-platform compatibility
Open the converted RTF file in different editors (e.g., Word and LibreOffice) to verify layout consistency.
-
Test before batch processing
Always validate a few sample files before running large-scale or automated conversions.
Conclusion
Converting Word to RTF is an effective way to improve compatibility, portability, and reliability across platforms. Depending on your needs, you can choose manual conversion with Microsoft Word or LibreOffice, quick conversion with online tools, or automated batch processing using C#.
Looking for more high-quality Word tutorials? Check out our free Word resources.
FAQs: Word to RTF
Q1: What is the easiest way to convert Word to RTF?
A1: Using Microsoft Word's "Save As" feature is the simplest method.
Q2: Will converting Word to RTF affect formatting?
A2: Basic formatting is preserved, but advanced features such as macros or SmartArt may not be fully supported.
Q3: Can I convert Word to RTF for free?
A3: Yes. LibreOffice and many online converters offer free conversion options.
Q4: How can I batch convert multiple Word files to RTF?
A4: You can use C# with libraries such as Spire.Doc to automate batch conversions.
Q5: Is RTF compatible across platforms and applications?
A5: Yes. RTF is widely supported on Windows, macOS, Linux, and most word processors.
Q6: Can I convert Word to RTF online without installing software?
A6: Yes. Online tools like Convertio allow browser-based conversion, though file size and privacy limitations may apply.
See Also
Remove Page Breaks in Excel: Manual & Automatic Guide (2025)
Unwanted page breaks in Excel can disrupt your worksheet layout and make printing your data frustrating. They often appear after changing print settings, adjusting margins, or switching views. Whether the page breaks are manually inserted or automatically added by Excel, knowing how to remove them helps you keep a clean and professional worksheet.
This article shows you how to remove page breaks in Excel, including both manual and automatic page breaks. It also covers how to hide page breaks and provides batch removal solutions for multiple worksheets or workbooks.
- Understanding Page Breaks in Excel (Manual vs. Automatic)
- How to Remove Manual Page Breaks in Excel
- How to Remove Automatic Page Breaks in Excel
- Hide Page Breaks in Normal View
- Batch Remove Page Breaks in Excel with Python
Understanding Page Breaks in Excel (Manual vs. Automatic)
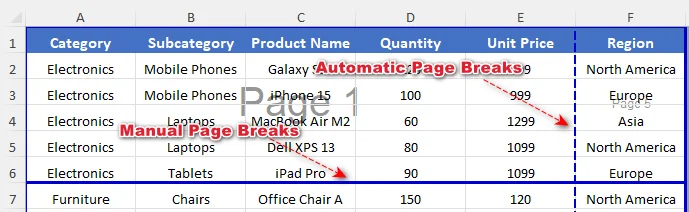
Before removing page breaks, it's important to know the two main types Excel uses:
- Manual Page Breaks: Inserted by users to control where a page ends when printing.
- Automatic Page Breaks: Added by Excel based on margins, paper size, scaling settings, and print area.
You can use Page Break Preview to identify page break types. Manual breaks appear as solid blue lines, while automatic breaks appear as dashed blue lines.
The removal method depends on which type of page break you're dealing with.
How to Remove Manual Page Breaks in Excel
You can remove individual manual page breaks or clear all manual page breaks within a worksheet as required. For bulk operations, Excel VBA scripts allow you to remove page breaks across multiple worksheets efficiently.
Remove a Manual Page Break
You can remove a specific manual page break in an Excel sheet by selecting the correct cell near the break. Here is how to do it:
-
Go to the View tab on the ribbon and click Page Break Preview under the Workbook Views group.
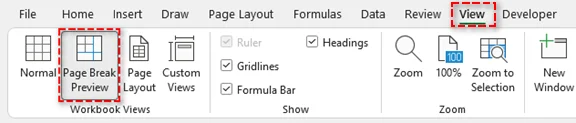
You can also click the Page Break Preview icon on the status bar (bottom right).
-
Identify the manual page break (solid blue line) you want to remove.
-
Select a cell near the page break:
-
For a horizontal page break, select any cell below the break.
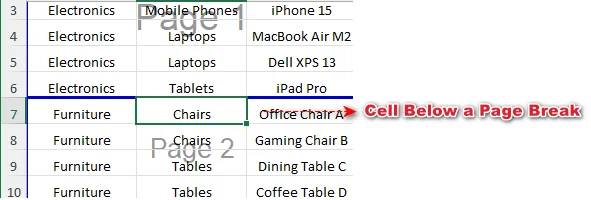
-
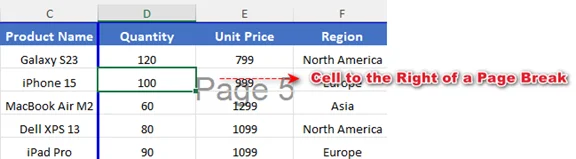
For a vertical page break, select any cell to the right of the break.
-
-
Go to the Page Layout tab on the ribbon.
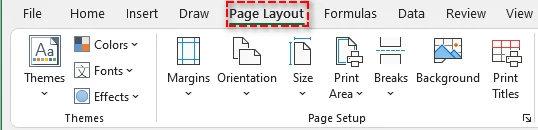
-
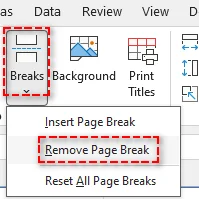
Click Breaks, then choose Remove Page Break.
This only removes the selected manual page break, and the rest of the sheet will remain unchanged.
Tip: You can also right-click the cell and select Remove Page Break to delete the break. Or, directly drag the break line outside of the page break preview area if the drag-and-drop feature is enabled in your Excel.
Remove All Manual Page Breaks from a Sheet
If your sheet has multiple manual page breaks, removing them all at once can save time. Follow these steps below:
-
Select any cell in the sheet.
-
Go to the Page Layout tab on the ribbon.
-
Click Breaks > Reset All Page Breaks.
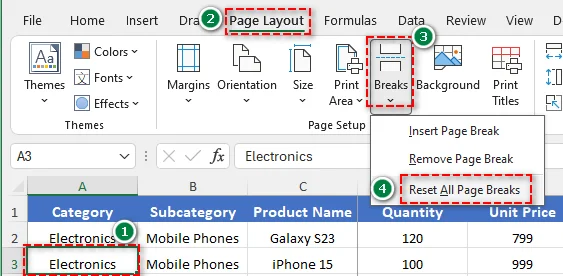
This removes all manually inserted page breaks from the active worksheet.
Delete Manual Page Breaks from Multiple Sheets with VBA
If you need to remove manual page breaks from multiple sheets simultaneously, using VBA (Visual Basic for Applications) is the most efficient solution. Here is how you can do it:
-
Press Alt + F11 (Windows) or Option + F11 (Mac) to open the VBA editor.
-
In the editor, go to Insert > Module.
-
Copy and paste the following code:
Sub ResetPageBreaksAllSheets() Dim ws As Worksheet For Each ws In ActiveWorkbook.Worksheets ws.ResetAllPageBreaks Next ws End Sub -
Press F5 to execute the macro.
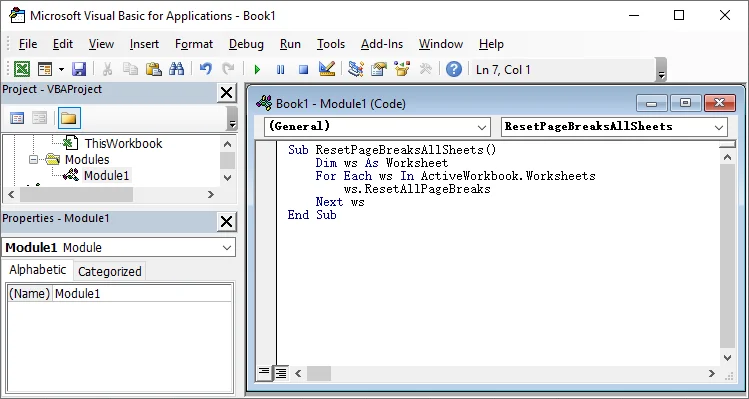
All manual page breaks on every worksheet in the active workbook will be removed at once.
How to Remove Automatic Page Breaks in Excel
Automatic page breaks in Excel cannot be removed completely. However, you can control them by adjusting layout settings such as scaling, margins, page orientation, and print area. Optimizing these settings allows more content to fit on each page and reduces unwanted breaks.
To reduce automatic page breaks:
- Change Scaling
Go to Page Layout > Scale to Fit, set Width and Height to Automatic, or increase the scaling percentage.
Fitting more content per page reduces automatic page breaks. - Adjust Margins
Go to Page Layout > Margins and select Narrow or Custom Margins.
Smaller margins expand the printable area and help reduce page breaks. - Change Page Orientation
Go to Page Layout > Orientation and switch from Portrait to Landscape.
Wider pages fit more columns, reducing vertical page breaks. - Clear Print Area
Go to Page Layout > Print Area and clear the print area if it restricts the content range.
Clearing the print area ensures Excel calculates automatic page breaks accurately and avoids unnecessary breaks.
Hide Page Breaks in Normal View
Sometimes, users want to hide page break lines in Excel without changing print behavior. This is useful if the break lines appear after entering Print Preview. Follow these steps:
-
Click File > Options.
-
Go to Advanced.
-
Scroll to Display options for this worksheet.
-
Uncheck Show page breaks.
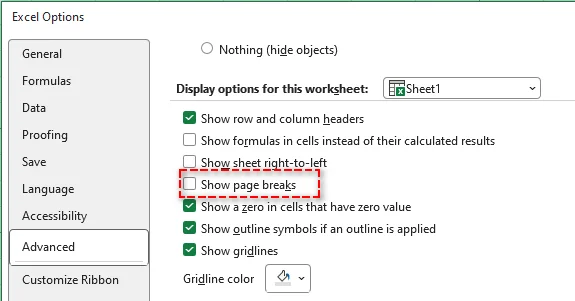
-
Click OK.
Note: This action does not remove page breaks. It only hides the page break lines on the screen and does not affect the print layout. If the Show page breaks box cannot be unchecked, make sure the worksheet is in Normal view rather than Page Break Preview mode.
Batch Remove Page Breaks in Excel with Python
Manually removing page breaks from multiple Excel workbooks can be time-consuming. Using Python and libraries like Spire.XLS for Python, you can batch remove all page breaks across multiple files, saving time and ensuring consistent formatting.

Steps for Batch Removal with Python:
-
Install Spire.XLS from PyPI using pip:
pip install spire.xls -
Write a Python script to batch remove page breaks from multiple Excel files
from spire.xls import * import os input_folder = "input_excels" output_folder = "output_excels" for file_name in os.listdir(input_folder): if file_name.endswith(".xlsx"): # Load workbook workbook = Workbook() workbook.LoadFromFile(os.path.join(input_folder, file_name)) # Clear page breaks in all worksheets for sheet in workbook.Worksheets: sheet.HPageBreaks.Clear() sheet.VPageBreaks.Clear() sheet.ViewMode = ViewMode.Preview # Save updated workbook workbook.SaveToFile(os.path.join(output_folder, file_name), ExcelVersion.Version2013) workbook.Dispose() -
Run the code
Execute the script to automatically remove page breaks in the targeted Excel sheet.
Tip: You can also adjust sheet scaling, margins, and page orientation in your code to reduce automatic page breaks.
Related Article: Python: Insert or Remove Page Breaks in Excel
Conclusion
In this guide, we've covered how to remove page breaks in Excel, including both manual and automatic page breaks. By following these steps, you can effectively clean up your worksheets and keep them organized and print-ready.
Looking for more high-quality Excel tutorials? Check out our free Excel resources.
Frequently Asked Questions: Remove Page Breaks in Excel
Q1: What's the difference between manual and automatic page breaks?
A1: Manual page breaks are inserted by users to control exactly where pages break during printing, while automatic page breaks are added by Excel based on print settings and layout.
Q2: Can I remove page breaks without affecting printing?
A2: Yes. You can hide page break lines in Normal worksheet view. This only affects their on-screen display; the breaks remain in the file and may still influence printing.
Q3: Why can't I remove some page breaks in Excel?
A3: Automatic page breaks cannot be deleted directly. They are controlled by Excel to maintain the print layout, but you can influence them by adjusting margins, scaling, paper size, or the print area.
Q4: How to remove page breaks in multiple worksheets at once?
A4: The most efficient way to remove page breaks in multiple worksheets in Excel is to use VBA or Python. This allows you to clear all manual page breaks across large workbooks or multiple files quickly and consistently.
See Also
How to Set Print Area in Excel: Manual, VBA & Python
Table of Contents

Have you ever faced the frustration of printing an Excel spreadsheet only to get pages of irrelevant data or endless blank sheets? Learning how to set print area in Excel is the essential solution that transforms chaotic print jobs into professional, precise documents.
In this step-by-step guide, we will explore multiple methods to set print area in Excel efficiently, ensuring your printed documents are well-organized and visually appealing.
- What is a Print Area in Excel
- Why Should You Set Print Area in Excel
- How to Set Print Area in Excel Manually
- Configure Print Area for Multiple Sheets Automatically Using VBA
- Batch Set Print Area for Multiple Excel Files Using Python
- Common Print Area Problems and How to Fix Them
- Conclusion: Quick Comparison of Print Area Methods
What is a Print Area in Excel?
A print area in Excel is a defined range of cells that you specify to print, excluding all other cells on the worksheet. When you define a print area, Excel remembers your selection and will only print those cells until you clear or change the setting.
Why Should You Set Print Area in Excel?
Setting a print area in Excel offers several key advantages:
- Efficiency: It saves paper and ink by ensuring only relevant data is printed.
- Cleaner Reports: It prevents unnecessary data from cluttering your printouts, making them more professional.
- Customization: It allows you to print specific sections without changing the layout of your data.
How to Set Print Area in Excel Manually
Excel provides several methods for customizing the print area. Below, we'll explore each method in detail, helping you choose the best option for your situation.
1. Set Print Area Using the Set Print Area Feature
The Set Print Area feature is the most common and straightforward method for defining the print range in Excel. It's ideal for users who need to print a specific selection without advanced configuration.
Steps:
-
Select the cells you want to print.
-
Go to the Page Layout tab on the Ribbon.
-
In the Page Setup group, click Print Area > Set Print Area.
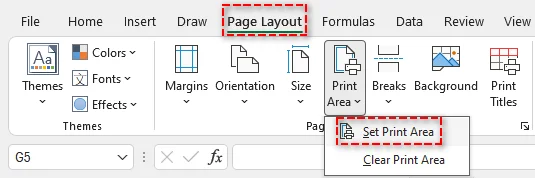
This method saves your selection as the print area, and Excel will print only the selected cells.
Tip:
- If you want to remove the print area later, go to Page Layout > Clear Print Area. This will reset the print area and allow you to redefine it as needed.
You might also be interested in: Highlight Duplicates in Excel: 4 Easy Methods.
2. Define Print Area with the Page Setup Dialog
For users who need more control over the print settings, the Page Setup Dialog offers advanced options. This allows you to manually enter or adjust the print area more precisely.
Steps:
-
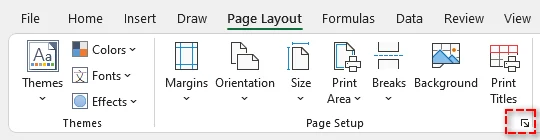
Go to the Page Layout tab on the Ribbon.
-
In the Page Setup group, click the small arrow icon in the bottom right corner to open the Page Setup Dialog.
-
In the dialog, select the Sheet tab.
-
In the Print Area field, manually type the cell range (e.g., $A$1:$F$20) or use the range selector to visually select the cells.
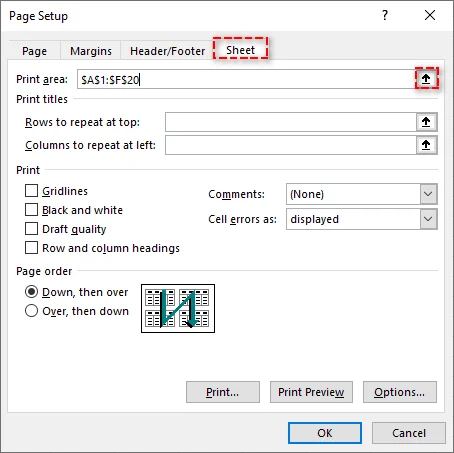
-
Adjust other settings like print titles, gridlines, or headings as needed.
-
Click OK to apply the print area.
Tip:
- If you want the print area to automatically adjust as you add or remove data, consider converting your range into an Excel Table. Excel will update the print area dynamically when data changes.
3. Print Specific Cells Using Keyboard Shortcuts
If you prefer speed, you can set your print area using a simple keyboard shortcut. This method is perfect for quickly defining print areas without navigating through menus.
Steps:
-
Select the range you want to print.
-
Press Alt → P → R → S in sequence to set the print area.

This shortcut instantly defines your print area for the selected cells.
Tip:
- The keyboard shortcut works best when you frequently define print areas and want to save time. However, it may not offer the same customization options as the Page Setup dialog.
4. Set Multiple Print Areas on a Sheet
Excel also allows you to define multiple print areas within one worksheet. This is useful when you want to print non-contiguous sections separately.
Steps:
-
Select the first range to include in the print area.
-
Hold down the Ctrl key and select additional ranges.
-
Go to Page Layout > Print Area > Set Print Area.
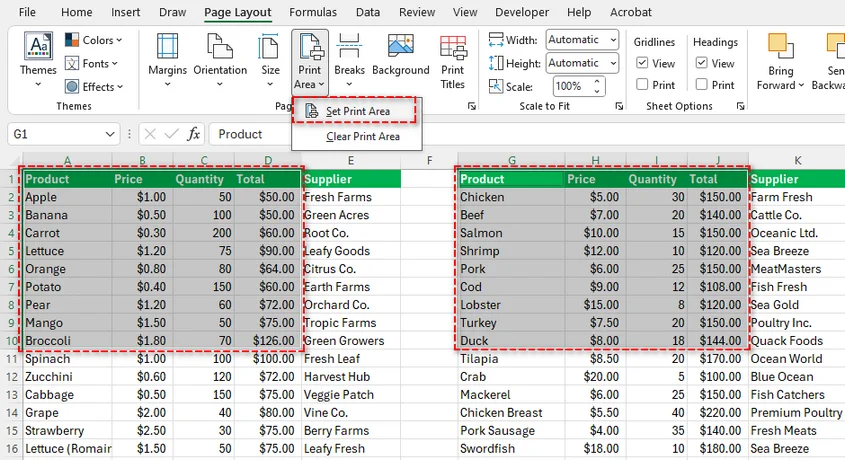
Each selected range will print on a separate page, making it ideal for reports with multiple sections.
Tip:
- After setting multiple print areas, Excel automatically inserts page breaks between each area. If you need to adjust where the page breaks occur, go to the Page Layout tab and use Breaks to modify them.
Configure Print Area for Multiple Sheets Automatically Using VBA
If you're working with large workbooks that contain multiple sheets, you can save time by automating the process of setting print areas across all sheets using VBA. This method is ideal for users who need to perform Excel print area settings frequently.
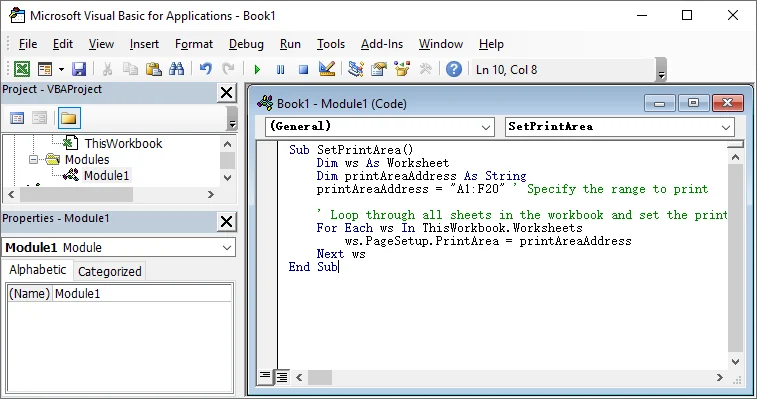
Here's a simple VBA code to set the print area for all sheets:
Sub SetPrintArea()
    Dim ws As Worksheet
    Dim printAreaAddress As String
    printAreaAddress = "A1:F20" ' Specify the range to print

    ' Loop through all sheets in the workbook and set the print area
    For Each ws In ThisWorkbook.Worksheets
        ws.PageSetup.PrintArea = printAreaAddress
    Next ws
End Sub
Steps to Use This VBA Code:
-
Press Alt + F11 to open the VBA editor.
-
Click Insert > Module to create a new module.
-
Paste the code into the module.
-
Press F5 to run the macro.
This code will apply the print area (e.g., A1:F20) to all sheets in your workbook.
Tip:
- You can change the printAreaAddress to any range you need, such as "B2:D15", depending on your print area requirements.
Need to learn more about the PageSetup.PrintArea property in this VBA script? See Microsoft's official guide: PageSetup.PrintArea property (Excel).
Batch Set Print Area for Multiple Excel Files Using Python
For batch processing multiple Excel files and defining print areas automatically, Python offers a powerful solution. By using the Spire.XLS for Python library, you can read and update Excel files in bulk without relying on Excel itself-making it perfect for server-side execution or automation tasks.
Here's how to batch process print areas for multiple Excel files using Python:
Steps:
-
Install the Spire.XLS library from PyPI using pip:
pip install spire-xls -
Use the following code to batch process Excel files and set print areas:
from spire.xls import *
import os

# Define the folder containing the Excel files
source_folder = "path_to_your_excel_files"  # Update with your folder path
target_folder = "path_to_modified_files"    # Path for saving modified files

# Create target folder if it doesn't exist
if not os.path.exists(target_folder):
    os.makedirs(target_folder)

# Define the print area range (adjust as needed)
print_area = "A1:F20"

# Loop through all Excel files in the folder
for file_name in os.listdir(source_folder):
    if file_name.endswith((".xlsx", ".xls")):
        try:
            # Load the workbook
            file_path = os.path.join(source_folder, file_name)
            workbook = Workbook()
            workbook.LoadFromFile(file_path)

            # Set the print area for the first worksheet
            sheet = workbook.Worksheets[0]
            sheet.PageSetup.PrintArea = print_area

            # Save the modified file
            new_file_name = f"modified_{file_name}"
            new_file_path = os.path.join(target_folder, new_file_name)
            workbook.SaveToFile(new_file_path, FileFormat.Version2016)

            print(f"Processed: {file_name} -> {new_file_name}")

        except Exception as e:
            print(f"Error processing {file_name}: {str(e)}")
            continue

print(f"\nBatch process completed! Modified files saved to: {target_folder}")
This Python script processes all Excel files in a folder, adjusts the print area for each file, and saves the modified files to a new directory.
Tip:
- In addition to adjusting print selection, Spire.XLS offers page setup options like margins, paper size, and scaling. For more details, refer to the official documentation: Python: Set Page Setup Options in Excel.
Common Print Area Problems and How to Fix Them
Sometimes, you may encounter issues when working with print areas. Below are some common problems and their solutions:
- Print Area Not Recognized by Excel
- Problem: Excel may fail to recognize the print area, often due to corrupted settings or incorrect cell selection.
- Solution: Go to Page Layout > Clear Print Area, then redefine the print area.
- Columns Cut Off in Print Preview
- Problem: Columns might be cut off in the print preview, leaving part of the content off the printed page.
- Solution: Adjust the margins or use Scale to Fit options under the Page Layout tab to ensure all content fits within the printable area.
- Hidden Rows or Columns Included in Print Area
- Problem: Hidden rows or columns might be unintentionally included in the print area, causing unwanted data to be printed.
- Solution: Unhide any hidden rows or columns before setting the print area.
- Gridlines Not Printed
- Problem: Even though gridlines are visible in Excel, they may not appear in the printed document.
- Solution: In the Page Layout tab, under Sheet Options, check the Print box next to Gridlines to ensure they appear on the printout.
Conclusion: Quick Comparison of Print Area Methods
Here's a quick comparison of the Excel print area methods:
| Method | Pros | Cons | Best For |
|---|---|---|---|
| Set Print Area Feature | Simple and intuitive | Not ideal for batch processing | One-time print setups, occasional use |
| Page Setup Dialog | Advanced settings and visual selection | More steps required | Custom print settings for complex documents |
| Keyboard Shortcuts | Fast and efficient | Limited to one print area | Regular users needing quick print area setups |
| VBA | Automates tasks across multiple sheets | Requires VBA knowledge | Large workbooks or recurring tasks |
| Python | Processes multiple files without opening Excel | Requires Python knowledge | Batch processing for large volumes of Excel files |
How to choose the best method:
- For simple, one-time tasks: Use the built-in Set Print Area Feature.
- For more control over print settings: Use Page Setup Dialog.
- For quick setups: Use Keyboard Shortcuts.
- For automating tasks across multiple sheets: Use VBA.
- For processing multiple files at once: Use Python.
FAQs: Excel Print Area
Q1: Can I set multiple print areas in one Excel sheet?
A1: Yes! By selecting non-adjacent ranges while holding Ctrl, you can define multiple print areas. Each selection will print on a separate page.
Q2: How to clear a previously defined print area?
A2: Go to Page Layout → Print Area → Clear Print Area, or use the keyboard shortcut Alt → P → R → C.
Q3: Does the print area save when I close Excel?
A3: Yes, when you save your workbook after setting a print area, Excel preserves this setting within the file.
Q4: Can the print area automatically update as data changes?
A4: Yes! Convert your range to an Excel Table (Ctrl + T), and the print area will adjust automatically as you add data.
See Also
Convert PDF to PDF/A: 4 Easy Ways
Table of Contents
- What Is PDF/A
- Why Convert PDF to PDF/A
- Method 1: Convert PDF to PDF/A Using Adobe Acrobat Pro DC
- Method 2: Convert PDF to PDF/A Using Free Online Converters
- Method 3: Convert PDF to PDF/A Using Ghostscript
- Method 4: Batch Convert PDF Files to PDF/A Using Python
- Troubleshooting Common Issues in PDF to PDF/A Conversion
- Conclusion: How to Choose the Right Method
Converting PDF to PDF/A ensures your documents are preserved for the long term, meet regulatory compliance, and remain accessible across systems. Whether you're working with legal, government, or enterprise documents, PDF/A guarantees readability and consistency. This guide explores four common approaches: using Adobe Acrobat Pro DC, free online converters, Ghostscript, and Python programming.
Quick Navigation
- What Is PDF/A
- Why Convert PDF to PDF/A
- Method 1: Convert PDF to PDF/A Using Adobe Acrobat Pro DC
- Method 2: Convert PDF to PDF/A Using Free Online Converters
- Method 3: Convert PDF to PDF/A Using Ghostscript
- Method 4: Batch Convert PDF Files to PDF/A Using Python
- Troubleshooting Common Issues in PDF to PDF/A Conversion
- Conclusion: How to Choose the Right Method
What Is PDF/A?
PDF/A is an ISO-standardized version of PDF designed specifically for long-term archiving. Unlike regular PDFs, PDF/A restricts the use of features that may compromise document stability in the future.
Key Characteristics of PDF/A
PDF/A enforces strict rules to guarantee longevity and consistency, including:
- All fonts must be embedded (no external font dependencies)
- No audio, video, or multimedia elements
- No encryption or password protection
- Standardized color profiles for consistent rendering
- No external references, ensuring the document is fully self-contained
PDF/A Versions
PDF/A comes in several versions, each designed to meet specific archival and document-preservation needs. The table below summarizes the major PDF/A versions and their ideal use cases:
| PDF/A Version | Key Features | Best Use Case |
|---|---|---|
| PDF/A-1 (ISO 19005-1) | The original and most restrictive standard; ensures maximum stability and broad compatibility | Long-term preservation of legal, governmental, and compliance-related documents |
| PDF/A-2 (ISO 19005-2) | Adds support for transparency, layers, and JPEG2000 images, offering greater flexibility | Modern documents that include graphics, layered content, or complex layouts |
| PDF/A-3 (ISO 19005-3) | Allows embedding non-PDF/A files such as XML, CSV, and Excel | E-invoices, business reports, and workflows that require attaching source files |
Why Convert PDF to PDF/A?
There are several reasons why converting a PDF to PDF/A might be necessary:
- Long-Term Preservation : PDF/A ensures that documents will remain accessible and usable for many years, making it ideal for legal, government, and archival purposes.
- Compliance with Regulations : Certain industries, including law and healthcare, require documents to be stored in PDF/A format for compliance with regulations such as ISO 19005.
- Consistency in Viewing : Since PDF/A embeds all fonts, images, and other resources, the document will display consistently across different systems without dependencies on external files.
Method 1: Convert PDF to PDF/A Using Adobe Acrobat Pro DC
Adobe Acrobat Pro DC remains the industry standard for PDF manipulation. It provides the most stable and accurate way to convert PDF to PDF/A with built-in validation tools.
Steps:
-
Open the PDF you want to convert in Adobe Acrobat Pro DC.
-
Go to File > Save As Other > Archivable PDF (PDF/A) .
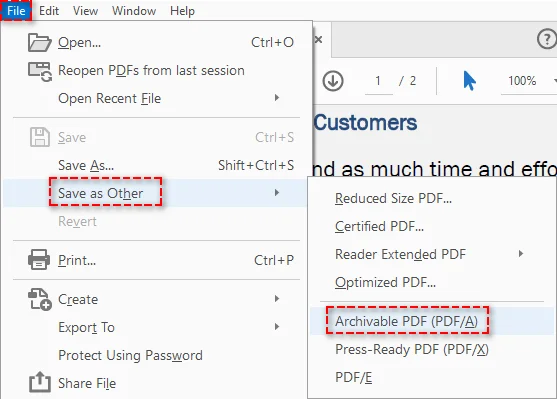
-
Select the desired PDF/A standard (such as PDF/A-1a, PDF/A-1b, PDF/A-2a, or PDF/A-2b).
-
Save the PDF/A file.
Pros:
- Easy to use with a professional-grade tool.
- Supports different PDF/A standards.
- Ensures compliance with PDF/A requirements.
Cons:
- Requires Adobe Acrobat Pro DC, which is a paid software.
Method 2: Convert PDF to PDF/A Using Free Online Converters
If you only need occasional conversions and prefer not to install software, free online converters like PDF2GO and AvePDF provide a fast and accessible solution. These tools run entirely in your browser, making them ideal for non-sensitive documents.
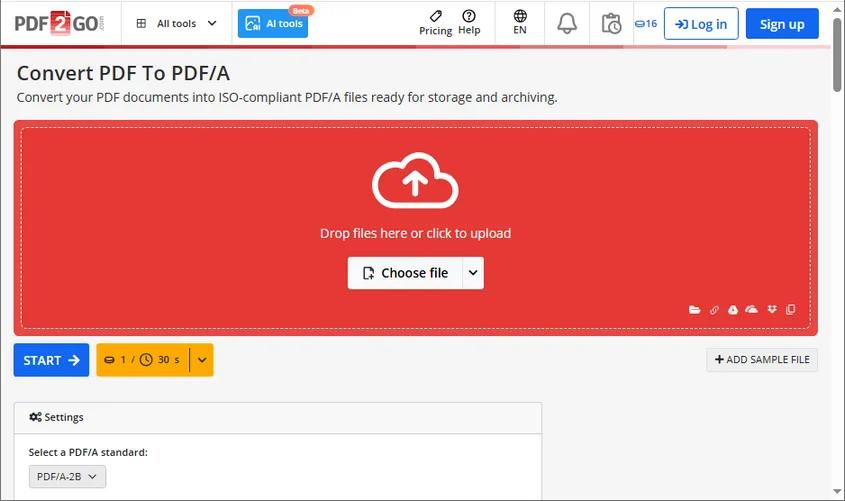
Steps (Using PDF2GO as an Example):
- Visit the PDF2GO’s free online PDF to PDF/A converter.
- Click Choose file to upload your PDF or drag & drop the file to the designated area.
- Choose the desired PDF/A standard as the output format.
- Click Start to begin the conversion process.
- Download the PDF/A version of your document.
Pros:
- Free to use.
- No software installation required.
- Quick and easy for occasional conversions.
Cons:
- Online tools may have file size limitations.
- Not ideal for sensitive or confidential documents due to potential security risks.
Method 3: Convert PDF to PDF/A Using Ghostscript
Ghostscript is a robust, open-source command-line tool widely used for automated PDF processing. It offers a flexible and cost-free way to convert PDFs to PDF/A-compliant documents.
Steps:
-
Download and install Ghostscript from its official website.
-
Open a command prompt or terminal window.
-
Run the following command to convert your PDF file to PDF/A (example for PDF/A-1b):
D:\Applications\Ghostscript\gs10.06.0\bin\gswin64.exe -dPDFA=1 -dBATCH -dNOPAUSE -sProcessColorModel=DeviceRGB -sDEVICE=pdfwrite -sPDFACompatibilityPolicy=1 -sColorConversionStrategy=UseDeviceIndependentColor -sOutputFile="C:/Users/Administrator/Documents/output.pdf" "C:/Users/Administrator/Documents/input.pdf"Important:
- Replace
"D:\Applications\Ghostscript\gs10.06.0\bin\gswin64.exe"with the actual path to your Ghostscript executable (gswin64.exe). - Replace
C:/Users/Administrator/Documents/input.pdfwith the path to your source PDF file, andC:/Users/Administrator/Documents/output.pdfwith the desired name and location for your converted file.
- Replace
Pros:
- Free and open-source.
- Highly customizable.
- Ideal for automation.
Cons:
- Requires command-line knowledge.
- More complex setup compared to graphical tools.
Method 4: Batch Convert PDF Files to PDF/A Using Python
For users who prefer a more programmatic approach, Python is a great choice, especially for batch processing or integrating PDF to PDF/A conversion into applications or backend services. With libraries like Spire.PDF for Python, you can batch convert multiple PDF files to PDF/A effortlessly. Additionally, the library also supports converting PDFs to Word and other formats, making it a versatile tool for document conversion.
Steps:
-
Install Spire.PDF from PyPI using the following command:
pip install spire-pdf -
Write a Python Script to batch convert multiple PDF files to PDF/A-1b format:
import os
from spire.pdf import *

# Define input and output folder paths
inputFolder = "path/to/your/input/folder/"
outputFolder = "path/to/your/output/folder/"

# Get a list of all PDF files in the input folder
pdfFiles = [f for f in os.listdir(inputFolder) if f.endswith('.pdf')]

# Iterate through each PDF file and convert
for pdfFile in pdfFiles:
    # Construct the full input and output file paths
    inputFile = os.path.join(inputFolder, pdfFile)
    outputFile = os.path.join(outputFolder, f"ToPdfA1B_{pdfFile}")

    # Create a PdfStandardsConverter object
    converter = PdfStandardsConverter(inputFile)

    # Perform the PDF to PDF/A-1b conversion
    converter.ToPdfA1B(outputFile)
    print(f"Converted: {inputFile} to {outputFile}")

print("Batch conversion completed.")
Pros:
- Ideal for batch processing and automation.
- Can be integrated into existing workflows or applications.
Cons:
- Requires Python programming knowledge.
- Need to install the Spire.PDF library.
For more advanced settings regarding this conversion, please visit Spire.PDF’s official guide: Python: Convert PDF to PDF/A and Vice Versa.
Troubleshooting Common Issues in PDF to PDF/A Conversion
When converting a PDF to PDF/A, you may encounter validation errors or failed exports. Below are the most common issues and the quick solutions:
- Missing or Unembedded Fonts
- Symptoms: "Font not embedded" error or incorrect text display.
- Solution: Embed all fonts or replace unsupported fonts with standard ones (e.g., Arial, Times New Roman).
- Transparency or Layer Issues
- Symptoms: Conversion fails due to transparency or layers (especially for PDF/A-1).
- Solution: Use PDF/A-2b or PDF/A-3b, or flatten transparency before conversion.
- External Links, Attachments, or Multimedia
- Symptoms: Conversion blocked due to external content (attachments, JavaScript, multimedia).
- Solution: Remove attachments or convert them to static content, and eliminate scripts or multimedia elements.
- Incorrect Color Profiles
- Symptoms: Validation errors related to color profiles.
- Solution: Apply a standard color profile (e.g., sRGB) and ensure images use supported color spaces.
- Validation Failed After Export
- Symptoms: Conversion completes, but the file fails PDF/A compliance.
- Solution: Validate using tools like veraPDF, Adobe Acrobat Preflight, or online PDF/A validators to identify and fix errors.
- Encrypted or Password-Protected PDFs
- Symptoms: Conversion not allowed due to password protection.
- Solution: Remove security settings or passwords before converting.
Conclusion: How to Choose the Right Method
Converting PDF to PDF/A is crucial for ensuring document longevity, accessibility, and compliance. The best method for converting PDF to PDF/A depends on your specific needs:
- For occasional conversions : free online tools are a quick and easy option.
- For professional and compliant conversions : Adobe Acrobat Pro DC is the most reliable choice.
- For those who prefer open-source tools : Ghostscript offers a robust, though command-line-intensive, solution.
- For automation or batch processing : Python is ideal for integration into larger systems.
Tip : Regardless of your chosen method, always validate converted files for PDF/A compliance and keep backups of original documents.
FAQs: PDF to PDF/A
Q1: What is PDF/A?
A1: PDF/A is an ISO-standardized PDF designed for long-term archiving. It embeds all fonts, metadata, and color profiles to ensure documents render the same way in the future.
Q2: Can I convert PDF to PDF/A for free?
A2: Yes, free tools like PDF2GO and Ghostscript allow PDF/A conversion without any cost.
Q3: Is PDF/A compatible with all PDF readers?
A3: Most modern PDF readers support PDF/A, but some advanced features may not display in older software.
Q4: Which PDF/A version should I use?
A4: For simple archival, PDF/A-1b is sufficient. For modern features like layers and attachments, PDF/A-2 or PDF/A-3 is recommended.
Q5: Can I automate PDF/A conversion for multiple files?
A5: Yes, using programmatic tools like Spire.PDF or Ghostscript scripts, batch conversion is possible.