Como Converter XLSB para XLSX (4 Métodos)
Índice
- Qual método de conversão de XLSB para XLSX você deve usar?
- Método 1: recurso Salvar como integrado do Excel
- Método 2: conversor online gratuito de XLSB para XLSX
- Método 3: conversão automatizada com VBA
- Método 4: conversão em lote com C#
- Entendendo a diferença: XLSB vs. XLSX
- O que verificar após converter XLSB para XLSX
- Perguntas frequentes
- Conclusão
Os arquivos XLSB funcionam bem no Microsoft Excel, mas alguns aplicativos de planilha e ferramentas de processamento de dados não oferecem suporte completo ao formato. Se você precisar compartilhar uma pasta de trabalho XLSB ou usá-la em outro aplicativo, convertê-la para XLSX costuma ser uma solução prática.
Este guia aborda quatro métodos: o recurso Salvar como integrado do Excel e um conversor online para arquivos individuais, VBA para automatizar uma única conversão e C# para processamento em lote.
Qual método de conversão de XLSB para XLSX você deve usar?
| Método | Melhor para | Prós | Contras |
|---|---|---|---|
| Microsoft Excel | Conversão de arquivos XLSB individuais | Suporte nativo ao formato; fácil de revisar os resultados | Requer Excel para desktop; processo manual |
| Conversor online | Conversões rápidas e ocasionais | Sem instalação; fácil de usar | É necessário fazer upload de arquivos; possíveis problemas de compatibilidade |
| Macro VBA | Automatizar conversões individuais no Excel | Macro reutilizável; é executada diretamente no Excel | Requer Excel para Windows e configuração básica de VBA |
| C# | Conversão em lote em aplicativos .NET | Processa vários arquivos sem o Excel | Requer um ambiente .NET e uma biblioteca compatível |
Importante: o XLSX não consegue manter macros VBA nem planilhas de macro do Excel 4.0, conforme explicado no guia da Microsoft sobre formatos de arquivo compatíveis com o Excel. Se sua pasta de trabalho XLSB contiver macros que você precisa preservar, considere salvá-la como XLSM.
Método 1: recurso Salvar como integrado do Excel
Para um único arquivo XLSB, o recurso Salvar como integrado do Microsoft Excel oferece uma maneira simples de convertê-lo para XLSX. Você pode revisar a pasta de trabalho antes de salvá-la. Não é necessário software de terceiros nem upload de dados.
Guia passo a passo
No Excel para desktop, selecione Arquivo > Abrir > Procurar e escolha seu arquivo
.xlsb. Se ele for aberto no Modo de Exibição Protegido, clique em Habilitar Edição somente se confiar na origem.Verifique se planilhas, fórmulas, gráficos e outros conteúdos importantes aparecem conforme o esperado.
Acesse Arquivo > Salvar como > Procurar ou pressione F12 no Excel para Windows.
Em Salvar como tipo, selecione Pasta de Trabalho do Excel (*.xlsx) e insira um nome de arquivo.
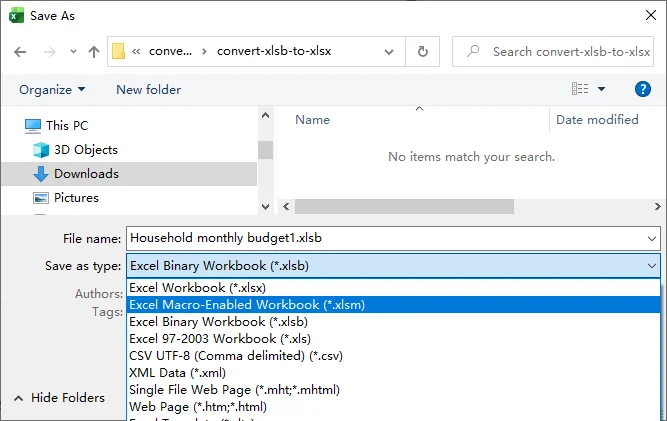
Clique em Salvar, revise quaisquer avisos de compatibilidade e reabra o arquivo XLSX para verificar o resultado.
Método 2: conversor online gratuito de XLSB para XLSX
Se você não tem o Microsoft Excel instalado ou precisa converter arquivos XLSB no Linux, ChromeOS ou em um dispositivo móvel, um conversor online oferece uma alternativa conveniente. As etapas a seguir usam o Vertopal como exemplo.
Guia passo a passo
Acesse o conversor de XLSB para XLSX do Vertopal.
Clique em Escolher arquivo e selecione sua pasta de trabalho (o tamanho máximo do arquivo é 50 MB).
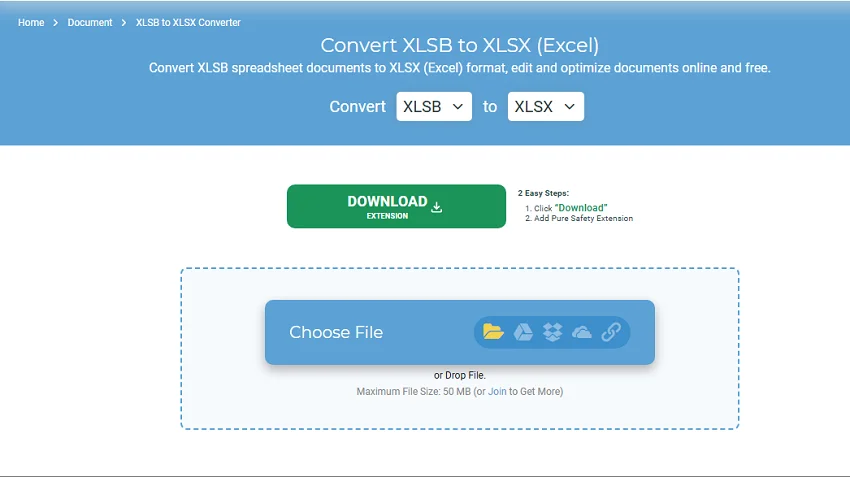
Clique em Continuar e depois em Converter para iniciar a conversão.
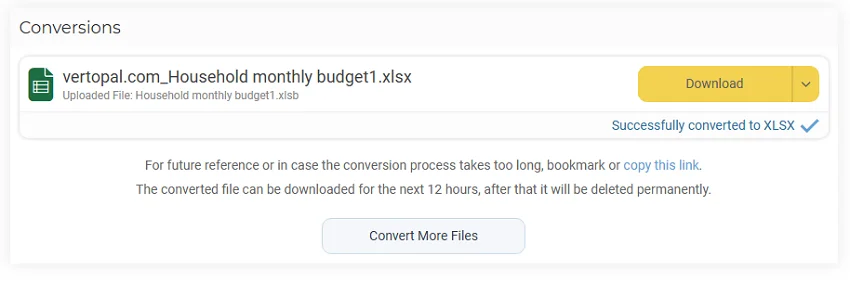
Baixe o arquivo XLSX convertido e abra-o para verificar o conteúdo.
Antes de fazer upload: os conversores online geralmente exigem o envio de arquivos para um serviço de terceiros. Evite fazer upload de pastas de trabalho confidenciais ou sensíveis, a menos que o serviço atenda aos seus requisitos de tratamento de dados. Os limites de tamanho de arquivo e as opções disponíveis variam, e recursos complexos do Excel podem não ser preservados exatamente.
Método 3: conversão automatizada com VBA
Se você precisar repetir a mesma conversão no Excel, uma macro VBA pode automatizar o processo sem usar Salvar como manualmente a cada vez. O exemplo abaixo converte uma pasta de trabalho XLSB para XLSX.
Código VBA para conversão de XLSB para XLSX
O script de macro abaixo usa o método Workbook.SaveAs do Excel para salvar uma cópia XLSX, deixando o arquivo original inalterado.
Atualize os caminhos de arquivo para corresponder à sua pasta de trabalho antes de executá-lo.
Sub ConvertXlsbToXlsx()
    Dim sourcePath As String, outputPath As String
    Dim wb As Workbook
    Dim oldAlerts As Boolean
    Dim oldSecurity As MsoAutomationSecurity

    sourcePath = "C:\XLSB\Report.xlsb"
    outputPath = "C:\XLSB\Report.xlsx"

    oldAlerts = Application.DisplayAlerts
    oldSecurity = Application.AutomationSecurity
    On Error GoTo Failed

    ' Avoid overwriting an existing XLSX file
    If Dir(outputPath) <> "" Then
        MsgBox "Output file already exists: " & outputPath, vbExclamation
        Exit Sub
    End If

    Application.DisplayAlerts = False
    Application.AutomationSecurity = msoAutomationSecurityForceDisable

    ' Open XLSB and save as XLSX
    Set wb = Workbooks.Open(Filename:=sourcePath, UpdateLinks:=0, ReadOnly:=True)
    wb.SaveAs Filename:=outputPath, FileFormat:=xlOpenXMLWorkbook
    MsgBox "Converted: " & outputPath, vbInformation

CleanUp:
    On Error Resume Next
    If Not wb Is Nothing Then wb.Close SaveChanges:=False
    Application.DisplayAlerts = oldAlerts
    Application.AutomationSecurity = oldSecurity
    Exit Sub

Failed:
    MsgBox "Conversion failed: " & Err.Description, vbExclamation
    Resume CleanUp
End Sub
Como executar a macro VBA
- Abra o Excel para Windows e crie uma pasta de trabalho em branco.
- Pressione Alt + F11 para abrir o Editor do VBA. Selecione Inserir > Módulo e cole o código.
- Crie
C:\XLSBe coloque nele um arquivo chamadoReport.xlsb. Como alternativa, atualizesourcePatheoutputPathno código para corresponder aos seus próprios caminhos de arquivo. - Volte ao Excel, pressione Alt + F8, selecione
ConvertXlsbToXlsxe clique em Executar. Execute macros apenas de fontes confiáveis. - Abra
C:\XLSB\Report.xlsxpara revisar o arquivo convertido.
Se precisar reutilizar a macro mais tarde, salve a pasta de trabalho que contém o código VBA como um arquivo separado Pasta de Trabalho Habilitada para Macros do Excel (*.xlsm).
Observação: a macro usa a configuração AutomationSecurity do Excel para desabilitar macros VBA ao abrir a pasta de trabalho de origem, mas avisos de macro do Excel 4.0 ainda podem aparecer. Os alertas de compatibilidade padrão são suprimidos, então revise o arquivo convertido antes de usá-lo.
Método 4: conversão em lote com C#
Para aplicativos .NET ou tarefas recorrentes de processamento de arquivos, o C# pode converter várias pastas de trabalho XLSB sem exigir a instalação do Microsoft Excel. O exemplo a seguir usa Spire.XLS for .NET.
Etapa 1: instalar Spire.XLS for .NET
Abra Ferramentas > Gerenciador de Pacotes NuGet > Console do Gerenciador de Pacotes no Visual Studio e execute o seguinte comando:
Install-Package Spire.XLS
Etapa 2: converter arquivos XLSB para XLSX em lote
Coloque os arquivos XLSB de origem em C:\XLSB. O programa cria C:\XLSX, ignora saídas existentes e relata erros enquanto continua com os arquivos restantes.
using System;
using System.IO;
using Spire.Xls;

class Program
{
    static void Main()
    {
        string inputFolder = @"C:\XLSB";
        string outputFolder = @"C:\XLSX";

        if (!Directory.Exists(inputFolder))
        {
            Console.WriteLine("Source folder not found: " + inputFolder);
            return;
        }

        Directory.CreateDirectory(outputFolder);

        foreach (string inputFile in Directory.EnumerateFiles(inputFolder))
        {
            if (!string.Equals(Path.GetExtension(inputFile), ".xlsb",
                               StringComparison.OrdinalIgnoreCase))
                continue;

            string outputFile = Path.Combine(
                outputFolder,
                Path.GetFileNameWithoutExtension(inputFile) + ".xlsx");

            if (File.Exists(outputFile))
            {
                Console.WriteLine("Skipped (already exists): " + outputFile);
                continue;
            }

            Workbook workbook = null;
            try
            {
                workbook = new Workbook();
                workbook.LoadFromFile(inputFile);
                workbook.SaveToFile(outputFile, ExcelVersion.Version2016);
                Console.WriteLine("Converted: " + Path.GetFileName(inputFile));
            }
            catch (Exception ex)
            {
                Console.WriteLine("Failed: " + Path.GetFileName(inputFile)
                                  + " - " + ex.Message);
            }
            finally
            {
                if (workbook != null)
                    workbook.Dispose();
            }
        }
    }
}
Workbook.LoadFromFile() carrega cada pasta de trabalho de origem, enquanto SaveToFile() a salva como XLSX. ExcelVersion.Version2016 especifica a versão do arquivo; isso não exige que o Excel 2016 esteja instalado. Para outros cenários de salvamento de pastas de trabalho no .NET, consulte como salvar arquivos do Excel em C#.
Observação: a versão de avaliação do Spire.XLS pode impor limitações ou adicionar avisos de avaliação. Você pode solicitar uma licença temporária para explorar a biblioteca sem essas restrições.
Entendendo a diferença: XLSB vs. XLSX
XLSB e XLSX oferecem suporte a planilhas, fórmulas, gráficos e formatação, mas armazenam os dados da pasta de trabalho de maneiras diferentes:
- XLSB (Pasta de Trabalho Binária do Excel): armazena os dados da pasta de trabalho em formato binário. Pode oferecer tamanhos de arquivo menores e tempos de abertura ou salvamento mais rápidos, especialmente para pastas de trabalho grandes ou complexas.
- XLSX (Pasta de Trabalho do Excel): usa um formato compactado baseado em XML e é o formato de pasta de trabalho padrão do Excel. É mais amplamente suportado por aplicativos de planilha de terceiros e ferramentas de processamento de dados.
Se a compatibilidade for sua principal preocupação, o XLSX geralmente é a melhor escolha. Se você trabalha principalmente com pastas de trabalho grandes no Excel e não precisa de maior compatibilidade, manter o XLSB original pode ser mais prático. Simplesmente renomear .xlsb para .xlsx não converte o formato interno do arquivo.
O que verificar após converter XLSB para XLSX
Uma pasta de trabalho convertida pode abrir com sucesso e ainda conter alterações inesperadas, especialmente quando um conversor de terceiros é usado. Antes de compartilhá-la ou importá-la, verifique o que importa para seu fluxo de trabalho:
- Fórmulas e resultados. Verifique cálculos importantes e referências entre planilhas em busca de erros como
#REF!ou#VALUE!. Se necessário, veja as fórmulas no Excel para inspecionar as expressões subjacentes. - Estrutura da pasta de trabalho. Verifique nomes de planilhas, planilhas ocultas e intervalos nomeados importantes.
- Gráficos e outros recursos. Inspecione gráficos, Tabelas Dinâmicas, formatação condicional e conexões de dados se sua pasta de trabalho os utilizar.
- Tamanho do arquivo e compatibilidade. O arquivo XLSX pode ser maior que o XLSB de origem. Confirme se o aplicativo pretendido consegue abri-lo e usá-lo corretamente.
Perguntas frequentes
Posso converter um arquivo XLSB protegido por senha para XLSX?
Sim, se você tiver a senha necessária para abri-lo. Insira a senha no Excel e use Salvar como para criar um arquivo XLSX. Verifique as configurações de proteção do novo arquivo antes de compartilhá-lo. Os conversores online podem não oferecer suporte a pastas de trabalho criptografadas. Consulte as orientações da Microsoft sobre proteção de arquivos do Excel.
Posso converter apenas uma planilha de uma pasta de trabalho XLSB?
Sim. No Excel, clique com o botão direito na guia da planilha, selecione Mover ou Copiar, escolha (novo livro) e marque Criar uma cópia. Salve a nova pasta de trabalho como XLSX. Verifique quaisquer fórmulas ou gráficos que dependam de outras planilhas, pois copiar uma planilha para uma pasta de trabalho separada pode afetar referências. Consulte as instruções da Microsoft para copiar planilhas.
Outras pastas de trabalho vinculadas ao XLSB original usarão automaticamente o novo arquivo XLSX?
Não. Salvar uma nova cópia XLSX não atualiza automaticamente as referências armazenadas em outras pastas de trabalho. Se outra pasta de trabalho ainda estiver vinculada ao XLSB original, abra essa pasta de trabalho e acesse Dados > Consultas e Conexões > Links da Pasta de Trabalho. Clique em Mais Comandos (...) ao lado da pasta de trabalho vinculada, selecione Alterar origem e escolha o novo arquivo XLSX. Consulte o guia da Microsoft sobre links de pastas de trabalho.
Conclusão
Para uma única pasta de trabalho, o recurso Salvar como do Excel geralmente é o método mais simples. Um conversor online pode ajudar quando o Excel não estiver disponível, enquanto o VBA pode automatizar uma única conversão e o C# pode processar uma pasta inteira em lotes. Mantenha o XLSB original até verificar o arquivo convertido.
XLSB를 XLSX로 변환하는 방법(4가지 방법)
XLSB 파일은 Microsoft Excel에서는 잘 작동하지만, 일부 스프레드시트 애플리케이션과 데이터 처리 도구는 이 형식을 완전히 지원하지 않습니다. XLSB 통합 문서를 공유하거나 다른 애플리케이션에서 사용해야 하는 경우, XLSX로 변환하는 것이 실용적인 해결책인 경우가 많습니다.
이 가이드에서는 네 가지 방법을 다룹니다. 개별 파일을 위한 Excel의 기본 제공 다른 이름으로 저장 기능과 온라인 변환기, 단일 변환 자동화를 위한 VBA, 일괄 처리를 위한 C#입니다.
XLSB를 XLSX로 변환하는 방법 중 어떤 것을 사용해야 할까요?
| 방법 | 적합한 용도 | 장점 | 단점 |
|---|---|---|---|
| Microsoft Excel | 개별 XLSB 파일 변환 | 기본 형식 지원, 결과 검토 용이 | 데스크톱 Excel 필요, 수동 프로세스 |
| 온라인 변환기 | 빠른 일회성 변환 | 설치 불필요, 사용 용이 | 파일 업로드 필요, 호환성 문제 발생 가능 |
| VBA 매크로 | Excel에서 개별 변환 자동화 | 재사용 가능한 매크로, Excel에서 직접 실행 | Windows용 Excel 및 기본 VBA 설정 필요 |
| C# | .NET 애플리케이션에서 일괄 변환 | Excel 없이 여러 파일 처리 | .NET 환경 및 호환 라이브러리 필요 |
중요: XLSX는 VBA 매크로나 Excel 4.0 매크로 시트를 유지할 수 없습니다. 이는 지원되는 Excel 파일 형식에 대한 Microsoft 가이드에 설명되어 있습니다. XLSB 통합 문서에 유지해야 하는 매크로가 포함되어 있다면 대신 XLSM으로 저장하는 것이 좋습니다.
방법 1: Excel의 기본 제공 다른 이름으로 저장 기능
단일 XLSB 파일의 경우 Microsoft Excel의 기본 제공 다른 이름으로 저장 기능을 사용하면 XLSX로 간단하게 변환할 수 있습니다. 저장하기 전에 통합 문서를 검토할 수 있습니다. 타사 소프트웨어나 데이터 업로드가 필요하지 않습니다.
단계별 가이드
데스크톱 Excel에서 파일 > 열기 > 찾아보기를 선택한 다음
.xlsb파일을 선택합니다. 보호된 보기에서 열리면 원본을 신뢰하는 경우에만 편집 사용을 클릭합니다.중요한 워크시트, 수식, 차트 및 기타 콘텐츠가 예상대로 표시되는지 확인합니다.
파일 > 다른 이름으로 저장 > 찾아보기로 이동하거나 Windows용 Excel에서 F12를 누릅니다.
파일 형식에서 Excel 통합 문서 (*.xlsx)를 선택하고 파일 이름을 입력합니다.
저장을 클릭하고 호환성 경고를 검토한 다음, XLSX 파일을 다시 열어 결과를 확인합니다.
방법 2: XLSB를 XLSX로 변환하는 무료 온라인 변환기
Microsoft Excel이 설치되어 있지 않거나 Linux, ChromeOS 또는 모바일 장치에서 XLSB 파일을 변환해야 하는 경우, 온라인 변환기가 편리한 대안이 됩니다. 다음 단계에서는 Vertopal을 예로 사용합니다.
단계별 가이드
Vertopal XLSB-XLSX 변환기를 방문합니다.
파일 선택을 클릭하고 통합 문서를 선택합니다(최대 파일 크기 50MB).
계속을 클릭한 다음 변환을 클릭하여 변환을 시작합니다.
변환된 XLSX 파일을 다운로드하고 열어 내용을 확인합니다.
업로드 전: 온라인 변환기는 일반적으로 파일을 타사 서비스로 전송해야 합니다. 해당 서비스가 데이터 처리 요구 사항을 충족하지 않는 한 기밀 또는 민감한 통합 문서를 업로드하지 마세요. 파일 크기 제한과 사용 가능한 옵션은 서비스마다 다르며, 복잡한 Excel 기능은 정확히 유지되지 않을 수 있습니다.
방법 3: VBA를 사용한 자동 변환
Excel에서 동일한 변환을 반복해야 하는 경우, VBA 매크로를 사용하면 매번 수동으로 다른 이름으로 저장을 사용하지 않고도 프로세스를 자동화할 수 있습니다. 아래 예제는 XLSB 통합 문서 하나를 XLSX로 변환합니다.
XLSB에서 XLSX로 변환하기 위한 VBA 코드
아래 매크로 스크립트는 Excel의 Workbook.SaveAs 메서드를 사용하여 XLSX 복사본을 저장하며, 원본 파일은 변경되지 않습니다.
실행하기 전에 파일 경로를 통합 문서에 맞게 업데이트하세요.
Sub ConvertXlsbToXlsx()
    Dim sourcePath As String, outputPath As String
    Dim wb As Workbook
    Dim oldAlerts As Boolean
    Dim oldSecurity As MsoAutomationSecurity

    sourcePath = "C:\XLSB\Report.xlsb"
    outputPath = "C:\XLSB\Report.xlsx"

    oldAlerts = Application.DisplayAlerts
    oldSecurity = Application.AutomationSecurity
    On Error GoTo Failed

    ' Avoid overwriting an existing XLSX file
    If Dir(outputPath) <> "" Then
        MsgBox "Output file already exists: " & outputPath, vbExclamation
        Exit Sub
    End If

    Application.DisplayAlerts = False
    Application.AutomationSecurity = msoAutomationSecurityForceDisable

    ' Open XLSB and save as XLSX
    Set wb = Workbooks.Open(Filename:=sourcePath, UpdateLinks:=0, ReadOnly:=True)
    wb.SaveAs Filename:=outputPath, FileFormat:=xlOpenXMLWorkbook
    MsgBox "Converted: " & outputPath, vbInformation

CleanUp:
    On Error Resume Next
    If Not wb Is Nothing Then wb.Close SaveChanges:=False
    Application.DisplayAlerts = oldAlerts
    Application.AutomationSecurity = oldSecurity
    Exit Sub

Failed:
    MsgBox "Conversion failed: " & Err.Description, vbExclamation
    Resume CleanUp
End Sub
VBA 매크로를 실행하는 방법
- Windows용 Excel을 열고 빈 통합 문서를 만듭니다.
- Alt + F11을 눌러 VBA 편집기를 엽니다. 삽입 > 모듈을 선택하고 코드를 붙여넣습니다.
C:\XLSB를 만들고 그 안에Report.xlsb라는 파일을 넣습니다. 또는 코드의sourcePath및outputPath를 자신의 파일 경로에 맞게 업데이트하세요.- Excel로 돌아가서 Alt + F8을 누르고
ConvertXlsbToXlsx를 선택한 다음 실행을 클릭합니다. 신뢰할 수 있는 원본의 매크로만 실행하세요. C:\XLSB\Report.xlsx를 열어 변환된 파일을 검토합니다.
나중에 매크로를 다시 사용해야 하는 경우 VBA 코드가 포함된 통합 문서를 별도의 Excel 매크로 사용 통합 문서 (*.xlsm) 파일로 저장하세요.
참고: 이 매크로는 Excel의 AutomationSecurity 설정을 사용하여 원본 통합 문서를 열 때 VBA 매크로를 비활성화하지만, Excel 4.0 매크로 프롬프트는 계속 표시될 수 있습니다. 표준 호환성 경고는 표시되지 않으므로 사용하기 전에 변환된 파일을 검토하세요.
방법 4: C#을 사용한 일괄 변환
.NET 애플리케이션이나 반복적인 파일 처리 작업의 경우 C#을 사용하면 Microsoft Excel을 설치하지 않고도 여러 XLSB 통합 문서를 변환할 수 있습니다. 다음 예제에서는 Spire.XLS for .NET을 사용합니다.
1단계: Spire.XLS for .NET 설치
Visual Studio에서 도구 > NuGet 패키지 관리자 > 패키지 관리자 콘솔을 열고 다음 명령을 실행합니다:
Install-Package Spire.XLS
2단계: XLSB 파일을 XLSX로 일괄 변환
원본 XLSB 파일을 C:\XLSB에 배치합니다. 프로그램은 C:\XLSX를 만들고 기존 출력을 건너뛰며 오류를 보고하면서 나머지 파일을 계속 처리합니다.
using System;
using System.IO;
using Spire.Xls;

class Program
{
    static void Main()
    {
        string inputFolder = @"C:\XLSB";
        string outputFolder = @"C:\XLSX";

        if (!Directory.Exists(inputFolder))
        {
            Console.WriteLine("Source folder not found: " + inputFolder);
            return;
        }

        Directory.CreateDirectory(outputFolder);

        foreach (string inputFile in Directory.EnumerateFiles(inputFolder))
        {
            if (!string.Equals(Path.GetExtension(inputFile), ".xlsb",
                               StringComparison.OrdinalIgnoreCase))
                continue;

            string outputFile = Path.Combine(
                outputFolder,
                Path.GetFileNameWithoutExtension(inputFile) + ".xlsx");

            if (File.Exists(outputFile))
            {
                Console.WriteLine("Skipped (already exists): " + outputFile);
                continue;
            }

            Workbook workbook = null;
            try
            {
                workbook = new Workbook();
                workbook.LoadFromFile(inputFile);
                workbook.SaveToFile(outputFile, ExcelVersion.Version2016);
                Console.WriteLine("Converted: " + Path.GetFileName(inputFile));
            }
            catch (Exception ex)
            {
                Console.WriteLine("Failed: " + Path.GetFileName(inputFile)
                                  + " - " + ex.Message);
            }
            finally
            {
                if (workbook != null)
                    workbook.Dispose();
            }
        }
    }
}
Workbook.LoadFromFile()은 각 원본 통합 문서를 로드하고, SaveToFile()은 이를 XLSX로 저장합니다. ExcelVersion.Version2016은 파일 버전을 지정하며, Excel 2016이 설치되어 있어야 하는 것은 아닙니다. .NET의 다른 통합 문서 저장 시나리오는 C#에서 Excel 파일을 저장하는 방법을 참조하세요.
참고: Spire.XLS 평가판은 제한을 적용하거나 평가 안내를 추가할 수 있습니다. 제한 없이 라이브러리를 살펴보려면 임시 라이선스를 요청할 수 있습니다.
차이점 이해: XLSB와 XLSX
XLSB와 XLSX는 모두 워크시트, 수식, 차트 및 서식을 지원하지만 통합 문서 데이터를 저장하는 방식은 다릅니다:
- XLSB(Excel 이진 통합 문서): 통합 문서 데이터를 이진 형식으로 저장합니다. 특히 크거나 복잡한 통합 문서의 경우 더 작은 파일 크기와 더 빠른 열기 또는 저장 시간을 제공할 수 있습니다.
- XLSX(Excel 통합 문서): 압축된 XML 기반 형식을 사용하며 Excel의 기본 통합 문서 형식입니다. 타사 스프레드시트 애플리케이션과 데이터 처리 도구에서 더 폭넓게 지원됩니다.
호환성이 주된 고려 사항이라면 일반적으로 XLSX가 더 나은 선택입니다. Excel에서 주로 큰 통합 문서를 다루고 더 넓은 호환성이 필요하지 않다면 원본 XLSB를 유지하는 것이 더 실용적일 수 있습니다. .xlsb의 이름을 .xlsx로 바꾸는 것만으로는 파일의 내부 형식이 변환되지 않습니다.
XLSB를 XLSX로 변환한 후 확인할 사항
변환된 통합 문서가 정상적으로 열리더라도 예상치 못한 변경이 포함되어 있을 수 있으며, 특히 타사 변환기를 사용한 경우 더 그렇습니다. 공유하거나 가져오기 전에 워크플로에 중요한 사항을 확인하세요:
- 수식 및 결과. 주요 계산과 시트 간 참조에서
#REF!또는#VALUE!와 같은 오류가 있는지 확인합니다. 필요한 경우 Excel에서 수식 보기를 통해 기본 수식을 검사합니다. - 통합 문서 구조. 시트 이름, 숨겨진 시트 및 중요한 명명된 범위를 확인합니다.
- 차트 및 기타 기능. 통합 문서에서 차트, 피벗 테이블, 조건부 서식 및 데이터 연결을 사용하는 경우 이를 검사합니다.
- 파일 크기 및 호환성. XLSX 파일이 원본 XLSB보다 클 수 있습니다. 사용하려는 애플리케이션에서 파일을 제대로 열고 사용할 수 있는지 확인합니다.
자주 묻는 질문
암호로 보호된 XLSB 파일을 XLSX로 변환할 수 있나요?
예, 파일을 여는 데 필요한 암호가 있는 경우 가능합니다. Excel에서 암호를 입력한 다음 다른 이름으로 저장을 사용하여 XLSX 파일을 만듭니다. 공유하기 전에 새 파일의 보호 설정을 확인하세요. 온라인 변환기는 암호화된 통합 문서를 지원하지 않을 수 있습니다. Excel 파일 보호에 대한 Microsoft 지침을 참조하세요.
XLSB 통합 문서에서 워크시트 하나만 변환할 수 있나요?
예. Excel에서 워크시트 탭을 마우스 오른쪽 단추로 클릭하고 이동 또는 복사를 선택한 다음 (새 통합 문서)를 선택하고 복사본 만들기를 선택합니다. 새 통합 문서를 XLSX로 저장합니다. 시트를 별도 통합 문서로 복사하면 참조에 영향을 줄 수 있으므로 다른 워크시트에 종속된 수식이나 차트가 있는지 확인하세요. 워크시트 복사에 대한 Microsoft 지침을 참조하세요.
원본 XLSB에 연결된 다른 통합 문서가 새 XLSX 파일을 자동으로 사용하나요?
아니요. 새 XLSX 복사본을 저장해도 다른 통합 문서에 저장된 참조가 자동으로 업데이트되지는 않습니다. 다른 통합 문서가 여전히 원본 XLSB에 연결되어 있는 경우 해당 통합 문서를 열고 데이터 > 쿼리 및 연결 > 통합 문서 링크로 이동합니다. 연결된 통합 문서 옆의 추가 명령 (...)을 클릭하고 원본 변경을 선택한 다음 새 XLSX 파일을 선택합니다. 통합 문서 링크에 대한 Microsoft 가이드를 참조하세요.
결론
통합 문서 하나의 경우 Excel의 다른 이름으로 저장이 일반적으로 가장 간단한 방법입니다. Excel을 사용할 수 없을 때는 온라인 변환기가 도움이 될 수 있으며, VBA는 단일 변환을 자동화하고 C#은 전체 폴더를 일괄 처리할 수 있습니다. 변환된 파일을 확인할 때까지 원본 XLSB를 보관하세요.
Come convertire XLSB in XLSX (4 metodi)
Indice
- Quale metodo di conversione da XLSB a XLSX dovresti usare?
- Metodo 1: Funzionalità Salva con nome integrata di Excel
- Metodo 2: Convertitore online gratuito da XLSB a XLSX
- Metodo 3: Conversione automatizzata con VBA
- Metodo 4: Conversione in batch con C#
- Capire la differenza: XLSB vs. XLSX
- Cosa controllare dopo aver convertito XLSB in XLSX
- Domande frequenti
- Conclusione
I file XLSB funzionano bene in Microsoft Excel, ma alcune applicazioni per fogli di calcolo e strumenti di elaborazione dati non supportano completamente il formato. Se devi condividere una cartella di lavoro XLSB o usarla in un'altra applicazione, convertirla in XLSX è spesso una soluzione pratica.
Questa guida illustra quattro metodi: la funzionalità integrata Salva con nome di Excel e un convertitore online per singoli file, VBA per automatizzare una singola conversione e C# per l'elaborazione in batch.
Quale metodo di conversione da XLSB a XLSX dovresti usare?
| Metodo | Ideale per | Vantaggi | Svantaggi |
|---|---|---|---|
| Microsoft Excel | Conversione di singoli file XLSB | Supporto nativo del formato; facile rivedere i risultati | Richiede Excel desktop; processo manuale |
| Convertitore online | Conversioni rapide e occasionali | Nessuna installazione; facile da usare | Richiede il caricamento dei file; possibili problemi di compatibilità |
| Macro VBA | Automazione di singole conversioni in Excel | Macro riutilizzabile; viene eseguita direttamente in Excel | Richiede Excel per Windows e una configurazione VBA di base |
| C# | Conversione in batch nelle applicazioni .NET | Elabora più file senza Excel | Richiede un ambiente .NET e una libreria compatibile |
Importante: XLSX non può conservare macro VBA o fogli macro di Excel 4.0, come spiegato nella guida Microsoft ai formati di file Excel supportati. Se la cartella di lavoro XLSB contiene macro che devi conservare, valuta la possibilità di salvarla come XLSM.
Metodo 1: Funzionalità Salva con nome integrata di Excel
Per un singolo file XLSB, la funzionalità Salva con nome integrata di Microsoft Excel offre un modo semplice per convertirlo in XLSX. Puoi rivedere la cartella di lavoro prima di salvarla. Non sono richiesti software di terze parti né il caricamento dei dati.
Guida passo passo
In Excel desktop, seleziona File > Apri > Sfoglia, quindi scegli il tuo file
.xlsb. Se si apre in Visualizzazione protetta, fai clic su Abilita modifica solo se ritieni attendibile l'origine.Verifica che i fogli di lavoro, le formule, i grafici e gli altri contenuti importanti vengano visualizzati come previsto.
Vai a File > Salva con nome > Sfoglia oppure premi F12 in Excel per Windows.
In Tipo file, seleziona Cartella di lavoro di Excel (*.xlsx) e inserisci un nome file.
Fai clic su Salva, rivedi eventuali avvisi di compatibilità, quindi riapri il file XLSX per controllare il risultato.
Metodo 2: Convertitore online gratuito da XLSB a XLSX
Se non hai Microsoft Excel installato o devi convertire file XLSB su Linux, ChromeOS o un dispositivo mobile, un convertitore online offre un'alternativa comoda. I passaggi seguenti usano Vertopal come esempio.
Guida passo passo
Visita il convertitore da XLSB a XLSX di Vertopal.
Fai clic su Scegli file e seleziona la cartella di lavoro (la dimensione massima del file è 50 MB).
Fai clic su Continua, quindi su Converti per avviare la conversione.
Scarica il file XLSX convertito e aprilo per controllare il contenuto.
Prima di caricare: i convertitori online in genere richiedono l'invio di file a un servizio di terze parti. Evita di caricare cartelle di lavoro riservate o sensibili a meno che il servizio non soddisfi i tuoi requisiti di gestione dei dati. I limiti di dimensione dei file e le opzioni disponibili variano e le funzionalità complesse di Excel potrebbero non essere conservate esattamente.
Metodo 3: Conversione automatizzata con VBA
Se devi ripetere la stessa conversione in Excel, una macro VBA può automatizzare il processo senza usare manualmente Salva con nome ogni volta. L'esempio seguente converte una cartella di lavoro XLSB in XLSX.
Codice VBA per la conversione da XLSB a XLSX
Lo script macro seguente usa il metodo Workbook.SaveAs di Excel per salvare una copia XLSX, lasciando invariato il file originale.
Aggiorna i percorsi dei file in base alla tua cartella di lavoro prima di eseguirlo.
Sub ConvertXlsbToXlsx()
    Dim sourcePath As String, outputPath As String
    Dim wb As Workbook
    Dim oldAlerts As Boolean
    Dim oldSecurity As MsoAutomationSecurity

    sourcePath = "C:\XLSB\Report.xlsb"
    outputPath = "C:\XLSB\Report.xlsx"

    oldAlerts = Application.DisplayAlerts
    oldSecurity = Application.AutomationSecurity
    On Error GoTo Failed

    ' Avoid overwriting an existing XLSX file
    If Dir(outputPath) <> "" Then
        MsgBox "Output file already exists: " & outputPath, vbExclamation
        Exit Sub
    End If

    Application.DisplayAlerts = False
    Application.AutomationSecurity = msoAutomationSecurityForceDisable

    ' Open XLSB and save as XLSX
    Set wb = Workbooks.Open(Filename:=sourcePath, UpdateLinks:=0, ReadOnly:=True)
    wb.SaveAs Filename:=outputPath, FileFormat:=xlOpenXMLWorkbook
    MsgBox "Converted: " & outputPath, vbInformation

CleanUp:
    On Error Resume Next
    If Not wb Is Nothing Then wb.Close SaveChanges:=False
    Application.DisplayAlerts = oldAlerts
    Application.AutomationSecurity = oldSecurity
    Exit Sub

Failed:
    MsgBox "Conversion failed: " & Err.Description, vbExclamation
    Resume CleanUp
End Sub
Come eseguire la macro VBA
- Apri Excel per Windows e crea una cartella di lavoro vuota.
- Premi Alt + F11 per aprire l'Editor VBA. Seleziona Inserisci > Modulo e incolla il codice.
- Crea
C:\XLSBe inserisci un file denominatoReport.xlsb. In alternativa, aggiornasourcePatheoutputPathnel codice per adattarli ai tuoi percorsi dei file. - Torna a Excel, premi Alt + F8, seleziona
ConvertXlsbToXlsxe fai clic su Esegui. Esegui macro solo da origini attendibili. - Apri
C:\XLSB\Report.xlsxper rivedere il file convertito.
Se devi riutilizzare la macro in seguito, salva la cartella di lavoro contenente il codice VBA come file separato Cartella di lavoro con attivazione macro di Excel (*.xlsm).
Nota: la macro usa l'impostazione AutomationSecurity di Excel per disabilitare le macro VBA all'apertura della cartella di lavoro di origine, ma potrebbero comunque comparire richieste relative alle macro di Excel 4.0. Gli avvisi di compatibilità standard vengono soppressi, quindi rivedi il file convertito prima di usarlo.
Metodo 4: Conversione in batch con C#
Per applicazioni .NET o attività ricorrenti di elaborazione dei file, C# può convertire più cartelle di lavoro XLSB senza richiedere l'installazione di Microsoft Excel. L'esempio seguente usa Spire.XLS per .NET.
Passaggio 1: installare Spire.XLS per .NET
Apri Strumenti > Gestione pacchetti NuGet > Console di Gestione pacchetti in Visual Studio, quindi esegui il comando seguente:
Install-Package Spire.XLS
Passaggio 2: convertire in batch file XLSB in XLSX
Inserisci i file XLSB di origine in C:\XLSB. Il programma crea C:\XLSX, ignora gli output esistenti e segnala gli errori continuando con i file rimanenti.
using System;
using System.IO;
using Spire.Xls;

class Program
{
    static void Main()
    {
        string inputFolder = @"C:\XLSB";
        string outputFolder = @"C:\XLSX";

        if (!Directory.Exists(inputFolder))
        {
            Console.WriteLine("Source folder not found: " + inputFolder);
            return;
        }

        Directory.CreateDirectory(outputFolder);

        foreach (string inputFile in Directory.EnumerateFiles(inputFolder))
        {
            if (!string.Equals(Path.GetExtension(inputFile), ".xlsb",
                               StringComparison.OrdinalIgnoreCase))
                continue;

            string outputFile = Path.Combine(
                outputFolder,
                Path.GetFileNameWithoutExtension(inputFile) + ".xlsx");

            if (File.Exists(outputFile))
            {
                Console.WriteLine("Skipped (already exists): " + outputFile);
                continue;
            }

            Workbook workbook = null;
            try
            {
                workbook = new Workbook();
                workbook.LoadFromFile(inputFile);
                workbook.SaveToFile(outputFile, ExcelVersion.Version2016);
                Console.WriteLine("Converted: " + Path.GetFileName(inputFile));
            }
            catch (Exception ex)
            {
                Console.WriteLine("Failed: " + Path.GetFileName(inputFile)
                                  + " - " + ex.Message);
            }
            finally
            {
                if (workbook != null)
                    workbook.Dispose();
            }
        }
    }
}
Workbook.LoadFromFile() carica ogni cartella di lavoro di origine, mentre SaveToFile() la salva come XLSX. ExcelVersion.Version2016 specifica la versione del file; non richiede che Excel 2016 sia installato. Per altri scenari di salvataggio di cartelle di lavoro in .NET, vedi come salvare file Excel in C#.
Nota: la versione di valutazione di Spire.XLS potrebbe imporre limitazioni o aggiungere avvisi di valutazione. Puoi richiedere una licenza temporanea per esplorare la libreria senza tali restrizioni.
Capire la differenza: XLSB vs. XLSX
XLSB e XLSX supportano entrambi fogli di lavoro, formule, grafici e formattazione, ma memorizzano i dati della cartella di lavoro in modo diverso:
- XLSB (cartella di lavoro binaria di Excel): memorizza i dati della cartella di lavoro in un formato binario. Può offrire dimensioni dei file inferiori e tempi di apertura o salvataggio più rapidi, soprattutto per cartelle di lavoro grandi o complesse.
- XLSX (cartella di lavoro di Excel): usa un formato compresso basato su XML ed è il formato predefinito delle cartelle di lavoro di Excel. È supportato più ampiamente dalle applicazioni per fogli di calcolo di terze parti e dagli strumenti di elaborazione dati.
Se la compatibilità è la tua principale preoccupazione, XLSX è di solito la scelta migliore. Se lavori principalmente con cartelle di lavoro di grandi dimensioni in Excel e non hai bisogno di una compatibilità più ampia, mantenere l'XLSB originale potrebbe essere più pratico. Rinominare semplicemente .xlsb in .xlsx non converte il formato interno del file.
Cosa controllare dopo aver convertito XLSB in XLSX
Una cartella di lavoro convertita potrebbe aprirsi correttamente e contenere comunque modifiche impreviste, soprattutto quando viene usato un convertitore di terze parti. Prima di condividerla o importarla, controlla ciò che è importante per il tuo flusso di lavoro:
- Formule e risultati. Controlla i calcoli principali e i riferimenti tra fogli per errori come
#REF!o#VALUE!. Se necessario, visualizza le formule in Excel per esaminare le espressioni sottostanti. - Struttura della cartella di lavoro. Verifica i nomi dei fogli, i fogli nascosti e gli intervalli denominati importanti.
- Grafici e altre funzionalità. Ispeziona grafici, tabelle pivot, formattazione condizionale e connessioni dati se la tua cartella di lavoro li utilizza.
- Dimensione del file e compatibilità. Il file XLSX potrebbe essere più grande della sorgente XLSB. Verifica che l'applicazione prevista sia in grado di aprirlo e utilizzarlo correttamente.
Domande frequenti
Posso convertire un file XLSB protetto da password in XLSX?
Sì, se disponi della password necessaria per aprirlo. Inserisci la password in Excel, quindi usa Salva con nome per creare un file XLSX. Controlla le impostazioni di protezione del nuovo file prima di condividerlo. I convertitori online potrebbero non supportare cartelle di lavoro crittografate. Vedi le indicazioni di Microsoft sulla protezione dei file Excel.
Posso convertire solo un foglio di lavoro da una cartella di lavoro XLSB?
Sì. In Excel, fai clic con il pulsante destro del mouse sulla scheda del foglio di lavoro, seleziona Sposta o copia, scegli (nuova cartella di lavoro) e seleziona Crea una copia. Salva la nuova cartella di lavoro come XLSX. Controlla eventuali formule o grafici che dipendono da altri fogli di lavoro, poiché la copia di un foglio in una cartella di lavoro separata può influire sui riferimenti. Vedi le istruzioni di Microsoft per copiare i fogli di lavoro.
Le altre cartelle di lavoro collegate all'XLSB originale useranno automaticamente il nuovo file XLSX?
No. Salvare una nuova copia XLSX non aggiorna automaticamente i riferimenti memorizzati in altre cartelle di lavoro. Se un'altra cartella di lavoro è ancora collegata all'XLSB originale, apri quella cartella di lavoro e vai a Dati > Query e connessioni > Collegamenti cartella di lavoro. Fai clic su Altri comandi (...) accanto alla cartella di lavoro collegata, seleziona Cambia origine e scegli il nuovo file XLSX. Vedi la guida di Microsoft ai collegamenti delle cartelle di lavoro.
Conclusione
Per una singola cartella di lavoro, Salva con nome di Excel è di solito il metodo più semplice. Un convertitore online può essere utile quando Excel non è disponibile, mentre VBA può automatizzare una singola conversione e C# può elaborare un'intera cartella in batch. Conserva l'XLSB originale finché non hai verificato il file convertito.
Comment convertir XLSB en XLSX (4 méthodes)
Table des matières
- Quelle méthode de conversion XLSB en XLSX devriez-vous utiliser ?
- Méthode 1 : Fonction Enregistrer sous intégrée d’Excel
- Méthode 2 : Convertisseur XLSB en XLSX en ligne gratuit
- Méthode 3 : Conversion automatisée avec VBA
- Méthode 4 : Conversion par lots avec C#
- Comprendre la différence : XLSB vs XLSX
- Ce qu’il faut vérifier après avoir converti XLSB en XLSX
- Questions fréquentes
- Conclusion
Les fichiers XLSB fonctionnent bien dans Microsoft Excel, mais certaines applications de tableur et certains outils de traitement de données ne prennent pas entièrement en charge ce format. Si vous devez partager un classeur XLSB ou l’utiliser dans une autre application, sa conversion en XLSX est souvent une solution pratique.
Ce guide couvre quatre méthodes : la fonction Enregistrer sous intégrée d’Excel et un convertisseur en ligne pour des fichiers individuels, VBA pour automatiser une conversion unique, et C# pour le traitement par lots.
Quelle méthode de conversion XLSB en XLSX devriez-vous utiliser ?
| Méthode | Idéal pour | Avantages | Inconvénients |
|---|---|---|---|
| Microsoft Excel | Convertir des fichiers XLSB individuels | Prise en charge native du format ; résultats faciles à vérifier | Nécessite Excel pour poste de travail ; processus manuel |
| Convertisseur en ligne | Conversions rapides et occasionnelles | Aucune installation ; facile à utiliser | Téléversement de fichiers requis ; problèmes de compatibilité possibles |
| Macro VBA | Automatiser des conversions individuelles dans Excel | Macro réutilisable ; s’exécute directement dans Excel | Nécessite Excel pour Windows et une configuration VBA de base |
| C# | Conversion par lots dans des applications .NET | Traite plusieurs fichiers sans Excel | Nécessite un environnement .NET et une bibliothèque compatible |
Important : XLSX ne peut pas conserver les macros VBA ni les feuilles de macros Excel 4.0, comme expliqué dans le guide de Microsoft sur les formats de fichier Excel pris en charge. Si votre classeur XLSB contient des macros que vous devez conserver, envisagez de l’enregistrer au format XLSM à la place.
Méthode 1 : Fonction Enregistrer sous intégrée d’Excel
Pour un seul fichier XLSB, la fonction Enregistrer sous intégrée à Microsoft Excel offre un moyen simple de le convertir en XLSX. Vous pouvez vérifier le classeur avant de l’enregistrer. Aucun logiciel tiers ni téléversement de données n’est nécessaire.
Guide étape par étape
Dans Excel pour poste de travail, sélectionnez Fichier > Ouvrir > Parcourir, puis choisissez votre fichier
.xlsb. S’il s’ouvre en mode Protégé, cliquez sur Activer la modification uniquement si vous faites confiance à sa source.Vérifiez que les feuilles de calcul, formules, graphiques et autres contenus importants s’affichent comme prévu.
Accédez à Fichier > Enregistrer sous > Parcourir, ou appuyez sur F12 dans Excel pour Windows.
Sous Type de fichier, sélectionnez Classeur Excel (*.xlsx) et saisissez un nom de fichier.
Cliquez sur Enregistrer, examinez les éventuels avertissements de compatibilité, puis rouvrez le fichier XLSX pour vérifier le résultat.
Méthode 2 : Convertisseur XLSB en XLSX en ligne gratuit
Si Microsoft Excel n’est pas installé ou si vous devez convertir des fichiers XLSB sous Linux, ChromeOS ou sur un appareil mobile, un convertisseur en ligne constitue une alternative pratique. Les étapes suivantes utilisent Vertopal à titre d’exemple.
Guide étape par étape
Rendez-vous sur le convertisseur XLSB en XLSX de Vertopal.
Cliquez sur Choisir un fichier et sélectionnez votre classeur (taille maximale du fichier : 50 Mo).
Cliquez sur Continuer, puis sur Convertir pour lancer la conversion.
Téléchargez le fichier XLSX converti et ouvrez-le pour vérifier son contenu.
Avant le téléversement : Les convertisseurs en ligne nécessitent généralement l’envoi de fichiers à un service tiers. Évitez de téléverser des classeurs confidentiels ou sensibles, sauf si le service répond à vos exigences en matière de traitement des données. Les limites de taille de fichier et les options disponibles varient, et les fonctionnalités Excel complexes peuvent ne pas être conservées exactement.
Méthode 3 : Conversion automatisée avec VBA
Si vous devez répéter la même conversion dans Excel, une macro VBA peut automatiser le processus sans utiliser Enregistrer sous manuellement à chaque fois. L’exemple ci-dessous convertit un classeur XLSB en XLSX.
Code VBA pour la conversion XLSB en XLSX
Le script de macro ci-dessous utilise la méthode Workbook.SaveAs d’Excel pour enregistrer une copie XLSX, en laissant le fichier d’origine inchangé.
Mettez à jour les chemins de fichiers pour qu’ils correspondent à votre classeur avant de l’exécuter.
Sub ConvertXlsbToXlsx()
    Dim sourcePath As String, outputPath As String
    Dim wb As Workbook
    Dim oldAlerts As Boolean
    Dim oldSecurity As MsoAutomationSecurity

    sourcePath = "C:\XLSB\Report.xlsb"
    outputPath = "C:\XLSB\Report.xlsx"

    oldAlerts = Application.DisplayAlerts
    oldSecurity = Application.AutomationSecurity
    On Error GoTo Failed

    ' Avoid overwriting an existing XLSX file
    If Dir(outputPath) <> "" Then
        MsgBox "Output file already exists: " & outputPath, vbExclamation
        Exit Sub
    End If

    Application.DisplayAlerts = False
    Application.AutomationSecurity = msoAutomationSecurityForceDisable

    ' Open XLSB and save as XLSX
    Set wb = Workbooks.Open(Filename:=sourcePath, UpdateLinks:=0, ReadOnly:=True)
    wb.SaveAs Filename:=outputPath, FileFormat:=xlOpenXMLWorkbook
    MsgBox "Converted: " & outputPath, vbInformation

CleanUp:
    On Error Resume Next
    If Not wb Is Nothing Then wb.Close SaveChanges:=False
    Application.DisplayAlerts = oldAlerts
    Application.AutomationSecurity = oldSecurity
    Exit Sub

Failed:
    MsgBox "Conversion failed: " & Err.Description, vbExclamation
    Resume CleanUp
End Sub
Comment exécuter la macro VBA
- Ouvrez Excel pour Windows et créez un classeur vide.
- Appuyez sur Alt + F11 pour ouvrir l’éditeur VBA. Sélectionnez Insertion > Module et collez le code.
- Créez
C:\XLSBet placez-y un fichier nomméReport.xlsb. Vous pouvez également mettre à joursourcePathetoutputPathdans le code pour qu’ils correspondent à vos propres chemins de fichiers. - Revenez à Excel, appuyez sur Alt + F8, sélectionnez
ConvertXlsbToXlsx, puis cliquez sur Exécuter. N’exécutez des macros qu’à partir de sources de confiance. - Ouvrez
C:\XLSB\Report.xlsxpour examiner le fichier converti.
Si vous devez réutiliser la macro ultérieurement, enregistrez le classeur contenant le code VBA en tant que fichier Classeur Excel prenant en charge les macros (*.xlsm) distinct.
Remarque : La macro utilise le paramètre AutomationSecurity d’Excel pour désactiver les macros VBA lors de l’ouverture du classeur source, mais des invites de macro Excel 4.0 peuvent encore apparaître. Les alertes de compatibilité standard sont supprimées, donc examinez le fichier converti avant de l’utiliser.
Méthode 4 : Conversion par lots avec C#
Pour les applications .NET ou les tâches récurrentes de traitement de fichiers, C# peut convertir plusieurs classeurs XLSB sans nécessiter l’installation de Microsoft Excel. L’exemple suivant utilise Spire.XLS for .NET.
Étape 1 : Installer Spire.XLS for .NET
Ouvrez Outils > Gestionnaire de packages NuGet > Console du Gestionnaire de packages dans Visual Studio, puis exécutez la commande suivante :
Install-Package Spire.XLS
Étape 2 : Convertir par lots des fichiers XLSB en XLSX
Placez les fichiers XLSB sources dans C:\XLSB. Le programme crée C:\XLSX, ignore les sorties existantes et signale les erreurs tout en poursuivant avec les fichiers restants.
using System;
using System.IO;
using Spire.Xls;

class Program
{
    static void Main()
    {
        string inputFolder = @"C:\XLSB";
        string outputFolder = @"C:\XLSX";

        if (!Directory.Exists(inputFolder))
        {
            Console.WriteLine("Source folder not found: " + inputFolder);
            return;
        }

        Directory.CreateDirectory(outputFolder);

        foreach (string inputFile in Directory.EnumerateFiles(inputFolder))
        {
            if (!string.Equals(Path.GetExtension(inputFile), ".xlsb",
                               StringComparison.OrdinalIgnoreCase))
                continue;

            string outputFile = Path.Combine(
                outputFolder,
                Path.GetFileNameWithoutExtension(inputFile) + ".xlsx");

            if (File.Exists(outputFile))
            {
                Console.WriteLine("Skipped (already exists): " + outputFile);
                continue;
            }

            Workbook workbook = null;
            try
            {
                workbook = new Workbook();
                workbook.LoadFromFile(inputFile);
                workbook.SaveToFile(outputFile, ExcelVersion.Version2016);
                Console.WriteLine("Converted: " + Path.GetFileName(inputFile));
            }
            catch (Exception ex)
            {
                Console.WriteLine("Failed: " + Path.GetFileName(inputFile)
                                  + " - " + ex.Message);
            }
            finally
            {
                if (workbook != null)
                    workbook.Dispose();
            }
        }
    }
}
Workbook.LoadFromFile() charge chaque classeur source, tandis que SaveToFile() l’enregistre au format XLSX. ExcelVersion.Version2016 spécifie la version de fichier ; cela ne nécessite pas l’installation d’Excel 2016. Pour d’autres scénarios d’enregistrement de classeurs dans .NET, consultez comment enregistrer des fichiers Excel en C#.
Remarque : La version d’évaluation de Spire.XLS peut imposer des limitations ou ajouter des avis d’évaluation. Vous pouvez demander une licence temporaire pour explorer la bibliothèque sans ces restrictions.
Comprendre la différence : XLSB vs XLSX
XLSB et XLSX prennent tous deux en charge les feuilles de calcul, les formules, les graphiques et la mise en forme, mais ils stockent les données du classeur différemment :
- XLSB (classeur binaire Excel) : Stocke les données du classeur dans un format binaire. Il peut offrir des tailles de fichier plus petites et des temps d’ouverture ou d’enregistrement plus rapides, en particulier pour les classeurs volumineux ou complexes.
- XLSX (classeur Excel) : Utilise un format compressé basé sur XML et constitue le format de classeur par défaut d’Excel. Il est plus largement pris en charge par les applications de tableur tierces et les outils de traitement de données.
Si la compatibilité est votre principale préoccupation, XLSX est généralement le meilleur choix. Si vous travaillez principalement avec de grands classeurs dans Excel et n’avez pas besoin d’une compatibilité plus large, conserver le XLSB d’origine peut être plus pratique. Le simple fait de renommer .xlsb en .xlsx ne convertit pas le format interne du fichier.
Ce qu’il faut vérifier après avoir converti XLSB en XLSX
Un classeur converti peut s’ouvrir correctement et contenir néanmoins des modifications inattendues, en particulier lorsqu’un convertisseur tiers est utilisé. Avant de le partager ou de l’importer, vérifiez ce qui compte pour votre flux de travail :
- Formules et résultats. Vérifiez les calculs clés et les références entre feuilles pour détecter des erreurs telles que
#REF!ou#VALUE!. Si nécessaire, affichez les formules dans Excel pour examiner les expressions sous-jacentes. - Structure du classeur. Vérifiez les noms des feuilles, les feuilles masquées et les plages nommées importantes.
- Graphiques et autres fonctionnalités. Inspectez les graphiques, les tableaux croisés dynamiques, la mise en forme conditionnelle et les connexions de données si votre classeur les utilise.
- Taille du fichier et compatibilité. Le fichier XLSX peut être plus volumineux que la source XLSB. Confirmez que l’application prévue peut l’ouvrir et l’utiliser correctement.
Questions fréquentes
Puis-je convertir un fichier XLSB protégé par mot de passe en XLSX ?
Oui, si vous disposez du mot de passe nécessaire pour l’ouvrir. Saisissez le mot de passe dans Excel, puis utilisez Enregistrer sous pour créer un fichier XLSX. Vérifiez les paramètres de protection du nouveau fichier avant de le partager. Les convertisseurs en ligne peuvent ne pas prendre en charge les classeurs chiffrés. Consultez les conseils de Microsoft sur la protection des fichiers Excel.
Puis-je convertir une seule feuille de calcul d’un classeur XLSB ?
Oui. Dans Excel, cliquez avec le bouton droit sur l’onglet de la feuille de calcul, sélectionnez Déplacer ou copier, choisissez (nouveau classeur) et cochez Créer une copie. Enregistrez le nouveau classeur au format XLSX. Vérifiez les formules ou graphiques qui dépendent d’autres feuilles de calcul, car la copie d’une feuille dans un classeur distinct peut affecter les références. Consultez les instructions de Microsoft pour copier des feuilles de calcul.
Les autres classeurs liés au fichier XLSB d’origine utiliseront-ils automatiquement le nouveau fichier XLSX ?
Non. L’enregistrement d’une nouvelle copie XLSX ne met pas automatiquement à jour les références stockées dans d’autres classeurs. Si un autre classeur est toujours lié au fichier XLSB d’origine, ouvrez ce classeur et accédez à Données > Requêtes et connexions > Liens du classeur. Cliquez sur Plus de commandes (...) à côté du classeur lié, sélectionnez Modifier la source, puis choisissez le nouveau fichier XLSX. Consultez le guide de Microsoft sur les liens de classeur.
Conclusion
Pour un seul classeur, la fonction Enregistrer sous d’Excel est généralement la méthode la plus simple. Un convertisseur en ligne peut être utile lorsque Excel n’est pas disponible, tandis que VBA peut automatiser une conversion unique et C# peut traiter un dossier entier par lots. Conservez le fichier XLSB d’origine jusqu’à ce que vous ayez vérifié le fichier converti.
Cómo convertir XLSB a XLSX (4 métodos)
Índice
- ¿Qué método de conversión de XLSB a XLSX debería usar?
- Método 1: función Guardar como integrada de Excel
- Método 2: Convertidor gratuito en línea de XLSB a XLSX
- Método 3: Conversión automatizada con VBA
- Método 4: Conversión por lotes con C#
- Entender la diferencia: XLSB vs. XLSX
- Qué revisar después de convertir XLSB a XLSX
- Preguntas frecuentes
- Conclusión
Los archivos XLSB funcionan bien en Microsoft Excel, pero algunas aplicaciones de hojas de cálculo y herramientas de procesamiento de datos no admiten completamente el formato. Si necesita compartir un libro de trabajo XLSB o usarlo en otra aplicación, convertirlo a XLSX suele ser una solución práctica.
Esta guía cubre cuatro métodos: la función integrada Guardar como de Excel y un convertidor en línea para archivos individuales, VBA para automatizar una conversión única y C# para el procesamiento por lotes.
¿Qué método de conversión de XLSB a XLSX debería usar?
| Método | Ideal para | Ventajas | Desventajas |
|---|---|---|---|
| Microsoft Excel | Convertir archivos XLSB individuales | Compatibilidad con el formato nativo; fácil de revisar los resultados | Requiere Excel de escritorio; proceso manual |
| Convertidor en línea | Conversiones rápidas y ocasionales | Sin instalación; fácil de usar | Se requiere subir archivos; posibles problemas de compatibilidad |
| Macro de VBA | Automatizar conversiones individuales en Excel | Macro reutilizable; se ejecuta directamente en Excel | Requiere Excel para Windows y una configuración básica de VBA |
| C# | Conversión por lotes en aplicaciones .NET | Procesa varios archivos sin Excel | Requiere un entorno .NET y una biblioteca compatible |
Importante: XLSX no puede conservar macros de VBA ni hojas de macros de Excel 4.0, como se explica en la guía de Microsoft sobre los formatos de archivo de Excel compatibles. Si su libro de trabajo XLSB contiene macros que necesita conservar, considere guardarlo como XLSM en su lugar.
Método 1: función Guardar como integrada de Excel
Para un único archivo XLSB, la función integrada Guardar como de Microsoft Excel ofrece una forma sencilla de convertirlo a XLSX. Puede revisar el libro de trabajo antes de guardarlo. No se requiere software de terceros ni cargar datos.
Guía paso a paso
En Excel de escritorio, seleccione Archivo > Abrir > Examinar, luego elija su archivo
.xlsb. Si se abre en Vista protegida, haga clic en Habilitar edición solo si confía en su origen.Compruebe que las hojas de cálculo, fórmulas, gráficos y otro contenido importantes aparezcan como se espera.
Vaya a Archivo > Guardar como > Examinar o presione F12 en Excel para Windows.
En Guardar como tipo, seleccione Libro de Excel (*.xlsx) y escriba un nombre de archivo.
Haga clic en Guardar, revise las advertencias de compatibilidad y vuelva a abrir el archivo XLSX para comprobar el resultado.
Método 2: Convertidor gratuito en línea de XLSB a XLSX
Si no tiene Microsoft Excel instalado o necesita convertir archivos XLSB en Linux, ChromeOS o un dispositivo móvil, un convertidor en línea ofrece una alternativa cómoda. Los siguientes pasos usan Vertopal como ejemplo.
Guía paso a paso
Visite el convertidor de XLSB a XLSX de Vertopal.
Haga clic en Elegir archivo y seleccione su libro de trabajo (el tamaño máximo de archivo es 50 MB).
Haga clic en Continuar y luego en Convertir para iniciar la conversión.
Descargue el archivo XLSX convertido y ábralo para comprobar el contenido.
Antes de cargar: Los convertidores en línea suelen requerir enviar archivos a un servicio de terceros. Evite cargar libros de trabajo confidenciales o sensibles a menos que el servicio cumpla con sus requisitos de manejo de datos. Los límites de tamaño de archivo y las opciones disponibles varían, y es posible que las funciones complejas de Excel no se conserven exactamente.
Método 3: Conversión automatizada con VBA
Si necesita repetir la misma conversión en Excel, una macro de VBA puede automatizar el proceso sin usar Guardar como manualmente cada vez. El ejemplo siguiente convierte un libro de trabajo XLSB a XLSX.
Código de VBA para la conversión de XLSB a XLSX
El script de macro siguiente usa el método Workbook.SaveAs de Excel para guardar una copia XLSX y deja el archivo original sin cambios.
Actualice las rutas de archivo para que coincidan con su libro de trabajo antes de ejecutarlo.
Sub ConvertXlsbToXlsx()
    Dim sourcePath As String, outputPath As String
    Dim wb As Workbook
    Dim oldAlerts As Boolean
    Dim oldSecurity As MsoAutomationSecurity

    sourcePath = "C:\XLSB\Report.xlsb"
    outputPath = "C:\XLSB\Report.xlsx"

    oldAlerts = Application.DisplayAlerts
    oldSecurity = Application.AutomationSecurity
    On Error GoTo Failed

    ' Avoid overwriting an existing XLSX file
    If Dir(outputPath) <> "" Then
        MsgBox "Output file already exists: " & outputPath, vbExclamation
        Exit Sub
    End If

    Application.DisplayAlerts = False
    Application.AutomationSecurity = msoAutomationSecurityForceDisable

    ' Open XLSB and save as XLSX
    Set wb = Workbooks.Open(Filename:=sourcePath, UpdateLinks:=0, ReadOnly:=True)
    wb.SaveAs Filename:=outputPath, FileFormat:=xlOpenXMLWorkbook
    MsgBox "Converted: " & outputPath, vbInformation

CleanUp:
    On Error Resume Next
    If Not wb Is Nothing Then wb.Close SaveChanges:=False
    Application.DisplayAlerts = oldAlerts
    Application.AutomationSecurity = oldSecurity
    Exit Sub

Failed:
    MsgBox "Conversion failed: " & Err.Description, vbExclamation
    Resume CleanUp
End Sub
Cómo ejecutar la macro de VBA
- Abra Excel para Windows y cree un libro de trabajo en blanco.
- Presione Alt + F11 para abrir el Editor de VBA. Seleccione Insertar > Módulo y pegue el código.
- Cree
C:\XLSBy coloque en ella un archivo llamadoReport.xlsb. Como alternativa, actualicesourcePathyoutputPathen el código para que coincidan con sus propias rutas de archivo. - Vuelva a Excel, presione Alt + F8, seleccione
ConvertXlsbToXlsxy haga clic en Ejecutar. Ejecute macros solo de fuentes en las que confíe. - Abra
C:\XLSB\Report.xlsxpara revisar el archivo convertido.
Si necesita reutilizar la macro más adelante, guarde el libro de trabajo que contiene el código de VBA como un archivo Libro de Excel habilitado para macros (*.xlsm) independiente.
Nota: La macro usa la configuración AutomationSecurity de Excel para deshabilitar las macros de VBA al abrir el libro de trabajo de origen, pero aún pueden aparecer mensajes de macros de Excel 4.0. Las alertas de compatibilidad estándar se suprimen, así que revise el archivo convertido antes de usarlo.
Método 4: Conversión por lotes con C#
Para aplicaciones .NET o tareas recurrentes de procesamiento de archivos, C# puede convertir varios libros de trabajo XLSB sin requerir que Microsoft Excel esté instalado. El ejemplo siguiente usa Spire.XLS for .NET.
Paso 1: Instalar Spire.XLS for .NET
Abra Herramientas > Administrador de paquetes NuGet > Consola del Administrador de paquetes en Visual Studio y luego ejecute el siguiente comando:
Install-Package Spire.XLS
Paso 2: Convertir por lotes archivos XLSB a XLSX
Coloque los archivos XLSB de origen en C:\XLSB. El programa crea C:\XLSX, omite las salidas existentes e informa errores mientras continúa con los archivos restantes.
using System;
using System.IO;
using Spire.Xls;

class Program
{
    static void Main()
    {
        string inputFolder = @"C:\XLSB";
        string outputFolder = @"C:\XLSX";

        if (!Directory.Exists(inputFolder))
        {
            Console.WriteLine("Source folder not found: " + inputFolder);
            return;
        }

        Directory.CreateDirectory(outputFolder);

        foreach (string inputFile in Directory.EnumerateFiles(inputFolder))
        {
            if (!string.Equals(Path.GetExtension(inputFile), ".xlsb",
                               StringComparison.OrdinalIgnoreCase))
                continue;

            string outputFile = Path.Combine(
                outputFolder,
                Path.GetFileNameWithoutExtension(inputFile) + ".xlsx");

            if (File.Exists(outputFile))
            {
                Console.WriteLine("Skipped (already exists): " + outputFile);
                continue;
            }

            Workbook workbook = null;
            try
            {
                workbook = new Workbook();
                workbook.LoadFromFile(inputFile);
                workbook.SaveToFile(outputFile, ExcelVersion.Version2016);
                Console.WriteLine("Converted: " + Path.GetFileName(inputFile));
            }
            catch (Exception ex)
            {
                Console.WriteLine("Failed: " + Path.GetFileName(inputFile)
                                  + " - " + ex.Message);
            }
            finally
            {
                if (workbook != null)
                    workbook.Dispose();
            }
        }
    }
}
Workbook.LoadFromFile() carga cada libro de trabajo de origen, mientras que SaveToFile() lo guarda como XLSX. ExcelVersion.Version2016 especifica la versión del archivo; no requiere que Excel 2016 esté instalado. Para otros escenarios de guardado de libros de trabajo en .NET, consulte cómo guardar archivos de Excel en C#.
Nota: La versión de evaluación de Spire.XLS puede imponer limitaciones o agregar avisos de evaluación. Puede solicitar una licencia temporal para explorar la biblioteca sin esas restricciones.
Entender la diferencia: XLSB vs. XLSX
XLSB y XLSX admiten hojas de cálculo, fórmulas, gráficos y formato, pero almacenan los datos del libro de trabajo de forma diferente:
- XLSB (Libro binario de Excel): Almacena los datos del libro de trabajo en un formato binario. Puede ofrecer tamaños de archivo más pequeños y tiempos de apertura o guardado más rápidos, especialmente para libros de trabajo grandes o complejos.
- XLSX (Libro de Excel): Usa un formato comprimido basado en XML y es el formato de libro de trabajo predeterminado de Excel. Es más ampliamente compatible con aplicaciones de hojas de cálculo de terceros y herramientas de procesamiento de datos.
Si la compatibilidad es su principal preocupación, XLSX suele ser la mejor opción. Si trabaja principalmente con libros de trabajo grandes en Excel y no necesita una compatibilidad más amplia, mantener el XLSB original puede ser más práctico. Simplemente cambiar el nombre de .xlsb a .xlsx no convierte el formato interno del archivo.
Qué revisar después de convertir XLSB a XLSX
Un libro de trabajo convertido puede abrirse correctamente y aun así contener cambios inesperados, especialmente cuando se usa un convertidor de terceros. Antes de compartirlo o importarlo, compruebe lo que importa para su flujo de trabajo:
- Fórmulas y resultados. Compruebe los cálculos clave y las referencias entre hojas en busca de errores como
#REF!o#VALUE!. Si es necesario, vea las fórmulas en Excel para inspeccionar las expresiones subyacentes. - Estructura del libro de trabajo. Verifique los nombres de las hojas, las hojas ocultas y los rangos con nombre importantes.
- Gráficos y otras funciones. Inspeccione gráficos, tablas dinámicas, formato condicional y conexiones de datos si su libro de trabajo los usa.
- Tamaño del archivo y compatibilidad. El archivo XLSX puede ser más grande que el XLSB de origen. Confirme que la aplicación prevista puede abrirlo y usarlo correctamente.
Preguntas frecuentes
¿Puedo convertir un archivo XLSB protegido con contraseña a XLSX?
Sí, si tiene la contraseña necesaria para abrirlo. Introduzca la contraseña en Excel y luego use Guardar como para crear un archivo XLSX. Compruebe la configuración de protección del nuevo archivo antes de compartirlo. Es posible que los convertidores en línea no admitan libros de trabajo cifrados. Consulte la guía de Microsoft sobre la protección de archivos de Excel.
¿Puedo convertir solo una hoja de cálculo de un libro de trabajo XLSB?
Sí. En Excel, haga clic con el botón derecho en la pestaña de la hoja de cálculo, seleccione Mover o copiar, elija (nuevo libro) y marque Crear una copia. Guarde el nuevo libro de trabajo como XLSX. Compruebe las fórmulas o los gráficos que dependan de otras hojas de cálculo, ya que copiar una hoja en un libro de trabajo separado puede afectar a las referencias. Consulte las instrucciones de Microsoft para copiar hojas de cálculo.
¿Los otros libros de trabajo vinculados al XLSB original usarán automáticamente el nuevo archivo XLSX?
No. Guardar una nueva copia XLSX no actualiza automáticamente las referencias almacenadas en otros libros de trabajo. Si otro libro de trabajo sigue vinculado al XLSB original, abra ese libro de trabajo y vaya a Datos > Consultas y conexiones > Vínculos del libro. Haga clic en Más comandos (...) junto al libro de trabajo vinculado, seleccione Cambiar origen y elija el nuevo archivo XLSX. Consulte la guía de Microsoft sobre vínculos de libros de trabajo.
Conclusión
Para un único libro de trabajo, Guardar como de Excel suele ser el método más sencillo. Un convertidor en línea puede ayudar cuando Excel no está disponible, mientras que VBA puede automatizar una conversión única y C# puede procesar una carpeta completa por lotes. Conserve el XLSB original hasta que haya verificado el archivo convertido.
So konvertieren Sie XLSB in XLSX (4 Methoden)
Inhaltsverzeichnis
- Welche Methode zur Konvertierung von XLSB in XLSX sollten Sie verwenden?
- Methode 1: Die integrierte Funktion „Speichern unter“ in Excel
- Methode 2: Kostenloser Online-Konverter für XLSB in XLSX
- Methode 3: Automatisierte Konvertierung mit VBA
- Methode 4: Stapelkonvertierung mit C#
- Den Unterschied verstehen: XLSB vs. XLSX
- Was nach der Konvertierung von XLSB in XLSX zu prüfen ist
- Häufig gestellte Fragen
- Fazit
XLSB-Dateien funktionieren gut in Microsoft Excel, aber einige Tabellenkalkulationsanwendungen und Datenverarbeitungstools unterstützen das Format nicht vollständig. Wenn Sie eine XLSB-Arbeitsmappe freigeben oder in einer anderen Anwendung verwenden möchten, ist die Konvertierung in XLSX oft eine praktische Lösung.
Dieser Leitfaden behandelt vier Methoden: die integrierte Funktion Speichern unter in Excel und einen Online-Konverter für einzelne Dateien, VBA zur Automatisierung einer einzelnen Konvertierung sowie C# für die Stapelverarbeitung.
Welche Methode zur Konvertierung von XLSB in XLSX sollten Sie verwenden?
| Methode | Ideal für | Vorteile | Nachteile |
|---|---|---|---|
| Microsoft Excel | Konvertierung einzelner XLSB-Dateien | Native Formatunterstützung; Ergebnisse lassen sich leicht prüfen | Erfordert Excel für Desktop; manueller Vorgang |
| Online-Konverter | Schnelle, gelegentliche Konvertierungen | Keine Installation; einfach zu bedienen | Dateiuploads erforderlich; mögliche Kompatibilitätsprobleme |
| VBA-Makro | Automatisierung einzelner Konvertierungen in Excel | Wiederverwendbares Makro; läuft direkt in Excel | Erfordert Excel für Windows und grundlegende VBA-Einrichtung |
| C# | Stapelkonvertierung in .NET-Anwendungen | Verarbeitet mehrere Dateien ohne Excel | Erfordert eine .NET-Umgebung und eine kompatible Bibliothek |
Wichtig: XLSX kann keine VBA-Makros oder Excel 4.0-Makroblätter beibehalten, wie in Microsofts Leitfaden zu unterstützten Excel-Dateiformaten erläutert wird. Wenn Ihre XLSB-Arbeitsmappe Makros enthält, die Sie beibehalten müssen, sollten Sie sie stattdessen als XLSM speichern.
Methode 1: Die integrierte Funktion „Speichern unter“ in Excel
Für eine einzelne XLSB-Datei bietet die integrierte Funktion „Speichern unter“ von Microsoft Excel eine unkomplizierte Möglichkeit, sie in XLSX zu konvertieren. Sie können die Arbeitsmappe vor dem Speichern prüfen. Es ist keine Drittanbieter-Software und kein Hochladen von Daten erforderlich.
Schritt-für-Schritt-Anleitung
Wählen Sie in Excel für Desktop Datei > Öffnen > Durchsuchen und wählen Sie dann Ihre
.xlsb-Datei aus. Wenn sie in der geschützten Ansicht geöffnet wird, klicken Sie nur dann auf Bearbeitung aktivieren, wenn Sie der Quelle vertrauen.Stellen Sie sicher, dass wichtige Arbeitsblätter, Formeln, Diagramme und andere Inhalte wie erwartet angezeigt werden.
Gehen Sie zu Datei > Speichern unter > Durchsuchen oder drücken Sie F12 in Excel für Windows.
Wählen Sie unter Dateityp die Option Excel-Arbeitsmappe (*.xlsx) aus und geben Sie einen Dateinamen ein.
Klicken Sie auf Speichern, prüfen Sie etwaige Kompatibilitätswarnungen und öffnen Sie dann die XLSX-Datei erneut, um das Ergebnis zu überprüfen.
Methode 2: Kostenloser Online-Konverter für XLSB in XLSX
Wenn Microsoft Excel nicht installiert ist oder Sie XLSB-Dateien unter Linux, ChromeOS oder auf einem mobilen Gerät konvertieren müssen, bietet ein Online-Konverter eine bequeme Alternative. Die folgenden Schritte verwenden Vertopal als Beispiel.
Schritt-für-Schritt-Anleitung
Besuchen Sie den Vertopal-Konverter für XLSB in XLSX.
Klicken Sie auf Datei auswählen und wählen Sie Ihre Arbeitsmappe aus (maximale Dateigröße 50 MB).
Klicken Sie auf Weiter und dann auf Konvertieren, um die Konvertierung zu starten.
Laden Sie die konvertierte XLSX-Datei herunter und öffnen Sie sie, um den Inhalt zu prüfen.
Vor dem Hochladen: Online-Konverter erfordern in der Regel das Senden von Dateien an einen Drittanbieterdienst. Vermeiden Sie das Hochladen vertraulicher oder sensibler Arbeitsmappen, es sei denn, der Dienst erfüllt Ihre Anforderungen an den Umgang mit Daten. Dateigrößenbeschränkungen und verfügbare Optionen variieren, und komplexe Excel-Funktionen werden möglicherweise nicht exakt beibehalten.
Methode 3: Automatisierte Konvertierung mit VBA
Wenn Sie dieselbe Konvertierung in Excel wiederholen müssen, kann ein VBA-Makro den Vorgang automatisieren, ohne jedes Mal manuell Speichern unter zu verwenden. Das folgende Beispiel konvertiert eine XLSB-Arbeitsmappe in XLSX.
VBA-Code für die Konvertierung von XLSB in XLSX
Das folgende Makroskript verwendet Excels Workbook.SaveAs-Methode, um eine XLSX-Kopie zu speichern, wobei die Originaldatei unverändert bleibt.
Aktualisieren Sie die Dateipfade, damit sie zu Ihrer Arbeitsmappe passen, bevor Sie es ausführen.
Sub ConvertXlsbToXlsx()
    Dim sourcePath As String, outputPath As String
    Dim wb As Workbook
    Dim oldAlerts As Boolean
    Dim oldSecurity As MsoAutomationSecurity

    sourcePath = "C:\XLSB\Report.xlsb"
    outputPath = "C:\XLSB\Report.xlsx"

    oldAlerts = Application.DisplayAlerts
    oldSecurity = Application.AutomationSecurity
    On Error GoTo Failed

    ' Avoid overwriting an existing XLSX file
    If Dir(outputPath) <> "" Then
        MsgBox "Output file already exists: " & outputPath, vbExclamation
        Exit Sub
    End If

    Application.DisplayAlerts = False
    Application.AutomationSecurity = msoAutomationSecurityForceDisable

    ' Open XLSB and save as XLSX
    Set wb = Workbooks.Open(Filename:=sourcePath, UpdateLinks:=0, ReadOnly:=True)
    wb.SaveAs Filename:=outputPath, FileFormat:=xlOpenXMLWorkbook
    MsgBox "Converted: " & outputPath, vbInformation

CleanUp:
    On Error Resume Next
    If Not wb Is Nothing Then wb.Close SaveChanges:=False
    Application.DisplayAlerts = oldAlerts
    Application.AutomationSecurity = oldSecurity
    Exit Sub

Failed:
    MsgBox "Conversion failed: " & Err.Description, vbExclamation
    Resume CleanUp
End Sub
Ausführen des VBA-Makros
- Öffnen Sie Excel für Windows und erstellen Sie eine leere Arbeitsmappe.
- Drücken Sie Alt + F11, um den VBA-Editor zu öffnen. Wählen Sie Einfügen > Modul und fügen Sie den Code ein.
- Erstellen Sie
C:\XLSBund legen Sie eine Datei mit dem NamenReport.xlsbdarin ab. Alternativ können SiesourcePathundoutputPathim Code an Ihre eigenen Dateipfade anpassen. - Kehren Sie zu Excel zurück, drücken Sie Alt + F8, wählen Sie
ConvertXlsbToXlsxaus und klicken Sie auf Ausführen. Führen Sie Makros nur aus Quellen aus, denen Sie vertrauen. - Öffnen Sie
C:\XLSB\Report.xlsx, um die konvertierte Datei zu prüfen.
Wenn Sie das Makro später wiederverwenden möchten, speichern Sie die Arbeitsmappe mit dem VBA-Code als separate Datei vom Typ Excel-Arbeitsmappe mit Makros (*.xlsm).
Hinweis: Das Makro verwendet Excels AutomationSecurity-Einstellung, um VBA-Makros beim Öffnen der Quellarbeitsmappe zu deaktivieren, aber Excel 4.0-Makroabfragen können weiterhin angezeigt werden. Standardmäßige Kompatibilitätswarnungen werden unterdrückt, daher sollten Sie die konvertierte Datei vor der Verwendung prüfen.
Methode 4: Stapelkonvertierung mit C#
Für .NET-Anwendungen oder wiederkehrende Dateiverarbeitungsaufgaben kann C# mehrere XLSB-Arbeitsmappen konvertieren, ohne dass Microsoft Excel installiert sein muss. Das folgende Beispiel verwendet Spire.XLS for .NET.
Schritt 1: Spire.XLS for .NET installieren
Öffnen Sie in Visual Studio Extras > NuGet-Paket-Manager > Paket-Manager-Konsole und führen Sie dann den folgenden Befehl aus:
Install-Package Spire.XLS
Schritt 2: XLSB-Dateien im Stapel in XLSX konvertieren
Legen Sie die XLSB-Quelldateien in C:\XLSB ab. Das Programm erstellt C:\XLSX, überspringt vorhandene Ausgaben und meldet Fehler, während es mit den übrigen Dateien fortfährt.
using System;
using System.IO;
using Spire.Xls;

class Program
{
    static void Main()
    {
        string inputFolder = @"C:\XLSB";
        string outputFolder = @"C:\XLSX";

        if (!Directory.Exists(inputFolder))
        {
            Console.WriteLine("Source folder not found: " + inputFolder);
            return;
        }

        Directory.CreateDirectory(outputFolder);

        foreach (string inputFile in Directory.EnumerateFiles(inputFolder))
        {
            if (!string.Equals(Path.GetExtension(inputFile), ".xlsb",
                               StringComparison.OrdinalIgnoreCase))
                continue;

            string outputFile = Path.Combine(
                outputFolder,
                Path.GetFileNameWithoutExtension(inputFile) + ".xlsx");

            if (File.Exists(outputFile))
            {
                Console.WriteLine("Skipped (already exists): " + outputFile);
                continue;
            }

            Workbook workbook = null;
            try
            {
                workbook = new Workbook();
                workbook.LoadFromFile(inputFile);
                workbook.SaveToFile(outputFile, ExcelVersion.Version2016);
                Console.WriteLine("Converted: " + Path.GetFileName(inputFile));
            }
            catch (Exception ex)
            {
                Console.WriteLine("Failed: " + Path.GetFileName(inputFile)
                                  + " - " + ex.Message);
            }
            finally
            {
                if (workbook != null)
                    workbook.Dispose();
            }
        }
    }
}
Workbook.LoadFromFile() lädt jede Quellarbeitsmappe, während SaveToFile() sie als XLSX speichert. ExcelVersion.Version2016 gibt die Dateiversion an; Excel 2016 muss dafür nicht installiert sein. Weitere Szenarien zum Speichern von Arbeitsmappen in .NET finden Sie unter So speichern Sie Excel-Dateien in C#.
Hinweis: Die Testversion von Spire.XLS kann Einschränkungen auferlegen oder Testhinweise hinzufügen. Sie können eine temporäre Lizenz anfordern, um die Bibliothek ohne diese Einschränkungen zu testen.
Den Unterschied verstehen: XLSB vs. XLSX
XLSB und XLSX unterstützen beide Arbeitsblätter, Formeln, Diagramme und Formatierungen, speichern Arbeitsmappendaten jedoch unterschiedlich:
- XLSB (Excel-Binärarbeitsmappe): Speichert Arbeitsmappendaten in einem Binärformat. Es kann kleinere Dateigrößen und schnellere Öffnungs- oder Speicherzeiten bieten, insbesondere bei großen oder komplexen Arbeitsmappen.
- XLSX (Excel-Arbeitsmappe): Verwendet ein komprimiertes XML-basiertes Format und ist Excels Standardformat für Arbeitsmappen. Es wird von Tabellenkalkulationsanwendungen und Datenverarbeitungstools von Drittanbietern breiter unterstützt.
Wenn Kompatibilität Ihr Hauptanliegen ist, ist XLSX normalerweise die bessere Wahl. Wenn Sie hauptsächlich mit großen Arbeitsmappen in Excel arbeiten und keine größere Kompatibilität benötigen, kann es praktischer sein, das ursprüngliche XLSB beizubehalten. Das bloße Umbenennen von .xlsb in .xlsx konvertiert nicht das interne Format der Datei.
Was nach der Konvertierung von XLSB in XLSX zu prüfen ist
Eine konvertierte Arbeitsmappe kann sich erfolgreich öffnen lassen und dennoch unerwartete Änderungen enthalten, insbesondere wenn ein Drittanbieter-Konverter verwendet wird. Prüfen Sie vor dem Freigeben oder Importieren, was für Ihren Workflow wichtig ist:
- Formeln und Ergebnisse. Prüfen Sie wichtige Berechnungen und blattübergreifende Verweise auf Fehler wie
#REF!oder#VALUE!. Bei Bedarf können Sie Formeln in Excel anzeigen, um die zugrunde liegenden Ausdrücke zu untersuchen. - Arbeitsmappenstruktur. Überprüfen Sie Blattnamen, ausgeblendete Blätter und wichtige benannte Bereiche.
- Diagramme und andere Funktionen. Prüfen Sie Diagramme, Pivot-Tabellen, bedingte Formatierung und Datenverbindungen, wenn Ihre Arbeitsmappe sie verwendet.
- Dateigröße und Kompatibilität. Die XLSX-Datei kann größer als die XLSB-Quelle sein. Stellen Sie sicher, dass die vorgesehene Anwendung sie korrekt öffnen und verwenden kann.
Häufig gestellte Fragen
Kann ich eine kennwortgeschützte XLSB-Datei in XLSX konvertieren?
Ja, wenn Sie über das zum Öffnen erforderliche Kennwort verfügen. Geben Sie das Kennwort in Excel ein und verwenden Sie dann Speichern unter, um eine XLSX-Datei zu erstellen. Prüfen Sie die Schutzeinstellungen der neuen Datei, bevor Sie sie freigeben. Online-Konverter unterstützen möglicherweise keine verschlüsselten Arbeitsmappen. Siehe Microsofts Anleitung zum Schutz von Excel-Dateien.
Kann ich nur ein Arbeitsblatt aus einer XLSB-Arbeitsmappe konvertieren?
Ja. Klicken Sie in Excel mit der rechten Maustaste auf die Registerkarte des Arbeitsblatts, wählen Sie Verschieben oder Kopieren, wählen Sie (neue Arbeitsmappe) und aktivieren Sie Kopie erstellen. Speichern Sie die neue Arbeitsmappe als XLSX. Prüfen Sie alle Formeln oder Diagramme, die von anderen Arbeitsblättern abhängen, da das Kopieren eines Blatts in eine separate Arbeitsmappe Verweise beeinflussen kann. Siehe Microsofts Anleitung zum Kopieren von Arbeitsblättern.
Verwenden andere Arbeitsmappen, die mit dem ursprünglichen XLSB verknüpft sind, automatisch die neue XLSX-Datei?
Nein. Das Speichern einer neuen XLSX-Kopie aktualisiert nicht automatisch Verweise, die in anderen Arbeitsmappen gespeichert sind. Wenn eine andere Arbeitsmappe noch mit dem ursprünglichen XLSB verknüpft ist, öffnen Sie diese Arbeitsmappe und gehen Sie zu Daten > Abfragen und Verbindungen > Arbeitsmappenverknüpfungen. Klicken Sie neben der verknüpften Arbeitsmappe auf Weitere Befehle (...), wählen Sie Quelle ändern und wählen Sie die neue XLSX-Datei aus. Siehe Microsofts Leitfaden zu Arbeitsmappenverknüpfungen.
Fazit
Für eine einzelne Arbeitsmappe ist Excels Speichern unter normalerweise die einfachste Methode. Ein Online-Konverter kann helfen, wenn Excel nicht verfügbar ist, während VBA eine einzelne Konvertierung automatisieren und C# einen gesamten Ordner im Stapel verarbeiten kann. Bewahren Sie das ursprüngliche XLSB auf, bis Sie die konvertierte Datei überprüft haben.
Как конвертировать XLSB в XLSX (4 метода)
Содержание
- Какой способ преобразования XLSB в XLSX выбрать?
- Способ 1: встроенная функция «Сохранить как» в Excel
- Способ 2: бесплатный онлайн-конвертер XLSB в XLSX
- Способ 3: автоматическое преобразование с помощью VBA
- Способ 4: пакетное преобразование с помощью C#
- В чём разница: XLSB и XLSX
- Что проверить после преобразования XLSB в XLSX
- Часто задаваемые вопросы
- Заключение
Файлы XLSB хорошо работают в Microsoft Excel, но некоторые приложения для работы с электронными таблицами и инструменты обработки данных не полностью поддерживают этот формат. Если вам нужно поделиться книгой XLSB или использовать её в другом приложении, преобразование в XLSX часто становится практичным решением.
В этом руководстве рассмотрены четыре способа: встроенная в Excel функция «Сохранить как» и онлайн-конвертер для отдельных файлов, VBA для автоматизации одного преобразования и C# для пакетной обработки.
Какой способ преобразования XLSB в XLSX выбрать?
| Способ | Лучше всего подходит для | Плюсы | Минусы |
|---|---|---|---|
| Microsoft Excel | Преобразование отдельных файлов XLSB | Встроенная поддержка формата; легко проверить результат | Требуется настольная версия Excel; ручной процесс |
| Онлайн-конвертер | Быстрые разовые преобразования | Не требуется установка; простота использования | Требуется загрузка файлов; возможны проблемы совместимости |
| Макрос VBA | Автоматизация отдельных преобразований в Excel | Многоразовый макрос; выполняется непосредственно в Excel | Требуется Excel для Windows и базовая настройка VBA |
| C# | Пакетное преобразование в приложениях .NET | Обрабатывает несколько файлов без Excel | Требуется среда .NET и совместимая библиотека |
Важно: XLSX не может сохранять макросы VBA или листы макросов Excel 4.0, как объяснено в руководстве Microsoft по поддерживаемым форматам файлов Excel. Если ваша книга XLSB содержит макросы, которые нужно сохранить, рассмотрите возможность сохранить её как XLSM.
Способ 1: встроенная функция «Сохранить как» в Excel
Для одного файла XLSB встроенная в Microsoft Excel «Сохранить как» — функция предлагает простой способ преобразовать его в XLSX. Вы можете просмотреть книгу перед сохранением. Стороннее ПО и загрузка данных не требуются.
Пошаговая инструкция
В настольной версии Excel выберите Файл > Открыть > Обзор, затем выберите файл
.xlsb. Если он открывается в режиме защищенного просмотра, нажмите Включить редактирование только если доверяете источнику.Убедитесь, что важные листы, формулы, диаграммы и другое содержимое отображаются должным образом.
Перейдите в Файл > Сохранить как > Обзор или нажмите F12 в Excel для Windows.
В разделе Тип файла выберите Книга Excel (*.xlsx) и введите имя файла.
Нажмите Сохранить, просмотрите предупреждения о совместимости, затем снова откройте файл XLSX, чтобы проверить результат.
Способ 2: бесплатный онлайн-конвертер XLSB в XLSX
Если Microsoft Excel не установлен или вам нужно преобразовать файлы XLSB в Linux, ChromeOS или на мобильном устройстве, онлайн-конвертер предлагает удобную альтернативу. В следующих шагах в качестве примера используется Vertopal.
Пошаговая инструкция
Откройте конвертер Vertopal XLSB в XLSX.
Нажмите Выбрать файл и выберите книгу (максимальный размер файла — 50 МБ).
Нажмите Продолжить, затем Преобразовать, чтобы начать преобразование.
Скачайте преобразованный файл XLSX и откройте его, чтобы проверить содержимое.
Перед загрузкой: онлайн-конвертеры обычно требуют отправки файлов стороннему сервису. Избегайте загрузки конфиденциальных или чувствительных книг, если сервис не соответствует вашим требованиям к обработке данных. Ограничения на размер файла и доступные параметры различаются, а сложные функции Excel могут сохраняться не в точности.
Способ 3: автоматическое преобразование с помощью VBA
Если вам нужно повторять одно и то же преобразование в Excel, макрос VBA может автоматизировать процесс без ручного использования «Сохранить как» каждый раз. В приведённом ниже примере один файл XLSB преобразуется в XLSX.
Код VBA для преобразования XLSB в XLSX
Приведённый ниже макрос использует метод Workbook.SaveAs Excel для сохранения копии XLSX, оставляя исходный файл без изменений.
Перед запуском обновите пути к файлам в соответствии с вашей книгой.
Sub ConvertXlsbToXlsx()
    Dim sourcePath As String, outputPath As String
    Dim wb As Workbook
    Dim oldAlerts As Boolean
    Dim oldSecurity As MsoAutomationSecurity

    sourcePath = "C:\XLSB\Report.xlsb"
    outputPath = "C:\XLSB\Report.xlsx"

    oldAlerts = Application.DisplayAlerts
    oldSecurity = Application.AutomationSecurity
    On Error GoTo Failed

    ' Avoid overwriting an existing XLSX file
    If Dir(outputPath) <> "" Then
        MsgBox "Output file already exists: " & outputPath, vbExclamation
        Exit Sub
    End If

    Application.DisplayAlerts = False
    Application.AutomationSecurity = msoAutomationSecurityForceDisable

    ' Open XLSB and save as XLSX
    Set wb = Workbooks.Open(Filename:=sourcePath, UpdateLinks:=0, ReadOnly:=True)
    wb.SaveAs Filename:=outputPath, FileFormat:=xlOpenXMLWorkbook
    MsgBox "Converted: " & outputPath, vbInformation

CleanUp:
    On Error Resume Next
    If Not wb Is Nothing Then wb.Close SaveChanges:=False
    Application.DisplayAlerts = oldAlerts
    Application.AutomationSecurity = oldSecurity
    Exit Sub

Failed:
    MsgBox "Conversion failed: " & Err.Description, vbExclamation
    Resume CleanUp
End Sub
Как запустить макрос VBA
- Откройте Excel для Windows и создайте пустую книгу.
- Нажмите Alt + F11, чтобы открыть редактор VBA. Выберите Вставка > Модуль и вставьте код.
- Создайте папку
C:\XLSBи поместите в неё файл с именемReport.xlsb. Либо изменитеsourcePathиoutputPathв коде, чтобы они соответствовали вашим путям к файлам. - Вернитесь в Excel, нажмите Alt + F8, выберите
ConvertXlsbToXlsxи нажмите Запустить. Запускайте макросы только из доверенных источников. - Откройте
C:\XLSB\Report.xlsx, чтобы просмотреть преобразованный файл.
Если вам понадобится повторно использовать макрос позже, сохраните книгу с кодом VBA как отдельный файл Книга Excel с поддержкой макросов (*.xlsm).
Примечание: Макрос использует параметр AutomationSecurity Excel, чтобы отключить макросы VBA при открытии исходной книги, но запросы макросов Excel 4.0 всё равно могут появляться. Стандартные предупреждения о совместимости подавляются, поэтому проверьте преобразованный файл перед использованием.
Способ 4: пакетное преобразование с помощью C#
Для приложений .NET или повторяющихся задач обработки файлов C# может преобразовывать несколько книг XLSB без необходимости установки Microsoft Excel. В следующем примере используется Spire.XLS for .NET.
Шаг 1: установите Spire.XLS for .NET
Откройте Средства > Диспетчер пакетов NuGet > Консоль диспетчера пакетов в Visual Studio, затем выполните следующую команду:
Install-Package Spire.XLS
Шаг 2: пакетное преобразование файлов XLSB в XLSX
Поместите исходные файлы XLSB в C:\XLSB. Программа создаёт C:\XLSX, пропускает существующие выходные файлы и сообщает об ошибках, продолжая работу с остальными файлами.
using System;
using System.IO;
using Spire.Xls;

class Program
{
    static void Main()
    {
        string inputFolder = @"C:\XLSB";
        string outputFolder = @"C:\XLSX";

        if (!Directory.Exists(inputFolder))
        {
            Console.WriteLine("Source folder not found: " + inputFolder);
            return;
        }

        Directory.CreateDirectory(outputFolder);

        foreach (string inputFile in Directory.EnumerateFiles(inputFolder))
        {
            if (!string.Equals(Path.GetExtension(inputFile), ".xlsb",
                               StringComparison.OrdinalIgnoreCase))
                continue;

            string outputFile = Path.Combine(
                outputFolder,
                Path.GetFileNameWithoutExtension(inputFile) + ".xlsx");

            if (File.Exists(outputFile))
            {
                Console.WriteLine("Skipped (already exists): " + outputFile);
                continue;
            }

            Workbook workbook = null;
            try
            {
                workbook = new Workbook();
                workbook.LoadFromFile(inputFile);
                workbook.SaveToFile(outputFile, ExcelVersion.Version2016);
                Console.WriteLine("Converted: " + Path.GetFileName(inputFile));
            }
            catch (Exception ex)
            {
                Console.WriteLine("Failed: " + Path.GetFileName(inputFile)
                                  + " - " + ex.Message);
            }
            finally
            {
                if (workbook != null)
                    workbook.Dispose();
            }
        }
    }
}
Workbook.LoadFromFile() загружает каждую исходную книгу, а SaveToFile() сохраняет её как XLSX. ExcelVersion.Version2016 указывает версию файла; для этого не требуется установленный Excel 2016. О других сценариях сохранения книг в .NET см. как сохранять файлы Excel в C#.
Примечание: Оценочная версия Spire.XLS может иметь ограничения или добавлять оценочные уведомления. Вы можете запросить временную лицензию, чтобы изучить библиотеку без этих ограничений.
В чём разница: XLSB и XLSX
XLSB и XLSX оба поддерживают листы, формулы, диаграммы и форматирование, но по-разному хранят данные книги:
- XLSB (двоичная книга Excel): хранит данные книги в двоичном формате. Он может обеспечивать меньший размер файла и более быстрое открытие или сохранение, особенно для больших или сложных книг.
- XLSX (книга Excel): использует сжатый формат на основе XML и является форматом книги Excel по умолчанию. Он шире поддерживается сторонними приложениями для работы с электронными таблицами и инструментами обработки данных.
Если совместимость для вас важнее всего, XLSX обычно лучший выбор. Если вы в основном работаете с большими книгами в Excel и не нуждаетесь в более широкой совместимости, сохранение исходного XLSB может быть более практичным. Простое переименование .xlsb в .xlsx не преобразует внутренний формат файла.
Что проверить после преобразования XLSB в XLSX
Преобразованная книга может успешно открываться и при этом содержать неожиданные изменения, особенно при использовании стороннего конвертера. Прежде чем делиться ею или импортировать её, проверьте то, что важно для вашего рабочего процесса:
- Формулы и результаты. Проверьте ключевые вычисления и межлистовые ссылки на ошибки, такие как
#REF!или#VALUE!. При необходимости просмотрите формулы в Excel, чтобы изучить лежащие в их основе выражения. - Структура книги. Проверьте имена листов, скрытые листы и важные именованные диапазоны.
- Диаграммы и другие функции. Проверьте диаграммы, сводные таблицы, условное форматирование и подключения к данным, если ваша книга их использует.
- Размер файла и совместимость. Файл XLSX может быть больше исходного XLSB. Убедитесь, что предполагаемое приложение может правильно открыть и использовать его.
Часто задаваемые вопросы
Можно ли преобразовать защищённый паролем файл XLSB в XLSX?
Да, если у вас есть пароль для его открытия. Введите пароль в Excel, затем используйте «Сохранить как», чтобы создать файл XLSX. Проверьте настройки защиты нового файла перед тем, как делиться им. Онлайн-конвертеры могут не поддерживать зашифрованные книги. См. рекомендации Microsoft по защите файлов Excel.
Можно ли преобразовать только один лист из книги XLSB?
Да. В Excel щёлкните вкладку листа правой кнопкой мыши, выберите Переместить или скопировать, выберите (новая книга) и установите флажок Создать копию. Сохраните новую книгу как XLSX. Проверьте все формулы или диаграммы, которые зависят от других листов, поскольку копирование листа в отдельную книгу может повлиять на ссылки. См. инструкции Microsoft по копированию листов.
Будут ли другие книги, связанные с исходным XLSB, автоматически использовать новый файл XLSX?
Нет. Сохранение новой копии XLSX не обновляет автоматически ссылки, хранящиеся в других книгах. Если другая книга по-прежнему ссылается на исходный XLSB, откройте эту книгу и перейдите в Данные > Запросы и подключения > Связи книги. Нажмите Дополнительные команды (...) рядом со связанной книгой, выберите Изменить источник и укажите новый файл XLSX. См. руководство Microsoft по связям книг.
Заключение
Для одной книги встроенная в Excel функция «Сохранить как» обычно является самым простым способом. Онлайн-конвертер может помочь, когда Excel недоступен, VBA может автоматизировать отдельное преобразование, а C# может обрабатывать целую папку пакетами. Сохраняйте исходный XLSB, пока не проверите преобразованный файл.
How to Convert XLSB to XLSX (4 Methods)
Table of Contents
- Which XLSB to XLSX Conversion Method Should You Use?
- Method 1: Excel's Built-in Save As Feature
- Method 2: Free Online XLSB to XLSX Converter
- Method 3: Automated Conversion with VBA
- Method 4: Batch Conversion with C#
- Understanding the Difference: XLSB vs. XLSX
- What to Check After Converting XLSB to XLSX
- Frequently Asked Questions
- Conclusion
XLSB files work well in Microsoft Excel, but some spreadsheet applications and data-processing tools do not fully support the format. If you need to share an XLSB workbook or use it in another application, converting it to XLSX is often a practical solution.
This guide covers four methods: Excel's built-in Save As feature and an online converter for individual files, VBA for automating a single conversion, and C# for batch processing.
Which XLSB to XLSX Conversion Method Should You Use?
| Method | Best For | Pros | Cons |
|---|---|---|---|
| Microsoft Excel | Converting individual XLSB files | Native format support; easy to review results | Requires desktop Excel; manual process |
| Online converter | Quick, occasional conversions | No installation; easy to use | File uploads required; possible compatibility issues |
| VBA macro | Automating individual conversions in Excel | Reusable macro; runs directly in Excel | Requires Excel for Windows and basic VBA setup |
| C# | Batch conversion in .NET applications | Processes multiple files without Excel | Requires a .NET environment and a compatible library |
Important: XLSX cannot retain VBA macros or Excel 4.0 macro sheets, as explained in Microsoft's guide to supported Excel file formats. If your XLSB workbook contains macros you need to preserve, consider saving it as XLSM instead.
Method 1: Excel's Built-in Save As Feature
For a single XLSB file, Microsoft Excel's built-in Save As feature offers a straightforward way to convert it to XLSX. You can review the workbook before saving it. No third-party software or data uploading is required.
Step-by-Step Guide
In desktop Excel, select File > Open > Browse, then choose your
.xlsbfile. If it opens in Protected View, click Enable Editing only if you trust its source.Check that important worksheets, formulas, charts, and other content appear as expected.
Go to File > Save As > Browse, or press F12 in Excel for Windows.
Under Save as type, select Excel Workbook (*.xlsx) and enter a file name.
Click Save, review any compatibility warnings, then reopen the XLSX file to check the result.
Method 2: Free Online XLSB to XLSX Converter
If you don't have Microsoft Excel installed or need to convert XLSB files on Linux, ChromeOS, or a mobile device, an online converter offers a convenient alternative. The following steps use Vertopal as an example.
Step-by-Step Guide
Visit the Vertopal XLSB to XLSX converter.
Click Choose File and select your workbook (maximum file size is 50 MB).
Click Continue, then Convert to start the conversion.
Download the converted XLSX file and open it to check the contents.
Before uploading: Online converters typically require sending files to a third-party service. Avoid uploading confidential or sensitive workbooks unless the service meets your data-handling requirements. File-size limits and available options vary, and complex Excel features may not be preserved exactly.
Method 3: Automated Conversion with VBA
If you need to repeat the same conversion in Excel, a VBA macro can automate the process without using Save As manually each time. The example below converts one XLSB workbook to XLSX.
VBA Code for XLSB to XLSX Conversion
The macro script below uses Excel's Workbook.SaveAs method to save an XLSX copy, leaving the original file unchanged.
Update the file paths to match your workbook before running it.
Sub ConvertXlsbToXlsx()
    Dim sourcePath As String, outputPath As String
    Dim wb As Workbook
    Dim oldAlerts As Boolean
    Dim oldSecurity As MsoAutomationSecurity

    sourcePath = "C:\XLSB\Report.xlsb"
    outputPath = "C:\XLSB\Report.xlsx"

    oldAlerts = Application.DisplayAlerts
    oldSecurity = Application.AutomationSecurity
    On Error GoTo Failed

    ' Avoid overwriting an existing XLSX file
    If Dir(outputPath) <> "" Then
        MsgBox "Output file already exists: " & outputPath, vbExclamation
        Exit Sub
    End If

    Application.DisplayAlerts = False
    Application.AutomationSecurity = msoAutomationSecurityForceDisable

    ' Open XLSB and save as XLSX
    Set wb = Workbooks.Open(Filename:=sourcePath, UpdateLinks:=0, ReadOnly:=True)
    wb.SaveAs Filename:=outputPath, FileFormat:=xlOpenXMLWorkbook
    MsgBox "Converted: " & outputPath, vbInformation

CleanUp:
    On Error Resume Next
    If Not wb Is Nothing Then wb.Close SaveChanges:=False
    Application.DisplayAlerts = oldAlerts
    Application.AutomationSecurity = oldSecurity
    Exit Sub

Failed:
    MsgBox "Conversion failed: " & Err.Description, vbExclamation
    Resume CleanUp
End Sub
How to Run the VBA Macro
- Open Excel for Windows and create a blank workbook.
- Press Alt + F11 to open the VBA Editor. Select Insert > Module and paste the code.
- Create
C:\XLSBand place a file namedReport.xlsbin it. Alternatively, updatesourcePathandoutputPathin the code to match your own file paths. - Return to Excel, press Alt + F8, select
ConvertXlsbToXlsx, and click Run. Run macros only from sources you trust. - Open
C:\XLSB\Report.xlsxto review the converted file.
If you need to reuse the macro later, save the workbook containing the VBA code as a separate Excel Macro-Enabled Workbook (*.xlsm) file.
Note: The macro uses Excel's AutomationSecurity setting to disable VBA macros when opening the source workbook, but Excel 4.0 macro prompts may still appear. Standard compatibility alerts are suppressed, so review the converted file before using it.
Method 4: Batch Conversion with C#
For .NET applications or recurring file-processing tasks, C# can convert multiple XLSB workbooks without requiring Microsoft Excel to be installed. The following example uses Spire.XLS for .NET.
Step 1: Install Spire.XLS for .NET
Open Tools > NuGet Package Manager > Package Manager Console in Visual Studio, then run the following command:
Install-Package Spire.XLS
Step 2: Batch Convert XLSB Files to XLSX
Place the source XLSB files in C:\XLSB. The program creates C:\XLSX, skips existing outputs, and reports errors while continuing with the remaining files.
using System;
using System.IO;
using Spire.Xls;

class Program
{
    static void Main()
    {
        string inputFolder = @"C:\XLSB";
        string outputFolder = @"C:\XLSX";

        if (!Directory.Exists(inputFolder))
        {
            Console.WriteLine("Source folder not found: " + inputFolder);
            return;
        }

        Directory.CreateDirectory(outputFolder);

        foreach (string inputFile in Directory.EnumerateFiles(inputFolder))
        {
            if (!string.Equals(Path.GetExtension(inputFile), ".xlsb",
                               StringComparison.OrdinalIgnoreCase))
                continue;

            string outputFile = Path.Combine(
                outputFolder,
                Path.GetFileNameWithoutExtension(inputFile) + ".xlsx");

            if (File.Exists(outputFile))
            {
                Console.WriteLine("Skipped (already exists): " + outputFile);
                continue;
            }

            Workbook workbook = null;
            try
            {
                workbook = new Workbook();
                workbook.LoadFromFile(inputFile);
                workbook.SaveToFile(outputFile, ExcelVersion.Version2016);
                Console.WriteLine("Converted: " + Path.GetFileName(inputFile));
            }
            catch (Exception ex)
            {
                Console.WriteLine("Failed: " + Path.GetFileName(inputFile)
                                  + " - " + ex.Message);
            }
            finally
            {
                if (workbook != null)
                    workbook.Dispose();
            }
        }
    }
}
Workbook.LoadFromFile() loads each source workbook, while SaveToFile() saves it as XLSX. ExcelVersion.Version2016 specifies the file version; it does not require Excel 2016 to be installed. For other workbook-saving scenarios in .NET, see how to save Excel files in C#.
Note: The evaluation version of Spire.XLS may impose limitations or add evaluation notices. You can request a temporary license to explore the library without those restrictions.
Understanding the Difference: XLSB vs. XLSX
XLSB and XLSX both support worksheets, formulas, charts, and formatting, but they store workbook data differently:
- XLSB (Excel Binary Workbook): Stores workbook data in a binary format. It can offer smaller file sizes and faster opening or saving times, especially for large or complex workbooks.
- XLSX (Excel Workbook): Uses a compressed XML-based format and is Excel's default workbook format. It is more widely supported by third-party spreadsheet applications and data-processing tools.
If compatibility is your main concern, XLSX is usually the better choice. If you mainly work with large workbooks in Excel and do not need wider compatibility, keeping the original XLSB may be more practical. Simply renaming .xlsb to .xlsx does not convert the file's internal format.
What to Check After Converting XLSB to XLSX
A converted workbook may open successfully and still contain unexpected changes, especially when a third-party converter is used. Before sharing or importing it, check what matters for your workflow:
- Formulas and results. Check key calculations and cross-sheet references for errors such as
#REF!or#VALUE!. If needed, view formulas in Excel to inspect the underlying expressions. - Workbook structure. Verify sheet names, hidden sheets, and important named ranges.
- Charts and other features. Inspect charts, PivotTables, conditional formatting, and data connections if your workbook uses them.
- File size and compatibility. The XLSX file may be larger than the XLSB source. Confirm that the intended application can open and use it correctly.
Frequently Asked Questions
Can I convert a password-protected XLSB file to XLSX?
Yes, if you have the password needed to open it. Enter the password in Excel, then use Save As to create an XLSX file. Check the new file's protection settings before sharing it. Online converters may not support encrypted workbooks. See Microsoft's guidance on Excel file protection.
Can I convert only one worksheet from an XLSB workbook?
Yes. In Excel, right-click the worksheet tab, select Move or Copy, choose (new book), and check Create a copy. Save the new workbook as XLSX. Check any formulas or charts that depend on other worksheets, since copying a sheet into a separate workbook can affect references. See Microsoft's instructions for copying worksheets.
Will other workbooks linked to the original XLSB automatically use the new XLSX file?
No. Saving a new XLSX copy does not automatically update references stored in other workbooks. If another workbook still links to the original XLSB, open that workbook and go to Data > Queries & Connections > Workbook Links. Click More Commands (...) next to the linked workbook, select Change source, and choose the new XLSX file. See Microsoft's workbook link guide.
Conclusion
For a single workbook, Excel's Save As is usually the simplest method. An online converter can help when Excel is unavailable, while VBA can automate a single conversion and C# can process an entire folder in batches. Keep the original XLSB until you have verified the converted file.
Como Contar Páginas em PDFs: 4 Métodos Fáceis
Sumário
- Métodos de contagem de páginas de PDF em resumo
- Método 1: Contar páginas de PDF com um leitor de PDF para desktop
- Método 2: Contar páginas de PDF em um navegador da web
- Método 3: Contar páginas de PDF online
- Método 4: Automatizar a contagem de páginas de PDF com Python
- Solução de problemas comuns de contagem de páginas de PDF
- Conclusão
- Perguntas frequentes
Precisa verificar se um PDF atende a um limite de páginas para envio, prepará-lo para impressão ou confirmar que ele contém o número esperado de páginas? Você pode contar rapidamente as páginas de um PDF usando um leitor de PDF para desktop, um navegador da web ou uma ferramenta online. Para tarefas recorrentes, o Python pode automatizar o processo e gerar relatórios de contagem de páginas.
Este guia fornece instruções passo a passo para todos os quatro métodos. Ele também explica por que a contagem total de páginas de um PDF pode diferir dos números de página impressos no documento.
Métodos de contagem de páginas de PDF em resumo
O melhor método depende das ferramentas disponíveis, de quantos PDFs você precisa verificar e se a tarefa é ocasional ou recorrente. Compare suas opções abaixo.
| Método | Melhor para | Limitações |
|---|---|---|
| Leitor de PDF para desktop (Adobe Acrobat Reader) | Contar páginas de PDF offline | Requer um leitor de PDF instalado; verificação manual |
| Navegador da web (Chrome ou Edge) | Contar páginas de PDF offline sem um leitor de PDF dedicado | Mais adequado para um arquivo por vez |
| Contador de páginas de PDF online | Contar rapidamente páginas em um ou vários PDFs online | Pode exigir upload de PDFs; limitações de privacidade e recursos variam conforme o serviço |
| Python | Tarefas automatizadas ou recorrentes de contagem de páginas de PDF | Requer um ambiente Python e conhecimento básico de programação |
Método 1: Contar páginas de PDF com um leitor de PDF para desktop
Leitores de PDF para desktop permitem verificar o número total de páginas de um PDF offline sem fazer upload do arquivo. Se você já usa um para ler ou revisar documentos PDF, pode encontrar rapidamente a contagem de páginas nos controles de navegação. As etapas abaixo usam o Adobe Acrobat Reader como exemplo.
Instruções passo a passo
Abra o PDF.
Inicie o Adobe Acrobat Reader, selecione Menu > Abrir (ou Arquivo > Abrir, dependendo da interface) e escolha seu arquivo PDF.Localize o indicador de página.
Na interface mais recente do Acrobat, os controles de navegação de página geralmente aparecem na parte inferior do painel direito. A localização pode variar em versões mais antigas.Leia a contagem total de páginas.
O indicador mostra a página atual e o número total de páginas, como 1 / 24. O primeiro número é a página atual; o segundo é o número total de páginas do PDF.
Observação: Alguns PDFs usam rótulos de página personalizados, como algarismos romanos. Esses rótulos podem diferir das posições reais das páginas, portanto, consulte a contagem total de páginas exibida nos controles de navegação em vez dos números impressos em páginas individuais.
Método 2: Contar páginas de PDF em um navegador da web
Se você não tiver um leitor de PDF dedicado instalado, pode usar um navegador da web como o Google Chrome ou o Microsoft Edge para verificar o número total de páginas de um PDF. Ambos os navegadores têm visualizadores de PDF integrados, permitindo abrir arquivos PDF locais e verificar suas contagens de páginas sem fazer upload deles online.
Instruções passo a passo
Abra o PDF no seu navegador.
Inicie o Chrome ou o Edge e arraste um arquivo PDF do seu computador para uma aba do navegador. Como alternativa, clique com o botão direito no arquivo e escolha Abrir com > Google Chrome ou Microsoft Edge, quando disponível.Encontre o indicador de página.
Procure o campo de navegação de página na barra de ferramentas do visualizador de PDF, geralmente perto da parte superior do documento. Se a barra de ferramentas estiver oculta, mova o ponteiro sobre o PDF.Verifique o número total de páginas.
O visualizador normalmente exibe um valor como 1 / 24. Isso significa que seu PDF contém 24 páginas e você está atualmente na primeira página.
Método 3: Contar páginas de PDF online
Contadores de páginas de PDF online oferecem uma maneira rápida de verificar o número de páginas de um PDF sem instalar um aplicativo de PDF dedicado. Você pode selecionar um arquivo diretamente em uma página da web e visualizar sua contagem de páginas. Algumas ferramentas também oferecem suporte a vários PDFs e permitem exportar os resultados para registro.
Opção 1: Contador de páginas de PDF do NextUtils
Acesse o site do Contador de páginas de PDF do NextUtils.
Clique em Escolher PDFs para selecionar um ou mais arquivos PDF ou arraste e solte-os na página.
Depois que os arquivos são analisados, a ferramenta exibe a contagem de páginas de cada PDF e o total combinado.
Se necessário, exporte os resultados como um arquivo CSV para registro ou análise posterior no Excel.
Opção 2: Contador de páginas de PDF do OS Authority
Abra o site do Contador de páginas de PDF do OS Authority.
Clique em Escolher arquivos para selecionar um ou mais PDFs do seu dispositivo ou arraste e solte-os na página.
Clique em Contar páginas para iniciar o processo.
Visualize a contagem de páginas de cada PDF e o total combinado. Você também pode copiar os resultados ou baixá-los como um arquivo CSV.
Limites de arquivo: O NextUtils oferece suporte a até 50 PDFs por lote, com limite de 50 MB por arquivo. O OS Authority permite até 100 PDFs por lote em computadores, 50 em tablets e 20 em celulares.
Observação de privacidade: Ambas as ferramentas afirmam que os arquivos PDF são processados localmente no seu navegador, em vez de serem enviados a um servidor. No entanto, outros serviços online podem exigir upload de arquivos, e as práticas de privacidade e os limites de uso podem variar. Sempre revise as informações de privacidade atuais de um serviço antes de processar documentos confidenciais.
Método 4: Automatizar a contagem de páginas de PDF com Python
Se você precisa verificar contagens de páginas de PDF regularmente, como quando novos relatórios chegam ou documentos são preparados para impressão, selecionar arquivos manualmente a cada vez pode se tornar repetitivo. O Python permite verificar automaticamente uma pasta, contar as páginas de cada PDF e salvar os resultados em um relatório. Você também pode agendar a execução do script em intervalos regulares.
Com o Spire.PDF para Python, você pode usar a propriedade PdfDocument.Pages.Count para obter contagens de páginas programaticamente sem abrir cada arquivo em um visualizador de PDF.
Instalar o Spire.PDF para Python
Instale a biblioteca usando pip:
pip install Spire.PDF
Contar automaticamente páginas de PDF e gerar um relatório
O script a seguir verifica uma pasta em busca de arquivos PDF, obtém a contagem de páginas de cada documento e salva os resultados em um relatório CSV. Ele também registra arquivos que não podem ser lidos e calcula a contagem combinada de páginas dos PDFs processados com sucesso.
Primeiro, crie uma pasta chamada pdf_files no mesmo diretório do seu script Python e coloque seus documentos PDF dentro dela.
from pathlib import Path
from datetime import datetime
import csv
from spire.pdf import PdfDocument

# Set up the input folder and output report
base_dir = Path(__file__).resolve().parent
input_folder = base_dir / "pdf_files"

timestamp = datetime.now().strftime("%Y%m%d_%H%M%S")
report_file = base_dir / f"pdf_page_counts_{timestamp}.csv"

if not input_folder.is_dir():
    raise FileNotFoundError("The 'pdf_files' folder does not exist.")

# Find PDF files in the folder
pdf_files = sorted(
    file for file in input_folder.iterdir()
    if file.is_file() and file.suffix.lower() == ".pdf"
)

results = []
total_pages = 0
successful_files = 0

# Count pages in each PDF
for pdf_file in pdf_files:
    pdf = PdfDocument()

    try:
        pdf.LoadFromFile(str(pdf_file))
        count = pdf.Pages.Count

        results.append([pdf_file.name, count, "Success"])
        total_pages += count
        successful_files += 1

    except Exception as e:
        results.append([pdf_file.name, "", f"Failed: {e}"])
        print(f"Failed to read {pdf_file.name}: {e}")

    finally:
        pdf.Close()

# Save the results to a CSV report
with report_file.open("w", newline="", encoding="utf-8-sig") as f:
    writer = csv.writer(f)
    writer.writerow(["File Name", "Page Count", "Status"])
    writer.writerows(results)

print(f"Successfully counted: {successful_files} of {len(pdf_files)} PDFs")
print(f"Failed: {len(pdf_files) - successful_files}")
print(f"Total pages: {total_pages}")
print(f"Report saved to: {report_file}")
Salve o script como count_pdf_pages.py e execute-o com:
python count_pdf_pages.py
Cada execução verifica os PDFs na pasta e gera um relatório CSV com carimbo de data/hora que você pode abrir no Excel. O relatório inclui o nome de cada arquivo, a contagem de páginas e o status de processamento. Arquivos ilegíveis são registrados, e o total combinado inclui apenas documentos processados com sucesso.
Dica: Para automatizar verificações recorrentes, você pode agendar o script usando o Agendador de Tarefas do Windows ou o cron no macOS e Linux. O script processa apenas PDFs diretamente dentro de pdf_files, não aqueles em subpastas. Ele lê os documentos sem modificá-los.
Solução de problemas comuns de contagem de páginas de PDF
1. A contagem de páginas não corresponde aos números de página impressos
- Possível causa: Páginas de capa, elementos pré-textuais ou a numeração de seções podem usar rótulos de página separados, como algarismos romanos, ou podem começar a numeração após a primeira página do PDF.
- Como corrigir: Use a contagem total de páginas do visualizador de PDF ou a propriedade de contagem de páginas de uma biblioteca, não o número de página impresso no cabeçalho ou rodapé. A contagem real inclui páginas de capa e páginas em branco.
2. Um PDF não pode ser aberto ou contado
- Possível causa: O PDF está protegido por senha, incompleto ou danificado.
- Como corrigir: Abra-o em um visualizador de PDF confiável e insira a senha correta, se necessário. Baixe o arquivo novamente se ele puder estar incompleto. Para scripts Python, trate erros por arquivo para que um PDF ilegível não interrompa o lote inteiro.
3. Um contador online falha com um PDF grande
- Possível causa: A ferramenta pode ter limites de arquivo, ou seu navegador pode não ter memória suficiente para analisar um documento ou lote grande.
- Como corrigir: Tente menos arquivos por vez, use um visualizador de PDF para desktop ou mude para um script Python que processe os arquivos individualmente.
Conclusão
Para um único PDF, um leitor para desktop como o Adobe Acrobat Reader ou o visualizador de PDF integrado de um navegador oferece uma maneira direta de verificar a contagem total de páginas offline. Contadores de páginas online oferecem verificações rápidas e, quando compatíveis, totais combinados ou exportações CSV. O Python é útil quando você precisa repetir a tarefa automaticamente e manter relatórios de contagem de páginas ao longo do tempo.
Independentemente do método usado, diferencie a contagem real de páginas do PDF de seus rótulos de página impressos, especialmente ao preparar envios ou estimativas de impressão.
Perguntas frequentes
P: Posso contar páginas de PDF sem o Adobe Acrobat?
R: Sim. Você pode abrir um PDF local no Chrome ou no Microsoft Edge, usar um contador de páginas baseado em navegador ou contar páginas programaticamente com Python. Você não precisa do Adobe Acrobat para esses métodos.
P: As páginas em branco contam para o número total de páginas do PDF?
R: Sim. Uma página em branco ainda é uma página no documento PDF, portanto, contadores de páginas e bibliotecas de PDF a incluem no total.
P: Posso contar páginas em arquivos PDF digitalizados?
R: Sim. A contagem de páginas lê a estrutura do documento PDF, portanto, o reconhecimento óptico de caracteres (OCR) não é necessário. As páginas de um PDF digitalizado são contadas mesmo que contenham apenas imagens.
P: A contagem de páginas do PDF é igual ao número de folhas impressas?
R: Não necessariamente. Por exemplo, um PDF de 20 páginas impresso em frente e verso com uma página de PDF por lado pode usar 10 folhas de papel. Configurações de impressão de páginas por folha podem alterar ainda mais o número de folhas físicas.
PDF 페이지 수 세는 방법: 쉬운 4가지 방법
PDF가 제출 페이지 제한을 충족하는지 확인해야 하거나, 인쇄를 준비하거나, 예상한 페이지 수가 포함되어 있는지 확인해야 하나요? 데스크톱 PDF 리더, 웹 브라우저 또는 온라인 도구를 사용하여 PDF 페이지 수를 빠르게 셀 수 있습니다. 반복적인 작업의 경우 Python으로 프로세스를 자동화하고 페이지 수 보고서를 생성할 수 있습니다.
이 가이드에서는 네 가지 방법 모두에 대한 단계별 지침을 제공합니다. 또한 PDF의 전체 페이지 수가 문서에 인쇄된 페이지 번호와 다를 수 있는 이유도 설명합니다.
PDF 페이지 수 세는 방법 한눈에 보기
가장 좋은 방법은 사용 가능한 도구, 확인해야 하는 PDF 수, 작업이 일회성인지 반복적인지에 따라 달라집니다. 아래에서 옵션을 비교해 보세요.
| 방법 | 적합한 용도 | 제한 사항 |
|---|---|---|
| 데스크톱 PDF 리더(Adobe Acrobat Reader) | 오프라인에서 PDF 페이지 수 세기 | PDF 리더가 설치되어 있어야 함, 수동 확인 필요 |
| 웹 브라우저(Chrome 또는 Edge) | 전용 PDF 리더 없이 오프라인에서 PDF 페이지 수 세기 | 한 번에 한 파일에 가장 적합 |
| 온라인 PDF 페이지 카운터 | 온라인에서 하나 또는 여러 PDF의 페이지 수를 빠르게 세기 | PDF 업로드가 필요할 수 있음, 개인정보 보호 및 기능 제한은 서비스마다 다름 |
| Python | 자동화되거나 반복적인 PDF 페이지 수 세기 작업 | Python 환경과 기본적인 코딩 지식 필요 |
방법 1: 데스크톱 PDF 리더로 PDF 페이지 수 세기
데스크톱 PDF 리더를 사용하면 파일을 업로드하지 않고 오프라인에서 PDF의 전체 페이지 수를 확인할 수 있습니다. 이미 PDF 문서를 읽거나 검토하는 데 사용하고 있다면 탐색 컨트롤에서 페이지 수를 빠르게 찾을 수 있습니다. 아래 단계는 Adobe Acrobat Reader를 예로 사용합니다.
단계별 지침
PDF를 엽니다.
Adobe Acrobat Reader를 실행하고 메뉴 > 열기(또는 인터페이스에 따라 파일 > 열기)를 선택한 다음 PDF 파일을 선택합니다.페이지 표시기를 찾습니다.
최신 Acrobat 인터페이스에서는 페이지 탐색 컨트롤이 일반적으로 오른쪽 패널 하단에 나타납니다. 이전 버전에서는 위치가 다를 수 있습니다.전체 페이지 수를 확인합니다.
표시기에는 현재 페이지와 전체 페이지 수가 표시됩니다(예: 1 / 24). 첫 번째 숫자는 현재 페이지이고, 두 번째 숫자는 PDF의 전체 페이지 수입니다.
참고: 일부 PDF는 로마 숫자와 같은 사용자 지정 페이지 레이블을 사용합니다. 이러한 레이블은 실제 페이지 위치와 다를 수 있으므로 개별 페이지에 인쇄된 숫자가 아니라 탐색 컨트롤에 표시되는 전체 페이지 수를 참조하세요.
방법 2: 웹 브라우저에서 PDF 페이지 수 세기
전용 PDF 리더가 설치되어 있지 않은 경우 Google Chrome 또는 Microsoft Edge와 같은 웹 브라우저를 사용하여 PDF의 전체 페이지 수를 확인할 수 있습니다. 두 브라우저 모두 내장 PDF 뷰어가 있어 로컬 PDF 파일을 온라인에 업로드하지 않고도 열어 페이지 수를 확인할 수 있습니다.
단계별 지침
브라우저에서 PDF를 엽니다.
Chrome 또는 Edge를 실행한 다음 컴퓨터에서 PDF 파일을 브라우저 탭으로 끌어다 놓습니다. 또는 파일을 마우스 오른쪽 버튼으로 클릭하고 사용 가능한 경우 연결 프로그램 > Google Chrome 또는 Microsoft Edge를 선택합니다.페이지 표시기를 찾습니다.
일반적으로 문서 상단 근처에 있는 PDF 뷰어 도구 모음에서 페이지 탐색 필드를 찾습니다. 도구 모음이 숨겨져 있으면 포인터를 PDF 위로 이동하세요.전체 페이지 수를 확인합니다.
뷰어에는 일반적으로 1 / 24와 같은 값이 표시됩니다. 이는 PDF에 24페이지가 있으며 현재 첫 페이지에 있다는 의미입니다.
방법 3: 온라인에서 PDF 페이지 수 세기
온라인 PDF 페이지 카운터는 전용 PDF 애플리케이션을 설치하지 않고 PDF의 페이지 수를 빠르게 확인할 수 있는 방법을 제공합니다. 웹페이지에서 직접 파일을 선택하고 페이지 수를 볼 수 있습니다. 일부 도구는 여러 PDF를 지원하고 기록용으로 결과를 내보낼 수도 있습니다.
옵션 1: NextUtils PDF 페이지 카운터
NextUtils PDF 페이지 카운터 웹사이트를 방문합니다.
PDF 선택을 클릭하여 하나 이상의 PDF 파일을 선택하거나 페이지로 끌어다 놓습니다.
파일이 분석되면 도구에 각 PDF의 페이지 수와 합계가 표시됩니다.
필요한 경우 기록용 또는 Excel에서 추가 분석을 위해 결과를 CSV 파일로 내보냅니다.
옵션 2: OS Authority PDF 페이지 카운터
OS Authority PDF 페이지 카운터 웹사이트를 엽니다.
파일 선택을 클릭하여 기기에서 하나 이상의 PDF를 선택하거나 페이지로 끌어다 놓습니다.
페이지 세기를 클릭하여 프로세스를 시작합니다.
각 PDF의 페이지 수와 합계를 확인합니다. 결과를 복사하거나 CSV 파일로 다운로드할 수도 있습니다.
파일 제한: NextUtils는 배치당 최대 50개의 PDF를 지원하며 파일당 50MB 제한이 있습니다. OS Authority는 컴퓨터에서 배치당 최대 100개의 PDF, 태블릿에서 50개, 휴대폰에서 20개를 허용합니다.
개인정보 보호 참고: 두 도구 모두 PDF 파일이 서버에 업로드되지 않고 브라우저에서 로컬로 처리된다고 명시합니다. 그러나 다른 온라인 서비스는 파일 업로드가 필요할 수 있으며 개인정보 보호 관행과 사용 제한은 다를 수 있습니다. 민감한 문서를 처리하기 전에 항상 서비스의 현재 개인정보 보호 정보를 검토하세요.
방법 4: Python으로 PDF 페이지 수 세기 자동화
새 보고서가 도착할 때나 인쇄를 위해 문서를 준비할 때처럼 PDF 페이지 수를 정기적으로 확인해야 하는 경우, 매번 수동으로 파일을 선택하는 작업이 반복될 수 있습니다. Python을 사용하면 폴더를 자동으로 검사하고 각 PDF의 페이지 수를 세고 결과를 보고서로 저장할 수 있습니다. 스크립트가 정기적으로 실행되도록 예약할 수도 있습니다.
Spire.PDF for Python을 사용하면 PDF 뷰어에서 각 파일을 열지 않고도 PdfDocument.Pages.Count 속성을 사용하여 프로그래밍 방식으로 페이지 수를 가져올 수 있습니다.
Spire.PDF for Python 설치
pip를 사용하여 라이브러리를 설치합니다:
pip install Spire.PDF
PDF 페이지 수를 자동으로 세고 보고서 생성
다음 스크립트는 폴더에서 PDF 파일을 검사하고, 각 문서의 페이지 수를 가져오고, 결과를 CSV 보고서로 저장합니다. 또한 읽을 수 없는 파일을 기록하고 성공적으로 처리된 PDF의 총 페이지 수를 계산합니다.
먼저 Python 스크립트와 같은 디렉터리에 pdf_files라는 폴더를 만들고 PDF 문서를 그 안에 넣습니다.
from pathlib import Path
from datetime import datetime
import csv
from spire.pdf import PdfDocument

# Set up the input folder and output report
base_dir = Path(__file__).resolve().parent
input_folder = base_dir / "pdf_files"

timestamp = datetime.now().strftime("%Y%m%d_%H%M%S")
report_file = base_dir / f"pdf_page_counts_{timestamp}.csv"

if not input_folder.is_dir():
    raise FileNotFoundError("The 'pdf_files' folder does not exist.")

# Find PDF files in the folder
pdf_files = sorted(
    file for file in input_folder.iterdir()
    if file.is_file() and file.suffix.lower() == ".pdf"
)

results = []
total_pages = 0
successful_files = 0

# Count pages in each PDF
for pdf_file in pdf_files:
    pdf = PdfDocument()

    try:
        pdf.LoadFromFile(str(pdf_file))
        count = pdf.Pages.Count

        results.append([pdf_file.name, count, "Success"])
        total_pages += count
        successful_files += 1

    except Exception as e:
        results.append([pdf_file.name, "", f"Failed: {e}"])
        print(f"Failed to read {pdf_file.name}: {e}")

    finally:
        pdf.Close()

# Save the results to a CSV report
with report_file.open("w", newline="", encoding="utf-8-sig") as f:
    writer = csv.writer(f)
    writer.writerow(["File Name", "Page Count", "Status"])
    writer.writerows(results)

print(f"Successfully counted: {successful_files} of {len(pdf_files)} PDFs")
print(f"Failed: {len(pdf_files) - successful_files}")
print(f"Total pages: {total_pages}")
print(f"Report saved to: {report_file}")
스크립트를 count_pdf_pages.py로 저장하고 다음 명령으로 실행합니다:
python count_pdf_pages.py
실행할 때마다 폴더의 PDF를 확인하고 Excel에서 열 수 있는 타임스탬프가 포함된 CSV 보고서를 생성합니다. 보고서에는 각 파일 이름, 페이지 수, 처리 상태가 포함됩니다. 읽을 수 없는 파일은 기록되며, 합계에는 성공적으로 처리된 문서만 포함됩니다.
팁: 반복적인 확인을 자동화하려면 Windows 작업 스케줄러 또는 macOS 및 Linux의 cron을 사용하여 스크립트를 예약할 수 있습니다. 이 스크립트는 하위 폴더가 아닌 pdf_files 내부에 직접 있는 PDF만 처리합니다. 문서를 수정하지 않고 읽습니다.
일반적인 PDF 페이지 수 관련 문제 해결
1. 페이지 수가 인쇄된 페이지 번호와 일치하지 않음
- 가능한 원인: 표지 페이지, 앞부분 또는 섹션 번호 매기기가 로마 숫자와 같은 별도의 페이지 레이블을 사용하거나 첫 PDF 페이지 이후부터 번호 매기기를 시작할 수 있습니다.
- 해결 방법: 머리글 또는 바닥글에 인쇄된 페이지 번호가 아니라 PDF 뷰어의 전체 페이지 수 또는 라이브러리의 페이지 수 속성을 사용하세요. 실제 수에는 표지와 빈 페이지가 포함됩니다.
2. PDF를 열거나 페이지 수를 셀 수 없음
- 가능한 원인: PDF가 암호로 보호되어 있거나, 불완전하거나, 손상되었을 수 있습니다.
- 해결 방법: 신뢰할 수 있는 PDF 뷰어에서 열고 필요한 경우 올바른 암호를 입력하세요. 파일이 불완전할 수 있는 경우 다시 다운로드하세요. Python 스크립트의 경우 읽을 수 없는 PDF 하나가 전체 배치를 중단하지 않도록 파일별로 오류를 처리하세요.
3. 온라인 카운터가 큰 PDF에서 실패함
- 가능한 원인: 도구에 파일 제한이 있거나 브라우저에 큰 문서 또는 배치를 분석할 충분한 메모리가 없을 수 있습니다.
- 해결 방법: 한 번에 더 적은 파일을 시도하거나, 데스크톱 PDF 뷰어를 사용하거나, 파일을 개별적으로 처리하는 Python 스크립트로 전환하세요.
결론
단일 PDF의 경우 Adobe Acrobat Reader와 같은 데스크톱 리더 또는 브라우저의 내장 PDF 뷰어를 사용하면 오프라인에서 전체 페이지 수를 간단하게 확인할 수 있습니다. 온라인 페이지 카운터는 빠른 확인과, 지원되는 경우 합계 또는 CSV 내보내기를 제공합니다. Python은 작업을 자동으로 반복하고 시간 경과에 따른 페이지 수 보고서를 유지해야 할 때 유용합니다.
어떤 방법을 사용하든 특히 제출물을 준비하거나 인쇄 견적을 낼 때 PDF의 실제 페이지 수와 인쇄된 페이지 레이블을 구분하세요.
자주 묻는 질문
질문: Adobe Acrobat 없이 PDF 페이지 수를 셀 수 있나요?
답변: 예. Chrome 또는 Microsoft Edge에서 로컬 PDF를 열거나, 브라우저 기반 페이지 카운터를 사용하거나, Python으로 프로그래밍 방식으로 페이지 수를 셀 수 있습니다. 이러한 방법에는 Adobe Acrobat이 필요하지 않습니다.
질문: 빈 페이지도 PDF 전체 페이지 수에 포함되나요?
답변: 예. 빈 페이지도 PDF 문서의 페이지이므로 페이지 카운터와 PDF 라이브러리에서 총계에 포함합니다.
질문: 스캔한 PDF 파일의 페이지 수를 셀 수 있나요?
답변: 예. 페이지 수 세기는 PDF의 문서 구조를 읽으므로 광학 문자 인식(OCR)이 필요하지 않습니다. 스캔한 PDF의 페이지는 이미지만 포함되어 있어도 계산됩니다.
질문: PDF 페이지 수는 인쇄 매수와 같은가요?
답변: 반드시 그렇지는 않습니다. 예를 들어 한 면에 PDF 페이지 하나씩 양면 인쇄하는 20페이지 PDF는 10장의 용지를 사용할 수 있습니다. 용지당 페이지 인쇄 설정에 따라 실제 용지 매수가 더 달라질 수 있습니다.