Comment écrire des fichiers XLSX avec Python | Spire.XLS
Table des matières
Installer via NuGet
PM> Install-Package Spire.XLS
Liens connexes
La création efficace de fichiers Excel est essentielle dans les flux de travail basés sur Python pour l'analyse de données, le reporting et l'automatisation. Parmi les nombreuses bibliothèques disponibles, Spire.XLS for Python se distingue comme une solution puissante et indépendante d'Excel qui prend en charge des fonctionnalités complexes telles que les graphiques, les formules, la mise en forme conditionnelle, le cryptage et la gestion de grands ensembles de données.
Ce guide montrera comment écrire des fichiers XLSX avec Python en utilisant Spire.XLS for Python, couvrant les détails de l'écriture de base à la mise en forme avancée, le tout en utilisant la bibliothèque Excel fiable et prête pour l'entreprise.
- Comment écrire des fichiers XLSX avec Spire.XLS for Python
- Écrire différents types de données dans des fichiers XLSX avec Python
- Appliquer des formats et des styles aux cellules Excel avec Python
Comment écrire des fichiers XLSX avec Spire.XLS for Python
Pourquoi utiliser Spire.XLS for Python ?
Spire.XLS for Python est une bibliothèque riche en fonctionnalités qui permet aux développeurs de lire, d'écrire et de manipuler des fichiers Excel sans avoir besoin de Microsoft Office. Elle est conçue pour la performance et la flexibilité, ce qui la rend idéale pour les tâches d'automatisation et les rapports à grande échelle.
Principaux avantages :
- API tout-en-un : Lecture/écriture de .xls et .xlsx, mise en forme des cellules, insertion de formules, conversion de fichiers, et plus encore.
- Support multiplateforme : Disponible pour .NET, Java, Python, et compatible avec les environnements basés sur le cloud.
- Fonctionnalités Excel avancées : Prend en charge les graphiques, les tableaux croisés dynamiques, la mise en forme conditionnelle et la protection.
- Documentation et support fiables : Référence API complète, tutoriels, forum des développeurs et équipe de support.
- Édition gratuite disponible : Idéale pour le traitement léger de fichiers Excel sans frais de licence.
Installation de Spire.XLS for Python
Vous pouvez installer la version complète ou la version gratuite de Spire.XLS en fonction de vos besoins.
Version complète :
pip install spire.xls
Version gratuite (pour les fichiers plus petits et les cas d'utilisation de base) :
pip install spire.xls.free
Étapes de base pour l'écriture de fichiers XLSX
Pour écrire dans des fichiers Excel avec Python, suivez ces étapes fondamentales :
- Créez un nouveau classeur Excel via le constructeur Workbook().
- Chargez un fichier XLSX existant (facultatif) avec la méthode Workbook.LoadFromFile().
- Ajoutez ou obtenez une feuille de calcul en utilisant la méthode Workbook.Worksheets.Add() ou la méthode get_Item().
- Accédez aux cellules via la méthode Worksheet.Range.get_Item().
- Écrivez des données en utilisant les propriétés de la classe CellRange, telles que Value, Text, NumberValue, etc.
- Enregistrez le classeur en utilisant la méthode Workbook.SaveToFile().
Exemple de code d'écriture de fichier XLSX de base
- Python
from spire.xls import Workbook, ExcelVersion
# Créer un objet Workbook
workbook = Workbook()
# Obtenir la première feuille de calcul par défaut
sheet = workbook.Worksheets.get_Item(0)
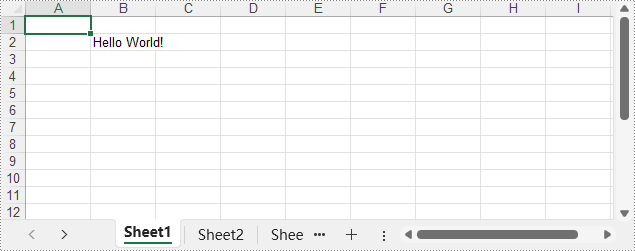
# Écrire une chaîne dans la cellule B2
sheet.Range.get_Item(2, 2).Text = "Bonjour le monde!"
# Enregistrer le classeur
workbook.SaveToFile("output/BasicWorkbook.xlsx", ExcelVersion.Version2016)
workbook.Dispose()
Le fichier XLSX de sortie :
Écrire différents types de données dans des fichiers XLSX avec Python
Spire.XLS offre une série de propriétés dans la classe CellRange qui permettent d'écrire divers types de données directement dans les cellules Excel, tels que des chaînes de caractères, des valeurs date-heure, des valeurs booléennes et des valeurs numériques. Cela facilite l'écriture de valeurs typées directement dans les cellules d'un fichier XLSX par les développeurs.
Types de données pris en charge et leurs propriétés
| Propriété | Type de valeur | Fonction |
| NumberValue | float | Définit une valeur numérique |
| Text | str | Définit du texte brut |
| DateTimeValue | datetime | Définit une date et une heure |
| BooleanValue | bool | Définit une valeur booléenne |
| Formula | str | Insère une formule |
| HtmlString | str | Insère du texte formaté en HTML |
| Value | str | Définit une valeur générique |
Exemple de code – Écriture de divers types de données
- Python
from spire.xls import Workbook, ExcelVersion, DateTime, HorizontalAlignType, Stream, ImageFormatType
# Créer un objet Workbook
workbook = Workbook()
# Obtenir la première feuille de calcul par défaut
sheet = workbook.Worksheets.get_Item(0)
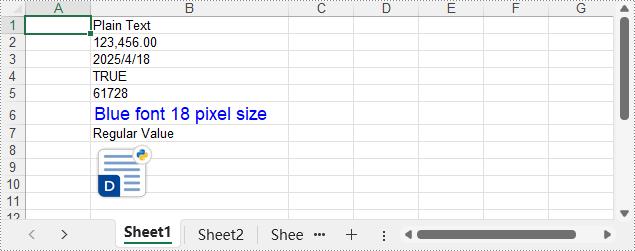
# Écrire du texte dans la cellule B1
sheet.Range.get_Item(1, 2).Text = "Texte brut"
# Écrire un nombre dans la cellule B2
sheet.Range.get_Item(2, 2).NumberValue = 123456
sheet.Range.get_Item(2, 2).NumberFormat = "#,##0.00"
# Écrire une date dans la cellule B3
sheet.Range.get_Item(3, 2).DateTimeValue = DateTime.get_UtcNow()
# Écrire une valeur booléenne dans la cellule B4
sheet.Range.get_Item(4, 2).BooleanValue = True
# Écrire une formule dans la cellule B5
sheet.Range.get_Item(5, 2).Formula = "B2/2"
# Écrire une chaîne HTML dans la cellule B6
sheet.Range.get_Item(6, 2).HtmlString = "<p><span style='color: blue; font-size: 18px;'>Police bleue taille 18 pixels</span></p>"
# Écrire une valeur normale dans la cellule B7
sheet.Range.get_Item(7, 2).Value = "Valeur normale"
# Insérer une image dans la cellule B8
with open("Logo.png", "rb") as f:
imageBytes = f.read()
stream = Stream(imageBytes)
sheet.Pictures.Add(8, 2, stream, ImageFormatType.Png)
# Appliquer une mise en forme de base
sheet.Range.get_Item(1, 2, 8, 2).HorizontalAlignment = HorizontalAlignType.Left
sheet.AutoFitColumn(2)
for i in range(sheet.Range.Columns.Count):
for j in range(sheet.Range.Rows.Count):
sheet.Range.get_Item(j + 1, i + 1).HorizontalAlignment = HorizontalAlignType.Left
# Enregistrer le classeur dans un fichier XLSX
workbook.SaveToFile("output/WriteDataExcelCell.xlsx", ExcelVersion.Version2016)
workbook.Dispose()
Le fichier XLSX de sortie :
Appliquer des formats et des styles aux cellules Excel avec Python
La mise en forme joue un rôle clé pour rendre les rapports Excel clairs et professionnels. Avec Spire.XLS for Python, vous pouvez personnaliser l'apparence des cellules en utilisant des polices, des couleurs, des alignements, des formats de nombre et des styles intégrés. Ces outils aident à améliorer la lisibilité et à présenter vos données de manière soignée et cohérente, ce qui est idéal pour le reporting et l'automatisation.
L'exemple de code suivant montre comment mettre en forme des feuilles de calcul avec Python.
Mettre en forme les cellules avec police, couleur, bordure et alignement
- Python
from spire.xls import Workbook, Color, LineStyleType, BordersLineType, HorizontalAlignType
# Créer un objet Workbook
workbook = Workbook()
# Charger le fichier XLSX
workbook.LoadFromFile("Sample.xlsx")
# Obtenir la première feuille de calcul
sheet = workbook.Worksheets.get_Item(0)
# Définir les styles de police
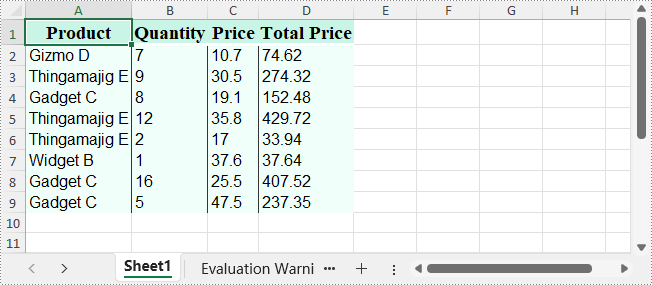
# Ligne d'en-tête
sheet.Rows.get_Item(0).Style.Font.FontName = "Times New Roman"
sheet.Rows.get_Item(0).Style.Font.Size = 14
sheet.Rows.get_Item(0).Style.Font.IsBold = True
# Lignes de données
for i in range(1, sheet.Rows.Count):
sheet.Rows.get_Item(i).Style.Font.FontName = "Arial"
sheet.Rows.get_Item(i).Style.Font.Size = 12
# Définir les couleurs des cellules
# Ligne d'en-tête
sheet.Rows.get_Item(0).Style.Color = Color.FromRgb(200, 245, 230)
# Lignes de données
for i in range(1, sheet.Rows.Count):
sheet.Rows.get_Item(i).Style.Color = Color.FromRgb(240, 255, 250)
# Définir les styles de bordure
# Ligne d'en-tête
sheet.Rows.get_Item(0).Style.Borders.get_Item(BordersLineType.EdgeBottom).LineStyle = LineStyleType.Thick
sheet.Rows.get_Item(0).Style.Borders.get_Item(BordersLineType.EdgeBottom).Color = Color.get_White()
# Lignes de données
for i in range(1, sheet.Rows.Count):
sheet.Rows.get_Item(i).BorderInside(LineStyleType.Thin, Color.get_Black())
# Définir l'alignement
# Ligne d'en-tête
sheet.Rows.get_Item(0).Style.HorizontalAlignment = HorizontalAlignType.Center
# Lignes de données
for i in range(1, sheet.Rows.Count):
sheet.Rows.get_Item(i).Style.HorizontalAlignment = HorizontalAlignType.Left
# Ajuster automatiquement la largeur de la colonne
for i in range(sheet.Columns.Count):
sheet.AutoFitColumn(i + 1)
# Enregistrer le fichier Excel
workbook.SaveToFile("output/FormatXLSXFile.xlsx")
workbook.Dispose()
Le fichier XLSX de sortie :
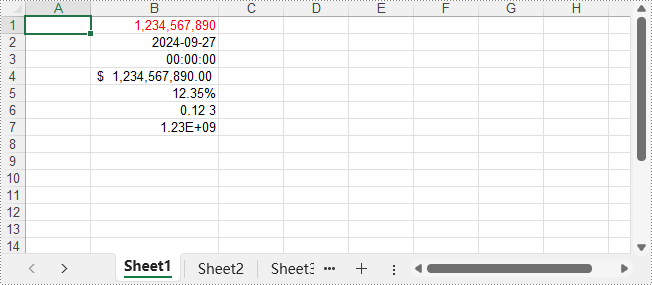
Définir les formats de nombre pour les cellules
- Python
from spire.xls import Workbook, ExcelVersion

# Créer une instance de Workbook
workbook = Workbook()

# Obtenir la première feuille de calcul
sheet = workbook.Worksheets.get_Item(0)

# Mettre en forme une cellule en tant que nombre
sheet.Range.get_Item(1, 2).NumberValue = 1234567890
sheet.Range.get_Item(1, 2).NumberFormat = "[Red]#,##0;[Green]#,##0"

# Mettre en forme une cellule en tant que date
sheet.Range.get_Item(2, 2).NumberValue = 45562
sheet.Range.get_Item(2, 2).NumberFormat = "yyyy-mm-dd"

# Mettre en forme une cellule en tant qu'heure
sheet.Range.get_Item(3, 2).NumberValue = 45562
sheet.Range.get_Item(3, 2).NumberFormat = "hh:mm:ss"

# Mettre en forme une cellule en tant que devise
sheet.Range.get_Item(4, 2).NumberValue = 1234567890
sheet.Range.get_Item(4, 2).NumberFormat = "_($* #,##0.00_);_($* (#,##0.00);_($* ""-""??_);_(@_)"

# Mettre en forme une cellule en tant que pourcentage
sheet.Range.get_Item(5, 2).NumberValue = 0.1234567890
sheet.Range.get_Item(5, 2).NumberFormat = "0.00%"

# Mettre en forme une cellule en tant que fraction
sheet.Range.get_Item(6, 2).NumberValue = 0.1234567890
sheet.Range.get_Item(6, 2).NumberFormat = "0.00_ ?"

# Mettre en forme une cellule en tant que nombre scientifique
sheet.Range.get_Item(7, 2).NumberValue = 1234567890
sheet.Range.get_Item(7, 2).NumberFormat = "0.00E+00"

# Ajuster automatiquement la largeur de la colonne
for i in range(sheet.Columns.Count):
    sheet.AutoFitColumn(i + 1)

# Enregistrer le fichier Excel
workbook.SaveToFile("output/SetNumberFormat.xlsx", ExcelVersion.Version2016)
workbook.Dispose()
Le fichier XLSX de sortie :
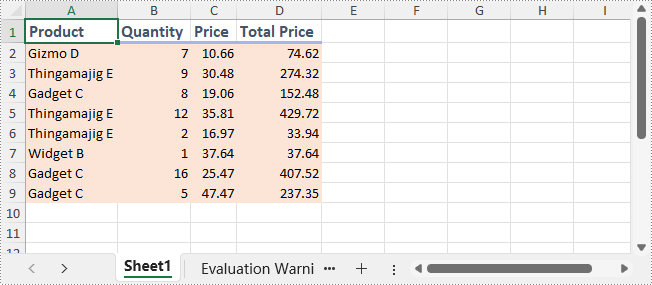
Appliquer des styles intégrés aux cellules
- Python
from spire.xls import Workbook, BuiltInStyles

# Créer une instance de Workbook
workbook = Workbook()

# Charger le fichier Excel
workbook.LoadFromFile("Sample.xlsx")

# Obtenir la première feuille de calcul
sheet = workbook.Worksheets.get_Item(0)

# Appliquer le style d'en-tête intégré à la première ligne
sheet.Rows.get_Item(0).BuiltInStyle = BuiltInStyles.Heading2

# Appliquer le style de pied de page intégré aux lignes de données
for i in range(1, sheet.Rows.Count):
    sheet.Rows.get_Item(i).BuiltInStyle = BuiltInStyles.Accent2_20

# Ajuster automatiquement la largeur de la colonne
for i in range(sheet.Columns.Count):
    sheet.AutoFitColumn(i + 1)

# Enregistrer le fichier Excel
workbook.SaveToFile("output/ApplyBuiltInStyle.xlsx")
workbook.Dispose()
Le fichier XLSX de sortie :
Conclusion
Dans ce guide, nous avons exploré comment écrire des fichiers XLSX avec Python en utilisant Spire.XLS, de l'écriture de base à la mise en forme. Qu'il s'agisse de générer des rapports, d'automatiser des exportations ou de créer des applications basées sur les données, Spire.XLS for Python offre une solution fiable et efficace pour la génération de fichiers Excel.
Obtenir une licence gratuite
Vous pouvez demander une licence d'essai gratuite de 30 jours pour la version complète de Spire.XLS for Python. Cela vous permet d'explorer toutes les fonctionnalités avancées sans limitations pendant la période d'essai.
Read Word DOC or DOCX Files in Python - Extract Text, Images, Tables and More

Reading Word documents in Python is a common task for developers who work with document automation, data extraction, or content processing. Whether you're working with modern .docx files or legacy .doc formats, being able to open, read, and extract content like text, tables, and images from Word files can save time and streamline your workflows.
While many Python libraries support .docx, reading .doc files—the older binary format—can be more challenging. Fortunately, there are reliable methods for handling both file types in Python.
In this tutorial, you'll learn how to read Word documents (.doc and .docx) in Python using the Spire.Doc for Python library. We'll walk through practical code examples to extract text, images, tables, comments, lists, and even metadata. Whether you're building an automation script or a full document parser, this guide will help you work with Word files effectively across formats.
Table of Contents
- Why Read Word Documents Programmatically in Python?
- Install the Library for Parsing Word Documents in Python
- Read Text from Word DOC or DOCX in Python
- Read Specific Elements from a Word Document in Python
- Conclusion
- FAQs
Why Read Word Documents Programmatically in Python?
Reading Word files using Python allows for powerful automation of content processing tasks, such as:
- Extracting data from reports, resumes, or forms.
- Parsing and organizing content into databases or dashboards.
- Converting or analyzing large volumes of Word documents.
- Integrating document reading into web apps, APIs, or back-end systems.
Programmatic reading eliminates manual copy-paste workflows and ensures consistent and scalable results.
Install the Library for Parsing Word Documents in Python
To read .docx and .doc files in Python, you need a library that can handle both formats. Spire.Doc for Python is a versatile and easy-to-use library that lets you extract text, images, tables, comments, lists, and metadata from Word documents. It runs independently of Microsoft Word, so Office installation is not required.
To get started, install Spire.Doc easily with pip:
pip install Spire.Doc
Read Text from Word DOC or DOCX in Python
Extracting text from Word documents is a common requirement in many automation and data processing tasks. Depending on your needs, you might want to read the entire content or focus on specific sections or paragraphs. This section covers both approaches.
Get Text from Entire Document
When you need to retrieve the complete textual content of a Word document — for tasks like full-text indexing or simple content export — you can use the Document.GetText() method. The following example demonstrates how to load a Word file, extract all text, and save it to a file:
from spire.doc import *

# Load the Word .docx or .doc file
document = Document()
document.LoadFromFile("sample.docx")

# Get all text
text = document.GetText()

# Save to a text file
with open("extracted_text.txt", "w", encoding="utf-8") as file:
    file.write(text)

document.Close()

Get Text from Specific Section or Paragraph
Many documents, such as reports or contracts, are organized into multiple sections. Extracting text from a specific section enables targeted processing when you need content from a particular part only. By iterating through the paragraphs of the selected section, you can isolate the relevant text:
from spire.doc import *

# Load the Word .docx or .doc file
document = Document()
document.LoadFromFile("sample.docx")

# Access the desired section
section = document.Sections[0]

# Get text from the paragraphs of the section
with open("paragraphs_output.txt", "w", encoding="utf-8") as file:
    for paragraph in section.Paragraphs:
        file.write(paragraph.Text + "\n")

document.Close()
Read Specific Elements from a Word Document in Python
Beyond plain text, Word documents often include rich content like images, tables, comments, lists, metadata, and more. These elements can easily be programmatically accessed and extracted.
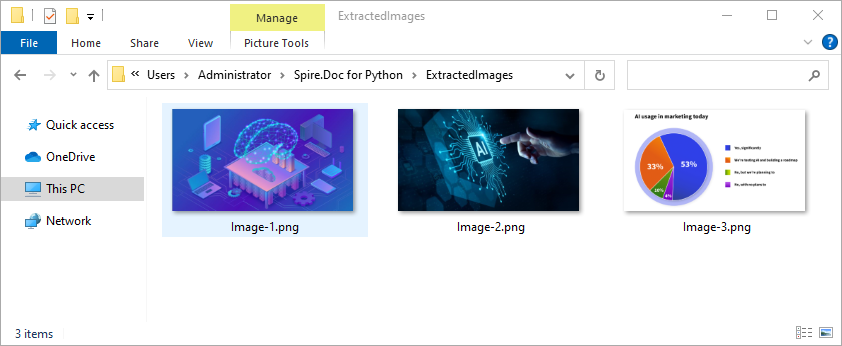
Extract Images
Word documents often embed images like logos, charts, or illustrations. To extract these images:
- Traverse each paragraph and its child objects.
- Identify objects of type DocPicture.
- Retrieve the image bytes and save them as separate files.
from spire.doc import *
import os

# Load the Word document
document = Document()
document.LoadFromFile("sample.docx")

# Create a list to store image byte data
images = []

# Iterate over sections
for s in range(document.Sections.Count):
    section = document.Sections.get_Item(s)

    # Iterate over paragraphs
    for p in range(section.Paragraphs.Count):
        paragraph = section.Paragraphs.get_Item(p)

        # Iterate over child objects
        for c in range(paragraph.ChildObjects.Count):
            obj = paragraph.ChildObjects[c]
            # Extract image data
            if isinstance(obj, DocPicture):
                picture = obj
                # Get image bytes
                dataBytes = picture.ImageBytes
                # Store in the list
                images.append(dataBytes)

# Create the output directory if it doesn't exist
output_folder = "ExtractedImages"
os.makedirs(output_folder, exist_ok=True)

# Save each image from byte data
for i, item in enumerate(images):
    fileName = f"Image-{i+1}.png"
    with open(os.path.join(output_folder, fileName), 'wb') as imageFile:
        imageFile.write(item)

# Close the document
document.Close()
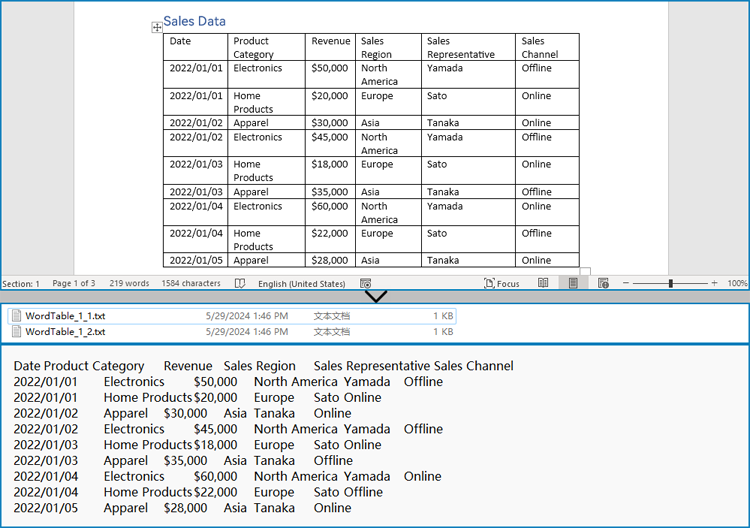
Get Table Data
Tables organize data such as schedules, financial records, or lists. To extract all tables and their content:
- Loop through tables in each section.
- Loop through rows and cells in each table.
- Traverse over each cell’s paragraphs and combine their texts.
- Save the extracted table data in a readable text format.
from spire.doc import *
import os

# Load the Word document
document = Document()
document.LoadFromFile("tables.docx")

# Ensure output directory exists
output_dir = "output/Tables"
os.makedirs(output_dir, exist_ok=True)

# Loop through each section
for s in range(document.Sections.Count):
    section = document.Sections.get_Item(s)
    tables = section.Tables

    # Loop through each table in the section
    for i in range(tables.Count):
        table = tables.get_Item(i)
        table_data = ""

        # Loop through each row
        for j in range(table.Rows.Count):
            row = table.Rows.get_Item(j)

            # Loop through each cell
            for k in range(row.Cells.Count):
                cell = row.Cells.get_Item(k)
                cell_text = ""

                # Combine text from all paragraphs in the cell
                for p in range(cell.Paragraphs.Count):
                    para_text = cell.Paragraphs.get_Item(p).Text
                    cell_text += para_text + " "

                table_data += cell_text.strip()

                # Add tab between cells (except after the last cell)
                if k < row.Cells.Count - 1:
                    table_data += "\t"
            table_data += "\n"

        # Save the table data to a separate text file
        output_path = os.path.join(output_dir, f"WordTable_{s+1}_{i+1}.txt")
        with open(output_path, "w", encoding="utf-8") as output_file:
            output_file.write(table_data)

# Close the document
document.Close()
Read Lists
Lists are frequently used to structure content in Word documents. This example identifies paragraphs formatted as list items and writes the list marker together with the text to a file.
from spire.doc import *

# Load the Word document
document = Document()
document.LoadFromFile("sample.docx")

# Open a text file for writing the list items
with open("list_items.txt", "w", encoding="utf-8") as output_file:

    # Iterate over sections
    for s in range(document.Sections.Count):
        section = document.Sections.get_Item(s)

        # Iterate over paragraphs
        for p in range(section.Paragraphs.Count):
            paragraph = section.Paragraphs.get_Item(p)

            # Check if the paragraph is a list
            if paragraph.ListFormat.ListType != ListType.NoList:
                # Write the combined list marker and paragraph text to file
                output_file.write(paragraph.ListText + paragraph.Text + "\n")

# Close the document
document.Close()
Extract Comments
Comments are typically used for collaboration and feedback in Word documents. This code retrieves all comments, including the author and content, and saves them to a file with clear formatting for later review or audit.
from spire.doc import *

# Load the Word .docx or .doc document
document = Document()
document.LoadFromFile("sample.docx")

# Open a text file to save comments
with open("extracted_comments.txt", "w", encoding="utf-8") as output_file:

    # Iterate over the comments
    for i in range(document.Comments.Count):
        comment = document.Comments.get_Item(i)

        # Write comment header with comment number
        output_file.write(f"Comment {i + 1}:\n")

        # Write comment author
        output_file.write(f"Author: {comment.Format.Author}\n")

        # Extract full comment text by concatenating all paragraph texts
        comment_text = ""
        for j in range(comment.Body.Paragraphs.Count):
            paragraph = comment.Body.Paragraphs[j]
            comment_text += paragraph.Text + "\n"

        # Write the comment text
        output_file.write(f"Content: {comment_text.strip()}\n")

        # Add a blank line between comments
        output_file.write("\n")

# Close the document
document.Close()
Retrieve Metadata (Document Properties)
Metadata provides information about the document such as author, title, creation date, and modification date. This code extracts common built-in properties for reporting or cataloging purposes.
from spire.doc import *

# Load the Word .docx or .doc document
document = Document()
document.LoadFromFile("sample.docx")

# Get the built-in document properties
props = document.BuiltinDocumentProperties

# Open a text file to write the properties
with open("document_properties.txt", "w", encoding="utf-8") as output_file:
    output_file.write(f"Title: {props.Title}\n")
    output_file.write(f"Author: {props.Author}\n")
    output_file.write(f"Subject: {props.Subject}\n")
    output_file.write(f"Created: {props.CreateDate}\n")
    output_file.write(f"Modified: {props.LastSaveDate}\n")

# Close the document
document.Close()
Conclusion
Reading both .doc and .docx Word documents in Python is fully achievable with the right tools. With Spire.Doc, you can:
- Read text from the entire document, any section or paragraph.
- Extract tables and process structured data.
- Export images embedded in the document.
- Extract comments and lists from the document.
- Work with both modern and legacy Word formats without extra effort.
Try Spire.Doc today to simplify your Word document parsing workflows in Python!
FAQs
Q1: How do I read a Word DOC or DOCX file in Python?
A1: Use a Python library like Spire.Doc to load and extract content from Word files.
Q2: Do I need Microsoft Word installed to use Spire.Doc?
A2: No, it works without any Office installation.
Q3: Can I generate or update Word documents with Spire.Doc?
A3: Yes, Spire.Doc not only allows you to read and extract content from Word documents but also provides powerful features to create, modify, and save Word files programmatically.
Get a Free License
To fully experience the capabilities of Spire.Doc for Python without any evaluation limitations, you can request a free 30-day trial license.
Spire.XLS for Java 15.6.3 supports font stream when applying custom fonts
We’re glad to announce the release of Spire.XLS for Java 15.6.3. This version starts to support font stream when applying custom fonts, and support retrieving the cell location of embedded images. Meanwhile, a number of known bugs have been successfully fixed. More details are listed below.
Here is a list of changes made in this release:
| Category | ID | Description |
| New feature | SPIREXLS-5817 | Added support for font stream data when applying custom fonts.
Workbook book = new Workbook();
FileInputStream stream = new FileInputStream("fontpath");
book.setCustomFontStreams(new FileInputStream[]{stream});
|
| New feature | SPIREXLS-5821 | Added support for setting setIsSaveBlankCell to control whether to export extra blank cells when converting Excel to HTML.
Workbook workbook = new Workbook(); workbook.loadFromFile(inputFile); WorksheetsCollection sheets = workbook.getWorksheets(); HTMLOptions options = new HTMLOptions(); options.setImageEmbedded(true); options.setStyleDefine(HTMLOptions.StyleDefineType.Inline); options.setIsSaveBlankCell(true); |
| New feature | SPIREXLS-5822 | Added support for retrieving the cell location of embedded images.
Worksheet worksheet=wb.getWorksheets().get(0); ExcelPicture[] cellimages=worksheet.getCellImages(); cellimages[0].getEmbedCellName() |
| Bug | SPIREXLS-5522 | Fixed the issue where sheet.getCellImages() could not retrieve images inserted by Office 365. |
| Bug | SPIREXLS-5803 | Fixed the issue where page numbering was incorrect when converting Excel to PDF. |
| Bug | SPIREXLS-5812 | Fixed the issue that caused a "NullPointerException" when copying Excel and saving it as .xls. |
| Bug | SPIREXLS-5813 | Fixed the issue where text content was truncated when converting Excel to PDF. |
| Bug | SPIREXLS-5815 | Fixed the issue that caused the error "For input string: 'OP_ID'" when converting CSV to Excel. |
| Bug | SPIREXLS-5816 | Fixed the issue where autoFitColumns() behaved incorrectly. |
| Bug | SPIREXLS-5823 | Fixed the issue where cell styling was inconsistent when converting Excel to HTML with setIsFixedTableColWidth enabled. |
| Bug | SPIREXLS-5844 | Fixed the issue that caused the error "Specified argument was out of the range of valid values" when converting Excel to HTML. |
| Bug | SPIREXLS-5852 SPIREXLS-5855 |
Fixed the issue where Excel was rendered incorrectly when converting to HTML. |
How to Add Data Bars in Excel (Manual & Java Automation Guide)
Table of Contents
Install with Maven
<dependency>
<groupId>e-iceblue</groupId>
<artifactId>spire.xls</artifactId>
<version>15.5.1</version>
</dependency>
Related Links
Working with Excel data can get overwhelming when numbers pile up and insights get buried. Data bars offer a quick, visual way to highlight values directly within cells, making it easy to spot trends and compare numbers at a glance. Whether it’s a sales report, project tracker, or budget sheet, data bars help turn raw data into clear visuals—no charts needed. In this guide, you’ll learn how to add data bars in Excel, both manually and with Java.
- Add Data Bars to Cells in Excel Manually
- Limitations of Manual Operation
- Add Data Bars in Excel Using Java
- Conclusion
How to Add Data Bars to Cells in Excel (Manual Method)
In this section, we’ll walk through the simple steps to add data bars to cells in Excel manually. This method allows you to quickly visualize your data without complex formulas, making it easy to highlight trends and compare values directly within your spreadsheet.
Steps to Add Data Bars in Excel:
- Open your source Excel file.
- Select the range of cells where you want to add data bars.
- Go to the Home tab.
- Click the Conditional Formatting dropdown arrow.
- In the expanded menu, select Data Bars, then choose either Gradient Fill or Solid Fill based on your preference.
Tip: If you want to add solid fill red data bars in Excel, just choose the "Red Data Bar" in the expanded menu.

Limitations of Manual Operation
While manually adding data bars in Excel can be useful for smaller tasks, there are several limitations:
-
Time-Consuming for Multiple Files: If you need to apply data bars to many spreadsheets or worksheets, doing it manually becomes a repetitive and time-consuming process. This is especially problematic when dealing with large datasets or multiple reports.
-
Inconsistent Chart Styles: When working with multiple sheets or teams, manually adding data bars can lead to inconsistencies in chart styles. Without a standardized approach, different users may apply different formats, resulting in uneven visual presentation across reports.
-
Not Ideal for Automated Reporting: For businesses or teams that need to generate reports frequently, manual data bar insertion is impractical. It’s inefficient when dealing with dynamic data or when reports need to be updated regularly, as each update requires manual intervention.
How to Add Data Bars in Excel Using Java
Now that we've covered the limitations of manual data bars, let's move on to an automated solution using Java. For this, we’ll be using Spire.XLS for Java, a powerful library that allows seamless manipulation of Excel files programmatically.
How to Get Started with Spire.XLS for Java
To get started, simply download Spire.XLS or include it in your Java project using Maven:
<repositories>
    <repository>
        <id>com.e-iceblue</id>
        <name>e-iceblue</name>
        <url>https://repo.e-iceblue.com/nexus/content/groups/public/</url>
    </repository>
</repositories>
<dependencies>
    <dependency>
        <groupId>e-iceblue</groupId>
        <artifactId>spire.xls</artifactId>
        <version>16.4.1</version>
    </dependency>
</dependencies>
Once installed, you can start using it to automate your Excel tasks, including adding data bars to your sheets or adding traffic light icons. Now, let’s jump into the code!
The code below demonstrates how to add a light green solid data bar in Excel to visualize the product inventory levels:
import com.spire.xls.*;
import com.spire.xls.core.*;
import java.awt.*;

public class applyDataBars {
    public static void main(String[] args)  {

        // Create a Workbook instance
        Workbook workbook = new Workbook();

        // Load an Excel file
        workbook.loadFromFile("/sales report.xlsx");

        // Get the first worksheet.
        Worksheet sheet = workbook.getWorksheets().get(0);

        // Get the specific cell range
        CellRange range = sheet.getCellRange("B2:B15");

        // Add the conditional formatting of data bars in the cell range
        IConditionalFormat format = range.getConditionalFormats().addCondition();
        format.setFormatType( ConditionalFormatType.DataBar);

        // Set color for the data bars
        format.getDataBar().setBarColor(new Color(180, 220, 180));
        format.getDataBar().setShowValue(true);

        // Save to file
        workbook.saveToFile("/ApplyDataBars.xlsx", ExcelVersion.Version2013);
    }
}

Key Steps Explained:
- Create a Workbook object and load the Excel file
Create a new Workbook object, then load the existing Excel file with Workbook.loadFromFile() method.
- Get the worksheet and define the cell range for conditional formatting
Access the desired worksheet using Workbook.getWorksheets().get() method; and specify the range of cells where you want to apply data bars with Worksheet.getCellRange().
- Add a conditional format to the specified cell range
Use ConditionalFormats. addCondition() method to add a new conditional format to the selected range. Then call ConditionalFormatWrapper.setFormatType() method to set the conditional format type as data bar.
- Set the color of the data bars and choose whether to show values in the cells
Configure the data bar’s color using DataBar().setBarColor() method; and optionally, enable or disable the display of values in the cells with DataBar().setShowValue() method.
Tip: The RGB values in the code represent light green. If you prefer not to adjust the parameters, you can easily add green data bars in Excel by simply setting it to green with:format.getDataBar().setBarColor(Color.GREEN)
- Save the modified Excel workbook as a new file
Save the updated workbook with Workbook.saveToFile() method.
Conclusion
In this guide, we’ve learned how to add data bars in Excel using both manual and Java-based methods. Data bars are a powerful tool for quickly visualizing your data, whether you're working with sales reports, inventory management, or financial data. By automating the process with Java, you can save time and ensure consistency across multiple files.
Ready to boost your Excel productivity? Start applying data bars today and explore more automation options with Spire.XLS for Java!
ALSO READ:
Spire.Presentation 10.6.4 enhances conversions from PowerPoint to PDF
We are delighted to announce the release of Spire.Presentation 10.6.4. The latest version enhances the conversion from PowerPoint to PDF. Besides, the issue where shapes were rendered incorrectly when converting slides to SVG is fixed successfully. More details are listed below.
Here is a list of changes made in this release
| Category | ID | Description |
| Bug | SPIREPPT-2876 | Fixes an issue where shapes were rendered incorrectly when converting slides to SVG. |
| Bug | SPIREPPT-2892 | Fixes an issue where images were cropped during PowerPoint-to-PDF conversion. |
Spire.Doc for Java 13.6.2 supports reading and setting chart formats
We’re pleased to announce the release of Spire.Doc for Java 13.6.2. This version introduces support for getting and setting various chart formats such as chart titles, data labels, coordinate axes, legends and data tables, as well as optimizations in table formatting and Word-to-PDF conversion performance - especially for large documents or complex layouts. In addition, many known issues have been successfully fixed, including TOC update failures, SVG conversion issues, and document comparison errors. More details are listed below.
Here is a list of changes made in this release
| Category | ID | Description |
| New feature | - | Supports getting and setting chart formats, including chart titles, data labels, axes, legends, and data tables. |
| New feature | - | Optimizes the reading and setting of table formats. |
| New feature | - | Optimizes Word-to-PDF conversion performance, reducing processing time and memory usage. |
| Bug | SPIREDOC-10375 | Fixes the issue where TOC (Table of Contents) field updates failed. |
| Bug | SPIREDOC-10582 SPIREDOC-11284 |
Fixes the issue where the “outputToOneSvg” parameter did not take effect during Word-to-SVG conversion. |
| Bug | SPIREDOC-10792 SPIREDOC-11165 |
Fixes the "Key cannot be null" error when comparing Word documents. |
| Bug | SPIREDOC-11237 | Fixes the "Cannot insert an object of type 10 into the 6" error when comparing Word documents. |
| Bug | SPIREDOC-11247 | Fixes blank content issues when comparing Word documents. |
| Bug | SPIREDOC-11264 | Fixes incorrect content retrieval when calling getText(). |
| Bug | SPIREDOC-11281 | Fixes incorrect line styles when accepting revisions. |
Spire.DocViewer 8.9.1 enhances the document rendering on WPF platform
We’re pleased to announce the release of Spire.DocViewer 8.9.1. This version mainly improves the document rendering performance on the WPF platform. More details are listed below.
Here is a list of changes made in this release
| Category | ID | Description |
| Bug | SPIREDOCVIEWER-108 | Fixed the issue where documents displayed incompletely when zoom was set to 120%. |
| Bug | SPIREDOCVIEWER-115 | Optimized document rendering performance on the WPF platform. |
Spire.PDF 11.6.14 enhances the conversions from PDF to Excel, Images and Markdown
We're pleased to announce the release of Spire.PDF 11.6.14. This version enhances the conversions from PDF to Excel/ Images/ Markdown, and also successfully fixes some known issues that occurred when setting fonts and rendering Arabic text. More details are listed below.
Here is a list of all changes made in this release
| Category | ID | Description |
| Bug | SPIREPDF-4390 SPIREPDF-4462 |
Fixes the issue that the Arabic text rendering effect was displayed incorrectly. |
| Bug | SPIREPDF-6586 | Fixes the issue where the content was incorrect when converting PDF to Excel. |
| Bug | SPIREPDF-7177 | Fixes the issue where the bold text styles were lost when converting PDF to Markdown. |
| Bug | SPIREPDF-7381 | Fixes the issue where the output was incorrect when converting PDF to Image. |
| Bug | SPIREPDF-7428 | Fixes the issue where black background images were generated when converting PDF to Image. |
| Bug | SPIREPDF-7498 | Fixes the issue where font size did not auto adjust when setting fonts and "Autosize" for PDF text fields. |
| Bug | SPIREPDF-7522 SPIREPDF-7537 |
Fixed the issue that it was failed to remove JavaScript from a PDF document. |
Spire.XLS 15.6.6 supports the SHEETS function
We are excited to announce the release of Spire.XLS 15.6.6. The latest version supports the SHEETS function. Besides, some known bugs are fixed successfully in this version, such as the issue that the AutoFitColumns effect was not working correctly. More details are listed below.
Here is a list of changes made in this release
| Category | ID | Description |
| New feature | SPIREXLS-5806 | Supports the SHEETS function.
sheet.Range["B2"].Formula = "=SHEETS()"; sheet.Range["B3"].Formula = "=SHEETS(Sheet2!C5)"; sheet.Range["B4"].Formula = "=SHEETS(Sheet3:Sheet5!A1)"; sheet.Range["B6"].Formula = "=SHEETS(Sheet4!C5); |
| Bug | SPIREXLS-5802 | Fixes the issue where the AutoFitColumns effect was not working correctly. |
| Bug | SPIREXLS-5804 | Fixes the issue where the style of shapes was incorrect when copying worksheets. |
| Bug | SPIREXLS-5814 SPIREXLS-5853 |
Fixes the issue where the data was incorrect when saving a sheet as an image. |
| Bug | SPIREXLS-5819 | Fixes the issue where the saved Excel file reported errors when opened. |
| Bug | SPIREXLS-5832 | Fixes the issue where saving an Excel file to PDF/A3B was incorrect. |
| Bug | SPIREXLS-5834 | Fixes the issue where the left and right margins were incorrect when converting Excel to PDF. |
| Bug | SPIREXLS-5841 | Fixes the issue where the content was incorrect when converting a CellRange to an image. |
How to Read PDF Files in Python – Text, Tables, Images, and More
Reading PDF files using Python is essential for tasks like document automation, content analysis, and data scraping. Whether you're working with contracts, reports, invoices, or scientific papers, being able to programmatically access PDF content saves time and enables powerful workflows.
To reliably read PDF content in Python — including text, tables, images, and metadata — you need a reliable Python PDF reader. In this guide, we’ll show you how to read PDFs in Python using Spire.PDF for Python, a professional and easy-to-use library that supports full-featured PDF reading without relying on any third-party tools.
Here's what's covered:
- Preparing Your Environment
- Load a PDF File in Python
- Read Text from PDF Pages in Python
- Read Table Data from PDFs in Python
- Read Images from PDFs in Python
- Read PDF Metadata (Title, Author, etc.)
- Common Questions on Reading PDFs
Environment Setup for Reading PDFs in Python
Spire.PDF for Python is a powerful Python PDF reader that allows users to read PDF content with simple Python code, including text, tables, images, and metadata. It offers a developer-friendly interface and supports a wide range of PDF reading operations:
- Read PDF files from disk or memory
- Access text, tables, metadata, and images
- No need for third-party tools
- High accuracy for structured data reading
- Free version available
It’s suitable for developers who want to read and process PDFs with minimal setup.
You can install Spire.PDF for Python via pip:
pip install spire.pdf
Or the free version Free Spire.PDF for Python for small tasks:
pip install spire.pdf.free
Load a PDF File in Python
Before accessing content, the first step is to load the PDF into memory. Spire.PDF lets you read PDF files from a path on disk or directly from in-memory byte streams — ideal for reading from web uploads or APIs.
Read PDF from File Path
To begin reading a PDF in Python, load the file using PdfDocument.LoadFromFile(). This creates a document object you can use to access content.
from spire.pdf import PdfDocument

# Create a PdfDocument instance
pdf = PdfDocument()
# Load a PDF document
pdf.LoadFromFile("sample.pdf")
Read PDF from Bytes (In-Memory)
To read a PDF file from memory without saving it to disk, you can first load its byte content and then initialize a PdfDocument using a Stream object. This method is especially useful when handling PDF files received from web uploads, APIs, or temporary in-memory data.
from spire.pdf import PdfDocument, Stream

# Read the PDF file to a byte array
with open("sample.pdf", "rb") as f:
    byte_data = f.read()

# Create a stream using the byte array
pdfStream = Stream(byte_data)
# Create a PdfDocument using the stream
pdf = PdfDocument(pdfStream)
To go further, check out this guide: Loading and Saving PDFs via Byte Streams in Python
Read Text from PDF Pages in Python
Reading text from a PDF file is one of the most common use cases in document automation. With Spire.PDF, you can easily retrieve all visible text from the entire PDF or from individual pages using simple methods.
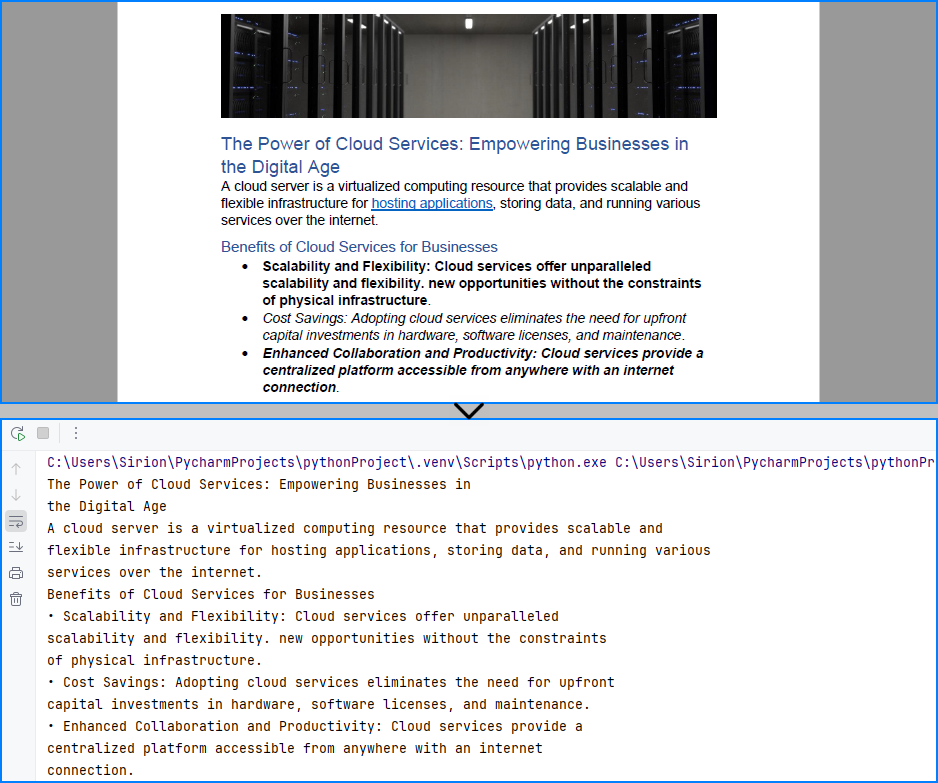
Read All Text from PDF
To extract all text from a PDF, loop through each page and call PdfTextExtractor.ExtractText() to collect visible text content.
from spire.pdf import PdfDocument, PdfTextExtractor, PdfTextExtractOptions

# Create a PdfDocument instance
pdf = PdfDocument()
# Load a PDF document
pdf.LoadFromFile("sample.pdf")

all_text = ""
# Loop through each page
for pageIndex in range(pdf.Pages.Count):
    page = pdf.Pages.get_Item(pageIndex)
    # Create a PdfTextExtract instance
    text_extractor = PdfTextExtractor(page)
    # Configure extracting options
    options = PdfTextExtractOptions()
    options.IsExtractAllText = True
    options.IsSimpleExtraction = True
    # Extract text from the current page
    all_text += text_extractor.ExtractText(options)
print(all_text)
Sample text content retrieved:
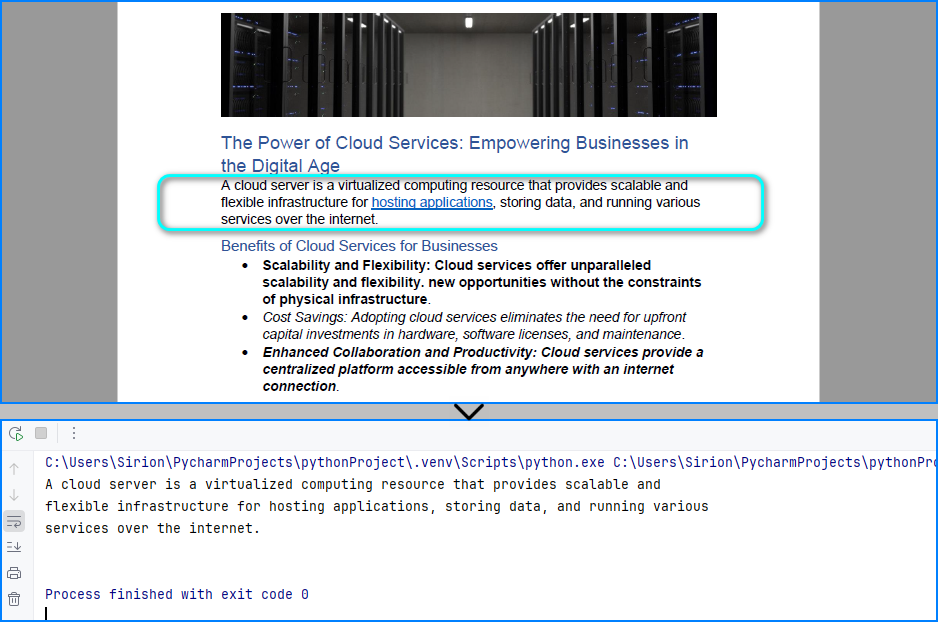
Read Text from Specific Area of a Page
You can also read text from a defined region of a page using a bounding box. This is useful when only a portion of the layout contains relevant information.
from spire.pdf import RectangleF, PdfDocument, PdfTextExtractor, PdfTextExtractOptions

# Load the PDF file
pdf = PdfDocument()
pdf.LoadFromFile("sample.pdf")

# Get the first page
page = pdf.Pages.get_Item(0)
# Create a PdfTextExtractor instance
textExtractor = PdfTextExtractor(page)
# Set the area to extract text by configuring the PdfTextExtractOptions
options = PdfTextExtractOptions()
area = RectangleF.FromLTRB(0, 200, page.Size.Width, 270)  # x, y, width, height
options.ExtractArea = area
options.IsSimpleExtraction = True

# Extract text from the area
text = textExtractor.ExtractText(options)
print(text)
The text read from the PDF page area:
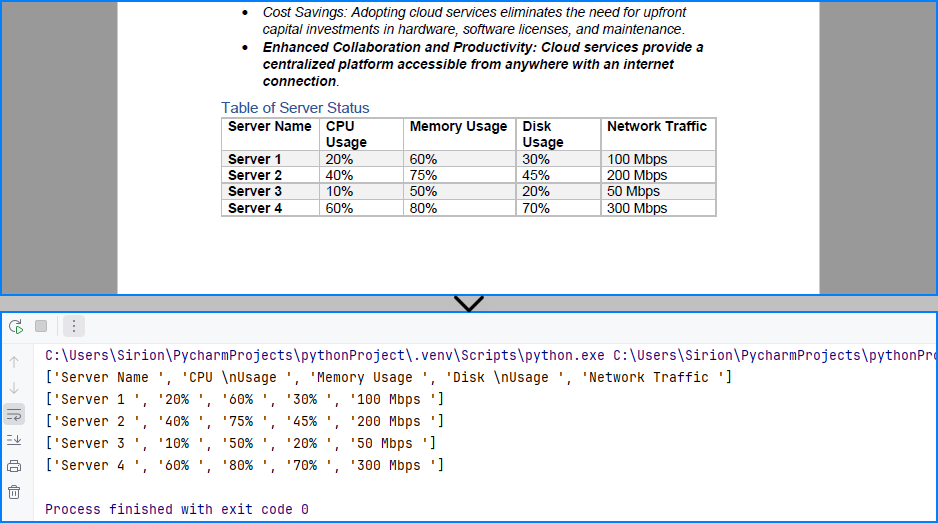
Read Table Data from PDFs in Python
PDF tables are often used in reports, invoices, and statements. With Spire.PDF, you can read PDF tables in Python by extracting structured tabular content using its layout-aware table extractor, making it ideal for financial and business documents. Use PdfTableExtractor.ExtractTable() to detect tables page by page and output each row and cell as structured text.
from spire.pdf import PdfDocument, PdfTableExtractor

# Load the PDF file
pdf = PdfDocument()
pdf.LoadFromFile("sample.pdf")

# Create a PdfTableExtractor instance
table_extractor = PdfTableExtractor(pdf)
# Extract the table from the first page
tables = table_extractor.ExtractTable(0)
for table in tables:
    # Get the number of rows and columns
    row_count = table.GetRowCount()
    column_count = table.GetColumnCount()
    # Iterate all rows
    for i in range(row_count):
        table_row = []
        # Iterate all columns
        for j in range(column_count):
            # Get the cell
            cell_text = table.GetText(i, j)
            table_row.append(cell_text)
        print(table_row)
Table content extracted using the code above:
Want to extract text from scanned PDFs using OCR? Read this guide on OCR with Python
Read Images from PDF in Python
PDF files often contain logos, scanned pages, or embedded images. Spire.PDF allows you to read and export these images, which is helpful for working with digitized documents or preserving visual content. Use PdfImageHelper.GetImagesInfo() on each page to retrieve and save all embedded images.
from spire.pdf import PdfDocument, PdfImageHelper

# Load the PDF file
pdf = PdfDocument()
pdf.LoadFromFile("sample.pdf")

# Get the first page
page = pdf.Pages.get_Item(0)

# Create a PdfImageHelper object
image_helper = PdfImageHelper()
# Get the image information from the page
images_info = image_helper.GetImagesInfo(page)
# Save the images from the page as image files
for i in range(len(images_info)):
    images_info[i].Image.Save("output/Images/image" + str(i) + ".png")
The image read from the PDF file:
Read PDF Metadata (Title, Author, etc.)
Sometimes you may want to access document metadata like author, subject, and title. This can be helpful for indexing or organizing files. Use the ocumentInformation property to read metadata fields.
from spire.pdf import PdfDocument

# Load the PDF file
pdf = PdfDocument()
pdf.LoadFromFile("sample.pdf")

# Get the document properties
properties = pdf.DocumentInformation
print("Title: " + properties.Title)
print("Author: " + properties.Author)
print("Subject: " + properties.Subject)
print("Keywords: " + properties.Keywords)
The metadata read from the PDF document:

Common Questions on Reading PDFs
Can Python parse a PDF file?
Yes. Libraries like Spire.PDF for Python allow you to read PDF text, extract tables, and access embedded images or metadata. It supports methods like PdfTextExtractor.ExtractText() and PdfTableExtractor.ExtractTable() for structured content parsing.
How do I read a PDF in Jupyter?
Spire.PDF works seamlessly in Jupyter Notebooks. Just install it via pip and use its API to read PDF files, extract text, or parse tables and images directly in your notebook environment.
How to read text from a PDF file?
Use the PdfTextExtractor.ExtractText() method on each page after loading the PDF with Spire.PDF. This lets you read PDF file to text in Python and retrieve visible content for processing or analysis.
Can I read a PDF file without saving it to disk?
Yes. You can use LoadFromStream() to read PDF content as bytes and load it directly from memory. This is useful for processing PDFs received from web APIs or file uploads.
Conclusion
With Spire.PDF for Python, you can easily read a PDF in Python — including reading PDF text, tables, images, and metadata — and even read a PDF file to text for further processing or automation. This makes it an ideal solution for document automation, data ingestion, and content parsing in Python.
Need to process large PDF files or unlock all features? Request a free license and take full advantage of Spire.PDF for Python today!