C#/VB.NET : convertir un PDF en linéarisé
Table des matières
Installé via NuGet
PM> Install-Package Spire.PDF
Liens connexes
La linéarisation PDF, également connue sous le nom de « Fast Web View », est un moyen d'optimiser les fichiers PDF. Habituellement, les utilisateurs ne peuvent visualiser un fichier PDF de plusieurs pages en ligne que lorsque leur navigateur Web a téléchargé toutes les pages du serveur. Cependant, si le fichier PDF est linéarisé, les navigateurs peuvent afficher la première page très rapidement même si le téléchargement complet n'est pas terminé. Cet article montrera comment convertir un PDF en linéarisé en C# et VB.NET en utilisant Spire.PDF for .NET.
Installer Spire.PDF for .NET
Pour commencer, vous devez ajouter les fichiers DLL inclus dans le package Spire.PDF for.NET comme références dans votre projet .NET. Les fichiers DLL peuvent être téléchargés à partir de ce lien ou installés via NuGet.
- Package Manager
PM> Install-Package Spire.PDF
Convertir un PDF en linéarisé
Voici les étapes pour convertir un fichier PDF en fichier linéarisé :
- Chargez un fichier PDF à l'aide de la classe PdfToLinearizedPdfConverter.
- Convertissez le fichier en linéarisé à l’aide de la méthode PdfToLinearizedPdfConverter.ToLinearizedPdf().
- C#
- VB.NET
using Spire.Pdf.Conversion;

    namespace ConvertPdfToLinearized
    {
        class Program
        {
            static void Main(string[] args)
            {
                //Load a PDF file
                PdfToLinearizedPdfConverter converter = new PdfToLinearizedPdfConverter("Sample.pdf");
                //Convert the file to a linearized PDF
                converter.ToLinearizedPdf("Linearized.pdf");
            }
        }
    }
Imports Spire.Pdf.Conversion

    Namespace ConvertPdfToLinearized
        Friend Class Program
            Private Shared Sub Main(ByVal args As String())
                'Load a PDF file
                Dim converter As PdfToLinearizedPdfConverter = New PdfToLinearizedPdfConverter("Sample.pdf")
                'Convert the file to a linearized PDF
                converter.ToLinearizedPdf("Linearized.pdf")
            End Sub
        End Class
    End Namespace
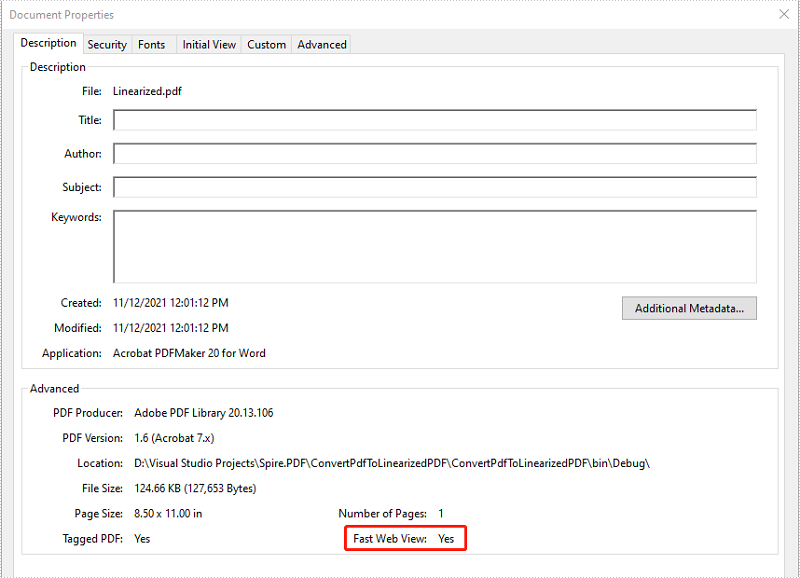
Ouvrez le fichier de résultat dans Adobe Acrobat et jetez un œil aux propriétés du document, vous pouvez voir que la valeur de « Fast Web View » est Oui, ce qui signifie que le fichier est linéarisé.
Demander une licence temporaire
Si vous souhaitez supprimer le message d'évaluation des documents générés ou vous débarrasser des limitations fonctionnelles, veuillez demander une licence d'essai de 30 jours pour toi.
C#/VB.NET: Create a Table in Word
Table of Contents
Installed via NuGet
PM> Install-Package Spire.Doc
Related Links
In MS Word, the tables can organize and present data in rows and columns, which makes the information easier to understand and analyze. In this article, you will learn how to programmatically create a table with data in a Word document using Spire.Doc for .NET.
Install Spire.Doc for .NET
To begin with, you need to add the DLL files included in the Spire.Doc for.NET package as references in your .NET project. The DLL files can be either downloaded from this link or installed via NuGet.
PM> Install-Package Spire.Doc
Create a Simple Table in Word
Below are some of the core classes and methods provided by Spire.Doc for .NET for creating and formatting tables in Word.
| Name | Description |
| Table Class | Represents a table in a Word document. |
| TableRow Class | Represents a row in a table. |
| TableCell Class | Represents a specific cell in a table. |
| Section.AddTbale() Method | Adds a new table to the specified section. |
| Table.ResetCells() Method | Resets row number and column number. |
| Table.Rows Property | Gets the table rows. |
| TableRow.Height Property | Sets the height of the specified row. |
| TableRow.Cells Property | Returns the cells collection. |
| TableRow.RowFormat Property | Gets the format of the specified row. |
The detailed steps are as follows
- Create a Document object and add a section to it.
- Prepare the data for the header row and other rows, storing them in a one-dimensional string array and a two-dimensional string array respectively.
- Add a table to the section using Section.AddTable() method.
- Insert data to the header row, and set the row formatting, including row height, background color, and text alignment.
- Insert data to the rest of the rows and apply formatting to these rows.
- Save the document to another file using Document.SaveToFile() method.
- C#
- VB.NET
using System;
    using System.Drawing;
    using Spire.Doc;
    using Spire.Doc.Documents;
    using Spire.Doc.Fields;

    namespace WordTable
    {
        class Program
        {
            static void Main(string[] args)
            {
                //Create a Document object
                Document doc = new Document();
                //Add a section
                Section s = doc.AddSection();

                //Define the data for the table
                String[] Header = { "Date", "Description", "Country", "On Hands", "On Order" };
                String[][] data = {
                                      new String[]{ "08/07/2021","Dive kayak","United States","24","16"},
                                      new String[]{ "08/07/2021","Underwater Diver Vehicle","United States","5","3"},
                                      new String[]{ "08/07/2021","Regulator System","Czech Republic","165","216"},
                                      new String[]{ "08/08/2021","Second Stage Regulator","United States","98","88"},
                                      new String[]{ "08/08/2021","Personal Dive Sonar","United States","46","45"},
                                      new String[]{ "08/09/2021","Compass Console Mount","United States","211","300"},
                                      new String[]{ "08/09/2021","Regulator System","United Kingdom","166","100"},
                                      new String[]{ "08/10/2021","Alternate Inflation Regulator","United Kingdom","47","43"},
                                  };
                //Add a table
                Table table = s.AddTable(true);
                table.ResetCells(data.Length + 1, Header.Length);

                //Set the first row as table header
                TableRow FRow = table.Rows[0];
                FRow.IsHeader = true;

                //Set the height and color of the first row
                FRow.Height = 23;
                FRow.RowFormat.BackColor = Color.LightSeaGreen;
                for (int i = 0; i < Header.Length; i++)
                {
                    //Set alignment for cells
                    Paragraph p = FRow.Cells[i].AddParagraph();
                    FRow.Cells[i].CellFormat.VerticalAlignment = VerticalAlignment.Middle;
                    p.Format.HorizontalAlignment = HorizontalAlignment.Center;

                    //Set data format
                    TextRange TR = p.AppendText(Header[i]);
                    TR.CharacterFormat.FontName = "Calibri";
                    TR.CharacterFormat.FontSize = 12;
                    TR.CharacterFormat.Bold = true;
                }

                //Add data to the rest of rows and set cell format
                for (int r = 0; r < data.Length; r++)
                {
                    TableRow DataRow = table.Rows[r + 1];
                    DataRow.Height = 20;
                    for (int c = 0; c < data[r].Length; c++)
                    {
                        DataRow.Cells[c].CellFormat.VerticalAlignment = VerticalAlignment.Middle;
                        Paragraph p2 = DataRow.Cells[c].AddParagraph();
                        TextRange TR2 = p2.AppendText(data[r][c]);
                        p2.Format.HorizontalAlignment = HorizontalAlignment.Center;

                        //Set data format
                        TR2.CharacterFormat.FontName = "Calibri";
                        TR2.CharacterFormat.FontSize = 11;
                    }
                }

                //Save the document
                doc.SaveToFile("WordTable.docx", FileFormat.Docx2013);
            }
        }
    }
Apply for a Temporary License
If you'd like to remove the evaluation message from the generated documents, or to get rid of the function limitations, please request a 30-day trial license for yourself.
C#/VB.NET: Crie uma tabela no Word
Instalado via NuGet
PM> Install-Package Spire.Doc
Links Relacionados
No MS Word, as tabelas podem organizar e apresentar os dados em linhas e colunas, o que facilita a compreensão e análise das informações. Neste artigo, você aprenderá como programar crie uma tabela com dados em um documento do Word usando Spire.Doc for .NET.
Instale o Spire.Doc for .NET
Para começar, você precisa adicionar os arquivos DLL incluídos no pacote Spire.Doc for.NET como referências em seu projeto .NET. Os arquivos DLL podem ser baixados deste link ou instalados via NuGet.
PM> Install-Package Spire.Doc
Crie uma tabela simples no Word
Abaixo estão algumas das principais classes e métodos fornecidos pelo Spire.Doc for .NET para criar e formatar tabelas no Word.
| Nome | Descrição |
| Classe de mesa | Representa uma tabela em um documento do Word. |
| Classe TableRow | Representa uma linha em uma tabela. |
| Classe TableCell | Representa uma célula específica em uma tabela. |
| Método Section.AddTbale() | Adiciona uma nova tabela à seção especificada. |
| Método Table.ResetCells() | Redefine o número da linha e o número da coluna. |
| Propriedade Table.Rows | Obtém as linhas da tabela. |
| Propriedade TableRow.Height | Define a altura da linha especificada. |
| Propriedade TableRow.Cells | Retorna a coleção de células. |
| Propriedade TableRow.RowFormat | Obtém o formato da linha especificada. |
As etapas detalhadas são as seguintes
- Crie um objeto Document e adicione uma seção a ele.
- Prepare os dados para a linha de cabeçalho e outras linhas, armazenando-os em uma matriz de strings unidimensional e em uma matriz de strings bidimensional, respectivamente.
- Adicione uma tabela à seção usando o método Section.AddTable().
- Insira dados na linha do cabeçalho e defina a formatação da linha, incluindo altura da linha, cor de fundo e alinhamento do texto.
- Insira dados no restante das linhas e aplique formatação a essas linhas.
- Salve o documento em outro arquivo usando o método Document.SaveToFile().
- C#
- VB.NET
using System;
    using System.Drawing;
    using Spire.Doc;
    using Spire.Doc.Documents;
    using Spire.Doc.Fields;

    namespace WordTable
    {
        class Program
        {
            static void Main(string[] args)
            {
                //Create a Document object
                Document doc = new Document();
                //Add a section
                Section s = doc.AddSection();

                //Define the data for the table
                String[] Header = { "Date", "Description", "Country", "On Hands", "On Order" };
                String[][] data = {
                                      new String[]{ "08/07/2021","Dive kayak","United States","24","16"},
                                      new String[]{ "08/07/2021","Underwater Diver Vehicle","United States","5","3"},
                                      new String[]{ "08/07/2021","Regulator System","Czech Republic","165","216"},
                                      new String[]{ "08/08/2021","Second Stage Regulator","United States","98","88"},
                                      new String[]{ "08/08/2021","Personal Dive Sonar","United States","46","45"},
                                      new String[]{ "08/09/2021","Compass Console Mount","United States","211","300"},
                                      new String[]{ "08/09/2021","Regulator System","United Kingdom","166","100"},
                                      new String[]{ "08/10/2021","Alternate Inflation Regulator","United Kingdom","47","43"},
                                  };
                //Add a table
                Table table = s.AddTable(true);
                table.ResetCells(data.Length + 1, Header.Length);

                //Set the first row as table header
                TableRow FRow = table.Rows[0];
                FRow.IsHeader = true;

                //Set the height and color of the first row
                FRow.Height = 23;
                FRow.RowFormat.BackColor = Color.LightSeaGreen;
                for (int i = 0; i < Header.Length; i++)
                {
                    //Set alignment for cells
                    Paragraph p = FRow.Cells[i].AddParagraph();
                    FRow.Cells[i].CellFormat.VerticalAlignment = VerticalAlignment.Middle;
                    p.Format.HorizontalAlignment = HorizontalAlignment.Center;

                    //Set data format
                    TextRange TR = p.AppendText(Header[i]);
                    TR.CharacterFormat.FontName = "Calibri";
                    TR.CharacterFormat.FontSize = 12;
                    TR.CharacterFormat.Bold = true;
                }

                //Add data to the rest of rows and set cell format
                for (int r = 0; r < data.Length; r++)
                {
                    TableRow DataRow = table.Rows[r + 1];
                    DataRow.Height = 20;
                    for (int c = 0; c < data[r].Length; c++)
                    {
                        DataRow.Cells[c].CellFormat.VerticalAlignment = VerticalAlignment.Middle;
                        Paragraph p2 = DataRow.Cells[c].AddParagraph();
                        TextRange TR2 = p2.AppendText(data[r][c]);
                        p2.Format.HorizontalAlignment = HorizontalAlignment.Center;

                        //Set data format
                        TR2.CharacterFormat.FontName = "Calibri";
                        TR2.CharacterFormat.FontSize = 11;
                    }
                }

                //Save the document
                doc.SaveToFile("WordTable.docx", FileFormat.Docx2013);
            }
        }
    }
Solicite uma licença temporária
Se desejar remover a mensagem de avaliação dos documentos gerados ou se livrar das limitações de função, por favor solicite uma licença de teste de 30 dias para você mesmo.
C#/VB.NET: создание таблицы в Word
Установлено через NuGet
PM> Install-Package Spire.Doc
Ссылки по теме
В MS Word таблицы могут организовывать и представлять данные в строках и столбцах, что облегчает понимание и анализ информации. В этой статье вы узнаете, как программно создать таблицу с данными в документе Word использование Spire.Doc for .NET.
Установите Spire.Doc for .NET
Для начала вам необходимо добавить файлы DLL, включенные в пакет Spire.Doc for .NET, в качестве ссылок в ваш проект .NET. Файлы DLL можно загрузить по этой ссылке или установить через NuGet.
PM> Install-Package Spire.Doc
Создать простую таблицу в Word
Ниже приведены некоторые основные классы и методы, предоставляемые Spire.Doc for .NET для создания и форматирования таблиц в Word.
| Имя | Описание |
| Класс таблицы | Представляет таблицу в документе Word. |
| Класс ТаблеРоу | Представляет строку в таблице. |
| Класс Таблеселл | Представляет определенную ячейку в таблице. |
| Метод Раздел.AddTbale() | Добавляет новую таблицу в указанный раздел. |
| Метод Table.ResetCells() | Сбрасывает номер строки и номер столбца. |
| Свойство Table.Rows | Получает строки таблицы. |
| Свойство TableRow.Height | Устанавливает высоту указанной строки. |
| Свойство TableRow.Cells | Возвращает коллекцию ячеек. |
| Свойство TableRow.RowFormat | Получает формат указанной строки. |
Подробные шаги следующие:
- Создайте объект Document и добавьте к нему раздел.
- Подготовьте данные для строки заголовка и других строк, сохранив их в одномерном массиве строк и двумерном массиве строк соответственно.
- Добавьте таблицу в раздел с помощью метода Раздел.AddTable().
- Вставьте данные в строку заголовка и задайте форматирование строки, включая высоту строки, цвет фона и выравнивание текста.
- Вставьте данные в остальные строки и примените к этим строкам форматирование.
- Сохраните документ в другой файл, используя метод Document.SaveToFile().
- C#
- VB.NET
using System;
    using System.Drawing;
    using Spire.Doc;
    using Spire.Doc.Documents;
    using Spire.Doc.Fields;

    namespace WordTable
    {
        class Program
        {
            static void Main(string[] args)
            {
                //Create a Document object
                Document doc = new Document();
                //Add a section
                Section s = doc.AddSection();

                //Define the data for the table
                String[] Header = { "Date", "Description", "Country", "On Hands", "On Order" };
                String[][] data = {
                                      new String[]{ "08/07/2021","Dive kayak","United States","24","16"},
                                      new String[]{ "08/07/2021","Underwater Diver Vehicle","United States","5","3"},
                                      new String[]{ "08/07/2021","Regulator System","Czech Republic","165","216"},
                                      new String[]{ "08/08/2021","Second Stage Regulator","United States","98","88"},
                                      new String[]{ "08/08/2021","Personal Dive Sonar","United States","46","45"},
                                      new String[]{ "08/09/2021","Compass Console Mount","United States","211","300"},
                                      new String[]{ "08/09/2021","Regulator System","United Kingdom","166","100"},
                                      new String[]{ "08/10/2021","Alternate Inflation Regulator","United Kingdom","47","43"},
                                  };
                //Add a table
                Table table = s.AddTable(true);
                table.ResetCells(data.Length + 1, Header.Length);

                //Set the first row as table header
                TableRow FRow = table.Rows[0];
                FRow.IsHeader = true;

                //Set the height and color of the first row
                FRow.Height = 23;
                FRow.RowFormat.BackColor = Color.LightSeaGreen;
                for (int i = 0; i < Header.Length; i++)
                {
                    //Set alignment for cells
                    Paragraph p = FRow.Cells[i].AddParagraph();
                    FRow.Cells[i].CellFormat.VerticalAlignment = VerticalAlignment.Middle;
                    p.Format.HorizontalAlignment = HorizontalAlignment.Center;

                    //Set data format
                    TextRange TR = p.AppendText(Header[i]);
                    TR.CharacterFormat.FontName = "Calibri";
                    TR.CharacterFormat.FontSize = 12;
                    TR.CharacterFormat.Bold = true;
                }

                //Add data to the rest of rows and set cell format
                for (int r = 0; r < data.Length; r++)
                {
                    TableRow DataRow = table.Rows[r + 1];
                    DataRow.Height = 20;
                    for (int c = 0; c < data[r].Length; c++)
                    {
                        DataRow.Cells[c].CellFormat.VerticalAlignment = VerticalAlignment.Middle;
                        Paragraph p2 = DataRow.Cells[c].AddParagraph();
                        TextRange TR2 = p2.AppendText(data[r][c]);
                        p2.Format.HorizontalAlignment = HorizontalAlignment.Center;

                        //Set data format
                        TR2.CharacterFormat.FontName = "Calibri";
                        TR2.CharacterFormat.FontSize = 11;
                    }
                }

                //Save the document
                doc.SaveToFile("WordTable.docx", FileFormat.Docx2013);
            }
        }
    }
Подать заявку на временную лицензию
Если вы хотите удалить сообщение об оценке из сгенерированных документов или избавиться от ограничений функции, пожалуйста запросите 30-дневную пробную лицензию для себя.
C#/VB.NET: Erstellen Sie eine Tabelle in Word
Inhaltsverzeichnis
Über NuGet installiert
PM> Install-Package Spire.Doc
verwandte Links
In MS Word können die Tabellen Daten in Zeilen und Spalten organisieren und darstellen, was das Verständnis und die Analyse der Informationen erleichtert. In diesem Artikel erfahren Sie, wie Sie programmgesteuert vorgehen Erstellen Sie eine Tabelle mit Daten in einem Word-Dokument Verwendung von Spire.Doc for .NET.
Installieren Sie Spire.Doc for .NET
Zunächst müssen Sie die im Spire.Doc for.NET-Paket enthaltenen DLL-Dateien als Referenzen in Ihrem .NET-Projekt hinzufügen. Die DLL-Dateien können entweder über diesen Link heruntergeladen oder über NuGet installiert werden.
PM> Install-Package Spire.Doc
Erstellen Sie eine einfache Tabelle in Word
Nachfolgend finden Sie einige der Kernklassen und Methoden, die Spire.Doc for .NET zum Erstellen und Formatieren von Tabellen in Word bereitstellt.
| Name | Beschreibung |
| Tischklasse | Stellt eine Tabelle in einem Word-Dokument dar. |
| TableRow-Klasse | Stellt eine Zeile in einer Tabelle dar. |
| TableCell-Klasse | Stellt eine bestimmte Zelle in einer Tabelle dar. |
| Section.AddTbale()-Methode | Fügt dem angegebenen Abschnitt eine neue Tabelle hinzu. |
| Table.ResetCells()-Methode | Setzt Zeilennummer und Spaltennummer zurück. |
| Table.Rows-Eigenschaft | Ruft die Tabellenzeilen ab. |
| TableRow.Height-Eigenschaft | Legt die Höhe der angegebenen Zeile fest. |
| TableRow.Cells-Eigenschaft | Gibt die Zellsammlung zurück. |
| TableRow.RowFormat-Eigenschaft | Ruft das Format der angegebenen Zeile ab. |
Die detaillierten Schritte sind wie folgt
- Erstellen Sie ein Document-Objekt und fügen Sie ihm einen Abschnitt hinzu.
- Bereiten Sie die Daten für die Kopfzeile und andere Zeilen vor und speichern Sie sie in einem eindimensionalen String-Array bzw. einem zweidimensionalen String-Array.
- Fügen Sie dem Abschnitt mit der Methode Section.AddTable() eine Tabelle hinzu.
- Fügen Sie Daten in die Kopfzeile ein und legen Sie die Zeilenformatierung fest, einschließlich Zeilenhöhe, Hintergrundfarbe und Textausrichtung.
- Fügen Sie Daten in die restlichen Zeilen ein und wenden Sie die Formatierung auf diese Zeilen an.
- Speichern Sie das Dokument mit der Methode Document.SaveToFile() in einer anderen Datei.
- C#
- VB.NET
using System;
    using System.Drawing;
    using Spire.Doc;
    using Spire.Doc.Documents;
    using Spire.Doc.Fields;

    namespace WordTable
    {
        class Program
        {
            static void Main(string[] args)
            {
                //Create a Document object
                Document doc = new Document();
                //Add a section
                Section s = doc.AddSection();

                //Define the data for the table
                String[] Header = { "Date", "Description", "Country", "On Hands", "On Order" };
                String[][] data = {
                                      new String[]{ "08/07/2021","Dive kayak","United States","24","16"},
                                      new String[]{ "08/07/2021","Underwater Diver Vehicle","United States","5","3"},
                                      new String[]{ "08/07/2021","Regulator System","Czech Republic","165","216"},
                                      new String[]{ "08/08/2021","Second Stage Regulator","United States","98","88"},
                                      new String[]{ "08/08/2021","Personal Dive Sonar","United States","46","45"},
                                      new String[]{ "08/09/2021","Compass Console Mount","United States","211","300"},
                                      new String[]{ "08/09/2021","Regulator System","United Kingdom","166","100"},
                                      new String[]{ "08/10/2021","Alternate Inflation Regulator","United Kingdom","47","43"},
                                  };
                //Add a table
                Table table = s.AddTable(true);
                table.ResetCells(data.Length + 1, Header.Length);

                //Set the first row as table header
                TableRow FRow = table.Rows[0];
                FRow.IsHeader = true;

                //Set the height and color of the first row
                FRow.Height = 23;
                FRow.RowFormat.BackColor = Color.LightSeaGreen;
                for (int i = 0; i < Header.Length; i++)
                {
                    //Set alignment for cells
                    Paragraph p = FRow.Cells[i].AddParagraph();
                    FRow.Cells[i].CellFormat.VerticalAlignment = VerticalAlignment.Middle;
                    p.Format.HorizontalAlignment = HorizontalAlignment.Center;

                    //Set data format
                    TextRange TR = p.AppendText(Header[i]);
                    TR.CharacterFormat.FontName = "Calibri";
                    TR.CharacterFormat.FontSize = 12;
                    TR.CharacterFormat.Bold = true;
                }

                //Add data to the rest of rows and set cell format
                for (int r = 0; r < data.Length; r++)
                {
                    TableRow DataRow = table.Rows[r + 1];
                    DataRow.Height = 20;
                    for (int c = 0; c < data[r].Length; c++)
                    {
                        DataRow.Cells[c].CellFormat.VerticalAlignment = VerticalAlignment.Middle;
                        Paragraph p2 = DataRow.Cells[c].AddParagraph();
                        TextRange TR2 = p2.AppendText(data[r][c]);
                        p2.Format.HorizontalAlignment = HorizontalAlignment.Center;

                        //Set data format
                        TR2.CharacterFormat.FontName = "Calibri";
                        TR2.CharacterFormat.FontSize = 11;
                    }
                }

                //Save the document
                doc.SaveToFile("WordTable.docx", FileFormat.Docx2013);
            }
        }
    }
Beantragen Sie eine temporäre Lizenz
Wenn Sie die Bewertungsmeldung aus den generierten Dokumenten entfernen oder die Funktionseinschränkungen beseitigen möchten, wenden Sie sich bitte an uns Fordern Sie eine 30-Tage-Testlizenz an für sich selbst.
- C#/VB.NET: Grenzen für Word-Tabellen oder Zellen festlegen
- C#/VB.NET: Bilder aus Tabellen in Word einfügen oder extrahieren
- C#/VB.NET: Tabellenzellen in Word zusammenführen oder teilen
- Alternativtext der Tabelle in Word in C# hinzufügen/abrufen
- Erstellen Sie eine verschachtelte Tabelle in Word in C#
C#/VB.NET: crear una tabla en Word
Tabla de contenido
Instalado a través de NuGet
PM> Install-Package Spire.Doc
enlaces relacionados
En MS Word, las tablas pueden organizar y presentar datos en filas y columnas, lo que hace que la información sea más fácil de entender y analizar. En este artículo, aprenderá cómo programar cree una tabla con datos en un documento de Word usando Spire.Doc for .NET.
Instalar Spire.Doc for .NET
Para empezar, debe agregar los archivos DLL incluidos en el paquete Spire.Doc for .NET como referencias en su proyecto .NET. Los archivos DLL se pueden descargar desde este enlace o instalar a través de NuGet.
PM> Install-Package Spire.Doc
Crear una tabla simple en Word
A continuación se muestran algunas de las clases y métodos principales proporcionados por Spire.Doc for .NET para crear y formatear tablas en Word.
| Nombre | Descripción |
| Clase de tabla | Representa una tabla en un documento de Word. |
| Clase TableRow | Representa una fila en una tabla. |
| Clase de celda de tabla | Representa una celda específica en una tabla. |
| Método Sección.AddTbale() | Agrega una nueva tabla a la sección especificada. |
| Método Table.ResetCells() | Restablece el número de fila y el número de columna. |
| Propiedad Table.Rows | Obtiene las filas de la tabla. |
| Propiedad TableRow.Height | Establece la altura de la fila especificada. |
| TableRow.Cells Propiedad | Devuelve la colección de células. |
| Propiedad TableRow.RowFormat | Obtiene el formato de la fila especificada. |
Los pasos detallados son los siguientes.
- Cree un objeto Documento y agréguele una sección.
- Prepare los datos para la fila del encabezado y otras filas, almacenándolos en una matriz de cadenas unidimensional y una matriz de cadenas bidimensionales, respectivamente.
- Agregue una tabla a la sección usando el método Sección.AddTable().
- Inserte datos en la fila del encabezado y establezca el formato de la fila, incluida la altura de la fila, el color de fondo y la alineación del texto.
- Inserte datos en el resto de las filas y aplique formato a estas filas.
- Guarde el documento en otro archivo utilizando el método Document.SaveToFile().
- C#
- VB.NET
using System;
    using System.Drawing;
    using Spire.Doc;
    using Spire.Doc.Documents;
    using Spire.Doc.Fields;

    namespace WordTable
    {
        class Program
        {
            static void Main(string[] args)
            {
                //Create a Document object
                Document doc = new Document();
                //Add a section
                Section s = doc.AddSection();

                //Define the data for the table
                String[] Header = { "Date", "Description", "Country", "On Hands", "On Order" };
                String[][] data = {
                                      new String[]{ "08/07/2021","Dive kayak","United States","24","16"},
                                      new String[]{ "08/07/2021","Underwater Diver Vehicle","United States","5","3"},
                                      new String[]{ "08/07/2021","Regulator System","Czech Republic","165","216"},
                                      new String[]{ "08/08/2021","Second Stage Regulator","United States","98","88"},
                                      new String[]{ "08/08/2021","Personal Dive Sonar","United States","46","45"},
                                      new String[]{ "08/09/2021","Compass Console Mount","United States","211","300"},
                                      new String[]{ "08/09/2021","Regulator System","United Kingdom","166","100"},
                                      new String[]{ "08/10/2021","Alternate Inflation Regulator","United Kingdom","47","43"},
                                  };
                //Add a table
                Table table = s.AddTable(true);
                table.ResetCells(data.Length + 1, Header.Length);

                //Set the first row as table header
                TableRow FRow = table.Rows[0];
                FRow.IsHeader = true;

                //Set the height and color of the first row
                FRow.Height = 23;
                FRow.RowFormat.BackColor = Color.LightSeaGreen;
                for (int i = 0; i < Header.Length; i++)
                {
                    //Set alignment for cells
                    Paragraph p = FRow.Cells[i].AddParagraph();
                    FRow.Cells[i].CellFormat.VerticalAlignment = VerticalAlignment.Middle;
                    p.Format.HorizontalAlignment = HorizontalAlignment.Center;

                    //Set data format
                    TextRange TR = p.AppendText(Header[i]);
                    TR.CharacterFormat.FontName = "Calibri";
                    TR.CharacterFormat.FontSize = 12;
                    TR.CharacterFormat.Bold = true;
                }

                //Add data to the rest of rows and set cell format
                for (int r = 0; r < data.Length; r++)
                {
                    TableRow DataRow = table.Rows[r + 1];
                    DataRow.Height = 20;
                    for (int c = 0; c < data[r].Length; c++)
                    {
                        DataRow.Cells[c].CellFormat.VerticalAlignment = VerticalAlignment.Middle;
                        Paragraph p2 = DataRow.Cells[c].AddParagraph();
                        TextRange TR2 = p2.AppendText(data[r][c]);
                        p2.Format.HorizontalAlignment = HorizontalAlignment.Center;

                        //Set data format
                        TR2.CharacterFormat.FontName = "Calibri";
                        TR2.CharacterFormat.FontSize = 11;
                    }
                }

                //Save the document
                doc.SaveToFile("WordTable.docx", FileFormat.Docx2013);
            }
        }
    }
Solicite una licencia temporal
Si desea eliminar el mensaje de evaluación de los documentos generados o deshacerse de las limitaciones de la función, por favor solicitar una licencia de prueba de 30 días para ti.
C#/VB.NET: Word에서 테이블 만들기
NuGet을 통해 설치됨
PM> Install-Package Spire.Doc
관련된 링크들
MS Word에서 테이블은 데이터를 행과 열로 구성하고 표시할 수 있으므로 정보를 더 쉽게 이해하고 분석할 수 있습니다. 이 기사에서는 프로그래밍 방식으로 방법을 배웁니다 Spire.Doc for .NET 사용하여 Word 문서에 데이터가 포함된 테이블을 만듭니다.
Spire.Doc for .NET 설치
먼저 Spire.Doc for.NET 패키지에 포함된 DLL 파일을 .NET 프로젝트의 참조로 추가해야 합니다. DLL 파일은 이 링크에서 다운로드하거나 NuGet을 통해 설치할 수 있습니다.
PM> Install-Package Spire.Doc
Word에서 간단한 표 만들기
다음은 Word에서 테이블을 만들고 서식을 지정하기 위해 Spire.Doc for .NET에서 제공하는 핵심 클래스와 메서드 중 일부입니다.
| 이름 | 설명 |
| 테이블 클래스 | Word 문서의 테이블을 나타냅니다. |
| TableRow 클래스 | 테이블의 행을 나타냅니다. |
| TableCell 클래스 | 테이블의 특정 셀을 나타냅니다. |
| Section.AddTbale() 메서드 | 지정된 섹션에 새 테이블을 추가합니다. |
| Table.ResetCells() 메서드 | 행 번호와 열 번호를 재설정합니다. |
| Table.Rows 속성 | 테이블 행을 가져옵니다. |
| TableRow.Height 속성 | 지정된 행의 높이를 설정합니다. |
| TableRow.Cells 속성 | 셀 컬렉션을 반환합니다. |
| TableRow.RowFormat 속성 | 지정된 행의 형식을 가져옵니다. |
자세한 단계는 다음과 같습니다
- Document 개체를 만들고 여기에 섹션을 추가합니다.
- 헤더 행과 다른 행에 대한 데이터를 준비하여 각각 1차원 문자열 배열과 2차원 문자열 배열에 저장합니다.
- Section.AddTable() 메서드를 사용하여 섹션에 테이블을 추가합니다.
- 머리글 행에 데이터를 삽입하고 행 높이, 배경색, 텍스트 정렬을 포함한 행 서식을 설정합니다.
- 나머지 행에 데이터를 삽입하고 해당 행에 서식을 적용합니다.
- Document.SaveToFile() 메서드를 사용하여 문서를 다른 파일에 저장합니다.
- C#
- VB.NET
using System;
    using System.Drawing;
    using Spire.Doc;
    using Spire.Doc.Documents;
    using Spire.Doc.Fields;

    namespace WordTable
    {
        class Program
        {
            static void Main(string[] args)
            {
                //Create a Document object
                Document doc = new Document();
                //Add a section
                Section s = doc.AddSection();

                //Define the data for the table
                String[] Header = { "Date", "Description", "Country", "On Hands", "On Order" };
                String[][] data = {
                                      new String[]{ "08/07/2021","Dive kayak","United States","24","16"},
                                      new String[]{ "08/07/2021","Underwater Diver Vehicle","United States","5","3"},
                                      new String[]{ "08/07/2021","Regulator System","Czech Republic","165","216"},
                                      new String[]{ "08/08/2021","Second Stage Regulator","United States","98","88"},
                                      new String[]{ "08/08/2021","Personal Dive Sonar","United States","46","45"},
                                      new String[]{ "08/09/2021","Compass Console Mount","United States","211","300"},
                                      new String[]{ "08/09/2021","Regulator System","United Kingdom","166","100"},
                                      new String[]{ "08/10/2021","Alternate Inflation Regulator","United Kingdom","47","43"},
                                  };
                //Add a table
                Table table = s.AddTable(true);
                table.ResetCells(data.Length + 1, Header.Length);

                //Set the first row as table header
                TableRow FRow = table.Rows[0];
                FRow.IsHeader = true;

                //Set the height and color of the first row
                FRow.Height = 23;
                FRow.RowFormat.BackColor = Color.LightSeaGreen;
                for (int i = 0; i < Header.Length; i++)
                {
                    //Set alignment for cells
                    Paragraph p = FRow.Cells[i].AddParagraph();
                    FRow.Cells[i].CellFormat.VerticalAlignment = VerticalAlignment.Middle;
                    p.Format.HorizontalAlignment = HorizontalAlignment.Center;

                    //Set data format
                    TextRange TR = p.AppendText(Header[i]);
                    TR.CharacterFormat.FontName = "Calibri";
                    TR.CharacterFormat.FontSize = 12;
                    TR.CharacterFormat.Bold = true;
                }

                //Add data to the rest of rows and set cell format
                for (int r = 0; r < data.Length; r++)
                {
                    TableRow DataRow = table.Rows[r + 1];
                    DataRow.Height = 20;
                    for (int c = 0; c < data[r].Length; c++)
                    {
                        DataRow.Cells[c].CellFormat.VerticalAlignment = VerticalAlignment.Middle;
                        Paragraph p2 = DataRow.Cells[c].AddParagraph();
                        TextRange TR2 = p2.AppendText(data[r][c]);
                        p2.Format.HorizontalAlignment = HorizontalAlignment.Center;

                        //Set data format
                        TR2.CharacterFormat.FontName = "Calibri";
                        TR2.CharacterFormat.FontSize = 11;
                    }
                }

                //Save the document
                doc.SaveToFile("WordTable.docx", FileFormat.Docx2013);
            }
        }
    }
임시 라이센스 신청
생성된 문서에서 평가 메시지를 제거하고 싶거나, 기능 제한을 없애고 싶다면 30일 평가판 라이센스 요청 자신을 위해.
C#/VB.NET: creare una tabella in Word
Installato tramite NuGet
PM> Install-Package Spire.Doc
Link correlati
In MS Word, le tabelle possono organizzare e presentare i dati in righe e colonne, il che rende le informazioni più facili da comprendere e analizzare. In questo articolo imparerai come farlo a livello di codice creare una tabella con i dati in un documento Word utilizzando Spire.Doc for .NET.
Installa Spire.Doc for .NET
Per cominciare, devi aggiungere i file DLL inclusi nel pacchetto Spire.Doc for.NET come riferimenti nel tuo progetto .NET. I file DLL possono essere scaricati da questo link o installato tramite NuGet.
PM> Install-Package Spire.Doc
Crea una tabella semplice in Word
Di seguito sono riportati alcuni dei metodi e delle classi principali forniti da Spire.Doc for .NET per la creazione e la formattazione di tabelle in Word.
| Nome | Descrizione |
| Classe tabella | Rappresenta una tabella in un documento di Word. |
| Classe TableRow | Rappresenta una riga in una tabella. |
| Classe TableCell | Rappresenta una cella specifica in una tabella. |
| Metodo Sezione.AddTbale() | Aggiunge una nuova tabella alla sezione specificata. |
| Metodo Table.ResetCells() | Reimposta il numero di riga e il numero di colonna. |
| Proprietà Table.Rows | Ottiene le righe della tabella. |
| Proprietà TableRow.Height | Imposta l'altezza della riga specificata. |
| Proprietà TableRow.Cells | Restituisce la raccolta di celle. |
| Proprietà TableRow.RowFormat | Ottiene il formato della riga specificata. |
I passaggi dettagliati sono i seguenti
- Crea un oggetto Document e aggiungi una sezione ad esso.
- Preparare i dati per la riga di intestazione e le altre righe, archiviandoli rispettivamente in una matrice di stringhe unidimensionale e in una matrice di stringhe bidimensionale.
- Aggiungi una tabella alla sezione utilizzando il metodo Sezione.AddTable().
- Inserisci i dati nella riga di intestazione e imposta la formattazione della riga, inclusi altezza della riga, colore di sfondo e allineamento del testo.
- Inserisci i dati nel resto delle righe e applica la formattazione a queste righe.
- Salva il documento in un altro file utilizzando il metodo Document.SaveToFile().
- C#
- VB.NET
using System;
    using System.Drawing;
    using Spire.Doc;
    using Spire.Doc.Documents;
    using Spire.Doc.Fields;

    namespace WordTable
    {
        class Program
        {
            static void Main(string[] args)
            {
                //Create a Document object
                Document doc = new Document();
                //Add a section
                Section s = doc.AddSection();

                //Define the data for the table
                String[] Header = { "Date", "Description", "Country", "On Hands", "On Order" };
                String[][] data = {
                                      new String[]{ "08/07/2021","Dive kayak","United States","24","16"},
                                      new String[]{ "08/07/2021","Underwater Diver Vehicle","United States","5","3"},
                                      new String[]{ "08/07/2021","Regulator System","Czech Republic","165","216"},
                                      new String[]{ "08/08/2021","Second Stage Regulator","United States","98","88"},
                                      new String[]{ "08/08/2021","Personal Dive Sonar","United States","46","45"},
                                      new String[]{ "08/09/2021","Compass Console Mount","United States","211","300"},
                                      new String[]{ "08/09/2021","Regulator System","United Kingdom","166","100"},
                                      new String[]{ "08/10/2021","Alternate Inflation Regulator","United Kingdom","47","43"},
                                  };
                //Add a table
                Table table = s.AddTable(true);
                table.ResetCells(data.Length + 1, Header.Length);

                //Set the first row as table header
                TableRow FRow = table.Rows[0];
                FRow.IsHeader = true;

                //Set the height and color of the first row
                FRow.Height = 23;
                FRow.RowFormat.BackColor = Color.LightSeaGreen;
                for (int i = 0; i < Header.Length; i++)
                {
                    //Set alignment for cells
                    Paragraph p = FRow.Cells[i].AddParagraph();
                    FRow.Cells[i].CellFormat.VerticalAlignment = VerticalAlignment.Middle;
                    p.Format.HorizontalAlignment = HorizontalAlignment.Center;

                    //Set data format
                    TextRange TR = p.AppendText(Header[i]);
                    TR.CharacterFormat.FontName = "Calibri";
                    TR.CharacterFormat.FontSize = 12;
                    TR.CharacterFormat.Bold = true;
                }

                //Add data to the rest of rows and set cell format
                for (int r = 0; r < data.Length; r++)
                {
                    TableRow DataRow = table.Rows[r + 1];
                    DataRow.Height = 20;
                    for (int c = 0; c < data[r].Length; c++)
                    {
                        DataRow.Cells[c].CellFormat.VerticalAlignment = VerticalAlignment.Middle;
                        Paragraph p2 = DataRow.Cells[c].AddParagraph();
                        TextRange TR2 = p2.AppendText(data[r][c]);
                        p2.Format.HorizontalAlignment = HorizontalAlignment.Center;

                        //Set data format
                        TR2.CharacterFormat.FontName = "Calibri";
                        TR2.CharacterFormat.FontSize = 11;
                    }
                }

                //Save the document
                doc.SaveToFile("WordTable.docx", FileFormat.Docx2013);
            }
        }
    }
Richiedi una licenza temporanea
Se desideri rimuovere il messaggio di valutazione dai documenti generati o eliminare le limitazioni della funzione, per favore richiedere una licenza di prova di 30 giorni per te.
C#/VB.NET : créer un tableau dans Word
Table des matières
Installé via NuGet
PM> Install-Package Spire.Doc
Liens connexes
Dans MS Word, les tableaux peuvent organiser et présenter les données en lignes et en colonnes, ce qui facilite la compréhension et l'analyse des informations. Dans cet article, vous apprendrez à programmer créer un tableau avec des données dans un document Word en utilisant Spire.Doc for .NET.
Installer Spire.Doc for .NET
Pour commencer, vous devez ajouter les fichiers DLL inclus dans le package Spire.Doc for.NET comme références dans votre projet .NET. Les fichiers DLL peuvent être téléchargés à partir de ce lien ou installés via NuGet.
PM> Install-Package Spire.Doc
Créer un tableau simple dans Word
Vous trouverez ci-dessous quelques-unes des classes et méthodes de base fournies par Spire.Doc for .NET pour créer et formater des tableaux dans Word.
| Nom | Description |
| Classe de table | Représente un tableau dans un document Word. |
| Classe TableRow | Représente une ligne dans un tableau. |
| Classe TableCell | Représente une cellule spécifique dans un tableau. |
| Méthode Section.AddTbale() | Ajoute une nouvelle table à la section spécifiée. |
| Méthode Table.ResetCells() | Réinitialise le numéro de ligne et le numéro de colonne. |
| Propriété Table.Rows | Obtient les lignes du tableau. |
| Propriété TableRow.Height | Définit la hauteur de la ligne spécifiée. |
| Propriété TableRow.Cells | Renvoie la collection de cellules. |
| Propriété TableRow.RowFormat | Obtient le format de la ligne spécifiée. |
Les étapes détaillées sont les suivantes
- Créez un objet Document et ajoutez-y une section.
- Préparez les données pour la ligne d'en-tête et les autres lignes, en les stockant respectivement dans un tableau de chaînes unidimensionnel et un tableau de chaînes bidimensionnel.
- Ajoutez un tableau à la section à l’aide de la méthode Section.AddTable().
- Insérez des données dans la ligne d'en-tête et définissez le formatage de la ligne, notamment la hauteur de la ligne, la couleur d'arrière-plan et l'alignement du texte.
- Insérez des données dans le reste des lignes et appliquez la mise en forme à ces lignes.
- Enregistrez le document dans un autre fichier à l'aide de la méthode Document.SaveToFile().
- C#
- VB.NET
using System;
    using System.Drawing;
    using Spire.Doc;
    using Spire.Doc.Documents;
    using Spire.Doc.Fields;

    namespace WordTable
    {
        class Program
        {
            static void Main(string[] args)
            {
                //Create a Document object
                Document doc = new Document();
                //Add a section
                Section s = doc.AddSection();

                //Define the data for the table
                String[] Header = { "Date", "Description", "Country", "On Hands", "On Order" };
                String[][] data = {
                                      new String[]{ "08/07/2021","Dive kayak","United States","24","16"},
                                      new String[]{ "08/07/2021","Underwater Diver Vehicle","United States","5","3"},
                                      new String[]{ "08/07/2021","Regulator System","Czech Republic","165","216"},
                                      new String[]{ "08/08/2021","Second Stage Regulator","United States","98","88"},
                                      new String[]{ "08/08/2021","Personal Dive Sonar","United States","46","45"},
                                      new String[]{ "08/09/2021","Compass Console Mount","United States","211","300"},
                                      new String[]{ "08/09/2021","Regulator System","United Kingdom","166","100"},
                                      new String[]{ "08/10/2021","Alternate Inflation Regulator","United Kingdom","47","43"},
                                  };
                //Add a table
                Table table = s.AddTable(true);
                table.ResetCells(data.Length + 1, Header.Length);

                //Set the first row as table header
                TableRow FRow = table.Rows[0];
                FRow.IsHeader = true;

                //Set the height and color of the first row
                FRow.Height = 23;
                FRow.RowFormat.BackColor = Color.LightSeaGreen;
                for (int i = 0; i < Header.Length; i++)
                {
                    //Set alignment for cells
                    Paragraph p = FRow.Cells[i].AddParagraph();
                    FRow.Cells[i].CellFormat.VerticalAlignment = VerticalAlignment.Middle;
                    p.Format.HorizontalAlignment = HorizontalAlignment.Center;

                    //Set data format
                    TextRange TR = p.AppendText(Header[i]);
                    TR.CharacterFormat.FontName = "Calibri";
                    TR.CharacterFormat.FontSize = 12;
                    TR.CharacterFormat.Bold = true;
                }

                //Add data to the rest of rows and set cell format
                for (int r = 0; r < data.Length; r++)
                {
                    TableRow DataRow = table.Rows[r + 1];
                    DataRow.Height = 20;
                    for (int c = 0; c < data[r].Length; c++)
                    {
                        DataRow.Cells[c].CellFormat.VerticalAlignment = VerticalAlignment.Middle;
                        Paragraph p2 = DataRow.Cells[c].AddParagraph();
                        TextRange TR2 = p2.AppendText(data[r][c]);
                        p2.Format.HorizontalAlignment = HorizontalAlignment.Center;

                        //Set data format
                        TR2.CharacterFormat.FontName = "Calibri";
                        TR2.CharacterFormat.FontSize = 11;
                    }
                }

                //Save the document
                doc.SaveToFile("WordTable.docx", FileFormat.Docx2013);
            }
        }
    }
Demander une licence temporaire
Si vous souhaitez supprimer le message d'évaluation des documents générés ou vous débarrasser des limitations fonctionnelles, veuillez demander une licence d'essai de 30 jours pour toi.
- C#/VB.NET : définir des bordures pour les tableaux ou cellules Word
- C#/VB.NET : insérer ou extraire des images de tableaux dans Word
- C#/VB.NET : fusionner ou diviser des cellules de tableau dans Word
- Ajouter/Obtenir un texte alternatif du tableau dans Word en C#
- Créer un tableau imbriqué dans Word en C#
C#/VB.NET: Add, Reply to or Delete Comments in Word
Table of Contents
Installed via NuGet
PM> Install-Package Spire.Doc
Related Links
The comment feature in Microsoft Word provides an excellent way for people to add their insights or opinions to a Word document without having to change or interrupt the content of the document. If someone comments on a document, the document author or other users can reply to the comment to have a discussion with him, even if they're not viewing the document at the same time. This article will demonstrate how to add, reply to or delete comments in Word in C# and VB.NET using Spire.Doc for .NET library.
- Add a Comment to Paragraph in Word in C# and VB.NET
- Add a Comment to Text in Word in C# and VB.NET
- Reply to a Comment in Word in C# and VB.NET
- Delete Comments in Word in C# and VB.NET
Install Spire.Doc for .NET
To begin with, you need to add the DLL files included in the Spire.Doc for.NET package as references in your .NET project. The DLL files can be either downloaded from this link or installed via NuGet.
PM> Install-Package Spire.Doc
Add a Comment to Paragraph in Word in C# and VB.NET
Spire.Doc for .NET provides the Paragraph.AppendComment() method to add a comment to a specific paragraph. The following are the detailed steps:
- Initialize an instance of the Document class.
- Load a Word document using Document.LoadFromFile() method.
- Access a specific section in the document by its index through Document.Sections[int] property.
- Access a specific paragraph in the section by its index through Section.Paragraphs[int] property.
- Add a comment to the paragraph using Paragraph.AppendComment() method.
- Set the author of the comment through Comment.Format.Author property.
- Save the result document using Document.SaveToFile() method.
- C#
- VB.NET
using Spire.Doc;
    using Spire.Doc.Documents;
    using Spire.Doc.Fields;

    namespace AddComments
    {
        internal class Program
        {
            static void Main(string[] args)
            {
                //Initialize an instance of the Document class
                Document document = new Document();
                //Load a Word document
                document.LoadFromFile(@"Sample.docx");

                //Get the first section in the document
                Section section = document.Sections[0];

                //Get the first paragraph in the section
                Paragraph paragraph = section.Paragraphs[0];
                //Add a comment to the paragraph
                Comment comment = paragraph.AppendComment("This comment is added using Spire.Doc for .NET.");
                //Set comment author
                comment.Format.Author = "Eiceblue";
                comment.Format.Initial = "CM";

                //Save the result document
                document.SaveToFile("AddCommentToParagraph.docx", FileFormat.Docx2013);
                document.Close();
            }
        }
    }
Add a Comment to Text in Word in C# and VB.NET
The Paragraph.AppendComment() method is used to add comments to an entire paragraph. By default, the comment marks will be placed at the end of the paragraph. To add a comment to a specific text, you need to search for the text using Document.FindString() method, then place the comment marks at the beginning and end of the text. The following are the detailed steps:
- Initialize an instance of the Document class.
- Load a Word document using Document.LoadFromFile() method.
- Find the specific text in the document using Document.FindString() method.
- Create a comment start mark and a comment end mark, which will be placed at the beginning and end of the found text respectively.
- Initialize an instance of the Comment class to create a new comment. Then set the content and author for the comment.
- Get the owner paragraph of the found text. Then add the comment to the paragraph as a child object.
- Insert the comment start mark before the text range and the comment end mark after the text range.
- Save the result document using Document.SaveToFile() method.
- C#
- VB.NET
using Spire.Doc;
    using Spire.Doc.Documents;
    using Spire.Doc.Fields;

    namespace AddCommentsToText
    {
        internal class Program
        {
            static void Main(string[] args)
            {
                //Initialize an instance of the Document class
                Document document = new Document();
                //Load a Word document
                document.LoadFromFile(@"CommentTemplate.docx");

                //Find a specific string
                TextSelection find = document.FindString("Microsoft Office", false, true);

                //Create the comment start mark and comment end mark
                CommentMark commentmarkStart = new CommentMark(document);
                commentmarkStart.Type = CommentMarkType.CommentStart;
                CommentMark commentmarkEnd = new CommentMark(document);
                commentmarkEnd.Type = CommentMarkType.CommentEnd;

                //Create a comment and set its content and author
                Comment comment = new Comment(document);
                comment.Body.AddParagraph().Text = "Developed by Microsoft.";
                comment.Format.Author = "Shaun";

                //Get the found text as a single text range
                TextRange range = find.GetAsOneRange();

                //Get the owner paragraph of the text range
                Paragraph para = range.OwnerParagraph;

                //Add the comment to the paragraph
                para.ChildObjects.Add(comment);

                //Get the index of text range in the paragraph
                int index = para.ChildObjects.IndexOf(range);

                //Insert the comment start mark before the text range
                para.ChildObjects.Insert(index, commentmarkStart);
                //Insert the comment end mark after the text range
                para.ChildObjects.Insert(index + 2, commentmarkEnd);

                //Save the result document
                document.SaveToFile("AddCommentForText.docx", FileFormat.Docx2013);
                document.Close();
            }
        }
    }
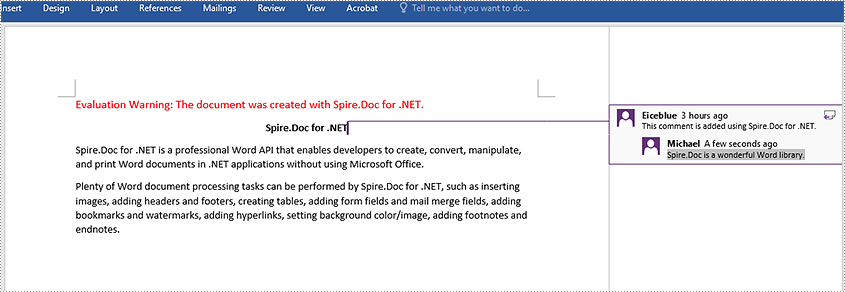
Reply to a Comment in Word in C# and VB.NET
To add a reply to an existing comment, you can use the Comment.ReplyToComment() method. The following are the detailed steps:
- Initialize an instance of the Document class.
- Load a Word document using Document.LoadFromFile() method.
- Get a specific comment in the document through Document.Comments[int] property.
- Initialize an instance of the Comment class to create a new comment. Then set the content and author for the comment.
- Add the new comment as a reply to the specific comment using Comment.ReplyToComment() method.
- Save the result document using Document.SaveToFile() method.
- C#
- VB.NET
using Spire.Doc;
    using Spire.Doc.Fields;

    namespace ReplyToComments
    {
        internal class Program
        {
            static void Main(string[] args)
            {
                //Initialize an instance of the Document class
                Document document = new Document();
                //Load a Word document
                document.LoadFromFile(@"AddCommentToParagraph.docx");

                //Get the first comment in the document
                Comment comment1 = document.Comments[0];

                //Create a new comment and specify its author and content
                Comment replyComment1 = new Comment(document);
                replyComment1.Format.Author = "Michael";
                replyComment1.Body.AddParagraph().AppendText("Spire.Doc is a wonderful Word library.");

                //Add the comment as a reply to the first comment
                comment1.ReplyToComment(replyComment1);

                //Save the result document
                document.SaveToFile("ReplyToComment.docx", FileFormat.Docx2013);
                document.Close();
            }
        }
    }
Delete Comments in Word in C# and VB.NET
Spire.Doc for .NET offers the Document.Comments.RemoveAt(int) method to remove a specific comment from a Word document and the Document.Comments.Clear() method to remove all comments from a Word document. The following are the detailed steps:
- Initialize an instance of the Document class.
- Load a Word document using Document.LoadFromFile() method.
- Delete a specific comment or all comments in the document using Document.Comments.RemoveAt(int) method or Document.Comments.Clear() method.
- Save the result document using Document.SaveToFile() method.
- C#
- VB.NET
using Spire.Doc;

    namespace DeleteComments
    {
        internal class Program
        {
            static void Main(string[] args)
            {
                //Initialize an instance of the Document class
                Document document = new Document();
                //Load a Word document
                document.LoadFromFile(@"AddCommentToParagraph.docx");

                //Delete the first comment in the document
                document.Comments.RemoveAt(0);

                //Delete all comments in the document
                //document.Comments.Clear();

                //Save the result document
                document.SaveToFile("DeleteComment.docx", FileFormat.Docx2013);
                document.Close();
            }
        }
    }
Apply for a Temporary License
If you'd like to remove the evaluation message from the generated documents, or to get rid of the function limitations, please request a 30-day trial license for yourself.