4 Effective Methods to Extract HTML Tables to Excel (Manual & Automated)
Table of Contents
Install with Pypi
pip install Spire.XLS
Related Links

Overview
Extracting HTML tables into Excel is a common requirement for data analysts, researchers, developers, and business professionals who frequently work with structured web data. HTML tables often contain valuable information such as financial reports, product catalogs, research results, or performance statistics. However, transferring that data into Excel in a clean and usable format can be tricky—especially when dealing with complex tables that include merged cells (rowspan, colspan), nested headers, or large datasets.
Fortunately, there are multiple approaches to convert HTML tables into Excel files. These methods range from quick, manual copy-paste actions suitable for small tasks to fully automated scripts using VBA or Python for large-scale or recurring jobs.
In this article, we’ll explore four effective methods for extracting HTML tables to Excel:
- Manual Copy-Paste (simplest method)
- Excel’s Built-in “From Web” Feature
- VBA Macro (Excel Automation)
- Python (BeautifulSoup + Spire.XLS)
Finally, we’ll compare these approaches in a summary table to help you choose the best method based on your use case.
Manual Copy-Paste (Simplest Method)
For small, one-off extractions, the simplest option is to use copy and paste directly from your browser into Excel.

Steps:
- Open the HTML page in a browser (e.g., Chrome, Edge, or Firefox).
- Highlight the table you want to extract.
- Copy it with Ctrl+C (or right-click → Copy).
- Open Excel and paste with Ctrl+V .
Pros:
- Extremely simple—no setup or coding required.
- Works instantly for small, clean tables.
Cons:
- Manual process—tedious and inefficient for frequent or large datasets.
- Doesn’t always preserve merged cells or formatting.
- Cannot handle dynamic (JavaScript-rendered) tables reliably.
When to use : Best suited for small tables, ad-hoc data collection, or quick testing.
Excel’s Built-in “From Web” Feature
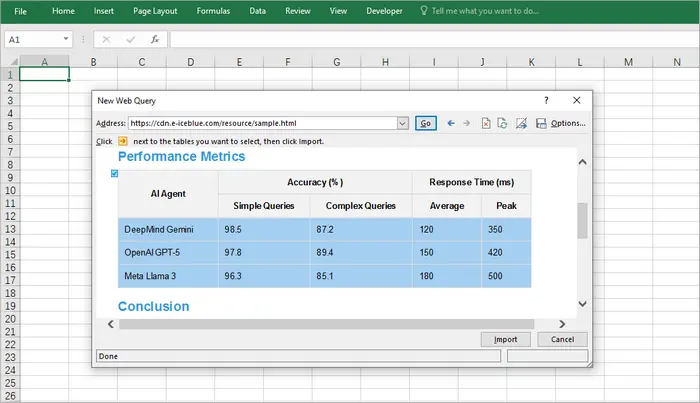
Excel includes a powerful “Get & Transform Data” tool (formerly Power Query) that allows users to pull tables directly from a web page.
Steps:
- Open Excel.
- Go to Data → From Web .
- Enter the URL of the webpage containing the table.
- Excel will display detected tables; select the one you want.
- Load the data into your worksheet.
Pros:
- Direct integration into Excel—no external tools required.
- Works well for structured HTML tables.
- Supports refresh—can re-pull updated data from the same source.
Cons:
- Limited support for dynamic or JavaScript-rendered content.
- Sometimes fails to detect complex tables.
- Requires internet access and valid URL (not for local HTML files unless imported manually).
When to use : Best for analysts pulling live, structured data from websites that are updated regularly.
VBA Macro (Excel Automation)
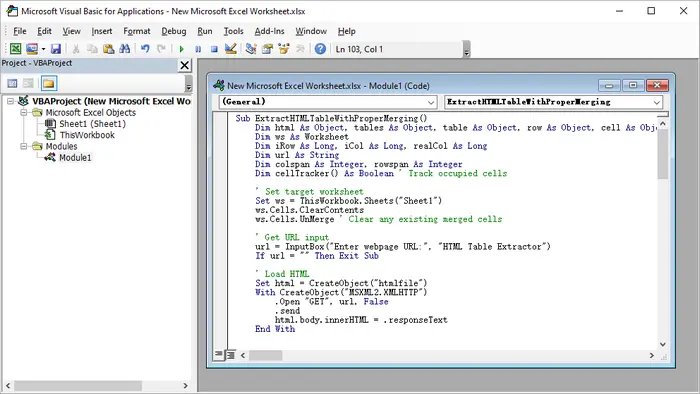
For users who frequently extract HTML tables and want more control, VBA (Visual Basic for Applications) provides an excellent solution. VBA allows you to fetch tables from a URL and correctly process merged cells, something basic copy-paste cannot handle.
Steps:
- Launch Microsoft Excel.
- Press Alt + F11 to open the VBA editor.
- Right-click the project explorer → Insert→ Module .
- Paste the provided VBA code.
- Close the VBA editor.
- Press Alt + F8 , select the macro name, and click Run .
Sample VBA Code:
Sub ExtractHTMLTableWithProperMerging()
    Dim html As Object, tables As Object, table As Object, row As Object, cell As Object
    Dim ws As Worksheet
    Dim iRow As Long, iCol As Long, realCol As Long
    Dim url As String
    Dim colspan As Integer, rowspan As Integer
    Dim cellTracker() As Boolean ' Track occupied cells

    ' Set target worksheet
    Set ws = ThisWorkbook.Sheets("Sheet1")
    ws.Cells.ClearContents
    ws.Cells.UnMerge ' Clear any existing merged cells

    ' Get URL input
    url = InputBox("Enter webpage URL:", "HTML Table Extractor")
    If url = "" Then Exit Sub

    ' Load HTML
    Set html = CreateObject("htmlfile")
    With CreateObject("MSXML2.XMLHTTP")
        .Open "GET", url, False
        .send
        html.body.innerHTML = .responseText
    End With

    ' Get first table (change index if needed)
    Set tables = html.getElementsByTagName("table")
    If tables.Length = 0 Then
        MsgBox "No tables found!", vbExclamation
        Exit Sub
    End If
    Set table = tables(0)

    ' Initialize cell tracker array
    Dim maxRows As Long, maxCols As Long
    maxRows = table.Rows.Length
    maxCols = 0
    For Each row In table.Rows
        If row.Cells.Length > maxCols Then maxCols = row.Cells.Length
    Next
    ReDim cellTracker(1 To maxRows, 1 To maxCols)

    ' Process table
    iRow = 1
    For Each row In table.Rows
        realCol = 1 ' Track actual column position accounting for rowspans

        ' Find first available column in this row
        While realCol <= maxCols And cellTracker(iRow, realCol)
            realCol = realCol + 1
        Wend

        iCol = 1 ' Track logical column position
        For Each cell In row.Cells
            ' Get merge attributes
            colspan = 1
            rowspan = 1
            On Error Resume Next ' In case attributes don't exist
            colspan = cell.colspan
            rowspan = cell.rowspan
            On Error GoTo 0

            ' Skip already occupied cells (from rowspan above)
            While realCol <= maxCols And cellTracker(iRow, realCol)
                realCol = realCol + 1
            Wend

            If realCol > maxCols Then Exit For

            ' Write value
            ws.Cells(iRow, realCol).Value = cell.innerText

            ' Mark all cells that will be occupied by this cell
            Dim r As Long, c As Long
            For r = iRow To iRow + rowspan - 1
                For c = realCol To realCol + colspan - 1
                    If r <= maxRows And c <= maxCols Then
                        cellTracker(r, c) = True
                    End If
                Next c
            Next r

            ' Merge cells if needed
            If colspan > 1 Or rowspan > 1 Then
                With ws.Range(ws.Cells(iRow, realCol), ws.Cells(iRow + rowspan - 1, realCol + colspan - 1))
                    .Merge
                    .HorizontalAlignment = xlCenter
                    .VerticalAlignment = xlCenter
                End With
            End If

            realCol = realCol + colspan
            iCol = iCol + 1
        Next cell
        iRow = iRow + 1
    Next row

    ' Formatting
    ws.UsedRange.Columns.AutoFit
    ws.UsedRange.Borders.Weight = xlThin
    MsgBox "Table extracted with proper merging!", vbInformation
End Sub
Pros:
- Runs entirely within Excel—no external tools required.
- Handles complex tables with merged cells.
- Can be customized for multiple tables or scheduled execution.
Cons:
- Setup requires knowledge of VBA.
- Cannot handle JavaScript-rendered data without extra steps.
- Only works in Excel desktop (not Excel Online).
When to use : Perfect for users who regularly extract similar tables and want a one-click solution.
Python (BeautifulSoup & Spire.XLS)
For developers or power users, Python provides the most flexible, scalable, and automated solution. With libraries like BeautifulSoup for parsing HTML and Spire.XLS for Python for Excel manipulation, you can programmatically fetch, clean, and export tables with full control.
Steps:
- Install Python (3.8+ recommended).
- Create a new project in your IDE (e.g., VS Code, PyCharm).
- Install dependencies:
pip install requests beautifulsoup4 spire.xls
- Copy and run the following script.
Python Code:
import requests

from bs4 import BeautifulSoup
from spire.xls import Workbook, ExcelVersion

# Get HTML string from url
response = requests.get("https://cdn.e-iceblue.com/resource/sample.html")
html = response.text

# Parse HTML
soup = BeautifulSoup(html, "html.parser")
table = soup.find("table")  # Get the first table

# Initialize Excel
workbook = Workbook()
sheet = workbook.Worksheets[0]

# Track merged cells to skip them later
skip_cells = set()

# Loop through HTML rows and cells
for row_idx, row in enumerate(table.find_all("tr")):
    col_idx = 1  # Excel columns start at 1
    for cell in row.find_all(["th", "td"]):
        # Skip already merged cells
        while (row_idx + 1, col_idx) in skip_cells:
            col_idx += 1

        # Get colspan/rowspan values (default to 1 if not present)
        colspan = int(cell.get("colspan", 1))
        rowspan = int(cell.get("rowspan", 1))

        # Write cell value to Excel
        sheet.Range[row_idx + 1, col_idx].Text = cell.get_text(strip=True)

        # Merge cells if colspan/rowspan > 1
        if colspan > 1 or rowspan > 1:
            end_row = row_idx + rowspan
            end_col = col_idx + colspan - 1
            sheet.Range[row_idx + 1, col_idx, end_row, end_col].Merge()

            # Mark merged cells to skip
            for r in range(row_idx + 1, end_row + 1):
                for c in range(col_idx, end_col + 1):
                    if r != row_idx + 1 or c != col_idx:  # Skip the main cell
                        skip_cells.add((r, c))

        col_idx += colspan

# Auto fit column width in all used range
sheet.AllocatedRange.AutoFitColumns()

# Save to Excel
workbook.SaveToFile("TableToExcel.xlsx", ExcelVersion.Version2016)
workbook.Dispose()
Pros:
- Full control—can parse, clean, and transform data.
- Handles merged cells properly.
- Easily scalable to multiple tables or websites.
- Automatable for scheduled tasks or batch jobs.
Cons:
- Requires Python installation and basic programming knowledge.
- More setup than built-in Excel solutions.
- External dependencies (BeautifulSoup, Spire.XLS).
When to use : Best for developers or advanced users extracting large or complex tables regularly.
Output:
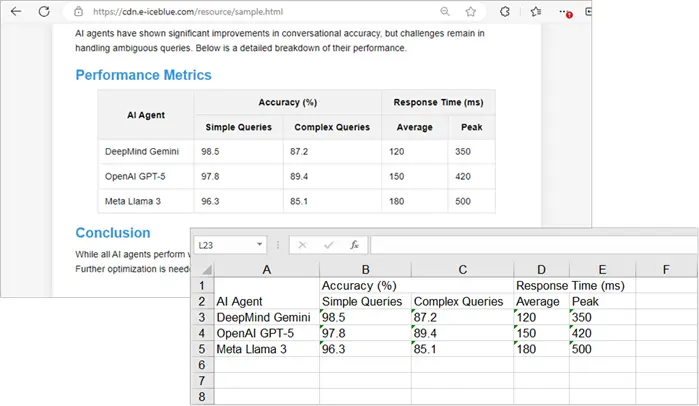
To enhance the visual appeal of the generated Excel worksheet in Python, you can apply styles to cells or worksheets in Excel.
Summary Table: Best Method by Use Case
| Method | Best For | Pros | Cons | Automation? |
|---|---|---|---|---|
| Manual Copy-Paste | Quick, one-time use | Fast, no setup | No automation, formatting issues | ❌No |
| Excel From Web | Live structured data | Integrated, supports refresh | Limited for dynamic tables | ❌No |
| VBA Macro | Repeated tasks in Excel | Automates extraction, handles merges | Requires VBA knowledge | ✅Yes |
| Python (BeautifulSoup + Spire.XLS) | Developers, large/complex tables | Full control, scalable, automatable | Requires coding & dependencies | ✅Yes |
Final Thoughts
The method you choose depends largely on your use case :
- If you only need to grab a small table occasionally, manual copy-paste is the fastest.
- If you want to pull structured data from a webpage that updates frequently, Excel’s From Web is convenient.
- For business users who work in Excel daily and want automation, a VBA macro is ideal.
- For developers handling multiple datasets or complex HTML structures, Python with BeautifulSoup and Spire.XLS provides the most flexibility and scalability.
By combining these methods with your workflow, you can save hours of manual effort and ensure cleaner, more reliable data extraction into Excel.
See Also
How to Scan QR Codes and Barcodes in ASP.NET Core with C#

Many business applications today need the ability to scan barcodes and QR codes in ASP.NET environments. From ticket validation and payment processing to inventory management, an ASP.NET QR code scanner or barcode reading feature can greatly improve efficiency and accuracy for both web and enterprise systems.
This tutorial demonstrates how to build a complete solution to scan barcodes in ASP.NET with C# code using Spire.Barcode for .NET. We’ll create an ASP.NET Core web application that can read both QR codes and various barcode formats from uploaded images, delivering high recognition accuracy and easy integration into existing projects.
Guide Overview
- 1. Project Setup
- 2. Implementing QR Code and Barcode Scanning Feature with C# in ASP.NET
- 3. Testing and Troubleshooting
- 4. Extending to Other .NET Applications
- 5. Conclusion
1. Project Setup
Step 1: Create the Project
Create a new ASP.NET Core Razor Pages project, which will serve as the foundation for the scanning feature. Use the following command to create a new project or manually configure it in Visual Studio:
dotnet new webapp -n QrBarcodeScanner
cd QrBarcodeScanner
Step 2: Install Spire.Barcode for .NET
Install the Spire.Barcode for .NET NuGet package, which supports decoding a wide range of barcode types with a straightforward API. Search for the package in the NuGet Package Manager or use the command below to install it:
dotnet add package Spire.Barcode
Spire.Barcode for .NET offers built-in support for both QR codes and multiple barcode formats such as Code128, EAN-13, and Code39, making it suitable for ASP.NET Core integration without requiring additional image processing libraries. To find out all the supported barcode types, refer to the BarcodeType API reference.
You can also use Free Spire.Barcode for .NET for smaller projects.
2. Implementing QR Code and Barcode Scanning Feature with C# in ASP.NET
A reliable scanning feature involves two main parts:
- Backend logic that processes and decodes uploaded images.
- A simple web interface that lets users upload files for scanning.
We will first focus on the backend implementation to ensure the scanning process works correctly, then connect it to a minimal Razor Page frontend.
Backend: QR & Barcode Scanning Logic with Spire.Barcode
The backend code reads the uploaded file into memory and processes it with Spire.Barcode, using either a memory stream or a file path. The scanned result is then returned. This implementation supports QR codes and other barcode types without requiring format-specific logic.
Index.cshtml.cs
using Microsoft.AspNetCore.Mvc;
using Microsoft.AspNetCore.Mvc.RazorPages;
using Spire.Barcode;

public class IndexModel : PageModel
{
    [BindProperty]
    public IFormFile Upload { get; set; }  // Uploaded file

    public string Result { get; set; }     // Scanning result
    public string UploadedImageBase64 { get; set; } // Base64 string for preview

    public void OnPost()
    {
        if (Upload != null && Upload.Length > 0)
        {
            using (var ms = new MemoryStream())
            {
                // Read the uploaded file into memory
                Upload.CopyTo(ms);

                // Convert the image to Base64 for displaying in HTML <img>
                UploadedImageBase64 = "data:" + Upload.ContentType + ";base64," +
                                      Convert.ToBase64String(ms.ToArray());

                // Reset the stream position before scanning
                ms.Position = 0;

                // Scan the barcode or QR code from the stream
                try
                {
                    string[] scanned = BarcodeScanner.Scan(ms);
                    // Return the scanned result
                    Result = scanned != null && scanned.Length > 0
                        ? string.Join(", ", scanned)
                        : "No code detected.";
                }
                catch (Exception ex)
                {
                    Result = "Error while scanning: " + ex.Message;
                }
            }
        }
    }
}
Explanation of Key Classes and Methods
- BarcodeScanner: A static class in Spire.Barcode that decodes images containing QR codes or barcodes.
- BarcodeScanner.Scan(Stream imageStream): Scans an uploaded image directly from a memory stream and returns an array of decoded strings. This method scans all barcodes in the given image.
- Supplementary methods (optional):
- BarcodeScanner.Scan(string imagePath): Scans an image from a file path.
- BarcodeScanner.ScanInfo(string imagePath): Scans an image from a file path and returns additional barcode information such as type, location, and data.
These methods can be used in different ways, depending on the application requirements.
Frontend: QR & Barcode Upload & Scanning Result Interface
The following page design provides a simple upload form where users can submit an image containing a QR code or barcode. Once uploaded, the image is displayed along with the recognized result, which can be copied with a single click. The layout is intentionally kept minimal for fast testing, yet styled for a clear and polished presentation.
Index.cshtml
@page
@model IndexModel
@{
    ViewData["Title"] = "QR & Barcode Scanner";
}

<div style="max-width:420px;margin:40px auto;padding:20px;border:1px solid #ccc;border-radius:8px;background:#f9f9f9;">
    <h2>QR & Barcode Scanner</h2>
    <form method="post" enctype="multipart/form-data" id="uploadForm">
        <input type="file" name="upload" accept="image/*" required onchange="this.form.submit()" style="margin:10px 0;" />
    </form>

    @if (!string.IsNullOrEmpty(Model.UploadedImageBase64))
    {
        <div style="margin-top:15px;text-align:center;">
            <img src="/@Model.UploadedImageBase64" style="width:300px;height:300px;object-fit:contain;border:1px solid #ddd;background:#fff;" />
        </div>
    }

    @if (!string.IsNullOrEmpty(Model.Result))
    {
        <div style="margin-top:15px;padding:10px;background:#e8f5e9;border-radius:6px;">
            <b>Scan Result:</b>
            <p id="scanText">@Model.Result</p>
            <button type="button" onclick="navigator.clipboard.writeText(scanText.innerText)" style="background:#28a745;color:#fff;padding:6px 10px;border:none;border-radius:4px;">Copy</button>
        </div>
    }
</div>
Below is a screenshot showing the scan page after successfully recognizing both a QR code and a Code128 barcode, with the results displayed and a one-click copy button available.
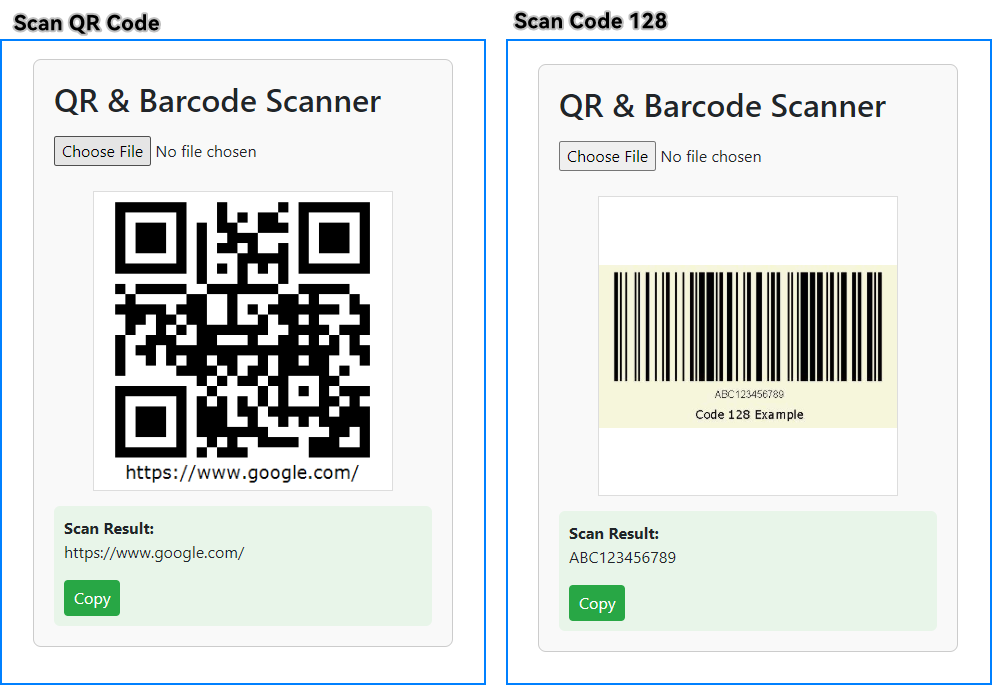
This ASP.NET Core application can scan QR codes and other barcodes from uploaded images. If you're looking to generate QR codes or barcodes, check out How to Generate QR Codes in ASP.NET Core.
3. Testing and Troubleshooting
After running the application, test the scanning feature with:
- A QR code image containing a URL or plain text.
- A barcode image such as Code128 or EAN-13.
If recognition fails:
- Ensure the image has good contrast and minimal distortion.
- Use images of reasonable resolution (not excessively large or pixelated).
- Test with different file formats such as JPG, PNG, or BMP.
- Avoid images with reflections, glare, or low lighting.
- When scanning multiple barcodes in one image, ensure each code is clearly separated to improve recognition accuracy.
A good practice is to maintain a small library of sample QR codes and barcodes to test regularly after making code changes.
4. Extending to Other .NET Applications
The barcode scanning logic in this tutorial works the same way across different .NET application types — only the way you supply the image file changes. This makes it easy to reuse the core decoding method, BarcodeScanner.Scan(), in various environments such as:
- ASP.NET Core MVC controllers or Web API endpoints
- Desktop applications like WinForms or WPF
- Console utilities for batch processing
Example: Minimal ASP.NET Core Web API Endpoint — receives an image file via HTTP POST and returns decoded results as JSON:
[ApiController]
[Route("api/[controller]")]
public class ScanController : ControllerBase
{
    [HttpPost]
    public IActionResult Scan(IFormFile file)
    {
        if (file == null) return BadRequest("No file uploaded");
        using var ms = new MemoryStream();
        file.CopyTo(ms);
        ms.Position = 0;
        string[] results = BarcodeScanner.Scan(ms);
        return Ok(results);
    }
}
Example: Console application — scans a local image file and prints the decoded text:
string[] result = BarcodeScanner.Scan(@"C:\path\to\image.png");
Console.WriteLine(string.Join(", ", result));
This flexibility makes it simple for developers to quickly add QR code and barcode scanning to new projects or extend existing .NET applications.
5. Conclusion
This tutorial has shown how to implement a complete QR code and barcode scanning solution in ASP.NET Core using Spire.Barcode for .NET. From receiving uploaded images to decoding and displaying the results, the process is straightforward and adaptable to a variety of application types. With this approach, developers can quickly integrate reliable scanning functionality into e-commerce platforms, ticketing systems, document verification tools, and other business-critical web applications.
For more advanced scenarios, Spire.Barcode for .NET provides additional features such as customizing the recognition process, handling multiple image formats and barcode types, and more. Apply for a free trial license to unlock all the advanced features.
Download Spire.Barcode for .NET today and start building your own ASP.NET barcode scanning solution.
Perform OCR on Scanned PDFs in C# for Text Extraction

Optical Character Recognition (OCR) technology has become essential for developers working with scanned documents and image-based PDFs. In this tutorial, you learn how to perform OCR on PDFs in C# to extract text from scanned documents or images within a PDF using the Spire.PDF for .NET and Spire.OCR for .NET libraries. By transferring scanned PDFs into editable and searchable formats, you can significantly improve your document management processes.
Table of Contents :
- Why OCR is Needed for Scanned PDFs?
- Setting Up: Installing Required Libraries
- Performing OCR on Scanned PDFs
- Extracting Text from Images within PDFs
- Wrapping Up
- FAQs
Why OCR is Needed for Scanned PDFs?
Scanned PDFs are essentially image files —they contain pictures of text rather than actual selectable and searchable text content. When you scan a paper document or receive an image-based PDF, the text exists only as pixels , making it impossible to edit, search, or extract. This creates significant limitations for businesses and individuals who need to work with these documents digitally.
OCR technology solves this problem by analyzing the shapes of letters and numbers in scanned images and converting them into machine-readable text. This process transforms static PDFs into usable, searchable, and editable documents—enabling text extraction, keyword searches, and seamless integration with databases and workflow automation tools.
In fields such as legal, healthcare, and education, where large volumes of scanned documents are common, OCR plays a crucial role in document digitization, making important data easily accessible and actionable.
Setting Up: Installing Required Libraries
Before we dive into the code, let's first set up our development environment with the necessary components: Spire.PDF and Spire.OCR . Spire.PDF handles PDF operations, while Spire.OCR performs the actual text recognition.
Step 1. Install Spire.PDF and Spire.OCR via NuGet
To begin, open the NuGet Package Manager in Visual Studio, and search for "Spire.PDF" and "Spire.OCR" to install them in your project. Alternatively, you can use the Package Manager Console :
Install-Package Spire.PDF
Install-Package Spire.OCR
Step 2. Download OCR Models:
Spire.OCR requires pre-trained language models for text recognition. Download the appropriate model files for your operating system (Windows, Linux, or MacOS) and extract them to a directory (e.g., D:\win-x64).
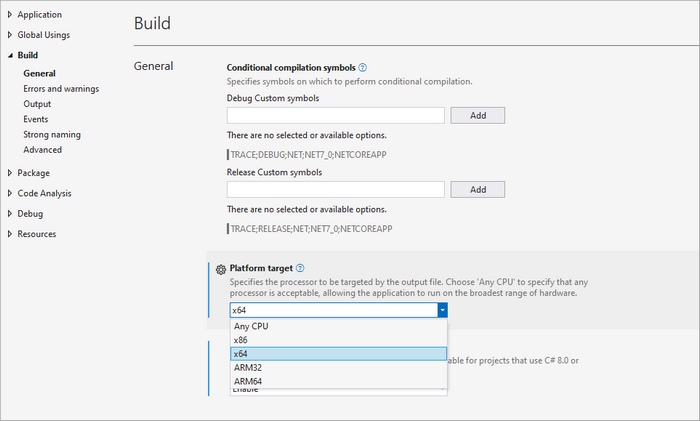
Important Note : Ensure your project targets x64 platform (Project Properties > Build > Platform target) as Spire.OCR only supports 64-bit systems.
Performing OCR on Scanned PDFs in C#
With the necessary libraries installed, we can now perform OCR on scanned PDFs. Below is a sample code snippet demonstrating this process.
using Spire.OCR;
using Spire.Pdf;
using Spire.Pdf.Graphics;
using System.Drawing;

namespace OCRPDF
{
    class Program
    {
        static void Main(string[] args)
        {
            // Create an instance of the OcrScanner class
            OcrScanner scanner = new OcrScanner();

            // Configure the scanner
            ConfigureOptions configureOptions = new ConfigureOptions
            {
                ModelPath = @"D:\win-x64", // Set model path
                Language = "English"        // Set language
            };

            // Apply the configuration options
            scanner.ConfigureDependencies(configureOptions);

            // Load a PDF document
            PdfDocument doc = new PdfDocument();
            doc.LoadFromFile(@"C:\Users\Administrator\Desktop\Input5.pdf");

            // Iterate through all pages
            for (int i = 0; i < doc.Pages.Count; i++)
            {
                // Convert page to image
                Image image = doc.SaveAsImage(i, PdfImageType.Bitmap);

                // Convert the image to a MemoryStream
                using (MemoryStream stream = new MemoryStream())
                {
                    image.Save(stream, System.Drawing.Imaging.ImageFormat.Png);
                    stream.Position = 0; // Reset the stream position

                    // Perform OCR on the image stream
                    scanner.Scan(stream, OCRImageFormat.Png);
                    string pageText = scanner.Text.ToString();

                    // Save extracted text to a separate file
                    string outputTxtPath = Path.Combine(@"C:\Users\Administrator\Desktop\Output", $"Page-{i + 1}.txt");
                    File.WriteAllText(outputTxtPath, pageText);
                }
            }

            // Close the document
            doc.Close();
        }
    }
}
Key Components Explained :
- OcrScanner Class : This class is crucial for performing OCR. It provides methods to configure and execute the scanning operation.
- ConfigureOptions Class : This class is used to set up the OCR scanner's configurations. The ModelPath property specifies the path to the OCR model files, and the Language property allows you to specify the language for text recognition.
- PdfDocument Class : This class represents the PDF document. The LoadFromFile method loads the PDF file that you want to process.
- Image Conversion : Each PDF page is converted to an image using the SaveAsImage method. This is essential because OCR works on image files.
- MemoryStream : The image is saved into a MemoryStream , allowing us to perform OCR without saving the image to disk.
- OCR Processing : The Scan method performs OCR on the image stream. The recognized text can be accessed using the Text property of the OcrScanner instance.
- Output : The extracted text is saved to a text file for each page.
Output :
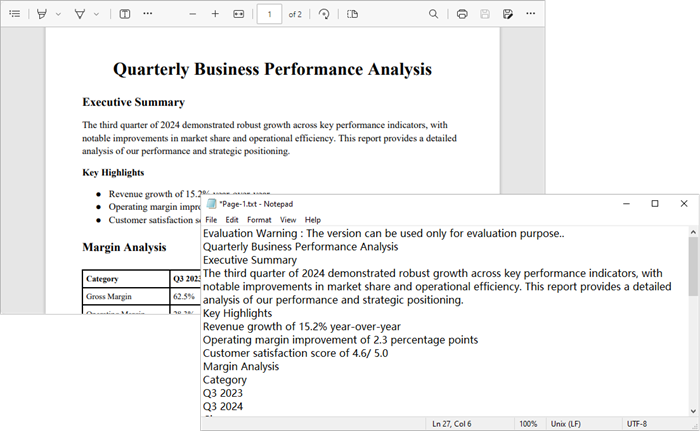
To extract text from searchable PDFs, refer to this guide: Automate PDF Text Extraction Using C#
Extracting Text from Images within PDFs in C#
In addition to processing entire PDF pages, you can also extract text from images embedded within PDFs. Here’s how:
using Spire.OCR;
using Spire.Pdf;
using Spire.Pdf.Graphics;
using System.Drawing;

namespace OCRPDF
{
    class Program
    {
        static void Main(string[] args)
        {
            // Create an instance of the OcrScanner class
            OcrScanner scanner = new OcrScanner();

            // Configure the scanner
            ConfigureOptions configureOptions = new ConfigureOptions
            {
                ModelPath = @"D:\win-x64", // Set model path
                Language = "English"        // Set language
            };

            // Apply the configuration options
            scanner.ConfigureDependencies(configureOptions);

            // Load a PDF document
            PdfDocument doc = new PdfDocument();
            doc.LoadFromFile(@"C:\Users\Administrator\Desktop\Input5.pdf");

            // Iterate through all pages
            for (int i = 0; i < doc.Pages.Count; i++)
            {
                // Convert page to image
                Image image = doc.SaveAsImage(i, PdfImageType.Bitmap);

                // Convert the image to a MemoryStream
                using (MemoryStream stream = new MemoryStream())
                {
                    image.Save(stream, System.Drawing.Imaging.ImageFormat.Png);
                    stream.Position = 0; // Reset the stream position

                    // Perform OCR on the image stream
                    scanner.Scan(stream, OCRImageFormat.Png);
                    string pageText = scanner.Text.ToString();

                    // Save extracted text to a separate file
                    string outputTxtPath = Path.Combine(@"C:\Users\Administrator\Desktop\Output", $"Page-{i + 1}.txt");
                    File.WriteAllText(outputTxtPath, pageText);
                }
            }

            // Close the document
            doc.Close();
        }
    }
}
Key Components Explained :
- PdfImageHelper Class : This class is essential for extracting images from a PDF page. It provides methods to retrieve image information such as GetImagesInfo , which returns an array of PdfImageInfo objects.
- PdfImageInfo Class : Each PdfImageInfo object contains properties related to an image, including the actual Image object that can be processed further.
- Image Processing : Similar to the previous example, each image is saved to a MemoryStream for OCR processing.
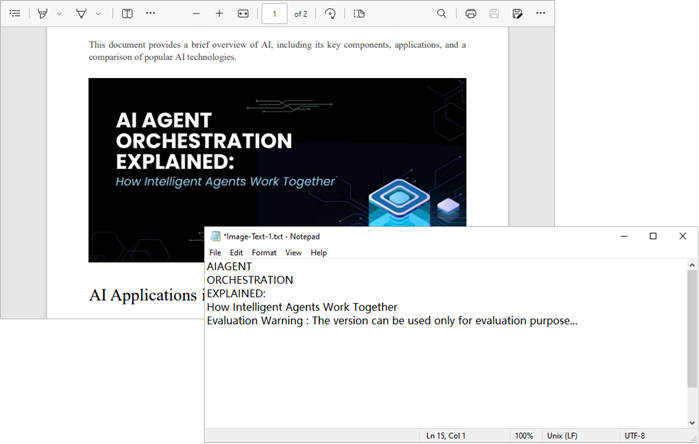
- Output : The extracted text from each image is saved to a separate text file.
Output:
Wrapping Up
By combining Spire.PDF with Spire.OCR , you can seamlessly transform scanned PDFs and image-based documents into fully searchable and editable text. Whether you need to process entire pages or extract text from specific embedded images, the approach is straightforward and flexible.
This OCR integration not only streamlines document digitization but also enhances productivity by enabling search, copy, and automated data extraction. In industries where large volumes of scanned documents are the norm, implementing OCR with C# can significantly improve accessibility, compliance, and information retrieval speed.
FAQs
Q1. Can I perform OCR on non-English PDFs?
Yes, Spire.OCR supports multiple languages. You can set the Language property in ConfigureOptions to the desired language.
Q2. What should I do if the output is garbled or incorrect?
Check the quality of the input PDF images. If the images are blurry or have low contrast, OCR may struggle to recognize text accurately. Consider enhancing the image quality before processing.
Q3. Can I extract text from images embedded within a PDF?
Yes, you can. Use a helper class to extract images from each page and then apply OCR to recognize text.
Q4. Can Spire.OCR handle handwritten text in PDFs?
Spire.OCR is primarily optimized for printed text. Handwriting recognition typically has lower accuracy.
Q5. Do I need to install additional language models for OCR?
Yes, Spire.OCR requires pre-trained language model files. Download and configure the appropriate models for your target language before performing OCR.
Get a Free License
To fully experience the capabilities of Spire.PDF for .NET and Spire.OCR for .NET without any evaluation limitations, you can request a free 30-day trial license.
How to Generate & Create QR Code in ASP.NET C# (Full Example)

QR codes have become a standard feature in modern web applications, widely used for user authentication, contactless transactions, and sharing data like URLs or contact information. For developers working with ASP.NET, implementing QR code generation using C# is a practical requirement in many real-world scenarios.
In this article, you’ll learn how to generate QR codes in ASP.NET using Spire.Barcode for .NET. We’ll walk through a complete example based on an ASP.NET Core Web App (Razor Pages) project, including backend logic and a simple UI to display the generated code. The same approach can be easily adapted to MVC, Web API, and Web Forms applications.
Article Overview
- 1. Project Setup and Dependencies
- 2. Generate QR Code in ASP.NET Using C#
- 3. Customize QR Code Output
- 4. Apply Logic in MVC, Web API, and Web Forms
- 5. Conclusion
- FAQs
1. Project Setup and Dependencies
Prerequisites
To follow along, make sure you have:
- Visual Studio 2019 or newer
- .NET 6 or later
- ASP.NET Core Web App (Razor Pages Template)
- NuGet package: Spire.Barcode for .NET
Install Spire.Barcode for .NET
Install the required library using NuGet Package Manager Console:
Install-Package Spire.Barcode
Spire.Barcode is a fully self-contained .NET barcode library that supports in-memory generation of QR codes without external APIs. You can also use Free Spire.Barcode for .NET for smaller projects.
2. Generate QR Code in ASP.NET Using C#
This section describes how to implement QR code generation in an ASP.NET Core Web App (Razor Pages) project. The example includes a backend C# handler that generates the QR code using Spire.Barcode for .NET, and a simple Razor Page frontend for user input and real-time display.
Step 1: Add QR Code Generation Logic in PageModel
The backend logic resides in the Index.cshtml.cs file. It processes the form input, generates a QR code using Spire.Barcode, and returns the result as a Base64-encoded image string that can be directly embedded in HTML.
using Microsoft.AspNetCore.Mvc;
using Microsoft.AspNetCore.Mvc.RazorPages;
using Spire.Barcode;

public class IndexModel : PageModel
{
    [BindProperty]
    public string InputData { get; set; }

    public string QrCodeBase64 { get; set; }

    public void OnPost()
    {
        if (!string.IsNullOrWhiteSpace(InputData))
        {
            QrCodeBase64 = GenerateQrCodeBase64(InputData);
        }
    }

    private string GenerateQrCodeBase64(string input)
    {
        var settings = new BarcodeSettings
        {
            Type = BarCodeType.QRCode,            // QR code type
            Data = input,                         // Main encoded data
            Data2D = input,                       // Required for 2D barcode, usually same as Data
            QRCodeDataMode = QRCodeDataMode.Byte, // Byte mode (supports multilingual content)
            QRCodeECL = QRCodeECL.M,              // Medium error correction (15%)
            X = 3,                                // Module size (affects image dimensions)
            ShowText = false,                     // Hide default barcode text
            ShowBottomText = true,                // Show custom bottom text
            BottomText = input                    // Bottom text to display under the QR code
        };

        var generator = new BarCodeGenerator(settings);
        using var ms = new MemoryStream();
        var qrImage = generator.GenerateImage();
        qrImage.Save(ms, System.Drawing.Imaging.ImageFormat.Png);
        return Convert.ToBase64String(ms.ToArray());
    }
}
Key Components:
-
BarcodeSettings: Specifies the QR code's core configuration, such as type (QRCode), data content, encoding mode, and error correction level.
-
BarCodeGenerator: Takes the settings and generates the QR code image as a System.Drawing.Image object using the GenerateImage() method.
-
Base64 Conversion: Converts the image to a Base64 string so it can be directly embedded into the HTML page without saving to disk.
This approach keeps the entire process in memory, making it fast, portable, and suitable for serverless or cloud-hosted applications.
Step 2: Create the Razor Page for User Input and QR Code Display and Download
The following Razor markup in the Index.cshtml file defines a form for entering text or URLs, displays the generated QR code upon submission, and provides a button to download the QR code image.
@page
@model IndexModel
@{
    ViewData["Title"] = "QR Code Generator";
}

<h2>QR Code Generator</h2>

<form method="post">
    <label for="InputData">Enter text or URL:</label>
    <input type="text" id="InputData" name="InputData" style="width:300px;" required />
    <button type="submit">Generate QR Code</button>
</form>

@if (!string.IsNullOrEmpty(Model.QrCodeBase64))
{
    <div style="margin-top:20px">
        <img src="data:image/png;base64,@Model.QrCodeBase64" alt="QR Code" />
        <br />
        <a href="data:image/png;base64,@Model.QrCodeBase64" download="qrcode.png">Download QR Code</a>
    </div>
}
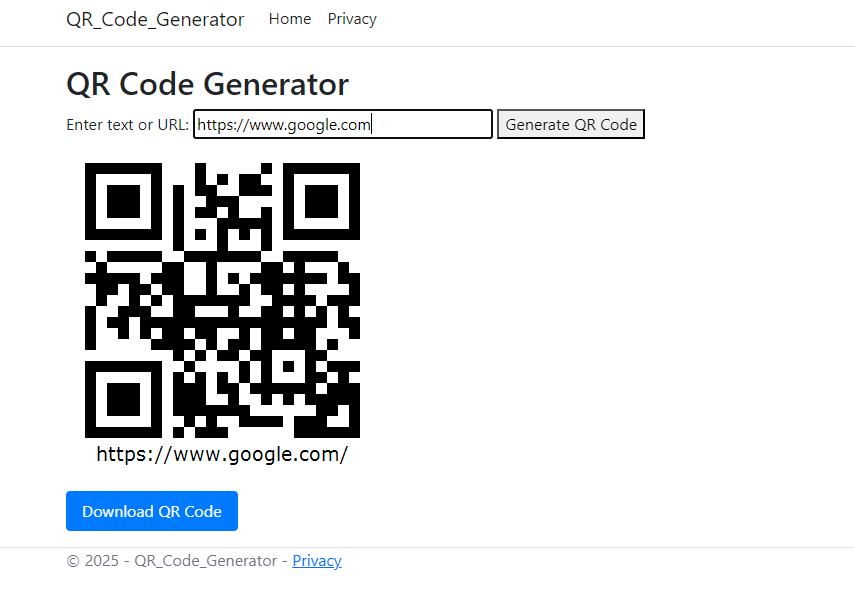
The Base64-encoded image is displayed directly in the browser using a data: URI. This eliminates the need for file storage and allows for immediate rendering and download.
The following screenshot shows the result after submitting text input.
If you need to scan QR codes instead, please refer to How to Scan QR Codes in C#.
3. Customize QR Code Output
Spire.Barcode provides several customization options through the BarcodeSettings class to control the appearance and behavior of the generated QR code:
| Property | Function | Example |
|---|---|---|
| QRCodeDataMode | Text encoding mode | QRCodeDataMode.Byte |
| QRCodeECL | Error correction level | QRCodeECL.H (high redundancy) |
| X | Module size (resolution) | settings.X = 6 |
| ImageWidth/Height | Control dimensions of QR image | settings.ImageWidth = 300 |
| ForeColor | Set QR code color | settings.ForeColor = Color.Blue |
| ShowText | Show or hide text below barcode | settings.ShowText = false |
| BottomText | Custom text to display below barcode | settings.BottomText = "Scan Me" |
| ShowBottomText | Show or hide the custom bottom text | settings.ShowBottomText = true |
| QRCodeLogoImage | Add a logo image to overlay at QR code center | settings.QRCodeLogoImage = System.Drawing.Image.FromFile("logo.png"); |
These properties help you tailor the appearance of your QR code for branding, readability, or user interaction purposes.
To explore more QR code settings, refer to the BarcodeSettings API reference.
4. Apply Logic in MVC, Web API, and Web Forms
The same QR code generation logic used in Razor Pages can also be reused in other ASP.NET frameworks such as MVC, Web API, and Web Forms.
MVC Controller Action
In an MVC project, you can add a Generate action in a controller (e.g., QrController.cs) to generate and return the QR code image directly:
public class QrController : Controller
{
    public ActionResult Generate(string data)
    {
        var settings = new BarcodeSettings
        {
            Type = BarCodeType.QRCode,
            Data = data,
            QRCodeDataMode = QRCodeDataMode.Byte,
            QRCodeECL = QRCodeECL.M,
            X = 5
        };

        var generator = new BarCodeGenerator(settings);
        using var ms = new MemoryStream();
        generator.GenerateImage().Save(ms, System.Drawing.Imaging.ImageFormat.Png);
        return File(ms.ToArray(), "image/png");
    }
}
This method returns the QR code as a downloadable PNG file, ideal for server-side rendering.
Web API Endpoint
For Web API, you can define a GET endpoint in a controller such as QrApiController.cs that responds with the generated image stream:
[ApiController]
[Route("api/[controller]")]
public class QrApiController : ControllerBase
{
    [HttpGet("generate")]
    public IActionResult GetQr(string data)
    {
        var settings = new BarcodeSettings
        {
            Type = BarCodeType.QRCode,
            Data = data
        };

        var generator = new BarCodeGenerator(settings);
        using var ms = new MemoryStream();
        generator.GenerateImage().Save(ms, System.Drawing.Imaging.ImageFormat.Png);
        return File(ms.ToArray(), "image/png");
    }
}
This approach is suitable for frontends built with React, Vue, Angular, or any JavaScript framework.
Web Forms Code-Behind
In ASP.NET Web Forms, you can handle QR code generation in the code-behind of a page like Default.aspx.cs:
protected void btnGenerate_Click(object sender, EventArgs e)
{
    var settings = new BarcodeSettings
    {
        Type = BarCodeType.QRCode,
        Data = txtInput.Text
    };

    var generator = new BarCodeGenerator(settings);
    using var ms = new MemoryStream();
    generator.GenerateImage().Save(ms, System.Drawing.Imaging.ImageFormat.Png);
    imgQR.ImageUrl = "data:image/png;base64," + Convert.ToBase64String(ms.ToArray());
}
The generated image is embedded directly into an asp:Image control using a Base64 data URI.
5. Conclusion
With Spire.Barcode for .NET, you can seamlessly generate and customize QR codes across all ASP.NET project types — Razor Pages, MVC, Web API, or Web Forms. The solution is fully offline, fast, and requires no third-party API.
Returning images as Base64 strings simplifies deployment and avoids file management. Whether you're building authentication tools, ticketing systems, or contact sharing, this approach is reliable and production-ready.
FAQs
Q: Does Spire.Barcode support Unicode characters like Chinese or Arabic?
A: Yes. Use QRCodeDataMode.Byte for full Unicode support.
Q: Can I adjust QR code size and color?
A: Absolutely. Use properties like X, ForeColor, and ImageWidth.
Q: Is this solution fully offline?
A: Yes. It works without any external API calls or services.
Q: Can I expose this QR logic via API?
A: Yes. Use ASP.NET Web API to serve generated images to client apps.
Export Database to Excel in C#: Practical Guide with SQL Example

Exporting data from a database to Excel using C# is a frequent requirement in business applications—be it for internal reporting, audit logs, data migration, or ad-hoc analysis. Excel's portability and familiarity make it a go-to format for sharing structured data with both technical and non-technical users.
In this guide, you'll learn how to export database records to Excel using C# and Spire.XLS for .NET. We’ll walk through retrieving data from a SQL Server database and writing it into a well-formatted Excel file. The same workflow applies to other relational databases such as SQLite, MySQL, or Oracle with only minimal adjustments.
Table of Contents:
- Prerequisites and Environment Setup
- Exporting Data from SQL Database to Excel in C#
- Format the Excel Output
- Alternative Approaches to Read Data
- Common Issues and Troubleshooting
- Conclusion
- FAQ
Prerequisites and Environment Setup
Before we dive into code, ensure your development environment is ready:
-
.NET Version: .NET Framework or .NET Core / .NET 6 / .NET 8
-
IDE: Visual Studio (Community or higher)
-
Database: A relational database (e.g., SQL Server, SQLite, MySQL, Oracle). This tutorial uses SQL Server Express as the example. By default, the connection uses Windows Authentication, but you can switch to SQL Authentication if needed.
-
Libraries:
- Spire.XLS for .NET (Install via NuGet: Install-Package Spire.XLS)
- Microsoft.Data.SqlClient (Install via NuGet if using SQL Server)
Sample Data
In the following examples, we'll use a simple Employees table stored in SQL Server Express. Here's the SQL script to create and populate it:
CREATE TABLE Employees (
    Id INT PRIMARY KEY IDENTITY,
    Name NVARCHAR(100) NOT NULL,
    Department NVARCHAR(50) NOT NULL,
    Position NVARCHAR(50),
    HireDate DATE NOT NULL,
    Salary DECIMAL(10, 2) NOT NULL,
    IsFullTime BIT NOT NULL
);

INSERT INTO Employees (Name, Department, Position, HireDate, Salary, IsFullTime) VALUES
('Alice Johnson', 'Human Resources', 'HR Manager', '2018-05-01', 5500.00, 1),
('Bob Smith', 'IT', 'Software Engineer', '2020-09-15', 7200.50, 1),
('Charlie Lee', 'Finance', 'Accountant', '2019-11-20', 6300.75, 0),
('Diana Chen', 'Marketing', 'Content Specialist', '2021-02-10', 4800.00, 1);
If you're using another database system like MySQL or SQLite, just adjust the SQL syntax and connection string accordingly. The export logic remains the same.
Exporting Data from SQL Database to Excel in C#
Let’s walk through how to retrieve data from a database and export it to an Excel file using Spire.XLS for .NET.
Step 1: Connect to the SQL Server Database
We start by establishing a connection to the database using SqlConnection. Here's an example connection string targeting SQL Server Express:
string connectionString = @"Data Source=YourServer\SQLEXPRESS;Initial Catalog=YourDatabaseName;Integrated Security=True;";
The above connection string uses Windows Authentication (Integrated Security=True). If you prefer SQL Server Authentication, replace it with: User ID=yourUsername;Password=yourPassword;Encrypt=True;TrustServerCertificate=True;
Make sure that your SQL Server Express instance is running, and that the specified database and table exist.
Step 2: Retrieve Data into a DataTable
To make the data ready for export, we use SqlDataAdapter to fill a DataTable with the results of a SQL query:
using System.Data;
using Microsoft.Data.SqlClient;

DataTable dataTable = new DataTable();
using (SqlConnection conn = new SqlConnection(connectionString))
{
    conn.Open();
    string query = "SELECT * FROM Employees";
    using (SqlDataAdapter adapter = new SqlDataAdapter(query, conn))
    {
        adapter.Fill(dataTable);
    }
}
Spire.XLS can directly import data from a DataTable using InsertDataTable, which makes it ideal for structured exports from relational databases.
Step 3: Export the DataTable to Excel Using Spire.XLS
Once the DataTable is populated, we can use Spire.XLS to write its contents into a new Excel worksheet:
using Spire.Xls;

// Create a new workbook
Workbook workbook = new Workbook();
// Clear the default sheets and create a new one
workbook.Worksheets.Clear();
Worksheet sheet = workbook.Worksheets.Add("Employees");

// Insert data starting from row 1, column 1, and include column headers
sheet.InsertDataTable(dataTable, true, 1, 1);

// Save the workbook as an Excel xlsx file
workbook.SaveToFile("Employees.xlsx", ExcelVersion.Version2013);
Key classes and methods used:
- Workbook: The main entry point for creating or loading Excel files.
- Worksheet: Represents a single sheet in the workbook. Use workbook.Worksheets[] to access a sheet, or Worksheets.Add() to add more.
- InsertDataTable(DataTable dataTable, bool columnHeaders, int firstRow, int firstColumn):
- columnHeaders = true tells Spire.XLS to write column names as the first row.
- firstRow, firstColumn specify where the data begins (1-based index).
- Workbook.SaveToFile(string fileName, ExcelVersion version): Saves the workbook to a file. Spire.XLS supports saving Excel workbooks to various formats, including .xlsx, .xls, and .csv. You can also save to a stream using SaveToStream().
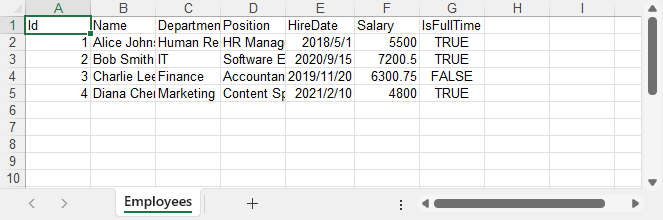
Here’s what the resulting Excel file looks like with the raw data exported from the database.
Step 4: Format the Excel Output (Optional but Recommended)
While the data is already exported, applying some formatting can significantly improve readability for end users:
// Write data to Excel, including column names, starting at row 1, column 1
sheet.InsertDataTable(dataTable, true, 1, 1);

// Make header row bold and highlight with background color
sheet.Rows[0].Style.Font.IsBold = true;
sheet.Rows[0].Style.Font.Size = 14;
sheet.Rows[0].Style.HorizontalAlignment = HorizontalAlignType.Center;
sheet.Rows[0].Style.Color = System.Drawing.Color.LightGray;

// Format data rows
for (int i = 1; i < sheet.Rows.Count(); i++)
{
    CellRange dataRow = sheet.Rows[i];
    dataRow.Style.Font.Size = 12;
    dataRow.Style.HorizontalAlignment = HorizontalAlignType.Left;
}

// Set font name
sheet.AllocatedRange.Style.Font.FontName = "Arial";

// Set borders
sheet.AllocatedRange.BorderAround(LineStyleType.Thin, System.Drawing.Color.Black);
sheet.AllocatedRange.BorderInside(LineStyleType.Medium, System.Drawing.Color.Black);

// Auto-fit columns
sheet.AllocatedRange.AutoFitColumns();
Here's what the Excel file looks like after formatting.
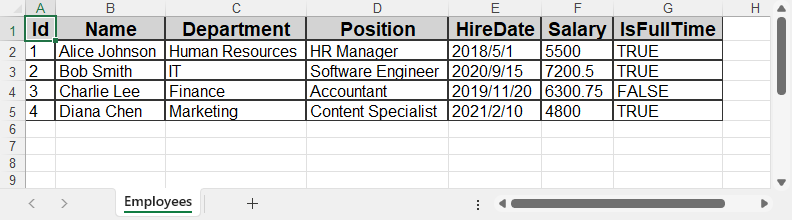
Spire.XLS provides full access to cell styles, fonts, colors, borders, alignment, and more—making it suitable for generating production-quality Excel reports.
If you need advanced number formatting, learn how to set number formats for Excel cells using C#.
Alternative Approaches to Read Data
The export process relies on having a DataTable, but how you populate it can vary based on your application architecture:
A. Using Entity Framework (ORM)
If you use EF Core or EF6, you can load data via LINQ and manually insert it into Excel:
var employees = dbContext.Employees.ToList();
To export, either convert this list into a DataTable, or use a loop to write rows manually using sheet.Range[row, col].Value = value.
B. Using Stored Procedures
Stored procedures allow encapsulating SQL logic. You can execute them using SqlCommand and fill the result into a DataTable:
SqlCommand cmd = new SqlCommand("GetEmployees", conn);
cmd.CommandType = CommandType.StoredProcedure;
C. Reading from SQLite
For lightweight scenarios, replace the connection string and class:
using (SQLiteConnection conn = new SQLiteConnection("Data Source=mydb.db"))
Export logic remains identical—fill a DataTable and use InsertDataTable.
D. Reading from MySQL or Oracle
Same pattern applies—just change the connection class:
using (MySqlConnection conn = new MySqlConnection("server=localhost;uid=root;pwd=123;database=test"))
Make sure to install the appropriate ADO.NET data provider (e.g., Microsoft.Data.SqlClient, Microsoft.Data.Sqlite, or MySql.Data) via NuGet when connecting to different databases.
As long as you populate a DataTable, Spire.XLS handles the Excel generation the same way.
You may also like: How to Import Data from Excel to Database – learn how to complete the full data exchange cycle using Spire.XLS.
Common Issues and Troubleshooting
| Issue | Solution |
|---|---|
| Excel file opens empty | Ensure the DataTable has data before calling InsertDataTable() |
| Access denied on save | Check folder permissions or file path conflicts |
| Connection fails | Verify your database server, credentials, and connection string |
| Special characters not displaying | Use NVARCHAR in SQL and Unicode-compatible fonts in Excel |
| Login failed or authentication error | Check authentication method: use Integrated Security=True for Windows, or provide User ID and Password for SQL Authentication. |
Conclusion
Exporting a database to Excel in C# can be done efficiently using Spire.XLS for .NET. By retrieving data into a DataTable and exporting it with InsertDataTable(), you can automate reporting and data extraction without needing Microsoft Office installed.
This solution can also be integrated into scheduled tasks, background services, or web applications for automated report generation.
To unlock all features during development or testing, you can apply for a free 30-day temporary license. For smaller projects, Free Spire.XLS for .NET may also be sufficient.
FAQ
How do I export SQL to Excel in C#?
Use SqlConnection to retrieve data into a DataTable, and export it using Spire.XLS’s InsertDataTable() method.
Can I use this method with SQLite or MySQL?
Yes. Just change the connection type and query, then pass the resulting DataTable to Spire.XLS.
Do I need Excel installed to use Spire.XLS?
No. Spire.XLS is a standalone library and does not require Microsoft Excel on the machine.
Can I export multiple tables to Excel?
Yes. Use Workbook.Worksheets.Add() to create additional worksheets, and export each DataTable separately.
How to Export DataTable to Excel in C# (XLSX/XLS File)
Exporting a DataTable to Excel in C# is a common task in .NET development, such as generating reports, exporting logs, or preparing data for sharing across systems. By using a standalone component, developers can quickly export data and apply formatting to create professional, ready-to-use Excel files from DataTables without relying on complex setup or external dependencies.
To streamline this process, Spire.XLS for .NET offers a lightweight and fully independent library. In this article, you'll learn how to export a DataTable to Excel (.xlsx or .xls) in C#, apply formatting to improve readability, and address common export scenarios effectively.
Quick Navigation
- Install and Configure Spire.XLS
- Step-by-Step: Export DataTable to Excel
- Format and Style the Exported Excel File
- Common Issues and Solutions
- Conclusion
- Frequently Asked Questions
Install and Configure Spire.XLS
Before you start, make sure your project includes Spire.XLS for .NET.
Install Spire.XLS via NuGet
Run this command in the NuGet Package Manager Console:
Install-Package Spire.XLS
Spire.XLS works with .NET Framework, .NET Core, .NET 6/7+, and ASP.NET projects — no Microsoft Office installation required.
Step-by-Step: Export DataTable to Excel in C#
The following steps demonstrate how to export a DataTable to an Excel file using Spire.XLS, including data preparation, file generation, optional streaming, and output formatting.
1. Create a Sample DataTable
First, create a DataTable and add some sample rows:
DataTable dt = new DataTable("Employees");

// Insert columns
dt.Columns.Add("ID", typeof(int));
dt.Columns.Add("Name", typeof(string));
dt.Columns.Add("Department", typeof(string));
dt.Columns.Add("Join Date", typeof(DateTime));
dt.Columns.Add("Salary", typeof(double));
dt.Columns.Add("Full-Time", typeof(bool));
dt.Columns.Add("Bonus Rate", typeof(decimal));

// Insert rows
dt.Rows.Add(1001, "Alice", "HR", new DateTime(2021, 5, 10), 55000.5, true, 0.05m);
dt.Rows.Add(1002, "Bob", "IT", new DateTime(2020, 11, 23), 72000.0, false, 0.03m);
dt.Rows.Add(1003, "Carol", "Finance", new DateTime(2019, 8, 15), 63000.75, true, 0.07m);
dt.Rows.Add(1004, "David", "Marketing", new DateTime(2022, 3, 8), 48800.0, true, 0.06m);
Tip: This is just sample data — you can bind any DataTable your app generates.
2. Import DataTable and Save to Excel File
Next, initialize the Excel workbook, import the DataTable into a worksheet, and save the file:
// Create a new workbook
Workbook workbook = new Workbook();
// Clear the default worksheets and add a new one
workbook.Worksheets.Clear();
Worksheet sheet = workbook.Worksheets.Add(dt.TableName);

// Import the DataTable starting at cell A1
sheet.InsertDataTable(dt, true, 1, 1);

// Save as XLSX (recommended)
workbook.SaveToFile("EmployeeData.xlsx", FileFormat.Version2016);

// Or save as XLS (older format)
workbook.SaveToFile("EmployeeData.xls", FileFormat.Version97to2003);
Explanation:
- Workbook is the container for your Excel file.
- InsertDataTable(dataTable, includeColumnHeaders, startRow, startColumn) maps the entire table to the Excel grid.
- SaveToFile() writes the file to disk in your chosen format.
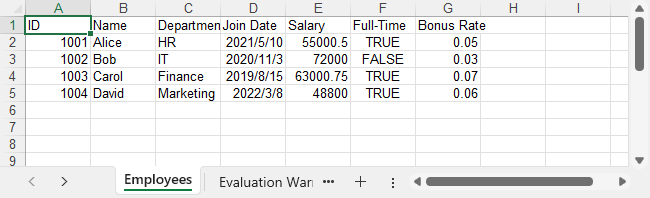
Output Preview
Example of the exported Excel file:
3. Export Excel File as Stream in ASP.NET
When building a web app, you might want to export the file directly as a stream instead of saving to disk:
MemoryStream stream = new MemoryStream();
workbook.SaveToStream(stream, FileFormat.Version2013);
stream.Position = 0;
Return this MemoryStream in your ASP.NET controller to trigger a file download in the browser.
For additional tips on managing Excel files in C#, check out How to Create and Manipulate Excel Files in C#.
Format and Style the Exported Excel File
Formatting is optional but recommended for creating professional Excel files. Below is how you can format the exported content using Spire.XLS.
// Style the header row
CellRange header = sheet.Rows[0];
header.Style.Font.IsBold = true;
header.Style.Font.FontName = "Arial";
header.Style.Font.Size = 13;
header.Style.Color = Color.LightGray;
header.Style.Borders[BordersLineType.EdgeBottom].LineStyle = LineStyleType.Thick;

// Style the data rows
for (int i =  1; i < sheet.Rows.Length; i++)
{
    CellRange dataRow = sheet.Rows[i];
    dataRow.Style.Font.FontName = "Times New Roman";
    dataRow.Style.Font.Size = 11;
    dataRow.BorderInside();
}

// Format date column to display as date
CellRange dateColumn = sheet.Range[2, 4, sheet.Rows.Length + 1, 4];
dateColumn.Style.NumberFormat = "yyyy-mm-dd";

// Auto-fit columns
sheet.AllocatedRange.AutoFitColumns();
Key Properties and Methods:
- Style: Applies font, color, border, number formatting, etc. to cells.
- AutoFitColumns(): Automatically adjusts column width to fit content.
- NumberFormat: Sets how dates or numbers are displayed in Excel, e.g., "yyyy-mm-dd".
- BorderInside(): Adds internal borders to improve table readability.
Formatted Output Preview
Excel file with formatted header and date column:
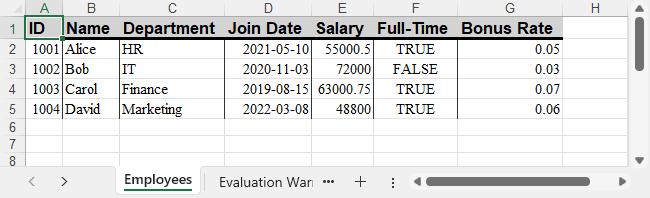
For more advanced number formatting options, see how to set number format in Excel using C#.
Common Issues and Solutions
- File won’t open or shows corruption error
Ensure streams are closed properly and file extensions match the format.
- Special characters or non-English text look garbled
Confirm strings are UTF-8 encoded and use appropriate fonts.
- Columns too narrow
Use AutoFitColumns() to adjust widths automatically or use CellRange.ColumnWidth to set a fixed column width.
Conclusion
Exporting a DataTable to Excel in C# is straightforward with Spire.XLS. This approach lets you create .xlsx or .xls files easily without relying on Office, while giving you full control over the output layout for both desktop and web applications.
If needed, you can also request a free temporary license to unlock the full feature set for evaluation.
Frequently Asked Questions
Q1: How to convert DataTable to Excel in C#?
You can use sheet.InsertDataTable() from Spire.XLS to load a DataTable into a worksheet, then save it as an Excel file using workbook.SaveToFile().
Q2: Is there a free library to export a DataTable to Excel in C#?
Yes — Free Spire.XLS for .NET is a standalone library that lets you create and export Excel files directly in C# without needing to install Microsoft Office.
Q3: Can I export DataTable to Excel in ASP.NET?
Yes, the same logic can be applied in ASP.NET by generating the workbook in a controller and streaming it back as a downloadable file.
Q4: What's the difference between .xlsx and .xls export?
.xlsx is the newer Office Open XML format, compatible with Excel 2007 and later. .xls supports legacy Excel 97–2003 but is limited to 65,536 rows.
OCR in Java: A Practical Guide to Extract Text from Images

Optical Character Recognition (OCR) has become an indispensable technology in modern software development, enabling computers to convert different types of documents, such as images or scanned documents, into editable and searchable text. In the Java ecosystem, integrating OCR capabilities enables powerful document processing, data extraction, and accessibility features. This guide explores how to implement OCR in Java using the Spire.OCR for Java library, leveraging its advanced features to extract text from images with or without positional coordinates.
Table of Contents:
- Why Perform OCR in Java?
- Environment Setup & Configuration
- Extract Text from an Image in Java
- Extract Text with Coordinates from an Image in Java
- Advanced OCR Techniques
- FAQs (Supported Languages and Image Formats)
- Conclusion & Free License
Why Perform OCR in Java?
OCR technology transforms images into machine-readable text. Java developers leverage OCR for:
- Automating invoice/receipt processing
- Digitizing printed records and forms
- Enabling text search in scanned documents
- Extracting structured data with spatial coordinates
Spire.OCR for Java stands out with its:
- Advanced OCR algorithms ensure accurate text recognition.
- Support for multiple image formats and languages.
- Batch processing of multiple images, improving efficiency.
- Ease of integration with Java applications
Environment Setup & Configuration
Step 1: Add Spire.OCR to Your Project
Add the following to your pom.xml:
<repositories>
    <repository>
        <id>com.e-iceblue</id>
        <name>e-iceblue</name>
        <url>https://repo.e-iceblue.com/nexus/content/groups/public/</url>
    </repository>
</repositories>
<dependency>
    <groupId>e-iceblue</groupId>
    <artifactId>spire.ocr</artifactId>
    <version>2.1.1</version>
</dependency>
Alternatively, you can download the Spire.OCR for Java library, and then add it to your Java project.
Step 2: Download the OCR Model Files
Spire.OCR for Java relies on pre-trained models to extract image text. Download the OCR model files for your OS:
After downloading, unzip the files to a directory (e.g., F:\win-x64)
Extract Text from an Image in Java
The following is a basic text extraction example, i.e., reading text from an image and saving it to .txt files.
Use Cases:
- Archiving printed materials (e.g., books, newspapers) as digital text.
- Converting images (e.g., screenshots, memes, signs) into shareable/editable text.
Java code to get text from an image:
import com.spire.ocr.*;
import java.io.BufferedWriter;
import java.io.FileWriter;
import java.io.IOException;

public class ocrJava {
    public static void main(String[] args) throws Exception {
            // Create an instance of the OcrScanner class
            OcrScanner scanner = new OcrScanner();

            // Create an instance of the ConfigureOptions class
            ConfigureOptions configureOptions = new ConfigureOptions();

            // Set the path to the OCR model
            configureOptions.setModelPath("F:\\win-x64");

            // Set the language for text recognition
            configureOptions.setLanguage("English");

            // Apply the configuration options to the scanner
            scanner.ConfigureDependencies(configureOptions);

            // Extract text from an image
            scanner.scan("sample.png");
            String text = scanner.getText().toString();

            // Save the extracted text to a text file
            try (BufferedWriter writer = new BufferedWriter(new FileWriter("output.txt"))) {
                writer.write(text);
            } catch (IOException e) {
            e.printStackTrace();
        }
    }
}
Key Steps:
-
Initialize Scanner: OcrScanner handles OCR operations
-
Configure Settings:
- setModelPath(): Location of OCR model files
- setLanguage(): Supports multiple languages (Chinese, Spanish, etc.)
-
Process Image: scan() performs OCR on the image file
-
Export Text: getText() retrieves results as a string
Output:

Extract Text with Coordinates from an Image in Java
In some applications, knowing the position of text within the image is crucial, for example, when processing structured documents like invoices or forms. The Spire.OCR library supports this through its block-based text extraction feature.
Use Cases:
- Automated invoice processing (locate amounts, dates)
- Form data extraction (identify fields by position)
Java code to extract text with coordinates:
import com.spire.ocr.*;
import java.io.IOException;
import java.nio.file.Files;
import java.nio.file.Paths;
import java.util.ArrayList;
import java.util.List;

public class ExtractWithCoordinates {
    public static void main(String[] args) throws Exception {
            // Create an instance of the OcrScanner class
            OcrScanner scanner = new OcrScanner();

            // Create an instance of the ConfigureOptions class
            ConfigureOptions configureOptions = new ConfigureOptions();

            // Set the path to the OCR model
            configureOptions.setModelPath("F:\\win-x64");

            // Set the language for text recognition
            configureOptions.setLanguage("English");

            // Apply the configuration options to the scanner
            scanner.ConfigureDependencies(configureOptions);

            // Extract text from an image
            scanner.scan("invoice.png");
            IOCRText text = scanner.getText();

            // Create a list to store information
            List<String> results = new ArrayList<>();

            // Iterate through each detected text block
            for (IOCRTextBlock block : text.getBlocks()) {
                // Add the extracted text and coordinates to the list
                results.add("Block Text: " + block.getText());
                results.add("Coordinates: " + block.getBox());
                results.add("---------");
            }

            // Save to a text file
            try {
                Files.write(Paths.get("ExtractWithCoordinates.txt"), results);
            } catch (IOException e) {
                e.printStackTrace();
            }
        }
    }
Key Features:
-
Text & Coordinate Extraction:
-
Iterates over text blocks detected in the image.
-
getText(): Returns an IOCRText object containing recognized text.
-
getBox(): Returns bounding box coordinates [x, y, width, height]
-
-
Efficient File Writing:
-
Uses Java NIO for efficient file operations.
-
Outputs human-readable results for easy parsing.
-
Output:
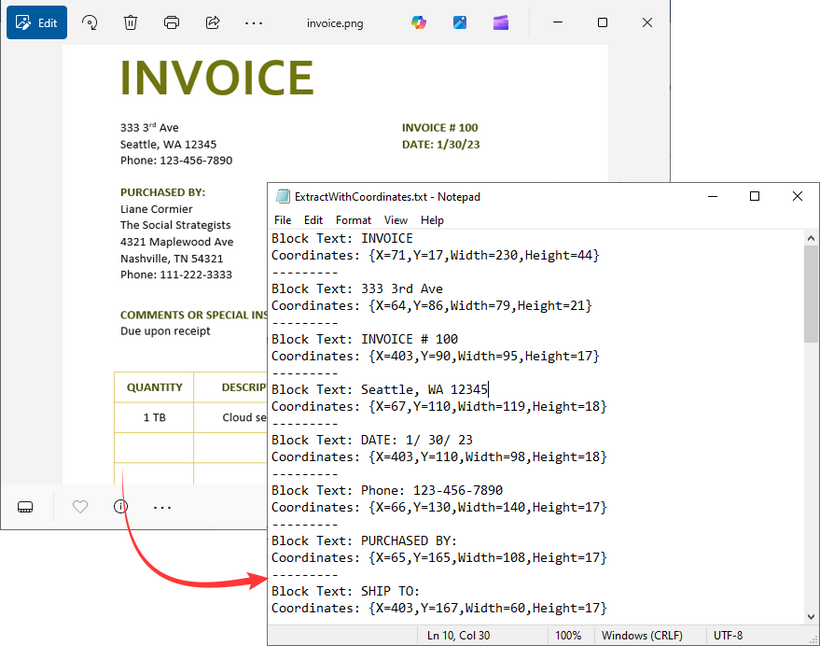
Advanced OCR Techniques
1. Enable Auto-Rotation of Images
For accurate processing of skewed or rotated images, enable the SetAutoRotate() method to rotate the image to the correct upright position automatically:
ConfigureOptions configureOptions = new ConfigureOptions();
configureOptions.SetAutoRotate(true);
2. Preserve the Original Layout
If you need to preserve the original visual layout in the image (e.g., table, multi-column layout), initialize the VisualTextAligner class to enhance the formatting of the extracted text.
// Align the recognized text (for better formatting)
VisualTextAligner visualTextAligner = new VisualTextAligner(scanner.getText());
String scannedText = visualTextAligner.toString();
FAQs (Supported Languages and Image Formats)
Q1: What image formats does Spire.OCR for Java support?
A: Spire.OCR for Java supports all common formats:
- PNG
- JPEG/JPG
- BMP
- TIFF
- GIF
Q2: What languages does Spire.OCR for Java support?
A: Multiple languages are supported:
- English (default)
- Chinese (Simplified and Traditional)
- Japanese
- Korean
- German
- French
Q3: How to improve OCR accuracy?
A: To boost accuracy:
- Use high-quality images (300+ DPI, well-lit, low noise).
- Preprocess images (adjust contrast, remove artifacts) before scanning.
- Specify the correct language(s) for the text in the image.
Q4: Can Spire.OCR for Java extract text from scanned PDFs?
A: This task requires the Spire.PDF for Java integration to convert PDFs to images or extract images from scanned PDFs first, and then use the above Java examples to get text from the images.
Conclusion & Free License
This guide provides a comprehensive roadmap for mastering Spire.OCR for Java, equipping developers with the knowledge to seamlessly integrate powerful OCR capabilities into their Java applications. From step-by-step installation to implementing basic and advanced text extraction, every critical aspect of recognizing text from images has been covered. Whether you're new to OCR or experienced, you now have the tools to convert images to text simply and effectively.
Request a 30-day free trial license here to enjoy unlimited OCR processing in Java.
Convertire Word in TIFF (con Adobe, strumenti online e Python)
Indice
Installa con Pypi
pip install Spire.Doc
pip install pillow
Link correlati
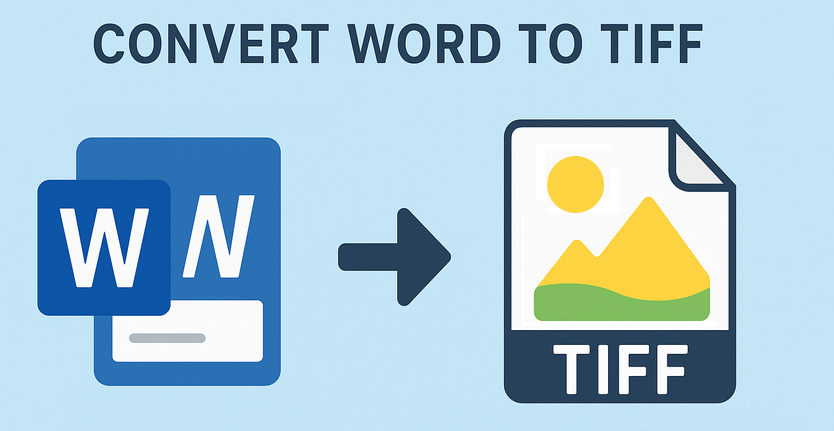
Convertire Word in TIFF potrebbe sembrare un'operazione di nicchia, ma è sorprendentemente essenziale per molti professionisti. Il TIFF (Tagged Image File Format) è apprezzato per la sua alta qualità, la compressione senza perdita di dati e la compatibilità con i settori del design grafico, della stampa e legale. Che tu abbia bisogno di preservare la formattazione di un contratto, condividere un documento con immagini ad alta risoluzione o soddisfare requisiti di invio specifici, sapere come convertire correttamente Word in TIFF è fondamentale.
Questa guida esplora tre metodi efficienti per convertire Word DOC/DOCX in TIFF - utilizzando Adobe Acrobat, strumenti online e l'automazione con Python.
- Cos'è il TIFF? Caratteristiche principali
- Strumenti affidabili per la conversione da Word a TIFF
- Come convertire Word in TIFF: 3 metodi semplici
- Considerazioni finali
Cos'è il TIFF? Caratteristiche principali
Il TIFF non è un formato di immagine comune come JPEG o PNG. È un formato raster robusto, flessibile e senza perdita di dati, progettato per l'alta qualità, la conservazione dei dettagli e la versatilità. Le caratteristiche principali includono:
- Compressione senza perdita: A differenza di JPEG, il TIFF (specialmente con compressione LZW o ZIP) conserva tutti i dati originali dell'immagine senza degradarne la qualità, il che è cruciale per l'archiviazione o la riproduzione.
- Alta fedeltà: Conserva perfettamente dettagli complessi come testo, disegni al tratto, diagrammi e immagini scansionate.
- Supporto multi-pagina: Un singolo file TIFF può contenere più pagine (come un documento scansionato), rendendolo ideale per documenti Word di più pagine.
- Ricco di metadati: Supporta l'incorporamento di metadati estesi (come autore, copyright, parole chiave).
- Profondità di colore: Gestisce varie modalità di colore (1 bit B/N, scala di grigi, RGB, CMYK) essenziali per la stampa professionale e l'archiviazione.
Strumenti affidabili per la conversione da Word a TIFF
La scelta dello strumento giusto dipende dalle tue esigenze - se desideri un flusso di lavoro desktop veloce, la comodità online o una soluzione programmabile. Ecco una panoramica delle migliori opzioni:
| Tipo di strumento | Nome dello strumento | Caratteristiche principali |
| Desktop | Adobe Acrobat | Conversione Word → PDF → TIFF, output di alta qualità, impostazioni avanzate. |
| Online | Zamzar | Conversione in batch, interfaccia drag-and-drop, nessun software necessario. |
| Basato su codice | Python (Spire.Doc + Pillow) | Automatizza le conversioni di massa, si integra con i flussi di lavoro. |
Come convertire Word in TIFF: 3 metodi semplici
Metodo 1: Adobe Acrobat Pro (conversione professionale)
Adobe Acrobat supporta la conversione di Word in PDF e quindi l'esportazione come TIFF. Questo metodo è perfetto per documenti complessi con immagini, tabelle o layout personalizzati, poiché il rendering avanzato di Acrobat minimizza gli errori di formattazione.
Passaggi:
1. Apri il tuo documento di Word in Acrobat:
- Vai su "File -> Crea -> PDF da file".
- Seleziona un documento .docx o .doc e fai clic su "Apri". Acrobat convertirà automaticamente il Word in un PDF in background.
2. Converti il PDF in TIFF:
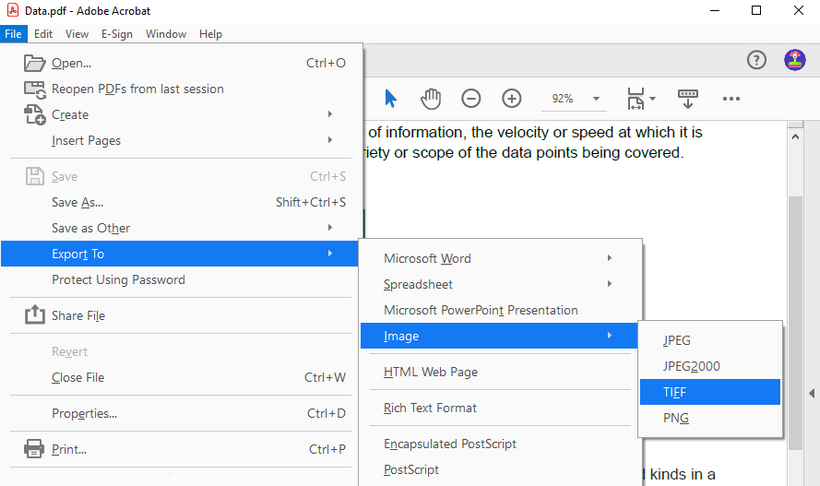
- Una volta aperto il PDF in Acrobat, vai su "File -> Esporta in -> Immagine -> TIFF".
- Seleziona l'icona delle impostazioni per modificare le preferenze di esportazione, come la personalizzazione della risoluzione, dello spazio colore e della compressione.
Vantaggi: Alta precisione per documenti complessi, sicuro, preserva bene la formattazione.
Svantaggi: Richiede un abbonamento a pagamento, l'accesso offline richiede l'installazione desktop.
Metodo 2: Convertitori online gratuiti (veloci, per file di piccole dimensioni)
Per conversioni una tantum senza installare software, gli strumenti online offrono una soluzione comoda per convertire documenti semplici come lettere di una pagina o curriculum di base.
Passaggi:
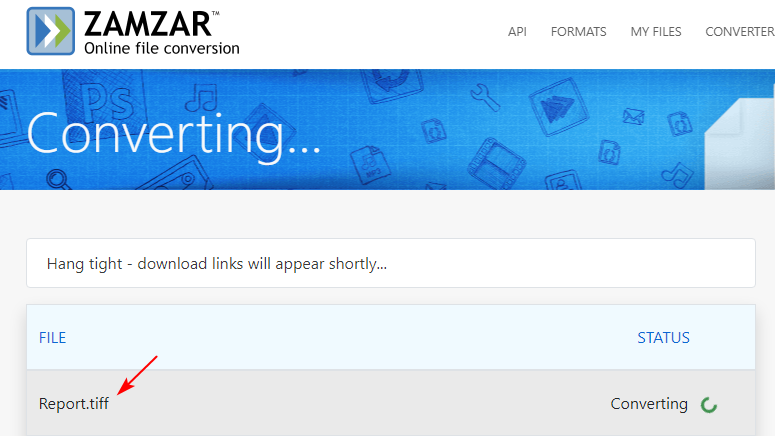
- Vai al sito web del convertitore gratuito (ad es. Zamzar / Convertio).
- Carica il tuo file di Word (dal tuo computer, Google Drive o Dropbox).
- Seleziona TIFF come formato di output.
- Fai clic su "Converti" e scarica il TIFF di output.
Vantaggi: Gratuito (per uso base), nessuna installazione di software, accessibilità multipiattaforma.
Svantaggi: Limiti di dimensione del file (solitamente 100 MB o meno), più lento per file di grandi dimensioni, potenziali rischi per la privacy con documenti sensibili.
Metodo 3: Script Python (Spire.Doc + Pillow) per l'automazione
Per gli sviluppatori che necessitano di automatizzare conversioni di massa, questo metodo Python è una soluzione ideale. Utilizza Spire.Doc for Python per gestire i file di Word e Pillow (PIL) per creare TIFF multi-pagina a livello di codice.
Passaggi:
1. Installa le librerie richieste
Innanzitutto, installa gli strumenti necessari tramite pip:
pip install Spire.Doc
pip install pillow
2. Esegui lo script di conversione da Word a TIFF
Usa il codice Python sottostante per convertire un documento di Word in un TIFF multi-pagina:
from spire.doc import *
from spire.doc.common import *

from PIL import Image
from io import BytesIO

# Crea un oggetto Document
doc = Document()

# Carica un documento di Word
doc.LoadFromFile("C:\\Users\\Administrator\\Desktop\\Input.docx")

# Crea una lista vuota per memorizzare le immagini PIL
images = []

# Itera attraverso le pagine del documento
for i in range(doc.GetPageCount()):

    # Converte una pagina specifica in un flusso di immagini
    with doc.SaveImageToStreams(i, ImageType.Bitmap) as imageData:

        # Apri un flusso di immagini specifico come un'immagine PIL
        img = Image.open(BytesIO(imageData.ToArray()))

        # Aggiungi l'immagine PIL alla lista
        images.append(img)

# Salva le immagini PIL come un file TIFF multi-pagina
images[0].save("Output/ToTIFF.tiff", save_all=True, append_images=images[1:])

# Rilascia le risorse
doc.Dispose()
Elaborazione in batch: racchiudi lo script in un ciclo per convertire tutti i file di Word in una cartella:
import os
for file in os.listdir("F:\\Reports"):
    if file.endswith((".docx", ".doc")):
        doc.LoadFromFile(os.path.join("F:\\Reports", file))
        # Inserisci qui il codice di conversione da Word a TIFF
Vantaggi: Pieno controllo programmatico, automatizza le conversioni di massa, nessuna dipendenza da Adobe.
Svantaggi: Richiede competenze di base di programmazione, necessita di configurazione delle librerie, non ideale per utenti non tecnici.
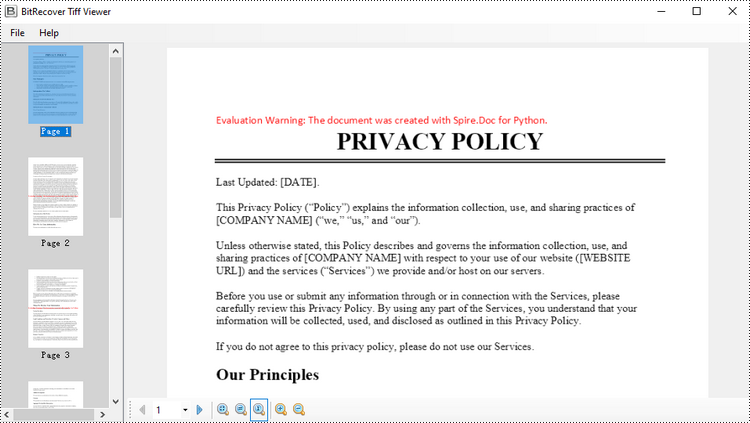
Suggerimento: Richiedi una licenza di prova gratuita qui per rimuovere la filigrana.
Considerazioni finali
La conversione di Word in TIFF è essenziale per la conservazione a lungo termine dei documenti. Questo articolo fornisce tre metodi praticabili per la conversione da Word a TIFF, su misura per esigenze diverse. Che tu sia un professionista che necessita di precisione (Adobe Acrobat), un utente occasionale che cerca velocità (strumenti online) o uno sviluppatore che automatizza attività di massa (script Python), ora sai quale metodo scegliere. Analizzando pro, contro e processi passo-passo, si elimina la confusione, aiutandoti a proteggere i file sensibili e a ottenere output TIFF di alta qualità.
Vedi anche
Converter Word para TIFF (com Adobe, ferramentas online e Python)
Índice
Instalar com Pypi
pip install Spire.Doc
pip install pillow
Links Relacionados
Converter Word para TIFF pode parecer uma tarefa de nicho, mas é surpreendentemente essencial para muitos profissionais. O TIFF (Tagged Image File Format) é valorizado pela sua alta qualidade, compressão sem perdas e compatibilidade com design gráfico, impressão e indústrias jurídicas. Quer precise preservar a formatação de um contrato, compartilhar um documento com imagens de alta resolução ou cumprir requisitos específicos de envio, saber como converter Word para TIFF corretamente é fundamental.
Este guia explora três métodos eficientes para converter Word DOC/DOCX para TIFF - usando o Adobe Acrobat, ferramentas online e automação com Python.
- O que é TIFF? Principais Características
- Ferramentas Confiáveis para a Conversão de Word para TIFF
- Como Converter Word para TIFF: 3 Métodos Fáceis
- Considerações Finais
O que é TIFF? Principais Características
O TIFF não é um formato de imagem comum como JPEG ou PNG. É um formato raster robusto, flexível e sem perdas, projetado para alta qualidade, preservação de detalhes e versatilidade. As características principais incluem:
- Compressão Sem Perdas: Ao contrário do JPEG, o TIFF (especialmente com compressão LZW ou ZIP) retém todos os dados da imagem original sem degradar a qualidade, o que é crucial para arquivamento ou reprodução.
- Alta Fidelidade: Preserva perfeitamente detalhes intrincados como texto, arte linear, diagramas e imagens digitalizadas.
- Suporte a Múltiplas Páginas: Um único arquivo TIFF pode conter várias páginas (como um documento digitalizado), tornando-o ideal para documentos do Word de várias páginas.
- Rico em Metadados: Suporta a incorporação de metadados extensos (como autor, direitos autorais, palavras-chave).
- Profundidade de Cor: Lida com vários modos de cor (1-bit P&B, Escala de Cinza, RGB, CMYK) essenciais para impressão e arquivamento profissionais.
Ferramentas Confiáveis para a Conversão de Word para TIFF
A escolha da ferramenta certa depende das suas necessidades - se você deseja um fluxo de trabalho rápido no desktop, a conveniência online ou uma solução programável. Aqui está um resumo das melhores opções:
| Tipo de Ferramenta | Nome da Ferramenta | Principais Características |
| Desktop | Adobe Acrobat | Conversão de Word → PDF → TIFF, saída de alta qualidade, configurações avançadas. |
| Online | Zamzar | Conversão em lote, interface de arrastar e soltar, sem necessidade de software. |
| Baseada em Código | Python (Spire.Doc + Pillow) | Automatiza conversões em massa, integra-se com fluxos de trabalho. |
Como Converter Word para TIFF: 3 Métodos Fáceis
Método 1: Adobe Acrobat Pro (Conversão Profissional)
O Adobe Acrobat suporta a conversão de Word para PDF e, em seguida, a exportação como TIFF. Este método é perfeito para documentos complexos com imagens, tabelas ou layouts personalizados, pois a renderização avançada do Acrobat minimiza erros de formatação.
Passos:
1. Abra seu documento do Word no Acrobat:
- Vá para "Arquivo -> Criar -> PDF a Partir de Arquivo".
- Selecione um documento .docx ou .doc e clique em "Abrir". O Acrobat converterá automaticamente o Word para PDF em segundo plano.
2. Converta o PDF para TIFF:
- Assim que o PDF estiver aberto no Acrobat, vá para "Arquivo -> Exportar Para -> Imagem -> TIFF".
- Selecione o ícone de configurações para alterar as preferências de exportação, como personalizar resolução, espaço de cor e compressão.
Prós: Alta precisão para documentos complexos, seguro, preserva bem a formatação.
Contras: Requer uma assinatura paga, o acesso offline requer instalação no desktop.
Método 2: Conversores Online Gratuitos (Rápido, para Arquivos Pequenos)
Para conversões pontuais sem instalar software, as ferramentas online oferecem uma solução conveniente para converter documentos simples como cartas de uma página ou currículos básicos.
Passos:
- Vá para o site do conversor gratuito (ex: Zamzar / Convertio).
- Carregue seu arquivo do Word (do seu computador, Google Drive ou Dropbox).
- Selecione TIFF como o formato de saída.
- Clique em "Converter" e baixe o TIFF de saída.
Prós: Gratuito (para uso básico), sem instalação de software, acessibilidade multiplataforma.
Contras: Limites de tamanho de arquivo (geralmente 100MB ou menos), mais lento para arquivos grandes, riscos potenciais de privacidade com documentos sensíveis.
Método 3: Script Python (Spire.Doc + Pillow) para Automação
Para desenvolvedores que precisam automatizar conversões em massa, este método Python é uma solução ideal. Ele usa Spire.Doc for Python para manipular arquivos do Word e Pillow (PIL) para criar TIFFs de várias páginas programaticamente.
Passos:
1. Instale as Bibliotecas Necessárias
Primeiro, instale as ferramentas necessárias via pip:
pip install Spire.Doc
pip install pillow
2. Execute o Script de Conversão de Word para TIFF
Use o código Python abaixo para converter um documento do Word em um TIFF de várias páginas:
from spire.doc import *
from spire.doc.common import *

from PIL import Image
from io import BytesIO

# Crie um objeto Document
doc = Document()

# Carregue um documento do Word
doc.LoadFromFile("C:\\Users\\Administrator\\Desktop\\Input.docx")

# Crie uma lista vazia para armazenar Imagens PIL
images = []

# Itere pelas páginas do documento
for i in range(doc.GetPageCount()):

    # Converta uma página específica para um fluxo de imagem
    with doc.SaveImageToStreams(i, ImageType.Bitmap) as imageData:

        # Abra um fluxo de imagem específico como uma imagem PIL
        img = Image.open(BytesIO(imageData.ToArray()))

        # Adicione a imagem PIL à lista
        images.append(img)

# Salve as Imagens PIL como um arquivo TIFF de várias páginas
images[0].save("Output/ToTIFF.tiff", save_all=True, append_images=images[1:])

# Libere os recursos
doc.Dispose()
Processamento em Lote: Envolva o script em um loop para converter todos os arquivos do Word em uma pasta:
import os
for file in os.listdir("F:\\Reports"):
    if file.endswith((".docx", ".doc")):
        doc.LoadFromFile(os.path.join("F:\\Reports", file))
        # Insira o código de conversão de Word para TIFF aqui
Prós: Controle programático total, automatiza conversões em massa, sem dependência do Adobe.
Contras: Requer habilidades básicas de codificação, necessita de configuração de bibliotecas, não é ideal para usuários não técnicos.
Dica: Solicite uma licença de avaliação gratuita aqui para remover a marca d'água.
Considerações Finais
A conversão de Word para TIFF é essencial para a preservação a longo prazo de documentos. Este artigo fornece três métodos práticos de conversão de Word para TIFF, adaptados a diferentes necessidades. Seja você um profissional que precisa de precisão (Adobe Acrobat), um usuário casual em busca de rapidez (ferramentas online) ou um desenvolvedor automatizando tarefas em massa (scripts Python), agora você sabe qual o melhor método a escolher. Ao detalhar prós, contras e processos passo a passo, ele elimina a confusão, ajudando você a proteger arquivos sensíveis e a obter saídas TIFF de alta qualidade.
Veja Também
Word를 TIFF로 변환하는 방법 (Adobe, 온라인 도구 및 Python 사용)
목차
Pypi로 설치
pip install Spire.Doc
pip install pillow
관련 링크
Word를 TIFF로 변환하는 것은 틈새 작업처럼 보일 수 있지만, 많은 전문가에게는 놀랍게도 필수적입니다. TIFF(Tagged Image File Format)는 고품질, 무손실 압축, 그래픽 디자인, 인쇄 및 법률 산업과의 호환성으로 높이 평가됩니다. 계약서의 서식을 보존하거나 고해상도 이미지가 포함된 문서를 공유하거나 특정 제출 요구 사항을 충족해야 하는 경우 Word를 TIFF로 올바르게 변환하는 방법을 아는 것이 중요합니다.
이 가이드에서는 Adobe Acrobat, 온라인 도구 및 Python 자동화를 사용하여 Word DOC/DOCX를 TIFF로 변환하는 세 가지 효율적인 방법을 살펴봅니다.
TIFF란 무엇인가? 주요 특징
TIFF는 JPEG나 PNG와 같은 일반적인 이미지 형식이 아닙니다. 고품질, 세부 정보 보존 및 다용성을 위해 설계된 강력하고 유연하며 무손실인 래스터 형식입니다. 주요 특징은 다음과 같습니다.
- 무손실 압축: JPEG와 달리 TIFF(특히 LZW 또는 ZIP 압축 사용 시)는 품질 저하 없이 모든 원본 이미지 데이터를 유지하므로 보관 또는 복제에 매우 중요합니다.
- 고충실도: 텍스트, 라인 아트, 다이어그램, 스캔 이미지와 같은 복잡한 세부 정보를 완벽하게 보존합니다.
- 다중 페이지 지원: 단일 TIFF 파일에 여러 페이지(스캔한 문서처럼)를 포함할 수 있어 여러 페이지의 Word 문서에 이상적입니다.
- 풍부한 메타데이터: 작성자, 저작권, 키워드와 같은 광범위한 메타데이터 포함을 지원합니다.
- 색상 깊이: 전문적인 인쇄 및 보관에 필수적인 다양한 색상 모드(1비트 흑백, 회색조, RGB, CMYK)를 처리합니다.
Word를 TIFF로 변환하는 신뢰할 수 있는 도구
올바른 도구를 선택하는 것은 빠른 데스크톱 워크플로, 온라인 편의성 또는 프로그래밍 가능한 솔루션을 원하는지에 따라 다릅니다. 다음은 최상의 옵션에 대한 분석입니다.
| 도구 유형 | 도구 이름 | 주요 특징 |
| 데스크톱 | Adobe Acrobat | Word → PDF → TIFF 변환, 고품질 출력, 고급 설정. |
| 온라인 | Zamzar | 일괄 변환, 드래그 앤 드롭 인터페이스, 소프트웨어 필요 없음. |
| 코드 기반 | Python (Spire.Doc + Pillow) | 대량 변환 자동화, 워크플로와 통합. |
Word를 TIFF로 변환하는 방법: 3가지 쉬운 방법
방법 1: Adobe Acrobat Pro (전문적인 변환)
Adobe Acrobat은 Word를 PDF로 변환한 다음 TIFF로 내보내는 것을 지원합니다. 이 방법은 Acrobat의 고급 렌더링이 서식 오류를 최소화하므로 이미지, 표 또는 사용자 지정 레이아웃이 있는 복잡한 문서에 적합합니다.
단계:
1. Acrobat에서 Word 문서 열기:
- "파일 -> 만들기 -> 파일에서 PDF"로 이동합니다.
- .docx 또는 .doc 문서를 선택하고 "열기"를 클릭합니다. Acrobat이 백그라운드에서 Word를 PDF로 자동 변환합니다.
2. PDF를 TIFF로 변환:
- PDF가 Acrobat에서 열리면 "파일 -> 내보내기 -> 이미지 -> TIFF"로 이동합니다.
- 해상도, 색 공간 및 압축을 사용자 지정하는 등 내보내기 기본 설정을 변경하려면 설정 아이콘을 선택합니다.
장점: 복잡한 문서에 대한 높은 정확도, 보안성, 서식 보존이 잘됨.
단점: 유료 구독 필요, 오프라인 액세스를 위해서는 데스크톱 설치 필요.
방법 2: 무료 온라인 변환기 (빠르고 작은 파일용)
소프트웨어를 설치하지 않고 일회성 변환을 하려면 온라인 도구가 한 페이지짜리 편지나 기본 이력서와 같은 간단한 문서를 변환하는 편리한 솔루션을 제공합니다.
단계:
- 무료 변환기 웹사이트로 이동합니다(예: Zamzar / Convertio).
- Word 파일을 업로드합니다(컴퓨터, Google Drive 또는 Dropbox에서).
- 출력 형식으로 TIFF를 선택합니다.
- "변환"을 클릭하고 출력 TIFF를 다운로드합니다.
장점: 무료(기본 사용), 소프트웨어 설치 불필요, 크로스 플랫폼 접근성.
단점: 파일 크기 제한(보통 100MB 이하), 대용량 파일의 경우 속도가 느림, 민감한 문서의 경우 잠재적인 개인 정보 보호 위험.
방법 3: 자동화를 위한 Python 스크립트 (Spire.Doc + Pillow)
대량 변환을 자동화해야 하는 개발자에게 이 Python 방법은 이상적인 솔루션입니다. Word 파일을 처리하기 위해 Spire.Doc for Python을 사용하고 프로그래밍 방식으로 다중 페이지 TIFF를 만들기 위해 Pillow(PIL)를 사용합니다.
단계:
1. 필요한 라이브러리 설치
먼저 pip를 통해 필요한 도구를 설치합니다.
pip install Spire.Doc
pip install pillow
2. Word에서 TIFF로 변환 스크립트 실행
아래 Python 코드를 사용하여 Word 문서를 다중 페이지 TIFF로 변환합니다.
from spire.doc import *
from spire.doc.common import *

from PIL import Image
from io import BytesIO

# Document 객체 생성
doc = Document()

# Word 문서 로드
doc.LoadFromFile("C:\\Users\\Administrator\\Desktop\\Input.docx")

# PIL 이미지를 저장할 빈 목록 생성
images = []

# 문서의 페이지 반복
for i in range(doc.GetPageCount()):

    # 특정 페이지를 이미지 스트림으로 변환
    with doc.SaveImageToStreams(i, ImageType.Bitmap) as imageData:

        # 특정 이미지 스트림을 PIL 이미지로 열기
        img = Image.open(BytesIO(imageData.ToArray()))

        # PIL 이미지를 목록에 추가
        images.append(img)

# PIL 이미지를 다중 페이지 TIFF 파일로 저장
images[0].save("Output/ToTIFF.tiff", save_all=True, append_images=images[1:])

# 리소스 해제
doc.Dispose()
일괄 처리: 스크립트를 루프로 감싸 폴더의 모든 Word 파일을 변환합니다.
import os
for file in os.listdir("F:\\Reports"):
    if file.endswith((".docx", ".doc")):
        doc.LoadFromFile(os.path.join("F:\\Reports", file))
        # 여기에 Word에서 TIFF로 변환 코드 삽입
장점: 완전한 프로그래밍 제어, 대량 변환 자동화, Adobe에 대한 종속성 없음.
단점: 기본 코딩 기술 필요, 라이브러리 설정 필요, 비기술 사용자에게는 적합하지 않음.
팁: 워터마크를 제거하려면 여기에서 무료 평가판 라이선스를 요청하십시오.
마지막 생각
Word를 TIFF로 변환하는 것은 문서의 장기 보존에 필수적입니다. 이 기사에서는 다양한 요구에 맞는 세 가지 실행 가능한 Word-TIFF 변환 방법을 제공합니다. 정밀함이 필요한 전문가(Adobe Acrobat), 속도를 추구하는 일반 사용자(온라인 도구) 또는 대량 작업을 자동화하는 개발자(Python 스크립트) 등 이제 어떤 방법을 선택해야 하는지 알게 되었습니다. 장단점과 단계별 프로세스를 분석하여 혼란을 없애고 민감한 파일을 보호하며 고품질 TIFF 출력을 얻을 수 있도록 도와줍니다.
참고 항목