Hiding rows in Excel is a simple way to keep worksheets organized without permanently deleting data. It is commonly used when a spreadsheet contains supporting calculations, temporary information, or sections that should not appear in a final report.
In this article, we will explore five practical methods to hide rows in Excel, including built-in Excel features, keyboard shortcuts, VBA automation, and a C# programming solution for developers who need to process Excel files automatically.
Why Hide Rows in Excel?
When working with large Excel worksheets, not every piece of information needs to be visible all the time. Instead of deleting unnecessary content, hiding rows allows you to keep the original data while creating a cleaner and more focused view.
Common scenarios for hiding rows include:
- Removing calculation rows from a presentation report
- Temporarily hiding unused sections in large worksheets
- Keeping sensitive or internal information out of view
- Improving worksheet readability before printing or sharing
- Preparing customized reports for different audiences
Hidden rows are not deleted from the worksheet. They can be restored whenever needed using Excel’s Unhide feature.
Method 1. Hide Rows Using the Excel Ribbon
The Excel Ribbon provides a built-in option for hiding rows without using any shortcuts or additional tools. This method is suitable for users who prefer working through Excel’s interface and need to hide rows occasionally.
To hide rows using the Ribbon:
- Select the rows you want to hide.
- Go to the Home tab.
- Click Format in the Cells group.
- Select Hide & Unhide > Hide Rows .
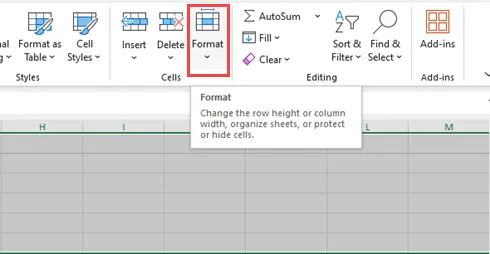
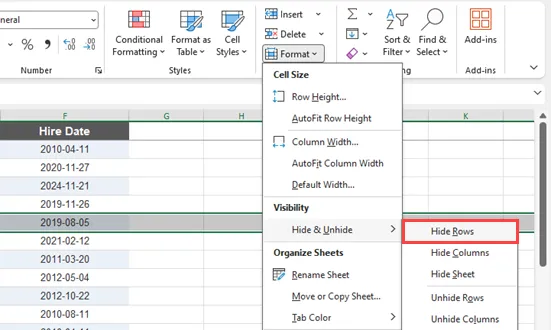
This method works well when you need to hide a few rows manually. However, navigating through multiple menus can become inconvenient when performing frequent operations.
Method 2. Hide Rows by Right-Clicking
Right-clicking is one of the fastest ways to hide rows in Excel. It allows you to access the Hide option directly from the worksheet without searching through Excel menus.
Follow these steps:
- Select one or more rows by clicking their row numbers.
- Right-click the selected rows.
- Choose Hide from the context menu.
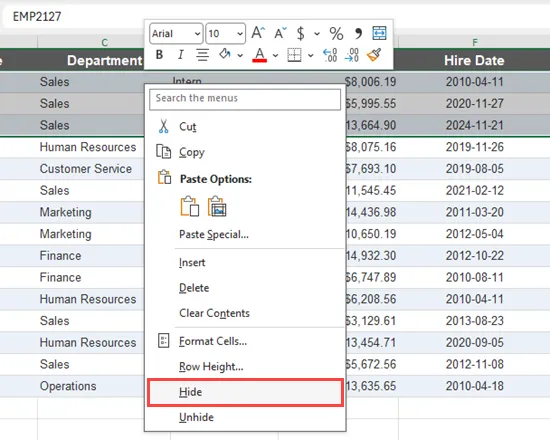
You can hide a single row or multiple consecutive rows at once. To hide non-adjacent rows, hold the Ctrl key while selecting different rows before right-clicking.
Method 3. Hide Rows Using Excel Keyboard Shortcuts
For users who frequently work with spreadsheets, keyboard shortcuts can significantly improve efficiency. Excel provides a dedicated shortcut that allows you to hide selected rows instantly.
To hide rows:
Ctrl + 9
To unhide rows:
Ctrl + Shift + 9
This method is especially useful when reviewing large worksheets because it avoids switching between the worksheet and Excel menus. Simply select the rows and press the shortcut to hide or restore them.
Method 4. Hide Rows Automatically with VBA
When hiding rows becomes part of a repeated workflow, VBA provides a way to automate the process directly inside Excel. It is useful for tasks such as preparing reports, cleaning worksheets, or hiding rows based on specific conditions.
Follow these steps to run the VBA macro:
- Open the Excel workbook.
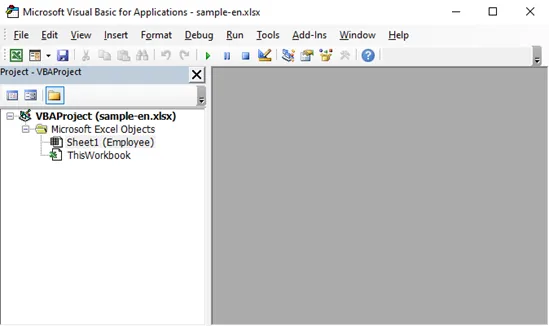
- Press Alt + F11 to open the VBA editor.
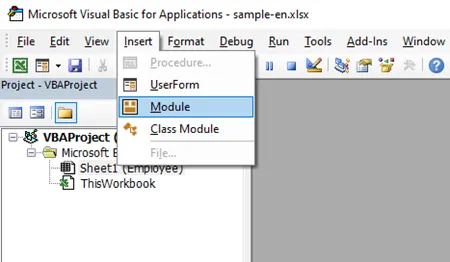
- Click Insert > Module to create a new module.
- Copy and paste the following VBA code into the module.
- Press F5 or click Run to execute the macro.
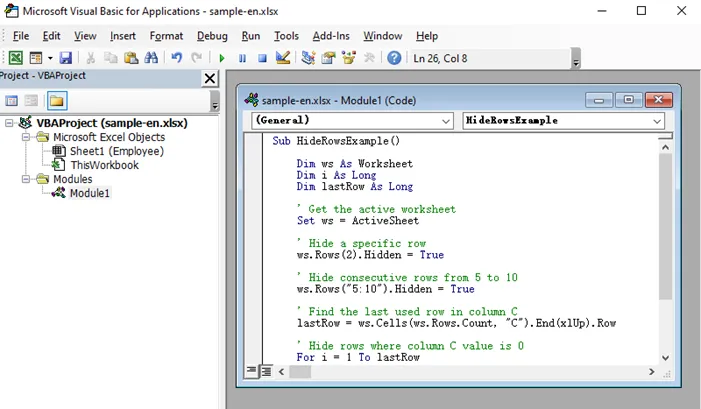
The following VBA example hides row 2, hides rows 5 to 10, and automatically hides rows where the value in column C is 0.
Sub HideRowsExample()

    Dim ws As Worksheet
    Dim i As Long
    Dim lastRow As Long

    ' Get the active worksheet
    Set ws = ActiveSheet

    ' Hide a specific row
    ws.Rows(2).Hidden = True

    ' Hide consecutive rows from 5 to 10
    ws.Rows("5:10").Hidden = True

    ' Find the last used row in column C
    lastRow = ws.Cells(ws.Rows.Count, "C").End(xlUp).Row

    ' Hide rows where column C value is 0
    For i = 1 To lastRow
        If ws.Cells(i, "C").Value = 0 Then
            ws.Rows(i).Hidden = True
        End If
    Next i

End Sub
In this example:
-
Rows(2).Hidden = Truehides a specific row. -
Rows("5:10").Hidden = Truehides multiple consecutive rows. - The loop checks values in column C and automatically hides rows that meet the condition.
VBA is a practical choice for Excel users who need automation but still work primarily within Microsoft Excel. However, it requires enabling macros and is less suitable for applications that process Excel files outside of Excel.
Method 5. Hide Rows in Excel with C#
For developers who need to generate or process Excel files programmatically, hiding rows can be automated without opening Microsoft Excel. This approach is useful for document management systems, reporting applications, and batch Excel processing workflows.
Using Free Spire.XLS for .NET, you can hide individual rows or multiple consecutive rows with simple API methods. The library provides direct control over worksheet rows while preserving the rest of the Excel document structure.
Step 1. Install Spire.XLS for .NET
Before writing the code, install the Free Spire.XLS package through NuGet Package Manager.
Open the NuGet Package Manager Console in Visual Studio and run:
Install-Package FreeSpire.XLS
Step 2. Hide Rows Using C#
After installing the library, you can load an existing Excel file and hide rows using the HideRow() and HideRows() methods.
The following example hides a specific row and multiple consecutive rows:
using Spire.Xls;

class Program
{
    static void Main()
    {
        // Create a Workbook object
        Workbook workbook = new Workbook();

        // Load an Excel file
        workbook.LoadFromFile("Input.xlsx");

        // Get the first worksheet
        Worksheet sheet = workbook.Worksheets[0];

        // Hide a specific row
        sheet.HideRow(2);

        // Hide consecutive rows from 5 to 7
        sheet.HideRows(5, 3);

        // Save the result file
        workbook.SaveToFile("HideRows.xlsx", ExcelVersion.Version2016);

        workbook.Dispose();
    }
}
In this example:
-
HideRow()hides a specific row in the worksheet. -
HideRows(startRow, count)hides multiple consecutive rows. - The workbook can be processed directly through code without requiring Microsoft Excel to be installed.
Besides hiding rows, Spire.XLS supports other worksheet automation tasks that are useful for organizing Excel data, such as removing duplicate rows, freezing rows or columns, and applying conditional formatting to highlight specific records. These features allow developers to build more structured and user-friendly Excel reports through code.
Comparison Table: Which Method Should You Choose?
| Method | Best For | Automation | Difficulty |
|---|---|---|---|
| Excel Ribbon | Occasional manual editing | No | Easy |
| Right-click Menu | Quick row hiding | No | Easy |
| Keyboard Shortcut | Frequent manual operations | No | Very Easy |
| VBA | Repetitive Excel tasks | Yes | Medium |
| C# with Spire.XLS | Application-level automation | Yes | Medium |
Conclusion
Excel provides several ways to hide rows depending on your workflow. For quick adjustments, built-in options such as the Ribbon, right-click menu, and keyboard shortcuts are usually enough. When dealing with repeated operations, VBA can help automate tasks directly inside Excel.
For developers who need to hide rows as part of an automated Excel processing workflow, a C# library such as Spire.XLS provides a reliable way to modify worksheets programmatically without relying on Microsoft Excel.
FAQs
1. How do I hide multiple rows in Excel?
Select the rows you want to hide, then right-click the selected row numbers and choose Hide . You can also use the shortcut Ctrl + 9 after selecting multiple rows.
2. What is the Excel shortcut for hiding rows?
The shortcut for hiding selected rows in Excel is Ctrl + 9 . To show hidden rows again, use Ctrl + Shift + 9 .
3. Does hiding rows delete data in Excel?
No. Hiding rows only changes their visibility. The data remains stored in the worksheet and can be displayed again using the Unhide option.
4. Can I hide rows automatically based on conditions in Excel?
Yes. You can use VBA to check cell values and hide rows that meet specific conditions, such as hiding rows with empty cells or zero values.
5. Can I hide rows in Excel programmatically with C#?
Yes. Libraries such as Spire.XLS allow developers to hide individual rows or multiple rows directly through C# code, making it suitable for automated Excel processing workflows.