
Knowledgebase (2370)
Children categories
PDF bookmarks are navigational aids that allow users to quickly locate and jump to specific sections or pages in a PDF document. Through a simple click, users can arrive at the target location, which eliminates the need to manually scroll or search for specific content in a lengthy document. In this article, you will learn how to programmatically add, modify and remove bookmarks in PDF using Spire.PDF for .NET.
- Add Bookmarks to a PDF Document
- Edit Bookmarks in a PDF Document
- Delete Bookmarks from a PDF Document
Install Spire.PDF for .NET
To begin with, you need to add the DLL files included in the Spire.PDF for.NET package as references in your .NET project. The DLL files can be either downloaded from this link or installed via NuGet.
PM> Install-Package Spire.PDF
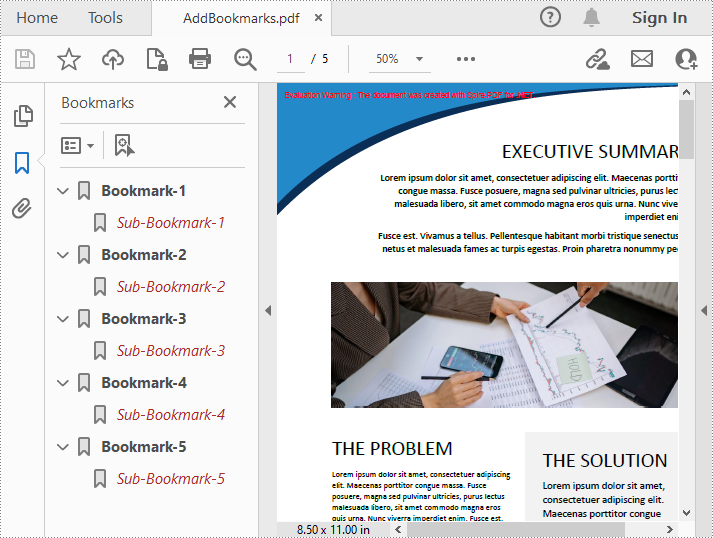
Add Bookmarks to a PDF Document in C# and VB.NET
Spire.PDF for .NET provides the PdfDocument.Bookmarks.Add() method to add bookmarks to a PDF document. After a bookmark is created, you can also use the PdfBookmark.Add() method to add sub-bookmarks for it. The following are the detailed steps.
- Create a PdfDocument object.
- Load a sample PDF file using PdfDocument.LoadFromFile() method.
- Loop through all pages in the PDF file to add bookmarks and set their styles.
- Add a parent bookmark to the document using PdfDocument.Bookmarks.Add() method.
- Create a PdfDestination object and set the destination of the parent bookmark using PdfBookmark.Action property.
- Set the text color and style of the parent bookmark.
- Add a sub-bookmark to the parent bookmark using PdfBookmark.Add() method.
- Set the destination, text color, and text style of the sub-bookmark.
- Save the result document using PdfDocument.SaveToFile() method.
- C#
- VB.NET
using System.Drawing;
using Spire.Pdf;
using Spire.Pdf.Graphics;
using Spire.Pdf.Actions;
using Spire.Pdf.Bookmarks;
using Spire.Pdf.General;

namespace AddBookmark
{
    class Program
    {
        static void Main(string[] args)
        {
            //Create a PdfDocument object
            PdfDocument pdf = new PdfDocument();

            //Load a sample PDF file
            pdf.LoadFromFile("template.pdf");

            //Loop through the pages in the PDF file
            for (int i = 0; i < pdf.Pages.Count; i++)
            {
                PdfPageBase page = pdf.Pages[i];

                //Add a bookmark
                PdfBookmark bookmark = pdf.Bookmarks.Add(string.Format("Bookmark-{0}", i + 1));

                //Set the destination page and location of the bookmark
                PdfDestination destination = new PdfDestination(page, new PointF(0, 0));
                bookmark.Action = new PdfGoToAction(destination);

                //Set the text color and style of the bookmark
                bookmark.Color = new PdfRGBColor(Color.Black);
                bookmark.DisplayStyle = PdfTextStyle.Bold;

                //Add a child bookmark
                PdfBookmark childBookmark = bookmark.Add(string.Format("Sub-Bookmark-{0}", i + 1));

                //Set the destination page and location of the child bookmark
                PdfDestination childDestination = new PdfDestination(page, new PointF(0, 100));
                childBookmark.Action = new PdfGoToAction(childDestination);

                //Set the text color and style of the child bookmark
                childBookmark.Color = new PdfRGBColor(Color.Brown);
                childBookmark.DisplayStyle = PdfTextStyle.Italic;
            }

            // Save the result file
            pdf.SaveToFile("AddBookmarks.pdf");
        }
    }
}
Edit Bookmarks in a PDF Document in C# and VB.NET
If you need to update the existing bookmarks, you can use the methods of PdfBookmark class to rename the bookmarks and change their text color, text style. The following are the detailed steps.
- Create a PdfDocument object.
- Load a sample PDF file using PdfDocument.LoadFromFile() method.
- Get a specified bookmark using PdfDocument.Bookmarks[] property.
- Change the title of the bookmark using PdfBookmark.Title property.
- Change the font color of the bookmark using PdfBookmark.Color property.
- Change the text style of the bookmark using PdfBookmark.DisplayStyle property.
- Change the text color and style of the sub-bookmark using the above methods.
- Save the result document using PdfDocument.SaveToFile() method.
- C#
- VB.NET
using Spire.Pdf;
using Spire.Pdf.Bookmarks;
using System.Drawing;


namespace ModifyBookmarks
{
    class Program
    {
        static void Main(string[] args)
        {
            //Create a PdfDocument object
            PdfDocument pdf = new PdfDocument();

            //Load a sample PDF file
            pdf.LoadFromFile("AddBookmarks.Pdf");

            //Get the first bookmark
            PdfBookmark bookmark = pdf.Bookmarks[0];

            //Change the title of the bookmark
            bookmark.Title = "Modified BookMark";

            //Change text color and style of the bookmark
            bookmark.Color = Color.Red;
            bookmark.DisplayStyle = PdfTextStyle.Italic;

            //Edit sub-bookmarks of the first bookmark
            foreach (PdfBookmark childBookmark in bookmark)
            {
                childBookmark.Color = Color.Blue;
                childBookmark.DisplayStyle = PdfTextStyle.Bold;
            }

            //Save the result file
            pdf.SaveToFile("EditBookmarks.Pdf");
        }
    }
}

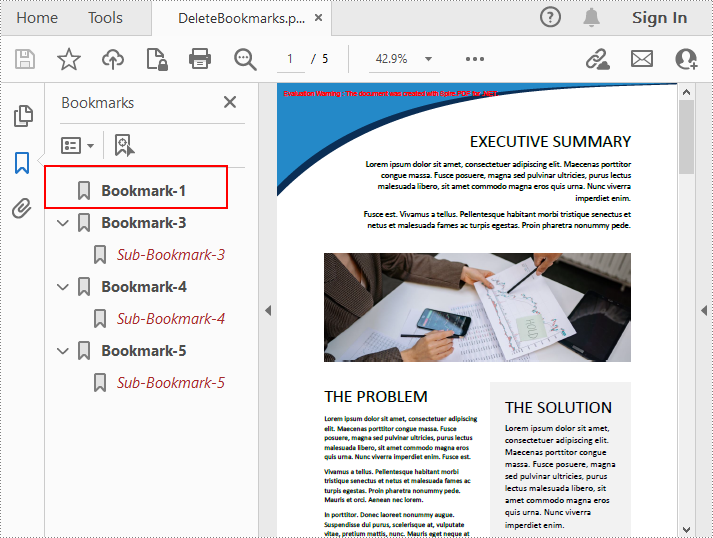
Delete Bookmarks from a PDF Document in C# and VB.NET
Spire.PDF for .NET allows to remove a specified bookmark as well as all bookmarks in a PDF file. Furthermore, removing only a specified sub-bookmark can also be achieved. The following are the detailed steps.
- Create a PdfDocument object.
- Load a sample PDF file using PdfDocument.LoadFromFile() method.
- Get the first bookmark using PdfDocument.Bookmarks[] property.
- Remove a specified sub-bookmark of the first bookmark using PdfBookmark.RemoveAt() method.
- Remove a specified bookmark including its sub-bookmarks using PdfDocument.Bookmarks.RemoveAt() method. Or you can remove all bookmarks in the PDF file using PdfDocument.Bookmarks.Clear() method.
- Save the document using PdfDocument.saveToFile() method.
- C#
- VB.NET
using Spire.Pdf;
using Spire.Pdf.Bookmarks;

namespace DeleteBookmarks
{
    class Program
    {
        static void Main(string[] args)
        {
            //Create a PdfDocument object
            PdfDocument pdf = new PdfDocument();

            //Load a sample PDF file
            pdf.LoadFromFile("AddBookmarks.Pdf");

            //Get the first bookmark
            PdfBookmark bookmark = pdf.Bookmarks[0];

            //Delete the first sub-bookmark of the first bookmark
            bookmark.RemoveAt(0);

            //Delete the second bookmark including its sub-bookmarks
            pdf.Bookmarks.RemoveAt(1);

            //Delete all bookmarks
            //pdf.Bookmarks.Clear();

            //Save the result file
            pdf.SaveToFile("DeleteBookmarks.pdf");
        }
    }
}
Apply for a Temporary License
If you'd like to remove the evaluation message from the generated documents, or to get rid of the function limitations, please request a 30-day trial license for yourself.
In this section, I will introduce a solution to export Excel to datatable through a datagridview via this WPF Excel component Spire.XLS for WPF. Using it, we can quickly export any Excel sheet to datatable. First let us see below picture:

When we export Excel to datatable, first we need to initialize a new instance of the class Spire.Xls.Workbook, here it is named “workbook”, then, after loading our Excel file from system by this method: Spire.Xls.Workbook.LoadFromFile(string fileName, ExcelVersion version); we need to decide which sheet will be exported to datatable. When using Spire.XLS for WPF, we do not need to install MS Excel, so suppose we do not know how many sheets in our Excel file, we can use this class System.Random provided by Microsoft to get the page count and export any sheet to datatable by calling the method: Spire.Xls.Worksheet.ExportDataTable(). After export data to datatable, with the help of the two properties of the class System.Data.Dataview:System.Data.Dataview.AutoGenerateColumns and System.Data.Dataview.ItemsSource. The datatable columns will be automatically created and all the data in datatable will be shown in datagrid.
Here we can download Spire.XLS for WPF and install it on system. After adding Spire.Xls dll on system, we can start our task of excel to datatable by below code:
using System.Data;
using Spire.Xls;

namespace wpfexceltodatatable
{
    public partial class MainWindow : Window
    {
        public MainWindow()
        {
            InitializeComponent();
        }
        private void button1_Click(object sender, RoutedEventArgs e)
        {
          //load an excel file
            Workbook workbook = new Workbook();
            workbook.LoadFromFile(@"..\excel.xls", ExcelVersion.Version97to2003);
            //get the count of excel worksheet
            int sheetCount = workbook.Worksheets.Count;
            Random r = new Random();
            int index = r.Next(0, sheetCount);
           //show datatable in datagrid
            Worksheet sheet = workbook.Worksheets[index];
            DataTable dataTable = sheet.ExportDataTable();
            DataView view = new DataView(dataTable);
            this.dataGrid1.ItemsSource = view;
            this.dataGrid1.AutoGenerateColumns = true;
        }
    }
}
Imports System.Data
Imports Spire.Xls

Namespace wpfexceltodatatable
	Public Partial Class MainWindow
		Inherits Window
		Public Sub New()
			InitializeComponent()
		End Sub
		Private Sub button1_Click(sender As Object, e As RoutedEventArgs)
			'load an excel file
			Dim workbook As New Workbook()
			workbook.LoadFromFile("..\excel.xls", ExcelVersion.Version97to2003)
			'get the count of excel worksheet
			Dim sheetCount As Integer = workbook.Worksheets.Count
			Dim r As New Random()
			Dim index As Integer = r.[Next](0, sheetCount)
			'show datatable in datagrid
			Dim sheet As Worksheet = workbook.Worksheets(index)
			Dim dataTable As DataTable = sheet.ExportDataTable()
			Dim view As New DataView(dataTable)
			Me.dataGrid1.ItemsSource = view
			Me.dataGrid1.AutoGenerateColumns = True
		End Sub
	End Class
End Namespace
A text box is a movable, resizable container for storing text or images. In Word documents, you can insert text boxes as sidebars or to bring focus to some important text, such as headings or quotes. Occasionally, you may also need to delete some mistakenly added text boxes. In this article, you will learn how to programmatically insert or remove a text box in a Word document using Spire.Doc for .NET.
Install Spire.Doc for .NET
To begin with, you need to add the DLL files included in the Spire.Doc for .NET package as references in your .NET project. The DLLs files can be either downloaded from this link or installed via NuGet.
PM> Install-Package Spire.Doc
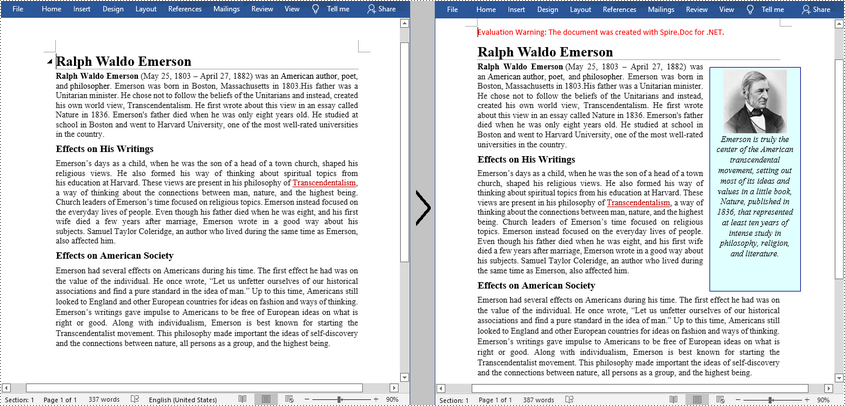
Insert a Text Box in a Word Document
Spire.Doc for .NET provides the Paragraph.AppendTextBox(float width, float height) method to insert a text box in a specified paragraph. After the text box is inserted, Spire.Doc for .NET also provides the TextBox class for users to format the text box by setting its properties, such as Format, Body etc. The detailed steps are as follows.
- Create a Document instance, and then load a sample Word document using Document.LoadFromFile() method.
- Get the first section using Document.Sections[] property, and then add a paragraph to the section using Section.AddParagraph() method.
- Add a text box to the paragraph using Paragraph.AppendTextBox(float width, float height) method.
- Get the format of the text box using TextBox.Format property, and then set the text box's wrapping type, position, border color and fill color using the properties of TextBoxFormat Class.
- Add a paragraph to the text box using TextBox.Body.AddParagraph() method, and then set its alignment.
- Insert an image to the paragraph using Paragraph.AppendPicture() method, and then set the size of the inserted image.
- Insert text to the text box using Paragraph.AppendText() method, and then set the text font.
- Save the document to another file using Document.SaveToFile() method.
- C#
- VB.NET
using Spire.Doc;
using Spire.Doc.Documents;
using Spire.Doc.Fields;
using System.Drawing;

namespace InsertTextbox
{
    class Program
    {
        static void Main(string[] args)
        {
            //Create a Document instance
            Document document = new Document();

            //Load a sample Word document
            document.LoadFromFile("Ralph.docx");

            //Insert a textbox and set its wrapping style
            TextBox TB = document.Sections[0].AddParagraph().AppendTextBox(130, 320);
            TB.Format.TextWrappingStyle = TextWrappingStyle.Square;

            //Set the position of the textbox
            TB.Format.HorizontalOrigin = HorizontalOrigin.RightMarginArea;
            TB.Format.HorizontalPosition = -100;
            TB.Format.VerticalOrigin = VerticalOrigin.Page;
            TB.Format.VerticalPosition = 130f;

            //Set the border style and fill color of the textbox
            TB.Format.LineColor = Color.DarkBlue;
            TB.Format.FillColor = Color.LightCyan;

            //Insert an image to textbox as a paragraph
            Paragraph para = TB.Body.AddParagraph();
            DocPicture picture = para.AppendPicture(@"C:\Users\Administrator\Desktop\Ralph.jpg");

            //Set alignment for the paragraph
            para.Format.HorizontalAlignment = HorizontalAlignment.Center;

            //Set the size of the inserted image
            picture.Height = 90;
            picture.Width = 90;


            //Insert text to textbox as the second paragraph
            TextRange TR = para.AppendText("Emerson is truly the center of the American transcendental movement, "
                + "setting out most of its ideas and values in a little book, Nature, published in 1836, "
                + "that represented at least ten years of intense study in philosophy, religion, and literature.");

            //Set alignment for the paragraph
            para.Format.HorizontalAlignment = HorizontalAlignment.Center;

            //Set the font of the text
            TR.CharacterFormat.FontName = "Times New Roman";
            TR.CharacterFormat.FontSize = 12;
            TR.CharacterFormat.Italic = true;

            //Save the result file
            document.SaveToFile("AddTextBox.docx", FileFormat.Docx);
        }
    }
}
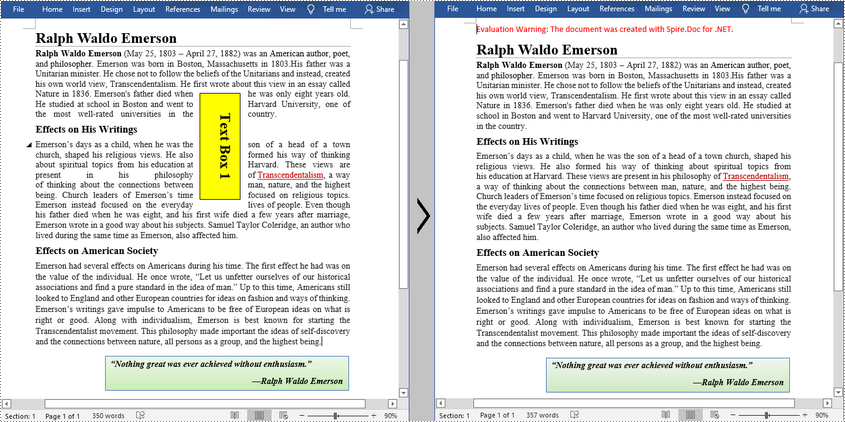
Remove a Text Box from a Word Document
Spire.Doc for .NET provides the Document.TextBoxes.RemoveAt(int index) method to delete a specified text box. If you want to delete all text boxes from a Word document, you can use the Document.TextBoxes.Clear() method. The below example shows how to remove the first text box from a Word document.
- Create a Document instance.
- Load a sample Word document using Document.LoadFromFile() method.
- Remove the first text box using Document.TextBoxes.RemoveAt(int index) method.
- Save the document to another file using Document.SaveToFile() method.
- C#
- VB.NET
using Spire.Doc;

namespace Removetextbox
{
    class Program
    {
        static void Main(string[] args)
        {
            //Create a Document instance
            Document Doc = new Document();

            //Load a sample Word document
            Doc.LoadFromFile("TextBox.docx");

            //Remove the first text box
            Doc.TextBoxes.RemoveAt(0);

            //Remove all text boxes
            //Doc.TextBoxes.Clear();

            //Save the result document
            Doc.SaveToFile("RemoveTextbox.docx", FileFormat.Docx);
        }
    }
}
Apply for a Temporary License
If you'd like to remove the evaluation message from the generated documents, or to get rid of the function limitations, please request a 30-day trial license for yourself.
