
Knowledgebase (2370)
Children categories
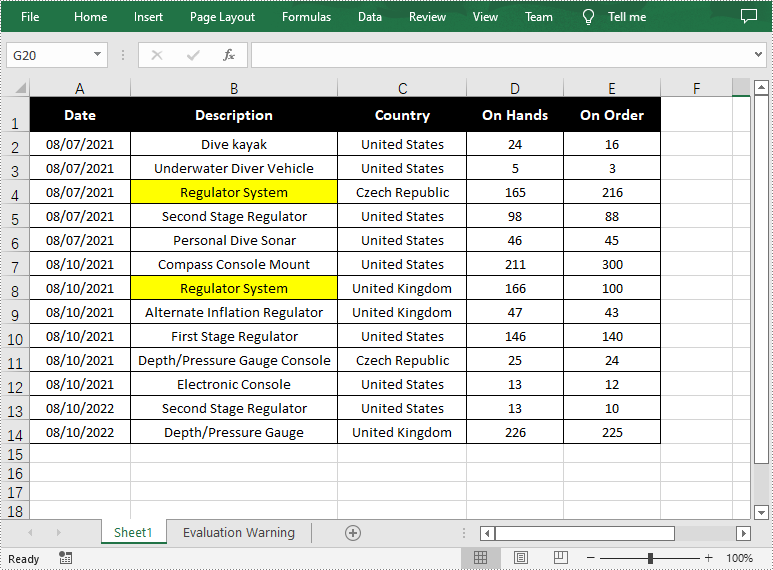
The Find function in Excel is one of the most commonly used functions for quickly locating specified data, and users can also highlight the data to make it more obvious. In this article, you will learn how to programmatically find and highlight cells with a specific value using Spire.XLS for .NET.
Install Spire.XLS for .NET
To begin with, you need to add the DLL files included in the Spire.XLS for .NET package as references in your .NET project. The DLL files can be either downloaded from this link or installed via NuGet.
PM> Install-Package Spire.XLS
Find and Highlight Data in Excel
The detailed steps are as follows.
- Create a Workbook instance.
- Load a sample Excel file using Workbook.LoadFromFile() method.
- Get a specified worksheet using Workbook.Worksheets[sheetIndex] property.
- Find all cells with matching text using Worksheet.FindAllString(string stringValue, bool formula, bool formulaValue) method.
- Set color to highlight the cells using CellRange.Style.Color property.
- Save the result file using Workbook.SaveToFile() method.
- C#
- VB.NET
using Spire.Xls;
using System.Drawing;

namespace FindHighlight
{
    class Program
    {
        static void Main(string[] args)
        {
            //Create a Workbook instance
            Workbook workbook = new Workbook();

            //Load a sample Excel file
            workbook.LoadFromFile("Test.xlsx");

            //Get the first worksheet
            Worksheet sheet = workbook.Worksheets[0];

            //Find all cells with the text "Regulator System"
            foreach (CellRange range in sheet.FindAllString("Regulator System", true, true))
            {
                //Set color to highlight the cells
                range.Style.Color = Color.Yellow;
            }

            //Save the result file
            workbook.SaveToFile("FindHighlight.xlsx", ExcelVersion.Version2016);
        }
    }
}
Apply for a Temporary License
If you'd like to remove the evaluation message from the generated documents, or to get rid of the function limitations, please request a 30-day trial license for yourself.
Excel comments are additional notes or commentary that can be added to specified cells to provide more in-depth explanations or to offer tips to other users. Once a comment’s been added, Excel provides users with the flexibility to format, edit, delete and show/hide the comment in the worksheet. In this article, you will learn how to programmatically edit or delete existing comments in Excel using Spire.XLS for .NET.
Install Spire.XLS for .NET
To begin with, you need to add the DLL files included in the Spire.XLS for.NET package as references in your .NET project. The DLLs files can be either downloaded from this link or installed via NuGet.
PM> Install-Package Spire.XLS
Edit Comments in Excel
After adding comments to your Excel workbook, you may sometimes need to make changes to the added comments. The below table lists some of the core classes and properties used to get the existing comments and then set new text as well as formatting for the comments.
| Name | Description |
| CellRange.Comment Property | Returns a Comment object that represents the comment associated with the cell in the upper-left corner of the range. |
| ExcelCommentObject Class | Represents a comment. |
| ExcelCommentObject.Text Property | Gets or sets the comment text. |
| ExcelCommentObject.Height Property | Gets or sets height of a comment. |
| ExcelCommentObject.Width Property | Gets or sets width of a comment. |
| ExcelCommentObject.AutoSize Property | Indicates whether the size of the specified object is changed automatically to fit text within its boundaries. |
The following are steps to edit comments in Excel:
- Create a Workbook instance.
- Load an Excel file using Workbook.LoadFromFile() method.
- Get the first worksheet of the Excel file using Workbook.Worksheets[] property.
- Get a comment in a specific cell range using Worksheet.Range.Comment property.
- Set new text and height/width or auto size for the existing comment using the properties of ExcelCommentObject class.
- Save the document to another file using Workbook.SaveToFile() method.
- C#
- VB.NET
using Spire.Xls;
namespace EditExcelComment
{
class Program
{
static void Main(string[] args)
{
// Create a Workbook instance
Workbook workbook = new Workbook();
// Load an Excel file
workbook.LoadFromFile("Comments.xlsx");
// Get the first worksheet
Worksheet sheet = workbook.Worksheets[0];
//Get comments in specific cells and set new comments
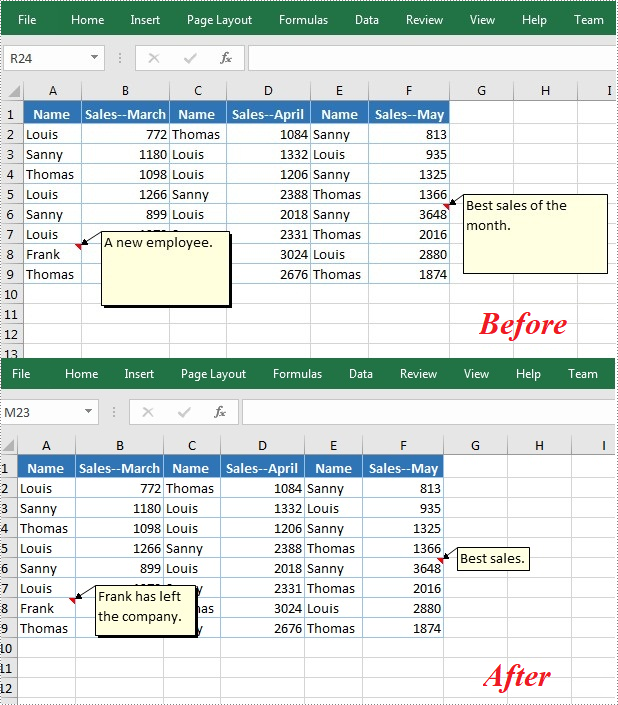
sheet.Range["A8"].Comment.Text = "Frank has left the company.";
sheet.Range["F6"].Comment.Text = "Best sales.";
// Set the height and width of the new comments
sheet.Range["A8"].Comment.Height = 50;
sheet.Range["A8"].Comment.Width = 100;
sheet.Range["F6"].Comment.AutoSize = true;
// Save to file.
workbook.SaveToFile("ModifyComment.xlsx", ExcelVersion.Version2013);
}
}
}
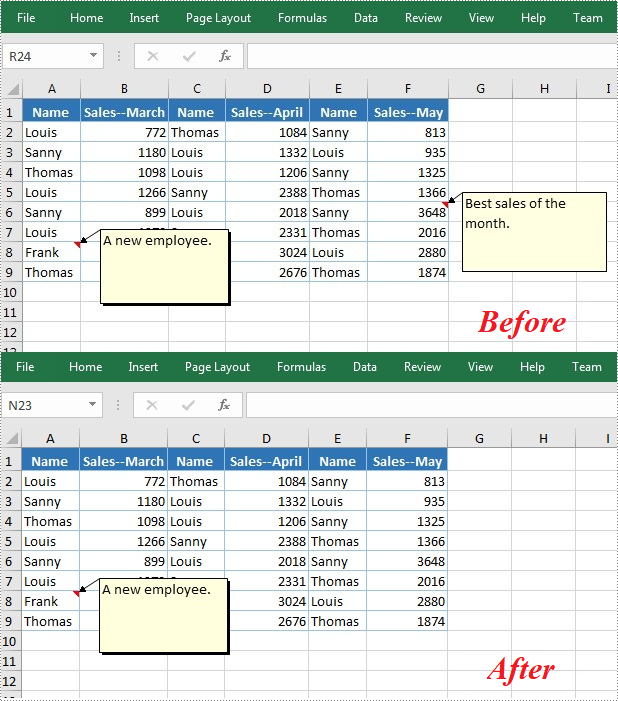
Delete Comments in Excel
The ExcelCommentObject.Remove() method offered by Spire.XLS for .NET allows you to remove a specified comment easily. The detailed steps are as follows:
- Create a Workbook instance.
- Load an Excel file using Workbook.LoadFromFile() method.
- Get the first worksheet of the Excel file using Workbook.Worksheets[] property.
- Get a comment in a specific cell range using Worksheet.Range.Comment property and then delete the comment using ExcelCommentObject.Remove() method.
- Save the document to another file using Workbook.SaveToFile() method.
- C#
- VB.NET
using Spire.Xls;

namespace EditExcelComment
{
    class Program
    {
        static void Main(string[] args)
        {
            // Create a Workbook instance
            Workbook workbook = new Workbook();

            // Load an Excel file
            workbook.LoadFromFile("Comments.xlsx");

            // Get the first worksheet
            Worksheet sheet = workbook.Worksheets[0];

            //Get the comment in a specific cell and remove it
            sheet.Range["F6"].Comment.Remove();

            // Save to file.
            workbook.SaveToFile("DeleteComment.xlsx", ExcelVersion.Version2013);
        }
    }
}
Apply for a Temporary License
If you'd like to remove the evaluation message from the generated documents, or to get rid of the function limitations, please request a 30-day trial license for yourself.
This section will introduce a solution to add two types of hyperlinks in PDF document via a WPF PDF component. One is a hyperlink directly displayed as url address in the PDF file, suppose it is named Hyperlink1; The other is a hyperlink in place of text, you can call it hyperlink2. Both of the two hyperlinks can automatically take you to a webpage, a file or an image when you click them. Before you start, it is very necessary to know some information of this PDF component
Spire.PDF for WPF enables you to directly generate, read, write and manipulate PDF files in your WPF applications without installing Adobe Acrobat or any third party library. Using Spire.PDF for WPF, you can easily add PDF hyperlink by three key steps. Please Download Spire.PDF for WPF and view the effective screenshot of this task as below picture:

Step 1: Set the link location in PDF page.
After you loading an existing PDF file or creating a new PDF file(a PDF file is imported from system in this step), please set the approximate location of hyperlink in PDF page by calling the Spire.Pdf.PdfPageBase: Canvas.ClientSize.Height.
            PdfDocument doc = new PdfDocument();
            doc.LoadFromFile(@"..\image to pdf.pdf");
            PdfPageBase page = doc.Pages[0];

            PdfUnitConvertor unitCvtr = new PdfUnitConvertor();
            PdfMargins margin = new PdfMargins();
            margin.Top = unitCvtr.ConvertUnits(2.54f, PdfGraphicsUnit.Centimeter, PdfGraphicsUnit.Point);
            margin.Bottom = margin.Top;
            margin.Left = unitCvtr.ConvertUnits(3.17f, PdfGraphicsUnit.Centimeter, PdfGraphicsUnit.Point);
            margin.Right = margin.Left;
            PdfTrueTypeFont font = new PdfTrueTypeFont(new Font("Verdana", 17));
            float space = font.Height * 0.75f;
            float y = page.Canvas.ClientSize.Height*0.6f - margin.Bottom + space;
           Dim doc As New PdfDocument()
	   doc.LoadFromFile("D:\michelle\my file\image to pdf.pdf")
	   Dim page As PdfPageBase = doc.Pages(0)
	   Dim unitCvtr As New PdfUnitConvertor()
	   Dim margin As New PdfMargins()
	   margin.Top = unitCvtr.ConvertUnits(2.54F, PdfGraphicsUnit.Centimeter, PdfGraphicsUnit.Point)
	   margin.Bottom = margin.Top
	   margin.Left = unitCvtr.ConvertUnits(3.17F, PdfGraphicsUnit.Centimeter, PdfGraphicsUnit.Point)
	   margin.Right = margin.Left
	   Dim font As New PdfTrueTypeFont(New Font("Verdana", 17))
	   Dim space As Single = font.Height * 0.75F
	   Dim y As Single = page.Canvas.ClientSize.Height * 0.6F - margin.Bottom + space
Step 2: Add Hyperlink1 in PDF.
In this step, you can draw a string in PDF page by calling Spire.Pdf. PdfPageBase method: PdfPageBase.Canvas.DrawString(string s, PdfFontBase font, PdfBrush brush, float x, float y, PdfStringFormat format) method. As the string format is a url address, a link can be drawn. Also by calculating the string width of label, link and PDF page, both link label location and link location can be set. In this method, link label and link are set in the middle.
            String label = "Image Source: ";
            PdfStringFormat format = new PdfStringFormat();
            format.MeasureTrailingSpaces = true;
            float x1 = font.MeasureString(label, format).Width;
            PdfTrueTypeFont font2 = new PdfTrueTypeFont(new Font("Verdana", 17, System.Drawing.FontStyle.Bold));
            String url1 = "http://www.e-iceblue.com";
            float x2 = font2.MeasureString(url1, format).Width;
            float x =( page.Canvas.ClientSize.Width-x1-x2)/2;
            page.Canvas.DrawString(label, font, PdfBrushes.DeepSkyBlue, x, y, format);
            x += x1;
            page.Canvas.DrawString(url1, font2, PdfBrushes.DeepSkyBlue, x, y);
            y = y + font2.MeasureString(url1).Height;
           Dim label As [String] = "Image Source: "
	   Dim format As New PdfStringFormat()
	   format.MeasureTrailingSpaces = True
	   Dim x1 As Single = font.MeasureString(label, format).Width
	   Dim font2 As New PdfTrueTypeFont(New Font("Verdana", 17, System.Drawing.FontStyle.Bold))
	   Dim url1 As [String] = "http://www.e-iceblue.com"
	   Dim x2 As Single = font2.MeasureString(url1, format).Width
	   Dim x As Single = (page.Canvas.ClientSize.Width - x1 - x2) / 2
	   page.Canvas.DrawString(label, font, PdfBrushes.DeepSkyBlue, x, y, format)
	   x += x1
	   page.Canvas.DrawString(url1, font2, PdfBrushes.DeepSkyBlue, x, y)
	   y = y + font2.MeasureString(url1).Height
Step 3: Add hyperlink 2 in place of text.
Use the method in step2 to draw a link label and add hyperlink2 in place of text by the method Spire.Pdf.Annotations. PdfTextWebLink to set link properties such as text, url and so on. Finally, invoke DrawTextWebLink(PdfCanvas graphics, PointF location) method to draw the PDF hyperlink in place of text.
            label = "Simple Link: ";
            x -= x1;
            page.Canvas.DrawString(label, font, PdfBrushes.DarkViolet, x, y, format);
            float xoffset2 = font.MeasureString(label, format).Width;
            x += xoffset2;
            String text = "e-iceblue";
            PdfTextWebLink link2 = new PdfTextWebLink();
            link2.Text = text;
            link2.Url = url1;
            link2.Font = font2;
            link2.Brush = PdfBrushes.DarkViolet;
            link2.DrawTextWebLink(page.Canvas, new PointF(x, y));
        label = "Simple Link: "
	x -= x1
	page.Canvas.DrawString(label, font, PdfBrushes.DarkViolet, x, y, format)
	Dim xoffset2 As Single = font.MeasureString(label, format).Width
	x += xoffset2
	Dim text As [String] = "e-iceblue"
	Dim link2 As New PdfTextWebLink()
	link2.Text = text
	link2.Url = url1
	link2.Font = font2
	link2.Brush = PdfBrushes.DarkViolet
	link2.DrawTextWebLink(page.Canvas, New PointF(x, y))
Spire.PDF is a PDF document creation component that enables your WPF applications to read, write and manipulate PDF documents without using Adobe Acrobat. Now, the new version added Silverlight platform which makes it more powerful.
