
Knowledgebase (2370)
Children categories
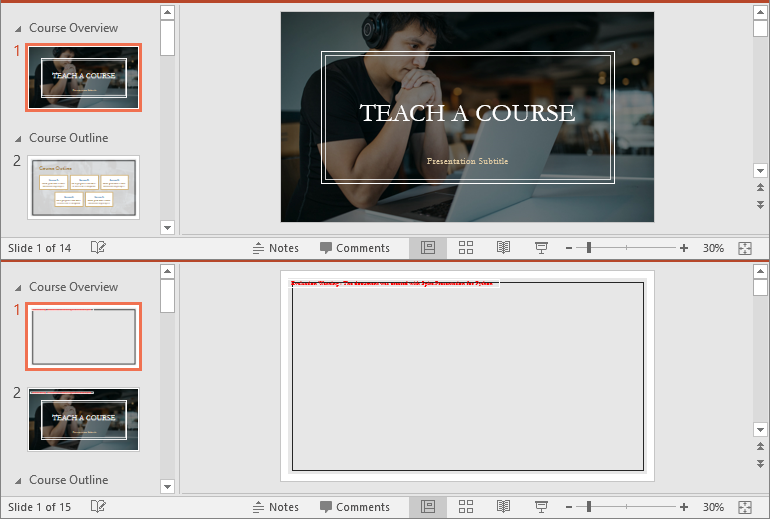
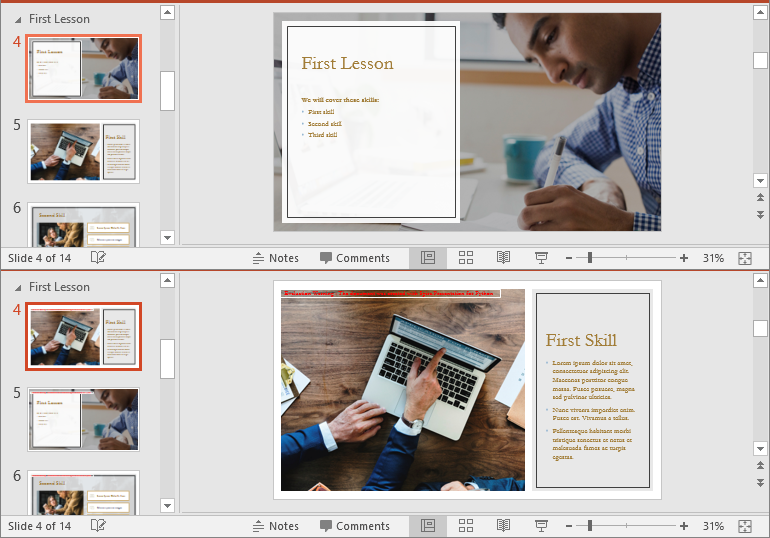
Python: Insert, Retrieve, Reorder, and Remove Slides in PowerPoint Sections
2024-11-26 01:20:18 Written by AdministratorPowerPoint presentations are a powerful tool for presenting information in an organized and engaging manner. To further enhance the organization of slides, PowerPoint allows users to group slides into sections. This feature makes navigating and managing large presentations much easier. In this article, we'll show you how to manage slides within PowerPoint sections in Python using Spire.Presentation for Python. Specifically, we'll cover how to add, retrieve, reorder, and remove slides in these sections.
- Insert Slides into a PowerPoint Section in Python
- Retrieve Slides from a PowerPoint Section in Python
- Reorder Slides in a PowerPoint Section in Python
- Remove Slides from a PowerPoint Section in Python
Install Spire.Presentation for Python
This scenario requires Spire.Presentation for Python and plum-dispatch v1.7.4. They can be easily installed in your Windows through the following pip command.
pip install Spire.Presentation
If you are unsure how to install, please refer to this tutorial: How to Install Spire.Presentation for Python on Windows
Insert Slides into a PowerPoint Section in Python
Inserting slides is essential when you want to introduce new content to a section. Using Spire.Presentation for Python, you can quickly insert a slide into a section with the Section.Insert() method. The detailed steps are as follows.
- Create an instance of the Presentation class.
- Load a PowerPoint presentation using the Presentation.LoadFromFile() method.
- Get a specific section through its index (0-based) using the Presentation.SectionList(index) property.
- Add a new slide to the presentation, then insert it into the section using the Section.Insert() method.
- Remove the added slide from the presentation.
- Save the resulting presentation using the Presentation.SaveToFile() method.
- Python
from spire.presentation import *

# Create an instance of the Presentation class
presentation = Presentation()
# Load a PowerPoint presentation
presentation.LoadFromFile("Example.pptx")

# Access the first section
first_section = presentation.SectionList.get_Item(0)

# Add a new slide to the presentation and insert it at the start of the section
slide = presentation.Slides.Append()
first_section.Insert(0, slide)

# Remove the added slide from the presentation
presentation.Slides.Remove(slide)

# Save the modified presentation
presentation.SaveToFile("InsertSlidesInSection.pptx", FileFormat.Pptx2016)
# Close the Presentation object
presentation.Dispose()
Retrieve Slides from a PowerPoint Section in Python
Retrieving slides from a specific section allows you to focus on a smaller group of slides for tasks such as reordering or applying custom formatting. Using the Section.GetSlides() method in Spire.Presentation for Python, you can easily access all the slides in a particular section. The detailed steps are as follows.
- Create an instance of the Presentation class.
- Load a PowerPoint presentation using the Presentation.LoadFromFile() method.
- Get a specific section through its index (0-based) using the Presentation.SectionList(index) property.
- Retrieve the slides within the section using the Section.GetSlides() method.
- Iterate through the retrieved slides and get the slide number (1-based) of each slide.
- Python
from spire.presentation import *

# Create an instance of the Presentation class
presentation = Presentation()
# Load a PowerPoint presentation
presentation.LoadFromFile("Example.pptx")

# Retrieve the slides in the 3rd section
section = presentation.SectionList.get_Item(2)
slides = section.GetSlides()

output_content = "The slide numbers in this section are:\n"

# Get the slide number of each slide in the section
for slide in slides:
    output_content += str(slide.SlideNumber) + " "

# Save the slide number to a text file
with open("slide_numbers.txt", "w") as file:
    file.write(output_content)

Reorder Slides in a PowerPoint Section in Python
Reordering slides is important to ensure related content is in the right order. Spire.Presentation for Python offers the Section.Move() method, which allows you to move a slide to a new position within a section. The detailed steps are as follows.
- Create an instance of the Presentation class.
- Load a PowerPoint presentation using the Presentation.LoadFromFile() method.
- Get a specific section through its index (0-based) using the Presentation.SectionList(index) property.
- Move a specific slide in the section to another position using the Section.Move() method.
- Save the resulting presentation using the Presentation.SaveToFile() method.
- Python
from spire.presentation import *

# Create an instance of the Presentation class
presentation = Presentation()
# Load a PowerPoint presentation
presentation.LoadFromFile("Example.pptx")

# Access the 3rd section
section = presentation.SectionList.get_Item(2)

# Retrieve the slides in the section
slides = section.GetSlides()

# Move the 1st slide in the section to the specified position
section.Move(2, slides[0])

# Save the modified presentation
presentation.SaveToFile("ReorderSlidesInSection.pptx", FileFormat.Pptx2016)
# Close the Presentation object
presentation.Dispose()
Remove Slides from a PowerPoint Section in Python
Removing slides from a section streamlines your presentation, particularly when some slides become outdated or unnecessary. With Spire.Presentation for Python, you can easily remove a single slide or multiple slides from a section using the Section.RemoveAt() or Section.RemoveRange() method. The detailed steps are as follows.
- Create an instance of the Presentation class.
- Load a PowerPoint presentation using the Presentation.LoadFromFile() method.
- Get a specific section through its index (0-based) using the Presentation.SectionList(index) property.
- Remove a specific slide or a range of slides from the presentation using the Section.RemoveAt() or Section.RemoveRange() method.
- Save the resulting presentation using the Presentation.SaveToFile() method.
- Python
from spire.presentation import *

# Create an instance of the Presentation class
presentation = Presentation()
# Load a PowerPoint presentation
presentation.LoadFromFile("Example.pptx")

# Access the 3rd section
section = presentation.SectionList.get_Item(2)

# Remove the first slide from the section
section.RemoveAt(0)

# Or remove a range of slides from the section
# section.RemoveRange(0, 2)

# Save the modified presentation
presentation.SaveToFile("RemoveSlidesInSection.pptx", FileFormat.Pptx2016)
# Close the Presentation object
presentation.Dispose()
Apply for a Temporary License
If you'd like to remove the evaluation message from the generated documents, or to get rid of the function limitations, please request a 30-day trial license for yourself.
Enhancing the interactivity of PDF files is a crucial aspect of document management and user engagement. Creating actions within PDFs using C# in the .NET framework allows developers to add dynamic elements such as file links, web links, and audio that can execute various functions like navigating to different pages, launching external applications, or playing background music, which improves the user experience by making PDFs more functional and engaging. This article demonstrates how to use the Spire.PDF for .NET library to create actions in PDF documents with C#.
- General Steps for Adding Actions to PDF with C#
- Create Navigation Actions in PDF with C#
- Create File Launch Actions in PDF with C#
- Create Sound Actions in PDF with C#
- Create Web Link Actions in PDF with C#
- Create JavaScript Actions in PDF with C#
Install Spire.PDF for .NET
To begin with, you need to add the DLL files included in the Spire.PDF for.NET package as references in your .NET project. The DLL files can be either downloaded from this link or installed via NuGet.
PM> Install-Package Spire.PDF
General Steps for Adding Actions to PDF with C#
Adding actions to a PDF using C# involves integrating interactive elements that enhance user experience, such as navigation buttons, file links, web links, or sound triggers. With the Spire.PDF for .NET library, developers can create various actions in PDF documents with C# code. Below is a table of the classes for commonly used actions and their descriptions:
| Class | Decryption |
| PdfGoToAction | Represents an action that navigates to a destination within the current document. |
| PdfLaunchAction | Represents an action that opens a file. |
| PdfSoundAction | Represents an action that plays a sound. |
| PdfJavaScriptAction | Represents an action that executes JavaScript code in a PDF document. |
| PdfUriAction | Represents an action that resolves a Uniform Resource Identifier (URI). |
| PdfGoToAction | Represents an action that navigates to a destination within the current document. |
For more action classes and their descriptions, refer to Spire.PDF for .NET action API references.
Actions can be added to PDF documents in two primary ways:
1. Using Action Annotations
This method involves creating an action and linking it to an annotation on the page. The action is displayed and triggered when the annotation is clicked.
General Steps:
- Create an instance of PdfDocument class and load a PDF document using PdfDocument.LoadFromFile() method.
- Get a page using PdfDocument.Pages[] property.
- Create an instance of the class that represents the action and set the action properties.
- Create an instance of PdfActionAnnotation class in a rectangular area on the page using the action.
- Add the cue word for the action to the page (optional).
- Add the action annotation to the page using PdfPageBase.Annotations.Add() method.
- Save the result document using PdfDocument.SaveToFile() method.
2. Assigning Actions to Document Events
Actions can also be assigned to document-level events such as opening, closing, or printing the document. These actions are triggered automatically when the specified events occur.
General Steps:
- Create an instance of PdfDocument class and load a PDF document using PdfDocument.LoadFromFile() method.
- Create an instance of the class that represents the action and set the action properties.
- Assign the action to a document event using the following properties:
- PdfDocument.AfterOpenAction
- PdfDocument.AfterSaveAction
- PdfDocument.AfterPrintAction
- PdfDocument.BeforeCloseAction
- PdfDocument.BeforeSaveAction
- PdfDocument.BeforePrintAction
- Save the result document using PdfDocument.SaveToFile() method.
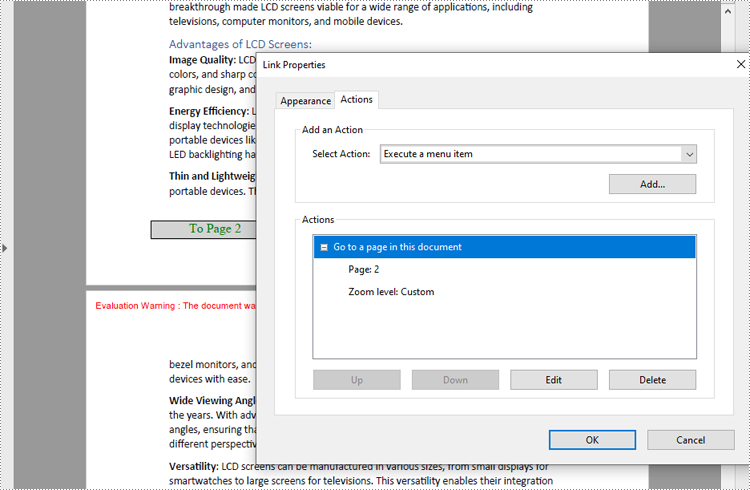
Create Navigation Actions in PDF with C#
Navigation actions can be created using the PdfGoToAction class, which defines navigation within the document to a specified destination. To achieve this, developers can create a PdfDestination object and pass it as a parameter to a PdfGoToAction instance.
The following is a code example of adding a navigation action to a PDF:
- C#
using Spire.Pdf;
using Spire.Pdf.Actions;
using Spire.Pdf.Annotations;
using Spire.Pdf.General;
using Spire.Pdf.Graphics;
using System.Drawing;

namespace AddNavigationButtonPDF
{
    class Program
    {
        static void Main(string[] args)
        {
            // Create an instance of PdfDocument
            PdfDocument pdf = new PdfDocument();

            // Load a PDF file
            pdf.LoadFromFile("Sample.pdf");

            // Create a PdfDestination instance and set the destination
            PdfDestination destination = new PdfDestination(pdf.Pages[1]);
            destination.Location = new PointF(0, 0);
            destination.Mode = PdfDestinationMode.Location;
            destination.Zoom = 0.8f;

            // Create a PdfGoToAction based on the destination
            PdfGoToAction action = new PdfGoToAction(destination);

            // Create a rectangle and draw it on the first page
            RectangleF rect = new RectangleF(70, pdf.PageSettings.Size.Height - 120, 140, 20);
            pdf.Pages[0].Canvas.DrawRectangle(PdfBrushes.LightGray, rect);
            // Draw cue words on the rectangle
            PdfFont font = new PdfFont(PdfFontFamily.TimesRoman, 14);
            PdfStringFormat stringFormat = new PdfStringFormat(PdfTextAlignment.Center);
            pdf.Pages[0].Canvas.DrawString("To Page 2", font, PdfBrushes.Green, rect, stringFormat);

            // Create a PdfActionAnnotation instance based on the rectangle and the action
            PdfActionAnnotation actionAnnotation = new PdfActionAnnotation(rect, action);

            // Add the action annotation to the first page
            pdf.Pages[0].Annotations.Add(actionAnnotation);

            // Save the document
            pdf.SaveToFile("output/NavigationButton.pdf");
            pdf.Close();
        }
    }
}
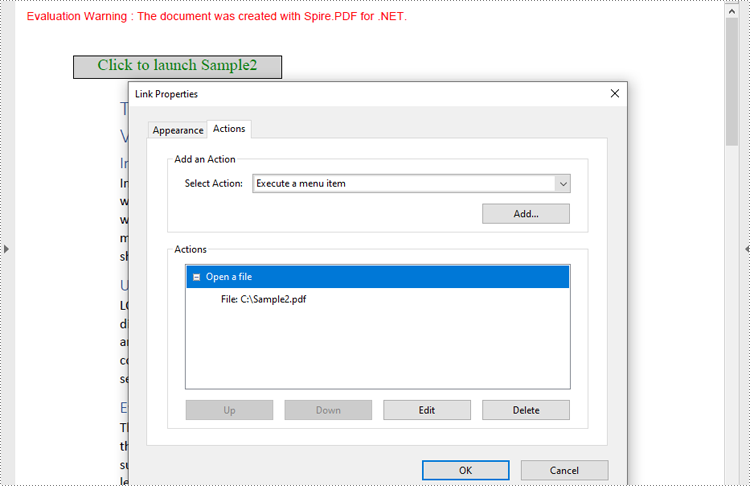
Create File Launch Actions in PDF with C#
The PdfLaunchAction class defines a file open action in a PDF that enables users to open a specific file by clicking a button embedded on a PDF page. When implementing this action, developers can set the file path (absolute or relative) and decide whether the file should open in a new window. Here is a code example for adding a file launch action in a PDF document:
- C#
using Spire.Pdf;
using Spire.Pdf.Actions;
using Spire.Pdf.Annotations;
using Spire.Pdf.Graphics;
using System.Drawing;

namespace AddFileLaunchActionPDF
{
    class Program
    {
        static void Main(string[] args)
        {
            // Create an instance of PdfDocument
            PdfDocument pdf = new PdfDocument();

            // Load a PDF file
            pdf.LoadFromFile("Sample.pdf");

            // Get the first page
            PdfPageBase page = pdf.Pages[0];

            // Draw a rectangle on the page
            RectangleF rect = new RectangleF(50, 50, 180, 20);
            page.Canvas.DrawRectangle(PdfBrushes.LightGray, rect);
            // Darw the cue words in the rectangle
            PdfFont font = new PdfFont(PdfFontFamily.TimesRoman, 14);
            PdfStringFormat stringFormat = new PdfStringFormat(PdfTextAlignment.Center);
            pdf.Pages[0].Canvas.DrawString("Click to launch Sample2", font, PdfBrushes.Green, rect, stringFormat);

            // Create a PdfLaunchAction instance
            PdfLaunchAction action = new PdfLaunchAction("C:/Sample2.pdf", PdfFilePathType.Absolute);
            // Set the launch mode to open in new window
            action.IsNewWindow = true;

            // Create a PdfActionAnnotation instance based on the rectangle and the launch action
            PdfActionAnnotation actionAnnotation = new PdfActionAnnotation(rect, action);

            // Add the action annotation to the first page
            page.Annotations.Add(actionAnnotation);

            // Save the document
            pdf.SaveToFile("output/LaunchAction.pdf");
            pdf.Close();
        }
    }
}
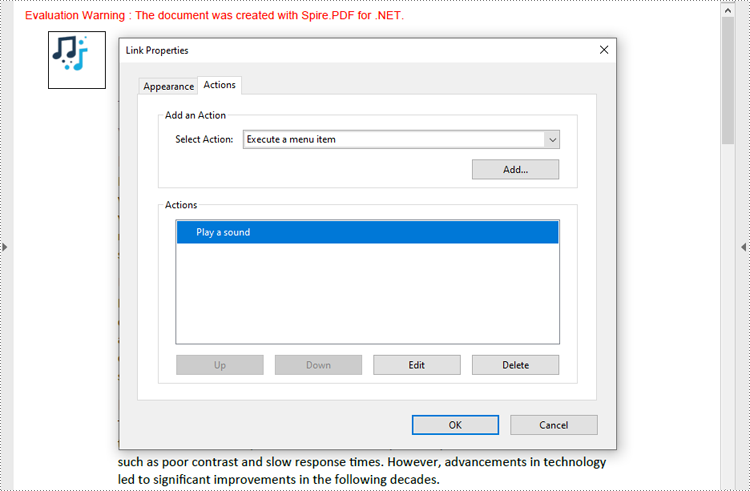
Create Sound Actions in PDF with C#
Developers can embed audio as an action in PDF documents with the PdfSoundAction class, enabling the audio to play in response to specific triggers, such as opening the file or clicking a button. Below is a code example for creating a sound action in a PDF document:
- C#
using Spire.Pdf;
using Spire.Pdf.Actions;
using Spire.Pdf.Annotations;
using Spire.Pdf.Graphics;
using Spire.Pdf.General;
using System.Drawing;

namespace AddSoundActionPDF
{
    class Program
    {
        static void Main(string[] args)
        {
            // Create an instance of PdfDocument
            PdfDocument pdf = new PdfDocument();

            // Load a PDF file
            pdf.LoadFromFile("Sample.pdf");

            // Get the first page
            PdfPageBase page = pdf.Pages[0];

            // Darw the cue image on the page
            PdfImage image = PdfImage.FromFile("Sound.png");
            page.Canvas.DrawImage(image, new PointF(30, 30));

            // Create a PdfSoundAction instance and set its property
            PdfSoundAction action = new PdfSoundAction("Wave.wav");
            // Set the sound parameters
            action.Sound.Bits = 16;
            action.Sound.Channels = PdfSoundChannels.Stereo;
            action.Sound.Encoding = PdfSoundEncoding.Signed;
            action.Sound.Rate = 44100;
            // Set the play options
            action.Volume = 0;
            action.Repeat = true;
            action.Mix = true;
            action.Synchronous = true;

            // Create a PdfActionAnnotation instance using the sound action at the location of the cue image
            RectangleF rect = new RectangleF(30, 30, image.Width, image.Height);
            PdfActionAnnotation actionAnnotation = new PdfActionAnnotation(rect, action);

            // Add the action annotation to the first page
            page.Annotations.Add(actionAnnotation);

            // Set the sound action to play after the document is opened
            pdf.AfterOpenAction = action;

            // Save the document
            pdf.SaveToFile("output/SoundAction.pdf");
            pdf.Close();
        }
    }
}
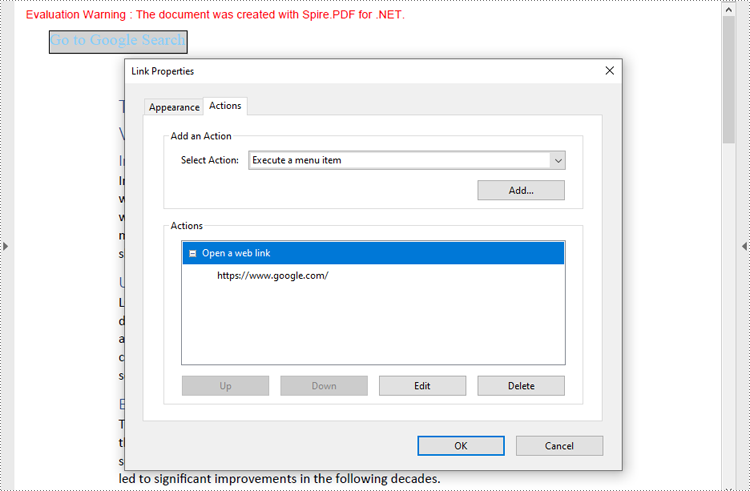
Create Web Link Actions in PDF with C#
Developers can use the PdfUriAction class to create a web link action in PDF documents, allowing users to open a web link when performing specific actions, such as clicking a button. Below is a code example for creating a web link action in a PDF document:
- C#
using Spire.Pdf;
using Spire.Pdf.Actions;
using Spire.Pdf.Annotations;
using Spire.Pdf.Graphics;
using System.Drawing;

namespace AddSoundActionPDF
{
    class Program
    {
        static void Main(string[] args)
        {
            // Create an instance of PdfDocument
            PdfDocument pdf = new PdfDocument();

            // Load a PDF file
            pdf.LoadFromFile("Sample.pdf");

            // Get the first page
            PdfPageBase page = pdf.Pages[0];

            // Draw a rectangle on the page
            RectangleF rect = new RectangleF(30, 30, 120, 20);
            page.Canvas.DrawRectangle(PdfBrushes.LightGray, rect);
            // Draw the cue words in the rectangle
            PdfFont font = new PdfFont(PdfFontFamily.TimesRoman, 14);
            PdfStringFormat stringFormat = new PdfStringFormat(PdfTextAlignment.Center);
            page.Canvas.DrawString("Go to Google Search", font, PdfBrushes.LightSkyBlue, rect);

            // Create a PdfUriAction instance and set its property
            PdfUriAction action = new PdfUriAction();
            action.Uri = "https://www.google.com/";

            // Create a PdfActionAnnotation instance using the web link action and the rectangle
            PdfActionAnnotation actionAnnotation = new PdfActionAnnotation(rect, action);

            // Add the action annotation to the first page
            page.Annotations.Add(actionAnnotation);

            // Save the document
            pdf.SaveToFile("output/WebLinkAction.pdf");
            pdf.Close();
        }
    }
}
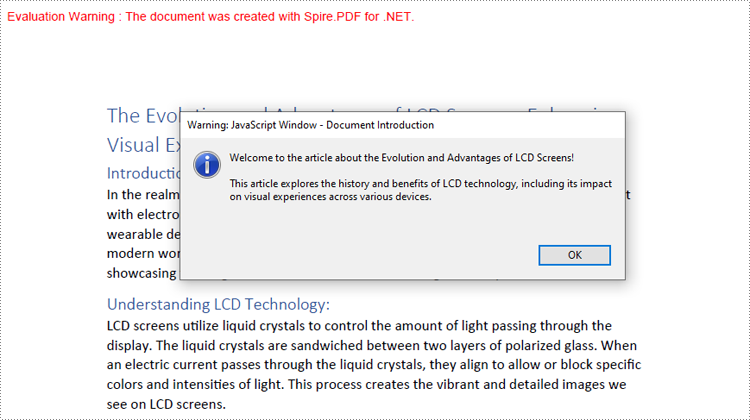
Create JavaScript Actions in PDF with C#
The PdfJavaScriptAction represents a JavaScript action in PDF, which allows developers to create complex interactions such as form validations, data calculations, and custom user interfaces. Below is a code example for adding a simple JavaScript action to a PDF document with C#:
- C#
using Spire.Pdf;
using Spire.Pdf.Actions;

namespace AddJavaScriptActionPDF
{
    class Program
    {
        static void Main(string[] args)
        {
            // Create a PdfDocument instance
            PdfDocument pdf = new PdfDocument();

            // Load a PDF file
            pdf.LoadFromFile("Sample.pdf");

            // Define JavaScript code
            var jsCode =
            "app.alert({" +
            "    cMsg: 'Welcome to the article about the Evolution and Advantages of LCD Screens!\\n\\nThis article explores the history and benefits of LCD technology, including its impact on visual experiences across various devices.', " +
            "    nIcon: 3, " +
            "    cTitle: 'Document Introduction'" +
            "});";

            // Create a PdfJavaScriptAction instance using the JavaScript code
            PdfJavaScriptAction action = new PdfJavaScriptAction(jsCode);

            // Set the action to be executed when the PDF document is launched
            pdf.AfterOpenAction = action;

            // Save the document
            pdf.SaveToFile("output/PDFJavaScriptAction.pdf");
            pdf.Close();
        }
    }
}
Apply for a Temporary License
If you'd like to remove the evaluation message from the generated documents, or to get rid of the function limitations, please request a 30-day trial license for yourself.
Annotations in PDF documents play a crucial role in enhancing collaboration, emphasizing key points, or providing additional context. Extracting annotations is essential for efficiently analyzing PDF content, but manual extraction can be tedious. This guide demonstrates how to extract annotations from PDF with Python using Spire.PDF for Python, providing a faster and more flexible solution to access important information.
- Extract Specified Annotations from PDF Documents
- Extract All Annotations from a PDF Page
- Extract All Annotations from PDF Files
Install Spire.PDF for Python
This scenario requires Spire.PDF for Python and plum-dispatch v1.7.4. They can be easily installed in your Windows through the following pip command.
pip install Spire.PDF
If you are unsure how to install it, please refer to this tutorial: How to Install Spire.PDF for Python on Windows.
Extract Specified Annotations from PDF Documents
Although Adobe Acrobat offers a built-in one-click annotation extraction feature, it lacks flexibility when handling specific annotations. If you only need to extract one or a few annotations, you must manually locate and copy them, which can be inefficient, especially when working with PDFs containing multiple annotations. Spire.PDF (short for Spire.PDF for Python), however, provides the PdfAnnotationCollection.get_item() method, enabling targeted extraction of specific annotations, making PDF annotation management more flexible and efficient.
Steps to extract specified annotations from PDF:
- Create an object of PdfDocument class.
- Load a PDF document from the local storage with PdfDocument.LoadFromFile() method.
- Get a page using PdfDocument.Pages[] property, and access the annotations collection with PdfPageBase.AnnotationsWidget property.
- Create a list to store annotation information.
- Access the specified annotation using PdfAnnotationCollection.get_Item() method.
- Append annotation details to the list.
- Save the list as a Text file.
Here is the code example of exporting the first annotation on the third page:
- Python
from spire.pdf.common import *
from spire.pdf import *

# Create a new PDF document
pdf = PdfDocument()

# Load the file from disk
pdf.LoadFromFile( "Sample.pdf")

# Get the third page
page = doc.Pages.get_Item(2)

# Access the annotations on the page
annotations = page.AnnotationsWidget

# Create a list to save information of annotations
sb = []

# Access the first annotation on the page
annotation = annotations.get_Item(0)

# Append the annotation details to the list
sb.append("Annotation information: ")
sb.append("Text: " + annotation.Text)
modifiedDate = annotation.ModifiedDate.ToString()
sb.append("ModifiedDate: " + modifiedDate)

# Save the list as a Text file
with open("GetSpecificAnnotation.txt", "w", encoding="utf-8") as file:
    file.write("\n".join(sb))

# Close the PDF file
pdf.Close()

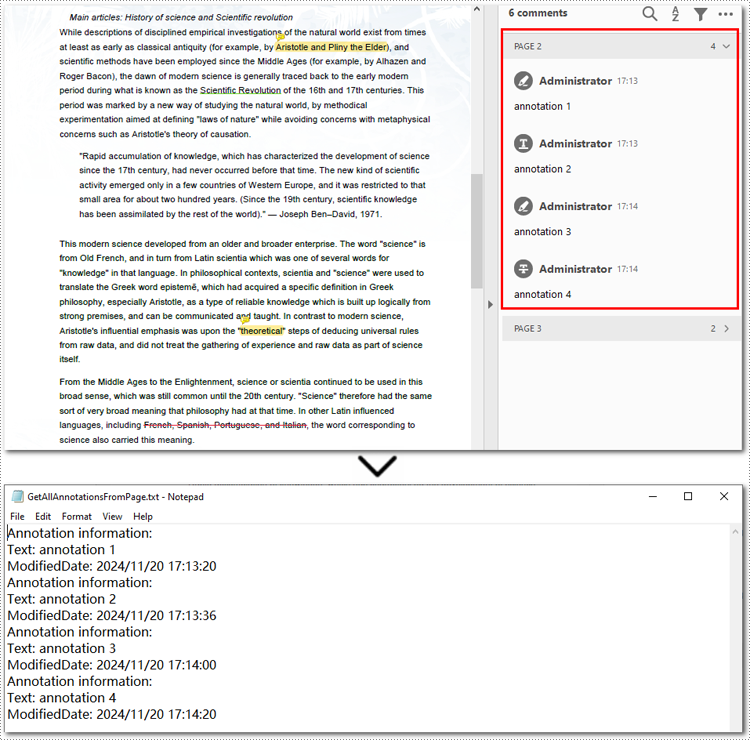
Extract All Annotations from a PDF Page
To export all annotations from a specified PDF page, you can still use the PdfPageBase.AnnotationsWidget property along with the PdfAnnotationCollection.get_item() method. However, you will need to iterate through all the annotations on the page to ensure none are missed. Below are the steps and code examples to guide you through the process.
Steps to extract annotations from PDF pages:
- Create a PdfDocument instance.
- Read a PDF document from the local storage with PdfDocument.LoadFromFile() method.
- Access the annotation collection on the specified page using PdfDocument.Pages.AnnotationsWidget property.
- Create a list to store annotation information.
- Loop through annotations on a certain page.
- Retrieve each annotation using PdfAnnotationCollection.get_Item() method.
- Add annotation details to the list.
- Save the list as a Text file.
Below is the code example of extracting all annotations on the second page:
- Python
from spire.pdf.common import *
from spire.pdf import *

# Create a new PDF document
pdf = PdfDocument()

# Load the file from disk
pdf.LoadFromFile("Sample.pdf")

# Get all annotations from the second page
annotations = pdf.Pages.get_Item(1).AnnotationsWidget

# Create a list to maintain annotation details
sb = []

# Loop through annotations on the page
if annotations.Count > 0:
    for i in range(annotations.Count):
        # Get the current annotation
        annotation = annotations.get_Item(i)

        # Get the annotation details
        if isinstance(annotation, PdfPopupAnnotationWidget):
            continue
        sb.append("Annotation information: ")
        sb.append("Text: " + annotation.Text)
        modifiedDate = annotation.ModifiedDate.ToString()
        sb.append("ModifiedDate: " + modifiedDate)

# Save annotations as a Text file
with open("GetAllAnnotationsFromPage.txt", "w", encoding="utf-8") as file:
    file.write("\n".join(sb))

# Release resources
pdf.Close()
Extract All Annotations from PDF Files
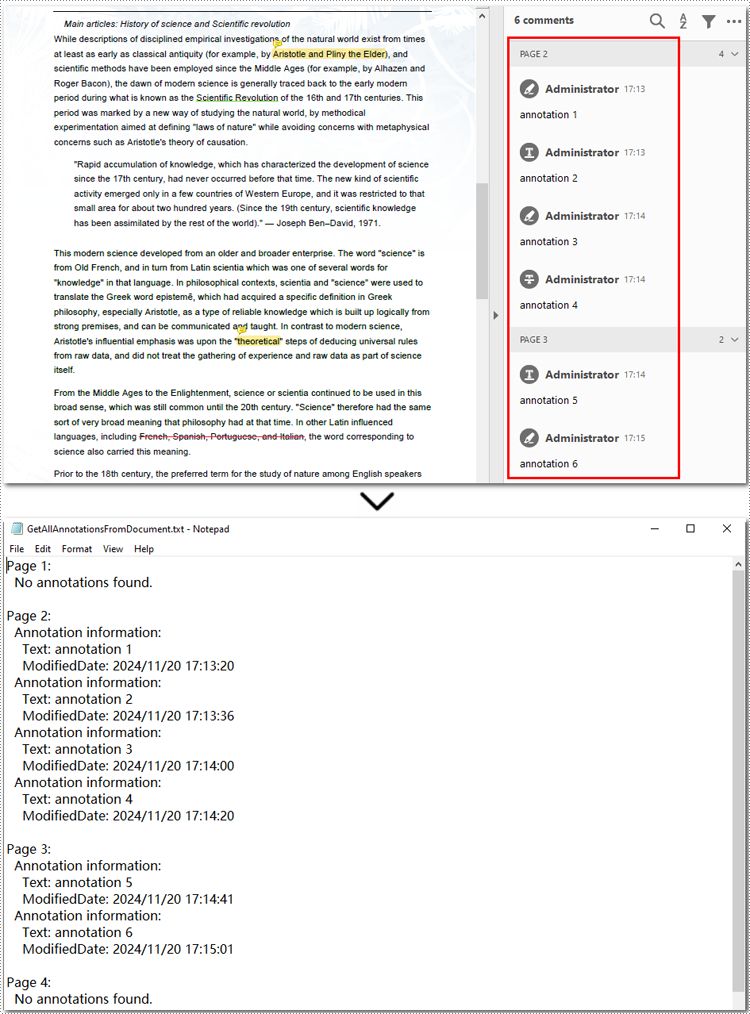
The final section of this guide illustrates how to extract all annotations from a PDF document using Python. The process is similar to exporting annotations from a single page but involves iterating through each page, traversing all annotations, and accessing their details. Finally, the extracted annotation details are saved to a text file for further use. Let’s take a closer look at the detailed steps.
Steps to extract all annotations from a PDF document:
- Create an instance of PdfDocument class.
- Read a PDF document from the disk with PdfDocument.LoadFromFile() method.
- Initialize a list to store annotation information.
- Loop through all pages and access the annotation collection with PdfDocument.Pages.AnnotationsWidget property.
- Iterate each annotation in the collection and get annotations using PdfAnnotationCollection.get_item() method.
- Append annotation details to the list.
- Output the list as a Text file.
Here is an example of exporting all annotations from a PDF file:
- Python
from spire.pdf.common import *
from spire.pdf import *

# Create a new PDF document
pdf = PdfDocument()

# Load the file from disk
pdf.LoadFromFile("Sample.pdf")

# Create a list to save annotation details
sb = []

# Iterate through all pages in the PDF document
for pageIndex in range(pdf.Pages.Count):
    sb.append(f"Page {pageIndex + 1}:")

    # Access the annotation collection of the current page
    annotations = pdf.Pages.get_Item(pageIndex).AnnotationsWidget

    # Loop through annotations in the collection
    if annotations.Count > 0:
        for i in range(annotations.Count):
            # Get the annotations of the current page
            annotation = annotations.get_Item(i)

            # Skip invalid annotations (empty text and default date)
            if not annotation.Text.strip() and annotation.ModifiedDate.ToString() == "0001/1/1 0:00:00":
                continue

            # Extract annotation information
            sb.append("Annotation information: ")
            sb.append("Text: " + (annotation.Text.strip() or "N/A"))
            modifiedDate = annotation.ModifiedDate.ToString()
            sb.append("ModifiedDate: " + modifiedDate)
    else:
        sb.append("No annotations found.")

    # Add a blank line after each page
    sb.append("")

# Save all annotations to a file
with open("GetAllAnnotationsFromDocument.txt", "w", encoding="utf-8") as file:
    file.write("\n".join(sb))

# Close the PDF document
pdf.Close()
Apply for a Temporary License
If you'd like to remove the evaluation message from the generated documents, or to get rid of the function limitations, please request a 30-day trial license for yourself.
