
Knowledgebase (2370)
Children categories
Python: Convert Excel Data to Word Table with Formatting
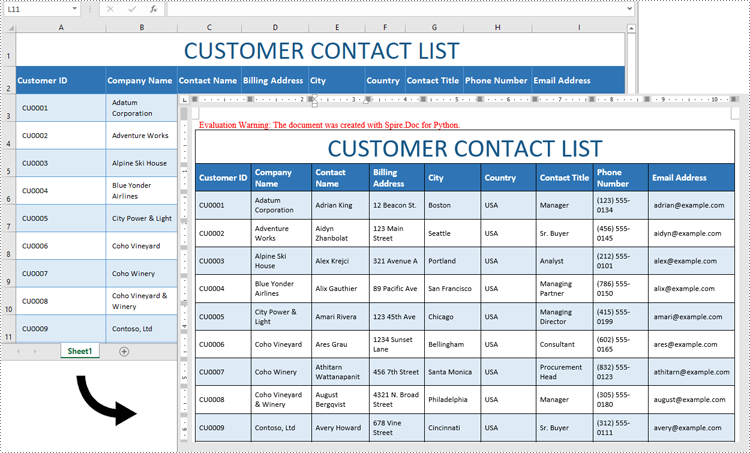
2024-11-18 01:07:09 Written by AdministratorExcel is ideal for data calculations, analysis, and organization, while Word shines at creating polished, well-formatted documents and reports. Transferring data from Excel to Word is often necessary for professionals preparing reports or presentations, as it allows for advanced formatting options that enhance readability and create a more professional look. In this guide, you will learn how to convert data in an Excel sheet to a Word table with formatting in Python using Spire.Office for Python.
Install Spire.Office for Python
This scenario requires Spire.Office for Python and plum-dispatch v1.7.4. They can be easily installed in your Windows through the following pip command.
pip install Spire.Office
Convert Excel Data to Word Table with Formatting in Python
This process uses two libraries in the Spire.Office for Python package. They’re Spire.XLS for Python and Spire.Doc for Python. The former is used to read data and formatting from an Excel worksheet, and the latter is used to create a Word document and write data, including formatting, into a table. To make this code example easy to understand, we have defined the following two custom methods that handle specific tasks:
- MergeCells() - Merge the corresponding cells in the Word table based on the merged cells in the Excel sheet.
- CopyStyle() - Copy various cell styles from the Excel worksheet to the Word table, including font style, background color, and text alignment.
The following steps demonstrate how to convert data from an Excel sheet to a Word table with formatting using Spire.Office for Python.
- Create an object of the Workbook class and load a sample Excel file using the Workbook.LoadFromFile() method.
- Get a specific worksheet through the Workbook.Worksheets[index] property.
- Create a new Word document using the Document class, and add a section to it.
- Add a table to the Word document using the Section.AddTable() method.
- Detect the merged cells in the worksheet and merge the corresponding cells in the Word tale using the custom method MergeCells().
- Iterate through the cells in the worksheet, read the data of the cells through the CellRange.Value property and add the data to Word table cells using the TableCell.AddParagraph().AppendText() method.
- Copy the cell styles from the Excel worksheet to the Word table using the custom method CopyStyle().
- Save the Word document to a file using the Document.SaveToFile() method.
- Python
from spire.xls import *
from spire.doc import *

def MergeCells(sheet, table):
    """Merge cells in the Word table based on merged cells in the Excel sheet."""
    if sheet.HasMergedCells:
        ranges = sheet.MergedCells
        for i in range(len(ranges)):
            startRow = ranges[i].Row
            startColumn = ranges[i].Column
            rowCount = ranges[i].RowCount
            columnCount = ranges[i].ColumnCount

            if rowCount > 1 and columnCount > 1:
                for j in range(startRow, startRow + rowCount):
                    table.ApplyHorizontalMerge(j - 1, startColumn - 1, startColumn - 1 + columnCount - 1)
                table.ApplyVerticalMerge(startColumn - 1, startRow - 1, startRow - 1 + rowCount - 1)

            if rowCount > 1 and columnCount == 1:
                table.ApplyVerticalMerge(startColumn - 1, startRow - 1, startRow - 1 + rowCount - 1)

            if columnCount > 1 and rowCount == 1:
                table.ApplyHorizontalMerge(startRow - 1, startColumn - 1, startColumn - 1 + columnCount - 1)

def CopyStyle(wTextRange, xCell, wCell):
    """Copy cell styling from Excel to Word."""
    # Copy font style
    wTextRange.CharacterFormat.TextColor = Color.FromRgb(xCell.Style.Font.Color.R, xCell.Style.Font.Color.G, xCell.Style.Font.Color.B)
    wTextRange.CharacterFormat.FontSize = float(xCell.Style.Font.Size)
    wTextRange.CharacterFormat.FontName = xCell.Style.Font.FontName
    wTextRange.CharacterFormat.Bold = xCell.Style.Font.IsBold
    wTextRange.CharacterFormat.Italic = xCell.Style.Font.IsItalic

    # Copy background color
    if xCell.Style.FillPattern is not ExcelPatternType.none:
        wCell.CellFormat.Shading.BackgroundPatternColor=Color.FromRgb(xCell.Style.Color.R, xCell.Style.Color.G, xCell.Style.Color.B)


        # Copy horizontal alignment
    if xCell.HorizontalAlignment == HorizontalAlignType.Left:
        wTextRange.OwnerParagraph.Format.HorizontalAlignment = HorizontalAlignment.Left
    elif xCell.HorizontalAlignment == HorizontalAlignType.Center:
        wTextRange.OwnerParagraph.Format.HorizontalAlignment = HorizontalAlignment.Center
    elif xCell.HorizontalAlignment == HorizontalAlignType.Right:
        wTextRange.OwnerParagraph.Format.HorizontalAlignment = HorizontalAlignment.Right

    # Copy vertical alignment
    if xCell.VerticalAlignment == VerticalAlignType.Bottom:
        wCell.CellFormat.VerticalAlignment = VerticalAlignment.Bottom
    elif xCell.VerticalAlignment == VerticalAlignType.Center:
        wCell.CellFormat.VerticalAlignment = VerticalAlignment.Middle
    elif xCell.VerticalAlignment == VerticalAlignType.Top:
        wCell.CellFormat.VerticalAlignment = VerticalAlignment.Top

# Load an Excel file
workbook = Workbook()
workbook.LoadFromFile("Contact list.xlsx")

# Get the first worksheet
sheet = workbook.Worksheets[0]

# Create a Word document
doc = Document()
section = doc.AddSection()
section.PageSetup.Orientation = PageOrientation.Landscape

# Add a table
table = section.AddTable(True)
table.ResetCells(sheet.LastRow, sheet.LastColumn)

# Merge cells
MergeCells(sheet, table)

# Export data and styles from Excel to Word table
for r in range(1, sheet.LastRow + 1):
    table.Rows[r - 1].Height = float(sheet.Rows[r - 1].RowHeight)

    for c in range(1, sheet.LastColumn + 1):
        xCell = sheet.Range[r, c]
        wCell = table.Rows[r - 1].Cells[c - 1]

        # Add text from Excel to Word table cell
        textRange = wCell.AddParagraph().AppendText(xCell.NumberText)

        # Copy font and cell style
        CopyStyle(textRange, xCell, wCell)

# Save the document to a Word file
doc.SaveToFile("ConvertExcelDataToWordTable.docx", FileFormat.Docx)
Apply for a Temporary License
If you'd like to remove the evaluation message from the generated documents, or to get rid of the function limitations, please request a 30-day trial license for yourself.
MS Word allows users to view hyperlinks but lacks a built-in feature for extracting hyperlinks with a single click. This limitation makes extracting multiple links from a document time-consuming. Thankfully, Python can streamline this process significantly. In this article, we'll show you how to use Spire.Doc for Python to easily extract hyperlinks from Word documents with Python, either individual or batch, saving you time and effort.
Install Spire.Doc for Python
This scenario requires Spire.Doc for Python and plum-dispatch v1.7.4. They can be easily installed in your Windows through the following pip command.
pip install Spire.Doc
If you are unsure how to install, please refer to this tutorial: How to Install Spire.Doc for Python on Windows.
Extract Hyperlinks from Word Documents: Specified Links
Whether you're looking to retrieve just one important link or filter out certain URLs, this section will guide you through the process step by step. Using the Field.FieldText and the Field.Code properties provided by Spire.Doc, you can efficiently target and extract specified hyperlinks, making it easier to access the information you need.
Steps to extract specified hyperlinks from Word documents:
- Create an instance of Document class.
- Read a Word document from files using Document.LoadFromFile() method.
- Iterate through elements to find all hyperlinks in this Word document.
- Get a certain hyperlink from the hyperlink collection.
- Retrieve the hyperlink text with Field.FieldText property.
- Extract URLs from the hyperlink in the Word document using Field.Code property.
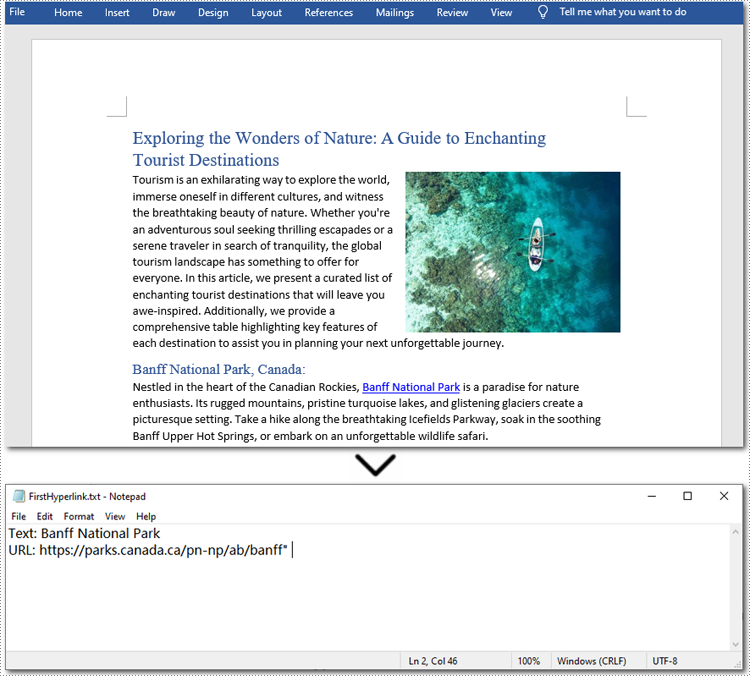
Here is the code example of extracting the first hyperlink in a Word document:
- Python
from spire.doc import *
from spire.doc.common import *

# Create a Document object
doc = Document()

# Load a Word file
doc.LoadFromFile("/sample.docx")

# Find all hyperlinks in the Word document
hyperlinks = []
for i in range(doc.Sections.Count):
    section = doc.Sections.get_Item(i)
    for j in range(section.Body.ChildObjects.Count):
        sec = section.Body.ChildObjects.get_Item(j)
        if sec.DocumentObjectType == DocumentObjectType.Paragraph:
            for k in range((sec if isinstance(sec, Paragraph) else None).ChildObjects.Count):
                para = (sec if isinstance(sec, Paragraph) else None).ChildObjects.get_Item(k)
                if para.DocumentObjectType == DocumentObjectType.Field:
                    field = para if isinstance(para, Field) else None
                    if field.Type == FieldType.FieldHyperlink:
                        hyperlinks.append(field)

# Get the first hyperlink text and URL
if hyperlinks:
    first_hyperlink = hyperlinks[0]
    hyperlink_text = first_hyperlink.FieldText
    hyperlink_url = first_hyperlink.Code.split('HYPERLINK ')[1].strip('"')

    # Save to a text file
    with open("/FirstHyperlink.txt", "w") as file:
        file.write(f"Text: {hyperlink_text}\nURL: {hyperlink_url}\n")

# Close the document
doc.Close()
Extract All Hyperlinks from Word Documents
After checking out how to extract specified hyperlinks, let's move on to extracting all hyperlinks from your Word documents. This is especially helpful when you need a list of all links, whether to check for broken ones or for other purposes. By automating this process with Spire.Doc(short for Spire Doc for Python), you can save time and ensure accuracy. Let's take a closer look at the steps and code example. Steps to extract all hyperlinks from Word documents:
- Create a Document object.
- Load a Word document from the local storage with Document.LoadFromFile() method.
- Loop through elements to find all hyperlinks in the Word document.
- Iterate through all hyperlinks in the collection.
- Use Field.FieldText property to extract the hyperlink text from each link.
- Use Field.Code property to get URLs from hyperlinks.
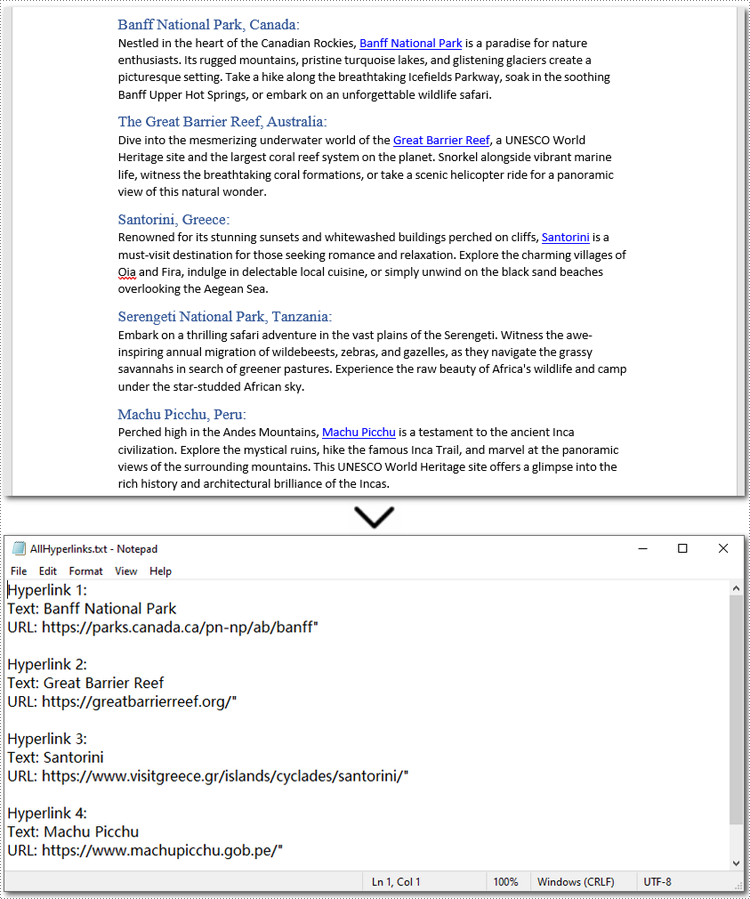
Below is a code example of extracting all hyperlinks from a Word document:
- Python
from spire.doc import *
from spire.doc.common import *

# Create a Document object
doc = Document()

# Load a Word file
doc.LoadFromFile("/sample.docx")

# Find all hyperlinks in the Word document
hyperlinks = []
for i in range(doc.Sections.Count):
    section = doc.Sections.get_Item(i)
    for j in range(section.Body.ChildObjects.Count):
        sec = section.Body.ChildObjects.get_Item(j)
        if sec.DocumentObjectType == DocumentObjectType.Paragraph:
            for k in range((sec if isinstance(sec, Paragraph) else None).ChildObjects.Count):
                para = (sec if isinstance(sec, Paragraph) else None).ChildObjects.get_Item(k)
                if para.DocumentObjectType == DocumentObjectType.Field:
                    field = para if isinstance(para, Field) else None
                    if field.Type == FieldType.FieldHyperlink:
                        hyperlinks.append(field)

# Save all hyperlinks text and URL to a text file
with open("/AllHyperlinks.txt", "w") as file:
    for i, hyperlink in enumerate(hyperlinks):
        hyperlink_text = hyperlink.FieldText
        hyperlink_url = hyperlink.Code.split('HYPERLINK ')[1].strip('"')
        file.write(f"Hyperlink {i+1}:\nText: {hyperlink_text}\nURL: {hyperlink_url}\n\n")

# Close the document
doc.Close()
Apply for a Temporary License
If you'd like to remove the evaluation message from the generated documents, or to get rid of the function limitations, please request a 30-day trial license for yourself.
C#: Insert, Retrieve, Reorder and Remove Slides in PowerPoint Sections
2024-11-15 01:03:47 Written by KoohjiSections in PowerPoint let you group related slides together, making it easy to segment a presentation by topics, chapters, or any other logical structure. When working with large, multi-section presentations, automating slide operations - such as insertion, retrieval, reordering, and removal - can significantly improve productivity. In this article, we will explain how to insert, retrieve, reorder, and remove slides in PPT sections in C# using Spire.Presentation for .NET.
- Insert Slides into a PowerPoint Section in C#
- Retrieve Slides from a PowerPoint Section in C#
- Reorder Slides in a PowerPoint Section in C#
- Remove Slides from a PowerPoint Section in C#
Install Spire.Presentation for .NET
To begin with, you need to add the DLL files included in the Spire.Presentation for.NET package as references in your .NET project. The DLL files can be either downloaded from this link or installed via NuGet.
PM> Install-Package Spire.Presentation
Insert Slides into a PowerPoint Section in C#
Inserting slides is often needed when you need to add new content to a section. With Spire.Presentation for .NET, you can insert a slide into a section using the Section.Insert() method. The detailed steps are as follows.
- Create an instance of the Presentation class.
- Load a PowerPoint presentation using the Presentation.LoadFromFile() method.
- Get a specific section through its index (0-based) using the Presentation.SectionList(index) property.
- Add a new slide to presentation, then insert it into the section using the Section.Insert() method.
- Remove the added slide from the presentation.
- Save the resulting presentation using the Presentation.SaveToFile() method.
- C#
using Spire.Presentation;
using System.Collections.Generic;

namespace InsertSlidesInSection
{
    internal class Program
    {
        static void Main(string[] args)
        {
            // Create an instance of the Presentation class
            using (Presentation presentation = new Presentation())
            {
                // Load a PowerPoint presentation
                presentation.LoadFromFile("Example.pptx");

                // Access the first section
                Section firstSection = presentation.SectionList[0];

                // Add a new slide to the presentation and insert it at the start of the section
            ISlide slide = presentation.Slides.Append();
            firstSection.Insert(0, slide);
            // Remove the added slide from the presentation
            presentation.Slides.Remove(slide);

                // Save the modified presentation
                presentation.SaveToFile("InsertSlidesInSection.pptx", FileFormat.Pptx2016);
            }
        }
    }
}

Retrieve Slides from a PowerPoint Section in C#
Extracting slides from a specific section allows you to focus on a subset of slides for targeted operations, like slide reordering or applying specific formatting. Using the Section.GetSlides() method in Spire.Presentation for .NET, you can easily retrieve all slides within a given section. The detailed steps are as follows.
- Create an instance of the Presentation class.
- Load a PowerPoint presentation using the Presentation.LoadFromFile() method.
- Get a specific section through its index (0-based) using the Presentation.SectionList(index) property.
- Retrieve the slides within the section using the Section.GetSlides() method.
- Iterate through the retrieved slides and get the slide number (1-based) of each slide.
- C#
using Spire.Presentation;
using System;

namespace RetrieveSlidesInSection
{
    internal class Program
    {
        static void Main(string[] args)
        {
            // Create an instance of the Presentation class
            using (Presentation presentation = new Presentation())
            {
                // Load a PowerPoint presentation
                presentation.LoadFromFile("Example.pptx");

                // Retrieve the slides in the 3rd section
                Section section = presentation.SectionList[2];
                ISlide[] slides = section.GetSlides();

                // Output the slide number for each slide in the section
                foreach (ISlide slide in slides)
                {
                    Console.Write(slide.SlideNumber + " ");
                }
                Console.ReadKey();
            }
        }
    }
}

Reorder Slides in a PowerPoint Section in C#
Reordering slides is essential for ensuring that related content follows a logical sequence. Spire.Presentation for .NET offers the Section.Move() method for moving a slide in a section to another position. The detailed steps are as follows.
- Create an instance of the Presentation class.
- Load a PowerPoint presentation using the Presentation.LoadFromFile() method.
- Get a specific section through its index (0-based) using the Presentation.SectionList(index) property.
- Move a specific slide in the section to another position using the Section.Move() method.
- Save the resulting presentation using the Presentation.SaveToFile() method.
- C#
using Spire.Presentation;

namespace ReorderSlidesInSection
{
    internal class Program
    {
        static void Main(string[] args)
        {
            // Create an instance of the Presentation class
            using (Presentation presentation = new Presentation())
            {
		   // Load a PowerPoint presentation
                presentation.LoadFromFile("Example.pptx");

                // Access the 3rd section
                Section section = presentation.SectionList[2];

                // Retrieve the slides in the section
                ISlide[] slides = section.GetSlides();

                // Move the 1st slide in the section to the specified position
                section.Move(2, slides[0]);

                // Save the modified presentation
                presentation.SaveToFile("ReorderSlidesInSection.pptx", FileFormat.Pptx2016);
            }
        }
    }
}

Remove Slides from a PowerPoint Section in C#
Removing slides from a section helps streamline your presentation, especially when certain slides become outdated or irrelevant. With the Section.RemoveAt() or Section.RemoveRange() method in Spire.Presentation for .NET, you can easily delete an individual slide or a range of slides from a section. The detailed steps are as follows.
- Create an instance of the Presentation class.
- Load a PowerPoint presentation using the Presentation.LoadFromFile() method.
- Get a specific section through its index (0-based) using the Presentation.SectionList(index) property.
- Remove a specific slide or a range of slides from the presentation using the Section.RemoveAt() or Section.RemoveRange() method.
- Save the resulting presentation using the Presentation.SaveToFile() method.
- C#
using Spire.Presentation;

namespace RemoveSlidesInSection
{
    internal class Program
    {
        static void Main(string[] args)
        {
            // Create an instance of the Presentation class
            using (Presentation presentation = new Presentation())
            {
                // Load a PowerPoint presentation
                presentation.LoadFromFile("Course.pptx");

                // Access the 3rd section
                Section section = presentation.SectionList[2];

                // Remove the first slide from the section
                section.RemoveAt(0);

                // Or remove a range of slides from the section
                //section.RemoveRange(0, 2);

                // Save the modified presentation
                presentation.SaveToFile("RemoveSlidesInSection.pptx", FileFormat.Pptx2016);
            }
        }
    }
}
Apply for a Temporary License
If you'd like to remove the evaluation message from the generated documents, or to get rid of the function limitations, please request a 30-day trial license for yourself.
