
Knowledgebase (2370)
Children categories
PDF forms are essential tools for collecting information across various industries. Understanding how to import and export this data in different formats like FDF, XFDF, and XML can greatly enhance your data management processes. For instance, importing form data allows you to update or pre-fill PDF forms with existing information, saving time and increasing accuracy. Conversely, exporting form data enables you to share collected information effortlessly with other applications, facilitating seamless integration and minimizing manual entry errors. In this article, we will introduce how to import and export PDF form data in Python using Spire.PDF for Python.
- Import PDF Form Data from FDF, XFDF or XML Files in Python
- Export PDF Form Data to FDF, XFDF or XML Files in Python
Install Spire.PDF for Python
This scenario requires Spire.PDF for Python and plum-dispatch v1.7.4. They can be easily installed in your Windows through the following pip command.
pip install Spire.PDF
If you are unsure how to install, please refer to this tutorial: How to Install Spire.PDF for Python on Windows
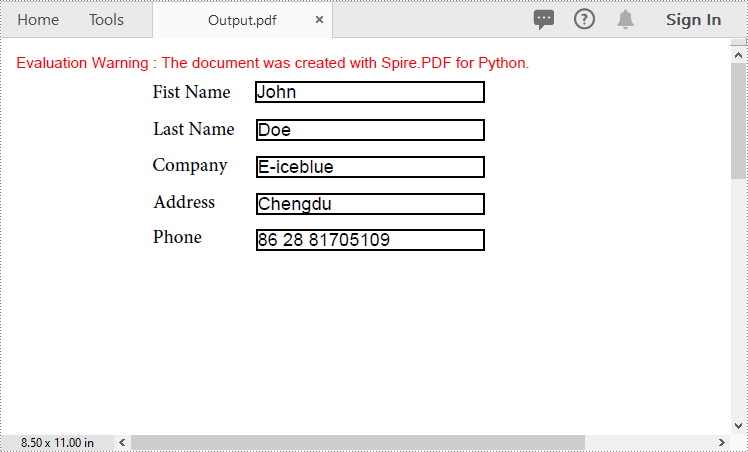
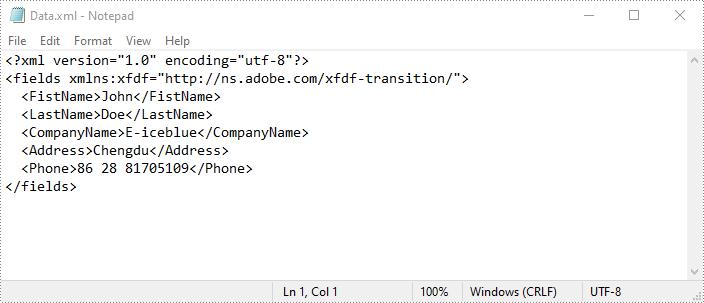
Import PDF Form Data from FDF, XFDF or XML Files in Python
Spire.PDF for Python offers the PdfFormWidget.ImportData() method for importing PDF form data from FDF, XFDF, or XML files. The detailed steps are as follows.
- Create an object of the PdfDocument class.
- Load a PDF document using PdfDocument.LoadFromFile() method.
- Get the form of the PDF document using PdfDocument.Form property.
- Import form data from an FDF, XFDF or XML file using PdfFormWidget.ImportData() method.
- Save the resulting document using PdfDocument.SaveToFile() method.
- Python
from spire.pdf.common import *
from spire.pdf import *

# Create an object of the PdfDocument class
pdf = PdfDocument()
# Load a PDF document
pdf.LoadFromFile("Forms.pdf")

# Get the form of the document
pdfForm = pdf.Form
formWidget = PdfFormWidget(pdfForm)

# Import PDF form data from an XML file
formWidget.ImportData("Data.xml", DataFormat.Xml)

# Import PDF form data from an FDF file
# formWidget.ImportData("Data.fdf", DataFormat.Fdf)

# Import PDF form data from an XFDF file
# formWidget.ImportData("Data.xfdf", DataFormat.XFdf)

# Save the resulting document
pdf.SaveToFile("Output.pdf")
# Close the PdfDocument object
pdf.Close()
Export PDF Form Data to FDF, XFDF or XML Files in Python
Spire.PDF for Python also enables developers to export PDF form data to FDF, XFDF, or XML files by using the PdfFormWidget.ExportData() method. The detailed steps are as follows.
- Create an object of the PdfDocument class.
- Load a PDF document using PdfDocument.LoadFromFile() method.
- Get the form of the PDF document using PdfDocument.Form property.
- Export form data to an FDF, XFDF or XML file using PdfFormWidget.ExportData() method.
- Python
from spire.pdf.common import *
from spire.pdf import *

# Create an object of the PdfDocument class
pdf = PdfDocument()
# Load a PDF document
pdf.LoadFromFile("Forms.pdf")

# Get the form of the document
pdfForm = pdf.Form
formWidget = PdfFormWidget(pdfForm)

# Export PDF form data to an XML file
formWidget.ExportData("Data.xml", DataFormat.Xml, "Form")

# Export PDF form data to an FDF file
# formWidget.ExportData("Data.fdf", DataFormat.Fdf, "Form")

# Export PDF form data to an XFDF file
# formWidget.ExportData("Data.xfdf", DataFormat.XFdf, "Form")

# Close the PdfDocument object
pdf.Close()
Apply for a Temporary License
If you'd like to remove the evaluation message from the generated documents, or to get rid of the function limitations, please request a 30-day trial license for yourself.
Markdown, with its lightweight syntax, offers a streamlined approach to web content creation, collaboration, and document sharing, particularly in environments where tools like Git or Markdown-friendly editors are prevalent. By converting Word documents to Markdown files, users can enhance their productivity, facilitate easier version control, and ensure compatibility across different systems and platforms. In this article, we will explore the process of converting Word documents to Markdown files using Spire.Doc for .NET, providing simple C# code examples.
Install Spire.Doc for .NET
To begin with, you need to add the DLL files included in the Spire.Doc for .NET package as references in your .NET project. The DLL files can be either downloaded from this link or installed via NuGet.
PM> Install-Package Spire.Doc
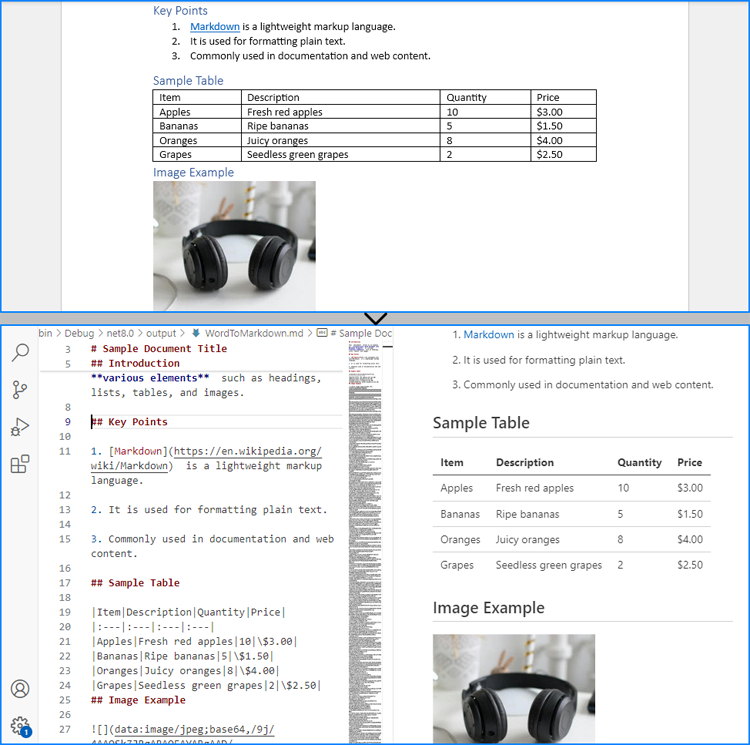
Convert Word to Markdown with C#
Using Spire.Doc for .NET, we can convert a Word document to a Markdown file by loading the document using Document.LoadFromFile() method and then convert it to a Markdown file using Document.SaveToFile(filename: String, FileFormat.Markdown) method. The detailed steps are as follows:
- Create an instance of Document class.
- Load a Word document using Document.LoadFromFile() method.
- Convert the document to a Markdown file using Document.SaveToFile(filename: String, FileFormat.Markdown) method.
- Release resources.
- C#
using Spire.Doc;

namespace WordToMarkdown
{
    class Program
    {
        static void Main(string[] args)
        {
            // Create an instance of Document class
            Document doc = new Document();

            // Load a Word document
            doc.LoadFromFile("Sample.docx");

            // Convert the document to a Markdown file
            doc.SaveToFile("output/WordToMarkdown.md", FileFormat.Markdown);
            doc.Dispose();
        }
    }
}
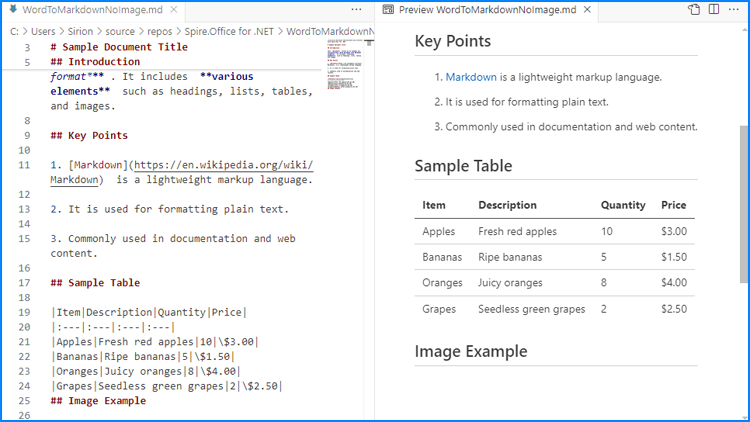
Convert Word to Markdown Without Images
When using Spire.Doc for .NET to convert Word documents to Markdown files, images are stored in Base64 encoding by default, which can increase the file size and affect compatibility. To address this, we can remove the images during conversion, thereby reducing the file size and enhancing compatibility.
The following steps outline how to convert Word documents to Markdown files without images:
- Create an instance of Document class.
- Load a Word document using Document.LoadFromFile() method.
- Iterate through the sections and then the paragraphs in the document.
- Iterate through the document objects in the paragraphs:
- Get a document object through Paragraph.ChildObjects[] property.
- Check if it’s an instance of DocPicture class. If it is, remove it using Paragraph.ChildObjects.Remove(DocumentObject) method.
- Convert the document to a Markdown file using Document.SaveToFile(filename: String, FileFormat.Markdown) method.
- Release resources.
- C#
using Spire.Doc;
using Spire.Doc.Documents;
using Spire.Doc.Fields;

namespace WordToMarkdownNoImage
{
    class Program
    {
        static void Main(string[] args)
        {
            // Create an instance of Document class
            Document doc = new Document();

            // Load a Word document
            doc.LoadFromFile("Sample.docx");

            // Iterate through the sections in the document
            foreach (Section section in doc.Sections)
            {
                // Iterate through the paragraphs in the sections
                foreach (Paragraph paragraph in section.Paragraphs)
                {
                    // Iterate through the document objects in the paragraphs
                    for (int i = 0; i < paragraph.ChildObjects.Count; i++)
                    {
                        // Get a document object
                        DocumentObject docObj = paragraph.ChildObjects[i];
                        // Check if it is an instance of DocPicture class
                        if (docObj is DocPicture)
                        {
                            // Remove the DocPicture instance
                            paragraph.ChildObjects.Remove(docObj);
                        }
                    }
                }
            }

            // Convert the document to a Markdown file
            doc.SaveToFile("output/WordToMarkdownNoImage.md", FileFormat.Markdown);
            doc.Dispose();
        }
    }
}
Apply for a Temporary License
If you'd like to remove the evaluation message from the generated documents, or to get rid of the function limitations, please request a 30-day trial license for yourself.
The Excel workbook, as a widely used data management tool, can be combined with Python to enable the automation of large-scale data processing. Using Python to set, update, and read cell values in Excel can significantly improve work efficiency, reduce repetitive tasks, and enhance the flexibility and scalability of data processing workflows, thus creating added value. This approach is applicable across a range of fields, from automating financial reports to generating data analysis reports, and can greatly boost productivity in various work contexts.
This article will demonstrate how to set, update, and retrieve cell values in Excel files using Spire.XLS for Python.
- Set cell values in Excel Files with Python
- Update cell values in Excel Files with Python
- Retrieve cell values in Excel Files with Python
Install Spire.XLS for Python
This scenario requires Spire.XLS for Python and plum-dispatch v1.7.4. They can be easily installed in your Windows through the following pip commands.
pip install Spire.XLS
If you are unsure how to install, please refer to: How to Install Spire.XLS for Python on Windows
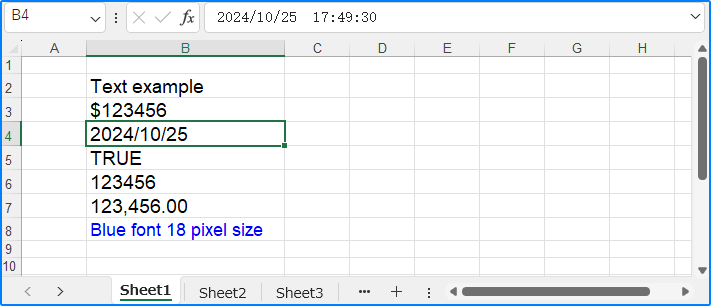
Set cell values in Excel Files with Python
We can use the Worksheet.Range.get_Item() method from Spire.XLS for Python to obtain a specified cell in an Excel worksheet as a CellRange object, such as Range.get_Item(2, 1) or Range.get_Item("A2") (row 2, column 1). Then, we can use the CellRange.Value property to set the cell value, or other properties within this class to set text, numbers, boolean values, and other types of data. The following is an example of the procedure:
- Create a Workbook object.
- Get the first default worksheet using Workbook.Worksheets.get_Item() method.
- Obtain the specified cell as a CellRange object using Worksheet.Range.get_Item() method.
- Use properties within the CellRange class, such as Text, Value, DateTimeValue, Formula, and NumberValue, to set cell values.
- Format the cells.
- Save the workbook using Workbook.SaveToFile().
- Python
from spire.xls import Workbook, FileFormat, DateTime, HorizontalAlignType
import datetime

# Create an instance of Workbook to create an Excel workbook
workbook = Workbook()

# Get the first default worksheet
sheet = workbook.Worksheets.get_Item(0)

# Get cell and set text
cell = sheet.Range.get_Item(2, 2)
cell.Text = "Text example"

# Get cell and set a regular value
cell1 = sheet.Range.get_Item(3, 2)
cell1.Value = "$123456"

# Get cell and set a date value
cell2 = sheet.Range.get_Item(4, 2)
cell2.DateTimeValue = DateTime.get_Now()

# Get cell and set a boolean value
cell3 = sheet.Range.get_Item(5, 2)
cell3.BooleanValue = True

# Get cell and set a formula
cell4 = sheet.Range.get_Item(6, 2)
cell4.Formula = "=SUM(B7)"

# Get cell, set a number value, and set number format
cell5 = sheet.Range.get_Item(7, 2)
cell5.NumberValue = 123456
cell5.NumberFormat = "#,##0.00"

# Get cell and set a formula array
cell6 = sheet.Range.get_Item(8, 2)
cell6.HtmlString = "<p><span style='color: blue; font-size: 18px;'>Blue font 18 pixel size</span></p>"

# Set formatting
cellRange = sheet.Range.get_Item(2, 2, 7, 2)
cellRange.Style.Font.FontName = "Arial"
cellRange.Style.Font.Size = 14
cellRange.Style.HorizontalAlignment = HorizontalAlignType.Left

# Auto-fit the column width
sheet.AutoFitColumn(2)

# Save the file
workbook.SaveToFile("output/SetExcelCellValue.xlsx", FileFormat.Version2016)
workbook.Dispose()
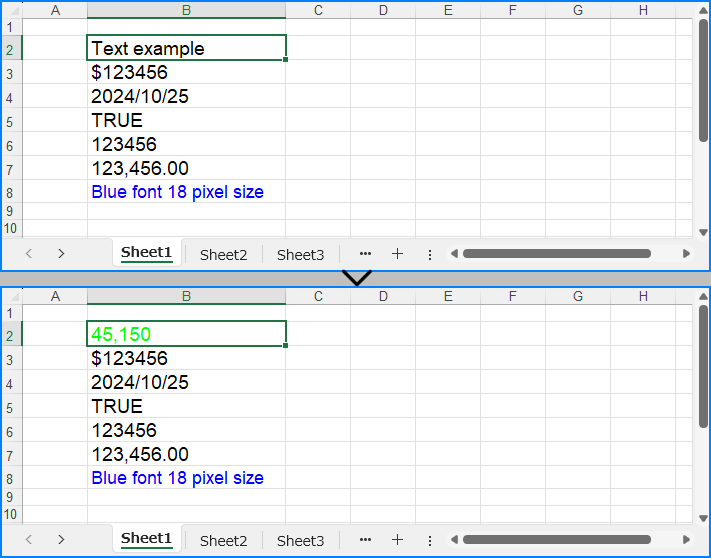
Update cell values in Excel Files with Python
To update a cell value in Excel, we can retrieve the cell to update and use the same approach as above to reset its value, thus updating the cell value. Below is an example of the procedure:
- Create a Workbook object.
- Load the Excel file using Workbook.LoadFromFile() method.
- Get a worksheet using Workbook.Worksheets.get_Item() method.
- Obtain the cell to update using Worksheet.Range.get_Item() method.
- Use properties under the CellRange class to reset the cell value.
- Save the workbook with Workbook.SaveToFile() method.
- Python
from spire.xls import Workbook

# Create an instance of Workbook
workbook = Workbook()

# Load the Excel file
workbook.LoadFromFile("output/SetExcelCellValue.xlsx")

# Get the worksheet
sheet = workbook.Worksheets.get_Item(0)

# Get the cell
cell = sheet.Range.get_Item(2, 2)

# Change the cell value to a number
cell.NumberValue = 45150
# Set the cell number format
cell.NumberFormat = "[Green]#,##0;[RED]-#,##0"

# Save the workbook
workbook.SaveToFile("output/UpdateExcelCellValue.xlsx")
workbook.Dispose()
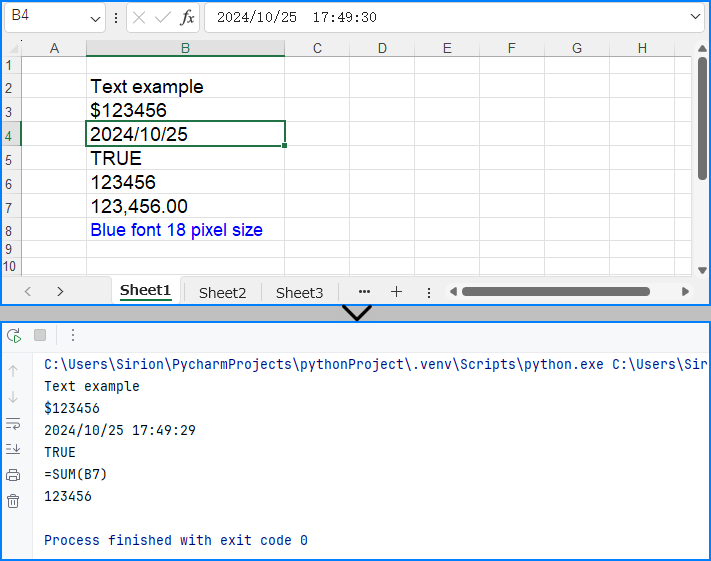
Retrieve cell values in Excel Files with Python
The CellRange.Value property can also be used to directly read cell values. Below is an example of the procedure to read cell values in Excel files:
- Create a Workbook object.
- Load the Excel file with Workbook.LoadFromFile() method.
- Get a worksheet using Workbook.Worksheets.get_Item() method.
- Loop through the specified cell range and use the CellRange.Value property to get the cell value.
- Print the results.
- Python
from spire.xls import Workbook

# Create an instance of Workbook
workbook = Workbook()

# Load the Excel file
workbook.LoadFromFile("output/SetExcelCellValue.xlsx")

# Get the worksheet
sheet = workbook.Worksheets.get_Item(0)

# Loop through cells from row 2 to 8 in column 2
for i in range(2, 8):
    # Get the cell
    cell = sheet.Range.get_Item(i, 2)
    # Get the cell value
    value = cell.Value
    # Output the value
    print(value)

workbook.Dispose()
Apply for a Temporary License
If you'd like to remove the evaluation message from the generated documents, or to get rid of the function limitations, please request a 30-day trial license for yourself.
