
Knowledgebase (2370)
Children categories
How to Integrate Spire.XLS for JavaScript in a React Project
2024-12-18 00:55:08 Written by AdministratorIn today's data-driven landscape, efficiently handling Excel files is crucial for web applications. React, a widely-used JavaScript library for user interfaces, can significantly enhance its capabilities by integrating Spire.XLS for JavaScript. This integration allows developers to perform complex operations like reading, writing, and formatting Excel files directly within their React projects.
This article will walk you through the integration of Spire.XLS for JavaScript into your React projects, covering everything from the initial setup to a straightforward usage example.
- Benefits of Using Spire.XLS for JavaScript in React Projects
- Set Up Your Environment
- Integrate Spire.XLS for JavaScript in Your Project
- Create and Save Excel Files Using JavaScript
Benefits of Using Spire.XLS for JavaScript in React Projects
React, a popular JavaScript library for building user interfaces, has revolutionized web development by enabling developers to create interactive and dynamic user experiences. On the other hand, Spire.XLS for JavaScript is a powerful library that allows developers to manipulate Excel files directly in the browser.
By integrating Spire.XLS for JavaScript into your React project, you can add advanced Excel capabilities to your application. Here are some of the key advantages:
- Enhanced Functionality: Spire.XLS for JavaScript enables creating, modifying, and formatting Excel files directly in the browser, enhancing your React app's capabilities and user experience.
- Improved Data Management: Easily import, export, and manipulate Excel files with Spire.XLS, streamlining data management and reducing errors.
- Cross-Browser Compatibility: Designed to work seamlessly across major web browsers, Spire.XLS ensures consistent handling of Excel files in your React application.
- Seamless Integration: Compatible with various JavaScript frameworks, including React, Spire.XLS integrates easily into existing projects without disrupting your workflow.
Set Up Your Environment
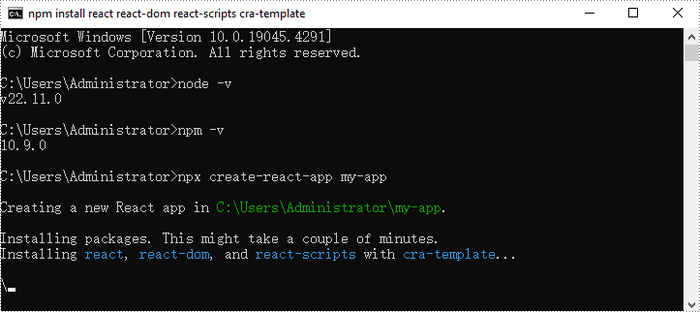
Step 1. Install Node.js and npm
Download and install Node.js from the official website. Make sure to choose the version that matches your operating system.
After the installation is complete, you can verify that Node.js and npm are working correctly by running the following commands in your terminal:
node -v
npm -v

Step 2. Create a New React Project
Create a new React project named my-app using Create React App from terminal:
npx create-react-app my-app
Once the project is created, you can navigate to the project directory and start the development server using the following commands:
cd my-app
npm start

If your React project is compiled successfully, the app will be served at http://localhost:3000, allowing you to view and test your application in a browser.

To visually browse and manage the files in your project, you can open the project using VS Code.

Integrate Spire.XLS for JavaScript in Your Project
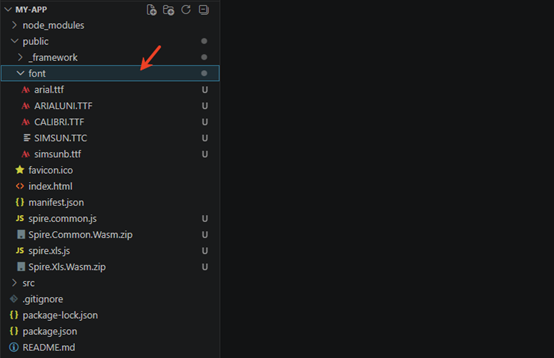
Download Spire.XLS for JavaScript from our website and unzip it to a location on your disk. The downloaded product package has been integrated Spire.Doc for JavaScript,Spire.XLS for JavaScript,Spire.PDF for JavaScript,Spire.Presentation for JavaScript. To use the functionality of Spire.XLS for JavaScript, you need to copy the corresponding files (spire.xls.js, Spire.Xls.Wasm.zip, spire.common.js, Spire.Common.Wasm.zip, and _framework) to the project's “public” folder.

You can also install Spire.XLS for JavaScript using npm. In the terminal within VS Code, run the following command:
npm i spire.office
After downloading this command, find the corresponding file in the node_comodules/spire.office path of the project and copy it to “public” folder.
At the same time, in order to ensure text rendering, the related font files can be added with custom paths. In the following example, the font addition path is: public\font.
Create Excel files using JavaScript
Modify the code in the "App.js" file to generate an Excel file using the WebAssembly (WASM) module. Specifically, utilize the Spire.XLS for JavaScript library for Excel file manipulation.
- JavaScript
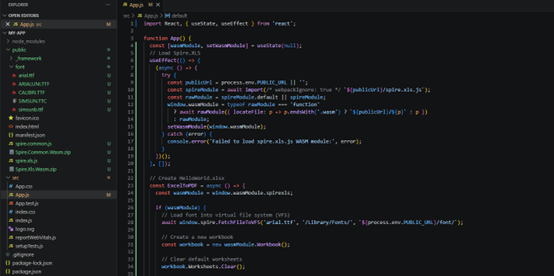
import React, { useState, useEffect } from 'react';

function App() {
  const [wasmModule, setWasmModule] = useState(null);
  // Load Spire.XLS
  useEffect(() => {
    (async () => {
      try {
        const publicUrl = process.env.PUBLIC_URL || '';
        const spireModule = await import(/* webpackIgnore: true */ `${publicUrl}/spire.xls.js`);
        const rawModule = spireModule.default || spireModule;
        window.wasmModule = typeof rawModule === 'function'
          ? await rawModule({ locateFile: p => p.endsWith('.wasm') ? `${publicUrl}/${p}` : p })
          : rawModule;
        setWasmModule(window.wasmModule);
      } catch (error) {
        console.error('Failed to load spire.xls.js WASM module:', error);
      }
    })();
  }, []);

  // Create HelloWorld.xlsx
  const ExcelToPDF = async () => {
    const wasmModule = window.wasmModule.spirexls;

    if (wasmModule) {
      // Load font into virtual file system (VFS)
      await window.spire.FetchFileToVFS('arial.ttf', '/Library/Fonts/', `${process.env.PUBLIC_URL}/font/`);

      // Create a new workbook
      const workbook = new wasmModule.Workbook();

      // Clear default worksheets
      workbook.Worksheets.Clear();

      // Add a new worksheet named "MySheet"
      const sheet = workbook.Worksheets.Add("MySheet");

      // Set the text of cell "A1"
      sheet.Range.get("A1").Text = "Hello World";

      // Set column width to auto-fit
      sheet.Range.get("A1").AutoFitColumns();

      // Define output file name
      const outputFileName = 'HelloWorld.xlsx';

      // Save the workbook to the specified path
      workbook.SaveToFile({ fileName: outputFileName, version: wasmModule.ExcelVersion.Version2010 });

      // Read the saved file and convert to Blob object
      const modifiedFileArray = window.dotnetRuntime.Module.FS.readFile(outputFileName);
      const modifiedFile = new Blob([modifiedFileArray], { type: 'application/vnd.openxmlformats-officedocument.spreadsheetml.sheet' });

      // Create a URL for the Blob and start download
      const url = URL.createObjectURL(modifiedFile);
      const a = document.createElement('a');
      a.href = url;
      a.download = outputFileName;
      document.body.appendChild(a);
      a.click();
      document.body.removeChild(a);
      URL.revokeObjectURL(url);

      // Clean up resources used by the workbook
      workbook.Dispose();
    }
  };

  return (
    <div style={{ textAlign: 'center', height: '300px' }}>
      <h1>Create HelloWorld.xlsx</h1>
      <button onClick={ExcelToPDF} disabled={!wasmModule}>
        Generate
      </button>
    </div>
  );
}

export default App;
Using "npm start" to run the program, and click "Generate" to download the generated Excel file.

Apply for a Temporary License
If you'd like to remove the evaluation message from the generated documents, or to get rid of the function limitations, please request a 30-day trial license for yourself.
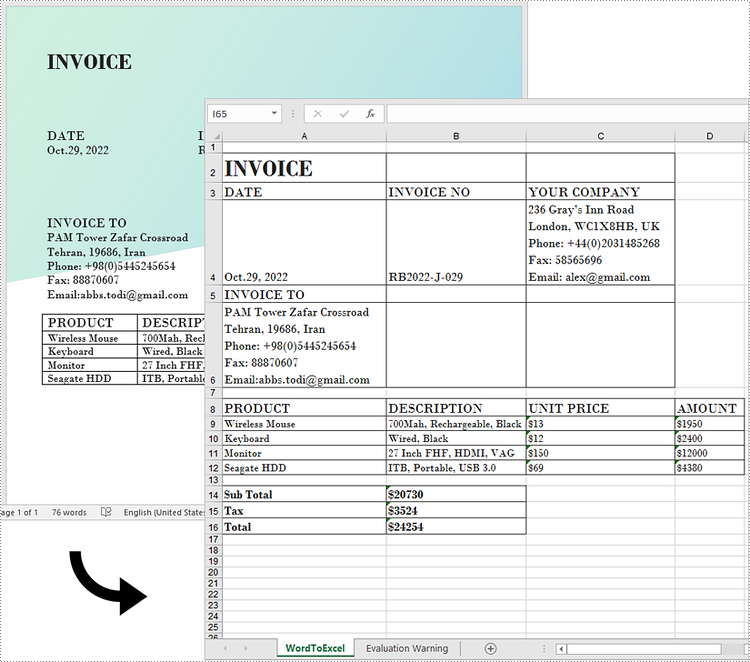
While Word is a powerful tool for creating and formatting documents, it is not optimized for advanced data management and analysis. In contrast, Excel excels at handling data in tabular form, allowing users to perform calculations, create charts, and conduct thorough data analysis.
Generally, converting complex Word documents into Excel spreadsheets is not advisable, as Excel may struggle to preserve the original layout. However, if your Word document primarily consists of tables, converting it to Excel can be highly beneficial. This transformation unlocks Excel's advanced functions, formulas, and visualization tools, enabling you to organize your data more effectively and improve your reporting and decision-making capabilities. In this article, we will focus specifically on how to convert this kind of Word documents to Excel in Python using Spire.Office for Python.
Install Spire.Office for Python
This scenario requires Spire.Office for Python and plum-dispatch v1.7.4. They can be easily installed in your Windows through the following pip command.
pip install Spire.Office
Convert Word to Excel in Python
This process uses two libraries in the Spire.Office for Python package. They're Spire.XLS for Python and Spire.Doc for Python. The former is used to read and extract content from a Word document, and the latter is used to create an Excel document and write data in specific cells. To make this code example easy to understand, we have defined the following three custom methods that handle specific tasks:
- ExportTableInExcel() - Export data from a Word table to specified Excel cells.
- CopyContentInTable() - Copy content from a table cell in Word to an Excel cell.
- CopyTextAndStyle() - Copy text with formatting from a Word paragraph to an Excel cell.
The following steps demonstrate how to export data from an entire Word document to an Excel worksheet using Spire.Office for Python.
- Create a Document object to load a Word file.
- Create a Worbbook object and add a worksheet named "WordToExcel" to it.
- Traverse through all the sections in the Word document and all the document objects under a certain section, and then determine if a document object is a paragraph or a table.
- If the document object is a paragraph, write the paragraph in a specified cell in Excel using CoypTextAndStyle() method.
- If the document object is a table, export the table data from Word to Excel cells using ExportTableInExcel() method.
- Auto fit the row height and column width in Excel so that the data within a cell will not exceed the bound of the cell.
- Save the workbook to an Excel file using Workbook.SaveToFile() method.
- Python
from spire.xls import *
from spire.doc import *

# Export data from Word table to Excel cells
def ExportTableInExcel(worksheet, row, table):
    for rowIndex in range(len(table.Rows)):
        tbRow = table.Rows[rowIndex]
        column = 1
        for cellIndex in range(len(tbRow.Cells)):
            tbCell = tbRow.Cells[cellIndex]
            cell = worksheet.Range[row, column]
            cell.BorderAround()
            CopyContentInTable(worksheet, tbCell, cell)
            column += 1
        row += 1
    return row

# Copy content from a Word table cell to an Excel cell
def CopyContentInTable(worksheet, tbCell, cell):
    newPara = Paragraph(tbCell.Document)
    for i in range(len(tbCell.ChildObjects)):
        documentObject = tbCell.ChildObjects[i]
        if isinstance(documentObject, Paragraph):
            paragraph = documentObject
            for cObj in range(len(paragraph.ChildObjects)):
                newPara.ChildObjects.Add(paragraph.ChildObjects[cObj].Clone())
            if i < len(tbCell.ChildObjects) - 1:
                newPara.AppendText("\n")
    CopyTextAndStyle(worksheet, cell, newPara)

# Copy text and style of a paragraph to a cell
def CopyTextAndStyle(worksheet, cell, paragraph):
    richText = cell.RichText
    richText.Text = paragraph.Text
    startIndex = 0
    for documentObject in range(len(paragraph.ChildObjects)):
        documentObject = paragraph.ChildObjects[documentObject]
        if isinstance(documentObject, TextRange):
            textRange = documentObject
            fontName = textRange.CharacterFormat.FontName
            isBold = textRange.CharacterFormat.Bold
            textColor = textRange.CharacterFormat.TextColor
            fontSize = textRange.CharacterFormat.FontSize
            textRangeText = textRange.Text
            strLength = len(textRangeText)
            font = worksheet.Workbook.CreateFont()
            font.Color = textColor
            font.IsBold = isBold
            font.Size = fontSize
            font.FontName = fontName
            endIndex = startIndex + strLength
            richText.SetFont(startIndex, endIndex, font)
            startIndex += strLength
        if isinstance(documentObject, DocPicture):
            picture = documentObject
            worksheet.Pictures.Add(cell.Row, cell.Column, picture.Image)
            worksheet.SetRowHeightInPixels(cell.Row, 1, picture.Image.Height)

    if paragraph.Format.HorizontalAlignment == HorizontalAlignment.Left:
        cell.Style.HorizontalAlignment = HorizontalAlignType.Left
    elif paragraph.Format.HorizontalAlignment == HorizontalAlignment.Center:
        cell.Style.HorizontalAlignment = HorizontalAlignType.Center
    elif paragraph.Format.HorizontalAlignment == HorizontalAlignment.Right:
        cell.Style.HorizontalAlignment = HorizontalAlignType.Right

# Create a Document object
doc = Document()
# Load a Word file
doc.LoadFromFile("C:/Users/Administrator/Desktop/Invoice.docx")

# Create a Workbook object
wb = Workbook()
# Remove the default worksheets
wb.Worksheets.Clear()

# Create a worksheet named "WordToExcel"
worksheet = wb.CreateEmptySheet("WordToExcel")
row = 1
column = 1

# Loop through the sections in the Word document
for sec_index in range(doc.Sections.Count):
    section = doc.Sections[sec_index]
    # Loop through the document object under a certain section
    for obj_index in range(section.Body.ChildObjects.Count):
        documentObject = section.Body.ChildObjects[obj_index]
        # Determine if the object is a paragraph
        if isinstance(documentObject, Paragraph):
            cell = worksheet.Range[row, column]
            paragraph = documentObject
            # Copy paragraph from Word to a specific cell
            CopyTextAndStyle(worksheet, cell, paragraph)
            row += 1

        # Determine if the object is a table
        if isinstance(documentObject, Table):
            table = documentObject
            # Export table data from Word to Excel
            currentRow = ExportTableInExcel(worksheet, row, table)
            row = currentRow

# Auto fit row height and column width
worksheet.AllocatedRange.AutoFitRows()
worksheet.AllocatedRange.AutoFitColumns()

# Wrap text in cells
worksheet.AllocatedRange.IsWrapText = True

# Save the workbook to an Excel file
wb.SaveToFile("WordToExcel.xlsx", ExcelVersion.Version2013)
wb.Dispose()
doc.Dispose()
Get a Free License
To fully experience the capabilities of Spire.Doc for Python without any evaluation limitations, you can request a free 30-day trial license.
When working with Excel in C#, copying rows, columns, and cells can feel like a simple task, but it often comes with a catch—how to keep the formatting intact. Whether you’re organizing data for a report, creating a presentation, or just trying to keep your spreadsheet looking sharp, maintaining the original look is crucial. In this article, we will demonstrate the methods to copy rows, columns, and cells in Excel while preserving the original formatting in C# using Spire.XLS for .NET.
- Copy Rows in Excel with Formatting in C#
- Copy Columns in Excel with Formatting in C#
- Copy Cells in Excel with Formatting in C#
Install Spire.XLS for .NET
To begin with, you need to add the DLL files included in the Spire.XLS for.NET package as references in your .NET project. The DLLs files can be either downloaded from this link or installed via NuGet.
PM> Install-Package Spire.XLS
Copy Rows in Excel with Formatting in C#
Copying rows in Excel while preserving their formatting can be efficiently achieved using the Worksheet.CopyRow(CellRange sourceRow, Worksheet destSheet, int destRowIndex, CopyRangeOptions copyOptions) method. This method enables you to duplicate rows either within the same worksheet or across different worksheets with precision. Additionally, you can control the copying behavior, such as copying all formatting, conditional formatting, data validations, styles, or even just the formula values, through the CopyRangeOptions parameter.
The following steps explain how to copy rows across different worksheets with formatting using Spire.XLS for .NET.
- Create an object of the Workbook class.
- Load an Excel file using the Workbook.LoadFromFile() method.
- Get the source worksheet and the destination worksheet using the Workbook.Worksheets[index] property.
- Get the desired row that you want to copy using the Worksheet.Rows[index] property.
- Copy the row and its formatting from the source worksheet to the destination worksheet using the Worksheet.CopyRow(CellRange sourceRow, Worksheet destSheet, int destRowIndex, CopyRangeOptions copyOptions) method.
- Copy the column widths of cells in the source row to the corresponding cells in the destination row.
- Save the workbook to a file using the Workbook.SaveToFile() method.
- C#
using Spire.Xls;
namespace CopyRows
{
internal class Program
{
static void Main(string[] args)
{
// Create a Workbook object
Workbook workbook = new Workbook();
// Load an Excel file
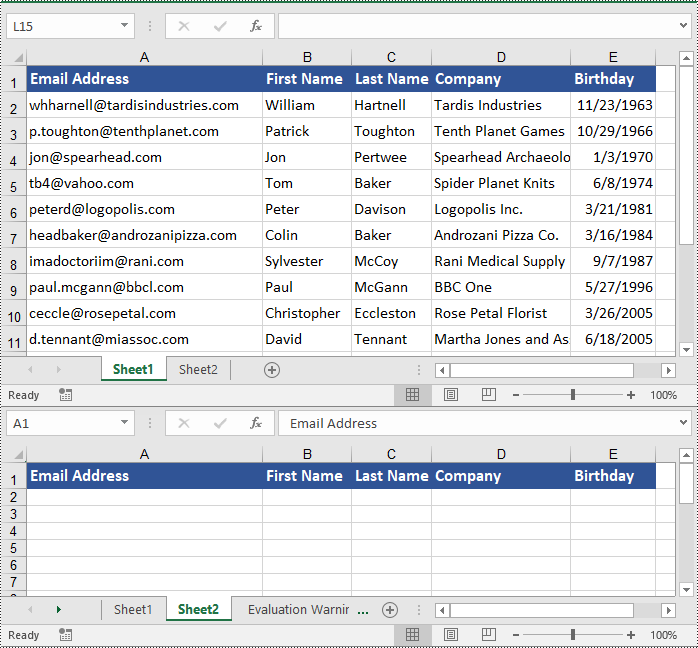
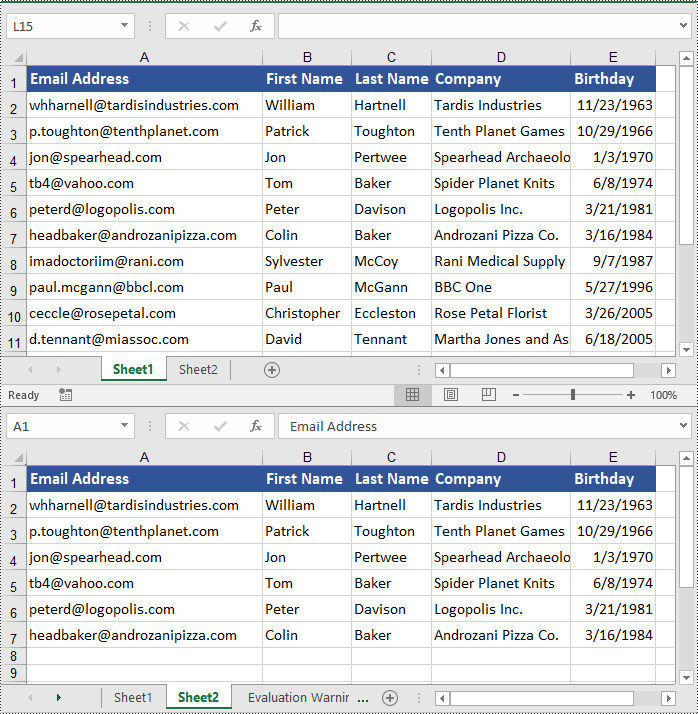
workbook.LoadFromFile("ContactList.xlsx");
// Get the source worksheet
Worksheet sheet1 = workbook.Worksheets[0];
// Get the destination worksheet
Worksheet sheet2 = workbook.Worksheets[1];
// Get the desired row that you want to copy
CellRange row = sheet1.Rows[0];
// Copy the row from the source worksheet to the first row of the destination worksheet
sheet1.CopyRow(row, sheet2, 1, CopyRangeOptions.All);
int columns = sheet1.Columns.Length;
// Copy the column widths of the cells in the source row to the corresponding cells in the destination row
for (int i = 0; i < columns; i++)
{
double columnWidth = row.Columns[i].ColumnWidth;
sheet2.Rows[0].Columns[i].ColumnWidth = columnWidth;
}
// Save the workbook to a file
workbook.SaveToFile("CopyRow.xlsx", ExcelVersion.Version2016);
workbook.Dispose();
}
}
}
Copy Columns in Excel with Formatting in C#
Similarly, copying columns in Excel with formatting can be accomplished using the Worksheet.CopyColumn(CellRange sourceColumn, Worksheet destSheet, int destColIndex, CopyRangeOptions copyOptions) method. The detailed steps are as follows.
- Create an object of the Workbook class.
- Load an Excel file using the Workbook.LoadFromFile() method.
- Get the source worksheet and the destination worksheet using the Workbook.Worksheets[index] property.
- Get the desired column that you want to copy using the Worksheet.Columns[index] property.
- Copy the column and its formatting from the source worksheet to the destination worksheet using the Worksheet.CopyColumn(CellRange sourceColumn, Worksheet destSheet, int destColIndex, CopyRangeOptions copyOptions) method.
- Copy the row heights of cells in the source column to the corresponding cells in the destination column.
- Save the workbook to a file using the Workbook.SaveToFile() method.
- C#
using Spire.Xls;

namespace CopyColumns
{
    internal class Program
    {
        static void Main(string[] args)
        {
            // Create a Workbook object
            Workbook workbook = new Workbook();
            // Load an Excel file
            workbook.LoadFromFile("ContactList.xlsx");

            // Get the source worksheet
            Worksheet sheet1 = workbook.Worksheets[0];

            // Get the destination worksheet
            Worksheet sheet2 = workbook.Worksheets[1];

            // Get the desired column that you want to copy
            CellRange column = sheet1.Columns[0];

            // Copy the column from the source worksheet to the first column of the destination worksheet
            sheet1.CopyColumn(column, sheet2, 1, CopyRangeOptions.All);

            int rows = column.Rows.Length;

            // Copy the row heights of cells in the source column to the corresponding cells in the destination column
            for (int i = 0; i < rows; i++)
            {
                double rowHeight = column.Rows[i].RowHeight;
                sheet2.Columns[0].Rows[i].RowHeight = rowHeight;
            }

            // Save the workbook to a file
            workbook.SaveToFile("CopyColumn.xlsx", ExcelVersion.Version2016);
            workbook.Dispose();
        }
    }
}

Copy Cells in Excel with Formatting in C#
In addition to copying rows and columns in Excel with formatting, Spire.XLS for .NET also allows copying cell ranges with formatting using the CellRange.Copy(CellRange destRange, CopyRangeOptions copyOptions) method. The detailed steps are as follows.
- Create an object of the Workbook class.
- Load an Excel file using the Workbook.LoadFromFile() method.
- Get the source worksheet and the destination worksheet using the Workbook.Worksheets[index] property.
- Get the source cell range and the destination cell range using the Worksheet.Range[] property.
- Copy the source cell range and its formatting from the source worksheet to the destination cell range in the destination worksheet using the CellRange.Copy(CellRange destRange, CopyRangeOptions copyOptions) method.
- Copy the row heights and column widths of the source cell range to the destination cell range.
- Save the workbook to a file using the Workbook.SaveToFile() method.
- C#
using Spire.Xls;

namespace CopyCells
{
    internal class Program
    {
        static void Main(string[] args)
        {
            // Create a Workbook object
            Workbook workbook = new Workbook();
            // Load an Excel file
            workbook.LoadFromFile("ContactList.xlsx");

            // Get the source worksheet
            Worksheet sheet1 = workbook.Worksheets[0];
            // Get the destination worksheet
            Worksheet sheet2 = workbook.Worksheets[1];

            // Get the source cell range
            CellRange range1 = sheet1.Range["A1:E7"];
            // Get the destination cell range
            CellRange range2 = sheet2.Range["A1:E7"];

            // Copy the source cell range from the source worksheet to the destination cell range in the destination worksheet
            range1.Copy(range2, CopyRangeOptions.All);

            // Copy the row heights and column widths of the source cell range to the destination cell range
            for (int i = 0; i < range1.Rows.Length; i++)
            {
                CellRange row = range1.Rows[i];
                for (int j = 0; j < row.Columns.Length; j++)
                {
                    CellRange column = row.Columns[j];
                    range2.Rows[i].Columns[j].ColumnWidth = column.ColumnWidth;
                    range2.Rows[i].RowHeight = row.RowHeight;
                }
            }

            // Save the workbook to a file
            workbook.SaveToFile("CopyCells.xlsx", ExcelVersion.Version2016);
            workbook.Dispose();
        }
    }
}
Apply for a Temporary License
If you'd like to remove the evaluation message from the generated documents, or to get rid of the function limitations, please request a 30-day trial license for yourself.
