
Knowledgebase (2370)
Children categories
Apply Fonts in a Word Document with JavaScript in React
2025-01-15 00:59:57 Written by AdministratorApplying fonts in a Word document significantly enhances its visual appeal and readability. The choice of font can influence how the content is perceived, allowing you to convey tone and mood effectively. By selecting appropriate fonts, you can emphasize key points, guide the reader's attention, and create a cohesive and polished presentation.
In this article, you will learn how to apply fonts in a Word document in React using Spire.Doc for JavaScript.
- Apply a Font Style to a Paragraph in Word
- Apply Multiple Font Styles to a Paragraph in Word
- Apply a Private Font in a Word Document
Install Spire.Doc for JavaScript
To get started with applying fonts in Word in a React application, you can either download Spire.Doc for JavaScript from our website or install it via npm with the following command:
npm i spire.officeThe downloaded product package integrates Spire.Doc for JavaScript, Spire.XLS for JavaScript, Spire.PDF for JavaScript, and Spire.Presentation for JavaScript. To use the features of Spire.Doc for JavaScript, you need to copy the corresponding files (spire.doc.js, Spire.Doc.Wasm.zip, spire.common.js, Spire.Common.Wasm.zip, and the _framework folder) to the public folder of your project. To ensure proper text rendering, you can add relevant font files with a custom path. In the following example, the font is added to the path: public\static\font.
For more details, refer to the documentation: How to Integrate Spire.Doc for JavaScript in a React Project
Apply a Font Style to a Paragraph in Word
Applying a font style to a paragraph in Microsoft Word is a fundamental skill that enhances the readability and overall appearance of your document.
Spire.Doc for JavaScript provides the ParagraphStyle class, enabling developers to define multiple text attributes, including font name, size, style, and color, all within a single object. After the style object is created, you can easily format a paragraph by using the Paragraph.ApplyStyle() method.
The following are the steps to apply a font style to a paragraph with JavaScript in React:
- Create a Document object using the new wasmModule.Document() method.
- Load the Word file using the Document.LoadFromFile() method.
- Add a paragraph to the document using the Document.LastSection.AddParagraph() method.
- Create a ParagraphStyle object, specifying the font name, font size, font style, and text color.
- Add the style to the document using the Document.Styles.Add() method.
- Apply the style to the paragraph using the Paragraph.ApplyStyle() method.
- Save the document to a different Word file.
- JavaScript
import React, { useState, useEffect } from 'react';

function App() {
  const [wasmModule, setWasmModule] = useState(null);
  // Load Spire.Doc
  useEffect(() => {
    (async () => {
      try {
        const publicUrl = process.env.PUBLIC_URL || '';
        const spireModule = await import(/* webpackIgnore: true */ `${publicUrl}/spire.doc.js`);
        const rawModule = spireModule.default || spireModule;
        window.wasmModule = typeof rawModule === 'function'
          ? await rawModule({ locateFile: p => p.endsWith('.wasm') ? `${publicUrl}/${p}` : p })
          : rawModule;
        setWasmModule(window.wasmModule);
      } catch (error) {
        console.error('Failed to load spire.doc.js WASM module:', error);
      }
    })();
  }, []);

  // Function to set font
  const SetFont = async () => {
    const wasmModule = window.wasmModule.spiredoc;

    if (wasmModule) {
      // Load the font files into the virtual file system (VFS)
      await window.spire.FetchFileToVFS('times.ttf', '/Library/Fonts/', `${process.env.PUBLIC_URL}/static/font/`);
      await window.spire.FetchFileToVFS('timesbd.ttf', '/Library/Fonts/', `${process.env.PUBLIC_URL}/static/font/`);
      await window.spire.FetchFileToVFS('timesbi.ttf', '/Library/Fonts/', `${process.env.PUBLIC_URL}/static/font/`);
      await window.spire.FetchFileToVFS('timesi.ttf', '/Library/Fonts/', `${process.env.PUBLIC_URL}/static/font/`);

      // Specify the input file name and the output file name
      const inputFileName = 'input.docx';
      const outputFileName = 'output.docx';

      // Fetch the input file and add it to the VFS
      await window.spire.FetchFileToVFS(inputFileName, '', `${process.env.PUBLIC_URL}/static/data/`);

      // Create an instance of the Document class
      const doc = new wasmModule.Document();

      // Load the Word file
      doc.LoadFromFile(inputFileName);

      // Add a section
      let section = doc.LastSection;

      // Add a paragraph
      let paragraph = section.AddParagraph();

      // Append text to the paragraph
      paragraph.AppendText('JavaScript is essential for modern web development, offering a rich ecosystem and ' +
        'a wide range of applications. Its ability to create responsive, interactive experiences ' +
        'makes it a favored choice among developers.');

      // Create a paragraph style,specifying font name, font size, and text color
      let paragraphStyle = new wasmModule.ParagraphStyle(doc);
      paragraphStyle.Name = 'newStyle';
      paragraphStyle.CharacterFormat.FontName = 'Times New Roman'
      paragraphStyle.CharacterFormat.FontSize = 13;
      paragraphStyle.CharacterFormat.TextColor = wasmModule.Color.get_Blue();

      // Add the style to the document
      doc.Styles.Add(paragraphStyle);

      // Apply the style to the paragraph
      paragraph.ApplyStyle(paragraphStyle.Name);


      // Save the document to the specified path
      doc.SaveToFile({ fileName: outputFileName, fileFormat: wasmModule.FileFormat.Docx2013 });

      // Read the generated Word file
      const modifiedFileArray = window.dotnetRuntime.Module.FS.readFile(outputFileName);

      // Create a Blob object from the Word file
      const modifiedFile = new Blob([modifiedFileArray], { type: 'application/vnd.openxmlformats-officedocument.wordprocessingml.document' });

      // Create a URL for the Blob
      const url = URL.createObjectURL(modifiedFile);

      // Create an anchor element to trigger the download
      const a = document.createElement('a');
      a.href = url;
      a.download = outputFileName;
      document.body.appendChild(a);
      a.click();
      document.body.removeChild(a);
      URL.revokeObjectURL(url);

      // Clean up resources
      doc.Dispose();
    }
  };

  return (
    <div style={{ textAlign: 'center', height: '300px' }}>
      <h1>Apply Fonts in a Word Document in React</h1>
      <button onClick={SetFont} disabled={!wasmModule}>
        Apply
      </button>
    </div>
  );
}

export default App;
Run the code to launch the React app at localhost:3000. Click "Apply", and a "Save As" window will appear, prompting you to save the output file in your chosen folder.
Below is a screenshot of the generated Word document:

Apply Multiple Font Styles to a Paragraph in Word
Applying multiple font styles to different parts of a paragraph allows you to highlight key points or sections, making your content more engaging for readers.
The Paragraph.AppendText() method returns a TextRange object, which offers simple APIs for formatting text within that range. When you call AppendText() multiple times, the paragraph's text is divided into distinct text ranges, allowing for individual styling with different fonts.
The following are the steps to apply multiple font styles to a paragraph using JavaScript in React:
- Load the font files you plan to use and the input Word file into the virtual file system (VFS).
- Create a Document object using the new wasmModule.Document() method.
- Load the Word file using the Document.LoadFromFile() method.
- Add a paragraph to the document using the Document.LastSection.AddParagraph() method.
- Append text to the paragraph using the Paragraph.AppendText() method, which returns a TextRange object.
- Append more text that needs to be styled differently to the paragraph and return different TextRange objects.
- Create a ParagraphStyle object with the basic font information and apply it to the paragraph.
- Change the font name, style, size and text color of the specified text range using the properties under the specific TextRange object.
- Save the document to a different Word file.
- JavaScript
import React, { useState, useEffect } from 'react';

function App() {
  const [wasmModule, setWasmModule] = useState(null);
  // Load Spire.Doc
  useEffect(() => {
    (async () => {
      try {
        const publicUrl = process.env.PUBLIC_URL || '';
        const spireModule = await import(/* webpackIgnore: true */ `${publicUrl}/spire.doc.js`);
        const rawModule = spireModule.default || spireModule;
        window.wasmModule = typeof rawModule === 'function'
          ? await rawModule({ locateFile: p => p.endsWith('.wasm') ? `${publicUrl}/${p}` : p })
          : rawModule;
        setWasmModule(window.wasmModule);
      } catch (error) {
        console.error('Failed to load spire.doc.js WASM module:', error);
      }
    })();
  }, []);

  // Function to set font
  const SetFont = async () => {
    const wasmModule = window.wasmModule.spiredoc;

    if (wasmModule) {
      // Load the font files into the virtual file system (VFS)
      await window.spire.FetchFileToVFS('times.ttf', '/Library/Fonts/', `${process.env.PUBLIC_URL}/static/font/`);
      await window.spire.FetchFileToVFS('timesbd.ttf', '/Library/Fonts/', `${process.env.PUBLIC_URL}/static/font/`);
      await window.spire.FetchFileToVFS('timesbi.ttf', '/Library/Fonts/', `${process.env.PUBLIC_URL}/static/font/`);
      await window.spire.FetchFileToVFS('timesi.ttf', '/Library/Fonts/', `${process.env.PUBLIC_URL}/static/font/`);

      // Specify the input file name and the output file name
      const inputFileName = 'input.docx';
      const outputFileName = 'output.docx';

      // Fetch the input file and add it to the VFS
      await window.spire.FetchFileToVFS(inputFileName, '', `${process.env.PUBLIC_URL}/static/data/`);

      // Create an instance of the Document class
      const doc = new wasmModule.Document();

      // Load the Word file
      doc.LoadFromFile(inputFileName);

      // Add a section
      let section = doc.LastSection;

      // Add a paragraph
      let paragraph = section.AddParagraph();

      // Append text to the paragraph
      let range_one = paragraph.AppendText('JavaScript is essential for ');
      let range_two = paragraph.AppendText('modern web development');
      let range_three = paragraph.AppendText(', offering a rich ecosystem and a wide range of applications. Its ability to create ');
      let range_four = paragraph.AppendText('responsive, interactive experiences')
      let range_five = paragraph.AppendText(' makes it a favored choice among developers.')

      // Create a paragraph style
      let paragraphStyle = new wasmModule.ParagraphStyle(doc);
      paragraphStyle.Name = 'newStyle';
      paragraphStyle.CharacterFormat.FontName = 'Times New Roman'
      paragraphStyle.CharacterFormat.FontSize = 13;
      paragraphStyle.CharacterFormat.TextColor = wasmModule.Color.get_Black();

      // Add the style to the document
      doc.Styles.Add(paragraphStyle);

      // Apply the style to the paragraph
      paragraph.ApplyStyle(paragraphStyle.Name);

      // Change the font style of the second text range
      range_two.CharacterFormat.TextColor = wasmModule.Color.get_Blue();
      range_two.CharacterFormat.Bold = true;
      range_two.CharacterFormat.UnderlineStyle = wasmModule.UnderlineStyle.Single;

      // Change the font style of the fourth text range
      range_four.CharacterFormat.TextColor = wasmModule.Color.get_Blue();
      range_four.CharacterFormat.Italic = true;

      // Save the document to the specified path
      doc.SaveToFile({ fileName: outputFileName, fileFormat: wasmModule.FileFormat.Docx2013 });

      // Read the generated Word file
      const modifiedFileArray = window.dotnetRuntime.Module.FS.readFile(outputFileName);

      // Create a Blob object from the Word file
      const modifiedFile = new Blob([modifiedFileArray], { type: 'application/vnd.openxmlformats-officedocument.wordprocessingml.document' });

      // Create a URL for the Blob
      const url = URL.createObjectURL(modifiedFile);

      // Create an anchor element to trigger the download
      const a = document.createElement('a');
      a.href = url;
      a.download = outputFileName;
      document.body.appendChild(a);
      a.click();
      document.body.removeChild(a);
      URL.revokeObjectURL(url);

      // Clean up resources
      doc.Dispose();
    }
  };

  return (
    <div style={{ textAlign: 'center', height: '300px' }}>
      <h1>Set Fonts in a Word Document in React</h1>
      <button onClick={SetFont} disabled={!wasmModule}>
        Apply Multiple Fonts
      </button>
    </div>
  );
}

export default App;
Apply a Private Font in a Word Document
Using a private font in a Word document can give your project a unique flair and reflect your personal or brand identity.
To apply a private font, use the TextRange.CharacterFormat.FontName property. To maintain a uniform look on various devices, it's advisable to embed the font within the document. You can do this by first loading the font file into the virtual file system using window.spire.FetchFileToVFS.
Then, employ the Document.AddPrivateFont() method to include the font in the document. Additionally, activate font embedding by setting Document.EmbedFontsInFile to true, which ensures the private font is retained in the final document.
The following are the steps to apply a private font in Word using JavaScript:
- Load the font files you plan to use and the input Word file into the virtual file system (VFS).
- Create a Document object using the new wasmModule.Document() method.
- Load the Word file using the Document.LoadFromFile() method.
- Add a paragraph to the document using the Document.LastSection.AddParagraph() method.
- Append text to the paragraph using the Paragraph.AppendText() method, which returns a TextRange object.
- Apply the font to the paragraph using the TextRange.CharacterFormat.FontName property.
- Add the font to document using the Document.AddPrivateFont() method.
- Embed the font in the document by setting Document.EmbedFontsInFile to true.
- Save the document to a different Word file.
- JavaScript
import React, { useState, useEffect } from 'react';

function App() {
  const [wasmModule, setWasmModule] = useState(null);
  // Load Spire.Doc
  useEffect(() => {
    (async () => {
      try {
        const publicUrl = process.env.PUBLIC_URL || '';
        const spireModule = await import(/* webpackIgnore: true */ `${publicUrl}/spire.doc.js`);
        const rawModule = spireModule.default || spireModule;
        window.wasmModule = typeof rawModule === 'function'
          ? await rawModule({ locateFile: p => p.endsWith('.wasm') ? `${publicUrl}/${p}` : p })
          : rawModule;
        setWasmModule(window.wasmModule);
      } catch (error) {
        console.error('Failed to load spire.doc.js WASM module:', error);
      }
    })();
  }, []);

  // Function to set font
  const SetFont = async () => {
    const wasmModule = window.wasmModule.spiredoc;

    if (wasmModule) {
      // Load the font files into the virtual file system (VFS)
      await window.spire.FetchFileToVFS('FreebrushScriptPLng.ttf', '/Library/Fonts/', `${process.env.PUBLIC_URL}/static/font/`);

      // Specify the input file name and the output file name
      const inputFileName = 'input.docx';
      const outputFileName = 'output.docx';

      // Fetch the input file and add it to the VFS
      await window.spire.FetchFileToVFS(inputFileName, '', `${process.env.PUBLIC_URL}/static/data/`);

      // Create an instance of the Document class
      const doc = new wasmModule.Document();

      // Load the Word file
      doc.LoadFromFile(inputFileName);

      // Add a section
      let section = doc.LastSection;

      // Add a paragraph
      let paragraph = section.AddParagraph();

      // Append text to the paragraph
      let textRange = paragraph.AppendText('JavaScript is essential for modern web development, offering a rich ecosystem and '+
                          'a wide range of applications. Its ability to create responsive, interactive experiences '+
                          'makes it a favored choice among developers.');

      // Apply the private font to the text range
      textRange.CharacterFormat.FontName = 'Freebrush Script'
      textRange.CharacterFormat.FontSize = 13;
      textRange.CharacterFormat.TextColor = wasmModule.Color.get_Blue();

      // Embed the private font in the document
      doc.AddPrivateFont(new wasmModule.PrivateFontPath("Freebrush Script",  "FreebrushScriptPLng.ttf"))

      // Allow embedding font in document
      doc.EmbedFontsInFile = true;

      // Save the document to the specified path
      doc.SaveToFile({fileName: outputFileName, fileFormat: wasmModule.FileFormat.Docx2013});

      // Read the generated Word file
      const modifiedFileArray =window.dotnetRuntime.Module.FS.readFile(outputFileName);

      // Create a Blob object from the Word file
      const modifiedFile = new Blob([modifiedFileArray], { type: 'application/vnd.openxmlformats-officedocument.wordprocessingml.document' });

      // Create a URL for the Blob
      const url = URL.createObjectURL(modifiedFile);

      // Create an anchor element to trigger the download
      const a = document.createElement('a');
      a.href = url;
      a.download = outputFileName;
      document.body.appendChild(a);
      a.click();
      document.body.removeChild(a);
      URL.revokeObjectURL(url);

      // Clean up resources
      doc.Dispose();
    }
  };

  return (
    <div style={{ textAlign: 'center', height: '300px' }}>
      <h1>Apply Fonts in a Word Document in React</h1>
      <button onClick={SetFont} disabled={!wasmModule}>
        Apply
      </button>
    </div>
  );
}

export default App;
Get a Free License
To fully experience the capabilities of Spire.Doc for JavaScript without any evaluation limitations, you can request a free 30-day trial license.
Editing an Excel document involves a variety of actions, such as inputting and formatting text, applying formulas, generating visualizations, and organizing data for clarity and insight. Being able to edit Excel documents programmatically is a crucial skill that empowers developers to enhance their data management capabilities.
In this article, you will learn how to edit an existing Excel document in Python using Spire.XLS for Python.
- Read and Write Excel Files in Python
- Apply Formatting to Excel Cells in Python
- Find and Replace Text in Excel in Python
- Add Formulas and Charts to Excel in Python
Install Spire.XLS for Python
This scenario requires Spire.XLS for Python and plum-dispatch v1.7.4. They can be easily installed in your Windows through the following pip command.
pip install Spire.XLS
If you are unsure how to install, please refer to this tutorial: How to Install Spire.XLS for Python on Windows
Read and Write Excel Files in Python
A key task when handling Excel files in Python is the efficient reading and writing of data, which is essential for numerous applications such as data analysis and report generation. Spire.XLS for Python simplifies this process by offering the CellRange.Value property. This feature allows developers to easily retrieve values from individual cells and reassign them as needed.
Here are the steps to read and write an Excel file using Python:
- Create a Workbook object.
- Load an Excel file from a given file path.
- Get a specific worksheet using the Workbook.Worksheets[index] property.
- Get a specific cell using the Worksheet.Range property
- Get or set the cell value using the CellRange.Value property.
- Save the workbook to a different Excel file.
- Python
from spire.xls import *
from spire.xls.common import *
# Create a Workbook object
workbook = Workbook()
# Load an Excel file
workbook.LoadFromFile("C:\\Users\\Administrator\\Desktop\\Input.xlsx")
# Get a specific worksheet
worksheet = workbook.Worksheets[0]
# Get a specific cell
cell = worksheet.Range["A1"]
# Read the cell value
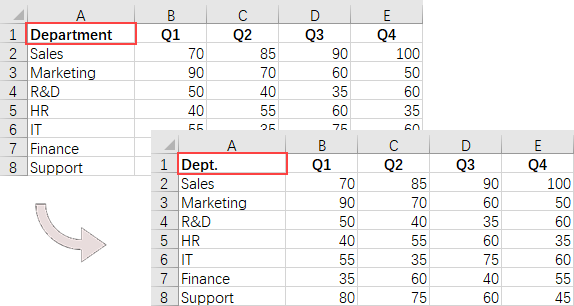
cellValue = cell.Value
# Determine if the cell value is "Department"
if (cellValue == "Department"):
# Update the cell value
cell.Value = "Dept."
# Save the workbook to a different
workbook.SaveToFile("ModifyExcel.xlsx", ExcelVersion.Version2016)
# Dispose resources
workbook.Dispose()
Apply Formatting to Excel Cells in Python
Formatting Excel documents is essential for producing professional-looking reports that effectively communicate information. Spire.XLS for Python offers a comprehensive suite of APIs within the CellRange class, empowering developers to manage various formatting options seamlessly. This includes adjusting font styles, selecting cell colors, aligning text, and modifying row heights and column widths.
Here are the steps to apply styles and formats to Excel cells using Python:
- Create a Workbook object.
- Load an Excel file from a given file path.
- Get a specific worksheet using the Workbook.Worksheets[index] property.
- Get all located range using the Worksheet.AllocatedRange property.
- Get a specific row using the CellRange.Rows[index] property, and set the cell color, text color, text alignment, and row height using the properties under the CellRange object.
- Get a specific column using the CellRange.Columns[index] property, and set the column width using the ColumnWidth property under the CellRange object.
- Save the workbook to a different Excel file.
- Python
from spire.xls import *
from spire.xls.common import *

# Create a Workbook object
workbook = Workbook()

# Load an Excel file
workbook.LoadFromFile("C:\\Users\\Administrator\\Desktop\\Input.xlsx")

# Get a specific worksheet
worksheet = workbook.Worksheets[0]

# Get all located range from the worksheet
allocatedRange = worksheet.AllocatedRange

#Iterate through the rows
for rowNum in range(0, allocatedRange.RowCount):
    if rowNum == 0:

        # Apply cell color to the header row
        allocatedRange.Rows[rowNum].Style.Color = Color.get_Black()

        # Change the font color of the header row
        allocatedRange.Rows[rowNum].Style.Font.Color = Color.get_White()
    else:
        # Apply alternate colors to other rows
        if rowNum % 2 == 1:
            allocatedRange.Rows[rowNum].Style.Color = Color.get_LightGray()
        else:
            allocatedRange.Rows[rowNum].Style.Color = Color.get_White()

    # Align text to center
    allocatedRange.Rows[rowNum].HorizontalAlignment = HorizontalAlignType.Center
    allocatedRange.Rows[rowNum].VerticalAlignment = VerticalAlignType.Center

    # Set the row height
    allocatedRange.Rows[rowNum].RowHeight = 20

# Iterate through the columns
for columnNum in range(0, allocatedRange.ColumnCount):
    if (columnNum > 0):

        # Set the column width
        allocatedRange.Columns[columnNum].ColumnWidth = 10

# Save the workbook to a different
workbook.SaveToFile("FormatExcel.xlsx", ExcelVersion.Version2016)

# Dispose resources
workbook.Dispose()

Find and Replace Text in Excel in Python
The find and replace functionality in Excel enables users to swiftly locate specific text within their spreadsheets and substitute it with new content, which is particularly useful for data corrections and updates. With Spire.XLS for Python, you can efficiently locate a cell containing a specific string using the Worksheet.FindString() method. Once identified, you can easily replace its value using the CellRange.Value property.
Here are the steps to find and replace text in Excel using Python:
- Create a Workbook object.
- Load an Excel file from a given file path.
- Get a specific worksheet using the Workbook.Worksheets[index] property.
- Find the cell that contains a specified string using the Worksheet.FindString() method.
- Update the cell value using the CellRange.Value property.
- Save the workbook to a different Excel file.
- Python
from spire.xls import *
from spire.xls.common import *
# Create a Workbook object
workbook = Workbook()
# Load an Excel file
workbook.LoadFromFile("C:\\Users\\Administrator\\Desktop\\Input.xlsx")
# Get a specific worksheet
worksheet = workbook.Worksheets[0]
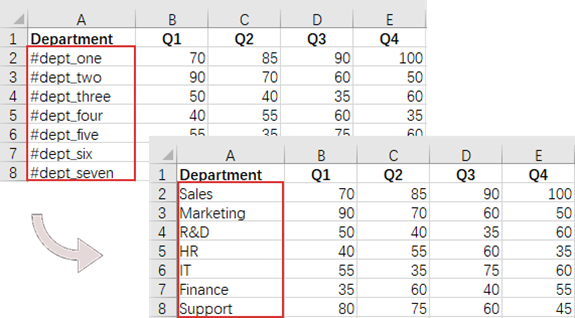
# Define a list of department names for replacement
departments = ["Sales", "Marketing", "R&D", "HR", "IT", "Finance", "Support"]
# Define a list of placeholders that will be replaced in the Excel sheet
placeholders = ["#dept_one", "#dept_two", "#dept_three", "#dept_four", "#dept_five", "#dept_six", "#dept_seven"]
# Iterate through the placeholder strings
for i in range (0, len(placeholders)):
# Find the cell containing the current placeholder string
cell = worksheet.FindString(placeholders[i], False, False)
# Replace the value in the found cell with the corresponding department name
cell.Value = departments[i]
# Save the workbook to a different
workbook.SaveToFile("ReplaceText.xlsx", ExcelVersion.Version2016)
# Dispose resources
workbook.Dispose()
Add Formulas and Charts to Excel in Python
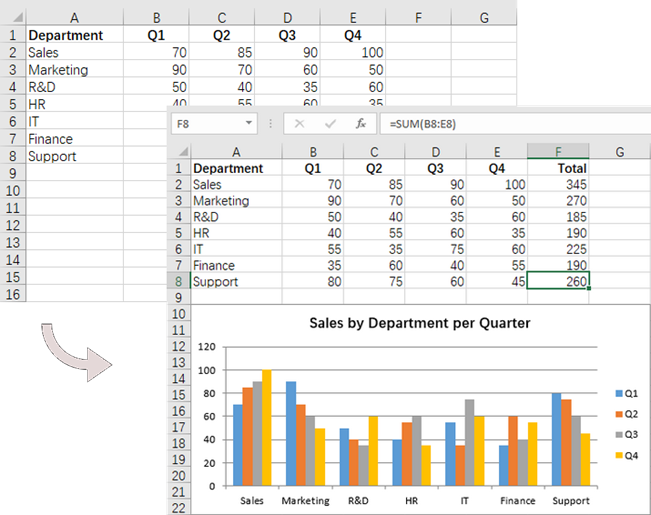
In addition to basic file operations, Spire.XLS for Python provides a variety of advanced techniques for working with Excel files. For example, you can insert formulas into cells using the CellRange.Formula property, which allows for real-time calculations and data analysis directly within your spreadsheet. Furthermore, it allows you to create visually appealing data presentations by adding charts to your worksheets using the Worksheet.Charts.Add() method.
Here are the steps to add formulas and charts to Excel using Python:
- Create a Workbook object.
- Load an Excel file from a given file path.
- Get a specific worksheet using the Workbook.Worksheets[index] property.
- Get a specific cell using the Worksheet.Range property.
- Add a formula to the cell using the CellRange.Formula property.
- Add a column chart to the worksheet using the Worksheet.Charts.Add() method.
- Set the chart data range, position, title and other attributes using the properties under the Chart object.
- Save the workbook to a different Excel file.
- Python
from spire.xls import *
from spire.xls.common import *

# Create a Workbook object
workbook = Workbook()

# Load an Excel file
workbook.LoadFromFile("C:\\Users\\Administrator\\Desktop\\Input.xlsx")

# Get a specific worksheet
worksheet = workbook.Worksheets[0]

# Get all located range
allocatedRange = worksheet.AllocatedRange

#Iterate through the rows
for rowNum in range(0, allocatedRange.RowCount):
    if (rowNum == 0):

        # Write text to cell G1
        worksheet.Range[rowNum + 1, 6].Text = "Total"

        # Apply style to the cell
        worksheet.Range[rowNum + 1, 6].Style.Font.IsBold = True
        worksheet.Range[rowNum + 1, 6].Style.HorizontalAlignment = HorizontalAlignType.Right
    else:

        # Add formulas to the cells from G2 to G8
        worksheet.Range[rowNum + 1, 6].Formula = f"=SUM(B{rowNum + 1}:E{rowNum + 1})"

# Add a clustered column chart
chart = worksheet.Charts.Add(ExcelChartType.ColumnClustered)

# Set data range for the chart
chart.DataRange = worksheet.Range["A1:E8"]
chart.SeriesDataFromRange = False

# Set position of the chart
chart.LeftColumn = 1
chart.TopRow = 10
chart.RightColumn = 8
chart.BottomRow = 23

# Set and format chart title
chart.ChartTitle = "Sales by Department per Quarter"
chart.ChartTitleArea.Size = 13
chart.ChartTitleArea.IsBold = True

# Save the workbook to a different
workbook.SaveToFile("AddFormulaAndChart.xlsx", ExcelVersion.Version2016)

# Dispose resources
workbook.Dispose()
Apply for a Temporary License
If you'd like to remove the evaluation message from the generated documents, or to get rid of the function limitations, please request a 30-day trial license for yourself.
Delete Rows and Columns from Excel with JavaScript in React
2025-01-10 02:46:07 Written by AdministratorWhen working with Excel, you might occasionally find your worksheets cluttered with unnecessary rows and columns. These might be leftover data from previous versions, temporary calculations, or placeholders that no longer serve a purpose. Removing these unnecessary or unwanted rows and columns can keep your data organized and your sheets neat. In this article, you will learn how to delete rows and columns from an Excel Worksheet in React using Spire.XLS for JavaScript.
- Delete a Specific Row and Column from Excel
- Delete Multiple Rows and Columns from Excel
- Delete Blank Rows and Columns from Excel
Install Spire.XLS for JavaScript
To get started with deleting Excel rows and columns in a React application, you can either download Spire.XLS for JavaScript from our website or install it via npm with the following command:
npm i spire.office
The downloaded product package has been integrated Spire.Doc for JavaScript,Spire.XLS for JavaScript,Spire.PDF for JavaScript,Spire.Presentation for JavaScript. To use the functionality of Spire.XLS for JavaScript, you need to copy the corresponding files (spire.xls.js, Spire.Xls.Wasm.zip, spire.common.js, Spire.Common.Wasm.zip, and _framework) to the project's "public" folder. At the same time, in order to ensure text rendering, the related font files can be added with custom paths. In the following example, the font addition path is: public\static\font.
For more details, refer to the documentation: How to Integrate Spire.XLS for JavaScript in a React Project
Delete a Specific Row and Column from Excel
Spire.XLS for JavaScript provides the Worksheet.DeleteRow() and Worksheet.DeleteColumn() methods to delete a specific row and column by index. The following are the main steps.
- Create a Workbook object using the new wasmModule.Workbook() method.
- Load an Excel file using the Workbook.LoadFromFile() method.
- Get a specific worksheet using the Workbook.Worksheets.get() method.
- Delete a specified row by its index (1-based) using the Worksheet.DeleteRow() method.
- Delete a specified column by its index (1-based) using the Worksheet.DeleteColumn() method.
- Save the result file using the Workbook.SaveToFile() method.
- JavaScript
import React, { useState, useEffect } from 'react';
function App() {
const [wasmModule, setWasmModule] = useState(null);
// Load Spire.XLS
useEffect(() => {
(async () => {
try {
const publicUrl = process.env.PUBLIC_URL || '';
const spireModule = await import(/* webpackIgnore: true */ `${publicUrl}/spire.xls.js`);
const rawModule = spireModule.default || spireModule;
window.wasmModule = typeof rawModule === 'function'
? await rawModule({ locateFile: p => p.endsWith('.wasm') ? `${publicUrl}/${p}` : p })
: rawModule;
setWasmModule(window.wasmModule);
} catch (error) {
console.error('Failed to load spire.xls.js WASM module:', error);
}
})();
}, []);
// Function to delete a specified row and column
const DeleteRowColumn = async () => {
const wasmModule = window.wasmModule.spirexls;
if (wasmModule) {
// Load font into Virtual File System (VFS)
await window.spire.FetchFileToVFS('Arial.ttf', '/Library/Fonts/', `${process.env.PUBLIC_URL}/static/font/`);
// Load the Excel files into the virtual file system (VFS)
let inputFileName = 'sample.xlsx';
await window.spire.FetchFileToVFS(inputFileName, '', `${process.env.PUBLIC_URL}/static/data/`);
// Create a new workbook
let workbook = new wasmModule.Workbook();
// Load an Excel document
workbook.LoadFromFile({ fileName: inputFileName });
// Get the first worksheet
let sheet = workbook.Worksheets.get(0);
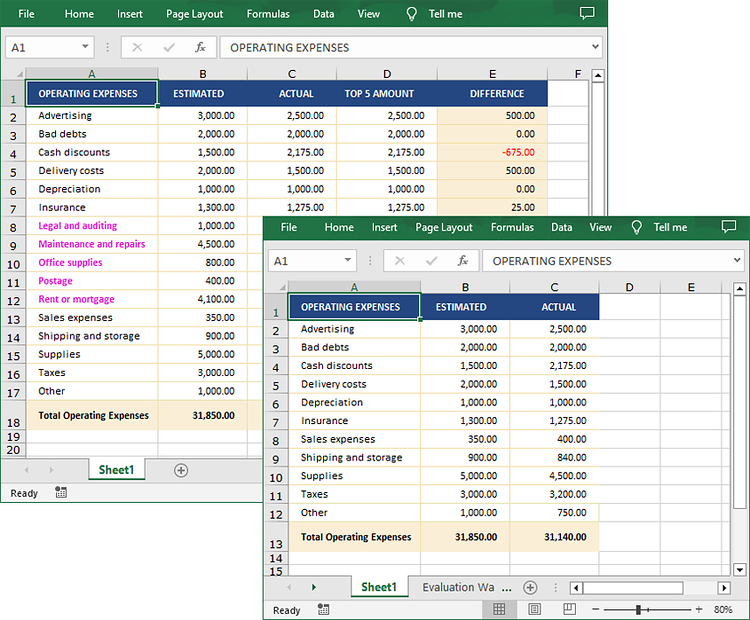
//Delete the 18th row
sheet.DeleteRow({ index: 18 });
//Delete the 5th
sheet.DeleteColumn({ index: 5 });
//Save result file
const outputFileName = 'DeleteRowAndColumn.xlsx';
workbook.SaveToFile({ fileName: outputFileName, version: wasmModule.ExcelVersion.Version2016 });
// Read the saved file and convert to Blob object
const modifiedFileArray = window.dotnetRuntime.Module.FS.readFile(outputFileName);
const modifiedFile = new Blob([modifiedFileArray], { type: 'application/vnd.openxmlformats-officedocument.spreadsheetml.sheet' });
// Create a URL for the Blob and initiate download
const url = URL.createObjectURL(modifiedFile);
const a = document.createElement('a');
a.href = url;
a.download = outputFileName;
document.body.appendChild(a);
a.click();
document.body.removeChild(a);
URL.revokeObjectURL(url);
// Clean up resources used by the workbook
workbook.Dispose();
}
};
return (
<div style={{ textAlign: 'center', height: '300px' }}>
<h1>Delete a Specified Row and Column Using JavaScript in React
<button onClick={DeleteRowColumn} disabled={!wasmModule}>
Delete
</button>
</div>
);
}
export default App;
Run the code to launch the React app at localhost:3000. Once it's running, click the "Delete" button to delete the specific row and column:
Below is the input Excel file and the result file:

Delete Multiple Rows and Columns from Excel
Spire.XLS for JavaScript also allows you to delete multiple adjacent rows and columns from an Excel worksheet at once through the Worksheet.DeleteRow(index, count) and Worksheet.DeleteColumn(index, count) methods. The following are the main steps.
- Create a Workbook object using the new wasmModule.Workbook() method.
- Load an Excel file using the Workbook.LoadFromFile() method.
- Get a specific worksheet using the Workbook.Worksheets.get() method.
- Delete multiple rows from the worksheet using the Worksheet.DeleteRow(index, count) method.
- Delete multiple columns from the worksheet using the Worksheet.DeleteColumn(index, count) method.
- Save the result file using the Workbook.SaveToFile() method.
- JavaScript
import React, { useState, useEffect } from 'react';
function App() {
  const [wasmModule, setWasmModule] = useState(null);
  // Load Spire.XLS
  useEffect(() => {
    (async () => {
      try {
        const publicUrl = process.env.PUBLIC_URL || '';
        const spireModule = await import(/* webpackIgnore: true */ `${publicUrl}/spire.xls.js`);
        const rawModule = spireModule.default || spireModule;
        window.wasmModule = typeof rawModule === 'function'
          ? await rawModule({ locateFile: p => p.endsWith('.wasm') ? `${publicUrl}/${p}` : p })
          : rawModule;
        setWasmModule(window.wasmModule);
      } catch (error) {
        console.error('Failed to load spire.xls.js WASM module:', error);
      }
    })();
  }, []);

  // Function to delete multiple rows and columns
  const DeleteMultiRowsColumns = async () => {
    const wasmModule = window.wasmModule.spirexls;

    if (wasmModule) {
      // Load font into Virtual File System (VFS)
      await window.spire.FetchFileToVFS('Arial.ttf', '/Library/Fonts/', `${process.env.PUBLIC_URL}/static/font/`);


      // Load the Excel files into the virtual file system (VFS)
      let inputFileName = 'sample.xlsx';
      await window.spire.FetchFileToVFS(inputFileName, '', `${process.env.PUBLIC_URL}/static/data/`);


      // Create a new workbook
      let workbook = new wasmModule.Workbook();

      // Load an Excel document
      workbook.LoadFromFile({ fileName: inputFileName });

      // Get the first worksheet
      let sheet = workbook.Worksheets.get(0);

      //Delete 5 rows from the 8th row
      sheet.DeleteRow({ index: 8, count: 5 });

      //Delete 2 columns from the 4th column
      sheet.DeleteColumn({ index: 4, count: 2 });

      //Save result file
      const outputFileName = 'DeleteMultiRowsAndColumns.xlsx';
      workbook.SaveToFile({ fileName: outputFileName, version: wasmModule.ExcelVersion.Version2016 });

      // Read the saved file and convert to Blob object
      const modifiedFileArray = window.dotnetRuntime.Module.FS.readFile(outputFileName);
      const modifiedFile = new Blob([modifiedFileArray], { type: 'application/vnd.openxmlformats-officedocument.spreadsheetml.sheet' });

      // Create a URL for the Blob and initiate download
      const url = URL.createObjectURL(modifiedFile);
      const a = document.createElement('a');
      a.href = url;
      a.download = outputFileName;
      document.body.appendChild(a);
      a.click();
      document.body.removeChild(a);
      URL.revokeObjectURL(url);

      // Clean up resources used by the workbook
      workbook.Dispose();
    }
  };

  return (
    <div style={{ textAlign: 'center', height: '300px' }}>
      <h1>Delete Multiple Rows and Columns Using JavaScript in React
      <button onClick={DeleteMultiRowsColumns} disabled={!wasmModule}>
        Delete
      </button>
    </div>
  );
}

export default App;
Delete Blank Rows and Columns from Excel
To remove the blank rows and column, you need to iterate over each row and column to detect whether they are blank or not. If yes, then remove them from the worksheet. The following are the main steps.
- Create a Workbook object using the new wasmModule.Workbook() method.
- Load an Excel file using the Workbook.LoadFromFile() method.
- Get a specific worksheet using the Workbook.Worksheets.get() method.
- Iterate through the used rows in the worksheet.
- Find the blank rows using the Worksheet.Rows.get().IsBlank property, and then delete them using the Worksheet.DeleteRow() method.
- Iterate through the used columns in the worksheet.
- Find the blank columns using the Worksheet.Columns.get().IsBlank property, and then delete them using the Worksheet.DeleteColumn() method.
- Save the result file using the Workbook.SaveToFile() method.
- JavaScript
import React, { useState, useEffect } from 'react';
function App() {
const [wasmModule, setWasmModule] = useState(null);
// Load Spire.XLS
useEffect(() => {
(async () => {
try {
const publicUrl = process.env.PUBLIC_URL || '';
const spireModule = await import(/* webpackIgnore: true */ `${publicUrl}/spire.xls.js`);
const rawModule = spireModule.default || spireModule;
window.wasmModule = typeof rawModule === 'function'
? await rawModule({ locateFile: p => p.endsWith('.wasm') ? `${publicUrl}/${p}` : p })
: rawModule;
setWasmModule(window.wasmModule);
} catch (error) {
console.error('Failed to load spire.xls.js WASM module:', error);
}
})();
}, []);
// Function to delete blank rows and columns
const DeleteBlankRowsColumns = async () => {
const wasmModule = window.wasmModule.spirexls;
if (wasmModule) {
// Load font into Virtual File System (VFS)
await window.spire.FetchFileToVFS('Arial.ttf', '/Library/Fonts/', `${process.env.PUBLIC_URL}/static/font/`);
// Load the Excel files into the virtual file system (VFS)
let inputFileName = 'sample.xlsx';
await window.spire.FetchFileToVFS(inputFileName, '', `${process.env.PUBLIC_URL}/static/data/`);
// Create a new workbook
let workbook = new wasmModule.Workbook();
// Load an Excel document
workbook.LoadFromFile({ fileName: inputFileName });
// Get the first worksheet
let sheet = workbook.Worksheets.get(0);
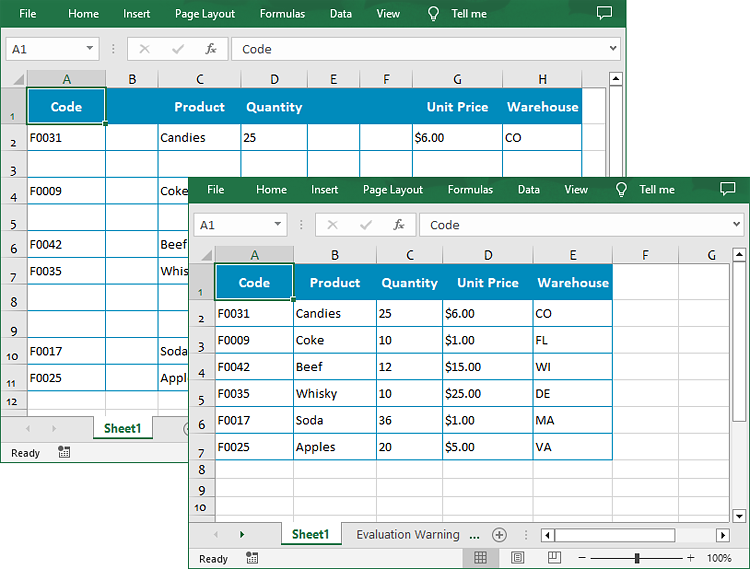
//Delete blank rows from the worksheet.
for (let i = sheet.Rows.Count - 1; i >= 0; i--) {
if (sheet.Rows.get(i).IsBlank) {
sheet.DeleteRow(i + 1);
}
}
//Delete blank columns from the worksheet.
for (let j = sheet.Columns.Count - 1; j >= 0; j--) {
if (sheet.Columns.get(j).IsBlank) {
sheet.DeleteColumn(j + 1);
}
}
//Save result file
const outputFileName = 'DeleteBlankRowsAndColumns.xlsx';
workbook.SaveToFile({ fileName: outputFileName, version: wasmModule.ExcelVersion.Version2016 });
// Read the saved file and convert to Blob object
const modifiedFileArray = window.dotnetRuntime.Module.FS.readFile(outputFileName);
const modifiedFile = new Blob([modifiedFileArray], { type: 'application/vnd.openxmlformats-officedocument.spreadsheetml.sheet' });
// Create a URL for the Blob and initiate download
const url = URL.createObjectURL(modifiedFile);
const a = document.createElement('a');
a.href = url;
a.download = outputFileName;
document.body.appendChild(a);
a.click();
document.body.removeChild(a);
URL.revokeObjectURL(url);
// Clean up resources used by the workbook
workbook.Dispose();
}
};
return (
<div style={{ textAlign: 'center', height: '300px' }}>
<h1>Delete Blank Rows and Columns Using JavaScript in React
<button onClick={DeleteBlankRowsColumns} disabled={!wasmModule}>
Delete
</button>
</div>
);
}
export default App;
Get a Free License
To fully experience the capabilities of Spire.XLS for JavaScript without any evaluation limitations, you can request a free 30-day trial license.
