Find Text in PDF by Regular Expression in Java
This article demonstrates how to find the text that matches a specific regular expression in a PDF document using Spire.PDF for Java.
import com.spire.pdf.*;
import com.spire.pdf.texts.*;
import java.awt.*;
import java.util.*;
import java.util.List;
public class FindText {
public static void main(String[] args) {
//Load a PDF document
PdfDocument pdf = new PdfDocument();
pdf.loadFromFile("C:\\Users\\Administrator\\Desktop\\test.pdf");
//Create a object of PdfTextFind collection
PdfTextFindOptions findOptions = new PdfTextFindOptions();
//Loop through the pages
for (Object page : (Iterable) pdf.getPages()) {
PdfPageBase pageBase = (PdfPageBase) page;
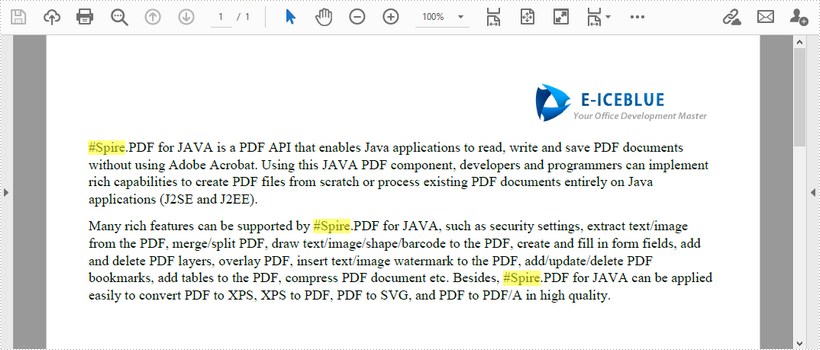
//Define a regular expression
String pattern = "\\#\\w+\\b";
// Set search parameter to use regular expression
findOptions.setTextFindParameter(EnumSet.of(TextFindParameter.Regex));
// Create a text finder object for the page
PdfTextFinder textFinder = new PdfTextFinder(pageBase);
// Find text fragments that match the pattern
List<PdfTextFragment> finds = textFinder.find(pattern, findOptions);
//Highlight the search results with yellow
for (PdfTextFragment find : finds) {
find.highLight(Color.yellow);
}
}
//Save to file
pdf.saveToFile("FindByPattern.pdf");
}
}
Convert Word to PDF Using Java – Complete Guide with Sample Code
To better understand the process, watch this short video demonstrating how to convert Word documents to PDF in Java before following the step-by-step guide below.
Converting Word documents (doc or .docx) to PDF is a common requirement in many Java-based applications, especially those involving documentation, report generation, or digital archiving. In this tutorial, we'll show you how to convert Word to PDF in Java using reliable and easy-to-implement libraries like Spire.Doc for Java. This guide will walk you through all the code examples from code library integration to converting Word files to PDF format seamlessly.
After reading this guide, you will learn:
- Specific Steps of How to Convert Doc/Docx Files to PDF Format with Spire.Doc for Java
- Advanced Settings When Converting Word Files to PDF
- How to Adjust Word Files When Converting Word to PDF with Java Code
Let's dive into the Java code for Word to PDF conversion and help your application automate document processing with just a few lines of code.
Specific Steps of How to Convert Doc/Docx Files to PDF Format with Spire.Doc for Java
Before going through the sample code, you should know one of the best Word Java library known as Spire.Doc for Java. It supports not only Word file format conversion, but more advanced settings including page size adjustment, font embed, specific area conversion, etc. It is a one time download for long-term benefits.
Follow the steps below to learn how you can convert Word files to PDF format with Spire.Doc for Java.
Step 1. Install Spire.Doc for Java
Before converting, you should add the Spire.Doc.jar file as a dependency in your Java program. You can download the JAR file from the official download page.
If you are using Maven, you can easily import the JAR file in your application by adding the following code to your project's pom.xml file directly:
<repositories>
    <repository>
        <id>com.e-iceblue</id>
        <name>e-iceblue</name>
        <url>https://repo.e-iceblue.com/nexus/content/groups/public/</url>
    </repository>
</repositories>
<dependencies>
    <dependency>
        <groupId>e-iceblue</groupId>
        <artifactId>spire.doc</artifactId>
        <version>14.7.0</version>
    </dependency>
</dependencies>
Step 2. Convert Word to PDF with Java Code
After library integration, now, it's time to convert your Word files. Copy the code below to your Java program:
import com.spire.doc.Document;
import com.spire.doc.FileFormat;

public class ConvertWordToPdf {

    public static void main(String[] args) {

        // Create a Document object
        Document doc = new Document();

        // Load a Word document
        doc.loadFromFile("C:\\Users\\Administrator\\Desktop\\Input.docx");

        // Save the document to PDF
        doc.saveToFile("ToPDF.pdf", FileFormat.PDF);

        // Dispose resources
        doc.dispose();
    }
}
RESULT:

Advanced Settings When Converting Word Files to PDF
Except for simply converting Word to PDF files, Spire.Doc for Java provides more options beyond simply conversion. For example, you can set a password to protect your PDF data with simple code during the conversion. You have no need to look for other tutorials. The following list is a preview of these settings, and you can directly jump to the corresponding part.
- Convert Word files to PDF/A Format with Java Code
- Convert Word Files to Password-Protected PDF in Java
- Convert a Specific Area in Word to PDF in Java
Convert Word files to PDF/A Format with Java Code
Spire.Doc for Java allows you to set the conformance level as Pdf/A-1a. To apply these customized settings, pass the ToPdfParameterList object as a parameter to the Document.saveToFile() method.
Copy the code below to convert your doc/docx to PDF/A files with Java:
import com.spire.doc.Document;
import com.spire.doc.ToPdfParameterList;
import com.spire.doc.PdfConformanceLevel;

public class ConvertWordToPdfa {

    public static void main(String[] args) {

        // Create a Document object
        Document doc = new Document();

        // Load a Word document
        doc.loadFromFile("C:\\Users\\Administrator\\Desktop\\input.docx");

        // Create a ToPdfParameterList object
        ToPdfParameterList parameters  = new ToPdfParameterList();

        // Set the conformance level for PDF
        parameters.setPdfConformanceLevel(PdfConformanceLevel.Pdf_A_1_A);

        // Save the document to a PDF file
        doc.saveToFile("C:\\Users\\Administrator\\Desktop\\ToPdfA.pdf", parameters);

        // Dispose resources
        doc.dispose();
    }
}
Convert Word Files to Password-Protected PDF in Java
To protect your data, you may need to set a password for the converted PDF file. In this part, you can encrypt the converted PDF documents with password during the conversion process without any hassle. By passing the ToPdfParameterList object as a parameter to the Document.saveToFile() method, these encryption settings will be applied during the saving process.
Copy the code below to encrypt converted PDF files during conversion with Java:
import com.spire.doc.Document;
import com.spire.doc.PdfPermissionsFlags;
import com.spire.doc.ToPdfParameterList;

public class ConvertWordToPasswordProtectedPdf {

    public static void main(String[] args) {

        // Create a Document object
        Document doc = new Document();

        // Load a Word document
        doc.loadFromFile("C:\\Users\\Administrator\\Desktop\\Input.docx");

        // Create a ToPdfParameterList object
        ToPdfParameterList parameters = new ToPdfParameterList();

        // Set open password and permission password for PDF
        parameters.getPdfSecurity().encrypt("openPsd", PdfPermissionsFlags.valueOf("permissionPsd"));

        // Save the document to PDF
        doc.saveToFile("PasswordProtected.pdf", parameters);

        // Dispose resources
        doc.dispose();
    }
}
Convert a Specific Area in Word to PDF in Java
The third section is that you can create a copy of a certain section with Spire.Doc's Section.deepClone() method and use the SectionCollection.add() method to add the copied section to the section collection of another document.
You can easily create a document containing the desired section from the source document with the following Java code:
import com.spire.doc.Document;
import com.spire.doc.FileFormat;
import com.spire.doc.Section;

public class ConvertSectionToPdf {

    public static void main(String[] args) {

        // Create a Document object
        Document doc = new Document();

        // Load a Word document
        doc.loadFromFile("C:\\Users\\Administrator\\Desktop\\Input.docx");

        // Get a specific section of the document
        Section section = doc.getSections().get(1);

        // Create a new document object
        Document newDoc = new Document();

        // Clone the default style to the new document
        doc.cloneDefaultStyleTo(newDoc);

        // Clone the section to the new document
        newDoc.getSections().add(section.deepClone());

        // Save the new document to PDF
        newDoc.saveToFile("SectionToPDF.pdf", FileFormat.PDF);

        // Dispose resources
        doc.dispose();
        newDoc.dispose();
    }
}
How to Adjust Word Files When Converting Word to PDF with Java Code
To get the best conversion result, you can make more adjustment to your Word documents during the conversion process. For example, you can embed fonts, adjust page size, set image quality, create bookmarks, or modify hyperlink with Java code.
Here, I will take one adjustment as an example to show you how to manage it. If you need to apply other adjustments, you can directly click the link above and jump to the corresponding page.
Example: Set Image Quality During Word to PDF Conversion
Image quality is a vital element when converting DOC/DOCX files to PDF format. It may influence the conversion speed and play an important role in the conversion result. With Spire.Doc for Java, you can set the image quality according to your specific needs to ensure the highest efficiency.
Copy the following code in your Java program to adjust picture quality:
import com.spire.doc.Document;
import com.spire.doc.FileFormat;

public class SetImageQualityDuringConversion {

    public static void main(String[] args) {

        // Create a Document object
        Document doc = new Document();

        // Load a Word document
        doc.loadFromFile("C:\\Users\\Administrator\\Desktop\\Input.docx");

        // Set the image quality to 50% of the original quality
        doc.setJPEGQuality(50);

        // Preserve original image quality
        // doc.setJPEGQuality(100);

        // Save the document to PDF
        doc.saveToFile("SetImageQuality.pdf", FileFormat.PDF);

        // Dispose resources
        doc.dispose();
    }
}
Final Words
Converting Word to PDF in Java is simple and efficient with Spire.Doc for Java. From basic conversion to advanced options like password protection, section export, and image quality settings, you can handle it all with just a few lines of code.
If you'd like to access all features without limitations and remove the evaluation watermark, please request a 30-day trial license for yourself.
Edit Bookmarks in PDF in Java
This article demonstrates how to edit the existing bookmarks in a PDF file, for example, change the bookmark title, font color and text style using Spire.PDF for Java.
import com.spire.pdf.PdfDocument;
import com.spire.pdf.bookmarks.PdfBookmark;
import com.spire.pdf.bookmarks.PdfTextStyle;
import com.spire.pdf.graphics.PdfRGBColor;
import java.awt.*;
public class EditBookmarks {
public static void main(String[] args) {
//Create a PdfDocument instance
PdfDocument doc = new PdfDocument();
//Load the PDF file
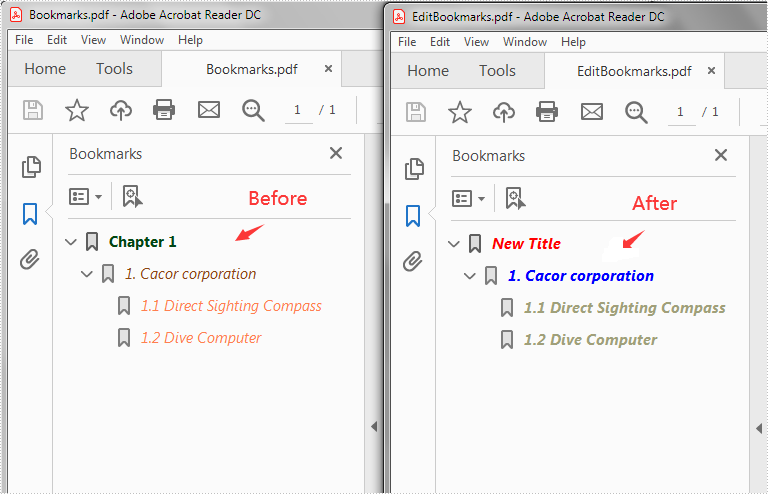
doc.loadFromFile("Bookmarks.pdf");
//Get the first bookmark
PdfBookmark bookmark = doc.getBookmarks().get(0);
//Change the title of the bookmark
bookmark.setTitle("New Title");
//Change the font color of the bookmark
bookmark.setColor(new PdfRGBColor(new Color(255,0,0)));
//Change the outline text style of the bookmark
bookmark.setDisplayStyle(PdfTextStyle.Italic);
//Edit child bookmarks of the first bookmark
for (Object Bookmark : (Iterable) bookmark) {
PdfBookmark childBookmark=(PdfBookmark)Bookmark;
childBookmark.setColor(new PdfRGBColor(new Color(0,0,255)));
childBookmark.setDisplayStyle(PdfTextStyle.Bold);
for (PdfBookmark Bookmark2 : (IterablePdfBookmark>) bookmark){
PdfBookmark childBookmark2=(PdfBookmark)Bookmark2;
childBookmark2.setColor(new PdfRGBColor(new Color(160,160,122)) );
childBookmark2.setDisplayStyle(PdfTextStyle.Bold);
}
}
//Save the result file
doc.saveToFile("EditBookmarks.pdf");
doc.close();
}
}
Output:
Java: Add, Edit, or Delete Bookmarks in PDF
A bookmark in a PDF document consists of formatted text linking to a specific section of the document. Readers can navigate through pages by simply clicking on the bookmarks displayed on the side of the page instead of scrolling up and down, which is very helpful for those huge documents. Moreover, well-organized bookmarks can also serve as contents. When you create a PDF document with a lot of pages, it’s better to add bookmarks to link to significant content. This article is going to show how to add, modify, and remove bookmarks in PDF documents using Spire.PDF for Java through programming.
- Add Bookmarks to a PDF Document
- Edit Bookmarks in a PDF Document
- Delete Bookmarks from a PDF Document
Install Spire.PDF for Java
First of all, you're required to add the Spire.Pdf.jar file as a dependency in your Java program. The JAR file can be downloaded from this link. If you use Maven, you can easily import the JAR file in your application by adding the following code to your project's pom.xml file.
<repositories>
    <repository>
        <id>com.e-iceblue</id>
        <name>e-iceblue</name>
        <url>https://repo.e-iceblue.com/nexus/content/groups/public/</url>
    </repository>
</repositories>
<dependencies>
    <dependency>
        <groupId>e-iceblue</groupId>
        <artifactId>spire.pdf</artifactId>
        <version>12.7.0</version>
    </dependency>
</dependencies>
Add Bookmarks to a PDF Document
Spire.PDF for Java provides PdfDocument.getBookmarks().add() method to add bookmarks to a PDF document. In addition to adding primary bookmarks, we can use PdfBookmark.add() method to add a sub-bookmark to a primary bookmark. There are also many other methods under PdfBookmark class which are used to set the destination, text color, and text style of bookmarks. The detailed steps of adding bookmarks to a PDF document are as follows.
- Create a PdfDocument class instance.
- Load a PDF document using PdfDocument.loadFromFile() method.
- Loop through the pages in the PDF document to add bookmarks and set their styles.
- Add a primary bookmark to the document using PdfDocument.getBookmarks().add() method.
- Create a PdfDestination class object and set the destination of the primary bookmark using PdfBookmark.setAction() method.
- Set the text color of the primary bookmark using PdfBookmark.setColor() method.
- Set the text style of the Primary bookmark using PdfBookmark.setDisplayStyle() method.
- Add a sub-bookmark to the primary bookmark using PdfBookmark.add() method.
- Use the above methods to set the destination, text color, and text style of the sub-bookmark.
- Save the document using PdfDocument.saveToFile() method.
- Java
import com.spire.pdf.PdfDocument;
import com.spire.pdf.PdfPageBase;
import com.spire.pdf.actions.PdfGoToAction;
import com.spire.pdf.bookmarks.PdfBookmark;
import com.spire.pdf.bookmarks.PdfTextStyle;
import com.spire.pdf.general.PdfDestination;
import com.spire.pdf.graphics.PdfRGBColor;
import java.awt.*;
import java.awt.geom.Point2D;
public class addBookmark {
public static void main(String[] args) {
//Create a PdfDocument class instance
PdfDocument pdf = new PdfDocument();
//Load a PDF file
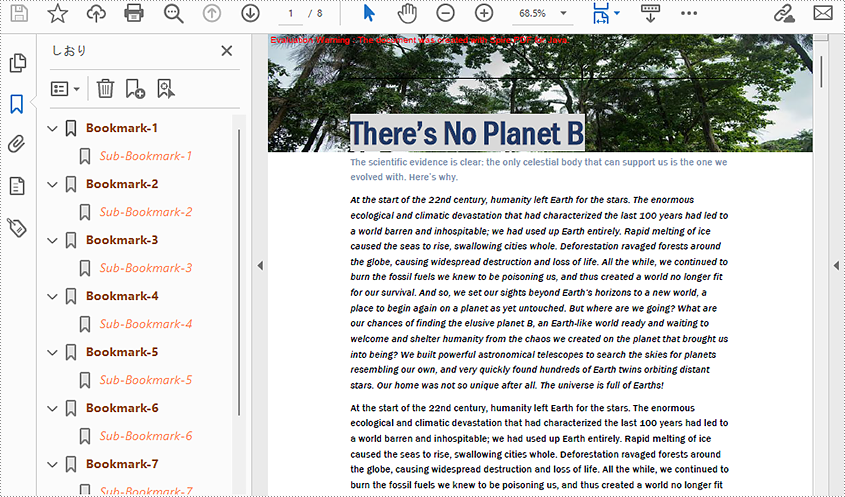
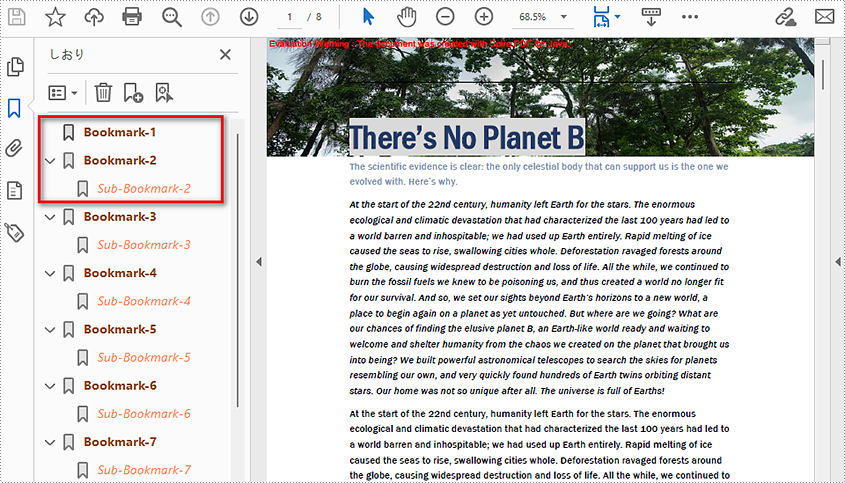
pdf.loadFromFile("There's No Planet B.pdf");
//Loop through the pages in the PDF file
for(int i = 0; i< pdf.getPages().getCount();i++) {
PdfPageBase page = pdf.getPages().get(i);
//Add a bookmark
PdfBookmark bookmark = pdf.getBookmarks().add(String.format("Bookmark-%s", i + 1));
//Set the destination page and location
PdfDestination destination = new PdfDestination(page, new Point2D.Float(0, 0));
bookmark.setAction(new PdfGoToAction(destination));
//Set the text color
bookmark.setColor(new PdfRGBColor(new Color(139, 69, 19)));
//Set the text style
bookmark.setDisplayStyle(PdfTextStyle.Bold);
//Add a child bookmark
PdfBookmark childBookmark = bookmark.add(String.format("Sub-Bookmark-%s", i + 1));
//Set the destination page and location
PdfDestination childDestination = new PdfDestination(page, new Point2D.Float(0, 100));
childBookmark.setAction(new PdfGoToAction(childDestination));
//Set the text color
childBookmark.setColor(new PdfRGBColor(new Color(255, 127, 80)));
//Set the text style
childBookmark.setDisplayStyle(PdfTextStyle.Italic);
}
//Save the result file
pdf.saveToFile("AddBookmarks.pdf");
}
}
Edit Bookmarks in a PDF Document
We can also use methods of PdfBookmark class in Spire.PDF for Java to edit existing PDF bookmarks. The detailed steps are as follows.
- Create a PdfDocument class instance.
- Load a PDF document using PdfDocument.loadFromFile() method.
- Get the first bookmark using PdfDocument.getBookmarks().get() method.
- Change the title of the bookmark using PdfBookmark.setTitle() method.
- Change the font color of the bookmark using PdfBookmark.setColor() method.
- Change the outline text style of the bookmark using PdfBookmark.setDisplayStyle() method.
- Change the text color and style of the sub-bookmark using the above methods.
- Save the document using PdfDocument.saveToFile() method.
- Java
import com.spire.pdf.PdfDocument;
import com.spire.pdf.bookmarks.PdfBookmark;
import com.spire.pdf.bookmarks.PdfTextStyle;
import com.spire.pdf.graphics.PdfRGBColor;
import java.awt.*;
public class editBookmarks {
public static void main(String[] args) {
//Create a PdfDocument class instance
PdfDocument doc = new PdfDocument();
//Load a PDF file
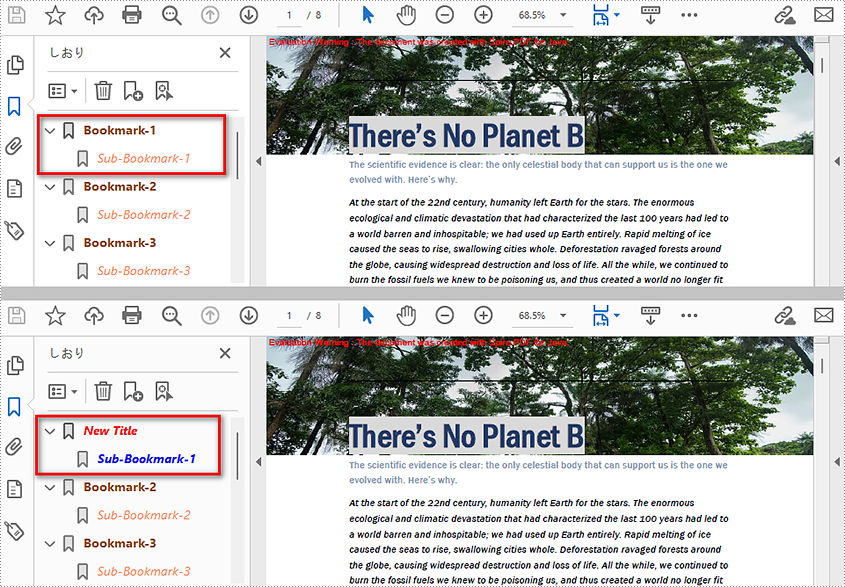
doc.loadFromFile("AddBookmarks.pdf");
//Get the first bookmark
PdfBookmark bookmark = doc.getBookmarks().get(0);
//Change the title of the bookmark
bookmark.setTitle("New Title");
//Change the font color of the bookmark
bookmark.setColor(new PdfRGBColor(new Color(255,0,0)));
//Change the outline text style of the bookmark
bookmark.setDisplayStyle(PdfTextStyle.Italic);
//Edit sub-bookmarks of the first bookmark
for (Object Bookmark : (Iterable) bookmark) {
PdfBookmark childBookmark=(PdfBookmark)Bookmark;
childBookmark.setColor(new PdfRGBColor(new Color(0,0,255)));
childBookmark.setDisplayStyle(PdfTextStyle.Bold);
}
//Save the result file
doc.saveToFile("EditBookmarks.pdf");
doc.close();
}
}
Delete Bookmarks from a PDF Document
We can use Spire.PDF for Java to delete any bookmark in a PDF document. PdfDocument.getBookmarks().removeAt() is used to remove a specific primary bookmark, PdfDocument.getBookmarks().clear() method is used to remove all bookmarks, and PdfBookmark.removeAt() method is used to remove a specific sub-bookmark of a primary bookmark. The detailed steps of removing bookmarks form a PDF document are as follows.
- Create PdfDocument class instance.
- Load a PDF document using PdfDocument.loadFromFile() method.
- Get the first bookmark using PdfDocument.getBookmarks().get() method.
- Remove the sub-bookmark of the first bookmark using PdfBookmark.removeAt() method.
- Save the document using PdfDocument.saveToFile() method.
- Java
import com.spire.pdf.PdfDocument;
import com.spire.pdf.bookmarks.PdfBookmark;

public class deleteBookmarks {
    public static void main(String[] args) {

        //Create a PdfDocument instance
        PdfDocument pdf = new PdfDocument();

        //Load the PDF file
        pdf.loadFromFile("AddBookmarks.pdf");

        //Get the first bookmark
        PdfBookmark pdfBookmark = pdf.getBookmarks().get(0);

        //Delete the sub-bookmark of the first bookmark
        pdfBookmark.removeAt(0);

        //Delete the first bookmark along with its child bookmark
        //pdf.getBookmarks().removeAt(0);

        //Delete all the bookmarks
        //pdf.getBookmarks().clear();

        //Save the result file
        pdf.saveToFile("DeleteBookmarks.pdf");
    }
}
Apply for a Temporary License
If you'd like to remove the evaluation message from the generated documents, or to get rid of the function limitations, please request a 30-day trial license for yourself.
Detect if an Excel Document is Password Protected in Java
This article demonstrates how to detect whether an Excel document is password protected or not using Spire.XLS for Java.
import com.spire.xls.*;
public class DetectProtectedOrNot {
public static void main(String[] args) {
//Get the file path
String filePath= "C:\\Users\\Administrator\\Desktop\\sample.xlsx";
//Detect whether the workbook is password protected or not
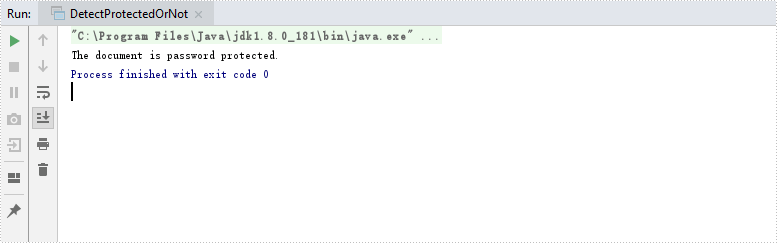
Boolean isProtected = Workbook.isPasswordProtected(filePath);
//Print results
if (isProtected) {
System.out.print("The document is password protected.");
}
else {
System.out.print("The document is not protected.");
}
}
}
Java remove text or image watermark from presentation slides
This article will demonstrate how to use Spire.Presentaion for Java to remove text watermark and image watermark from the presentation slides.
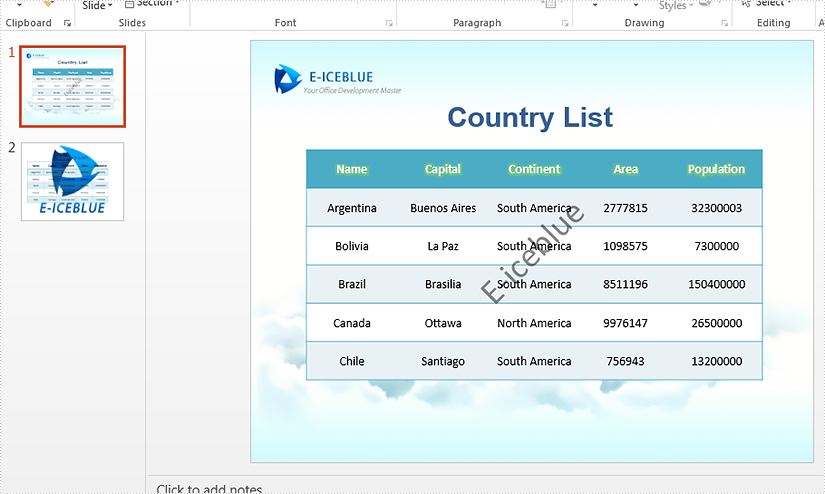
Firstly, view the sample PowerPoint document with text and image watermark:
import com.spire.presentation.*;
import com.spire.presentation.drawing.*;

public class removeTextOrImageWatermark {

    public static void main(String[] args) throws Exception {
        //Load the sample document
        Presentation presentation = new Presentation();
        presentation.loadFromFile("Sample.pptx");

        //Remove text watermark by removing the shape which contains the string "E-iceblue".
        for (int i = 0; i < presentation.getSlides().getCount(); i++)
        {
            for (int j = 0; j < presentation.getSlides().get(i).getShapes().getCount(); j++)
            {
                if (presentation.getSlides().get(i).getShapes().get(j) instanceof IAutoShape)
                {
                    IAutoShape shape = (IAutoShape)presentation.getSlides().get(i).getShapes().get(j);
                    if (shape.getTextFrame().getText().contains("E-iceblue"))
                    {
                        presentation.getSlides().get(i).getShapes().remove(shape);
                    }
                }
            }
        }

        //Remove image watermark
        for (int i = 0; i < presentation.getSlides().getCount(); i++)
        {
            presentation.getSlides().get(i).getSlideBackground().getFill().setFillType(FillFormatType.NONE);
        }

        //Save to file.
        presentation.saveToFile("removeTextOrImageWatermark.pptx", FileFormat.PPTX_2013);
    }
}
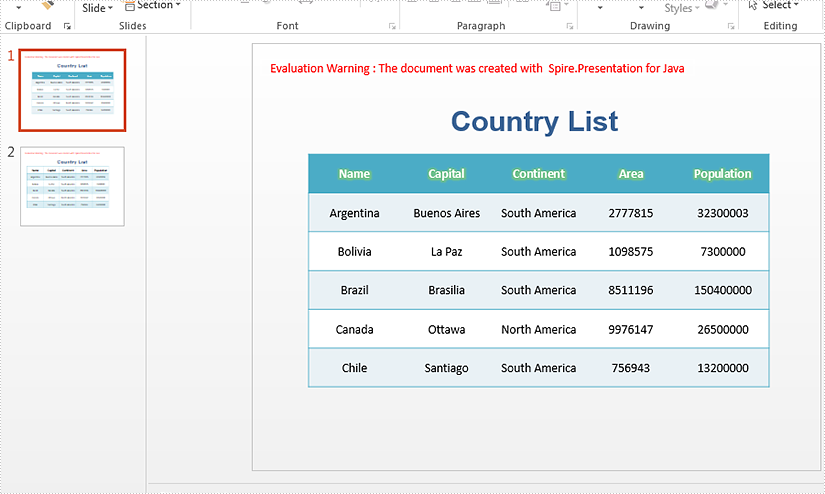
Effective screenshot after removing text or image watermark:
Highlight Highest and Lowest Value in Excel in Java
This article demonstrates how to highlight the highest and lowest value in a cell rang through conditional formatting. You can also highlight the top 5 or bottom 5 values by passing 5 to setRank() method in the code snippet below.
import com.spire.xls.*;
import com.spire.xls.core.IConditionalFormat;
import com.spire.xls.core.spreadsheet.collections.XlsConditionalFormats;

import java.awt.*;

public class HighlightTopBottom {
    public static void main(String[] args) {

        //Create a Workbook object
        Workbook workbook = new Workbook();

        //Load the sample Excel file
        workbook.loadFromFile("G:\\360MoveData\\Users\\Administrator\\Desktop\\sales report.xlsx");

        //Get the first worksheet
        Worksheet sheet = workbook.getWorksheets().get(0);

        //Add a conditional formatting and specify ranges
        XlsConditionalFormats conditional = sheet.getConditionalFormats().add();
        conditional.addRange(sheet.getCellRange("B2:E5"));

        //Apply conditional formatting to highlight the highest value
        IConditionalFormat format1 = conditional.addTopBottomCondition(TopBottomType.Top,1);
        format1.setBackColor(Color.red);

        //Apply conditional formatting to highlight the lowest value
        IConditionalFormat format2 = conditional.addTopBottomCondition(TopBottomType.Bottom,1)
        format2.setBackColor(Color.yellow);

        //Save the document
        workbook.saveToFile("output/HighestLowestValue.xlsx", ExcelVersion.Version2016);


    }
}
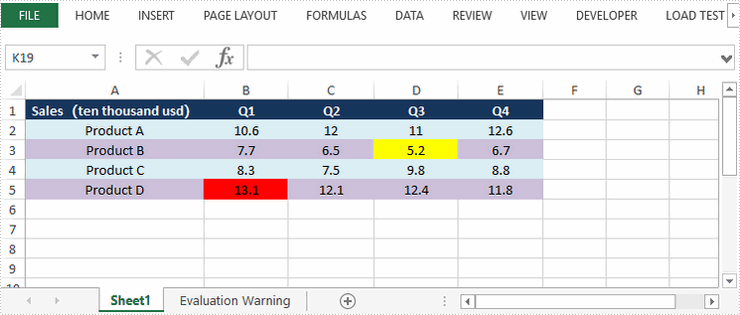
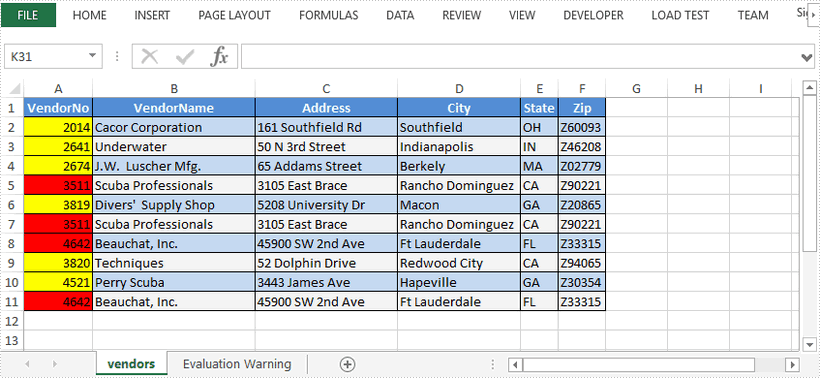
Highlight Dulicate and Unique Values in Excel in Java
This article demonstrates how to highlight the duplicate and unique values in a selected range through conditional formatting using Spire.XLS for Java.
import com.spire.xls.*;
import com.spire.xls.core.IConditionalFormat;
import com.spire.xls.core.spreadsheet.collections.XlsConditionalFormats;

import java.awt.*;

public class HighlightDuplicates  {
    public static void main(String[] args) {
        //Create a Workbook instance
        Workbook workbook = new Workbook();

        //Load a sample Excel file
        workbook.loadFromFile("C:\\Users\\Administrator\\Desktop\\sample.xlsx");

        //Get the first worksheet
        Worksheet sheet = workbook.getWorksheets().get(0);

        //Add a conditional formatting and specify ranges
        XlsConditionalFormats conditional = sheet.getConditionalFormats().add();
        conditional.addRange(sheet.getCellRange("A2:A11"));

        //Use conditional formatting to highlight duplicate values with red
        IConditionalFormat format1 = conditional.addCondition();
        format1.setFormatType(ConditionalFormatType.DuplicateValues);
        format1.setBackColor(Color.red);

        //Use conditional formatting to highlight unique values with yellow
        IConditionalFormat format2 = conditional.addCondition();
        format2.setFormatType(ConditionalFormatType.UniqueValues);
        format2.setBackColor(Color.yellow);

        //Save the document
        workbook.saveToFile("HighlightDuplicates.xlsx", ExcelVersion.Version2016);
    }
}
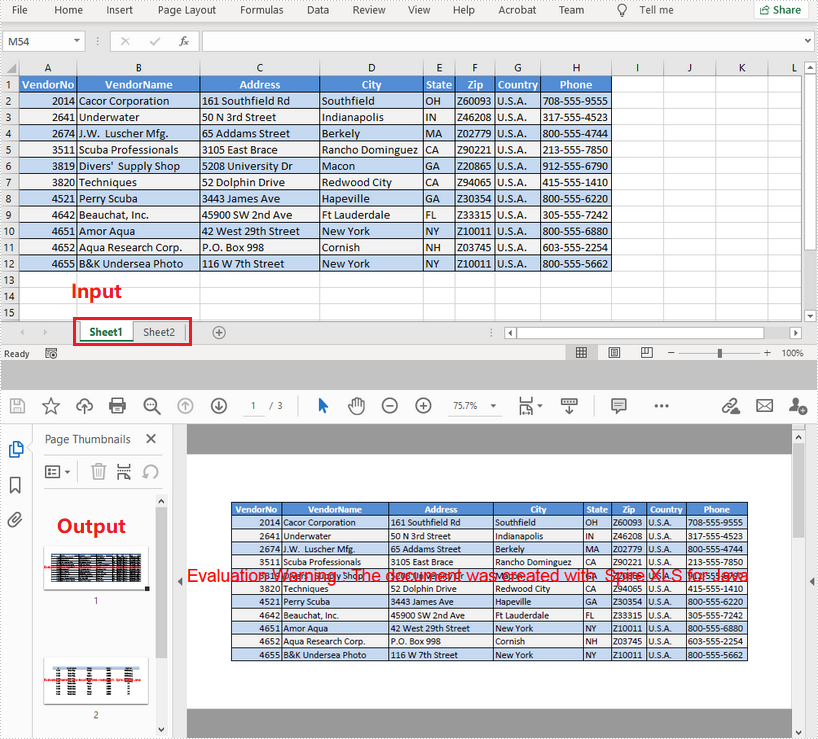
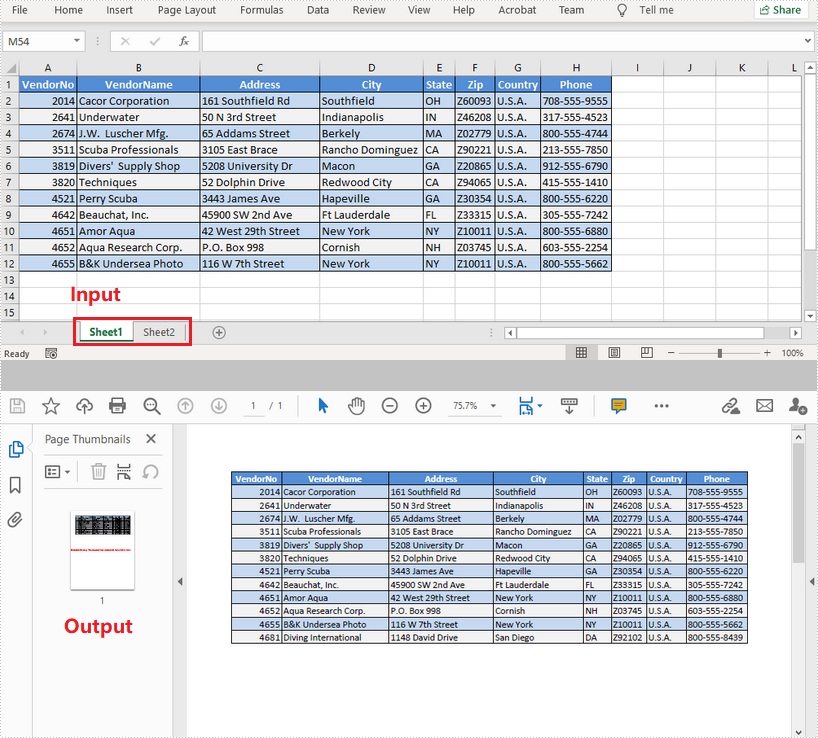
Java: Convert Excel to PDF
Check out this video for a quick overview of Excel to PDF conversion in Java before reading the detailed tutorial below.
Using PDF as a format for sending documents ensures that no formatting changes will occur to the original document. Exporting Excel to PDF is a common practice in many cases. This article introduces how to convert a whole Excel document or a specific worksheet to PDF using Spire.XLS for Java.
Install Spire.XLS for Java
First of all, you're required to add the Spire.Xls.jar file as a dependency in your Java program. The JAR file can be downloaded from this link. If you use Maven, you can easily import the JAR file in your application by adding the following code to your project's pom.xml file.
<repositories>
    <repository>
        <id>com.e-iceblue</id>
        <name>e-iceblue</name>
        <url>https://repo.e-iceblue.com/nexus/content/groups/public/</url>
    </repository>
</repositories>
<dependencies>
    <dependency>
        <groupId>e-iceblue</groupId>
        <artifactId>spire.xls</artifactId>
        <version>16.6.5</version>
    </dependency>
</dependencies>
Convert a Whole Excel File to PDF
The following are the steps to convert a whole Excel document to PDF.
- Create a Workbook object.
- Load a sample Excel document using Workbook.loadFromFile() method.
- Set the Excel to PDF conversion options through the methods under the ConverterSetting object, which is returned by Workbook.getConverterSetting() method.
- Convert the whole Excel document to PDF using Workbook.saveToFile() method.
- Java
import com.spire.xls.FileFormat;
import com.spire.xls.Workbook;

public class ConvertExcelToPdf {

    public static void main(String[] args) {

        //Create a Workbook instance and load an Excel file
        Workbook workbook = new Workbook();
        workbook.loadFromFile("C:\\Users\\Administrator\\Desktop\\Sample.xlsx");

        //Set worksheets to fit to page when converting
        workbook.getConverterSetting().setSheetFitToPage(true);

        //Save the resulting document to a specified path
        workbook.saveToFile("output/ExcelToPdf.pdf", FileFormat.PDF);
    }
}
Convert a Specific Worksheet to PDF
The following are the steps to convert a specific worksheet to PDF.
- Create a Workbook object.
- Load a sample Excel document using Workbook.loadFromFile() method.
- Set the Excel to PDF conversion options through the methods under the ConverterSetting object, which is returned by Workbook.getConverterSetting() method.
- Get a specific worksheet using Workbook.getWorksheets().get() method.
- Convert the worksheet to PDF using Worksheet.saveToPdf() method.
- Java
import com.spire.xls.Workbook;
import com.spire.xls.Worksheet;

public class ConvertWorksheetToPdf {

    public static void main(String[] args) {

        //Create a Workbook instance and load an Excel file
        Workbook workbook = new Workbook();
        workbook.loadFromFile("C:\\Users\\Administrator\\Desktop\\Sample.xlsx");

        //Set worksheets to fit to width when converting
        workbook.getConverterSetting().setSheetFitToWidth(true);

        //Get the first worksheet
        Worksheet worksheet = workbook.getWorksheets().get(0);

        //Convert to PDF and save the resulting document to a specified path
        worksheet.saveToPdf("output/WorksheetToPdf.pdf");
    }
}
Apply for a Temporary License
If you'd like to remove the evaluation message from the generated documents, or to get rid of the function limitations, please request a 30-day trial license for yourself.
Modify Hyperlinks in Word in Java
This article demonstrates how to modify hyperlinks in Word including modifying hyperlink address and display text using Spire.Doc for Java.
Below is the sample Word document we used for demonstration:

import com.spire.doc.*;
import com.spire.doc.documents.*;
import com.spire.doc.fields.Field;
import java.util.ArrayList;
import java.util.List;
public class ModifyHyperlink {
public static void main(String[] args) {
//Load Word document
Document doc = new Document();
doc.loadFromFile("Hyperlink.docx");
List<Field> hyperlinks = new ArrayList<>();
//Loop through the section in the document
for (Section section : (Iterable<Section>) doc.getSections()
) {
//Loop through the section in the document
for (Paragraph para : (Iterable<Paragraph>) section.getParagraphs()
) {
for (DocumentObject obj:(Iterable<DocumentObject>) para.getChildObjects()
) {
if (obj.getDocumentObjectType().equals(DocumentObjectType.Field)) {
Field field = (Field) obj;
if (field.getType().equals(FieldType.Field_Hyperlink)) {
hyperlinks.add(field);
}
}
}
}
}
hyperlinks.get(0).setCode("HYPERLINK \"http://www.google.com\"");
hyperlinks.get(0).setFieldText("www.google.com");
doc.saveToFile("EditHyperlink.docx", FileFormat.Docx_2013);
}
}
Output: