C++: Add Background Color or Picture to Word Documents
A background color or picture can help make a document more aesthetically pleasing and attention-grabbing. If you are creating a document for marketing, education, or presentation purposes, adding an attractive background color or picture would be very useful. In this article, we will demonstrate how to programmatically add background color or picture to Word documents in C++ using Spire.Doc for C++.
- Add a Background Color to Word in C++
- Add a Gradient Background to Word in C++
- Add a Background Picture to Word in C++
Install Spire.Doc for C++
There are two ways to integrate Spire.Doc for C++ into your application. One way is to install it through NuGet, and the other way is to download the package from our website and copy the libraries into your program. Installation via NuGet is simpler and more recommended. You can find more details by visiting the following link.
Integrate Spire.Doc for C++ in a C++ Application
Add a Background Color to Word in C++
Adding a background color to a Word document is very straightforward using Spire.Doc for C++. You just need to set the document’s background type as color and then specify a color as the background. The detailed steps are as follows.
- Initialize an instance of the Document class.
- Load a Word document using Document->LoadFromFile() method.
- Get the document's background using Document->GetBackground() method.
- Set the background type as color using Background->SetType(BackgroundType::Color) method.
- Set the background color using Background->SetColor() method.
- Save the result document using Document->SaveToFile() method.
- C++
#include "Spire.Doc.o.h"

using namespace Spire::Doc;

int main()
{
	//Initialize an instance of the Document class
	intrusive_ptr<Document> document = new Document();
	//Load a Word document
	document->LoadFromFile(L"Sample.docx");

	//Get the document's background
	intrusive_ptr <Background> background = document->GetBackground();
	//Set the background type as color
	background->SetType(BackgroundType::Color);
	//Set the background color
	background->SetColor(Color::GetAliceBlue());

	//Save the result document
	document->SaveToFile(L"AddBackgroundColor.docx", FileFormat::Docx2013);
	document->Close();
}
Add a Gradient Background to Word in C++
To add a gradient background, you need to set the background type as gradient, specify the gradient color and then set the gradient shading variant and style. The detailed steps are as follows.
- Initialize an instance of the Document class.
- Load a Word document using Document->LoadFromFile() method.
- Get the document's background using Document->GetBackground() method.
- Set the background type as gradient using Background->SetType(BackgroundType::Gradient) method.
- Specify two gradient colors using Background->GetGradient()->SetColor1() and Background->GetGradient()->SetColor2() methods.
- Set gradient shading variant and style using Background->GetGradient()->SetShadingVariant() and Background->GetGradient()->SetShadingStyle() methods.
- Save the result document using Document->SaveToFile() method.
- C++
#include "Spire.Doc.o.h"

using namespace Spire::Doc;

int main()
{
	//Initialize an instance of the Document class
	intrusive_ptr <Document> document = new Document();
	//Load a Word document
	document->LoadFromFile(L"Sample.docx");

	//Get the document's background
	intrusive_ptr <Background> background = document->GetBackground();
	//Set the background type as gradient
	background->SetType(BackgroundType::Gradient);

	//Specify two gradient colors
	background->GetGradient()->SetColor1(Color::GetWhite());
	background->GetGradient()->SetColor2(Color::GetLightBlue());

	//Set gradient shading variant and style
	background->GetGradient()->SetShadingVariant(GradientShadingVariant::ShadingDown);
	background->GetGradient()->SetShadingStyle(GradientShadingStyle::Horizontal);

	//Save the result document
	document->SaveToFile(L"AddGradientBackground.docx", FileFormat::Docx2013);
	document->Close();
}
Add a Background Picture to Word in C++
To add a background image to a Word document, you need to set the background type as picture, and then insert a picture as the background. The detailed steps are as follows.
- Initialize an instance of the Document class.
- Load a Word document using Document->LoadFromFile() method.
- Get the document's background using Document->GetBackground() method.
- Set the background type as picture using Background->SetType(BackgroundType::Picture) method.
- Set the background picture using Background->SetPicture() method.
- Save the result document using Document->SaveToFile() method.
- C++
#include "Spire.Doc.o.h"

using namespace Spire::Doc;

int main()
{
	//Initialize an instance of the Document class
	intrusive_ptr <Document> document = new Document();
	//Load a Word document
	document->LoadFromFile(L"Sample.docx");

	//Get the document's background
	intrusive_ptr <Background> background = document->GetBackground();
	//Set the background type as picture
	background->SetType(BackgroundType::Picture);

	//Set the background picture
	background->SetPicture(L"background.png");

	//Save the result document
	document->SaveToFile(L"AddBackgroundPicture.docx", FileFormat::Docx2013);
	document->Close();
}

Apply for a Temporary License
If you'd like to remove the evaluation message from the generated documents, or to get rid of the function limitations, please request a 30-day trial license for yourself.
C++: Insert or Remove Page Breaks in Word
In MS Word, a Page Break is an important feature of page layout that helps you start a new page wherever you want. After inserting page breaks, all formatting of the previous page applies to the new page, which makes the whole document neat and well organized. In this article, you will learn how to programmatically add or remove page breaks in a Word document using Spire.Doc for C++.
- Insert a Page Break after a Specific Paragraph in Word in C++
- Insert a Page Break after a Specific Text in Word in C++
- Remove Page Breaks in a Word Document in C++
Install Spire.Doc for C++
There are two ways to integrate Spire.Doc for C++ into your application. One way is to install it through NuGet, and the other way is to download the package from our website and copy the libraries into your program. Installation via NuGet is simpler and more recommended. You can find more details by visiting the following link.
Integrate Spire.Doc for C++ in a C++ Application
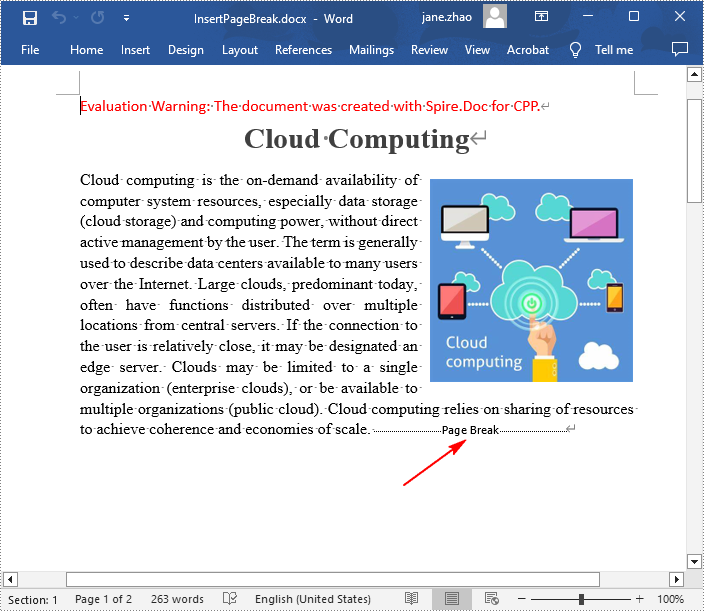
Insert a Page Break after a Specific Paragraph in Word in C++
Spire.Doc for C++ offers the Paragraph->AppendBreak(BreakType::PageBreak) method to insert a page break after a paragraph. Once inserted, a symbol indicating the page break will be shown. The following are the detailed steps.
- Create a Document instance.
- Load a Word document using Document->LoadFromFile() method.
- Get a specified section using Document->GetSections()->GetItem(sectionIndex) method.
- Get a specified paragraph using Section->GetParagraphs()->GetItem(paragraphIndex) method.
- Add a page break to end of the paragraph using Paragraph->AppendBreak(BreakType::PageBreak) method.
- Save the result document using Document->SaveToFile() method.
- C++
#include "Spire.Doc.o.h"

using namespace Spire::Doc;

int main() {
 //Specify input file path and name
 std::wstring input_path = L"Data\\";
 std::wstring inputFile = input_path + L"Input.docx";

 //Specify output file path and name
 std::wstring output_path = L"Output\\";
 std::wstring outputFile = output_path + L"InsertPageBreak.docx";

 //Create a Document instance
 intrusive_ptr<Document> document = new Document();

 //Load a Word document from disk
 document->LoadFromFile(inputFile.c_str());

 //Get the first section
 intrusive_ptr<Section> section = document->GetSections()->GetItemInSectionCollection(0);

 //Get the 2nd paragraph in the section
 intrusive_ptr <Paragraph> paragraph = section->GetParagraphs()->GetItemInParagraphCollection(1);

 //Insert a page break after the paragraph
 paragraph->AppendBreak(BreakType::PageBreak);

 //Save the result document
 document->SaveToFile(outputFile.c_str(), FileFormat::Docx2013);
 document->Close();
}
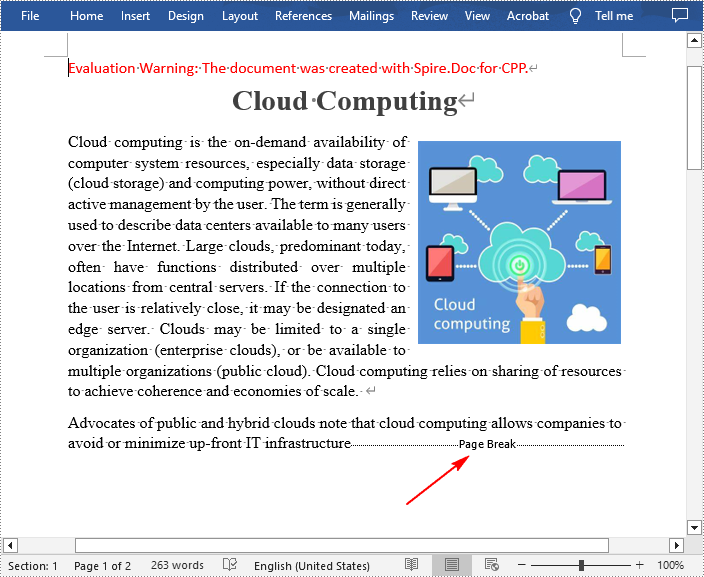
Insert a Page Break after a Specific Text in Word in C++
In addition to inserting a page break after a paragraph, Spire.Doc for C++ also allows you to find a specified text and then insert the page break after the specified text. The following are the detailed steps.
- Create a Document instance.
- Load a Word document using Document->LoadFromFile() method.
- Find a specified text using Document->FindString() method.
- Get the text range of the specified text using TextSelection->GetAsOneRange() method.
- Get the paragraph where the text range is located using TextRange->GetOwnerParagraph() method.
- Get the position index of the text range in the paragraph using Paragraph->GetChildObjects()->IndexOf() method.
- Initialize an instance of Break class to create a page break.
- Insert the page break after the specified text using Paragraph->GetChildObjects()->Insert() method.
- Save the result document using Document->SaveToFile() method.
- C++
#include "Spire.Doc.o.h"

using namespace Spire::Doc;

int main() {
 //Specify input file path and name
 std::wstring input_path = L"Data\\";
 std::wstring inputFile = input_path + L"Input.docx";

 //Specify output file path and name
 std::wstring output_path = L"Output\\";
 std::wstring outputFile = output_path + L"InsertPageBreakAfterText.docx";

 //Create a Document instance
 intrusive_ptr<Document> document = new Document();

 //Load a Word document from disk
 document->LoadFromFile(inputFile.c_str());

 //Find a specified text
 intrusive_ptr<TextSelection> selection = document->FindString(L"infrastructure", true, true);

 //Get the text range of the specified text
 intrusive_ptr<TextRange> range = selection->GetAsOneRange();

 //Get the paragraph where the text range is located
 intrusive_ptr<Paragraph> paragraph = range->GetOwnerParagraph();

 //Get the position index of the text range in the paragraph
 int index = paragraph->GetChildObjects()->IndexOf(range);

 //Create a page break
 intrusive_ptr<Break> pageBreak = new Break(document, BreakType::PageBreak);

 //Insert a page break after the specified text
 paragraph->GetChildObjects()->Insert(index + 1, pageBreak);

 //Save to result document
 document->SaveToFile(outputFile.c_str(), FileFormat::Docx2013);
 document->Close();
}
Remove Page Breaks in a Word Document in C++
Some mistakenly added page breaks can mess up the structure of your entire document, so it's quite necessary to remove them. The following are the steps to remove page breaks in a Word document.
- Create a Document instance.
- Load a Word document using Document->LoadFromFile() method.
- Traverse through each paragraph in the first section, and then traverse through each child object of a paragraph.
- Determine whether the child object type is a page break. If yes, remove the page break from the paragraph using Paragraph->GetChildObjects()->Remove() method.
- Save the result document using Document->SaveToFile() method.
- C++
#include "Spire.Doc.o.h"

using namespace Spire::Doc;

int main() {
 //Specify input file path and name
 std::wstring input_path = L"Data\\";
 std::wstring inputFile = input_path + L"InsertPageBreak.docx";

 //Specify output file path and name
 std::wstring output_path = L"Output\\";
 std::wstring outputFile = output_path + L"RemovePageBreaks.docx";

 //Create a Document instance
 intrusive_ptr<Document> document = new Document();

 //Load a Word document from disk
 document->LoadFromFile(inputFile.c_str());

 //Traverse through each paragraph in the first section of the document
 for (int j = 0; j < document->GetSections()->GetItemInSectionCollection(0)->GetParagraphs()->GetCount(); j++)
 {
  intrusive_ptr<Paragraph> p = document->GetSections()->GetItemInSectionCollection(0)->GetParagraphs()->GetItemInParagraphCollection(j);

  //Traverse through each child object of a paragraph
  for (int i = 0; i < p->GetChildObjects()->GetCount(); i++)
  {
   intrusive_ptr <DocumentObject> obj = p->GetChildObjects()->GetItem(i);

   //Determine whether the child object type is a page break
   if (Object::CheckType<Break>(obj) && (Object::Dynamic_cast<Break>(obj))->GetBreakType() == BreakType::PageBreak)
   {
    //Remove the page break from the paragraph
    p->GetChildObjects()->Remove(obj);
   }
  }
 }

 //Save the result document
 document->SaveToFile(outputFile.c_str(), FileFormat::Docx2013);
 document->Close();
}
Apply for a Temporary License
If you'd like to remove the evaluation message from the generated documents, or to get rid of the function limitations, please request a 30-day trial license for yourself.
C++: Convert Word to PDF
PDF is one of the most versatile, universal and feature-rich file formats in use today. Compared to Word, PDF documents are less likely to lose formatting when they’re opened on various devices. Additionally, PDF has absolute advantages over Word in terms of document security, archiving and transmission. These are some of the reasons why we should convert Word to PDF. In this article, you will learn how to convert Word to PDF and how to set conversion options in C++ using Spire.Doc for C++.
- Convert Doc or Docx to PDF
- Convert Word to PDF with Bookmarks
- Convert Word to PDF with Fonts Embedded
- Set Image Quality When Converting Word to PDF
Install Spire.Doc for C++
There are two ways to integrate Spire.Doc for C++ into your application. One way is to install it through NuGet, and the other way is to download the package from our website and copy the libraries into your program. Installation via NuGet is simpler and more recommended. You can find more details by visiting the following link.
Integrate Spire.Doc for C++ in a C++ Application
Convert Doc or Docx to PDF in C++
The Document->SaveToFile(LPCWSTR_S fileName, FileFormat fileFormat) method provided by Spire.Doc for C++ allows to save Word as PDF, XPS, HTML, RTF, etc. If you just want to save your Word documents as regular PDFs without additional settings, follow the steps below.
- Create a Document object.
- Load a sample Word file using Document->LoadFromFile() method.
- Save the document to PDF using Doucment->SaveToFile() method.
- C++
#include "Spire.Doc.o.h";

using namespace Spire::Doc;
using namespace std;

int main() {

 //Specify input file path
 wstring inputFilePath = L"C:\\Users\\Administrator\\Desktop\\sample.docx";

 //Specify output file path and name
 wstring outputPath = L"Output\\";
 wstring outputFile = outputPath + L"ToPDF.pdf";

 //Create a Document object
 intrusive_ptr<Document> document = new Document();

 //Load a Word file
 document->LoadFromFile(inputFilePath.c_str());

 //Save the document to PDF
 document->SaveToFile(outputFile.c_str(), FileFormat::PDF);
 document->Close();
}
Convert Word to PDF with Bookmarks in C++
Bookmarks can enhance the readability of a document. When generating PDF from Word, you may would like to preserve existing bookmarks of the Word document or create bookmarks from the headings. The following are the steps to convert Word to PDF with bookmarks.
- Create a Document object.
- Load a sample Word file using Document->LoadFromFile() method.
- Create a ToPdfParameterList object, which is used to set conversion options.
- Create bookmarks in PDF from the headings in Word using ToPdfParameterList.SetCreateWordBookmarksUsingHeadings() method.
- Save the document to PDF with bookmarks using Doucment->SaveToFile(LPCWSTR_S fileName, ToPdfParameterList* paramList) method.
- C++
#include "Spire.Doc.o.h";

using namespace Spire::Doc;
using namespace std;

int main() {

 //Specify input file path
 wstring inputFilePath = L"C:\\Users\\Administrator\\Desktop\\sample.docx";

 //Specify output file path and name
 wstring outputPath = L"Output\\";
 wstring outputFile = outputPath + L"ToPDF.pdf";

 //Create a Document object
 intrusive_ptr<Document> document = new Document();

 //Load a Word file
 document->LoadFromFile(inputFilePath.c_str());

 //Create a ToPdfParameterList object
 intrusive_ptr<ToPdfParameterList> parameters = new ToPdfParameterList();

 //Create bookmarks from Word headings
 parameters->SetCreateWordBookmarksUsingHeadings(true);

 //Create bookmarks in PDF from existing bookmarks in Word
 //parameters->SetCreateWordBookmarks(true);

 //Save the document to PDF
 document->SaveToFile(outputFile.c_str(), parameters);
 document->Close();
}
Convert Word to PDF with Fonts Embedded in C++
By embedding fonts used in a Word document into the PDF document, you ensure that the PDF document looks the same on any device that does not have the appropriate fonts installed. The steps to embed fonts in PDF during conversion are as follows.
- Create a Document object.
- Load a sample Word file using Document->LoadFromFile() method.
- Create a ToPdfParameterList object, which is used to set conversion options.
- Embed fonts in generated PDF using ToPdfParameterList.SetIsEmbeddedAllFonts() method.
- Save the document to PDF using Doucment->SaveToFile(LPCWSTR_S fileName, ToPdfParameterList* paramList) method.
- C++
#include "Spire.Doc.o.h";

using namespace Spire::Doc;
using namespace std;

int main() {

 //Specify input file path
 wstring inputFilePath = L"C:\\Users\\Administrator\\Desktop\\sample.docx";

 //Specify output file path and name
 wstring outputPath = L"Output\\";
 wstring outputFile = outputPath + L"ToPDF.pdf";

 //Create a Document object
 intrusive_ptr<Document> document = new Document();

 //Load a Word file
 document->LoadFromFile(inputFilePath.c_str());

 //Create a ToPdfParameterList object
 intrusive_ptr<ToPdfParameterList> parameters = new ToPdfParameterList();

 //Embed fonts used in Word in generated PDF
 parameters->SetIsEmbeddedAllFonts(true);

 //Save the document to PDF
 document->SaveToFile(outputFile.c_str(), parameters);
 document->Close();
}
Set Image Quality When Converting Word to PDF in C++
A document containing a large number of high-quality images will often be large in size. When you convert Word to PDF, you can decide whether to compress the image quality or not. The following are the detailed steps.
- Create a Document object.
- Load a sample Word file using Document->LoadFromFile() method.
- Set the image quality using Document->SetJPEGQuality() mehtod
- Save the document to PDF using Doucment->SaveToFile() method.
- C++
#include "Spire.Doc.o.h";

using namespace Spire::Doc;
using namespace std;

int main() {

 //Specify input file path
 wstring inputFilePath = L"C:\\Users\\Administrator\\Desktop\\sample.docx";

 //Specify output file path and name
 wstring outputPath = L"Output\\";
 wstring outputFile = outputPath + L"ToPDF.pdf";

 //Create a Document object
 intrusive_ptr<Document> document = new Document();

 //Load a Word file
 document->LoadFromFile(inputFilePath.c_str());

 //Compress image to 40% of the original quality
 document->SetJPEGQuality(40);

 //Preserve original image quality
 //document->SetJPEGQuality(100);

 //Save the document to PDF
 document->SaveToFile(outputFile.c_str(), FileFormat::PDF);
 document->Close();
}
Apply for a Temporary License
If you'd like to remove the evaluation message from the generated documents, or to get rid of the function limitations, please request a 30-day trial license for yourself.
C++: Extract Text and Images from Word Documents
Extracting text and images is a common requirement while working with Word documents. This will help you to save useful content out of the original document to re-use in a new document or for other purposes. In this article, you will learn how to extract text or images from a Word document using Spire.Doc for C++.
Install Spire.Doc for C++
There are two ways to integrate Spire.Doc for C++ into your application. One way is to install it through NuGet, and the other way is to download the package from our website and copy the libraries into your program. Installation via NuGet is simpler and more recommended. You can find more details by visiting the following link.
Integrate Spire.Doc for C++ in a C++ Application
Extract Text from a Word Document in C++
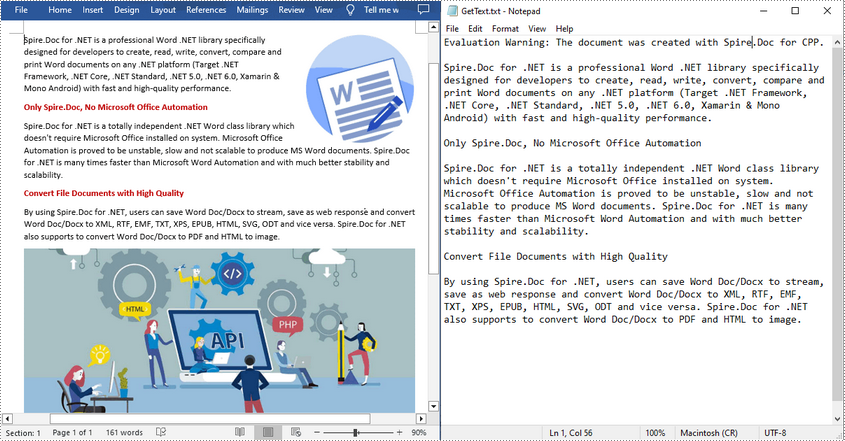
To extract the text content from an existing Word document, Spire.Doc for C++ provides the Document->GetText() method. The following are steps to extract text and save in a TXT file.
- Create a Document instance.
- Load a sample Word document using Document->LoadFromFile() method.
- Get text from the document using Document->GetText() method.
- Create a new txt file and write the extracted text to the file.
- C++
#include "Spire.Doc.o.h"

using namespace Spire::Doc;

int main() {
 //Specify input file path and name
 std::wstring data_path = L"Data\\";
 std::wstring inputFile = data_path + L"input.docx";

 //Specify output file path and name
 std::wstring outputPath = L"Output\\";
 std::wstring outputFile = outputPath + L"GetText.txt";

 //Create a Document instance
 intrusive_ptr<Document> document = new Document();

 //Load a sample Word document from disk
 document->LoadFromFile(inputFile.c_str());

 //Get text from the document
 std::wstring text = document->GetText();

 //Create a new TXT File to save the extracted text
 std::wofstream write(outputFile);
 write << text;
 write.close();
 document->Close();
}
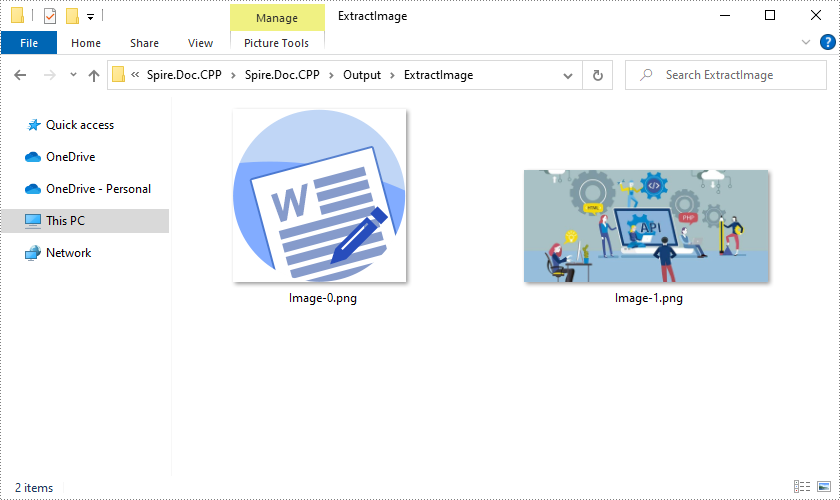
Extract Images from a Word Document in C++
For a Word document with a lot of images, manually saving these images one by one is quite time-consuming. Below are steps to extract all images at once using Spire.Doc for C++.
- Load a sample Word document using Document->LoadFromFile() method.
- Append the document to the end of the deque, and then create a vector of images list.
- Traverse through all child objects of the document.
- Determine whether the object type is picture. If yes, get each image using DocPicture->GetImage() method and add it to the list.
- Save the extracted images out of the document in a specified output file path.
- C++
#include "Spire.Doc.o.h"
#include <deque>

using namespace Spire::Doc;

int main() {
 //Specify input file path and name
 std::wstring data_path = L"Data\\";
 std::wstring inputFile = data_path + L"input.docx";

 //Specify output file path and name
 std::wstring outputPath = L"Output\\";
 std::wstring outputFile = outputPath + L"ExtractImage/";

 //Load a sample Word document
 intrusive_ptr<Document> document = new Document();
 document->LoadFromFile(inputFile.c_str());

 //Append the document to the end of the deque
 std::deque<intrusive_ptr<ICompositeObject>> nodes;
 nodes.push_back(document);

 //Create a vector of images list
 std::vector<std::vector<byte>> images;

 //Traverse through all child objects of the document
 while (nodes.size() > 0)
 {
  intrusive_ptr<ICompositeObject> node = nodes.front();
  nodes.pop_front();
  for (int i = 0; i < node->GetChildObjects()->GetCount(); i++)
  {
   intrusive_ptr<IDocumentObject> child = node->GetChildObjects()->GetItem(i);
   if (child->GetDocumentObjectType() == DocumentObjectType::Picture)
   {
    intrusive_ptr<DocPicture> picture = Object::Dynamic_cast<DocPicture>(child);
    std::vector<byte> imageByte = picture->GetImageBytes();
    images.push_back(imageByte);
   }
   else if (Object::CheckType<ICompositeObject>(child))
   {
    nodes.push_back(boost::dynamic_pointer_cast<ICompositeObject>(child));
   }
  }
 }
 //Save the images out of the document
 for (size_t i = 0; i < images.size(); i++)
 {
  std::wstring fileName = L"Image-" + std::to_wstring(i) + L".png";
  std::ofstream outFile(fileName, std::ios::binary);
  if (outFile.is_open())
  {
   outFile.write(reinterpret_cast<const char*>(images[i].data()), images[i].size());
   outFile.close();
  }
 }
 document->Close();
}
Apply for a Temporary License
If you'd like to remove the evaluation message from the generated documents, or to get rid of the function limitations, please request a 30-day trial license for yourself.
C++: Convert Excel Workbooks or Worksheets to PDF
Excel is a wonderful tool for the creation and management of spreadsheets. However, when it comes to sharing these files with others, Excel may not deliver the best results. As soon as you have finalized your report, you can convert it to PDF, which keeps the formatting of your spreadsheets and allows them to be displayed perfectly on a variety of devices. Furthermore, PDFs are secure and can be encrypted to prevent unauthorized changes to the content.
In this article, you will learn how to convert an Excel workbook to PDF and how to convert an Excel worksheet to PDF in C++ using Spire.XLS for C++.
Install Spire.XLS for C++
There are two ways to integrate Spire.XLS for C++ into your application. One way is to install it through NuGet, and the other way is to download the package from our website and copy the libraries into your program. Installation via NuGet is simpler and more recommended. You can find more details by visiting the following link.
Integrate Spire.XLS for C++ in a C++ Application
Convert an Excel Workbook to a PDF Document in C++
Spire.XLS for C++ offers the Workbook->SaveToFile(LPCWSTR_S fileName, FileFormat fileFormat) method, enabling users to convert an entire workbook to another format file, like PDF, HTML, CSV and XPS. Besides, it offers the ConverterSetting class to specify the convert options, such as whether to automatically adjust the height and width of the cells during conversion. The following are the steps to convert an Excel workbook to PDF using it.
- Create a Workbook object.
- Load a sample Excel document using Workbook->LoadFromFile() method.
- Make worksheets to fit to page when converting using Workbook->GetConverterSetting()->SetSheetFitToPage() method.
- Convert the workbook to PDF using Workbook->SaveToFile() method.
- C++
#include "Spire.Xls.o.h"

using namespace Spire::Xls;
using namespace std;

int main()
{
    //Specify input file path
    wstring inputFilePath = L"C:\\Users\\Administrator\\Desktop\\sample.xlsx";

    //Specify output file path and name
    wstring outputPath = L"Output\\";
    wstring outputFile = outputPath + L"ToPDF.pdf";

    //Create a Workbook object
    intrusive_ptr<Workbook> workbook = new Workbook();

    //Load the source Excel file
    workbook->LoadFromFile(inputFilePath.c_str());

    //Set worksheets to fit to page when converting
    workbook->GetConverterSetting()->SetSheetFitToPage(true);

    //Save to PDF
    workbook->SaveToFile(outputFile.c_str(), FileFormat::PDF);
    workbook->Dispose();
}
Convert a Specific Worksheet to a PDF Document in C++
To export a specific worksheet as a PDF, you must first use the Workbook->GetWorksheets()->Get(index) method to obtain the worksheet, and then use the Worksheet->SaveToPdf(LPCWSTR_S fileName) method to save it. The following are the detailed steps.
- Create a Workbook object.
- Load a sample Excel document using Workbook->LoadFromFile() method.
- Make worksheets to fit to page when converting using Workbook->GetConverterSetting()->SetSheetFitToPage() method.
- Get a specific worksheet using Workbook->GetWorksheets()->Get() method.
- Convert the worksheet to PDF using Worksheet->SaveToPdf() method.
- C++
#include "Spire.Xls.o.h"

using namespace Spire::Xls;
using namespace std;

int main()
{
	//Specify input file path
	wstring inputFilePath = L"C:\\Users\\Administrator\\Desktop\\sample.xlsx";

	//Specify output file path and name
	wstring outputPath = L"Output\\";
	wstring outputFile = outputPath + L"ToPDF.pdf";

	//Create a Workbook object
	intrusive_ptr<Workbook> workbook = new Workbook();

	//Load the source Excel file
	workbook->LoadFromFile(inputFilePath.c_str());

	//Set worksheets to fit to page when converting
	workbook->GetConverterSetting()->SetSheetFitToPage(true);

	//Get a specific worksheet
	intrusive_ptr<Worksheet> sheet = dynamic_pointer_cast<Worksheet>(workbook->GetWorksheets()->Get(0));

	//Save it to PDF
	sheet->SaveToPdf(outputFile.c_str());
	workbook->Dispose();
}
Apply for a Temporary License
If you'd like to remove the evaluation message from the generated documents, or to get rid of the function limitations, please request a 30-day trial license for yourself.
C++: Freeze Rows and Columns in Excel
When viewing data in a large excel worksheet, you may often lose track of the header rows or columns when scrolling to another part of the worksheet. Under the circumstances, MS Excel provides the "Freeze Panes" function to help you lock the necessary rows or/and columns to keep them visible all the time. In this article, you will learn how to programmatically freeze rows or/and columns in an Excel worksheet using Spire.XLS for C++.
Spire.XLS for C++ provides the Worksheet->FreezePanes(int rowIndex, int columnIndex) method to freeze all rows and columns above and left of the selected cell which is specified by the rowIndex and the columnIndex.
This tutorial provides the code examples for the following cases:
- Freeze the Top Row in Excel in C++
- Freeze the First Column in Excel in C++
- Freeze the First Row and First Column in Excel in C++
Install Spire.XLS for C++
There are two ways to integrate Spire.XLS for C++ into your application. One way is to install it through NuGet, and the other way is to download the package from our website and copy the libraries into your program. Installation via NuGet is simpler and more recommended. You can find more details by visiting the following link.
Integrate Spire.XLS for C++ in a C++ Application
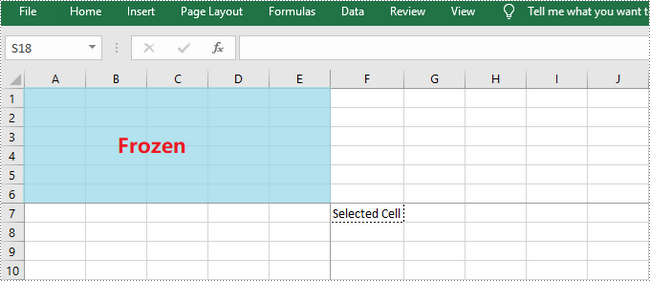
Freeze the Top Row in Excel in C++
To freeze the top row, the selected cell should be the cell (2, 1) – "A2". The following are the detailed steps.
- Create a Workbook object.
- Load an Excel document using Workbook->LoadFromFile() method.
- Get a specific worksheet using Workbook->GetWorksheets()->Get() method.
- Freeze the top row using Worksheet->FreezePanes(2, 1) method.
- Save the workbook to another Excel file using Workbook->SaveToFile() method.
- C++
#include "Spire.Xls.o.h"

using namespace Spire::Xls;
using namespace std;

int main()
{
	//Specify input file path and name
	std::wstring data_path = L"Data\\";
	std::wstring inputFile = data_path + L"sample.xlsx";

	//Specify output file path and name
	std::wstring outputPath = L"Output\\";
	std::wstring outputFile = outputPath + L"FreezeFirstRowAndColumn.xlsx";

	//Create a Workbook object
	intrusive_ptr<Workbook> workbook = new Workbook();

	//Load the Excel document from disk
	workbook->LoadFromFile(inputFile.c_str());

	//Get the first worksheet
	intrusive_ptr<Worksheet> sheet = dynamic_pointer_cast<Worksheet>(workbook->GetWorksheets()->Get(0));

	//Freeze top row
	sheet->FreezePanes(2, 1);

	//Save to file
	workbook->SaveToFile(outputFile.c_str(), ExcelVersion::Version2013);
	workbook->Dispose();
}
Freeze the First Column in Excel in C++
To freeze the first column, the selected cell should be the cell (1, 2) – "B1". The following are the steps to freeze the first column in an Excel worksheet.
- Create a Workbook object.
- Load an Excel document using Workbook->LoadFromFile() method.
- Get a specific worksheet using Workbook->GetWorksheets()->Get() method.
- Freeze the first column using Worksheet->FreezePanes(1, 2) method.
- Save the workbook to another Excel file using Workbook->SaveToFile() method.
- C++
#include "Spire.Xls.o.h"

using namespace Spire::Xls;
using namespace std;

int main()
{
	//Specify input file path and name
	std::wstring data_path = L"Data\\";
	std::wstring inputFile = data_path + L"sample.xlsx";

	//Specify output file path and name
	std::wstring outputPath = L"Output\\";
	std::wstring outputFile = outputPath + L"FreezeFirstRowAndColumn.xlsx";

	//Create a workbook
	intrusive_ptr<Workbook> workbook = new Workbook();

	//Load the Excel document from disk
	workbook->LoadFromFile(inputFile.c_str());

	//Get the first worksheet
	intrusive_ptr<Worksheet> sheet = dynamic_pointer_cast<Worksheet>(workbook->GetWorksheets()->Get(0));

	//Freeze first column
	sheet->FreezePanes(1, 2);

	//Save to file
	workbook->SaveToFile(outputFile.c_str(), ExcelVersion::Version2013);
	workbook->Dispose();
}
Freeze the First Row and First Column in Excel in C++
If you want to freeze the top row and the first column at the same time, the selected cell should be the cell (2, 2) – "B2". The following are the detailed steps.
- Create a Workbook object.
- Load an Excel document using Workbook->LoadFromFile() method.
- Get a specific worksheet using Workbook->GetWorksheets()->Get() method.
- Freeze the top row and first column using Worksheet->FreezePanes(1, 2) method.
- Save the workbook to another Excel file using Workbook->SaveToFile() method.
- C++
#include "Spire.Xls.o.h"

using namespace Spire::Xls;
using namespace std;

int main()
{
	//Specify input file path and name
	std::wstring data_path = L"Data\\";
	std::wstring inputFile = data_path + L"sample.xlsx";

	//Specify output file path and name
	std::wstring outputPath = L"Output\\";
	std::wstring outputFile = outputPath + L"FreezeFirstRowAndColumn.xlsx";

	//Create a workbook
	intrusive_ptr<Workbook> workbook = new Workbook();

	//Load the Excel document from disk
	workbook->LoadFromFile(inputFile.c_str());

	//Get the first worksheet
	intrusive_ptr<Worksheet> sheet = dynamic_pointer_cast<Worksheet>(workbook->GetWorksheets()->Get(0));

	//Freeze top row and first column
	sheet->FreezePanes(2, 2);

	//Save to file
	workbook->SaveToFile(outputFile.c_str(), ExcelVersion::Version2013);
	workbook->Dispose();
}
Apply for a Temporary License
If you'd like to remove the evaluation message from the generated documents, or to get rid of the function limitations, please request a 30-day trial license for yourself.
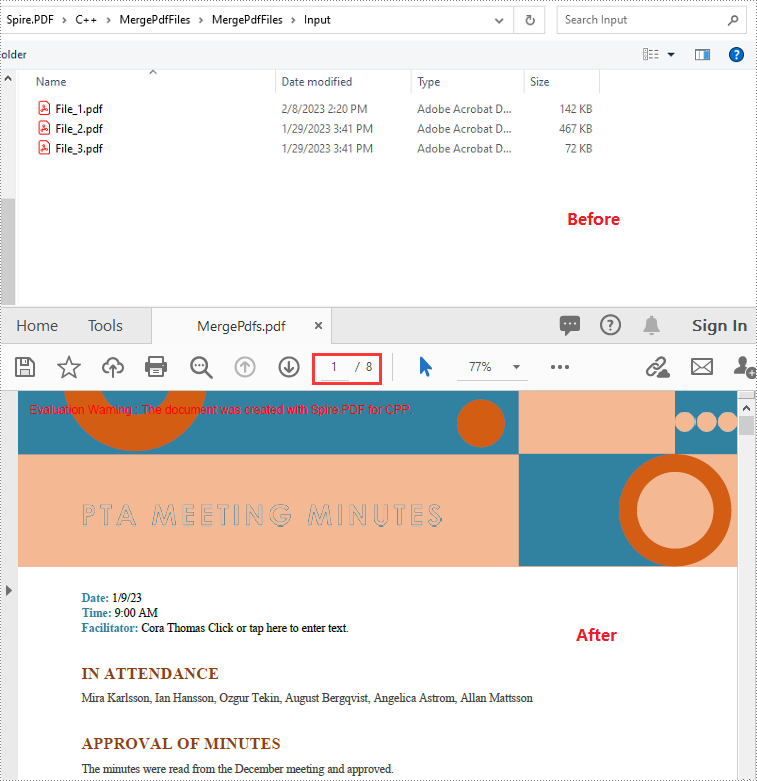
C++: Merge Multiple PDF Files into a Single PDF
Merging multiple PDF files into a single PDF can help you reduce clutter and let you read, print, and share the files more easily. After merging, you only need to deal with one file instead of multiple files. In this article, you will learn how to merge multiple PDF files into a single PDF in C++ using Spire.PDF for C++.
- Merge Multiple PDF Files into a Single PDF in C++
- Merge Multiple PDF Files from Streams in C++
- Merge Selected Pages of PDF Files into a Single PDF in C++
Install Spire.PDF for C++
There are two ways to integrate Spire.PDF for C++ into your application. One way is to install it through NuGet, and the other way is to download the package from our website and copy the libraries into your program. Installation via NuGet is simpler and more recommended. You can find more details by visiting the following link.
Integrate Spire.PDF for C++ in a C++ Application
Merge Multiple PDF Files into a Single PDF in C++
Spire.PDF for C++ offers a static method - PdfDocument::MergeFiles(std::vector<LPCWSTR_S> inputFiles) which enables you to merge multiple PDF files into a single PDF file easily. The following are the detailed steps:
- Put the input PDF files' paths into a vector.
- Merge the PDF files specified by the paths in the vector using PdfDocument::MergeFiles(std::vector<LPCWSTR_S> inputFiles) method.
- Specify the output file path.
- Save the result PDF file using PdfDocumentBase->Save() method.
- C++
#include "Spire.Pdf.o.h"

using namespace Spire::Pdf;
using namespace std;

int main() {
	//Put the input PDF files' paths into a vector
	std::vector<LPCWSTR_S> files = { L"Input\\File_1.pdf", L"Input\\File_2.pdf", L"Input\\File_3.pdf" };

	//Merge the PDF files specified by the paths in the vector
    boost::intrusive_ptr <PdfDocumentBase>  doc = PdfDocument::MergeFiles(files);"

	//Specify the output file path
	wstring outputFile = L"Output\\MergePdfs.pdf";

	//Save the result PDF file
	doc->Save(outputFile.c_str(), FileFormat::PDF);
	doc->Close();
}
Merge Multiple PDF Files from Streams in C++
You can use the PdfDocument::MergeFiles(std::vector< Stream*> streams) method to merge multiple PDF streams into a single PDF. The following are the detailed steps:
- Read the input PDF files into streams.
- Put the streams into a vector.
- Merge the PDF streams using PdfDocument::MergeFiles(std::vector< Stream*> streams) method.
- Save the result PDF file using PdfDocumentBase->Save() method.
- C++
#include "Spire.Pdf.o.h"

using namespace Spire::Pdf;
using namespace std;

int main() {
	//Read the input PDF files into streams
	Stream* stream1 = new Stream(L"Input\\File_1.pdf");
	Stream* stream2 = new Stream(L"Input\\File_2.pdf");
	Stream* stream3 = new Stream(L"Input\\File_3.pdf");

    //Put the streams into a vector
	std::vector<boost::intrusive_ptr<Stream>> streams = { stream1, stream2, stream3 };
	//Merge the PDF streams
	boost::intrusive_ptr<PdfDocumentBase> doc = PdfDocument::MergeFiles(streams);


	//Specify the output file path
	wstring outputFile = L"Output\\MergePdfs.pdf";

	//Save the result PDF file
	doc->Save(outputFile.c_str(), FileFormat::PDF);
	doc->Close();
}
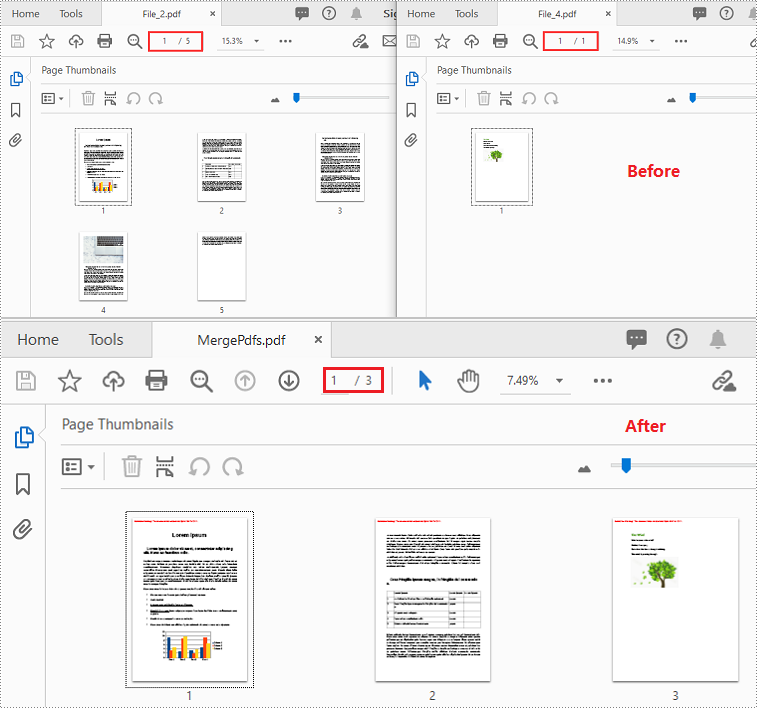
Merge Selected Pages of PDF Files into a Single PDF in C++
You can merge a specific page or a range of pages of multiple PDF files into a single PDF file using PdfDocument->InsertPage(PdfDocument ldDoc, int pageIndex) or PdfDocument->InsertPageRange(PdfDocument ldDoc, int startIndex, int endIndex) method. The following are the detailed steps:
- Put the input PDF files' paths into a vector.
- Create a vector of PdfDocument objects.
- Iterate through the paths in the vector.
- Load the PDF files specified by the paths using PdfDocument->LoadFromFile() method.
- Initialize an instance of PdfDocument class to create a new PDF document.
- Insert a specific page or a range of pages from the loaded PDF files into the new PDF using PdfDocument->InsertPage(PdfDocument ldDoc, int pageIndex) or PdfDocument->InsertPageRange(PdfDocument ldDoc, int startIndex, int endIndex) method.
- Save the result PDF using PdfDocument->SaveToFile() method.
- C++
#include "Spire.Pdf.o.h"

using namespace Spire::Pdf;
using namespace std;
using namespace Spire::Common;

int main() {

	//Put the input PDF files' paths into a vector
	std::vector<std::wstring> files = { L"Input\\File_2.pdf", L"Input\\File_4.pdf" };

	//Create a vector of PdfDocument objects
	std::vector<PdfDocument*> docs(files.size());

	//Iterate through the paths in the vector
	for (int i = 0; i < files.size(); i++)
	{
		//Load the PDF files specified by the paths
		docs[i] = new PdfDocument();
		docs[i]->LoadFromFile(files[i].c_str());
	}

	//Create a new PDF document
	PdfDocument* newDoc = new PdfDocument();

	//Insert pages 1-2 of the first PDF into the new PDF
	newDoc->InsertPageRange(docs[0], 0, 1);
	//Insert page 1 of the second PDF into the new PDF
	newDoc->InsertPage(docs[1], 0);

	//Specify the output file path
	wstring outputFile = L"Output\\MergePdfs.pdf";

	//Save the result pdf file
	newDoc->SaveToFile(outputFile.c_str());

	//Close the PdfDocument objects
	newDoc->Close();
	for (auto doc : docs)
	{
		doc->Close();
	}
}
Apply for a Temporary License
If you'd like to remove the evaluation message from the generated documents, or to get rid of the function limitations, please request a 30-day trial license for yourself.
How to Convert Word to Excel in C#

Word and Excel are designed for different types of content - Word focuses on documents, while Excel is better for structured data and analysis. Because of this, working with the same content across both formats isn't always straightforward.
If you have data in a Word document that you'd like to view or process in Excel, converting it manually can be tedious. With Spire.Doc for .NET, you can now convert Word directly to Excel, making it easier to reuse Word content in Excel.
In this tutorial, you'll learn how to convert Word to Excel in C#.
- Install Spire.Doc for .NET
- Basic Word to Excel Conversion in C#
- Advanced Word to Excel Conversion Scenarios
- Notes and Best Practices
- FAQs
- Get a Free License
Install Spire.Doc for .NET
To begin with, you need to add the DLL files included in the Spire.Doc for .NET package as references in your .NET project. The DLL files can be either downloaded from this link or installed via NuGet.
PM> Install-Package Spire.Doc
Basic Word to Excel Conversion in C#
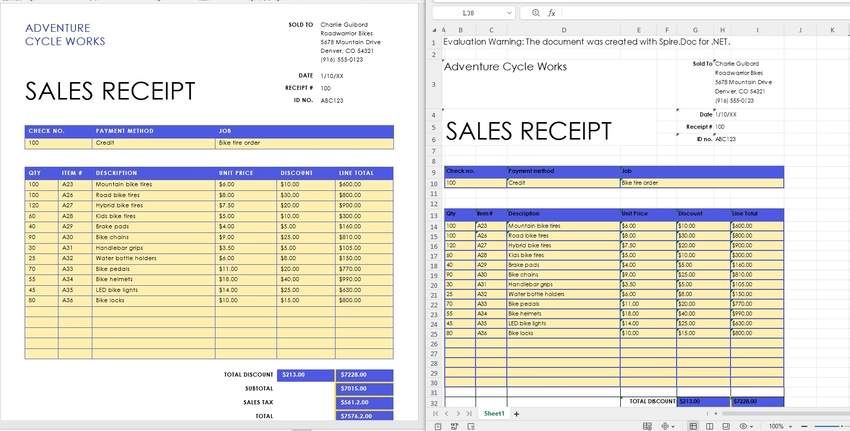
Converting a Word document to Excel with Spire.Doc is straightforward:
-
Load a Word document using Document.LoadFromFile() method.
-
Save the document as an Excel file using Document.SaveToFile() method.
This works best when your Word document contains structured content, especially tables, which can be naturally mapped into spreadsheet cells.
using Spire.Doc;

namespace WordToExcel
{
    class Program
    {
        static void Main(string[] args)
        {
            // Load the Word document
            Document document = new Document();
            document.LoadFromFile("C:\\Users\\Tommy\\Desktop\\Sample.docx");

            // Save as Excel
            document.SaveToFile("C:\\Users\\Tommy\\Desktop\\Sample.xlsx", FileFormat.XLSX);

            document.Dispose();
        }
    }
}
Output Results:
What Gets Converted Well?
When converting Word to Excel, it's important to understand how content is interpreted:
- Tables in Word are converted into Excel worksheets with rows and columns preserved.
- Paragraph text may be inserted into cells, but without strict structure.
- Complex layouts (floating elements, multi-column sections) may not translate perfectly.
- By default, each Section in a Word document is converted into a separate worksheet in Excel.
For best results, ensure your Word document uses clear table structures before conversion.
Advanced Word to Excel Conversion Scenarios
Once you understand the basic conversion process, you can handle more advanced scenarios depending on your needs.
Convert Only Tables from Word to Excel
If you only need structured data, extracting tables from a Word document is often more useful than converting the entire file. By default, all tables within the same section are placed into a single worksheet. To output each table into a separate worksheet, you can place each table into its own section before conversion.
To do this, you can work with the document structure and table objects:
- Use section.Tables to access all tables within a section.
- Use table.Clone() to create a copy of each table.
- Create a new section for each table so that each one is mapped to a separate worksheet in Excel.
This approach gives you precise control over the output and ensures that only relevant data is included in the resulting Excel file.
using Spire.Doc;

class Program
{
    static void Main()
    {
        // Load the Word document
        Document doc = new Document();
        doc.LoadFromFile("G:/Documents/Sample84.docx");

        // Create a new document to store extracted tables
        Document tempDoc = new Document();

        // Iterate through all sections in the source document
        foreach (Section section in doc.Sections)
        {
            // Iterate through all tables in the current section
            foreach (Table table in section.Tables)
            {
                // Create a new section for each table (each section becomes a separate worksheet in Excel)
                Section tempSec = tempDoc.AddSection();

                // Clone the table and add it to the new section
                tempSec.Tables.Add(table.Clone());
            }
        }

        // Save as Excel file
        tempDoc.SaveToFile("Tables.xlsx", FileFormat.XLSX);

        // Close and release resources
        doc.Close();
        tempDoc.Close();
    }
}
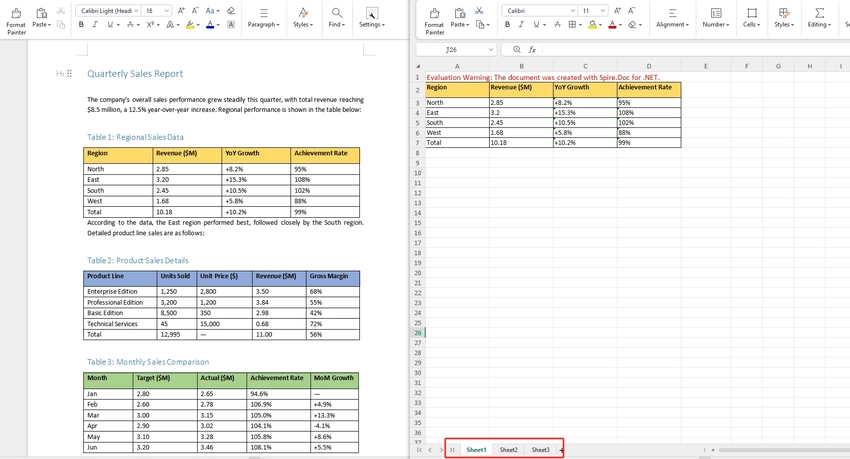
Note: Since each table is placed into its own section before conversion, each table will appear in a separate worksheet in the output Excel file.
Convert a Specific Page of a Word Document to Excel
In some cases, only a specific page contains the data you need — for example, a summary table on page 2 — use Document.ExtractPages() to isolate that page into a new Document object before converting. This avoids processing the entire file and gives you a cleaner, focused output. If you're only interested in structured data from that page, you can further extract tables from Word in C# before exporting.
using Spire.Doc;

namespace WordPageToExcel
{
    class Program
    {
        static void Main(string[] args)
        {
            // Load the Word document
            Document document = new Document();
            document.LoadFromFile("input.docx");

            // Extract the content of the specified page (e.g., page 1)
            Document pageDoc = document.ExtractPages(0, 1); // Retrieve page 1 (starting from index 0, retrieve page 1).

            // Save the extracted page as Excel
            pageDoc.SaveToFile("output.xlsx", FileFormat.XLSX);

            document.Dispose();
            pageDoc.Dispose();
        }
    }
}
Note: Page boundaries in Word are flow-based and can shift depending on font rendering. If the extracted page doesn't match what you see in Word, verify the page index by testing with a few values around your target.
Batch Convert Multiple Word Documents to Excel
To convert an entire folder of Word files, loop through each .docx file and apply the same conversion. This is useful for bulk migrations or scheduled processing pipelines.
This approach can be easily integrated into background jobs or automation workflows.
using Spire.Doc;
using System.IO;

namespace BatchWordToExcel
{
    class Program
    {
        static void Main(string[] args)
        {
            // Get all Word files from the input folder
            string inputFolder = "inputDocs";
            string outputFolder = "outputExcels";
            Directory.CreateDirectory(outputFolder);

            string[] wordFiles = Directory.GetFiles(inputFolder, "*.docx");

            // Loop through each Word file and convert to Excel
            foreach (string filePath in wordFiles)
            {
                Document document = new Document();
                document.LoadFromFile(filePath);

                string fileName = Path.GetFileNameWithoutExtension(filePath);
                string outputPath = Path.Combine(outputFolder, fileName + ".xlsx");

                document.SaveToFile(outputPath, FileFormat.XLSX);
                document.Dispose();
            }
        }
    }
}
Tip: For large batches, consider wrapping the inner block in a try/catch so a single malformed file doesn't abort the entire run. If your workflow requires combining documents before conversion, learn how to merge Word documents in C#.
Notes and Best Practices
- For best results, use well-structured tables in Word.
- Avoid complex layouts like floating shapes or multi-column designs.
- For large-scale processing, consider handling files in batches to optimize memory usage.
FAQs
Q1: Which Word file formats are supported for conversion?
A: Spire.Doc for .NET supports both .doc and .docx formats as input. You can load either format using Document.LoadFromFile() and the library will handle the rest automatically.
Q2: Will the original formatting be preserved after conversion?
A: The conversion focuses on exporting content into a spreadsheet format. Structured content like tables is usually preserved with good readability, while complex layouts may not be retained exactly as in Word.
Q3: Is this feature suitable for large documents?
A: Yes, but performance may vary depending on document size and complexity. For large files, it is recommended to optimize memory usage and process documents efficiently in your code.
Q4: Can I further customize the Excel output after conversion?
A: Yes. After saving the converted .xlsx file, you can open it with Spire.XLS for .NET to further customize the output, such as adjusting cell styles, fonts, colors, column widths, or adding formulas. The two libraries are designed to work together seamlessly.
Conclusion
In this article, you learned how to convert Word to Excel in C# using Spire.Doc for .NET, from basic document conversion to more advanced scenarios like page extraction and table-focused processing. For more control over the output, such as adjusting fonts, colors, or cell formatting - you can combine it with Spire.XLS for .NET.
You can also explore other conversion features, such as exporting Word documents to PDF, HTML, or images.
Get a Free License
If you'd like to remove the evaluation message from the generated documents, or to get rid of the function limitations, please request a 30-day trial license for yourself.
Java: Convert Images (PNG, JPG, BMP, etc.) to PowerPoint
Picture files are among the most commonly used types of documents in people's lives. Sometimes, you may want to take all image files in a folder and convert them into slides for a PowerPoint presentation. Depending on your requirements, you can convert images to shapes or slide backgrounds. This article demonstrates how to convert images (in any common image format) to a PowerPoint document in Java using Spire.Presentation for Java.
- Convert Images to Backgrounds in PowerPoint in Java
- Convert Images to Shapes in PowerPoint in Java
- Convert Images to PowerPoint with Customized Slide Size in Java
Install Spire.Presentation for Java
First, you're required to add the Spire.Presentation.jar file as a dependency in your Java program. The JAR file can be downloaded from this link. If you use Maven, you can easily import the JAR file in your application by adding the following code to your project's pom.xml file.
<repositories>
    <repository>
        <id>com.e-iceblue</id>
        <name>e-iceblue</name>
        <url>https://repo.e-iceblue.com/nexus/content/groups/public/</url>
    </repository>
</repositories>
<dependencies>
    <dependency>
        <groupId>e-iceblue</groupId>
        <artifactId>spire.presentation</artifactId>
        <version>11.5.1</version>
    </dependency>
</dependencies>
Convert Images to Backgrounds in PowerPoint in Java
When images are converted as background of each slide in a PowerPoint document, they cannot be moved or scaled. The following are the steps to convert a set of images to a PowerPoint file as background images using Spire.Presentation for Java.
- Create a Presentation object.
- Set the slide size type to Sreen16x9.
- Get the image paths from a folder.
- Traverse through the images.
- Get a specific image and append it to the image collection of the document using Presentation.getImages().append() method.
- Add a slide to the document using Presentation.getSlides().append() method.
- Set the image as the background of the slide using the methods under SlideBackground object.
- Save the document to a PowerPoint file using Presentation.saveToFile() method.
- Java
import com.spire.presentation.*;
import com.spire.presentation.drawing.*;

import javax.imageio.ImageIO;
import java.awt.image.BufferedImage;
import java.io.File;
import java.io.FileInputStream;

public class ConvertImagesAsBackground {

    public static void main(String[] args) throws Exception {

        //Create a Presentation object
        Presentation presentation = new Presentation();

        //Set slide size type
        presentation.getSlideSize().setType(SlideSizeType.SCREEN_16_X_9);

        //Remove the default slide
        presentation.getSlides().removeAt(0);

        //Get image files from a folder
        File directoryPath = new File("C:\\Users\\Administrator\\Desktop\\Images");
        File[] picFiles  = directoryPath.listFiles();

        //Loop through the images
        for (int i = 0; i < picFiles.length; i++)
        {
            //Add a slide
            ISlide slide = presentation.getSlides().append();

            //Get a specific image
            String imageFile = picFiles[i].getAbsolutePath();

            //Append it to the image collection
            BufferedImage bufferedImage =  ImageIO.read(new FileInputStream(imageFile));
            IImageData imageData = presentation.getImages().append(bufferedImage);

            //Set the image as the background image of the slide
            slide.getSlideBackground().setType(BackgroundType.CUSTOM);
            slide.getSlideBackground().getFill().setFillType(FillFormatType.PICTURE);
            slide.getSlideBackground().getFill().getPictureFill().setFillType(PictureFillType.STRETCH);
            slide.getSlideBackground().getFill().getPictureFill().getPicture().setEmbedImage(imageData);
        }

        //Save to file
        presentation.saveToFile("output/ImagesToBackground.pptx", FileFormat.PPTX_2013);
    }
}
Convert Images to Shapes in PowerPoint in Java
If you would like the images are moveable and resizable in the PowerPoint file, you can convert them as shapes. Below are the steps to convert images to shapes in a PowerPoint document using Spire.Presentation for Java.
- Create a Presentation object.
- Set the slide size type to Sreen16x9.
- Get the image paths from a folder.
- Traverse through the images.
- Get a specific image and append it to the image collection of the document using Presentation.getImages().append() method.
- Add a slide to the document using Presentation.getSlides().append() method.
- Add a shape with the size equal to the slide using ISlide.getShapes().appendShape() method.
- Fill the shape with the image using the methods under FillFormat object.
- Save the document to a PowerPoint file using Presentation.saveToFile() method.
- Java
import com.spire.presentation.*;
import com.spire.presentation.drawing.*;

import javax.imageio.ImageIO;
import java.awt.geom.Rectangle2D;
import java.awt.image.BufferedImage;
import java.io.File;
import java.io.FileInputStream;

public class ConvertImageToShape {

    public static void main(String[] args) throws Exception {

        //Create a Presentation object
        Presentation presentation = new Presentation();

        //Set slide size type
        presentation.getSlideSize().setType(SlideSizeType.SCREEN_16_X_9);

        //Remove the default slide
        presentation.getSlides().removeAt(0);

        //Get image files from a folder
        File directoryPath = new File("C:\\Users\\Administrator\\Desktop\\Images");
        File[] picFiles  = directoryPath.listFiles();

        //Loop through the images
        for (int i = 0; i < picFiles.length; i++)
        {
            //Add a slide
            ISlide slide = presentation.getSlides().append();

            //Get a specific image
            String imageFile = picFiles[i].getAbsolutePath();

            //Append it to the image collection
            BufferedImage bufferedImage =  ImageIO.read(new FileInputStream(imageFile));
            IImageData imageData = presentation.getImages().append(bufferedImage);

            //Add a shape with the size equal to the slide
            IAutoShape shape = slide.getShapes().appendShape(ShapeType.RECTANGLE, new Rectangle2D.Float(0, 0, (float) presentation.getSlideSize().getSize().getWidth(), (float)presentation.getSlideSize().getSize().getHeight()));

            //Fill the shape with image
            shape.getLine().setFillType(FillFormatType.NONE);
            shape.getFill().setFillType(FillFormatType.PICTURE);
            shape.getFill().getPictureFill().setFillType(PictureFillType.STRETCH);
            shape.getFill().getPictureFill().getPicture().setEmbedImage(imageData);
        }

        //Save to file
        presentation.saveToFile("output/ImagesToShape.pptx", FileFormat.PPTX_2013);
    }
}
Convert Images to PowerPoint with Customized Slide Size in Java
If the aspect ratio of your images is not 16:9, or they are not in a standard slide size, you can create slides based on the actual size of the pictures. This will prevent the image from being over stretched or compressed. The following are the steps to convert images to a PowerPoint document with customized slide size using Spire.Presentation for Java.
- Create a Presentation object.
- Create a PdfUnitConvertor object, which is used to convert pixel to point.
- Get the image paths from a folder.
- Traverse through the images.
- Get a specific image and append it to the image collection of the document using Presentation.getImages().append() method.
- Get the image width and height, and convert them to point.
- Set the slide size of the presentation based on the image size using Presentation.getSlideSize().setSize() method.
- Add a slide to the document using Presentation.getSlides().append() method.
- Set the image as the background image of the slide using the methods under SlideBackground object.
- Save the document to a PowerPoint file using Presentation.saveToFile() method.
- Java
import com.spire.presentation.pdf.graphics.PdfGraphicsUnit;
import com.spire.presentation.pdf.graphics.PdfUnitConvertor;
import com.spire.presentation.*;
import com.spire.presentation.drawing.*;

import javax.imageio.ImageIO;
import java.awt.*;
import java.awt.image.BufferedImage;
import java.io.File;
import java.io.FileInputStream;

public class CustomizeSlideSize {

    public static void main(String[] args) throws Exception {

        //Create a Presentation object
        Presentation presentation = new Presentation();

        //Remove the default slide
        presentation.getSlides().removeAt(0);

        //Get image files from a folder
        File directoryPath = new File("C:\\Users\\Administrator\\Desktop\\Images");
        File[] picFiles  = directoryPath.listFiles();

        //Create a PdfUnitConvertor object
        PdfUnitConvertor convertor = new PdfUnitConvertor();

        //Loop through the images
        for (int i = 0; i < picFiles.length; i++)
        {
            //Get a specific image
            String imageFile = picFiles[i].getAbsolutePath();

            //Append it to the image collection
            BufferedImage bufferedImage =  ImageIO.read(new FileInputStream(imageFile));
            IImageData imageData = presentation.getImages().append(bufferedImage);

            //Get image height and width in pixel
            int height = imageData.getHeight();
            int width = imageData.getWidth();

            //Convert pixel to point
            float widthPoint = convertor.convertUnits(width, PdfGraphicsUnit.Pixel, PdfGraphicsUnit.Point);
            float heightPoint= convertor.convertUnits(height, PdfGraphicsUnit.Pixel, PdfGraphicsUnit.Point);

            //Set slide size
            presentation.getSlideSize().setSize(new Dimension((int)widthPoint, (int)heightPoint));

            //Add a slide
            ISlide slide = presentation.getSlides().append();

            //Set the image as the background image of the slide
            slide.getSlideBackground().setType(BackgroundType.CUSTOM);
            slide.getSlideBackground().getFill().setFillType(FillFormatType.PICTURE);
            slide.getSlideBackground().getFill().getPictureFill().setFillType(PictureFillType.STRETCH);
            slide.getSlideBackground().getFill().getPictureFill().getPicture().setEmbedImage(imageData);
        }

        //Save to file
        presentation.saveToFile("output/CustomizeSlideSize.pptx", FileFormat.PPTX_2013);
    }
}
Apply for a Temporary License
If you'd like to remove the evaluation message from the generated documents, or to get rid of the function limitations, please request a 30-day trial license for yourself.
C#/VB.NET: Convert Images (PNG, JPG, BMP, etc.) to PowerPoint
There are times when you need to create a PowerPoint document from a group of pre-created image files. As an example, you have been provided with some beautiful flyers by your company, and you need to combine them into a single PowerPoint document in order to display each picture in an orderly manner. In this article, you will learn how to convert image files (in any popular image format) to a PowerPoint document in C# and VB.NET using Spire.Presentation for .NET.
- Convert Image to Background in PowerPoint in C# and VB.NET
- Convert Image to Shape in PowerPoint in C# and VB.NET
- Convert Image to PowerPoint with Customized Slide Size in C# and VB.NET
Install Spire.Presentation for .NET
To begin with, you need to add the DLL files included in the Spire.Presentation for.NET package as references in your .NET project. The DLL files can be either downloaded from this link or installed via NuGet.
PM> Install-Package Spire.Presentation
Convert Image to Background in PowerPoint in C# and VB.NET
When images are converted as background of each slide in a PowerPoint document, they cannot be moved or scaled. The following are the steps to convert a set of images to a PowerPoint file as background images using Spire.Presentation for .NET.
- Create a Presentation object.
- Set the slide size type to Sreen16x9.
- Get the image paths from a folder and save in a string array.
- Traverse through the images.
- Get a specific image and append it to the image collection of the document using Presentation.Images.Append() method.
- Add a slide to the document using Presentation.Slides.Append() method.
- Set the image as the background of the slide through the properties under ISlide.SlideBackground object.
- Save the document to a PowerPoint file using Presentation.SaveToFile() method.
- C#
- VB.NET
using Spire.Presentation;
using Spire.Presentation.Drawing;
using System.Drawing;
using System.IO;

namespace ConvertImageToBackground
{
    class Program
    {
        static void Main(string[] args)
        {
            //Create a Presentation object
            Presentation presentation = new Presentation();

            //Set slide size type
            presentation.SlideSize.Type = SlideSizeType.Screen16x9;

            //Remove the default slide
            presentation.Slides.RemoveAt(0);

            //Get file paths in a string array
            string[] picFiles = Directory.GetFiles(@"C:\Users\Administrator\Desktop\Images");

            //Loop through the images
            for (int i = 0; i < picFiles.Length; i++)
            {
                //Add a slide
                ISlide slide = presentation.Slides.Append();

                //Get a specific image
                string imageFile = picFiles[i];
                Image image = Image.FromFile(imageFile);

                //Append it to the image collection
                IImageData imageData = presentation.Images.Append(image);

                //Set the image as the background image of the slide
                slide.SlideBackground.Type = BackgroundType.Custom;
                slide.SlideBackground.Fill.FillType = FillFormatType.Picture;
                slide.SlideBackground.Fill.PictureFill.FillType = PictureFillType.Stretch;
                slide.SlideBackground.Fill.PictureFill.Picture.EmbedImage = imageData;
            }

            //Save to file
            presentation.SaveToFile("ImagesToBackground.pptx", FileFormat.Pptx2013);
        }
    }
}
Convert Image to Shape in PowerPoint in C# and VB.NET
If you would like the images are moveable and resizable in the PowerPoint file, you can convert them as shapes. Below are the steps to convert images to shapes in a PowerPoint document using Spire.Presentation for .NET.
- Create a Presentation object.
- Set the slide size type to Sreen16x9.
- Get the image paths from a folder and save in a string array.
- Traverse through the images.
- Get a specific image and append it to the image collection of the document using Presentation.Images.Append() method.
- Add a slide to the document using Presentation.Slides.Append() method.
- Add a shape with the size equal to the slide using ISlide.Shapes.AppendShape() method.
- Fill the shape with the image through the properties under IAutoShape.Fill object.
- Save the document to a PowerPoint file using Presentation.SaveToFile() method.
- C#
- VB.NET
using Spire.Presentation;
using Spire.Presentation.Drawing;
using System.Drawing;
using System.IO;

namespace ConvertImageToShape
{
    class Program
    {
        static void Main(string[] args)
        {
            //Create a Presentation object
            Presentation presentation = new Presentation();

            //Set slide size type
            presentation.SlideSize.Type = SlideSizeType.Screen16x9;

            //Remove the default slide
            presentation.Slides.RemoveAt(0);

            //Get file paths in a string array
            string[] picFiles = Directory.GetFiles(@"C:\Users\Administrator\Desktop\Images");

            //Loop through the images
            for (int i = 0; i < picFiles.Length; i++)
            {
                //Add a slide
                ISlide slide = presentation.Slides.Append();

                //Get a specific image
                string imageFile = picFiles[i];
                Image image = Image.FromFile(imageFile);

                //Append it to the image collection
                IImageData imageData = presentation.Images.Append(image);

                //Add a shape with a size equal to the slide
                IAutoShape shape = slide.Shapes.AppendShape(ShapeType.Rectangle, new RectangleF(new PointF(0, 0), presentation.SlideSize.Size));

                //Fill the shape with image
                shape.Line.FillType = FillFormatType.None;
                shape.Fill.FillType = FillFormatType.Picture;
                shape.Fill.PictureFill.FillType = PictureFillType.Stretch;
                shape.Fill.PictureFill.Picture.EmbedImage = imageData;
            }

            //Save to file
            presentation.SaveToFile("ImageToShape.pptx", FileFormat.Pptx2013);
        }
    }
}
Convert Image to PowerPoint with Customized Slide Size in C# and VB.NET
If the aspect ratio of your images is not 16:9, or they are not in a standard slide size, you can create slides based on the actual size of the pictures. This will prevent the image from being over stretched or compressed. The following are the steps to convert images to a PowerPoint document with customized slide size using Spire.Presentation for .NET.
- Create a Presentation object.
- Create a PdfUnitConvertor object, which is used to convert pixel to point.
- Get the image paths from a folder and save in a string array.
- Traverse through the images.
- Get a specific image and append it to the image collection of the document using Presentation.Images.Append() method.
- Get the image width and height, and convert them to point.
- Set the slide size of the presentation based on the image size through Presentation.SlideSize.Size property.
- Add a slide to the document using Presentation.Slides.Append() method.
- Set the image as the background image of the slide through the properties under ISlide.SlideBackground object.
- Save the document to a PowerPoint file using Presentation.SaveToFile() method.
- C#
- VB.NET
using Spire.Pdf.Graphics;
using Spire.Presentation;
using Spire.Presentation.Drawing;
using System.Drawing;
using System.IO;

namespace CustomSlideSize
{
    class Program
    {
        static void Main(string[] args)
        {
            //Create a Presentation object
            Presentation presentation = new Presentation();

            //Remove the default slide
            presentation.Slides.RemoveAt(0);

            //Get file paths in a string array
            string[] picFiles = Directory.GetFiles(@""C:\Users\Administrator\Desktop\Images"");

            TextBox picBox = new TextBox();

            Graphics g = picBox.CreateGraphics();

            float dpiY = g.DpiY;

            //Loop through the images
            for (int i = 0; i < picFiles.Length; i++)
            {
                //Get a specific image
                string imageFile = picFiles[i];
                Image image = Image.FromFile(imageFile);

                //Append it to the image collection
                IImageData imageData = presentation.Images.Append(image);

                //Get image height and width in pixel
                int heightpixels = imageData.Height;
                int widthpixels = imageData.Width;

                //Convert pixel to point
                float widthPoint = widthpixels * 72.0f / dpiY;

                float heightPoint = heightpixels * 72.0f / dpiY;

                //Set slide size
                presentation.SlideSize.Size = new SizeF(widthPoint, heightPoint);

                //Add a slide
                ISlide slide = presentation.Slides.Append();

                //Set the image as the background image of the slide
                slide.SlideBackground.Type = BackgroundType.Custom;
                slide.SlideBackground.Fill.FillType = FillFormatType.Picture;
                slide.SlideBackground.Fill.PictureFill.FillType = PictureFillType.Stretch;
                slide.SlideBackground.Fill.PictureFill.Picture.EmbedImage = imageData;
            }

            //Save to file
            presentation.SaveToFile(""CustomizeSlideSize.pptx"", FileFormat.Pptx2013);
        }
    }
}
Apply for a Temporary License
If you'd like to remove the evaluation message from the generated documents, or to get rid of the function limitations, please request a 30-day trial license for yourself.