Deleting cells in Excel can mean different things. You may simply want to remove the data inside a cell while keeping the worksheet layout unchanged, or you may need to delete the cell itself and shift surrounding data to fill the gap.
This guide covers 7 practical ways to delete cells in Excel, from clearing cell contents and removing blank cells to working with Excel Tables and processing multiple workbooks with Python.
Before You Delete Cells: Check Formula References
Before deleting cells, check whether they are referenced by formulas elsewhere in the workbook. Removing referenced cells can change formula results or cause a #REF! error if a reference becomes invalid.
To check for dependencies before deleting:
-
Select the cell you plan to remove.
-
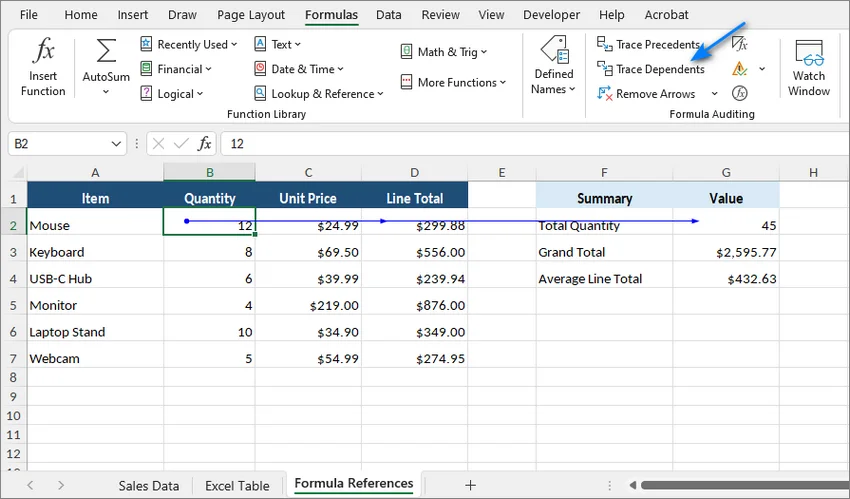
Go to the Formulas tab and click Trace Dependents in the Formula Auditing group.
-
Review the arrows to see which formulas depend on that cell.
-
If the cell is referenced elsewhere, update the affected formulas before proceeding.
Tip: If you are making substantial changes to an important workbook, save a backup copy first so you can easily restore the original data if necessary.
Quick Guide: Choose the Right Way to Delete Cells in Excel
The right method depends on what you actually want to remove. Use this table to choose the most suitable approach:
| What You Want to Do | Recommended Method |
|---|---|
| Clear cell contents only | Press Delete |
| Delete cells and shift surrounding data | Right-click > Delete... |
| Find and remove blank cells | Use the Go To Special feature |
| Find and delete cells based on values or formatting | Use the Find and Replace tool |
| Remove Cells from an Excel Table | Clear the contents or delete entire table rows or columns |
| Delete cells online in a web browser | Use Excel for the web |
| Automate Cell Deletion across Multiple Excel Files | Use Python automation |
1. Clear Cell Contents Only
If you want to remove the data or formulas inside selected cells without changing the position of surrounding cells, clear the contents instead of deleting the cells themselves.
- Select the cells you want to clear.
- Press the Delete key.
The cell contents are removed, while formatting such as borders, fill colors, and number formats remains in place.
Tip: Excel provides several Clear options for cell contents and formatting. To remove both the contents and formatting, go to Home > Clear > Clear All. If you only want to remove formatting, choose Clear Formats instead.
2. Delete Cells and Shift Surrounding Data
If you want to remove selected cells completely and move nearby data into the empty space:
-
Select the cells you want to delete.
-
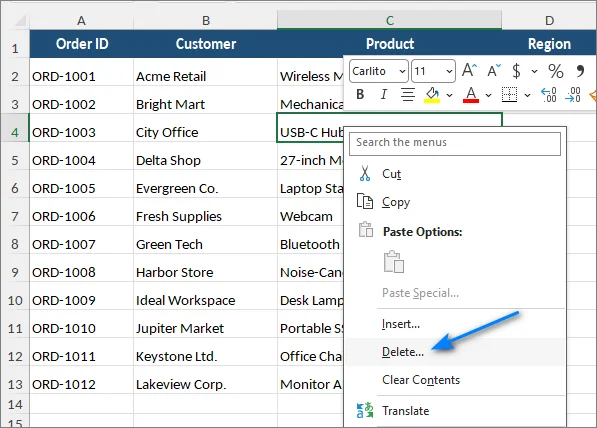
Right-click inside the selection.
-
Click Delete....
-
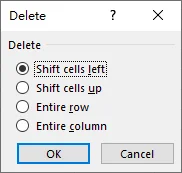
Choose how Excel should fill the gap:
- Shift cells up: Moves the cells below upward.
- Shift cells left: Moves cells on the right to the left.
- Entire row: Deletes the whole worksheet row.
- Entire column: Deletes the whole worksheet column.
-
Click OK.
Keyboard shortcut: You can also press Ctrl + - to open the Delete dialog box instantly, then pick your shift option.
Caution: Be careful when shifting only part of a row or column. If each row represents one complete record, moving cells independently can cause values from different records to become misaligned.
3. Find and Remove Blank Cells
If a worksheet contains scattered blank cells, Excel's Go To Special feature can select them at once.
-
Select the data range that contains the blank cells.
-
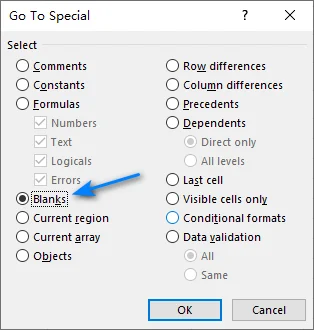
Press F5 or Ctrl + G to open the Go To dialog box, then click Special....
-
Select Blanks and click OK.
-
Excel highlights the blank cells in the selected range.
-
Open the Delete dialog and choose Shift cells up or Shift cells left, depending on how the surrounding data should move.
Caution: If each row in your dataset represents a complete record (e.g., Name, Email, Phone), avoid shifting individual blank cells up. Instead, select and delete entire blank rows to prevent column values from becoming misaligned.
4. Find and Delete Cells Based on Values or Formatting
When you need to remove multiple cells containing the same value, error, text, or formatting, Find and Replace can locate them quickly.
For example, you may want to find all cells containing Out of Stock, #N/A, or a particular fill color.
-
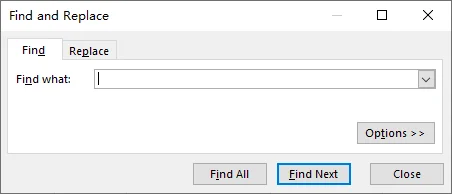
Press Ctrl + F to open the Find and Replace dialog box.
-
Enter the value you want to find.
- To search for a displayed result such as
#N/A, click Options and set Look in to Values. - To search by formatting, click Format and specify the formatting criteria.
- To search for a displayed result such as
-
Click Find All.
-
Click inside the results list and press Ctrl + A to select all matches.
-
Close the Find window.
-
Open the Delete dialog with Ctrl + - and choose how the surrounding data should shift.
Tip: If your goal is only to remove the matching values while keeping the worksheet structure unchanged, press Delete after selecting the results instead of deleting and shifting the cells.
5. Delete Cells Inside an Excel Table
Excel Tables created with Ctrl + T behave differently from ordinary worksheet ranges. Their data is organized into structured rows and columns, so deleting individual cells and shifting only part of the table is not handled in the same way as a normal range.
Choose the option that matches what you need to remove.
Option A: Clear a Table Cell without Moving Data
If you only need to remove the value or formula:
- Select the table cell.
- Press Delete.
The cell remains part of the table, but its contents are cleared.
Option B: Delete an Entire Table Row or Column
To remove a complete record or field:
-
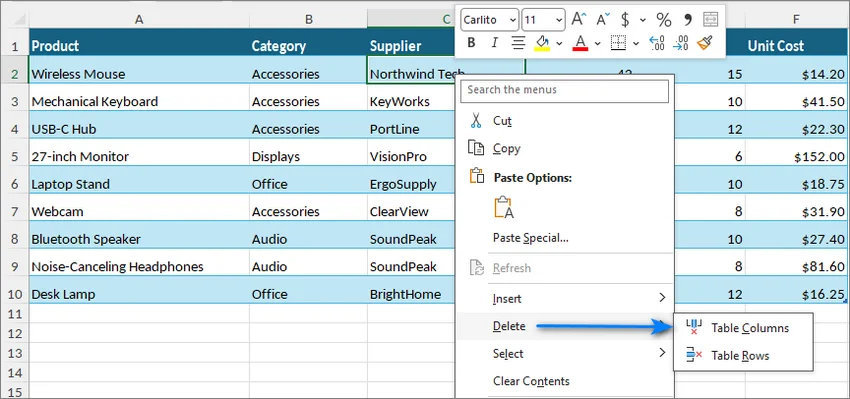
Right-click a cell in the table row or column you want to remove.
-
Hover over Delete.
-
Select Table Rows or Table Columns.
Microsoft also provides these commands through the Home > Delete menu for Excel Tables.
Option C: Convert the Table to a Range before Shifting Individual Cells
If you specifically need normal worksheet behavior such as shifting individual cells up or left:
-
Click anywhere inside the table.
-
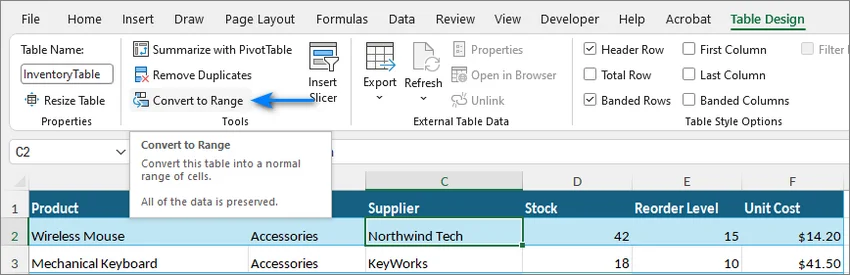
Go to the Table Design tab.
-
Click Convert to Range in the Tools group.
-
Click Yes to confirm.
-
The table is now a normal cell range. Delete the required cells and choose the appropriate shift direction.
-
If necessary, select the range and press Ctrl + T to create a new table.
Warning: Converting a Table to a normal range removes table-specific functionality and converts structured references in formulas to regular cell references. If you recreate the table later, Excel does not automatically convert those formulas back to structured references.
If you want to remove an entire Excel Table rather than selected cells, see Remove a Table in Excel.
6. Delete Cells Online in a Web Browser
Excel for the web lets you delete cells, rows, and columns directly in a web browser, without installing the desktop version of Excel. It is a convenient option for quick online edits on any supported device.
- Upload and open your workbook in Excel for the web.
- Right-click in the cells, row, or column you want to remove.
- Hover over Delete and choose the appropriate deletion option.
Note: Some keyboard shortcuts behave differently in Excel for the web because they can conflict with browser shortcuts. If a desktop shortcut does not behave as expected, use the ribbon or context menu instead.
7. Automate Cell Deletion across Multiple Excel Files (Python Automation for Developers)
The methods above work well when editing one workbook manually. If the same cell range needs to be removed from dozens or hundreds of files, repeating the operation in Excel becomes inefficient and increases the chance of inconsistent changes.
In that case, the process can be automated with Python. The example below uses Free Spire.XLS for Python to delete the same range from multiple .xlsx files without requiring Microsoft Excel to be installed.
Step 1: Install the Required Library
Run the following command:
pip install Spire.Xls.Free
Step 2: Delete the Same Cell Range from Multiple Workbooks
Create a Python file such as clean_excel.py, then place the workbooks you want to process in an input folder.
The following example deletes the range B5:C6 from the first worksheet of every .xlsx file and shifts the cells below upward:
from pathlib import Path
from spire.xls import *

# Define input and output folders
input_folder = Path("input")
output_folder = Path("output")

# Create the output folder if it does not already exist
output_folder.mkdir(exist_ok=True)

# Get all .xlsx files in the input folder
files = list(input_folder.glob("*.xlsx"))

if not files:
    print("No .xlsx files found in the 'input' folder.")
else:
    for file_path in files:
        workbook = Workbook()

        try:
            # Load the workbook
            workbook.LoadFromFile(str(file_path))

            # Get the first worksheet
            worksheet = workbook.Worksheets[0]

            # Delete B5:C6 and move the cells below upward
            target_range = worksheet.Range["B5:C6"]
            worksheet.DeleteRange(target_range, DeleteOption.MoveUp)

            # Save the modified workbook to the output folder
            output_path = output_folder / file_path.name
            workbook.SaveToFile(
                str(output_path),
                ExcelVersion.Version2016
            )

            print(f"Successfully processed: {file_path.name}")

        except Exception as e:
            print(f"Error processing {file_path.name}: {e}")

        finally:
            workbook.Dispose()
This script keeps the original files in the input folder unchanged and saves the processed copies separately in output.
Customize How Cells Are Deleted
Shift Cells to the Left
DeleteOption.MoveUp behaves like Excel's Shift cells up option.
To move cells from the right into the deleted range instead, use:
worksheet.DeleteRange(target_range, DeleteOption.MoveLeft)
Delete Entire Rows or Columns
If you need to remove complete rows or columns instead of individual cells, use DeleteRow() or DeleteColumn().
The indexes are 1-based:
# Delete row 5
worksheet.DeleteRow(5)

# Delete column C
worksheet.DeleteColumn(3)
Tip:
- Before running a batch script on important workbooks, test it on a few copies first and confirm that formulas, tables, charts, and other references still point to the expected data after the cells are removed.
- You can also find cells containing specific content or use the
IXLSRange.IsBlankproperty to identify blank cells, then delete the matched cells using the same method.
Troubleshooting Common Issues
1. A #REF! Error Appears after Deleting Cells
-
Cause: A formula referenced a cell or range that became invalid after the deletion.
-
Fix: Press Ctrl + Z to undo the change. Use Trace Dependents or Trace Precedents to identify related formulas, update the references, and then perform the deletion again if appropriate.
2. Excel Says "Cannot Change Part of a Merged Cell"
-
Cause: The selected range includes only part of a merged cell.
-
Fix: Select the merged area, go to Home > Merge & Center, unmerge the cells, and then perform the deletion.
3. Data Becomes Misaligned after Shifting Cells
-
Cause: Using Shift cells up or Shift cells left moves only the selected portion of the worksheet, which can break the relationship between values in the same record.
-
Fix: If each row represents one complete record, delete the entire row instead of shifting individual cells.
4. Conditional Formatting Becomes Fragmented
-
Cause: Repeatedly inserting, deleting, or copying cells can split conditional-formatting rules across multiple ranges.
-
Fix: Go to Home > Conditional Formatting > Manage Rules. Review duplicate or overlapping rules and consolidate their Applies to ranges where appropriate.
5. PivotTables or Charts Show Missing or Incorrect Data
-
Cause: Deleting source cells, columns, or headers can change the range used by a PivotTable or chart.
-
Fix: Check the source range under PivotTable Analyze > Change Data Source or Chart Design > Select Data, then refresh the PivotTable if necessary. Using an Excel Table as a source can make ranges easier to maintain when records are regularly added or removed.
Frequently Asked Questions
Q1: What is the keyboard shortcut to delete cells in Excel?
Select the cells and press Ctrl + - to open the Delete dialog.
Q2: What is the difference between clearing cell contents and deleting cells?
Clearing cell contents leaves the cells in place and preserves most formatting. Deleting cells, by contrast, removes the selected cells and shifts surrounding cells to fill the gap.
Q3: How can I clear cell formatting without deleting the data?
Select the cells, go to Home > Clear, and choose Clear Formats.
Q4: Can I delete cells in Excel without installing Microsoft Excel?
Yes. For basic worksheet editing, you can open the workbook in Excel for the web and use the available Delete commands. For automated processing of multiple files, you can also use a Python library without running the desktop Excel application.
Final Thoughts
The best way to delete cells in Excel depends on whether you want to clear contents, shift surrounding data, remove complete records, or apply the same change across multiple files.
For everyday editing, Excel's built-in commands are usually enough. For repetitive changes across many workbooks, Python can automate the same operation consistently. Before deleting large ranges, check formula references and make sure shifting cells will not disrupt the structure of your data.