
JavaScript (260)
PDF keeps its layout fixed and identical across devices, which makes it the format of choice for distributing contracts, reports, and photo albums. But PDFs that contain many high-resolution images or embedded fonts are often very large: they eat up storage space and slow down emailing, web uploads, and downloads. If the document can be “slimmed down” directly in the browser while keeping it readable, distribution and loading get noticeably better — without uploading the file to a server and waiting for processing.
Spire.PDF for JavaScript runs on WebAssembly and completes the loading, compression, and saving of PDFs entirely in the browser, managing input and output files through a virtual file system (VFS) with no backend required. It ships a dedicated PdfCompressor, whose Options control the compression strategy along three dimensions: first ImageCompressionOptions resizes and re-compresses the images in the document, second TextCompressionOptions compresses font data or even removes embedded fonts, and third CompressContents re-compresses the page content streams. The three can be freely combined in a single pass to balance visual quality against file size.
This article first introduces the three compression dimensions of PdfCompressor, and then gives a complete runnable example that combines them:
- Compressing Images in a PDF
- Compressing Fonts and Unembedding Fonts in a PDF
- Compressing PDF Content Streams
- Combining All Three Approaches to Compress a PDF
For installation and project configuration, refer to Integrating Spire.PDF for JavaScript in a React Project. The examples below assume Spire.PDF is installed and the WebAssembly module has been initialized.
Compressing Images in a PDF
High-resolution bitmaps on a page are usually the main source of a PDF's size. Options.ImageCompressionOptions controls image scaling and re-encoding with three properties:
| Property | What it does | Effect and trade-off |
|---|---|---|
ResizeImages |
Scales images down proportionally and re-encodes them | Noticeably reduces the size; suited to very large, high-resolution images |
CompressImage |
Performs lossy compression on images | Smaller file at the cost of a little image quality |
ImageQuality |
Controls the quality tier used for re-encoding | High gives better quality but a larger file; Low gives a smaller file but images may look softer |
For an image-heavy document, a typical approach is to enable ResizeImages and CompressImage first, then pick the ImageQuality tier that matches your tolerance for quality loss:
// Compress images in the document: resize, re-compress, and lower the quality
compressor.Options.ImageCompressionOptions.ResizeImages = true;
compressor.Options.ImageCompressionOptions.CompressImage = true;
compressor.Options.ImageCompressionOptions.ImageQuality = pdfModule.ImageQuality.Low;
Compressing Fonts and Unembedding Fonts in a PDF
A PDF embeds the fonts used in its text as subsets inside the file, and several fonts with multiple weights can add up to a fair amount of size. Options.TextCompressionOptions offers two ways to handle fonts:
| Property | What it does | Effect and trade-off |
|---|---|---|
CompressFonts |
Compresses the embedded font data and keeps the fonts | Same rendering, smaller file, no display risk |
UnembedFonts |
Removes the fonts and lets the reader render with system fonts | Even smaller file; glyphs may be substituted if the target system lacks the fonts |
UnembedFonts shrinks the file further but carries a display risk, so whether to enable it depends on where the document will be viewed:
// Compress font data; UnembedFonts goes further and removes the embedded fonts
compressor.Options.TextCompressionOptions.CompressFonts = true;
compressor.Options.TextCompressionOptions.UnembedFonts = true;
Compressing PDF Content Streams
The text and vector drawing commands on a PDF page are stored as “content streams”. They are usually compressed when generated, but after repeated edits or processing by different tools they can still hold redundancy. Options.CompressContents re-compresses the document's content streams, which can also free up some space in text-heavy, layout-complex documents:
// Re-compress the document content streams
compressor.Options.CompressContents = true;
Combining All Three Approaches to Compress a PDF
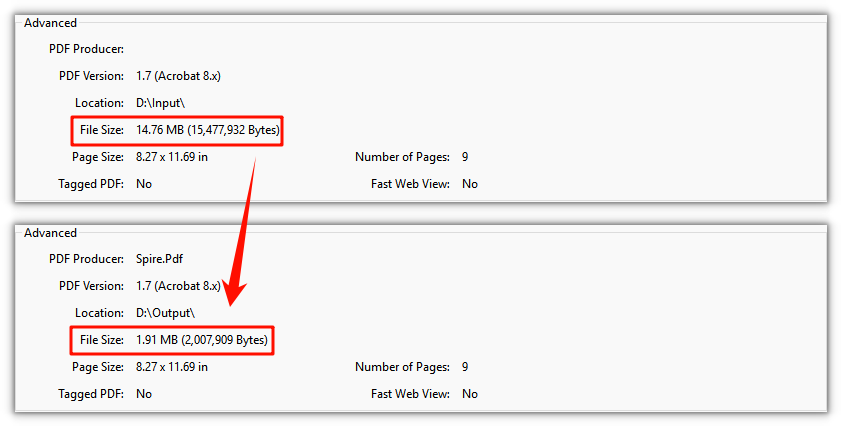
Combining the three approaches above gives a complete compression flow that balances effect and speed: after loading the PDF, enable image, font, and content compression in one pass, then call CompressToFile to write the result to a new file. The example below enables ResizeImages, CompressImage (with the High quality tier), CompressFonts, UnembedFonts, and CompressContents all at once on a PDF that contains both high-resolution images and text, and produces a new document that is clearly smaller:
function App() {
  const compressPdfDocument = async () => {
    // Get the Spire.PDF WASM module
    const pdfModule = window.wasmModule?.spirepdf;

    // Check that the module is ready
    if (!pdfModule) {
      alert('Spire.PDF is not ready yet');
      return;
    }

    // Load the PDF to be compressed into the VFS
    const inputFileName = 'ImageDocument.pdf';
    await window.spire.FetchFileToVFS(inputFileName, "", `${process.env.PUBLIC_URL}/data/`);

    // Create a PdfCompressor and point it at the PDF to compress
    let compressor = new pdfModule.PdfCompressor({ filePath: inputFileName });

    // 1. Image compression: resize and re-compress images, with a higher quality tier
    compressor.Options.ImageCompressionOptions.ResizeImages = true;
    compressor.Options.ImageCompressionOptions.CompressImage = true;
    compressor.Options.ImageCompressionOptions.ImageQuality = pdfModule.ImageQuality.High;

    // 2. Font compression: compress font data and remove embedded fonts
    compressor.Options.TextCompressionOptions.CompressFonts = true;
    compressor.Options.TextCompressionOptions.UnembedFonts = true;

    // 3. Content compression: re-compress the document content streams
    compressor.Options.CompressContents = true;

    // Define the output file name and compress to it
    const outputFileName = 'CompressedDocument.pdf';
    compressor.CompressToFile(outputFileName);

    // Read the generated file from the VFS and trigger the download
    const fileArray = window.dotnetRuntime.Module.FS.readFile(outputFileName);
    const blob = new Blob([fileArray], { type: 'application/pdf' });
    const url = URL.createObjectURL(blob);
    const a = document.createElement('a');
    a.href = url;
    a.download = outputFileName;
    a.click();
    URL.revokeObjectURL(url);
  };

  return (
    <div style={{ textAlign: 'center', height: '300px' }}>
      <h1>Compress PDF Document</h1>
      <button onClick={compressPdfDocument}>
        Generate
      </button>
    </div>
  );
}

export default App;
PDF document compressed by combining all three approaches
FAQ
Why is the file still large after compression when the PDF has few images
Reason: The size does not always come from images. When the pages are text-heavy, the size is more likely to come from the embedded fonts and the page content streams, so enabling image compression alone helps little.
Solution: Cover the other dimensions as well — compress font data with TextCompressionOptions (using UnembedFonts to remove embedded fonts when appropriate) and re-compress the content streams with CompressContents, so that text-heavy documents also shrink noticeably.
Will unembedding fonts cause the text to display incorrectly
Reason: UnembedFonts removes the font programs from the PDF, so the reader renders the text with fonts installed on the system; if the target environment lacks those fonts, glyph substitution or spacing changes may occur.
Solution: For documents distributed to users whose font environments are unknown, keep the fonts embedded and only use CompressFonts to compress the font data; enable UnembedFonts only when you are sure the target system has the corresponding fonts:
// Keep fonts embedded but compress the font data to avoid display risks after unembedding
compressor.Options.TextCompressionOptions.UnembedFonts = false;
compressor.Options.TextCompressionOptions.CompressFonts = true;
How should I trade off the image quality tier against the compression methods
Reason: ImageQuality only affects the quality and size of the re-encoded images; depending on the document, the part that contributes the most to its size differs, so a single dimension rarely reaches an ideal compression ratio.
Solution: For image-heavy documents, enable ResizeImages and CompressImage first and choose between the High/Low tiers; for text-heavy documents, focus on font compression and content compression. If fonts must stay embedded, just turn off UnembedFonts — the other compression options are unaffected:
// For image-heavy documents, choose the lower quality tier for a smaller file
compressor.Options.ImageCompressionOptions.ImageQuality = pdfModule.ImageQuality.Low;
Get a Free License
If you want to remove the evaluation message from the result documents or get rid of feature limitations, please contact sales to obtain a free 30-day temporary license.
PDF is a fixed-layout format that is easy to distribute, yet a single PDF usually carries only the body of a document. In practice you often want to hand over supporting material together with the main document, such as a contract bundled with its signed images, or a report bundled with the source data behind it, so that everything stays together for archiving and circulation. PDF attachments (embedded files) provide a standard way to do this: a PDF can carry files of any type in its embedded-file tree, and a recipient who opens one PDF finds both the main document and the supporting files in the viewer’s “Attachments” panel, with no need to request them separately.
Spire.PDF for JavaScript is built on WebAssembly, so it loads, draws, and saves PDFs directly in the browser and manages input and output files through a virtual file system (VFS), with no backend service required. Working with attachments comes down to two operations: adding—wrap a file into an attachment with PdfAttachment and add it to the document’s attachment collection through doc.Attachments.Add; and removing—delete a specified attachment from the doc.Attachments collection with Attachments.RemoveAt(index). Both revolve around the PdfDocument.Attachments collection.
This article covers two key operations:
For installation and project setup, refer to How to Integrate Spire.PDF for JavaScript in a React Project. The examples below assume Spire.PDF is installed and the WebAssembly module has been initialized.
Add an Attachment to a PDF Document
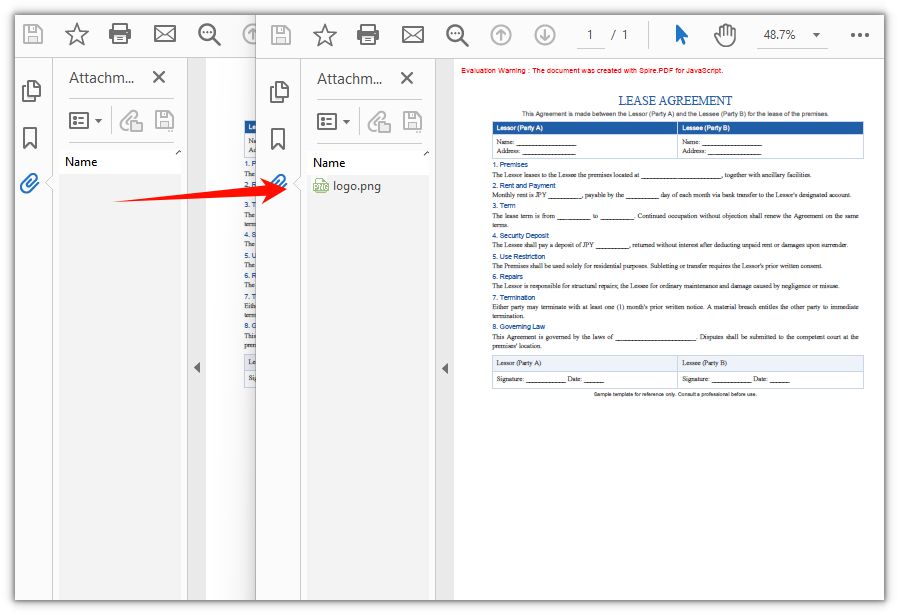
To add an attachment, first load the container PDF and the file to embed into the virtual file system, then wrap the file with PdfAttachment (name, data, description, and MIME type) and add it to doc.Attachments. The attachment is not drawn on the page; it is stored in the PDF’s embedded-file tree, where you can view and save it from the viewer’s “Attachments” panel. This example embeds a logo.png into a lease agreement.
function App() {
  const addAttachment = async () => {
    // Get the Spire.PDF WASM module
    const pdfModule = window.wasmModule?.spirepdf;

    // Check whether the module is ready
    if (!pdfModule) {
      alert('Spire.PDF is not ready yet');
      return;
    }

    // Load the container PDF file into the VFS
    const inputFileName = 'Lease_Agreement_EN.pdf';
    await window.spire.FetchFileToVFS(inputFileName, "", `${process.env.PUBLIC_URL}/data/`);

    // Load the image file to embed as an attachment into the VFS
    const attachFileName = 'logo.png';
    await window.spire.FetchFileToVFS(attachFileName, "", `${process.env.PUBLIC_URL}/data/`);

    // Create a PdfDocument object and load the PDF document
    let doc = new pdfModule.PdfDocument();
    doc.LoadFromFile(inputFileName);

    // Create the attachment and set its file name, description, and MIME type
    let attachment = new pdfModule.PdfAttachment({ fileName: attachFileName });
    attachment.Data = window.dotnetRuntime.Module.FS.readFile(attachFileName);
    attachment.Description = 'Company logo attached to the agreement';
    attachment.MimeType = 'image/png';

    // Add the attachment to the document's attachment collection
    doc.Attachments.Add({ attachment: attachment });

    // Define the output file name and save the document
    const outputFileName = 'Agreement_With_Attachment.pdf';
    doc.SaveToFile(outputFileName);
    doc.Close();

    // Read the generated file from the VFS and trigger a download
    const fileArray = window.dotnetRuntime.Module.FS.readFile(outputFileName);
    const blob = new Blob([fileArray], { type: 'application/pdf' });
    const url = URL.createObjectURL(blob);
    const a = document.createElement('a');
    a.href = url;
    a.download = outputFileName;
    a.click();
    URL.revokeObjectURL(url);
  };

  return (
    <div style={{ textAlign: 'center', height: '300px' }}>
      <h1>Add Attachment To PDF</h1>
      <button onClick={addAttachment}>
        Generate
      </button>
    </div>
  );
}

export default App;
Agreement with the logo.png attachment embedded
Remove an Attachment from a PDF Document
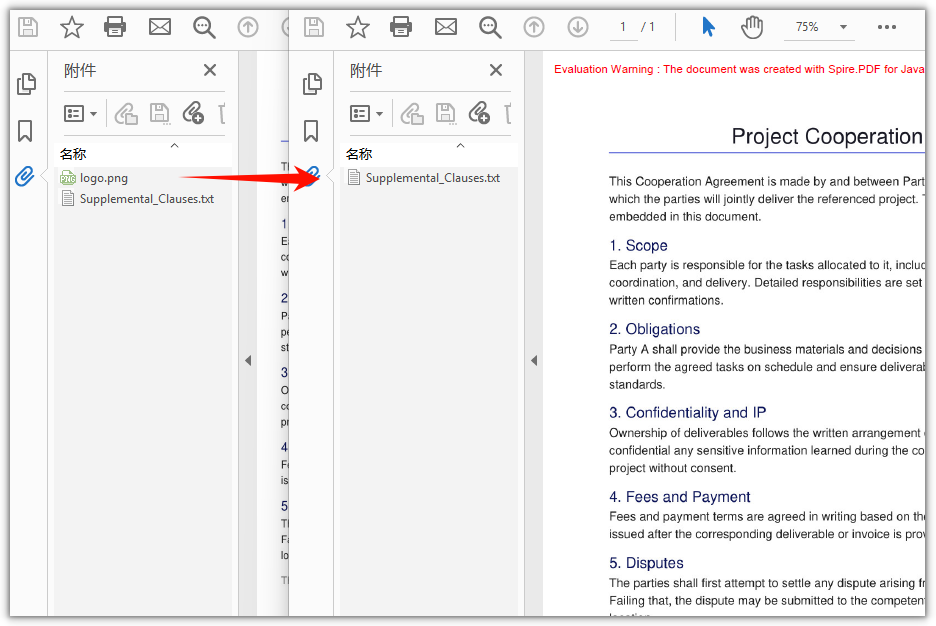
To remove a specified attachment, call Attachments.RemoveAt(index) on the attachment collection; the index is zero-based (check Count first to confirm how many attachments there are). This example loads a sample document that already contains attachments and deletes its first one. To remove every attachment from the document at once, call attachments.Clear() instead.
function App() {
  const deleteAttachments = async () => {
    // Get the Spire.PDF WASM module
    const pdfModule = window.wasmModule?.spirepdf;

    // Check whether the module is ready
    if (!pdfModule) {
      alert('Spire.PDF is not ready yet');
      return;
    }

    // Load the PDF file that contains attachments into the VFS
    const inputFileName = 'SampleWithAttachments.pdf';
    await window.spire.FetchFileToVFS(inputFileName, "", `${process.env.PUBLIC_URL}/data/`);

    // Create a PdfDocument object and load the PDF document
    let doc = new pdfModule.PdfDocument();
    doc.LoadFromFile(inputFileName);

    // Get the document's attachment collection
    let attachments = doc.Attachments;

    // Remove the attachment at the given index (zero-based; here the first one)
    attachments.RemoveAt(0);

    // Define the output file name and save the document
    const outputFileName = 'Attachment_Removed.pdf';
    doc.SaveToFile(outputFileName);
    doc.Close();

    // Read the generated file from the VFS and trigger a download
    const fileArray = window.dotnetRuntime.Module.FS.readFile(outputFileName);
    const blob = new Blob([fileArray], { type: 'application/pdf' });
    const url = URL.createObjectURL(blob);
    const a = document.createElement('a');
    a.href = url;
    a.download = outputFileName;
    a.click();
    URL.revokeObjectURL(url);
  };

  return (
    <div style={{ textAlign: 'center', height: '300px' }}>
      <h1>Delete Attachments From PDF</h1>
      <button onClick={deleteAttachments}>
        Generate
      </button>
    </div>
  );
}

export default App;
PDF document after the first attachment is removed
Frequently Asked Questions
How do I check whether a PDF contains attachments and how many there are
Reason: Before removing or reading attachments, you usually want to know whether the document has any attachments and how many, to avoid invalid operations on an empty collection.
Solution: All attachments of a document live in the doc.Attachments collection; its Count property returns the number of attachments, and a value of 0 means there are none. To read a single attachment, access it by index with get_Item(index):
// Get the document's attachment collection and the number of attachments
let attachments = doc.Attachments;
let count = attachments.Count;
Which properties should I set when adding an attachment
Reason: If you only assign the file bytes without a name and description, the item is displayed incompletely in the viewer’s “Attachments” panel and the recipient cannot tell what the file is.
Solution: The commonly used properties of PdfAttachment are fileName (the file name the recipient sees), Description (a one-line description), and MimeType (the content type); assign the file bytes to Data. After setting them, Add the attachment to the collection so the panel shows it with its name and description:
// Create the attachment and set its file name, data, description, and MIME type
let attachment = new pdfModule.PdfAttachment({ fileName: 'logo.png' });
attachment.Data = window.dotnetRuntime.Module.FS.readFile('logo.png');
attachment.Description = 'Company logo attached to the agreement';
attachment.MimeType = 'image/png';
doc.Attachments.Add({ attachment: attachment });
Can I embed file types other than images as attachments
Reason: Examples often demonstrate attachments with images, which can make it look as if PDF attachments only accept images.
Solution: A PDF attachment is essentially an embedded file that carries arbitrary bytes, with no restriction on the type. As long as you load the file into the virtual file system, read its bytes into Data with FS.readFile, and set MimeType to the matching content type, files such as Word, Excel, PDF, or archives can all be embedded as attachments. Embedding a PDF appendix, for example:
// Load the PDF appendix to embed and add it as an attachment
const attachName = 'Product_Appendix.pdf';
await window.spire.FetchFileToVFS(attachName, "", `${process.env.PUBLIC_URL}/data/`);
let attachment = new pdfModule.PdfAttachment({ fileName: attachName });
attachment.Data = window.dotnetRuntime.Module.FS.readFile(attachName);
attachment.MimeType = 'application/pdf';
doc.Attachments.Add({ attachment: attachment });
Get a Free License
If you wish to delete the evaluation message from the resulting documents, or to get rid of function limitations, please contact sales to obtain a valid 30-day temporary license.
Add, Read, Modify, and Delete Excel Hyperlinks with JavaScript in React
2026-09-09 08:58:49 Written by Nina TangHyperlinks are a common element in Excel for quickly jumping to web pages, email addresses, or other resources, and they often appear in tables such as product websites, contact information, and reference materials. Spire.XLS for JavaScript uses WebAssembly to add, read, modify, and delete hyperlinks directly in the browser and manages input/output files through a virtual file system (VFS) without any backend support.
This article demonstrates the following common features:
For installation and project configuration, please refer to Integrating Spire.XLS for JavaScript in a React Project. The examples below assume that Spire.XLS is installed and the WebAssembly module has been initialized.
Add a Hyperlink to Text
For cells that contain text such as company names, website names, or email addresses, you can add hyperlinks to the text so that users can click to jump to a web page or send an email.
function App() {
  const addHyperlinkToText = async () => {
    // Get the Spire.XLS WASM module
    const xlsModule = window.wasmModule?.spirexls;

    // Check whether the module is ready
    if (!xlsModule) {
      alert('Spire.Xls is not ready yet');
      return;
    }

    // Load the font and the Excel file into the VFS
    await window.spire.FetchFileToVFS('ARIAL.TTF', '/Library/Fonts/', `${process.env.PUBLIC_URL}/font/`);
    const inputFileName = 'HyperlinksSample.xlsx';
    await window.spire.FetchFileToVFS(inputFileName, '', `${process.env.PUBLIC_URL}data/`);

    // Load the workbook
    const workbook = new xlsModule.Workbook();
    workbook.LoadFromFile({ fileName: inputFileName });

    // Get the first worksheet
    const sheet = workbook.Worksheets.get(0);

    // Add a web hyperlink to the text in cell D10
    const urlLink = sheet.HyperLinks.Add({ range: sheet.Range.get('D10') });
    urlLink.TextToDisplay = sheet.Range.get('D10').Text;
    urlLink.Type = xlsModule.HyperLinkType.Url;
    urlLink.Address = 'https://www.e-iceblue.com/';

    // Add an email hyperlink to the text in cell E10
    const mailLink = sheet.HyperLinks.Add({ range: sheet.Range.get('E10') });
    mailLink.TextToDisplay = sheet.Range.get('E10').Text;
    mailLink.Type = xlsModule.HyperLinkType.Url;
    mailLink.Address = 'mailto:support@e-iceblue.com';

    // Save the workbook
    const outputFileName = 'AddHyperlinkToText_output.xlsx';
    workbook.SaveToFile({ fileName: outputFileName, version: xlsModule.ExcelVersion.Version2010 });

    // Dispose of the workbook
    workbook.Dispose();

    // Read the generated file from the VFS and trigger the download
    const fileArray = window.dotnetRuntime.Module.FS.readFile(outputFileName);
    const blob = new Blob([fileArray], { type: 'application/vnd.openxmlformats-officedocument.spreadsheetml.sheet' });
    const url = URL.createObjectURL(blob);
    const a = document.createElement('a');
    a.href = url;
    a.download = outputFileName;
    a.click();
    URL.revokeObjectURL(url);
  };

  return (
    <div style={{ textAlign: 'center', height: '300px' }}>
      <h1>Add Hyperlink To Text</h1>
      <button onClick={addHyperlinkToText}>Start</button>
    </div>
  );
}

export default App;
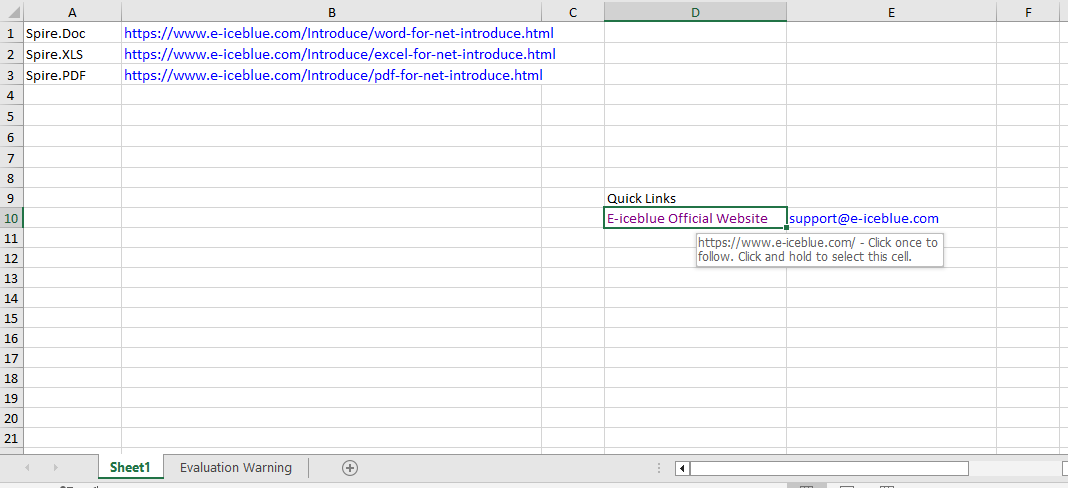
After running, the text in cell D10 becomes a clickable web link, and the email address in cell E10 becomes an email link that can be used to send an email.
Read Hyperlinks
Through the Worksheet.HyperLinks collection, you can get all the hyperlinks in a worksheet and access the target address of each hyperlink by index.
function App() {
  const readHyperlinks = async () => {
    // Get the Spire.XLS WASM module
    const xlsModule = window.wasmModule?.spirexls;

    // Check whether the module is ready
    if (!xlsModule) {
      alert('Spire.Xls is not ready yet');
      return;
    }

    // Load the Excel file into the VFS
    const inputFileName = 'HyperlinksSample.xlsx';
    await window.spire.FetchFileToVFS(inputFileName, '', `${process.env.PUBLIC_URL}data/`);

    // Load the workbook
    const workbook = new xlsModule.Workbook();
    workbook.LoadFromFile({ fileName: inputFileName });

    // Get the first worksheet
    const sheet = workbook.Worksheets.get(0);

    // Read the target addresses of all hyperlinks
    const hyperlinkCount = sheet.HyperLinks.Count;
    let allAddresses = '';

    for (let i = 0; i < hyperlinkCount; i++) {
        const address = sheet.HyperLinks.get(i).Address;
        allAddresses += address + '\n';
    }

    // Save the hyperlink addresses as a txt file
    const outputFileName = 'ReadHyperlinks_output.txt';
    window.dotnetRuntime.Module.FS.writeFile(outputFileName, allAddresses);
    workbook.Dispose();

    // Read the generated file from the VFS and trigger the download
    const fileArray = window.dotnetRuntime.Module.FS.readFile(outputFileName);
    const blob = new Blob([fileArray], { type: 'text/plain' });
    const url = URL.createObjectURL(blob);
    const a = document.createElement('a');
    a.href = url;
    a.download = outputFileName;
    a.click();
    URL.revokeObjectURL(url);
  };

  return (
    <div style={{ textAlign: 'center', height: '300px' }}>
      <h1>Read Hyperlinks</h1>
      <button onClick={readHyperlinks}>Start</button>
    </div>
  );
}

export default App;
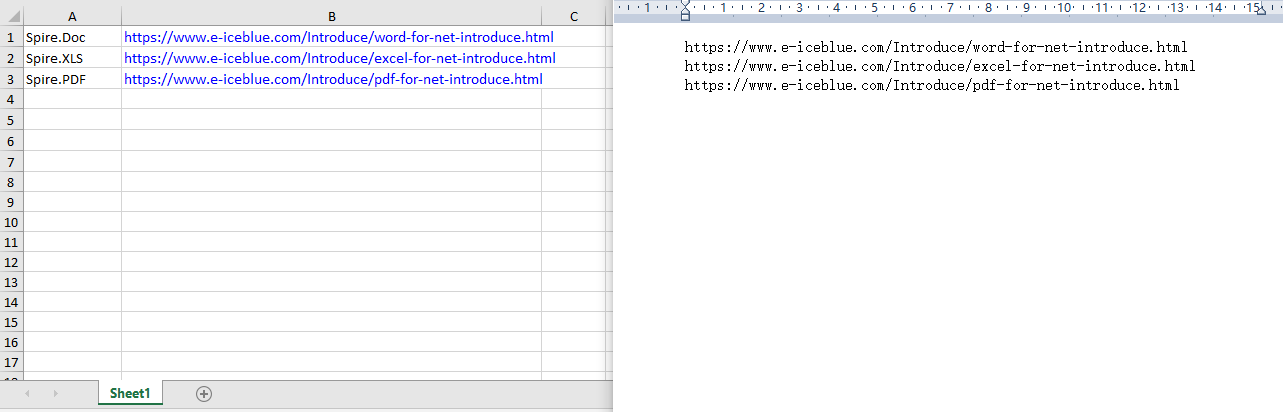
Use the HyperLinks.Count property to get the total number of hyperlinks in the worksheet.
Modify a Hyperlink
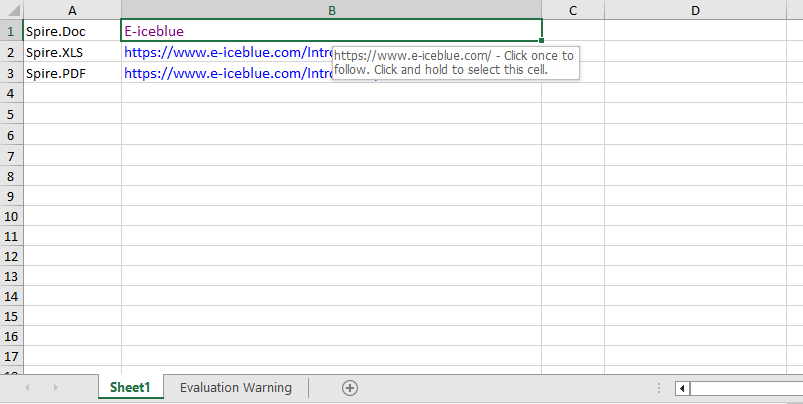
After getting a hyperlink by index with HyperLinks.get(0), you can reset its display text and target address to modify the hyperlink.
function App() {
  const modifyHyperlink = async () => {
    // Get the Spire.XLS WASM module
    const xlsModule = window.wasmModule?.spirexls;

    // Check whether the module is ready
    if (!xlsModule) {
      alert('Spire.Xls is not ready yet');
      return;
    }

    // Load the font and the Excel file into the VFS
    await window.spire.FetchFileToVFS('ARIAL.TTF', '/Library/Fonts/', `${process.env.PUBLIC_URL}/font/`);
    const inputFileName = 'HyperlinksSample.xlsx';
    await window.spire.FetchFileToVFS(inputFileName, '', `${process.env.PUBLIC_URL}data/`);

    // Load the workbook
    const workbook = new xlsModule.Workbook();
    workbook.LoadFromFile({ fileName: inputFileName });

    // Get the first worksheet
    const sheet = workbook.Worksheets.get(0);

    // Get all hyperlinks in the worksheet
    const links = sheet.HyperLinks;

    // Modify the display text and target address of the first hyperlink
    links.get(0).TextToDisplay = 'E-iceblue';
    links.get(0).Address = 'https://www.e-iceblue.com/';

    // Save the workbook
    const outputFileName = 'ModifyHyperlink_output.xlsx';
    workbook.SaveToFile({ fileName: outputFileName, version: xlsModule.ExcelVersion.Version2010 });

    // Dispose of the workbook
    workbook.Dispose();

    // Read the generated file from the VFS and trigger the download
    const fileArray = window.dotnetRuntime.Module.FS.readFile(outputFileName);
    const blob = new Blob([fileArray], { type: 'application/vnd.openxmlformats-officedocument.spreadsheetml.sheet' });
    const url = URL.createObjectURL(blob);
    const a = document.createElement('a');
    a.href = url;
    a.download = outputFileName;
    a.click();
    URL.revokeObjectURL(url);
  };

  return (
    <div style={{ textAlign: 'center', height: '300px' }}>
      <h1>Modify Hyperlink</h1>
      <button onClick={modifyHyperlink}>Start</button>
    </div>
  );
}

export default App;
After modification, both the display text and the target address of the first hyperlink are updated.
Remove Hyperlinks
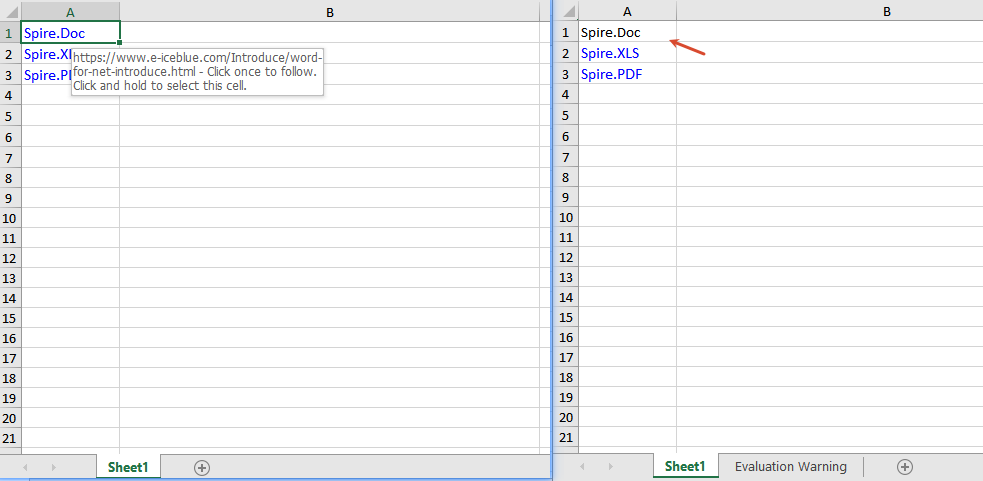
Use the HyperLinks.RemoveAt(index) method to only remove the hyperlink and keep the text, or use the Range.ClearAll() method to clear all content in the cell, including the hyperlink.
function App() {
  const removeHyperlinks = async () => {
    // Get the Spire.XLS WASM module
    const xlsModule = window.wasmModule?.spirexls;

    // Check whether the module is ready
    if (!xlsModule) {
      alert('Spire.Xls is not ready yet');
      return;
    }

    // Load the font and the Excel file into the VFS
    await window.spire.FetchFileToVFS('ARIAL.TTF', '/Library/Fonts/', `${process.env.PUBLIC_URL}/font/`);
    const inputFileName = 'HyperlinksSample.xlsx';
    await window.spire.FetchFileToVFS(inputFileName, '', `${process.env.PUBLIC_URL}data/`);

    // Load the workbook
    const workbook = new xlsModule.Workbook();
    workbook.LoadFromFile({ fileName: inputFileName });

    // Get the first worksheet
    const sheet = workbook.Worksheets.get(0);

    // Get all hyperlinks in the worksheet
    const links = sheet.HyperLinks;

    // Clear all content in the linked cells
    // sheet.Range.get('A1').ClearAll();
    // sheet.Range.get('A2').ClearAll();
    // sheet.Range.get('A3').ClearAll();

    // Only remove the hyperlink and keep the original text
    sheet.HyperLinks.RemoveAt(0);

    // Save the workbook
    const outputFileName = 'RemoveHyperlinks_output.xlsx';
    workbook.SaveToFile({ fileName: outputFileName, version: xlsModule.ExcelVersion.Version2010 });

    // Dispose of the workbook
    workbook.Dispose();

    // Read the generated file from the VFS and trigger the download
    const fileArray = window.dotnetRuntime.Module.FS.readFile(outputFileName);
    const blob = new Blob([fileArray], { type: 'application/vnd.openxmlformats-officedocument.spreadsheetml.sheet' });
    const url = URL.createObjectURL(blob);
    const a = document.createElement('a');
    a.href = url;
    a.download = outputFileName;
    a.click();
    URL.revokeObjectURL(url);
  };

  return (
    <div style={{ textAlign: 'center', height: '300px' }}>
      <h1>Remove Hyperlinks</h1>
      <button onClick={removeHyperlinks}>Start</button>
    </div>
  );
}

export default App;
Frequently Asked Questions
The target address is not updated after modifying the hyperlink
Reason: The wrong hyperlink index was modified, or there is no hyperlink on the target cell.
Solution: Make sure a hyperlink already exists in the worksheet, access it at the correct index such as sheet.HyperLinks.get(0), and then set its Address property.
Get a Free License
If you want to remove the evaluation message from the result documents or get rid of feature limitations, please contact sales to obtain a temporary license valid for 30 days.
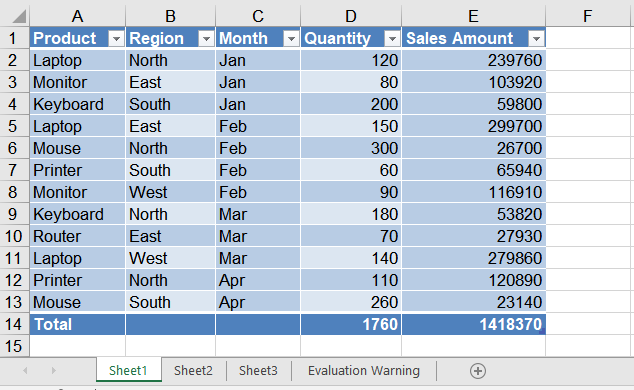
When organizing data such as sales records or statistical reports, converting a plain data range into an Excel table (Table / ListObject) gives the data a dedicated header row, automatic filter drop-downs, banded styling, and a "total row", which makes later browsing and summarizing more convenient. After the table is created, its appearance can also be adjusted at any time through built-in styles and various display options. Spire.XLS for JavaScript completes all of these operations directly in the browser based on WebAssembly, and manages input/output files through a virtual file system (VFS), with no backend service required.
This article covers two core features:
For installation and project configuration, refer to Integrating Spire.XLS for JavaScript in a React Project. The examples below assume Spire.XLS is installed and the WebAssembly module is initialized.
Create a Table in Excel
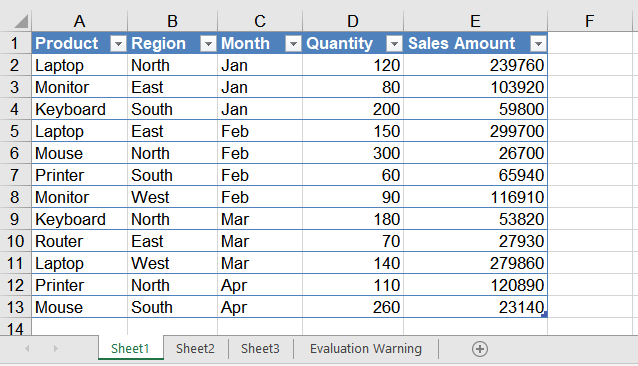
Converting a data range into a table is a quick way to obtain a structured range that has built-in filter buttons and banded styling. In this example, a sales detail list (Product, Region, Month, Quantity, Sales Amount) is first written into the worksheet, then the A1:E13 range is converted into a table named "Table1" with ListObjects.Create(), and finally the built-in light style TableStyleLight9 is applied. The main steps are as follows:
- Create a
Workbookobject and get the first worksheet. - Write the headers and the sample data into the cells.
- Call the
Worksheet.ListObjects.Create()method to convert the range that contains the headers into a table. - Apply a built-in style to the table through the
IListObject.BuiltInTableStyleproperty. - Save the workbook with the
Workbook.SaveToFile()method.
Here is a complete code example showing how to create an Excel table for a worksheet in React:
function App() {
  const createTable = async () => {
    // Get the Spire.XLS WASM module
    const xlsModule = window.wasmModule?.spirexls;

    // Check whether the module is ready
    if (!xlsModule) {
      alert('Spire.Xls is not ready yet');
      return;
    }

    // Load the font into the VFS for text measurement and column auto-fit
    await window.spire.FetchFileToVFS('ARIAL.TTF', '/Library/Fonts/', `${process.env.PUBLIC_URL}/font/`);

    // Create a new workbook and get the first worksheet
    const workbook = new xlsModule.Workbook();
    const sheet = workbook.Worksheets.get(0);

    // Write the headers
    sheet.Range.get('A1').Value = 'Product';
    sheet.Range.get('B1').Value = 'Region';
    sheet.Range.get('C1').Value = 'Month';
    sheet.Range.get('D1').Value = 'Quantity';
    sheet.Range.get('E1').Value = 'Sales Amount';

    // Write the sample data
    sheet.Range.get('A2').Value = 'Laptop';
    sheet.Range.get('B2').Value = 'North';
    sheet.Range.get('C2').Value = 'Jan';
    sheet.Range.get('D2').NumberValue = 120;
    sheet.Range.get('E2').NumberValue = 239760;

    sheet.Range.get('A3').Value = 'Monitor';
    sheet.Range.get('B3').Value = 'East';
    sheet.Range.get('C3').Value = 'Jan';
    sheet.Range.get('D3').NumberValue = 80;
    sheet.Range.get('E3').NumberValue = 103920;

    sheet.Range.get('A4').Value = 'Keyboard';
    sheet.Range.get('B4').Value = 'South';
    sheet.Range.get('C4').Value = 'Jan';
    sheet.Range.get('D4').NumberValue = 200;
    sheet.Range.get('E4').NumberValue = 59800;

    sheet.Range.get('A5').Value = 'Laptop';
    sheet.Range.get('B5').Value = 'East';
    sheet.Range.get('C5').Value = 'Feb';
    sheet.Range.get('D5').NumberValue = 150;
    sheet.Range.get('E5').NumberValue = 299700;

    sheet.Range.get('A6').Value = 'Mouse';
    sheet.Range.get('B6').Value = 'North';
    sheet.Range.get('C6').Value = 'Feb';
    sheet.Range.get('D6').NumberValue = 300;
    sheet.Range.get('E6').NumberValue = 26700;

    sheet.Range.get('A7').Value = 'Printer';
    sheet.Range.get('B7').Value = 'South';
    sheet.Range.get('C7').Value = 'Feb';
    sheet.Range.get('D7').NumberValue = 60;
    sheet.Range.get('E7').NumberValue = 65940;

    sheet.Range.get('A8').Value = 'Monitor';
    sheet.Range.get('B8').Value = 'West';
    sheet.Range.get('C8').Value = 'Feb';
    sheet.Range.get('D8').NumberValue = 90;
    sheet.Range.get('E8').NumberValue = 116910;

    sheet.Range.get('A9').Value = 'Keyboard';
    sheet.Range.get('B9').Value = 'North';
    sheet.Range.get('C9').Value = 'Mar';
    sheet.Range.get('D9').NumberValue = 180;
    sheet.Range.get('E9').NumberValue = 53820;

    sheet.Range.get('A10').Value = 'Router';
    sheet.Range.get('B10').Value = 'East';
    sheet.Range.get('C10').Value = 'Mar';
    sheet.Range.get('D10').NumberValue = 70;
    sheet.Range.get('E10').NumberValue = 27930;

    sheet.Range.get('A11').Value = 'Laptop';
    sheet.Range.get('B11').Value = 'West';
    sheet.Range.get('C11').Value = 'Mar';
    sheet.Range.get('D11').NumberValue = 140;
    sheet.Range.get('E11').NumberValue = 279860;

    sheet.Range.get('A12').Value = 'Printer';
    sheet.Range.get('B12').Value = 'North';
    sheet.Range.get('C12').Value = 'Apr';
    sheet.Range.get('D12').NumberValue = 110;
    sheet.Range.get('E12').NumberValue = 120890;

    sheet.Range.get('A13').Value = 'Mouse';
    sheet.Range.get('B13').Value = 'South';
    sheet.Range.get('C13').Value = 'Apr';
    sheet.Range.get('D13').NumberValue = 260;
    sheet.Range.get('E13').NumberValue = 23140;

    // Convert the A1:E13 data range into an Excel table (ListObject)
    const table = sheet.ListObjects.Create('Table1', sheet.Range.get({ row: 1, column: 1, lastRow: 13, lastColumn: 5 }));

    // Apply a built-in light table style
    table.BuiltInTableStyle = xlsModule.TableBuiltInStyles.TableStyleLight9;

    // Auto-fit the columns so that the contents are fully shown
    sheet.AllocatedRange.AutoFitColumns();

    // Save the workbook
    const outputFileName = 'CreateTable.xlsx';
    workbook.SaveToFile({ fileName: outputFileName, version: xlsModule.ExcelVersion.Version2010 });

    // Release resources
    workbook.Dispose();

    // Read the saved file from the VFS and trigger the download
    const fileArray = window.dotnetRuntime.Module.FS.readFile(outputFileName);
    const blob = new Blob([fileArray], { type: 'application/vnd.openxmlformats-officedocument.spreadsheetml.sheet' });
    const url = URL.createObjectURL(blob);
    const a = document.createElement('a');
    a.href = url;
    a.download = outputFileName;
    a.click();
    URL.revokeObjectURL(url);
  };

  return (
    <div style={{ textAlign: 'center', height: '300px' }}>
      <h1>Create Table</h1>
      <button onClick={createTable}>Start</button>
    </div>
  );
}

export default App;
Effect of creating the table:
Set the Table Style, Total Row and Stripes
A created table can be restyled at any time: for example, replace the light style with the built-in Medium dark style, show a total row at the bottom of the table and let the "Quantity" and "Sales Amount" columns be summed automatically, and enable both row and column stripes to make the data easier to read. The main steps are as follows:
- Create a
Workbookobject and load a workbook that already contains a table with theWorkbook.LoadFromFile()method. - Get the worksheet with the
Workbook.Worksheets.get()method, and then get the table object withListObjects.get(). - Assign a new built-in style through the
BuiltInTableStyleproperty. - Set
DisplayTotalRowtotrueto show the total row, and useColumns[].TotalsRowLabelandColumns[].TotalsCalculationto set the label and the calculation of the total row columns. - Enable row and column stripes with
ShowTableStyleRowStripesandShowTableStyleColumnStripes. - Save the workbook with the
Workbook.SaveToFile()method.
Here is a complete code example showing how to load a created table in React and set its style and total row:
function App() {
  const formatTable = async () => {
    // Get the Spire.XLS WASM module
    const xlsModule = window.wasmModule?.spirexls;

    // Check whether the module is ready
    if (!xlsModule) {
      alert('Spire.Xls is not ready yet');
      return;
    }

    // Load the font into the VFS for text measurement and column auto-fit
    await window.spire.FetchFileToVFS('ARIAL.TTF', '/Library/Fonts/', `${process.env.PUBLIC_URL}/font/`);

    // Load the Excel file created in the previous section, which already contains a table
    const inputFileName = 'CreateTable.xlsx';
    await window.spire.FetchFileToVFS(inputFileName, '', `${process.env.PUBLIC_URL}data/`);

    // Create a Workbook object and load the workbook
    const workbook = new xlsModule.Workbook();
    workbook.LoadFromFile({ fileName: inputFileName });

    // Get the first worksheet and the table in it
    const sheet = workbook.Worksheets.get(0);
    const table = sheet.ListObjects.get(0);

    // Apply a built-in Medium table style
    table.BuiltInTableStyle = xlsModule.TableBuiltInStyles.TableStyleMedium9;

    // Show the total row
    table.DisplayTotalRow = true;

    // Set the label of the first column of the total row to "Total"
    table.Columns.get(0).TotalsRowLabel = 'Total';

    // Do not calculate the text columns, and sum the "Quantity" and "Sales Amount" columns automatically
    table.Columns.get(1).TotalsCalculation = xlsModule.ExcelTotalsCalculation.None;
    table.Columns.get(2).TotalsCalculation = xlsModule.ExcelTotalsCalculation.None;
    table.Columns.get(3).TotalsCalculation = xlsModule.ExcelTotalsCalculation.Sum;
    table.Columns.get(4).TotalsCalculation = xlsModule.ExcelTotalsCalculation.Sum;

    // Show the row stripes and column stripes
    table.ShowTableStyleRowStripes = true;
    table.ShowTableStyleColumnStripes = true;

    // Auto-fit the columns so that the contents are fully shown
    sheet.AllocatedRange.AutoFitColumns();

    // Save the workbook
    const outputFileName = 'FormatTable_out.xlsx';
    workbook.SaveToFile({ fileName: outputFileName, version: xlsModule.ExcelVersion.Version2010 });

    // Release resources
    workbook.Dispose();

    // Read the saved file from the VFS and trigger the download
    const fileArray = window.dotnetRuntime.Module.FS.readFile(outputFileName);
    const blob = new Blob([fileArray], { type: 'application/vnd.openxmlformats-officedocument.spreadsheetml.sheet' });
    const url = URL.createObjectURL(blob);
    const a = document.createElement('a');
    a.href = url;
    a.download = outputFileName;
    a.click();
    URL.revokeObjectURL(url);
  };

  return (
    <div style={{ textAlign: 'center', height: '300px' }}>
      <h1>Format Table</h1>
      <button onClick={formatTable}>Start</button>
    </div>
  );
}

export default App;
Effect of setting the table style:
Frequently Asked Questions
How do I change the built-in style of a table? What styles are available?
Reason: The BuiltInTableStyle property was not reassigned after the table was created, or the wrong enum type was assigned to the property.
Solution: Reassign the IListObject.BuiltInTableStyle property. Its values come from the TableBuiltInStyles enum, which provides multiple built-in styles including Light (TableStyleLight1 ~ TableStyleLight21), Medium (TableStyleMedium1 ~ TableStyleMedium28) and Dark (TableStyleDark1 ~ TableStyleDark11). For example, this article first applies TableStyleLight9 and then switches to TableStyleMedium9.
How do I name a table or rename it? What happens if two tables have the same name?
Reason: The first parameter of ListObjects.Create() is the table name, e.g. Create("Table1", ...). Within the same worksheet, table names must be unique; otherwise creating another table with the same name raises an error.
Solution: Pass a unique name when creating the table (e.g. "SalesTable1"). To rename an existing table, set its DisplayName property directly, for example table.DisplayName = "SalesTable2025";.
Get a Free License
Spire.XLS for JavaScript offers a 30-day full-featured free trial license with no functional limitations. Apply here to evaluate before purchasing.
Accept or Reject Tracked Changes in Excel with JavaScript in React
2026-09-09 08:12:04 Written by liu taliaWhen multiple users collaborate on an Excel document with tracking changes (Track Changes) enabled, every insertion, modification and deletion made to cells is recorded. When reviewing these changes, you often need to accept all tracked changes (to formally merge the changes of others into the document) or reject all tracked changes (to revert all changes and restore the state before the edits). Handling these changes one by one in Excel is tedious and error-prone, while processing them in bulk through code in a web application is far more efficient. Spire.XLS for JavaScript completes this directly in the browser based on WebAssembly, and manages input/output files through a virtual file system (VFS), with no backend service required.
Spire.XLS for JavaScript provides revision-handling capabilities through the workbook object: after loading a workbook that contains revision records, call the AcceptAllTrackedChanges() method to accept all tracked changes in the document, or call the RejectAllTrackedChanges() method to reject all tracked changes in the document.
This article covers two core features:
For installation and project configuration, refer to Integrating Spire.XLS for JavaScript in a React Project. The examples below assume Spire.XLS is installed and the WebAssembly module is initialized.
Accept All Tracked Changes in Excel
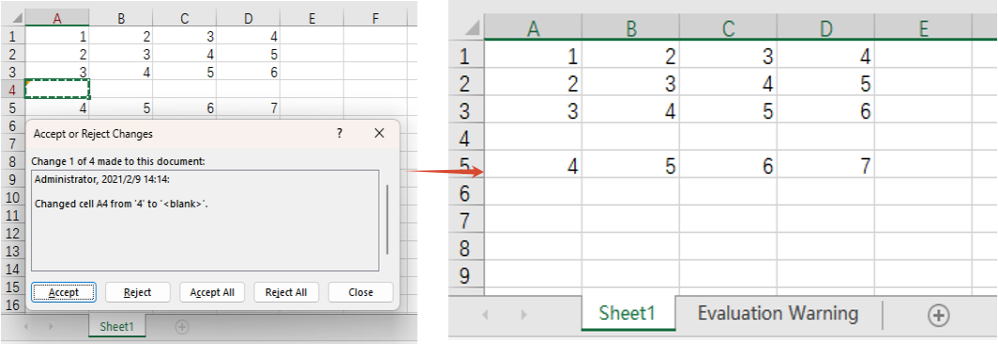
When a workbook containing revision records has been edited by multiple users and passes review, all the changes need to be formally merged into the document, that is, the tracked changes are "accepted". After the changes are accepted, they become the official content of the document and the revision records are cleared. The main steps are as follows:
- Create a
Workbookobject. - Load the workbook containing revision records with the
Workbook.LoadFromFile()method. - Call the
Workbook.AcceptAllTrackedChanges()method to accept all tracked changes in the document. - Save the workbook with the
Workbook.SaveToFile()method.
Here is a complete code example showing how to accept all tracked changes in an Excel workbook in React:
function App() {
  const acceptTrackedChanges = async () => {
    // Get the Spire.XLS WASM module
    const xlsModule = window.wasmModule?.spirexls;

    // Check whether the module is ready
    if (!xlsModule) {
      alert('Spire.Xls is not ready yet');
      return;
    }

    // Load the font and the Excel file into the VFS
    await window.spire.FetchFileToVFS('ARIAL.TTF', '/Library/Fonts/', `${process.env.PUBLIC_URL}/font/`);
    const inputFileName = 'TrackChanges.xlsx';
    await window.spire.FetchFileToVFS(inputFileName, '', `${process.env.PUBLIC_URL}data/`);

    // Create a Workbook object and load the workbook containing tracked changes
    const workbook = new xlsModule.Workbook();
    workbook.LoadFromFile({ fileName: inputFileName });

    // Accept all tracked changes in the document
    workbook.AcceptAllTrackedChanges();

    // Save the document
    const outputFileName = 'AcceptTrackedChanges_output.xlsx';
    workbook.SaveToFile({ fileName: outputFileName, version: xlsModule.ExcelVersion.Version2010 });

    // Release resources
    workbook.Dispose();

    // Read the converted file from the VFS and trigger a download
    const fileArray = window.dotnetRuntime.Module.FS.readFile(outputFileName);
    const blob = new Blob([fileArray], { type: 'application/vnd.openxmlformats-officedocument.spreadsheetml.sheet' });
    const url = URL.createObjectURL(blob);
    const a = document.createElement('a');
    a.href = url;
    a.download = outputFileName;
    a.click();
    URL.revokeObjectURL(url);
  };

  return (
    <div style={{ textAlign: 'center', height: '300px' }}>
      <h1>Accept All Tracked Changes</h1>
      <button onClick={acceptTrackedChanges}>
        Start
      </button>
    </div>
  );
}

export default App;
Effect of accepting all tracked changes
Reject All Tracked Changes in Excel
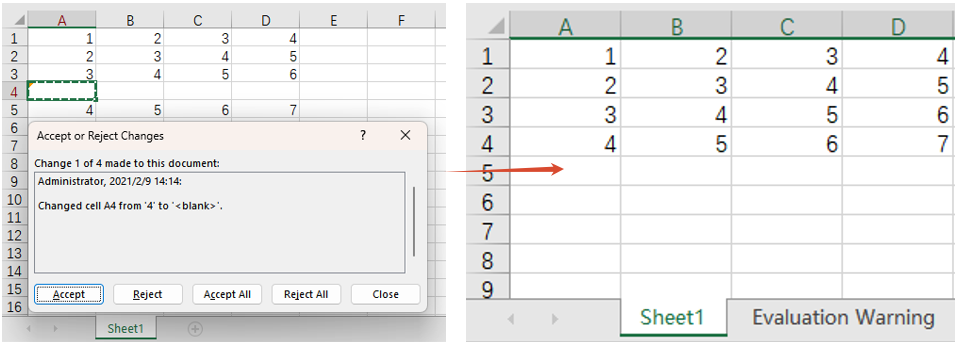
When the tracked changes are disputed or no longer needed, the reviewer can reject all of them at once so that the document returns to the state before the edits. The main steps are as follows:
- Create a
Workbookobject. - Load the workbook containing revision records with the
Workbook.LoadFromFile()method. - Call the
Workbook.RejectAllTrackedChanges()method to reject all tracked changes in the document. - Save the workbook with the
Workbook.SaveToFile()method.
Here is a complete code example showing how to reject all tracked changes in an Excel workbook in React:
function App() {
  const rejectTrackedChanges = async () => {
    // Get the Spire.XLS WASM module
    const xlsModule = window.wasmModule?.spirexls;

    // Check whether the module is ready
    if (!xlsModule) {
      alert('Spire.Xls is not ready yet');
      return;
    }

    // Load the font and the Excel file into the VFS
    await window.spire.FetchFileToVFS('ARIAL.TTF', '/Library/Fonts/', `${process.env.PUBLIC_URL}/font/`);
    const inputFileName = 'TrackChanges.xlsx';
    await window.spire.FetchFileToVFS(inputFileName, '', `${process.env.PUBLIC_URL}data/`);

    // Create a Workbook object and load the workbook containing tracked changes
    const workbook = new xlsModule.Workbook();
    workbook.LoadFromFile({ fileName: inputFileName });

    // Reject all tracked changes in the document
    workbook.RejectAllTrackedChanges();

    // Save the document
    const outputFileName = 'RejectTrackedChanges_output.xlsx';
    workbook.SaveToFile({ fileName: outputFileName, version: xlsModule.ExcelVersion.Version2010 });

    // Release resources
    workbook.Dispose();

    // Read the converted file from the VFS and trigger a download
    const fileArray = window.dotnetRuntime.Module.FS.readFile(outputFileName);
    const blob = new Blob([fileArray], { type: 'application/vnd.openxmlformats-officedocument.spreadsheetml.sheet' });
    const url = URL.createObjectURL(blob);
    const a = document.createElement('a');
    a.href = url;
    a.download = outputFileName;
    a.click();
    URL.revokeObjectURL(url);
  };

  return (
    <div style={{ textAlign: 'center', height: '300px' }}>
      <h1>Reject All Tracked Changes</h1>
      <button onClick={rejectTrackedChanges}>
        Start
      </button>
    </div>
  );
}

export default App;
Effect of rejecting all tracked changes
FAQ
The content is not restored to its pre-edit state after rejecting tracked changes
Cause: RejectAllTrackedChanges() rejects only the cell changes that were recorded by the Track Changes feature. If some changes were made before tracking was enabled, or were written by other means and never recorded, they are not revisions that can be rejected, so they keep their current values and the document will not fully return to the original baseline.
Can I accept or reject only part of the tracked changes instead of all of them
Cause: AcceptAllTrackedChanges() and RejectAllTrackedChanges() process all the revisions of a whole workbook at once. They do not provide APIs for filtering individual revisions by user, time or cell range.
Obtain a Free License
Spire.XLS for JavaScript offers a 30-day full-featured free trial license with no functional limitations. Apply here to evaluate before purchasing.
PDF annotations provide a convenient way to add comments, highlights, notes, links, stamps, and other interactive elements to a document without changing its original content. They are widely used in document review, proofreading, collaboration, and approval workflows.
With Spire.PDF for JavaScript, developers can programmatically add different types of annotations to PDF documents directly in React applications. This article demonstrates how to add two commonly used annotation types: markup annotations for highlighting specific text and popup annotations for attaching comments to a page.
On this page:
- Install Spire.PDF for JavaScript in a React Project
- Add a Markup Annotation to PDF with JavaScript
- Add a Popup Annotation to PDF with JavaScript
- Markup Annotation vs. Popup Annotation
- Working with Other PDF Annotation Types
- Conclusion
- FAQs
Install Spire.PDF for JavaScript in a React Project
Before working with PDF annotations, you need to integrate Spire.PDF for JavaScript into your React application.
You can install the required package through npm:
npm i spire.office
Then copy the required JavaScript, WebAssembly, and framework files to the public folder of your React project so that they can be loaded by the application at runtime.
For detailed installation and configuration instructions, refer to:
How to Integrate Spire.PDF for JavaScript in a React Project
The examples below assume that Spire.PDF has already been configured and that the input PDF file is available in the public folder.
Add a Markup Annotation to PDF with JavaScript
Markup annotations are commonly used during document review. They allow developers to highlight, underline, strike out, or otherwise mark specific text in a PDF.
In this example, we first locate a specific sentence in the PDF using PdfTextFinder. Once the text is found, its bounding rectangles are retrieved and a highlight annotation is created for each corresponding area.
The following React code demonstrates how to highlight specified text in a PDF document:
import React, { useEffect, useState } from 'react';

function App() {
  const [ready, setReady] = useState(false);

  useEffect(() => {
    (async () => {
      const publicUrl = process.env.PUBLIC_URL || '';
      await import(/* webpackIgnore: true */ `${publicUrl}/spire.common.js`);
      const spireModule = await import(/* webpackIgnore: true */ `${publicUrl}/spire.pdf.js`);
      const rawModule = spireModule.default || spireModule;

      window.wasmModule = typeof rawModule === 'function'
        ? await rawModule({ locateFile: p => p.endsWith('.wasm') ? `${publicUrl}/${p}` : p })
        : rawModule;

      setReady(true);
    })();
  }, []);

  const addMarkupAnnotation = async () => {
    const wasmModule = window.wasmModule.spirepdf;
    const inputFileName = 'input.pdf';
    const outputFileName = 'MarkupAnnotation.pdf';

    await window.spire.FetchFileToVFS(inputFileName, '/', `${process.env.PUBLIC_URL || ''}/`);

    const doc = new wasmModule.PdfDocument();
    doc.LoadFromFile(inputFileName);

    const page = doc.Pages.get_Item(0);
    const finder = new wasmModule.PdfTextFinder(page);
    finder.Options.Parameter = wasmModule.TextFindParameter.IgnoreCase;

    const TARGET_TEXT = 'Artificial Intelligence (AI) is a rapidly evolving field of computer science focused on creating ' +
    'systems capable of performing tasks that typically require human intelligence.';

    const textFragment = finder.Find(TARGET_TEXT).get(0);
    const bounds = textFragment.Bounds.toArray();

    bounds.forEach((rect) => {
      const annotation = new wasmModule.PdfTextMarkupAnnotation(
        'Administrator',
        'This is a markup annotation.',
        rect
      );

      annotation.TextMarkupAnnotationType =
        wasmModule.PdfTextMarkupAnnotationType.Highlight;

      annotation.TextMarkupColor =
        new wasmModule.PdfRGBColor({
          color: wasmModule.Color.get_LightYellow()
        });

      page.AnnotationsWidget.Add(annotation);
    });

    doc.SaveToFile(outputFileName);
    doc.Close();
    finder.Dispose();

    const fileArray = window.dotnetRuntime.Module.FS.readFile(outputFileName);
    const url = URL.createObjectURL(
      new Blob([fileArray], { type: 'application/pdf' })
    );

    const link = document.createElement('a');
    link.href = url;
    link.download = outputFileName;
    link.click();

    URL.revokeObjectURL(url);
  };

  return (
    <div style={{ textAlign: 'center', padding: 30 }}>
      <h1>Add Markup Annotation to PDF</h1>
      <button onClick={addMarkupAnnotation} disabled={!ready}>
        Add Markup Annotation
      </button>
    </div>
  );
}

export default App;
Output:

How the Code Works
The annotation process can be divided into several main steps.
First, FetchFileToVFS() loads input.pdf into the WebAssembly virtual file system. A PdfDocument object is then created to load and manipulate the document.
await window.spire.FetchFileToVFS(
  inputFileName,
  '/',
  `${process.env.PUBLIC_URL || ''}/`
);

const doc = new wasmModule.PdfDocument();
doc.LoadFromFile(inputFileName);
Next, the first PDF page is obtained and passed to PdfTextFinder. Setting TextFindParameter.IgnoreCase allows the search to ignore differences in uppercase and lowercase characters.
const page = doc.Pages.get_Item(0);
const finder = new wasmModule.PdfTextFinder(page);

finder.Options.Parameter =
  wasmModule.TextFindParameter.IgnoreCase;
The target text is then located, and its bounding rectangles are retrieved:
const textFragment = finder.Find(TARGET_TEXT).get(0);
const bounds = textFragment.Bounds.toArray();
A sentence may span multiple lines, so its location can consist of several rectangles. The code therefore loops through all returned bounds and creates a PdfTextMarkupAnnotation for each one.
bounds.forEach((rect) => {
  const annotation = new wasmModule.PdfTextMarkupAnnotation(
    'Administrator',
    'This is a markup annotation.',
    rect
  );

  annotation.TextMarkupAnnotationType =
    wasmModule.PdfTextMarkupAnnotationType.Highlight;

  page.AnnotationsWidget.Add(annotation);
});
In this example, the annotation type is set to Highlight and its color is set to light yellow.
Finally, the modified PDF is saved to the virtual file system and converted to a Blob, allowing the browser to download the resulting file.
Add a Popup Annotation to PDF with JavaScript
Popup annotations are useful when comments or notes need to be attached to a particular position on a PDF page. Instead of marking existing text, a popup annotation creates an annotation icon that readers can interact with in compatible PDF viewers.
The following example adds a comment annotation to the first page of a PDF:
import React, { useEffect, useState } from 'react';

function App() {
  const [ready, setReady] = useState(false);

  useEffect(() => {
    (async () => {
      const publicUrl = process.env.PUBLIC_URL || '';
      await import(/* webpackIgnore: true */ `${publicUrl}/spire.common.js`);
      const spireModule = await import(/* webpackIgnore: true */ `${publicUrl}/spire.pdf.js`);
      const rawModule = spireModule.default || spireModule;

      window.wasmModule = typeof rawModule === 'function'
        ? await rawModule({ locateFile: p => p.endsWith('.wasm') ? `${publicUrl}/${p}` : p })
        : rawModule;

      setReady(true);
    })();
  }, []);

  const addPopupAnnotation = async () => {
    const wasmModule = window.wasmModule.spirepdf;
    const inputFileName = 'input.pdf';
    const outputFileName = 'PopupAnnotation.pdf';

    await window.spire.FetchFileToVFS(
      inputFileName,
      '/',
      `${process.env.PUBLIC_URL || ''}/`
    );

    const doc = new wasmModule.PdfDocument();
    doc.LoadFromFile(inputFileName);

    const page = doc.Pages.get_Item(0);

    const rect = new wasmModule.RectangleF({
      x: 155,
      y: 105,
      width: 0,
      height: 0
    });

    const annotation = new wasmModule.PdfPopupAnnotation({
      rectangle: rect,
      text: 'This is a popup annotation.'
    });

    annotation.Icon = wasmModule.PdfPopupIcon.Comment;

    annotation.Color =
      new wasmModule.PdfRGBColor({
        color: wasmModule.Color.get_Red()
      });

    page.Annotations.Add(annotation);

    doc.SaveToFile(outputFileName);
    doc.Close();

    const fileArray =
      window.dotnetRuntime.Module.FS.readFile(outputFileName);

    const url = URL.createObjectURL(
      new Blob([fileArray], { type: 'application/pdf' })
    );

    const link = document.createElement('a');
    link.href = url;
    link.download = outputFileName;
    link.click();

    URL.revokeObjectURL(url);
  };

  return (
    <div style={{ textAlign: 'center', padding: 30 }}>
      <h1>Add Popup Annotation to PDF</h1>
      <button onClick={addPopupAnnotation} disabled={!ready}>
        Add Popup Annotation
      </button>
    </div>
  );
}

export default App;
Output:

How the Code Works
After loading the PDF, the first page is retrieved:
const page = doc.Pages.get_Item(0);
A RectangleF object is then created to define the position of the popup annotation on the page.
const rect = new wasmModule.RectangleF({
  x: 155,
  y: 105,
  width: 0,
  height: 0
});
Next, a PdfPopupAnnotation object is created. Its rectangle property determines where the annotation appears, while text defines the comment displayed by the annotation.
const annotation = new wasmModule.PdfPopupAnnotation({
  rectangle: rect,
  text: 'This is a popup annotation.'
});
The icon style and color can also be customized:
annotation.Icon = wasmModule.PdfPopupIcon.Comment;

annotation.Color =
  new wasmModule.PdfRGBColor({
    color: wasmModule.Color.get_Red()
  });
Finally, the annotation is added to the page using:
page.Annotations.Add(annotation);
The modified PDF is then saved and downloaded in the browser.
Markup Annotation vs. Popup Annotation
Although both annotation types are designed to add review information to PDF documents, they serve different purposes.
| Annotation Type | Typical Use | Positioning |
|---|---|---|
| Markup Annotation | Highlighting or marking existing PDF text | Based on the bounds of selected text |
| Popup Annotation | Adding comments or notes at a particular location | Based on page coordinates |
Markup annotations are particularly suitable for reviewing existing content because the annotation can follow the exact location of the target text. Popup annotations are more flexible when a comment needs to be associated with a general area rather than a specific text fragment.
Working with Other PDF Annotation Types
The examples above cover only two annotation types, but the overall process is similar when creating other annotations supported by Spire.PDF for JavaScript.
A typical annotation workflow is:
- Load the PDF document.
- Get the page where the annotation should be placed.
- Determine the annotation position or target content.
- Create the appropriate annotation object.
- Configure properties such as text, color, icon, border, or destination.
- Add the annotation to the PDF page.
- Save the modified document.
For example, free text annotations can be used to display text directly on a page, stamp annotations can represent review states such as approval, and link annotations can connect PDF content to web pages, external files, or other locations in the same document.
The annotation class and available properties will differ, but the basic implementation pattern remains largely the same.
Conclusion
Annotations make PDF documents more interactive and are particularly useful in reviewing, commenting, collaboration, and approval scenarios.
With Spire.PDF for JavaScript, React applications can create PDF annotations programmatically in the browser. In this article, we demonstrated how to locate text and apply a markup annotation , as well as how to place a popup annotation at specified coordinates on a PDF page.
Using the same general approach, developers can further implement free text, stamps, shapes, links, and other annotation types according to their application requirements.
FAQs
1. What types of PDF annotations can be added with Spire.PDF for JavaScript?
Spire.PDF for JavaScript supports various annotation types, including markup annotations, free text annotations, popup annotations, stamp annotations, shape annotations, web link annotations, file link annotations, and document link annotations.
The exact classes and properties used depend on the annotation type.
2. Can I highlight text automatically instead of specifying coordinates manually?
Yes. You can use PdfTextFinder to search for specific text in a PDF and retrieve its bounding rectangles. These rectangles can then be used to position markup annotations automatically.
This approach is useful for workflows such as automatically highlighting keywords, review terms, or specific sentences.
3. Why does the markup example create multiple annotations for one sentence?
A sentence may span multiple lines in a PDF. In this case, the text finder can return multiple bounding rectangles representing different portions of the same text.
Creating an annotation for each rectangle ensures that the entire target text is highlighted correctly across line breaks.
4. Can I customize the appearance of PDF annotations?
Yes. Depending on the annotation type, properties such as color, icon, annotation text, position, markup type, and other appearance settings can be customized.
For example, the markup annotation in this tutorial uses a light-yellow highlight, while the popup annotation uses a red comment icon.
5. Are the annotations preserved when the PDF is downloaded?
Yes. The annotations are written into the output PDF when SaveToFile() is called. After the file is downloaded, they can be viewed in PDF readers that support standard PDF annotations.
Get a Free License
To fully experience the capabilities of Spire.PDF for JavaScript without any evaluation limitations, you can request a 30-day free trial license.
PDF has a fixed layout and is easy to distribute, but once its content has been generated, it is difficult to modify within the body text. For documents such as contracts, reports, and notices, you often need to indicate the confidentiality level, copyright ownership, or usage states such as "Draft" and "Sample" without affecting the reading of the body content. Besides the text watermarks mentioned above, image watermarks made from a company logo, seal, or warning image are also quite common: they float over the content as semi-transparent images, conveying the brand and status information clearly without harming the readability of the original.
Spire.PDF for JavaScript loads, draws, and saves PDFs directly in the browser via WebAssembly, managing input and output files through a virtual file system (VFS) without requiring a backend server. Image watermarking usually takes two forms: one places a single image watermark at a specified position on the page (such as the center of the page), which can be achieved directly by loading the image with PdfImage.FromFile and combining the transparency settings of the page canvas with the DrawImage method; the other repeats the image across the whole page, which can be done with the PdfTilingBrush tiling brush.
This article covers two core features:
For installation and project setup, refer to Integrating Spire.PDF for JavaScript in a React Project. The examples below assume Spire.PDF is installed and the WebAssembly module is initialized.
Add a Single Image Watermark to PDF
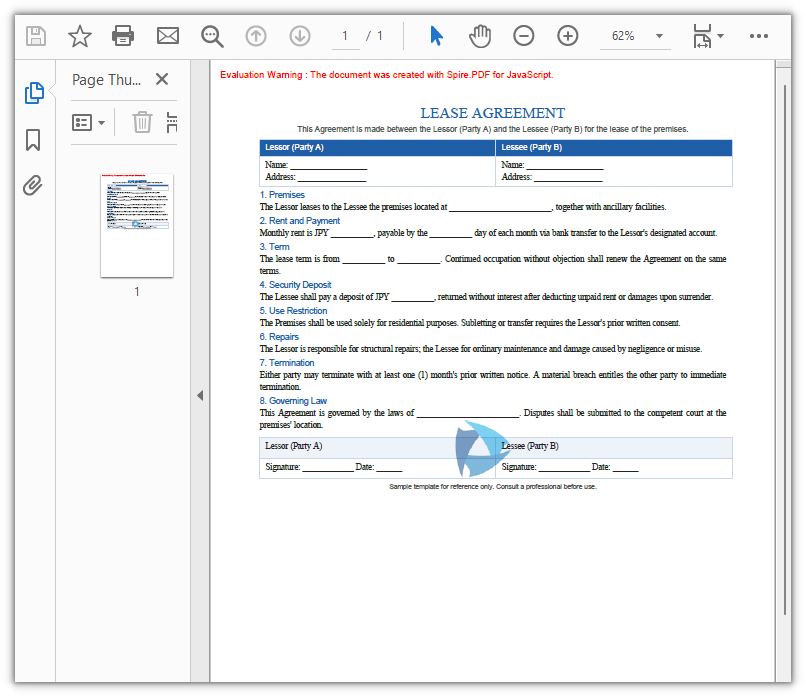
A single image watermark places a semi-transparent image at a specified position on the page (in this example, the center of each page), suitable for placing a company logo or warning sign in a prominent position of the document. The approach is as follows: load the image from a file with PdfImage.FromFile; then, on the canvas of each page, save the state with Save, set the transparency and blend mode with SetTransparency, draw the image at the centered position with DrawImage, and finally restore the canvas state with Restore.
function App() {
  const addSingleImageWatermark = async () => {
    // Get the Spire.PDF WASM module
    const pdfModule = window.wasmModule?.spirepdf;

    // Check whether the WASM module is ready
    if (!pdfModule) {
      alert('Spire.PDF is not ready yet');
      return;
    }

    // Load the PDF file to be watermarked into VFS
    const inputFileName = 'Lease_Agreement_EN.pdf';
    await window.spire.FetchFileToVFS(inputFileName, "", `${process.env.PUBLIC_URL}/data/`);

    // Load the watermark image into VFS
    const inputImageName = 'logo.png';
    await window.spire.FetchFileToVFS(inputImageName, "", `${process.env.PUBLIC_URL}/data/`);

    // Create a PdfDocument object and load the PDF document
    let doc = new pdfModule.PdfDocument();
    doc.LoadFromFile(inputFileName);

    // Load the watermark image from a file
    let image = pdfModule.PdfImage.FromFile(inputImageName);

    // Loop through all the pages in the document
    for (let i = 0; i < doc.Pages.Count; i++) {
      // Get the specified page
      let page = doc.Pages.get_Item(i);

      // Save the canvas state, and set the semi-transparency (alpha 0.5) with the Multiply blend mode
      page.Canvas.Save();
      page.Canvas.SetTransparency({ alphaPen: 0.5, alphaBrush: 0.5, blendMode: pdfModule.PdfBlendMode.Multiply });

      // Compute the centered drawing position: subtract the image size from the page size and halve the result
      let position = new pdfModule.PointF(
        (page.Canvas.Size.Width - image.Width) / 2,
        (page.Canvas.Size.Height - image.Height) / 2
      );

      // Draw the watermark image at the center of the page
      page.Canvas.DrawImage({ image: image, point: position });

      // Restore the previous state of the canvas
      page.Canvas.Restore();
    }

    // Define the output file name and save the document
    const outputFileName = 'SingleImageWatermark.pdf';
    doc.SaveToFile(outputFileName);
    doc.Close();

    // Read the generated file from VFS and trigger the download
    const fileArray = window.dotnetRuntime.Module.FS.readFile(outputFileName);
    const blob = new Blob([fileArray], { type: 'application/pdf' });
    const url = URL.createObjectURL(blob);
    const a = document.createElement('a');
    a.href = url;
    a.download = outputFileName;
    a.click();
    URL.revokeObjectURL(url);
  };

  return (
    <div style={{ textAlign: 'center', height: '300px' }}>
      <h1>Add Single Image Watermark To PDF</h1>
      <button onClick={addSingleImageWatermark}>
        Generate
      </button>
    </div>
  );
}

export default App;
PDF document after adding the single image watermark
Add a Tiled Image Watermark to PDF
When you need the watermark to fill the whole page and form a faint background texture, use a tiled image watermark. The approach is as follows: load the image with PdfImage.FromFile; divide the page into tiling cells according to the page size with PdfTilingBrush; inside the graphics context of the brush, lower the transparency with SetTransparency and draw the image within the cell with DrawImage; finally fill the whole page with the brush using DrawRectangle so that the image repeats row by row and column by column, covering the entire page.
function App() {
  const addTiledImageWatermark = async () => {
    // Get the Spire.PDF WASM module
    const pdfModule = window.wasmModule?.spirepdf;

    // Check whether the WASM module is ready
    if (!pdfModule) {
      alert('Spire.PDF is not ready yet');
      return;
    }

    // Load the PDF file to be watermarked into VFS
    const inputFileName = 'Lease_Agreement_EN.pdf';
    await window.spire.FetchFileToVFS(inputFileName, "", `${process.env.PUBLIC_URL}/data/`);

    // Load the watermark image into VFS
    const inputImageName = 'logo.png';
    await window.spire.FetchFileToVFS(inputImageName, "", `${process.env.PUBLIC_URL}/data/`);

    // Create a PdfDocument object and load the PDF document
    let doc = new pdfModule.PdfDocument();
    doc.LoadFromFile(inputFileName);

    // Load the watermark image from a file
    let image = pdfModule.PdfImage.FromFile(inputImageName);

    // Loop through all the pages in the document
    for (let i = 0; i < doc.Pages.Count; i++) {
      // Get the specified page
      let page = doc.Pages.get_Item(i);

      // Create a tiling brush: use one third of the page width and one fifth of the page height as the tiling cell
      let size = new pdfModule.SizeF({
        width: page.Canvas.Size.Width / 3,
        height: page.Canvas.Size.Height / 5
      });
      let brush = new pdfModule.PdfTilingBrush({ size: size });

      // Set the watermark transparency to 30%
      brush.Graphics.SetTransparency({ alpha: 0.3 });

      // Draw the watermark image at the center of the tiling cell
      let point = new pdfModule.PointF(
        (brush.Size.Width - image.Width) / 2,
        (brush.Size.Height - image.Height) / 2
      );
      brush.Graphics.DrawImage({ image: image, point: point });

      // Fill a whole-page rectangle with the tiling brush so that the image watermark tiles across the entire page
      let rect = new pdfModule.RectangleF({
        location: new pdfModule.PointF(0, 0),
        size: page.Canvas.Size
      });
      page.Canvas.DrawRectangle({ brush: brush, rectangle: rect });
    }

    // Define the output file name and save the document
    const outputFileName = 'TiledImageWatermark.pdf';
    doc.SaveToFile(outputFileName);
    doc.Close();

    // Read the generated file from VFS and trigger the download
    const fileArray = window.dotnetRuntime.Module.FS.readFile(outputFileName);
    const blob = new Blob([fileArray], { type: 'application/pdf' });
    const url = URL.createObjectURL(blob);
    const a = document.createElement('a');
    a.href = url;
    a.download = outputFileName;
    a.click();
    URL.revokeObjectURL(url);
  };

  return (
    <div style={{ textAlign: 'center', height: '300px' }}>
      <h1>Add Tiled Image Watermark To PDF</h1>
      <button onClick={addTiledImageWatermark}>
        Generate
      </button>
    </div>
  );
}

export default App;
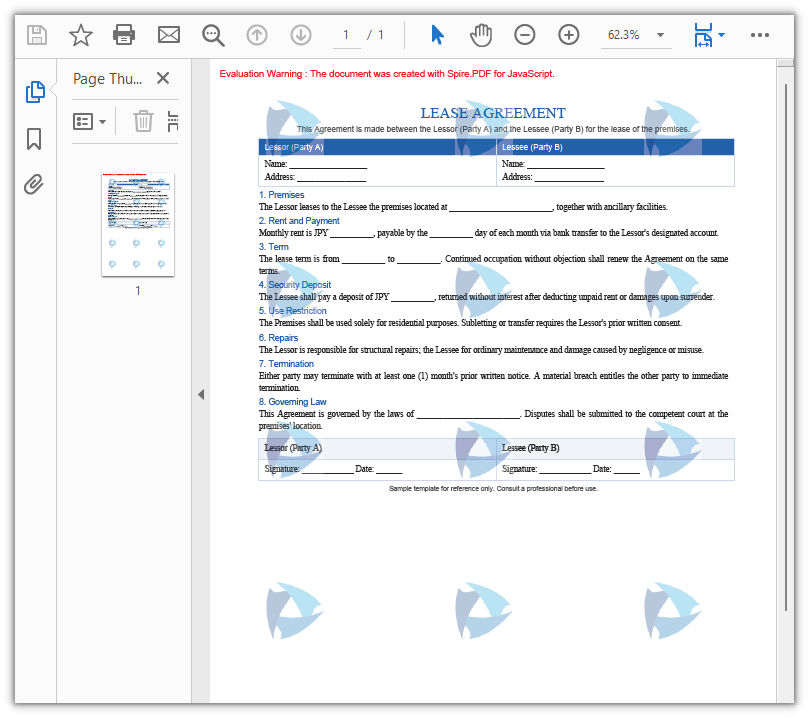
PDF document after adding the tiled image watermark
FAQ
How to control the transparency of an image watermark
Reason: An image watermark is layered over the body content as an image; if its transparency is not lowered, it will obscure the content underneath.
Solution: Before drawing, save the canvas state with Save, and then set the transparency with SetTransparency, whose value is specified by alphaPen and alphaBrush ranging from 0 (fully transparent) to 1 (opaque). To make the watermark blend naturally with the background, you can also specify a blend mode through blendMode, such as PdfBlendMode.Multiply. After drawing, restore the canvas state with Restore to avoid affecting subsequent drawing:
// Save the canvas state, set the semi-transparency and the Multiply blend mode, then draw the watermark image
page.Canvas.Save();
page.Canvas.SetTransparency({ alphaPen: 0.5, alphaBrush: 0.5, blendMode: pdfModule.PdfBlendMode.Multiply });
page.Canvas.DrawImage({ image: image, point: position });
page.Canvas.Restore();
How to specify the position of an image watermark
Reason: If no position is passed, DrawImage draws the image at the default coordinates, making it impossible to precisely control where the watermark lands.
Solution: DrawImage supports passing a PointF position or x, y coordinates. To center the image, subtract the image size from the page size and halve the result to get the centering coordinates:
// Compute the centered position: subtract the image size from the page size and halve the result
let point = new pdfModule.PointF(
  (page.Canvas.Size.Width - image.Width) / 2,
  (page.Canvas.Size.Height - image.Height) / 2
);

// Draw the watermark image at the specified position
page.Canvas.DrawImage({ image: image, point: point });
How to adjust the density of a tiled image watermark
Reason: The density of a tiled image watermark is determined by the size (tiling cell size) of the PdfTilingBrush tiling brush.
Solution: The smaller the tiling cell, the denser the repeated images; the larger the cell, the sparser they are. Set size to a certain ratio of the page width and height to tile the images row by row and column by column — for example, using one third of the page width and one fifth of the page height as one cell yields a moderately spaced watermark texture. To make it sparser, increase the divisor (such as Width / 4); to make it denser, decrease the divisor:
// Create a tiling brush: use one third of the page width and one fifth of the page height as the tiling cell
let size = new pdfModule.SizeF({
  width: page.Canvas.Size.Width / 3,
  height: page.Canvas.Size.Height / 5
});
let brush = new pdfModule.PdfTilingBrush({ size: size });
Get a Free License
If you want to remove the evaluation messages in the resulting documents or get rid of functional limitations, contact sales to obtain a 30-day temporary license.
Add, Extract or Remove TextBoxes in Excel with JavaScript in React
2026-09-09 02:21:38 Written by zaki zakiIn daily Excel document processing, textboxes are often used to add explanatory text, annotations, or tips to data — whether adding comments to reports or extracting annotation content from existing documents, the add/remove/modify operations on textboxes are essential. Spire.XLS for JavaScript completes these operations directly in the browser based on WebAssembly, managing input and output files through a virtual file system (VFS), with no backend service required.
This article covers three core features:
For installation and project configuration, refer to Integrating Spire.XLS for JavaScript in a React Project. The examples below assume Spire.XLS is installed and the WebAssembly module is initialized.
Add TextBox
Adding textboxes to a worksheet provides supplementary explanations for data, such as operation guidance or notes. Spire.XLS for JavaScript inserts a textbox at a specified position with the Worksheet.TextBoxes.AddTextBox() method, after which you can set the text, alignment, font, and background color of the textbox, or fill it with a picture. The main steps are as follows:
- Create a
Workbookobject and use theLoadFromFile()method to load the Excel document. - Use the
Workbook.Worksheets.get()method to get a specific worksheet. - Use the
Worksheet.TextBoxes.AddTextBox()method to add the first textbox, and set its text, horizontal/vertical center alignment, font, and background color. - Use the
Worksheet.TextBoxes.AddTextBox()method to add a second textbox and fill it with a picture. - Use the
Workbook.SaveToFile()method to save the document to a specified path.
Here is a complete code example showing how to add two textboxes to a worksheet in React — one containing text and one filled with a picture:
function App() {
  const addTextBox = async () => {
    // Get the Spire.XLS WASM module
    const xlsModule = window.wasmModule?.spirexls;

    // Check whether the module is ready
    if (!xlsModule) {
      alert('Spire.Xls is not ready yet');
      return;
    }

    // Load the font, Excel file and picture into the VFS
    await window.spire.FetchFileToVFS('ARIAL.TTF', '/Library/Fonts/', `${process.env.PUBLIC_URL}/font/`);
    const inputFileName = 'TextBox.xlsx';
    await window.spire.FetchFileToVFS(inputFileName, '', `${process.env.PUBLIC_URL}data/`);
    await window.spire.FetchFileToVFS('logo.png', '', `${process.env.PUBLIC_URL}data/`);

    // Load the workbook
    const workbook = new xlsModule.Workbook();
    workbook.LoadFromFile({ fileName: inputFileName });

    // Get the first worksheet
    const sheet = workbook.Worksheets.get(0);

    // Add the first textbox and set its position and size
    const textBox = sheet.TextBoxes.AddTextBox(3, 2, 50, 196);

    // Set the text in the textbox
    textBox.Text = 'Insert Excel TextBox';

    // Set the text to be centered horizontally and vertically
    textBox.HAlignment = xlsModule.CommentHAlignType.Center;
    textBox.VAlignment = xlsModule.CommentVAlignType.Center;

    // Set the font of the textbox (bold, white, 12pt)
    const font = workbook.CreateFont();
    font.FontName = 'Arial';
    font.Size = 12;
    font.IsBold = true;
    font.Color = xlsModule.Color.get_White();
    const rt = xlsModule.RichTextShape.Convert(textBox.RichText);
    rt.SetFont(0, textBox.Text.length - 1, font);

    // Set the background color of the textbox to blue-gray
    textBox.Fill.FillType = xlsModule.ShapeFillType.SolidColor;
    textBox.Fill.ForeKnownColor = xlsModule.ExcelColors.BlueGray;

    // Add the second textbox and set its position and size
    const textBox2 = sheet.TextBoxes.AddTextBox(6, 5, 90, 90);

    // Load a picture and fill the textbox with it
    textBox2.Fill.CustomPicture('logo.png');
    textBox2.Fill.FillType = xlsModule.ShapeFillType.Picture;

    // Set the border of the second textbox to 0
    textBox2.Line.Weight = 0;

    // Save the document
    const outputFileName = 'AddTextBox_output.xlsx';
    workbook.SaveToFile({ fileName: outputFileName });

    // Release resources
    workbook.Dispose();

    // Read the converted file from the VFS and trigger the download
    const fileArray = window.dotnetRuntime.Module.FS.readFile(outputFileName);
    const blob = new Blob([fileArray], { type: 'application/vnd.openxmlformats-officedocument.spreadsheetml.sheet' });
    const url = URL.createObjectURL(blob);
    const a = document.createElement('a');
    a.href = url;
    a.download = outputFileName;
    a.click();
    URL.revokeObjectURL(url);
  };

  return (
    <div style={{ textAlign: 'center', height: '300px' }}>
      <h1>Add TextBox</h1>
      <button onClick={addTextBox}>
        Start
      </button>
    </div>
  );
}

export default App;
The result of adding the textboxes 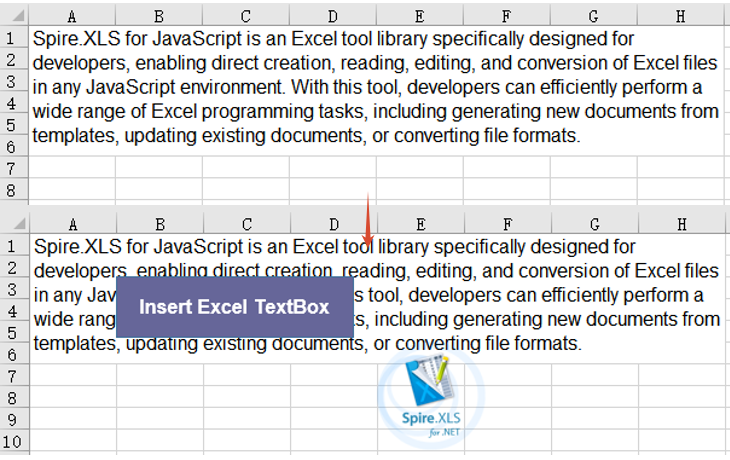
Extract Text and Image from TextBox
When you need to aggregate or reuse annotation information in existing documents, you can iterate through the textboxes and extract their text content and fill images. Spire.XLS for JavaScript gets the number of textboxes with Worksheet.TextBoxes.Count and iterates over each textbox with the Worksheet.TextBoxes.get() method: it reads the Text property to obtain the text content, checks the fill type through Fill.FillType, and extracts the fill image through the Fill.Picture property, finally saving the results as a txt file and a png image file respectively. The main steps are as follows:
- Create a
Workbookobject and use theLoadFromFile()method to load the Excel document. - Use the
Workbook.Worksheets.get()method to get a specific worksheet. - Iterate over each textbox in the
TextBoxescollection withWorksheet.TextBoxes.CountandWorksheet.TextBoxes.get(). - Read the
Textproperty of each textbox to collect the text content. - For a textbox filled with a picture, get its fill image through the
Fill.Pictureproperty and save it as a png file. - Write the collected text into a txt file.
Here is a complete code example showing how to extract text and images from a textbox in React:
function App() {
  const extractTextAndImage = async () => {
    // Get the Spire.XLS WASM module
    const xlsModule = window.wasmModule?.spirexls;

    // Check whether the module is ready
    if (!xlsModule) {
      alert('Spire.Xls is not ready yet');
      return;
    }

    // Load the font and Excel file into the VFS
    await window.spire.FetchFileToVFS('ARIAL.TTF', '/Library/Fonts/', `${process.env.PUBLIC_URL}/font/`);
    const inputFileName = 'TextBox.xlsx';
    await window.spire.FetchFileToVFS(inputFileName, '', `${process.env.PUBLIC_URL}data/`);

    // Load the workbook
    const workbook = new xlsModule.Workbook();
    workbook.LoadFromFile({ fileName: inputFileName });

    // Get the first worksheet
    const sheet = workbook.Worksheets.get(0);

    // Iterate over all textboxes in the worksheet and extract text and pictures
    const textLines = [];
    const pictureFiles = [];
    for (let i = sheet.TextBoxes.Count - 1; i >= 0; i--) {
      const shape = sheet.TextBoxes.get(i);

      // Extract the text in the textbox
      if (shape.Text) {
        textLines.push(shape.Text);
      }

      // Extract the fill picture of the textbox
      if (shape.Fill.FillType === xlsModule.ShapeFillType.Picture) {
        const picture = shape.Fill.Picture;
        const imageFile = 'ExtractedImage' + i + '.png';
        picture.Save(imageFile);
        pictureFiles.push(imageFile);
      }
    }

    // Save the extracted text as a txt file
    const textFile = 'ExtractedText.txt';
    window.dotnetRuntime.Module.FS.writeFile(textFile, textLines.join('\r\n'));

    // Release resources
    workbook.Dispose();

    // Read the extracted txt file from the VFS and trigger the download
    const txtArray = window.dotnetRuntime.Module.FS.readFile(textFile);
    const txtBlob = new Blob([txtArray], { type: 'text/plain' });
    const txtUrl = URL.createObjectURL(txtBlob);
    const txtAnchor = document.createElement('a');
    txtAnchor.href = txtUrl;
    txtAnchor.download = textFile;
    txtAnchor.click();
    URL.revokeObjectURL(txtUrl);

    // Read the extracted picture files from the VFS and trigger the downloads
    for (const imageFile of pictureFiles) {
      const imageArray = window.dotnetRuntime.Module.FS.readFile(imageFile);
      const imageBlob = new Blob([imageArray], { type: 'application/png' });
      const imageUrl = URL.createObjectURL(imageBlob);
      const imageAnchor = document.createElement('a');
      imageAnchor.href = imageUrl;
      imageAnchor.download = imageFile;
      imageAnchor.click();
      URL.revokeObjectURL(imageUrl);
    }
  };

  return (
    <div style={{ textAlign: 'center', height: '300px' }}>
      <h1>Extract Text And Image From TextBox</h1>
      <button onClick={extractTextAndImage}>
        Start
      </button>
    </div>
  );
}

export default App;
The result of extracting the text and image from the textbox 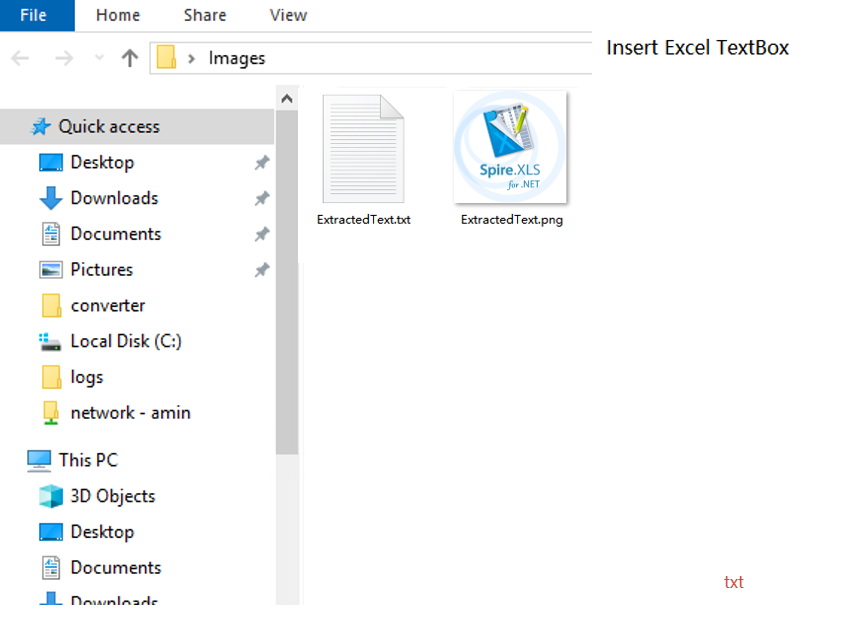
Remove TextBox
When annotation information in a document is no longer needed, you can delete it to keep the worksheet tidy. Spire.XLS for JavaScript deletes a specified textbox by index with the Worksheet.TextBoxes.RemoveAt() method. The main steps are as follows:
- Create a
Workbookobject and use theLoadFromFile()method to load the Excel document. - Use the
Workbook.Worksheets.get()method to get a specific worksheet. - Use the
Worksheet.TextBoxes.RemoveAt()method to delete the textbox at a specified index. - Use the
Workbook.SaveToFile()method to save the document to a specified path.
Here is a complete code example showing how to remove a textbox from a worksheet in React:
function App() {
  const removeTextBox = async () => {
    // Get the Spire.XLS WASM module
    const xlsModule = window.wasmModule?.spirexls;

    // Check whether the module is ready
    if (!xlsModule) {
      alert('Spire.Xls is not ready yet');
      return;
    }

    // Load the font and Excel file into the VFS
    await window.spire.FetchFileToVFS('ARIAL.TTF', '/Library/Fonts/', `${process.env.PUBLIC_URL}/font/`);
    const inputFileName = 'TextBox.xlsx';
    await window.spire.FetchFileToVFS(inputFileName, '', `${process.env.PUBLIC_URL}data/`);

    // Load the workbook
    const workbook = new xlsModule.Workbook();
    workbook.LoadFromFile({ fileName: inputFileName });

    // Get the first worksheet
    const sheet = workbook.Worksheets.get(0);

    // Remove the first textbox
    sheet.TextBoxes.RemoveAt(0);

    // Save the document
    const outputFileName = 'RemoveTextBox_output.xlsx';
    workbook.SaveToFile({ fileName: outputFileName });

    // Release resources
    workbook.Dispose();

    // Read the converted file from the VFS and trigger the download
    const fileArray = window.dotnetRuntime.Module.FS.readFile(outputFileName);
    const blob = new Blob([fileArray], { type: 'application/vnd.openxmlformats-officedocument.spreadsheetml.sheet' });
    const url = URL.createObjectURL(blob);
    const a = document.createElement('a');
    a.href = url;
    a.download = outputFileName;
    a.click();
    URL.revokeObjectURL(url);
  };

  return (
    <div style={{ textAlign: 'center', height: '300px' }}>
      <h1>Remove TextBox</h1>
      <button onClick={removeTextBox}>
        Start
      </button>
    </div>
  );
}

export default App;
The result of removing the textbox 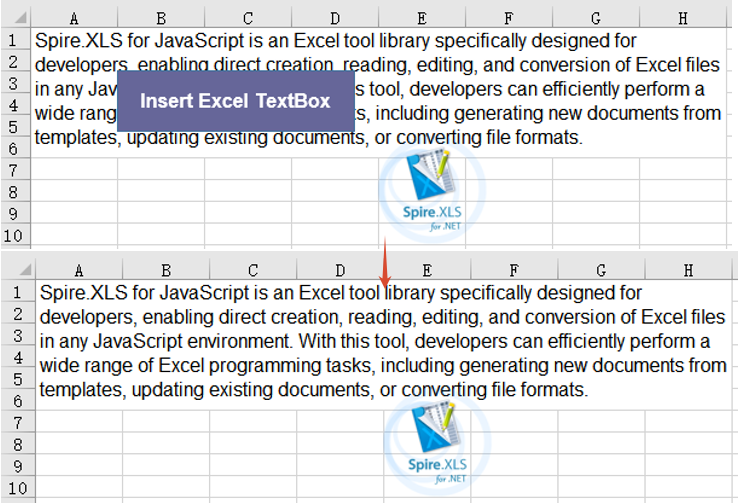
Frequently Asked Questions
The added textbox does not display in the result document
Cause: The row and column coordinates specified in the AddTextBox() method are out of range, or the font file was not loaded into the VFS, so the text in the textbox cannot be rendered properly.
Solution: Make sure the row and column coordinates are within the worksheet range, and ensure the required font has been loaded via FetchFileToVFS() before use, for example:
await window.spire.FetchFileToVFS(
  'ARIAL.TTF', '/Library/Fonts/', '/'
);
An error occurs when extracting an image due to the fill type
Cause: Accessing the Fill.Picture property directly only works for textboxes filled with a picture. If no image fill is set on the textbox (for example, a solid-color fill), accessing this property throws an exception.
Solution: Check whether the Fill.FillType of the textbox is Picture before accessing Fill.Picture; only then get the picture and call the Save() method to save it.
Obtain a Free License
Spire.XLS for JavaScript offers a 30-day full-featured free trial license with no functional limitations. Apply here to evaluate before purchasing.
Insert or Read Functions and Formulas in Excel Worksheets with JavaScript in React
2026-09-08 09:57:41 Written by zaki zakiIn Excel document processing, formulas and functions are among the most essential capabilities — whether summing, averaging, or performing date and trigonometric operations, formulas make data processing automated and efficient. Spire.XLS for JavaScript completes the insertion and reading of formulas and functions directly in the browser based on WebAssembly, and manages input and output files through a virtual file system (VFS), with no backend service required.
This article covers two core features:
- Insert Formulas and Functions into an Excel Worksheet
- Read Formulas and Functions from an Excel Worksheet
For installation and project configuration, refer to Integrating Spire.XLS for JavaScript in a React Project. The examples below assume Spire.XLS is installed and the WebAssembly module is initialized.
Insert Formulas and Functions into an Excel Worksheet
The Formula property of the cell Range object returned by the Worksheet.Range.get() method in Spire.XLS for JavaScript can be used to add formulas or functions to specified cells in an Excel worksheet. The main steps for adding formulas and functions to an Excel worksheet are as follows:
- Create a
Workbookobject. - Use the
Workbook.Worksheets.get()method to get a specific worksheet. - Write data into cells and set the cell formatting.
- Use the
Range.Formulaproperty to add formulas and functions to the specified cells of the worksheet. - Use the
Workbook.SaveToFile()method to save the workbook.
Here is a complete code example showing how to insert mathematical operations, date functions, trigonometric functions, average functions, and sum functions into an Excel worksheet in React:
function App() {
  const insertFormulasAndFunctions = async () => {
    // Get the Spire.XLS WASM module
    const xlsModule = window.wasmModule?.spirexls;

    // Check whether the module is ready
    if (!xlsModule) {
      alert('Spire.Xls is not ready yet');
      return;
    }

    // Load the font into the VFS
    await window.spire.FetchFileToVFS('ARIAL.TTF', '/Library/Fonts/', `${process.env.PUBLIC_URL}/font/`);

    // Create a Workbook object
    const workbook = new xlsModule.Workbook();

    // Get the first worksheet
    const sheet = workbook.Worksheets.get(0);

    // Declare two variables: currentRow and currentFormula
    let currentRow = 1;
    let currentFormula = "";

    // Set the column width
    sheet.SetColumnWidth(1, 32);
    sheet.SetColumnWidth(2, 16);

    // Write data into cells
    sheet.Range.get({ row: currentRow, column: 1 }).Value = "Test Data";
    sheet.Range.get({ row: currentRow, column: 2 }).NumberValue = 1;
    sheet.Range.get({ row: currentRow, column: 3 }).NumberValue = 2;
    sheet.Range.get({ row: currentRow, column: 4 }).NumberValue = 3;
    sheet.Range.get({ row: currentRow, column: 5 }).NumberValue = 4;
    sheet.Range.get({ row: currentRow, column: 6 }).NumberValue = 5;
    currentRow += 2;
    sheet.Range.get({ row: currentRow, column: 1 }).Value = "Formula or Function";
    sheet.Range.get({ row: currentRow, column: 2 }).Value = "Result";

    // Set the cell formatting
    let range = sheet.Range.get({ row: currentRow, column: 1, lastRow: currentRow, lastColumn: 2 });
    range.Style.Font.FontName = "Arial";
    range.Style.KnownColor = xlsModule.ExcelColors.LightGreen;
    range.Style.FillPattern = xlsModule.ExcelPatternType.Solid;
    range.Style.Borders.get(xlsModule.BordersLineType.EdgeBottom).LineStyle = xlsModule.LineStyleType.Medium;
    range.Style.Font.IsBold = true;

    // Mathematical operation
    currentFormula = "=1/2+3*4";
    currentRow += 1;
    sheet.Range.get({ row: currentRow, column: 1 }).NumberFormat = "@";
    sheet.Range.get({ row: currentRow, column: 1 }).Text = currentFormula;
    sheet.Range.get({ row: currentRow, column: 2 }).Formula = currentFormula;

    // Date function
    currentFormula = "=TODAY()";
    currentRow += 1;
    sheet.Range.get({ row: currentRow, column: 1 }).NumberFormat = "@";
    sheet.Range.get({ row: currentRow, column: 1 }).Text = currentFormula;
    sheet.Range.get({ row: currentRow, column: 2 }).Formula = currentFormula;
    sheet.Range.get({ row: currentRow, column: 2 }).Style.NumberFormat = "YYYY/MM/DD";

    // Trigonometric function
    currentFormula = "=SIN(PI()/6)";
    currentRow += 1;
    sheet.Range.get({ row: currentRow, column: 1 }).NumberFormat = "@";
    sheet.Range.get({ row: currentRow, column: 1 }).Text = currentFormula;
    sheet.Range.get({ row: currentRow, column: 2 }).Formula = currentFormula;

    // Average function
    currentFormula = "=AVERAGE(B1:F1)";
    currentRow += 1;
    sheet.Range.get({ row: currentRow, column: 1 }).NumberFormat = "@";
    sheet.Range.get({ row: currentRow, column: 1 }).Text = currentFormula;
    sheet.Range.get({ row: currentRow, column: 2 }).Formula = currentFormula;

    // Sum function
    currentFormula = "=SUM(B1:F1)";
    currentRow += 1;
    sheet.Range.get({ row: currentRow, column: 1 }).NumberFormat = "@";
    sheet.Range.get({ row: currentRow, column: 1 }).Text = currentFormula;
    sheet.Range.get({ row: currentRow, column: 2 }).Formula = currentFormula;

    // Save the workbook
    const outputFileName = 'InsertFormulasAndFunctions_output.xlsx';
    workbook.SaveToFile({ fileName: outputFileName, version: xlsModule.ExcelVersion.Version2010 });

    // Release resources
    workbook.Dispose();

    // Read the converted file from the VFS and trigger a download
    const fileArray = window.dotnetRuntime.Module.FS.readFile(outputFileName);
    const blob = new Blob([fileArray], { type: 'application/vnd.openxmlformats-officedocument.spreadsheetml.sheet' });
    const url = URL.createObjectURL(blob);
    const a = document.createElement('a');
    a.href = url;
    a.download = outputFileName;
    a.click();
    URL.revokeObjectURL(url);
  };

  return (
    <div style={{ textAlign: 'center', height: '300px' }}>
      <h1>Insert Formulas and Functions</h1>
      <button onClick={insertFormulasAndFunctions}>
        Start
      </button>
    </div>
  );
}

export default App;
Insert formulas and function results into Excel worksheets
Read Formulas and Functions from an Excel Worksheet
To read formulas and functions from an Excel worksheet, you need to loop through all the used cells in the worksheet, then use the HasFormula property of a cell to find the cells that contain formulas or functions, and finally use the Range.Formula property to get the formulas or functions in those cells. The detailed steps are as follows:
- Create a
Workbookobject. - Use the
Workbook.LoadFromFile()method to load an Excel workbook. - Use the
Workbook.Worksheets.get()method to get the first worksheet. - Loop through the used cells in the worksheet.
- Use the
HasFormulaproperty to detect whether a cell contains a formula or function. If so, use theRange.RangeAddressLocalproperty and theRange.Formulaproperty to get the cell name and its formula or function, and output the retrieved content.
Here is a complete code example showing how to loop through a worksheet and read the formulas and functions in React:
function App() {
  const readFormulasAndFunctions = async () => {
    // Get the Spire.XLS WASM module
    const xlsModule = window.wasmModule?.spirexls;

    // Check whether the module is ready
    if (!xlsModule) {
      alert('Spire.Xls is not ready yet');
      return;
    }

    // Load the font and Excel file into the VFS
    await window.spire.FetchFileToVFS('ARIAL.TTF', '/Library/Fonts/', `${process.env.PUBLIC_URL}/font/`);
    const inputFileName = 'FormulasAndFunctions.xlsx';
    await window.spire.FetchFileToVFS(inputFileName, '', `${process.env.PUBLIC_URL}data/`);

    // Create a Workbook object
    const workbook = new xlsModule.Workbook();

    // Load the Excel workbook
    workbook.LoadFromFile({ fileName: inputFileName });

    // Get the first worksheet
    const sheet = workbook.Worksheets.get(0);

    // Get the used cell range of the worksheet
    const usedRange = sheet.AllocatedRange;

    // Create an output workbook
    const output = new xlsModule.Workbook();
    const outSheet = output.Worksheets.get(0);
    let outRow = 1;

    // Loop through the used cells
    for (const cell of usedRange.Cells) {
      // Check whether the cell contains a formula or function
      if (cell.HasFormula) {
        // Get the cell name
        const cellname = cell.RangeAddressLocal;

        // Get the formula or function in the cell
        const formula = cell.Formula;

        // Write the cell name and formula that were read
        outSheet.Range.get({ row: outRow, column: 1 }).Value = "Cell " + cellname + " contains: " + formula;
        outRow += 1;
      }
    }

    // Set the output column width so the text displays completely
    outSheet.SetColumnWidth(1, 45);

    // Save the output workbook
    const outputFileName = 'ReadFormulasAndFunctions_output.xlsx';
    output.SaveToFile({ fileName: outputFileName, version: xlsModule.ExcelVersion.Version2010 });

    // Release resources
    output.Dispose();

    // Read the converted file from the VFS and trigger a download
    const fileArray = window.dotnetRuntime.Module.FS.readFile(outputFileName);
    const blob = new Blob([fileArray], { type: 'application/vnd.openxmlformats-officedocument.spreadsheetml.sheet' });
    const url = URL.createObjectURL(blob);
    const a = document.createElement('a');
    a.href = url;
    a.download = outputFileName;
    a.click();
    URL.revokeObjectURL(url);
  };

  return (
    <div style={{ textAlign: 'center', height: '300px' }}>
      <h1>Read Formulas and Functions</h1>
      <button onClick={readFormulasAndFunctions}>
        Start
      </button>
    </div>
  );
}

export default App;
Read formulas and function results from Excel worksheets
Frequently Asked Questions
HasFormula cannot detect the formula, and the loop returns no results
Cause: The formula in the target cell was actually written as text (using the Text/Value property instead of the Formula property), and HasFormula only returns true for real formulas.
Solution: Make sure to use the Range.Formula property when inserting; otherwise, re-assign the text as a formula before reading.
Confusing the Formula and FormulaNumberValue properties
Cause: The Formula property returns the formula string in the cell, while the FormulaNumberValue property returns the numeric result after the formula is calculated. The two return different content.
Solution: Use cell.Formula when you need the formula string, and cell.FormulaNumberValue when you need the numeric result after calculation. Choose the appropriate property based on your actual needs.
Get a Free License
Spire.XLS for JavaScript offers a 30-day full-featured free trial license with no functional limitations. Apply here to evaluate before purchasing.
Group or Ungroup Rows and Columns in Excel with JavaScript in React
2026-09-04 08:50:04 Written by zaki zakiIn everyday Excel spreadsheet handling, grouping rows or columns lets you collapse detail data and show only summary information, making large tables cleaner and easier to read. Spire.XLS for JavaScript performs grouping and ungrouping directly in the browser based on WebAssembly, and manages input/output files through a virtual file system (VFS), with no backend service required.
This article covers two core features:
For installation and project configuration, refer to Integrate Spire.XLS for JavaScript in a React Project. The examples below assume Spire.XLS is installed and the WebAssembly module is initialized.
Group Rows or Columns
After grouping rows or columns, you can collapse the detail data inside a group and keep only the summary rows or columns you need, making the worksheet tidier. Spire.XLS for JavaScript groups rows with the GroupByRows() method and columns with the GroupByColumns() method. The main steps are as follows:
- Create a
Workbookobject and use theLoadFromFile()method to load the Excel document. - Use the
Workbook.Worksheets.get()method to get a specific worksheet. - Use the
Worksheet.GroupByRows()method to group rows. - Use the
Worksheet.GroupByColumns()method to group columns. - Use the
Workbook.SaveToFile()method to save the document to a specified path.
Here is a complete code example showing how to group rows or columns in React:
function App() {
  const groupRowsAndColumns = async () => {
    // Get the Spire.XLS WASM module
    const xlsModule = window.wasmModule?.spirexls;

    // Check whether the module is ready
    if (!xlsModule) {
      alert('Spire.Xls is not ready yet');
      return;
    }

    // Load the font and Excel file into the VFS
    await window.spire.FetchFileToVFS('ARIAL.TTF', '/Library/Fonts/', `${process.env.PUBLIC_URL}/font/`);
    const inputFileName = 'GroupRowsAndColumns.xlsx';
    await window.spire.FetchFileToVFS(inputFileName, '', `${process.env.PUBLIC_URL}data/`);

    // Load the workbook
    const workbook = new xlsModule.Workbook();
    workbook.LoadFromFile({ fileName: inputFileName });

    // Get the first worksheet
    const sheet = workbook.Worksheets.get(0);

    // Group rows
    sheet.GroupByRows(6, 10, false);
    sheet.GroupByRows(14, 16, false);

    // Group columns
    sheet.GroupByColumns(2, 7, false);

    // Save the document
    const outputFileName = 'GroupRowsAndColumns_output.xlsx';
    workbook.SaveToFile({ fileName: outputFileName, version: xlsModule.ExcelVersion.Version2010 });

    // Release resources
    workbook.Dispose();

    // Read the converted file from the VFS and trigger a download
    const fileArray = window.dotnetRuntime.Module.FS.readFile(outputFileName);
    const blob = new Blob([fileArray], { type: 'application/vnd.openxmlformats-officedocument.spreadsheetml.sheet' });
    const url = URL.createObjectURL(blob);
    const a = document.createElement('a');
    a.href = url;
    a.download = outputFileName;
    a.click();
    URL.revokeObjectURL(url);
  };

  return (
    <div style={{ textAlign: 'center', height: '300px' }}>
      <h1>Group Rows And Columns</h1>
      <button onClick={groupRowsAndColumns}>
        Start
      </button>
    </div>
  );
}

export default App;
After grouping, group markers appear on the left side of the grouped rows or above the grouped columns. Click a marker to collapse or expand the detail data.
Ungroup Rows or Columns
When the grouping structure is no longer needed, you can ungroup the existing groups so that all rows and columns return to their normal display. Spire.XLS for JavaScript ungroups rows with the UngroupByRows() method and columns with the UngroupByColumns() method. The main steps are as follows:
- Create a
Workbookobject and use theLoadFromFile()method to load the Excel document that contains groups. - Use the
Workbook.Worksheets.get()method to get a specific worksheet. - Use the
Worksheet.UngroupByRows()method to ungroup rows. - Use the
Worksheet.UngroupByColumns()method to ungroup columns. - Use the
Workbook.SaveToFile()method to save the document to a specified path.
Here is a complete code example showing how to ungroup rows or columns in React:
function App() {
  const ungroupRowsAndColumns = async () => {
    // Get the Spire.XLS WASM module
    const xlsModule = window.wasmModule?.spirexls;

    // Check whether the module is ready
    if (!xlsModule) {
      alert('Spire.Xls is not ready yet');
      return;
    }

    // Load the font and Excel file into the VFS
    await window.spire.FetchFileToVFS('ARIAL.TTF', '/Library/Fonts/', `${process.env.PUBLIC_URL}/font/`);
    const inputFileName = 'GroupRowsAndColumns.xlsx';
    await window.spire.FetchFileToVFS(inputFileName, '', `${process.env.PUBLIC_URL}data/`);

    // Load the workbook
    const workbook = new xlsModule.Workbook();
    workbook.LoadFromFile({ fileName: inputFileName });

    // Get the first worksheet
    const sheet = workbook.Worksheets.get(0);

    // Ungroup rows
    sheet.UngroupByRows(6, 10);
    sheet.UngroupByRows(14, 16);

    // Ungroup columns
    sheet.UngroupByColumns(2, 7);

    // Save the document
    const outputFileName = 'UngroupRowsAndColumns_output.xlsx';
    workbook.SaveToFile({ fileName: outputFileName, version: xlsModule.ExcelVersion.Version2010 });

    // Release resources
    workbook.Dispose();

    // Read the converted file from the VFS and trigger a download
    const fileArray = window.dotnetRuntime.Module.FS.readFile(outputFileName);
    const blob = new Blob([fileArray], { type: 'application/vnd.openxmlformats-officedocument.spreadsheetml.sheet' });
    const url = URL.createObjectURL(blob);
    const a = document.createElement('a');
    a.href = url;
    a.download = outputFileName;
    a.click();
    URL.revokeObjectURL(url);
  };

  return (
    <div style={{ textAlign: 'center', height: '300px' }}>
      <h1>Ungroup Rows And Columns</h1>
      <button onClick={ungroupRowsAndColumns}>
        Start
      </button>
    </div>
  );
}

export default App;
After ungrouping, the group markers on the rows or columns disappear and the data returns to the normal ungrouped display.
FAQ
Cannot collapse or expand detail data after grouping
Cause: The third parameter isCollapsed of the GroupByRows() and GroupByColumns() methods is set to false, so the groups are displayed expanded by default.
Solution: Set this parameter to true, and the groups will be displayed collapsed after saving:
sheet.GroupByRows(6, 10, true);
Some rows or columns still show group symbols after ungrouping
Cause: The UngroupByRows() and UngroupByColumns() methods only ungroup the rows or columns within the specified range. If these rows or columns also belong to a higher-level group, the higher-level group symbols are still retained.
Solution: Make sure the range passed when ungrouping matches the range used when grouping. If nested groups exist, call the ungroup methods repeatedly to ungroup level by level:
sheet.UngroupByRows(6, 10);
sheet.UngroupByRows(14, 16);
sheet.UngroupByColumns(2, 7);
Obtain a Free License
Spire.XLS for JavaScript offers a 30-day full-featured free trial license with no functional limitations. Apply here to evaluate before purchasing.
