Convert PowerPoint to High-Resolution TIFF: 4 Practical Methods
Table of Contents
- Method 1: Modify the Windows Registry and Export from PowerPoint
- Method 2: Export PowerPoint Slides to TIFF with a VBA Macro
- Method 3: Convert PowerPoint to TIFF with Convertio
- Method 4: Convert PowerPoint to a High-Resolution TIFF Using Python
- Bonus Tips: Combine Single-Page TIFFs into a Multi-Page TIFF
- Comparison Table: Choose the Right Method
- Conclusion
- FAQs

PowerPoint presentations often contain charts, diagrams, product designs, technical illustrations, and other visual content that may need to be reused outside Microsoft PowerPoint. Converting slides to TIFF is particularly useful for professional printing, document archiving, publishing, faxing, and workflows that require lossless raster images.
However, simply exporting slides from PowerPoint may not produce the resolution you expect. On Windows, PowerPoint normally exports slides as bitmap images at 96 DPI by default. This is generally sufficient for screen viewing, but the resulting images may appear blurry when enlarged or printed. For print-ready output, 300 DPI is usually a more practical target.
This article introduces four ways to convert PowerPoint presentations to high-resolution TIFF files. The methods range from PowerPoint’s built-in export feature to VBA automation, an online converter, and a Python-based solution for generating high-resolution multi-page TIFF files.
Method 1: Modify the Windows Registry and Export from PowerPoint
PowerPoint can save slides directly as TIFF images through its standard Save As or Export feature. The main limitation is that PowerPoint uses a default export resolution of 96 DPI on Windows.
To generate higher-resolution images, you can add a registry value that changes PowerPoint’s bitmap export resolution. For example, setting the value to 300 produces a 4000 × 2250-pixel image from a standard 16:9 widescreen slide.
Editing the Windows Registry incorrectly can affect system or application behavior. Consider backing up the relevant registry key before making changes.
Step 1: Change the PowerPoint Export Resolution
- Close PowerPoint and other Microsoft Office applications.
- Press Windows + R to open the Run dialog.
- Enter
regeditand click OK . - Navigate to the following location for PowerPoint 2016, 2019, 2021, 2024, or Microsoft 365:
HKEY_CURRENT_USER\Software\Microsoft\Office\16.0\PowerPoint\Options
- Right-click an empty area in the right pane.
- Select New → DWORD (32-bit) Value .
- Name the new value:
ExportBitmapResolution
- Double-click the value and select Decimal .
- Enter
300in the Value data field. - Click OK and close Registry Editor.
You can use other values, such as 150 or 200, when you need a balance between image quality and file size. Microsoft’s export calculations show that a 16:9 slide produces approximately 2000 × 1125 pixels at 150 DPI, 2667 × 1500 pixels at 200 DPI, and 4000 × 2250 pixels at 300 DPI.
Step 2: Export the Slides as TIFF
- Open the presentation in PowerPoint.
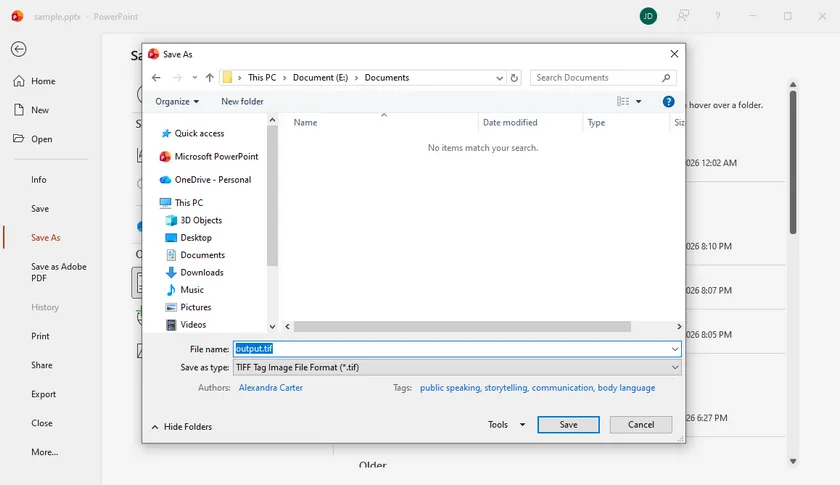
- Go to File → Save As or File → Export → Change File Type .
- Choose TIFF Tag Image File Format (*.tif) .
- Select an output folder and click Save .
- When prompted, choose All Slides or Just This One .
When all slides are exported, PowerPoint creates a folder containing a separate TIFF file for each slide.
This method is convenient when you only occasionally need high-resolution TIFF images and already have Microsoft PowerPoint installed. Its main disadvantage is that it modifies a user-level Office setting and does not offer a convenient way to process many presentations automatically.
Method 2: Export PowerPoint Slides to TIFF with a VBA Macro
A VBA macro is more efficient when a presentation contains many slides or when you frequently repeat the same export task. Unlike the standard export dialog, the PowerPoint Slide.Export method allows you to specify the output width and height directly in pixels. Microsoft documents both ScaleWidth and ScaleHeight as optional pixel dimensions for the exported slide.
The following macro exports every slide as a 4000 × 2250-pixel TIFF image, which matches the 16:9 dimensions commonly associated with a 300-DPI widescreen slide.
Add and Run the VBA Macro
- Open your PowerPoint presentation.
- Press Alt + F11 to open the Visual Basic Editor.
- Select Insert → Module .
- Paste the following code into the module:
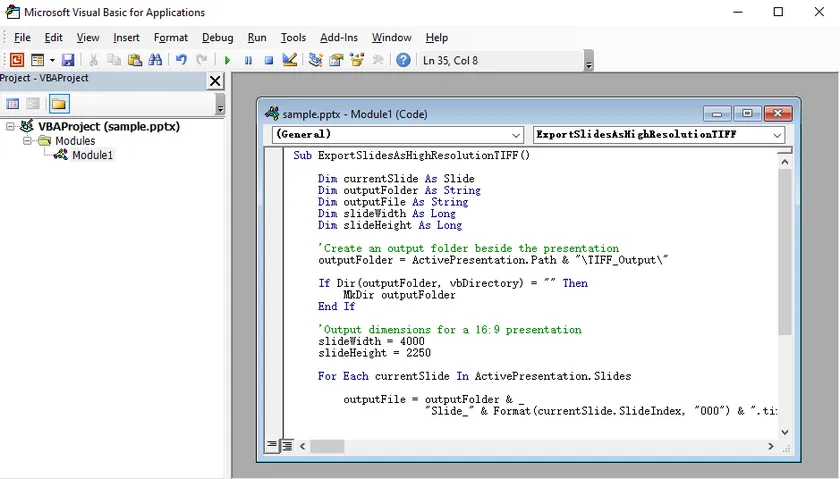
Sub ExportSlidesAsHighResolutionTIFF()

    Dim currentSlide As Slide
    Dim outputFolder As String
    Dim outputFile As String
    Dim slideWidth As Long
    Dim slideHeight As Long

    'Create an output folder beside the presentation
    outputFolder = ActivePresentation.Path & "\TIFF_Output\"

    If Dir(outputFolder, vbDirectory) = "" Then
        MkDir outputFolder
    End If

    'Output dimensions for a 16:9 presentation
    slideWidth = 4000
    slideHeight = 2250

    For Each currentSlide In ActivePresentation.Slides

        outputFile = outputFolder & _
                     "Slide_" & Format(currentSlide.SlideIndex, "000") & ".tif"

        currentSlide.Export _
            outputFile, _
            "TIFF", _
            slideWidth, _
            slideHeight

    Next currentSlide

    MsgBox "All slides have been exported to:" & vbCrLf & outputFolder

End Sub
- Press F5 or click Run .
- Open the
TIFF_Outputfolder created beside the presentation.
The macro uses numbered filenames such as Slide_001.tif, Slide_002.tif, and Slide_003.tif. Zero-padded numbering helps maintain the correct slide order when the images are sorted by filename.
For a 4:3 presentation, replace the dimensions with values that match that aspect ratio, such as:
slideWidth = 3000
slideHeight = 2250
The advantage of VBA is that it automates the entire presentation without requiring another application. It also gives you direct control over pixel dimensions. However, macros must be enabled, and the code runs through the installed PowerPoint application, making it less suitable for unattended server environments.
Method 3: Convert PowerPoint to TIFF with Convertio
An online converter is useful when you cannot install software, do not have access to PowerPoint, or only need to convert a small number of files.
Convertio provides dedicated PPT-to-TIFF and PPTX-to-TIFF conversion pages. It accepts files from a local computer and may also support imports from cloud storage or a URL. The service converts the presentation in the cloud and provides the resulting TIFF file for download.
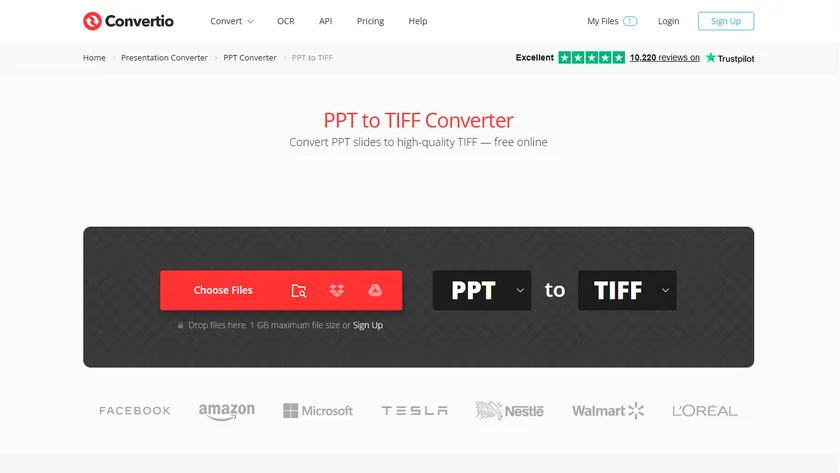
Steps to Convert PowerPoint Online
- Open the Convertio PowerPoint-to-TIFF converter.
- Upload a
.pptor.pptxpresentation. - Click Convert .
- Wait for the conversion to finish.
- Download the converted TIFF file.
This is the easiest option for a quick, one-time conversion because there are no registry changes, macros, or development tools involved. It also works on operating systems other than Windows.
The main limitation is control. Online converters may not provide precise DPI, pixel-size, compression, or color-profile settings. Free plans may also impose restrictions on file size, conversion frequency, or batch processing.
More importantly, uploading a presentation sends its contents to a third-party server. Avoid this method for presentations containing confidential business information, customer data, financial records, unpublished research, or other sensitive material.
Method 4: Convert PowerPoint to a High-Resolution TIFF Using Python
For automated conversion or integration into document-processing applications, you can use Spire.Presentation for Python together with Pillow. Spire.Presentation can render each slide at a specified pixel size without requiring Microsoft PowerPoint to be installed.
Unlike directly saving the presentation as TIFF, which may produce images at only 1280 × 720 pixels, the SaveAsImageByWH() method lets you specify the output width and height. The rendered slide images can then be combined into a single multi-page TIFF using Pillow.
Install the Required Libraries
Install Spire.Presentation for Python and Pillow using pip:
pip install Spire.Presentation Pillow
Python Code: Convert PowerPoint to a Multi-Page TIFF
from spire.presentation import *
from PIL import Image
from io import BytesIO

# Create a Presentation object
presentation = Presentation()

# Load a PowerPoint presentation
presentation.LoadFromFile("Input.pptx")

# Store the converted slide images
images = []

# Convert each slide to a high-resolution image
for i in range(presentation.Slides.Count):
    slide = presentation.Slides[i]

    # Render the slide at 4000 × 2250 pixels
    stream = slide.SaveAsImageByWH(4000, 2250)

    # Convert the image stream to a PIL image
    image = Image.open(BytesIO(stream.ToArray())).convert("RGB")
    images.append(image)

    stream.Dispose()

# Save all slide images as a multi-page TIFF
images[0].save(
    "Output/PowerPointToTIFF.tiff",
    format="TIFF",
    save_all=True,
    append_images=images[1:],
    compression="tiff_lzw",
    dpi=(300, 300)
)

# Dispose resources
presentation.Dispose()
How It Works
The code first loads the PowerPoint presentation and loops through its slides. Each slide is rendered as a 4000 × 2250-pixel image, which is suitable for a standard 16:9 presentation intended for high-quality printing.
The image stream returned by SaveAsImageByWH() is then opened with Pillow and added to a list. Finally, Pillow saves the first image as a TIFF file and appends the remaining images as additional pages.
The following arguments are important:
save_all=Trueenables multi-page image output.append_images=images[1:]adds the remaining slides to the TIFF file.compression="tiff_lzw"applies lossless LZW compression to reduce the output file size.dpi=(300, 300)records 300-DPI resolution information in the TIFF metadata.
The actual visual detail is primarily determined by the 4000 × 2250 rendering dimensions. The DPI setting mainly tells compatible applications how densely those pixels should be printed.
For a lower-resolution output with a smaller file size, you can change the slide dimensions to:
stream = slide.SaveAsImageByWH(2667, 1500)
This method is suitable for batch processing, server-side conversion, and workflows in which multiple presentations must be converted automatically. It also creates a multi-page TIFF directly, so there is no need to merge the individual slide images afterward.
What's More
Beyond TIFF conversion, Spire.Presentation for Python can also be used to convert PowerPoint slides to other image formats, such as PNG, JPG, and SVG, depending on the output requirements. For broader document-sharing workflows, presentations can also be converted to formats such as PDF and HTML. These options make it easier to reuse slide content for websites, reports, archives, previews, and cross-platform distribution.
Bonus Tips: Combine Single-Page TIFFs into a Multi-Page TIFF
Methods 1 and 2 export each slide as a separate TIFF file. If you prefer one multi-page TIFF containing all slides, IrfanView is a practical Windows tool that supports creating and editing multi-page TIFF files. Method 3 and 4, however, create a multi-page TIFF directly and do not require this additional merging step.
Combine TIFF Files with IrfanView
- Open IrfanView and go to File → Thumbnails , or press T .
- In the Thumbnails window, navigate to the folder containing the exported TIFF files.
- Select all the TIFF files you want to merge. Use Ctrl or Shift while clicking to select multiple files.
- Right-click one of the selected files.
- Choose Start Multipage-TIF dialog with selected files .
- Review the file order in the multipage TIFF dialog.
- Set the output folder and filename.
- Click Create TIF Image .
After processing, IrfanView creates a single TIFF file in which each slide appears as a separate page.
Check the order carefully before creating the file. Naming the source images with padded numbers—such as Slide_001, Slide_002, and Slide_010—prevents incorrect alphabetical sorting.
Free online TIFF merger tools are another option, but the same privacy concerns apply when uploading sensitive images.
Comparison Table: Choose the Right Method
| Method | Best suited for | Resolution control | Batch support | Requires PowerPoint | Main limitation |
|---|---|---|---|---|---|
| Registry + PowerPoint | Occasional manual export | DPI-based | One presentation at a time | Yes | Requires registry modification |
| VBA macro | Repeated slide export | Exact pixel dimensions | Yes | Yes | Macros must be enabled |
| Convertio | Quick conversion without installation | Limited | Limited by service plan | No | Privacy and upload restrictions |
| Spire.Presentation for Python | Automated application workflows | Programmable | Yes | No | Requires coding and licensing consideration |
Conclusion
The best way to convert PowerPoint to high-resolution TIFF depends on how often you perform the conversion and how much control you require.
For a one-time export on Windows, changing PowerPoint’s registry setting and using the native TIFF export feature is straightforward. A VBA macro is more efficient when you need to export every slide repeatedly at fixed pixel dimensions. Convertio is convenient for occasional browser-based conversions, provided the presentation is not confidential.
For automated document workflows, Spire.Presentation for Python provides greater control over the output dimensions without requiring Microsoft PowerPoint. Combined with Pillow, it can also place all rendered slides into a single multi-page TIFF file.
When separate slide images are not convenient, the exported TIFF files can also be combined into a single multi-page TIFF with IrfanView.
FAQs
Can PowerPoint export slides directly as TIFF files?
Yes. In PowerPoint, select File → Save As and choose TIFF as the output format. PowerPoint can export the current slide or every slide in the presentation.
Why do TIFF files exported from PowerPoint look blurry?
PowerPoint’s default bitmap export resolution on Windows is normally 96 DPI. This may be sufficient for screens but inadequate for enlargement or professional printing. Changing the ExportBitmapResolution registry value or specifying larger pixel dimensions through VBA produces sharper output.
Is 300 DPI always necessary?
Not always. Around 96 to 150 DPI may be sufficient for screen-based documents and internal previews. A resolution of 300 DPI is more appropriate for high-quality printing, publishing, and detailed diagrams. Higher resolution also produces larger TIFF files.
Does increasing the DPI improve low-quality images inside the presentation?
No. A higher export resolution preserves slide elements more clearly, but it cannot restore details that are missing from a low-resolution source image. For the best result, use high-quality original images and disable unnecessary image compression in PowerPoint.
Can multiple PowerPoint slides be stored in one TIFF file?
Yes. TIFF supports multiple pages. PowerPoint and VBA normally export each slide as a separate image, which can be combined using IrfanView. In Python, you can render the slides with Spire.Presentation and use Pillow to save them directly as a single multi-page TIFF.
See Also
Merge Multiple CSV Files into One Excel (Separate Sheets)
Table of Contents
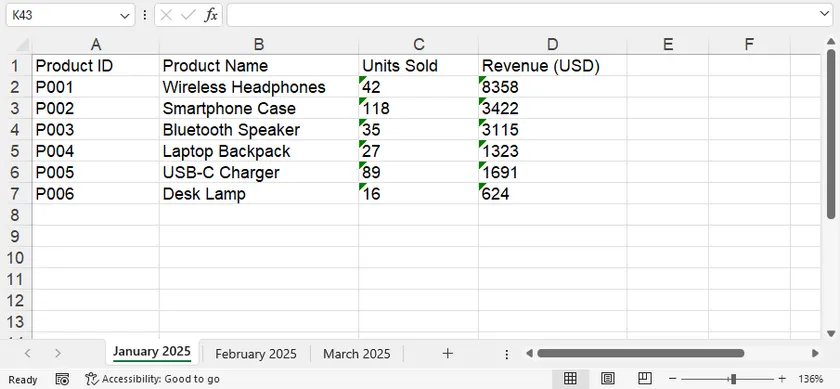
When working with reports exported from different systems, it's common to end up with dozens of CSV files. For example, each department, store, or month may generate its own CSV report. While this makes data collection straightforward, managing a large number of separate files quickly becomes inconvenient.
A practical solution is to combine all CSV files into one Excel workbook , while keeping each CSV as a separate worksheet . This preserves the original file structure, makes navigation easier, and allows you to share a single workbook instead of multiple individual files.
In this article, we'll introduce three practical methods—from a simple manual approach to Excel automation with VBA and a fully programmatic Python solution.
Methods covered:
- Method 1. Copy and Paste CSV Files into Separate Worksheets
- Method 2. Use a VBA Macro to Import Multiple CSV Files
- Method 3. Merge Multiple CSV Files in Python Using Spire.XLS
Method 1. Copy and Paste CSV Files into Separate Worksheets
If you only have a few CSV files to merge, the simplest solution is to copy their contents into different worksheets manually.
One important detail is that you should open each CSV file with Microsoft Excel instead of a text editor such as Notepad . When a CSV is opened in Excel, its rows and columns are parsed correctly based on the delimiter. If you copy the text directly from Notepad, Excel may paste everything into a single column rather than separating the values automatically.
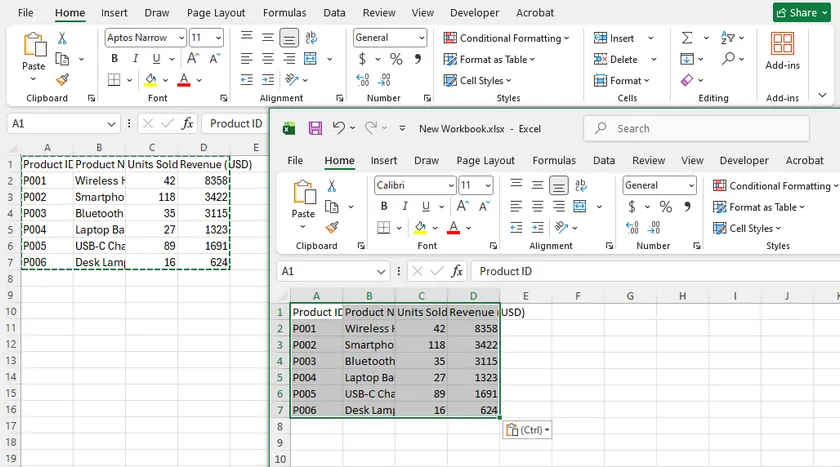
Steps
- Open Microsoft Excel and create a new workbook.
- Open the first CSV file using Excel .
- Select all data ( Ctrl + A ) and copy it ( Ctrl + C ).
- Return to the new workbook and paste the data into the first worksheet.
- Rename the worksheet if necessary.
- Repeat the process for each remaining CSV file, creating a new worksheet each time.
- Save the workbook as an .xlsx file.
Pros
- No programming required.
- Works in every Excel installation.
- Preserves one CSV per worksheet.
- Ideal for occasional tasks involving only a few files.
Cons
- Time-consuming when processing many files.
- Entirely manual.
- Easy to make mistakes when handling dozens of CSV files.
Method 2. Use a VBA Macro to Import Multiple CSV Files
If you frequently perform this task inside Excel, a VBA macro can automate the entire process. The macro scans a folder, opens every CSV file, copies its worksheet into the current workbook, and names the worksheet after the CSV file.
Step 1. Create a Blank Workbook
Open Excel and create a new workbook. This workbook will become the destination workbook that stores all imported worksheets.
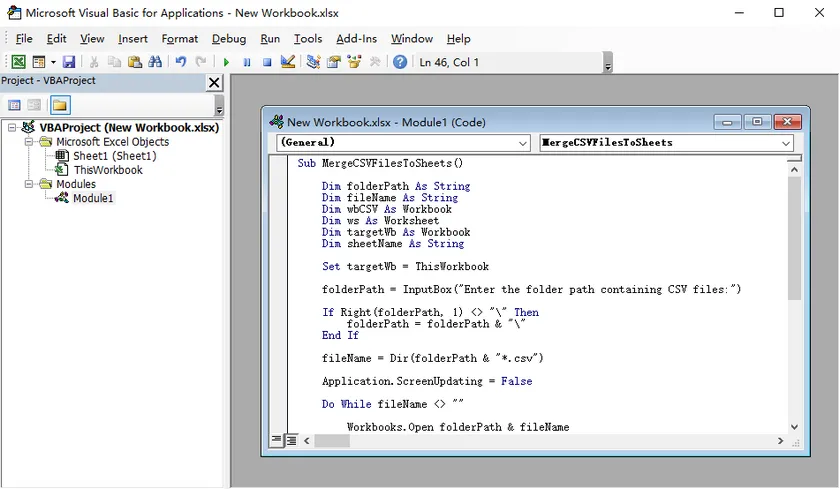
Step 2. Open the VBA Editor
Press Alt + F11 to open the Visual Basic Editor.
Choose Insert > Module , then paste the following code into the new module.
Sub MergeCSVFilesToSheets()

    Dim folderPath As String
    Dim fileName As String
    Dim wbCSV As Workbook
    Dim ws As Worksheet
    Dim targetWb As Workbook
    Dim sheetName As String

    Set targetWb = ThisWorkbook

    folderPath = InputBox("Enter the folder path containing CSV files:")

    If Right(folderPath, 1) <> "\" Then
        folderPath = folderPath & "\"
    End If

    fileName = Dir(folderPath & "*.csv")

    Application.ScreenUpdating = False

    Do While fileName <> ""

        Workbooks.Open folderPath & fileName
        Set wbCSV = ActiveWorkbook

        sheetName = Left(fileName, InStrRev(fileName, ".") - 1)

        wbCSV.Worksheets(1).Copy After:=targetWb.Sheets(targetWb.Sheets.Count)
        Set ws = targetWb.Sheets(targetWb.Sheets.Count)

        On Error Resume Next
        ws.Name = Left(sheetName, 31)
        On Error GoTo 0

        wbCSV.Close SaveChanges:=False

        fileName = Dir
    Loop

    Application.ScreenUpdating = True

    MsgBox "CSV files have been merged successfully."

End Sub
Step 3. Run the Macro
Press F5 , enter the folder containing your CSV files, and the macro will automatically import every CSV into its own worksheet.
Pros
- Much faster than manual copying.
- Runs entirely inside Microsoft Excel.
- Automatically creates one worksheet for each CSV file.
- Suitable for users who regularly work with Excel.
Cons
- Requires macro-enabled workbooks.
- Users must enable VBA macros.
- Less suitable for unattended or server-side automation.
Method 3. Merge Multiple CSV Files in Python Using Spire.XLS
For recurring workflows, scheduled jobs, or business applications, programmatic automation is often the most efficient solution.
Many developers immediately think of Pandas for CSV processing. Pandas is an excellent library for reading, analyzing, and transforming tabular data. However, its primary focus is data analysis rather than document generation.
If your workflow continues beyond simply importing CSV files—for example, formatting worksheets, applying styles, inserting charts, protecting workbooks, or exporting the final workbook to PDF—a spreadsheet library such as Free Spire.XLS for Python provides a more complete solution.
First, install the library:
pip install Spire.XLS
Then use the following code to merge every CSV file in a folder into a single Excel workbook, with each CSV becoming a separate worksheet.
import os
from spire.xls import Workbook, WorksheetCopyType, FileFormat

input_folder = "input"
output_folder = "output"

# Create the destination workbook
merged_workbook = Workbook()
merged_workbook.Worksheets.Clear()

# Process every CSV file
for csv_file in os.listdir(input_folder):
    if csv_file.endswith(".csv"):

        input_path = os.path.join(input_folder, csv_file)

        workbook = Workbook()
        workbook.LoadFromFile(input_path, ",", 1, 1)

        sheet = workbook.Worksheets[0]
        merged_workbook.Worksheets.AddCopy(
            sheet,
            WorksheetCopyType.CopyAll
        )

merged_workbook.SaveToFile(
    os.path.join(output_folder, "Merged.xlsx"),
    FileFormat.Version2013
)
Output:
Compared with manual methods or VBA, this approach is much easier to integrate into automated workflows. After generating the workbook, you can continue processing it with Spire.XLS—for example:
- Apply fonts, colors, borders, and number formats.
- Freeze panes or adjust column widths automatically.
- Create charts and pivot tables.
- Protect worksheets or the workbook.
- Export the completed workbook to PDF or other formats.
These capabilities make it suitable not only for CSV merging, but also for end-to-end report generation pipelines.
Comparison of the Three Methods
| Method | Programming Required | Batch Processing | Best For |
|---|---|---|---|
| Copy and Paste | No | Limited | One-time tasks with only a few CSV files |
| VBA Macro | Basic VBA | Yes | Excel users who regularly import CSV files |
| Python + Free Spire.XLS | Python | Excellent | Automated workflows, business applications, and batch processing |
Conclusion
The best method depends on how often you need to perform the task.
If you only need to combine a few CSV files occasionally, manually copying and pasting the data into separate worksheets is the quickest solution.
If you work primarily in Excel and perform this task regularly, a VBA macro can automate the process with minimal effort.
For developers building repeatable workflows or integrating CSV processing into applications, Python with Spire.XLS offers the greatest flexibility. Beyond merging CSV files, it enables advanced spreadsheet manipulation and document generation, making it suitable for a wide range of automation scenarios.
FAQs
Can I merge hundreds of CSV files into one Excel workbook?
Yes. VBA can handle many files, but for very large batches or automated workflows, a Python solution is generally more reliable and scalable.
Will each CSV file become its own worksheet?
Yes. All three methods described in this article preserve each CSV as a separate worksheet instead of combining all data into a single sheet.
Can the worksheet names be based on the CSV filenames?
Yes. Both the VBA macro and the Python example automatically use the CSV filename (without the extension) as the worksheet name.
What if my CSV files use UTF-8 or other encodings?
Most CSV files can be imported without issues. If your files use a different encoding or delimiter, adjust the import settings accordingly before processing.
Can I continue editing the workbook after merging the CSV files?
Absolutely. After the workbook is created, you can format worksheets, insert charts, add formulas, protect the workbook, or export it to PDF just like any other Excel file.
See Also
How to Combine Multiple Word Files into One PDF (4 Easy Methods)
Table of Contents
When you're working with reports, contracts, invoices, or project documentation, it's common to end up with several Word files that need to be shared as a single PDF. Combining them into one document not only makes distribution easier but also keeps the content organized and professional.
Fortunately, there are several ways to accomplish this task. Some methods are ideal for occasional use, while others are better suited for batch processing or automated workflows.
In this guide, we'll explore four practical methods to combine multiple Word documents into a single PDF, ranging from Microsoft Word and online tools to desktop software and C# automation.
Methods covered:
- Method 1. Merge Word Documents in MS Word and Save as PDF
- Method 2. Combine Word Files into One PDF Online
- Method 3. Combine Word Files into One PDF with PDF24 Toolbox
- Method 4. Merge Word Files into One PDF in C#
Method 1. Merge Word Documents in MS Word and Save as PDF
If you only need to combine a few documents occasionally, Microsoft Word provides a built-in solution without requiring additional software. You can insert multiple Word documents into one master document and then export the final result as a PDF.
This method preserves most formatting and is easy to follow, making it a good choice for personal or office use.
Steps
- Open the Word document that will become the main document.
- Place the cursor where you want to insert another document.
- Select Insert > Object > Text from File.
- Choose the Word files you want to insert.
- Repeat until all documents have been added.
- Click File > Save As or Export.
- Select PDF as the output format and save the file.
Pros
- No additional software required
- Keeps original formatting well
- Suitable for small numbers of documents
Cons
- Documents must be inserted manually
- Not practical for large batches
- No automation support
Method 2. Combine Word Files into One PDF Online
If you don't have Microsoft Word installed or simply want a quick solution, an online document merger can be a convenient alternative. These services work directly in your browser, allowing you to upload multiple Word files and download a merged PDF within minutes.
Online tools are especially useful when you're using a shared computer or only need to merge documents occasionally. However, they may impose file size limits and aren't recommended for confidential documents.
Steps
- Open the Word Merge page (https://pdfaid.com/word-to-merge) on PDFaid.
- Upload all Word documents.
- Arrange the files in the desired order.
- Start the merging process.
- Download the merged PDF.
Pros
- No software installation
- Works on any operating system
- Simple and beginner-friendly
Cons
- Requires an internet connection
- Upload speed depends on file size
- Not ideal for sensitive documents
Method 3. Combine Word Files into One PDF with PDF24 Toolbox
If you frequently work with documents on Windows, PDF24 Toolbox offers a convenient desktop solution. Unlike many PDF utilities, it allows you to load multiple Word documents and combine them directly into a single PDF without first converting each file individually.
Because everything is processed locally, PDF24 Toolbox is also a better choice for documents that shouldn't be uploaded to online services.
Steps
- Launch PDF24 Toolbox.
- Open the Merge PDF tool.
- Add all Word documents.
- Arrange them in the desired order.
- Click Create PDF .
- Save the merged PDF document.
Pros
- Completely offline
- Free to use
- Supports batch processing
- Better privacy than online tools
Cons
- Windows desktop only
- Requires software installation
Method 4. Merge Word Documents into One PDF in C#
For developers or organizations that regularly generate PDF documents, automating the merging process can save considerable time. Instead of manually combining files, you can load every Word document from a folder, merge them programmatically, and export the final document as a PDF.
Using Spire.Doc for .NET , the entire process requires only a few lines of code while preserving document formatting, images, tables, headers, footers, and other layout elements. It's an ideal solution for report generation, document archiving, and other server-side workflows.
Install Spire.Doc for .NET
PM> Install-Package Spire.Doc
C# Code
using System.IO;
using System.Linq;
using Spire.Doc;

namespace MergeWordFolder
{
    class Program
    {
        static void Main(string[] args)
        {
            // Create the destination document
            Document mergedDocument = new Document();

            // Get all Word files from the folder
            string folderPath = @"Documents";
            string[] files = Directory.GetFiles(folderPath, "*.docx")
                                      .OrderBy(f => f)
                                      .ToArray();

            // Load the first document
            mergedDocument.LoadFromFile(files[0], FileFormat.Docx);

            // Append the remaining documents
            for (int i = 1; i < files.Length; i++)
            {
                mergedDocument.InsertTextFromFile(files[i], FileFormat.Docx);
            }

            // Save as PDF
            mergedDocument.SaveToFile("MergedDocument.pdf", FileFormat.PDF);
        }
    }
}
Why use this approach?
Compared with manual methods, this solution is much more scalable. You can merge dozens or even hundreds of Word documents automatically without user intervention. Since the files are loaded directly from a folder, it's also easy to integrate the code into scheduled tasks, desktop applications, web services, or document management systems.
In addition, Spire.Doc provides many customization options beyond simple merging. For example, you can sort files before merging, adjust page size, add watermarks, protect the generated PDF with passwords, or further process the document after it has been created.
Comparison of the Four Methods
| Method | Installation | Offline | Batch Processing | Best For |
|---|---|---|---|---|
| Microsoft Word | No | Yes | No | Occasional document merging |
| Online Tool | No | No | Limited | Quick one-time tasks |
| PDF24 Toolbox | Yes | Yes | Yes | Frequent desktop users |
| C# + Spire.Doc | Yes | Yes | Excellent | Developers and automation |
Conclusion
Choosing the right method depends on how often you need to combine Word documents.
If you only merge a few files from time to time, Microsoft Word or an online tool will usually be sufficient. If you prefer an offline desktop application, PDF24 Toolbox offers a simple and free solution.
For repetitive tasks, batch processing, or enterprise applications, a C# solution with Spire.Doc for .NET provides the greatest flexibility. By automatically loading all Word documents from a folder, merging them, and exporting the result as a single PDF, it can significantly improve productivity while eliminating repetitive manual work.
FAQs
Can I combine multiple Word documents into one PDF without Microsoft Word?
Yes. You can use an online document merger or desktop software such as PDF24 Toolbox to combine multiple Word files into a single PDF without installing Microsoft Word. These tools are convenient for occasional use, although online services may require uploading your documents to a remote server.
Will the formatting change after merging Word documents?
In most cases, the original formatting—including fonts, images, tables, page orientation, headers, and footers—is preserved. However, the final appearance also depends on the tool you use. Dedicated Word processing libraries, such as Spire.Doc for .NET, generally provide more consistent formatting than browser-based converters.
How can I merge dozens of Word files automatically?
If you need to merge documents on a regular basis, using a programming solution is the most efficient approach. For example, with Spire.Doc for .NET, you can load all Word documents from a folder, merge them in a specified order, and export the combined document as a single PDF with just a few lines of C# code.
Is there a limit to how many Word documents I can merge?
The limit depends on the software or service you use. Microsoft Word and desktop applications are generally constrained only by your system's available memory and processing power, while online tools often impose restrictions on the number of files, total file size, or document length. For large-scale document processing, a desktop or programmatic solution is usually the more reliable choice.
See Also
How to Convert BMP to PDF: 5 Methods for Any Workflow
Table of Contents
- Method 1: Print BMP to PDF via Windows Built-in PDF Printer
- Method 2: Convert BMP to PDF Using Microsoft Word
- Method 3: Convert BMP to PDF via Online Converter
- Method 4: Merge Multiple BMP Images into One PDF with PDF24
- Method 5: Convert BMP to PDF Using Python
- Comparison Table: Which Method Should You Choose?
- Conclusion
- BMP to PDF FAQs
BMP (Bitmap) is one of the oldest and simplest image formats. It stores image data without complex compression, making it suitable for screenshots, scanned documents, and image processing workflows. However, BMP files are often much larger than other image formats and are not always convenient for sharing, printing, or archiving.
PDF, on the other hand, is widely supported across operating systems and devices. Converting BMP images to PDF can make files easier to distribute, print, and organize, especially when you need to combine multiple images into a single document.
In this guide, we'll explore five practical ways to convert BMP to PDF, ranging from built-in Windows tools to automated Python solutions.
Methods covered:
- Method 1: Print BMP to PDF via Windows Built-in PDF Printer
- Method 2: Convert BMP to PDF Using Microsoft Word
- Method 3: Convert BMP to PDF via Online Converter
- Method 4: Merge Multiple BMP Images into One PDF with PDF24
- Method 5: Convert BMP to PDF Using Python
Method 1: Print BMP to PDF via Windows Built-in PDF Printer
If you only need to convert a single BMP image, Windows already provides a quick built-in solution. The Microsoft Print to PDF feature allows you to turn any image into a PDF without installing additional software. It is ideal for simple, one-off conversions.
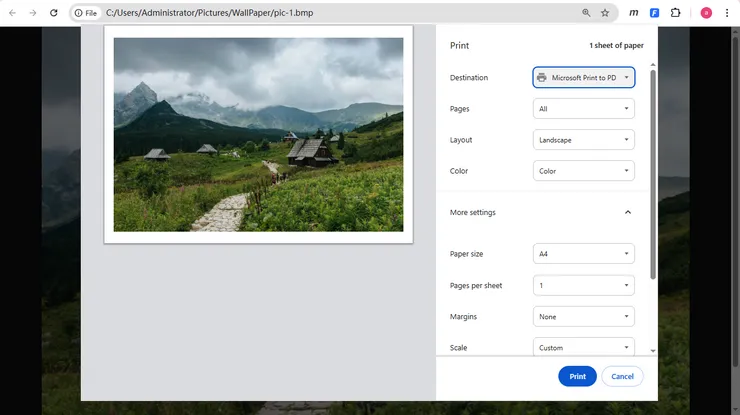
To use this method:
- Open the BMP image in Paint, Photos, or any modern browser.
- Press Ctrl + P or select Print from the menu.
- Choose Microsoft Print to PDF as the printer.
- Configure page size and orientation if needed.
- Click Print and save the resulting PDF file.
This approach requires no additional software and works on most modern Windows systems.
Pros
- Built into Windows
- No installation required
- Fast and easy for occasional use
Cons
- Not ideal for multiple images
- Limited control over PDF layout
If you're converting only a few BMP files from time to time, this may be the quickest solution available.
Method 2: Convert BMP to PDF Using Microsoft Word
Microsoft Word can also be used to convert BMP images into PDF format while offering more layout control. You can insert one or multiple images into a document and adjust their positioning freely. This method is particularly useful when you want to add captions, notes, or additional content alongside your images.
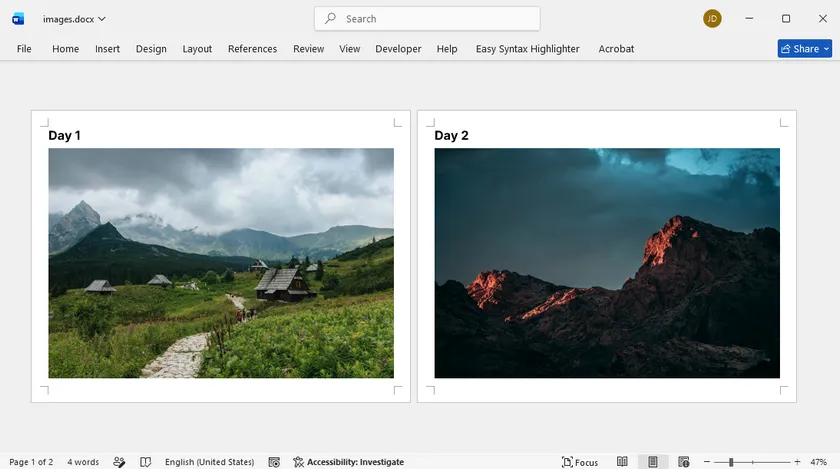
Steps:
- Open a blank Word document.
- Insert the BMP image(s) using Insert > Pictures .
- Adjust the image size and position as needed.
- Select File > Save As .
- Choose PDF as the output format.
Unlike the Windows print method, Word allows you to arrange multiple images across pages and combine them with text content before exporting.
Pros
- Easy to organize images
- Supports multiple BMP files
- Allows additional document formatting
Cons
- Requires Microsoft Word
- More steps than direct conversion
This method is a good choice when the BMP image is part of a larger report, presentation, or document.
Method 3: Convert BMP to PDF via Online Converter
Online converters provide a fast and convenient way to convert BMP files without installing any software. Most tools support drag-and-drop uploads and can process multiple images at once. However, they are best suited for non-sensitive files due to privacy considerations.
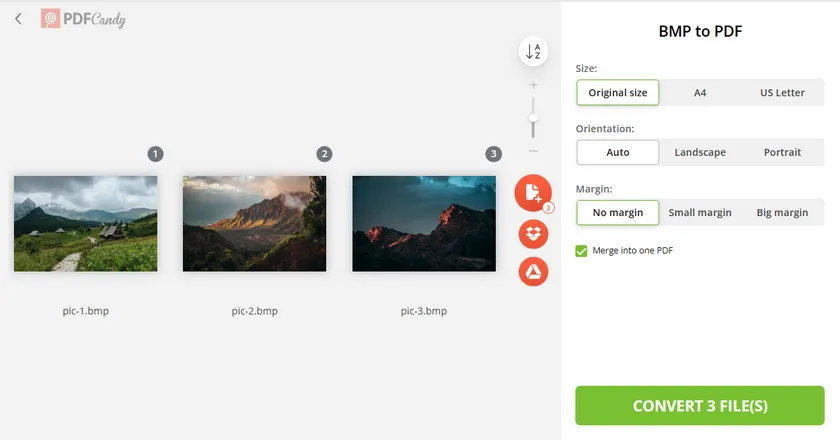
Most online tools follow the same workflow:
- Open a BMP-to-PDF conversion website like PDFCandy.
- Upload one or more BMP files.
- Configure options such as size, orientation, and margins.
- Check the Merge into One PDF option if you want to combine multiple BMP files in a single PDF.
- Start the conversion process.
- Download the generated PDF.
Many services support drag-and-drop uploads and can combine multiple images into a single PDF automatically.
Pros
- Works from any device
- No installation required
- Simple user experience
Cons
- Requires an internet connection
- Uploading sensitive files may raise privacy concerns
- File size limits may apply
Online tools are best suited for quick conversions involving non-confidential images. For business documents or large batches of files, offline solutions are often preferable.
Method 4: Merge Multiple BMP Images into One PDF with PDF24
PDF24 Toolbox offers a simple desktop solution for combining multiple BMP images into one PDF file. You can drag and drop images, rearrange their order, and generate a single output document in just a few steps. This makes it ideal for scanned pages, photo sets, or image-based documents.
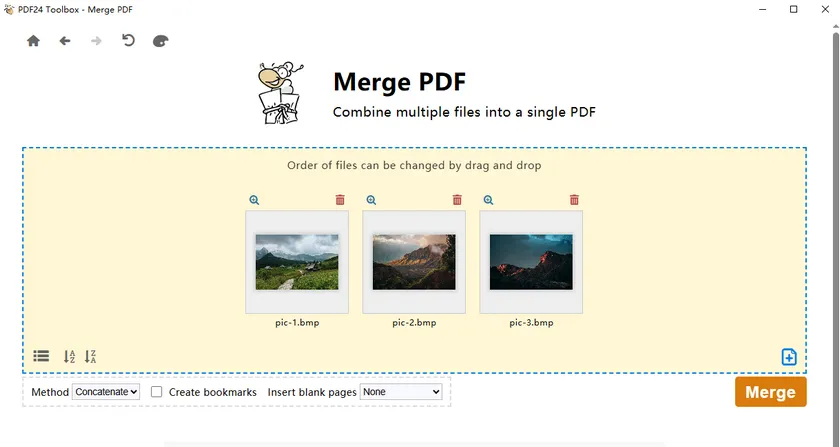
Follow these steps:
- Download and install PDF24 Creator. A PDF24 Toolbox desktop shortcut will be generated automatically once the installation finishes.
- Launch PDF24 Toolbox.
- Choose the Merge PDF tool.
- Drag and drop your BMP image files into the working area.
- Adjust the sequence of images as needed.
- Export and save the combined file in PDF format.
One advantage of this method is that you can visually adjust the sequence of images before generating the final document. This is particularly useful for scanned pages, image-based reports, photo collections, and document archives.
Pros
- Supports batch processing
- Easy drag-and-drop workflow
- Allows page reordering
Cons
- Requires software installation
- Limited control over PDF layout
For users who regularly work with image collections but do not need programming-based automation, PDF24 provides a practical middle ground between basic tools and custom code.
Method 5: Convert BMP to PDF Using Python
For developers and IT teams, automation is often the most efficient approach. Python allows you to integrate BMP-to-PDF conversion into larger workflows, scheduled jobs, document management systems, or data processing pipelines.
In this example, we'll use Spire.PDF for Python to convert a BMP image to PDF while preserving the original image dimensions.
Install Spire.PDF for Python
pip install Spire.PDF
Convert a Single BMP to PDF
from spire.pdf.common import *
from spire.pdf import *

# Create PDF document
doc = PdfDocument()

# Load BMP image
image = PdfImage.FromFile("sample.bmp")

# Create page matching image size
page = doc.Pages.Add(SizeF(
    image.PhysicalDimension.Width,
    image.PhysicalDimension.Height
))

# Draw image
page.Canvas.DrawImage(
    image,
    0,
    0,
    image.PhysicalDimension.Width,
    image.PhysicalDimension.Height
)

# Save PDF
doc.SaveToFile("BMPtoPDF.pdf")
doc.Dispose()
The code creates a PDF page that matches the image dimensions and places the BMP image at the top-left corner. This helps maintain the original appearance without scaling or cropping.
Batch Conversion Logic
If you need to process multiple BMP files, you can place the conversion logic inside a loop and iterate through all images in a folder.
For example:
for file in bmp_files:
    image = PdfImage.FromFile(file)

    # create page
    # draw image
    # save output
This approach allows you to automatically convert entire directories of BMP images, making it suitable for enterprise workflows and large-scale document processing tasks.
Pros
- Fully automated
- Suitable for batch processing
- Easy to integrate into applications and services
Cons
- Requires Python knowledge
- Initial setup takes longer than GUI tools
For organizations that regularly process image files, automation can save significant time compared with manual conversion methods. Beyond simple BMP-to-PDF conversion, Spire.PDF for Python also provides a wide range of PDF processing features that can be integrated into the same workflow.
For example, you can add headers or blank pages, insert text or image watermarks, apply password protection and encryption, or perform additional post-processing before saving the final PDF. These capabilities make it well suited for building customized document workflows, whether you're generating reports, archiving scanned images, or creating secure PDFs for business use.
Comparison Table: Which Method Should You Choose?
Choosing the right BMP to PDF conversion method depends on your specific needs, such as speed, batch processing, and whether you prefer online or offline tools. The table below summarizes the key differences to help you decide quickly.
| Method | Best For | Pros | Cons |
|---|---|---|---|
| Windows Print to PDF | Single BMP conversion | Built-in, fast, no installation | Not suitable for multiple files |
| Microsoft Word | Document-style layouts | Flexible formatting, supports multiple images | Requires Word, more manual steps |
| Online Converter | Quick, occasional use | No installation, easy to use | Privacy concerns, file size limits |
| PDF24 Toolbox | Multiple BMP files | Batch processing, drag-and-drop, free | Requires software installation |
| Python (Spire.PDF) | Automation & large-scale tasks | Fully automated, scalable, customizable | Requires coding knowledge |
Conclusion
There is no single best way to convert BMP to PDF—the right choice depends on your specific requirements.
- Use Microsoft Print to PDF for quick single-image conversions.
- Use Microsoft Word when images need to be combined with text content.
- Use an online converter for occasional conversions without software installation.
- Use PDF24 Toolbox when combining multiple BMP images into one PDF manually.
- Use Python and Spire.PDF when you need automation, scalability, and integration with existing workflows.
Whether you're converting a single image or thousands of files, these methods provide flexible options for turning BMP images into PDF documents efficiently.
BMP to PDF FAQs
Does converting BMP to PDF reduce image quality?
No, converting BMP to PDF does not necessarily reduce image quality. Most methods simply embed the original image into a PDF container without compression. However, some online tools may apply compression, so the output quality depends on the tool you use.
Can I convert multiple BMP files into one PDF?
Yes, several methods support combining multiple BMP images into a single PDF. You can use tools like PDF24 Toolbox, Microsoft Word, or automated scripts in Python. These methods allow you to reorder images and generate a single multi-page PDF file.
Is there a free way to convert BMP to PDF?
Yes, there are multiple free options available. Windows includes a built-in “Print to PDF” feature, and online converters also allow free usage for basic tasks. Additionally, tools like PDF24 Toolbox offer free desktop-based conversion.
What is the easiest way to convert BMP to PDF?
The easiest method depends on your needs. For a single image, the Windows Print to PDF feature is the fastest. For multiple images, PDF24 Toolbox provides a simple drag-and-drop solution without requiring technical skills.
How can I automate BMP to PDF conversion?
You can automate the process using Python libraries such as Spire.PDF. By writing a simple script, you can loop through all BMP files in a folder and generate PDFs automatically. This is especially useful for batch processing or enterprise workflows.
Can I convert BMP to PDF without installing software?
Yes, online converters allow you to convert BMP files directly in your browser without installation. However, they are best used for small or non-sensitive files due to upload and privacy limitations.
See Also
How to Convert PDF to High-Quality BMP (3 Practical Methods)
Table of Contents
BMP is one of the oldest and simplest image formats still in use today. Unlike JPEG, it does not apply lossy compression, making it a popular choice for OCR systems, document archiving, image analysis, and legacy software that requires raw bitmap images.
However, converting a PDF to BMP is not always as straightforward as it seems. Many users find that the resulting images appear blurry, especially when text, diagrams, or scanned pages are involved. In most cases, the issue is not caused by the BMP format itself but by the resolution used during the PDF rendering process.
In this guide, we'll explore three practical methods to achieve sharp, high-quality BMP output — including an online converter, a local command-line solution, and a Python-based automation approach. The focus is on how to properly control rendering resolution (DPI) to get the best results.
On this page:
- Understanding BMP Output Quality
- Method 1: Convert PDF to BMP Online Using CloudConvert
- Method 2: Convert PDF to BMP Using Ghostscript + ImageMagick
- Method 3: Convert PDF to BMP Programmatically with Python
- Comparison Table: Choosing the Right Method
- FAQs
- Conclusion
Understanding BMP Output Quality
BMP stores image data without compression, preserving every pixel. This makes it a common choice for OCR, document digitization, and image analysis — scenarios where fidelity matters more than file size.
However, saving as BMP does not automatically guarantee sharp results. The output quality depends primarily on the rendering resolution (DPI) used when converting the PDF page into bitmap data. A low DPI setting will produce blurry images regardless of the format.
| DPI | Typical Use |
|---|---|
| 72 DPI | Screen preview |
| 150 DPI | General viewing |
| 300 DPI | Printing and OCR |
| 600 DPI | Archiving and detailed documents |
The rendering engine also plays a role — different tools may handle fonts, vector graphics, and embedded images differently even at the same DPI. But in most cases, setting the right resolution is the single biggest factor in getting usable output.
Method 1: Convert PDF to BMP Online Using CloudConvert
Online converters provide the simplest way to convert PDF files to BMP without installing any software. Among them, CloudConvert offers good control over output resolution, making it suitable for users who need higher-quality results.
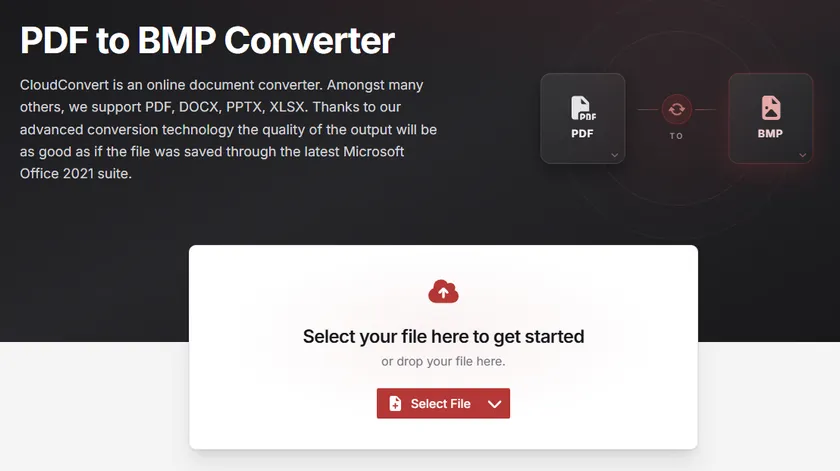
Steps to Convert PDF to BMP Online
- Go to the CloudConvert PDF-to-BMP converter in your web browser.
- Click Select File and upload your PDF document.
- Open the Options section.
- Set Pixel Density to 300 .
- Click Convert .
- Download the generated BMP files after conversion completes.
Pros
- No software installation required
- Easy to use for beginners
- Works on all operating systems
Cons
- Requires uploading files to a third-party server
- Not ideal for sensitive or confidential documents
- Limited automation support
CloudConvert is ideal for users who only need occasional conversions and prefer a fast, browser-based solution.
Method 2: Convert PDF to BMP Using Ghostscript + ImageMagick
For users who prefer local processing and do not want to upload sensitive documents to third-party servers, a combination of Ghostscript and ImageMagick provides a reliable offline solution. This method gives you full control over rendering resolution while keeping all files on your machine.
Ghostscript handles the PDF rendering, while ImageMagick manages the final image format conversion to BMP.
Step 1: Install Ghostscript
Download and install Ghostscript from the official website:
https://www.ghostscript.com/releases/gsdnld.html
Make sure it is properly added to your system PATH after installation.
Step 2: Install ImageMagick
Download ImageMagick from the official website:
https://imagemagick.org/script/download.php
During installation, ensure that "Install legacy utilities (convert, magick)" is enabled.
Step 3: Convert PDF to BMP
Use the following command:
magick -density 300 input.pdf output-%d.bmp
For multi-page PDFs, each page will be saved as a separate file (e.g., output-0.bmp, output-1.bmp).
How It Works
- The
-density 300parameter sets the rendering resolution to 300 DPI. - ImageMagick delegates the PDF rendering to Ghostscript internally.
- The rendered bitmap data is then saved as a BMP file.
- Higher DPI values result in sharper images due to increased pixel density.
Pros
- Full control over image quality and DPI
- Supports batch processing
- No file upload required
- Ideal for automation and scripting workflows
Cons
- Requires installation and initial setup
- Command-line usage may be unfamiliar for beginners
This method is recommended for developers or power users who need consistent, high-quality output without relying on cloud services.
Method 3: Convert PDF to BMP Programmatically with Python
For developers, programmatic conversion is often the most efficient approach. It allows precise control over image quality while making it possible to process large numbers of PDF files automatically.
In this example, we'll use Spire.PDF for Python to render each PDF page at 300 DPI and save it as a separate BMP image.
Install Spire.PDF for Python
pip install Spire.PDF
Convert PDF to BMP
from spire.pdf.common import *
from spire.pdf import *
from io import BytesIO
import os

# Create output folder if not exists
output_dir = "Output"
if not os.path.exists(output_dir):
    os.makedirs(output_dir)

# Create a PdfDocument object
doc = PdfDocument()

# Load a PDF document
doc.LoadFromFile(r"input.pdf")

# Iterate through all pages in the document
for page_idx in range(doc.Pages.Count):
    # Convert page to image stream, resolution 300 DPI
    with doc.SaveAsImage(page_idx, 300, 300) as imageData:

        # Save each page as separate BMP file
        save_path = os.path.join(output_dir, f"page_{page_idx + 1}.bmp")
        imageData.save(save_path, format="BMP")
        print(f"Saved: {save_path}")

# Dispose resources
doc.Dispose()
Output:

How It Works
The script first loads the PDF document and creates an output directory for storing the generated images.
Next, it iterates through all pages and renders each one at the specified resolution. The rendered image stream is then saved as a BMP file.
The key factor affecting output quality is the following line:
doc.SaveAsImage(page_idx, 300, 300)
The two values represent the horizontal and vertical rendering resolution in DPI. Increasing these values produces larger and sharper images, which is especially useful for OCR, printing, and image-processing applications.
Besides BMP, Spire.PDF also supports exporting PDF pages to a variety of other image formats, including PNG, JPG, SVG, and TIFF. This flexibility allows you to choose the most suitable format for different scenarios. Beyond image conversion, you can also use Spire.PDF to merge or split PDF files, add watermarks and page numbers, extract text and images, and automate a wide range of document-processing tasks in Python.
Comparison Table: Choosing the Right Method
| CloudConvert | Ghostscript + ImageMagick | Spire.PDF for Python | |
|---|---|---|---|
| Difficulty | Easy | Moderate | Moderate |
| Installation Required | No | Yes | Yes (pip install) |
| DPI Control | Yes (limited options) | Yes (fully customizable) | Yes (fully customizable) |
| Batch Processing | Limited | Yes | Yes |
| Automation Support | No | Yes (CLI scripting) | Yes (Python scripting) |
| Local Processing | No (cloud-based) | Yes | Yes |
| Pricing | Free (with daily limits) | Free and open-source | Free / Paid |
| Best For | Quick one-off conversions | DevOps and CLI workflows | Python-based applications |
Conclusion
Achieving high-quality BMP output from a PDF is primarily a matter of choosing the right rendering resolution. While the BMP format itself preserves image data without compression, low-resolution rendering can still produce blurry results.
The key factor is not the conversion tool, but the DPI setting used during the rendering step. A value of 300 DPI or higher is typically recommended to ensure sharp text and clear details across all methods.
Whether you prefer a quick online converter, a local command-line workflow, or a Python-based automation pipeline, controlling the rendering resolution is the single most important step toward getting crisp, usable BMP images.
FAQs
Why does my BMP output look blurry?
The most common cause is low rendering resolution. Many tools default to 72 or 96 DPI, which is fine for screen preview but too low for printing or OCR. Try setting the DPI to 300 or higher before exporting.
Is BMP higher quality than JPG?
BMP does not use lossy compression, while JPG does. As a result, BMP preserves more image detail and avoids the compression artifacts commonly seen in JPEG files, especially around text edges.
What DPI should I use?
It depends on your use case. For general viewing, 150 DPI is usually sufficient. For printing, OCR, or document archiving, 300 DPI is recommended. For highly detailed technical drawings, 600 DPI may be worth the larger file size.
Can I convert multi-page PDFs to BMP?
Yes. Most tools export each page as a separate BMP file. Both the Ghostscript + ImageMagick command and the Python example above handle multi-page documents automatically.
Is BMP better than PNG?
Both formats support lossless image quality. BMP is uncompressed and produces larger files, while PNG uses lossless compression to significantly reduce file size without sacrificing quality. PNG also supports transparency. For most modern workflows, PNG is the more practical choice unless your application specifically requires BMP.
See Also
How to Batch Print PDF Files in the Correct Order (5 Methods)
Table of Contents
- Before You Start: Rename PDFs for Consistent Sorting
- Method 1: Batch Print PDFs from File Explorer
- Method 2: Merge PDFs into a Single File Before Printing
- Method 3: Batch Print PDFs with Adobe Acrobat Pro
- Method 4: Print Multiple PDFs Using PowerShell
- Method 5: Batch Print PDF Files in Order Using C#
- Comparison of the 5 Methods
- Troubleshooting Common PDF Printing Issues
- Conclusion
- FAQs
When you batch print PDF files such as shipping invoices, legal contracts or multi-chapter reports, keeping PDFs printed in the correct order can be challenging. Windows and mainstream PDF utilities arrange print queues by filename or modified date; mismatched file naming will mess up your printing sequence.
File naming issues usually cause this disorder, yet solutions vary by workflow: weekly manual printing or app-integrated auto execution, single-file custom page ranges or plain ordered batch print PDF files commands.
This tutorial lists five solutions, ranging from Windows File Explorer’s native operation to full C# coding automation, for different technical proficiency and scenarios. Each method builds on a shared foundation, so start with the "Before You Start" section before diving into any specific approach.
Quick Navigation:
- Before You Start: Rename PDFs for Consistent Sorting
- Method 1: Batch Print PDFs from File Explorer
- Method 2: Merge PDFs into a Single File Before Printing
- Method 3: Batch Print PDFs with Adobe Acrobat Pro
- Method 4: Print Multiple PDFs Using PowerShell
- Method 5: Batch Print PDF Files in Order Using C#
Before You Start: Rename PDFs for Consistent Sorting
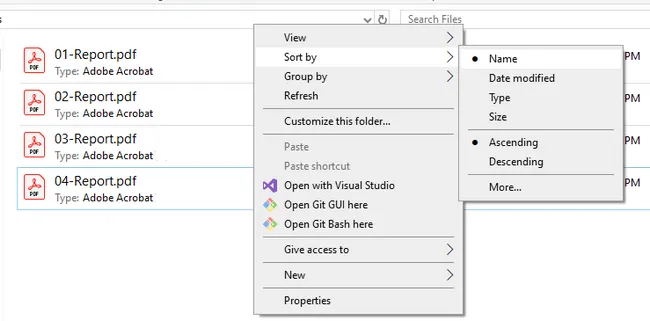
Regardless of which method you use below, file naming is the foundation of print order control. Every tool — File Explorer, Adobe Acrobat, PowerShell, and even C# — retrieves files in the order the OS returns them, which is alphabetical by filename.
The fix is simple: use zero-padded numeric prefixes.
| Bad naming | Good naming |
|---|---|
| invoice.pdf | 01_invoice.pdf |
| receipt.pdf | 02_receipt.pdf |
| summary.pdf | 03_summary.pdf |
Without the leading zero, 10_file.pdf sorts before 2_file.pdf. With zero-padding (01, 02, 10), the order is always correct.
To rename files on Windows, the most straightforward approach is to do it manually in File Explorer: right-click a file → Rename , add the numeric prefix, and repeat for each file. This keeps you in full control of the sequence.
Once your files are named correctly, every method below will respect that order automatically.
Method 1: Batch Print PDFs from File Explorer
If you just need to print a handful of PDFs without installing anything, Windows File Explorer can handle it natively. This method works by sending each file to the print queue in the order they appear in the folder view — which is why correct file naming (covered above) is essential. It takes less than a minute to set up and requires no additional software, making it the best starting point for anyone who prints PDF batches only occasionally.
Steps:
- Open File Explorer and navigate to the folder containing your PDFs.
- Right-click anywhere in an empty area of the folder, select Sort by, and choose Name to sort files alphabetically. Verify the order matches your intended print sequence before proceeding.
- Select all the PDF files you want to print: press
Ctrl + Ato select all, or holdCtrland click to select specific files. - Right-click the selection and choose Print .
- A print dialog will appear. Select your printer, choose paper size and number of copies, then click Print .
Limitation: File Explorer sends each PDF to the print queue as a separate job. If the printer is busy or the queue processes jobs out of order, pages may still interleave. For large batches, Method 2 or 3 is more reliable.
Method 2: Merge PDFs into a Single File Before Printing
When File Explorer's multi-job queue feels unreliable — especially for large batches where jobs can arrive at the printer faster than it processes them — merging all your PDFs into a single file first is the most foolproof solution. Instead of sending dozens of separate print jobs, you send one. The page order is locked in during the merge step, so there's no risk of the print queue reordering anything. This method works with any PDF viewer and any printer, and requires only a free tool to do the merging.
Steps:
- Open an online PDF merger tool such as PDF24 (free) .
- Add your PDF files to the merge tool. Drag them in the exact order you want them printed — the file list order becomes the page order.

- Click Merge and save the combined PDF.
- Open the merged PDF in any PDF viewer (Edge, Chrome, or Adobe Reader).
- Press
Ctrl + P, select your printer, and print.
Best for: Print jobs where exact page sequence is critical, such as booklets, reports, or multi-chapter documents.
Method 3: Batch Print PDFs with Adobe Acrobat Pro
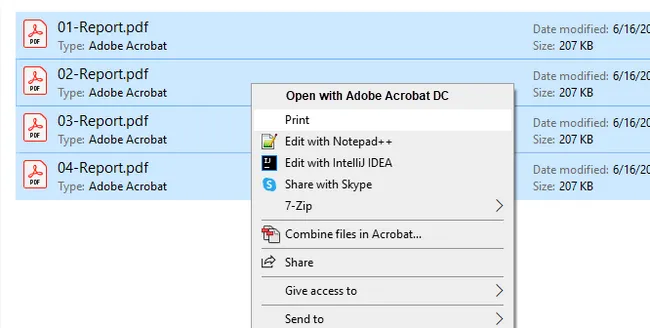
If you already have Adobe Acrobat Pro in your workflow, it offers the most control of any GUI-based batch printing option. Unlike File Explorer, Acrobat lets you manually reorder files in the print queue, configure different settings per file (page range, duplex, color mode), and save those configurations as reusable Actions. This makes it particularly useful for office environments where print jobs follow consistent but complex rules — for example, always printing the first document single-sided and the rest double-sided.
Steps:
- Open Adobe Acrobat Pro and click Tools in the top navigation bar.
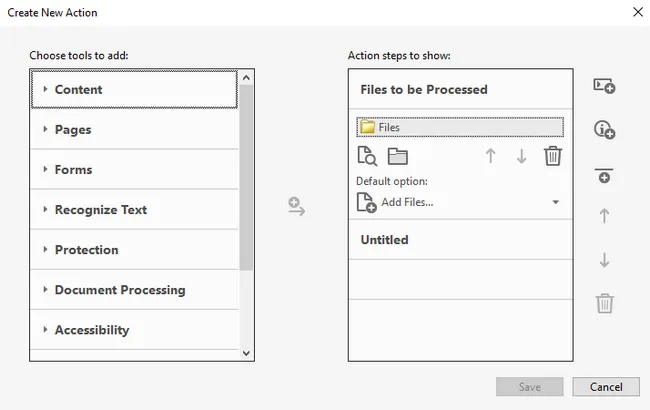
- Scroll down and select Action Wizard to open the Actions panel.
- Click New Action . In the Create New Action dialog, set Files to be processed to a specific folder (point it to the folder containing your PDFs).
- In the Choose tools to add pane on the left, expand More Tools and double-click Print to add it as an action step.
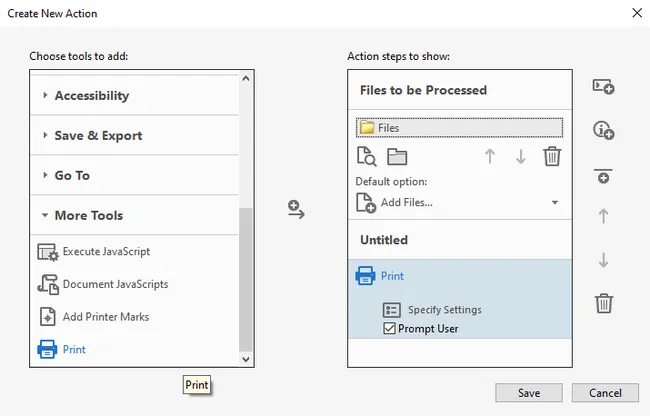
- Click Specify Settings on the Print step to configure your printer, page range, duplex, and copies. Uncheck Prompt User if you want it to run without interruption.
- Click Save , give the action a name like "Batch Print". You can then find the Batch Print action from the Actions List panel.

- Click "Batch Print" and then click the Start button to run it.
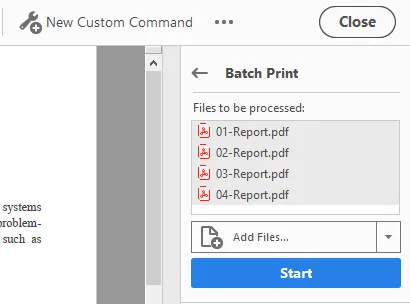
- Acrobat will process and print all PDFs in the folder in filename order.
Note: Adobe Acrobat Pro is a paid subscription. This method is most valuable when you need to reuse the same print configuration repeatedly — once the Action is saved, future batch print jobs take a single click.
Method 4: Print Multiple PDFs Using PowerShell
PowerShell is built into every modern Windows installation and requires no extra software. For users who are comfortable with a terminal, it offers a significant upgrade over File Explorer: you can schedule the script as a Windows Task, log print results, add conditional logic, and control the delay between jobs programmatically. This makes it well-suited for recurring print tasks — for example, automatically printing a folder of daily reports each morning.
Steps:
-
Open PowerShell as Administrator (search "PowerShell" in Start Menu, right-click → Run as administrator).
-
Paste the following script, replacing the folder path and printer name:
$folderPath = "C:\PDFs\"
$printer = "Your Printer Name"

Get-ChildItem -Path $folderPath -Filter "*.pdf" | Sort-Object Name | ForEach-Object {
    Start-Process -FilePath $_.FullName -Verb PrintTo -ArgumentList $printer
    Start-Sleep -Seconds 3
}
-
Press
Enterto run. The script retrieves all PDFs sorted by filename, then sends each one to the specified printer.
Key points:
Sort-Object Nameensures alphabetical order — this is why correct file naming matters.Start-Sleep -Seconds 3adds a short delay between jobs to prevent the printer queue from receiving jobs faster than it can process them. Increase this value for large files.- To find your exact printer name, run
Get-Printer | Select Namein PowerShell.
Method 5: Batch Print PDF Files in Order Using C#
For developers building .NET applications that need to trigger PDF printing programmatically — whether that's an order management system, a document archival tool, or an ERP module — Spire.PDF for .NET provides a clean, dependency-light API.
Unlike shell-based approaches, Spire.PDF doesn't rely on the system's default PDF viewer to handle printing; it renders and prints the document directly, which means it works reliably in server environments and background services where no GUI is available. The code below is a complete, runnable example that prints all PDFs in a folder in alphabetical order.
Install Spire.PDF via NuGet:
Install-Package Spire.PDF
Complete working example:
using Spire.Pdf;
using System.IO;

namespace BatchPrintPdf
{
    class Program
    {
        static void Main(string[] args)
        {
            // Specify the folder containing PDF files
            string folderPath = @"C:\PDFs\";

            // Get all PDF files in the folder, sorted by filename
            string[] files = Directory.GetFiles(folderPath, "*.pdf");

            // Loop through each PDF file
            foreach (string file in files)
            {
                // Load the PDF document
                PdfDocument doc = new PdfDocument();
                doc.LoadFromFile(file);

                // Specify printer name
                doc.PrintSettings.PrinterName = "Your Printer Name";

		// Enable silent printing
		doc.PrintSettings.PrintController = new StandardPrintController();

                // Print the PDF
                doc.Print();

                // Dispose resources
                doc.Dispose();
            }
        }
    }
}
How it works:
Directory.GetFiles()returns files sorted alphabetically by default — consistent with the naming convention established earlier.PrintSettings.PrinterNamelets you target any installed printer by name. Remove this line to use the system default printer.doc.Dispose()releases file handles after each print job, preventing memory leaks in long-running batches.- Spire.PDF also exposes
PrintSettings.Copies,PrintSettings.SelectPageRange(), and duplex settings if you need more control per file. For more details, check out: How to Print PDF Documents in C# (Without Adobe)
This approach integrates naturally into document management systems, ERP backends, or any .NET application that needs to trigger print jobs programmatically. Beyond batch printing, Spire.PDF supports a wide range of document operations you can incorporate into the same workflow — such as adding watermarks before printing or merging multiple PDFs in order with page numbers.
Comparison of the 5 Methods
| Method | Skill Level | Silent / No Pop-ups | Requires PDF Viewer | Best For |
|---|---|---|---|---|
| File Explorer | Beginner | No | Yes | Quick one-off jobs |
| Merge First | Beginner | No | No | Guaranteed page order |
| Adobe Acrobat Pro | Intermediate | After initial setup | Yes (Adobe itself) | Per-file print control |
| PowerShell | Intermediate | Depends on PDF viewer | Yes | Scheduled/recurring tasks |
| C# (Spire.PDF) | Developer | Yes | No | App integration |
Troubleshooting Common PDF Printing Issues
Files print in the wrong order even after renaming
Double-check that the sort type in File Explorer is set to Name , not Date Modified or Size . In PowerShell, confirm Sort-Object Name is in your script.
Print jobs overlap or pages interleave
The printer queue is receiving jobs faster than it can process them. In PowerShell, increase the Start-Sleep delay. In C#, consider adding Thread.Sleep(2000) between print calls. Alternatively, use Method 2 (merge first) to eliminate this problem entirely.
PDF opens but won't print silently (PowerShell/C#)
Ensure the default PDF handler supports silent printing. Adobe Reader's command-line /t flag can help, or use Spire.PDF (Method 5) which handles printing directly without opening a viewer.
"Printer not found" error in code
Run Get-Printer | Select Name in PowerShell to get the exact printer name string. Copy it verbatim — including spaces and capitalization — into your script or C# code.
Conclusion
Batch printing PDFs in the correct order isn't a single problem with a single solution — it depends on how often you print, how many files are involved, and whether printing is a manual task or part of a larger automated system.
For a one-off job, File Explorer gets it done in under a minute. If queue reliability is a concern, merging first eliminates the problem entirely. For recurring tasks, a PowerShell script runs on a schedule without any manual intervention. And for developers embedding print functionality into a .NET application, Spire.PDF's PdfDocument API gives you precise, programmatic control — no dependency on a system PDF viewer, no GUI required.
Whichever method you choose, the foundation is the same: get your file naming right before anything else. A consistent zero-padded naming scheme costs you two minutes of setup and saves every method downstream from ever producing output in the wrong order.
FAQs
Can I batch print PDFs without Adobe Acrobat?
Yes. File Explorer, PowerShell, Spire.PDF, and third-party tools like PDF24 all support batch printing without Adobe Acrobat. Adobe Acrobat Pro is only necessary if you need per-file print settings like custom page ranges.
Why does my printer print PDF files out of order?
The most common cause is inconsistent file naming. If files aren't named with numeric prefixes (e.g., 01_, 02_), the OS may sort them alphabetically by their full name, which doesn't match the intended sequence.
Can I batch print PDFs in order on a Mac?
The methods in this guide are Windows-focused, but Mac users can achieve the same result through Finder. Select all PDF files in a Finder window, right-click and choose Open With → Preview . Preview will load all files into a single sidebar — drag to reorder them, then go to File → Print to print the entire set in one job.
How many PDF files can I batch print at once using File Explorer?
Windows doesn't impose a hard limit, but in practice, selecting more than 15–20 files via File Explorer's right-click Print can cause issues — some files may be skipped or the print queue may stall. For larger batches, use the PowerShell or C# method instead, as both handle arbitrarily large file sets reliably.
See Also
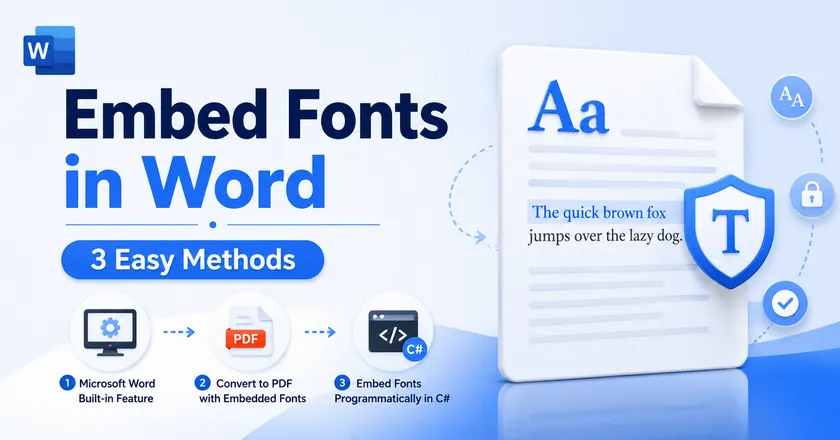
How to Embed Fonts in Word Documents: 3 Effective Methods
Table of Contents
- Prerequisites and Important Considerations
- Method 1: Embed Fonts Using Microsoft Word's Built-In Feature
- Method 2: Convert Word Documents to PDF with Embedded Fonts
- Method 3: Embed Fonts in Word Documents Programmatically in C#
- How to Check Whether Fonts Are Embedded
- Troubleshooting Common Font Embedding Issues
- Conclusion
- FAQs
When you share a Word document with colleagues, clients, or printers, you expect it to look exactly the same on every device. However, if the recipient does not have the fonts used in the document installed, Word may automatically substitute them with different fonts, causing layout shifts, spacing issues, and inconsistent formatting.
Font embedding solves this problem by storing font information directly inside the document or output file. As a result, the document can preserve its original appearance even when opened on a computer that lacks the required fonts.
In this guide, you'll learn three practical ways to embed fonts in Word documents, including Word's built-in font embedding feature, PDF conversion, and a C# automation solution for developers.
Quick navigation:
- Method 1: Embed Fonts Using Microsoft Word's Built-In Feature
- Method 2: Convert Word Documents to PDF with Embedded Fonts
- Method 3: Embed Fonts in Word Documents Programmatically in C#
Prerequisites and Important Considerations
Before embedding fonts, it's helpful to understand a few limitations and requirements.
Supported Word Versions
Font embedding is supported in most modern versions of Microsoft Word, including Microsoft 365, Word 2021, Word 2019, and Word 2016. If you're using an older version, some options may be unavailable or behave differently.
Supported Font Types
Word primarily supports embedding TrueType (.ttf) and OpenType (.otf) fonts. Most modern fonts fall into one of these categories.
Font Licensing and Embedding Permissions
Not all fonts can be embedded. Font creators can define embedding permissions that determine whether a font may be included in a document. Some fonts allow full embedding, while others permit only previewing and printing. Restricted fonts cannot be embedded at all.
File Size Impact
Embedding fonts increases the size of a document because font data is stored within the file. The amount of growth depends on whether you embed the entire font or only the characters actually used in the document.
Method 1: Embed Fonts Using Microsoft Word's Built-In Feature
Microsoft Word includes a built-in option that allows you to embed fonts directly into a document. This is the simplest and most commonly used solution.
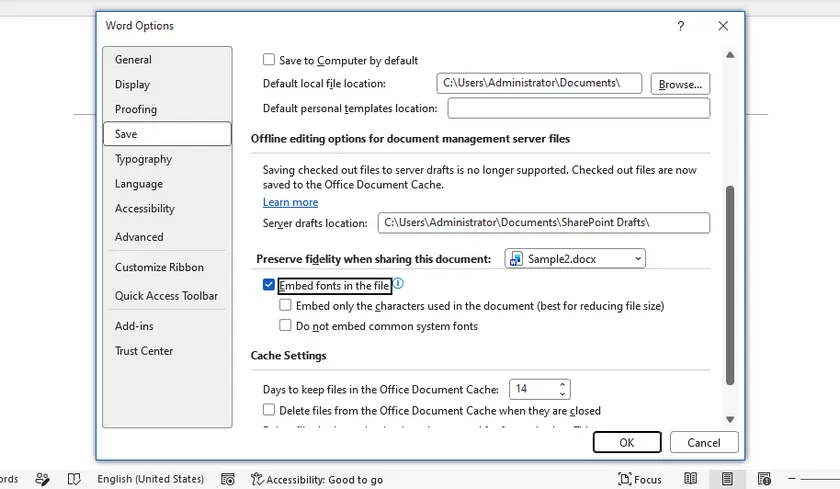
Enable Font Embedding in Word
To embed fonts:
- Open your Word document.
- Click File > Options.
- Select Save.
- Under Preserve fidelity when sharing this document, check Embed fonts in the file.
- Save the document.
After saving, Word stores font information inside the document whenever the selected fonts allow embedding.
Advanced Embedding Options
Word provides two additional options that help balance compatibility and file size:
- Embed only the characters used in the document – Embeds only the glyphs that appear in the document, reducing file size. However, if someone later adds new characters that were not included, the original font may be required.
- Do not embed common system fonts – Skips fonts that are commonly installed on most computers, further reducing file size while relying on the recipient's system to provide those fonts.
For documents intended for editing and long-term sharing, embedding all required font data is usually the safest choice. If file size is a concern, consider embedding only the used characters while keeping important custom fonts embedded.
Method 2: Convert Word Documents to PDF with Embedded Fonts
In many situations, the goal is not to edit the document but simply to ensure that it displays and prints correctly. In such cases, converting the Word document to PDF can be an effective alternative.
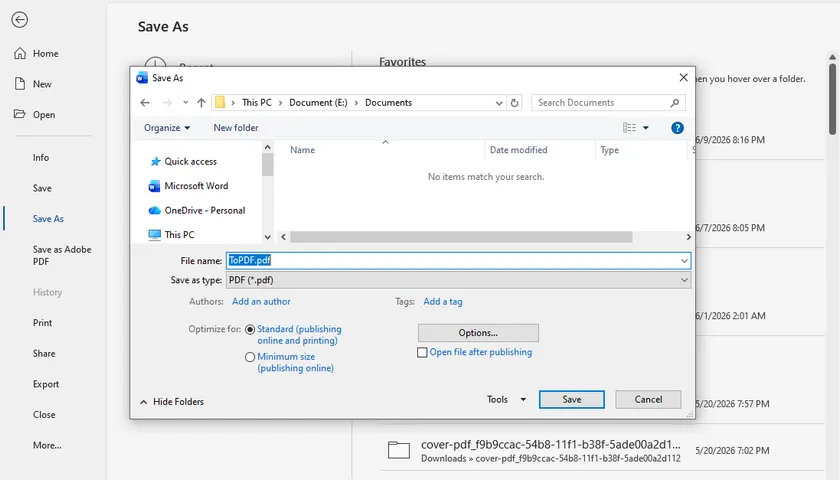
Save a Word Document as PDF
Microsoft Word can export documents directly to PDF.
- Open the document.
- Click File > Save As.
- Choose a destination folder.
- Select PDF as the file type.
- Save the file.
During PDF creation, Word typically embeds the fonts required to render the document correctly.
Verify Fonts Are Embedded
After generating the PDF, you can verify the embedded fonts using a PDF viewer.
In Adobe Acrobat Reader:
- Open the PDF.
- Select File > Properties.
- Open the Fonts tab.
Fonts marked as Embedded or Embedded Subset indicate that the font information is included in the PDF.
Advantages and Limitations
PDF files provide excellent consistency across operating systems and devices. They are ideal for document distribution, publishing, and printing.
However, PDF files are not intended for collaborative editing. If recipients need to modify the content extensively, embedding fonts directly in the Word document may be a better choice.
Method 3: Embed Fonts in Word Documents Programmatically in C#
If you generate Word documents automatically, manually configuring font settings in Word may not be practical. In such cases, programmatic font embedding provides a scalable solution.
Using Spire.Doc for .NET, you can embed custom fonts into Word documents by specifying local font files. The library supports both newly created documents and existing Word files, making it suitable for automated document workflows.
Why Use Programmatic Font Embedding?
Automated font embedding is useful for:
- Document generation systems
- Reporting applications
- Batch document processing
- Template-based workflows
- Documents that rely on custom branding fonts
Instead of requiring users to install fonts manually, the application can package the necessary font resources directly into the generated document.
Embed Fonts in a Word Document Using C#
using Spire.Doc;
using Spire.Doc.Documents;
using Spire.Doc.Fields;

namespace Embed_private_font_into_Word
{
    class Program
    {
        static void Main(string[] args)
        {
            Document document = new Document();
            Section section = document.AddSection();
            Paragraph p = section.AddParagraph();

            TextRange range = p.AppendText("Let life be beautiful like summer flowers\n"
                +"Life, thin and light-off time and time again\n"
                + "Frivolous tireless");
            range.CharacterFormat.FontName = "DeeDeeFlowers";
            range.CharacterFormat.FontSize = 20;

            document.EmbedFontsInFile = true;
            document.PrivateFontList.Add(new PrivateFontPath("DeeDeeFlowers", @"C:\Fonts\DeeDeeFlowers.ttf"));

            document.SaveToFile("result.docx", FileFormat.Docx);
        }
    }
}
In this example, a custom font is loaded from a local TTF file, applied to the document content, and embedded into the generated DOCX file. As a result, the document can display correctly even on systems where the font is not installed.
Benefits of Automated Font Embedding
Automated font embedding is especially valuable in document generation and processing workflows. In addition to embedding custom fonts, developers can programmatically modify document content, change fonts, apply formatting, and convert Word documents to PDF while maintaining a consistent appearance. Combining these operations into a single workflow reduces manual work and helps ensure reliable results across different devices and environments.
How to Check Whether Fonts Are Embedded
After embedding fonts, it is a good idea to verify the result.
For Word documents, reopen the file on another computer that does not have the original font installed. If the document displays correctly without font substitution, the embedding was successful.
For PDF files, use the Fonts section in the document properties to confirm that the fonts are listed as embedded.
Testing on a separate machine is often the most reliable way to validate the final output.
Troubleshooting Common Font Embedding Issues
Fonts Not Embedded Successfully
If the document displays correctly on your computer but uses different fonts on another device, the fonts may not have been embedded successfully. Ensure the file is saved in .docx format and that Embed fonts in the file is enabled before saving. To verify the result, open the document on a computer that does not have the original fonts installed.
Grayed-out Embed Fonts Option
This option may be unavailable when the document is opened in Compatibility Mode, set to read-only, or restricted by organizational policies. Try converting the file to the latest DOCX format and removing any editing restrictions. Updating Microsoft Word to the latest version may also restore the feature.
File Size Too Large After Embedding
Embedding fonts can noticeably increase file size, especially when multiple custom fonts are used. To reduce the impact, enable Embed only the characters used in the document and Do not embed common system fonts. Limiting the number of embedded font families can also help keep the document size manageable.
Specific Fonts Cannot Be Embedded
Some fonts include licensing restrictions that prevent embedding. If Word displays a warning or skips a font during saving, check the font's embedding permissions and consider using an embeddable alternative. If editing is not required, converting the document to PDF is often the simplest workaround.
Conclusion
Embedding fonts is one of the most effective ways to preserve the appearance of Word documents across different devices and environments. For everyday use, Word's built-in embedding feature is often sufficient. For document distribution, converting to PDF provides excellent compatibility. For automated workflows and large-scale document generation, C# font embedding offers the greatest flexibility and control.
By choosing the method that best fits your scenario, you can prevent font substitution issues and ensure that your documents always appear exactly as intended.
FAQs
Can all fonts be embedded in Word?
No. Font embedding depends on the permissions defined by the font vendor.
Does embedding fonts increase file size?
Yes. The document becomes larger because font data is stored inside the file.
What is the difference between full embedding and subset embedding?
Full embedding includes the entire font, while subset embedding includes only the characters used in the document.
Is PDF better than embedding fonts in Word?
PDF is generally better for sharing and printing, while embedded Word documents remain easier to edit.
Can I embed fonts automatically using C#?
Yes. Libraries such as Spire.Doc allow developers to embed fonts programmatically during document generation.
See Also
How to Print Multiple Word Documents at Once: 6 Ways
Table of Contents
- Method 1: Right-Click & Print from File Explorer
- Method 2: Drag and Drop Multiple Word Files via Print Queue Window
- Method 3: Merge Word Files First for a Unified Print Job
- Method 4: Use a Word Macro (VBA) to Print All Documents in a Folder
- Method 5: Silent Batch Printing with a PowerShell Script
- Method 6: Print Word Documents in C# Using Spire.Doc
- Quick Comparison: Which Batch Printing Method Suits You Best?
- Final Thoughts
- FAQs
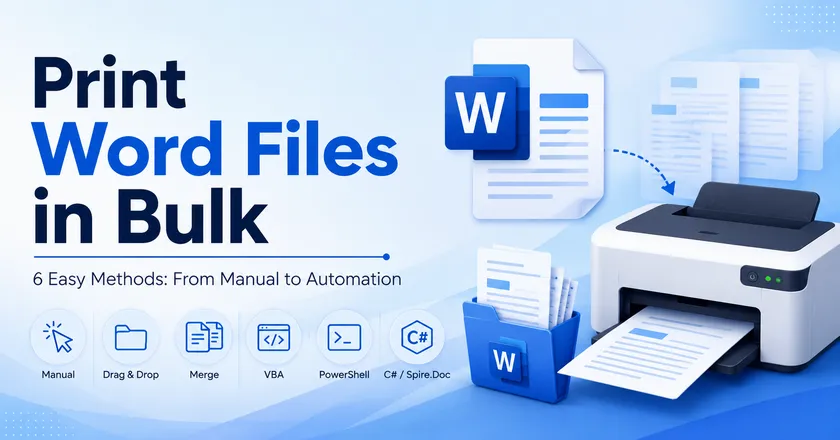
Printing dozens of contracts, reports, or invoices one by one is a tedious time-waster. Whether you are preparing handouts for a meeting, producing legal documents, or simply organising your office paperwork, the ability to send a whole folder of Word files to the printer in one go can save you hours.
This article walks you through six practical methods to batch print .doc and .docx files—from effortless right-click tricks to a powerful developer‑oriented solution using Spire.Doc in C#. Pick the one that fits your workflow and start printing smarter today.
Overview of the methods covered:
- Method 1: Right-Click & Print from File Explorer
- Method 2: Drag and Drop Multiple Word Files via Print Queue Window
- Method 3: Merge Word Files First for a Unified Print Job
- Method 4: Use a Word Macro (VBA) to Print All Documents in a Folder
- Method 5: Silent Batch Printing with a PowerShell Script
- Method 6: Print Word Documents in C# Using Spire.Doc
Method 1: Right-Click & Print from File Explorer
The simplest method requires zero extra tools and works instantly on any Windows PC. It’s perfect for quickly printing a handful of documents without installing any software. Simply select your files and let Windows handle the rest.
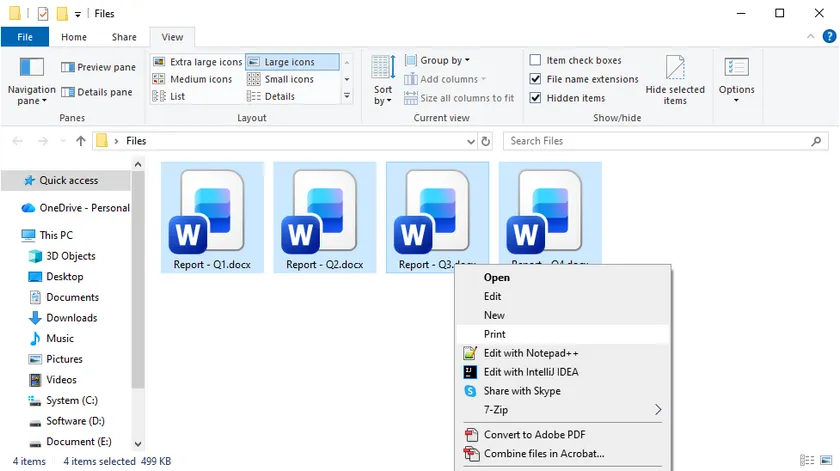
Steps:
- Open File Explorer and navigate to the folder containing your Word documents.
- Select the files you want to print: hold down the Ctrl key and click each one individually, or press Ctrl + A to select all.
- Right-click any highlighted file and choose Print from the context menu.
Windows will automatically open each document in Microsoft Word, send it to your default printer, and close Word when finished. Keep in mind that if your Word security settings display macro warnings or Protected View prompts, the process may pause until you manually confirm them. Still, for quick, occasional jobs this method is hard to beat.
Method 2: Drag and Drop Multiple Word Files via Print Queue Window
This native Windows drag-and-drop workflow enables batch printing of multiple Word documents—simply drag your files onto a dedicated printer desktop shortcut. This approach makes it easy to switch between different printers at will, making it ideal for office environments equipped with several printing devices.
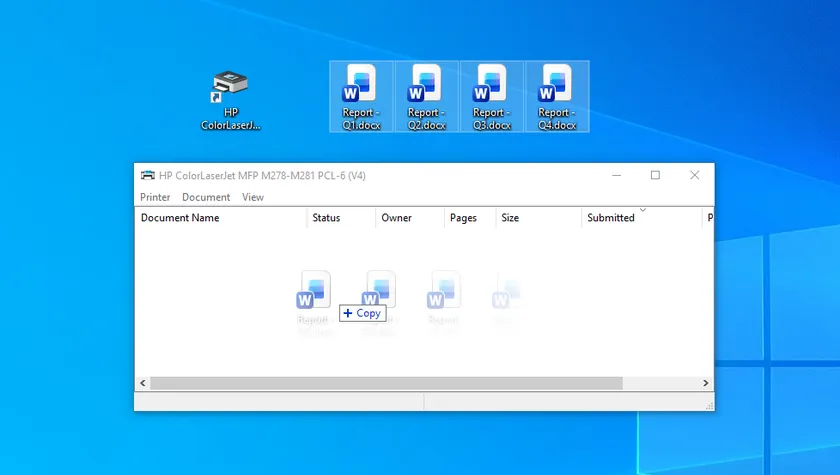
Steps:
- Press Win + R, type control printers, then press Enter to launch the Devices and Printers window.
- Double-click your target printer icon to bring up its print queue window.
- Select all target Word files, then drag and drop them directly into the blank area of the open print queue window.
Files will populate the print job list automatically. Windows will open, print, and close each document sequentially.
Pro tip: You can also create a desktop printer shortcut for quick access, though dragging into the print queue window delivers more reliable results for batch tasks.
Method 3: Merge Word Files First for a Unified Print Job
If you want all separate Word files printed as one continuous, ordered document, this merging workflow is your optimal solution. It works exceptionally well for handouts, formal reports and booklets that require consistent page sequencing. Merging files ahead of printing removes tedious manual page sorting after output.

Steps:
- Launch Microsoft Word and create a blank new document.
- Navigate to Insert > Object > Text from File (alternate paths: Insert > File or expand the Object drop-down menu on certain Word editions).
- Highlight all DOCX files to be merged, then click Insert . Files will assemble following your selected order.
- Hit Ctrl + P to open the print panel. Select either your physical printer or Microsoft Print to PDF , then confirm printing.
You will receive one cohesive document with uninterrupted page flow. Though merging takes a small amount of extra time, it prevents misordered pages and eliminates manual collation—ideal for bound documents and printed handouts.
Method 4: Use a Word Macro (VBA) to Print All Documents in a Folder
If you frequently print batches of documents from the same folder, a simple VBA macro can fully automate the process. This method runs directly inside Microsoft Word, requires no extra software, and can be set up for one-click printing. It’s an ideal built-in automation tool for regular, repeated printing tasks.
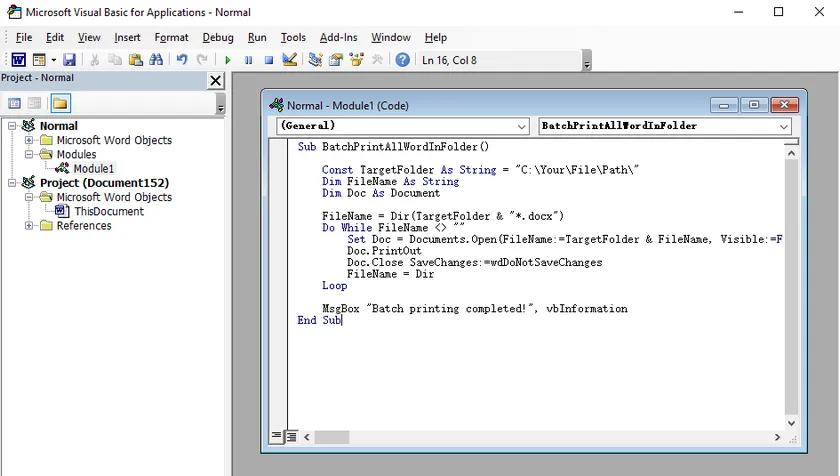
Steps:
- Open Microsoft Word and press Alt + F11 to open the VBA editor.
- Go to Insert > Module and paste the ready-to-use VBA code provided below.
- Replace the folder path in the code with your own directory.
- Press F5 to run the macro, or assign it to the Quick Access Toolbar for one-click printing.
VBA code:
Sub BatchPrintAllWordInFolder()

    Const TargetFolder As String = "C:\Your\File\Path\"
    Dim FileName As String
    Dim Doc As Document

    FileName = Dir(TargetFolder & "*.docx")
    Do While FileName <> ""
        Set Doc = Documents.Open(FileName:=TargetFolder & FileName, Visible:=False)
        Doc.PrintOut
        Doc.Close SaveChanges:=wdDoNotSaveChanges
        FileName = Dir
    Loop

    MsgBox "Batch printing completed!", vbInformation
End Sub
This method prints files silently in the background without opening windows. The only requirements are enabling macros and having Word installed — perfect for reliable personal or office desktop use.
Method 5: Silent Batch Printing with a PowerShell Script
PowerShell offers a fast, lightweight, and script-based way to print multiple Word documents in the background—no windows, no pop-ups, and no manual interaction. This method is ideal for users who want fully automated printing, and it can even be scheduled with Windows Task Scheduler for automatic, timed jobs.
Steps:
- Open PowerShell from the Start Menu (no administrator rights required for basic printing).
- Copy and paste the simple batch-print script provided below.
- Change the
$folderPathvalue to your target document folder. - Run the script. Word will run silently in the background, print all your documents automatically, and close cleanly when finished.
PowerShell script:
$folderPath = "C:\Your\Files\Here"

$word = New-Object -ComObject Word.Application
$word.Visible = $false
$word.DisplayAlerts = 0

Get-ChildItem -Path $folderPath -Filter *.docx | ForEach-Object {
    $doc = $word.Documents.Open($_.FullName)
    $doc.PrintOut()
    $doc.Close()
}

$word.Quit()
[System.GC]::Collect()
[System.GC]::WaitForPendingFinalizers()

Write-Host "Batch printing completed!"
This method works without extra software, supports all Word formats, and delivers reliable, silent batch printing for both personal and office use.
Method 6: Print Word Documents in C# Using Spire.Doc
When you need a fully automated, high‑performance batch printing solution that runs on a server without Microsoft Office, Spire.Doc for .NET is the go‑to library. It gives you complete programmatic control over document printing, making it ideal for web applications, background services, or document management systems.
Why Use Spire.Doc for Batch Printing?
Spire.Doc is a standalone .NET library that reads, creates, and manipulates Word files without any dependency on Word itself. For batch printing, this means you can process thousands of documents reliably on a server, select a specific printer, set page ranges, and even handle print duplex—all through clean C# code.
Setting Up Spire.Doc in Your .NET Project
Install the package via NuGet Package Manager:
Install-Package Spire.Doc
Or use the .NET CLI: dotnet add package Spire.Doc. That’s it—no additional Office licences or installations.
C# Code Example: Print All Word Files from a Directory
Below is a complete console application that reads all .docx and .doc files from a folder and prints them silently with a standard print controller (no pop‑up dialog). The code also shows how to handle possible exceptions gracefully.
using Spire.Doc;
using System;
using System.Drawing.Printing;
using System.IO;

class BatchPrint
{
    static void Main(string[] args)
    {
        string folderPath = @"C:\DocumentsToPrint";
        string[] wordFiles = Directory.GetFiles(folderPath, "*.doc*");
        // Filter to .docx and .doc only
        string[] allowedExtensions = { ".docx", ".doc" };

        foreach (string filePath in wordFiles)
        {
            string ext = Path.GetExtension(filePath).ToLower();
            if (Array.Exists(allowedExtensions, e => e == ext))
            {
                try
                {
                    Console.WriteLine($"Printing: {Path.GetFileName(filePath)}");
                    Document doc = new Document();
                    doc.LoadFromFile(filePath);

                    PrintDocument printDoc = doc.PrintDocument;
                    // Suppress the print dialog for silent printing
                    printDoc.PrintController = new StandardPrintController();

                    // Optionally set printer name and copies
                    // printDoc.PrinterSettings.PrinterName = "My Specific Printer";
                    // printDoc.PrinterSettings.Copies = 2;

                    printDoc.Print();
                    doc.Close();
                }
                catch (Exception ex)
                {
                    Console.WriteLine($"Failed to print {filePath}: {ex.Message}");
                }
            }
        }
        Console.WriteLine("Batch print completed.");
    }
}
The logic is straightforward: get all files from the directory, check the extension, load each one into a Spire.Doc Document object, access its PrintDocument, set StandardPrintController to avoid the Windows print dialog, and call Print(). The loop ensures every valid Word document is printed sequentially.
The PrintDocument.PrinterSettings property opens the door to fine‑grained control. You can specify the exact printer with PrinterName, set the number of copies, choose a page range, or enable duplex printing. For more detailed introduction, refer to How to Print Word Documents in C#.
Quick Comparison: Which Batch Printing Method Suits You Best?
| Method | Requires Word? | Silent / No Pop-ups | Best For |
|---|---|---|---|
| Right‑click & Print | Yes | Possible interruptions | Occasional one‑off tasks |
| Drag to Printer Shortcut | Yes | Possible interruptions | Visual, quick daily use |
| Merge & Print to PDF | Yes | Yes (once merged) | Producing a single ordered printout |
| VBA Macro | Yes | Yes, if configured | Personal repetitive folders |
| PowerShell Script | Yes (COM) | Yes | Scheduled server‑side tasks |
| Spire.Doc with C# | No | Yes, fully silent | Server automation & integration |
Final Thoughts
Batch printing Word documents doesn’t have to be a chore. Start with the quick built‑in tricks, adopt a script when you need repeatability, and move to a dedicated library like Spire.Doc when your project demands a robust, Office‑free solution. Whichever route you take, the minutes you save will quickly add up to hours of reclaimed productivity. Now pick a method, load up your folder, and let the printer do the heavy lifting.
FAQs
Can I print Word documents without opening each one?
Yes. Methods 4, 5, and 6 all suppress the Word interface or work without it entirely. The PowerShell script and Spire.Doc both print silently in the background, while the VBA macro can hide the application window.
Does batch printing work with .doc and .docx files?
Absolutely. Every method described here handles both legacy .doc and modern .docx formats. When using Spire.Doc, the library seamlessly reads both formats without any conversion.
How do I select a specific printer when printing multiple files?
For the manual methods, set your desired printer as the default before starting. With the PowerShell script and the C# Spire.Doc example, you can programmatically set the printer name inside the code, giving you precise control without changing system defaults.
See Also
Format Excel Files in C#: Fonts, Colors, Borders, and More
Formatting plays an important role in making Excel spreadsheets easier to read, analyze, and present. Whether you are generating reports, invoices, financial statements, or dashboards, raw data often needs proper styling before it can be shared with end users.
In C#, Excel formatting tasks may include changing fonts, applying colors, aligning content, formatting numbers and dates, adding borders, creating tables, and configuring page layouts. Performing these tasks manually can be time-consuming, especially when dealing with large volumes of spreadsheets.
Spire.XLS for .NET provides a comprehensive set of APIs for creating, editing, formatting, and converting Excel documents without requiring Microsoft Excel to be installed. In this article, you will learn how to apply various types of formatting to Excel files in C# using Spire.XLS for .NET.
Table of Contents:
- Prepare Your C# Project for Excel Formatting
- Part 1. Format Cell Appearance
- Part 2. Format Cell Values
- Part 3. Format Ranges and Layout
- Part 4. Apply Advanced Formatting
- Part 5. Format Excel Tables and Worksheets
- Part 6. Create a Professional Report Example
- Conclusion
- FAQs
Prepare Your C# Project for Excel Formatting
Spire.XLS for .NET is a powerful Excel library that enables developers to work with XLS, XLSX, XLSM, CSV, and other spreadsheet formats programmatically. Besides formatting operations, it also supports formula calculation, chart creation, pivot tables, worksheet management, printing, and file conversion.
To install Spire.XLS for .NET, run the following NuGet command:
Install-Package Spire.XLS
Before applying formatting, load an existing Excel workbook (or create a new one) and access the worksheet you want to modify. Once all formatting operations are complete, save the result to a new Excel file using the SaveToFile() method.
using Spire.Xls;
using System.Drawing;

// Create a workbook object
Workbook workbook = new Workbook();

// Load an existing Excel file
workbook.LoadFromFile("input.xlsx");

// Get a specific worksheet
Worksheet sheet = workbook.Worksheets[0];

// Apply formatting
...

// Save the result
workbook.SaveToFile("output.xlsx", ExcelVersion.Version2016);
Note: The following examples assume that the workbook has already been loaded and the worksheet object has been obtained.
Part 1. Format Cell Appearance
Cell appearance settings control how data looks inside a worksheet. Proper formatting can significantly improve readability and help users quickly identify important information.
Format Cell Fonts
Font formatting allows you to customize the visual style of cell content. Common options include font family, font size, bold, italic, underline, and font color. These settings are frequently used for report titles, section headers, and highlighted values.
CellStyle style = workbook.Styles.Add("FontStyle");

style.Font.FontName = "Calibri";
style.Font.Size = 14;
style.Font.IsBold = true;
style.Font.IsItalic = true;
style.Font.Underline = FontUnderlineType.Single;
style.Font.Color = Color.Blue;

sheet.Range["A1"].Text = "Formatted Text";
sheet.Range["A1"].Style = style;
Set Cell Background Colors
Background colors help distinguish different sections of a worksheet and draw attention to key cells. For example, you may use a colored header row or highlight summary data with a contrasting fill color.
sheet.Range["A2"].Text = "Background Color";
sheet.Range["A2"].Style.Color = Color.LightSkyBlue;
Align Cell Content
Excel provides horizontal alignment, vertical alignment, indentation, and text rotation options. Proper alignment improves the overall layout of a worksheet and makes tabular data easier to scan.
sheet.Range["B2"].Text = "Centered Text";
CellStyle style = sheet.Range["B2"].Style;

style.HorizontalAlignment = HorizontalAlignType.Center;
style.VerticalAlignment = VerticalAlignType.Center;
style.Rotation = 45;

sheet.SetRowHeight(2, 40);
sheet.SetColumnWidth(2, 20);
Add Cell Borders
Borders are useful for separating rows and columns and defining table structures. Depending on the scenario, you can apply borders to individual cells or entire ranges and customize their styles and colors.
CellRange range = sheet.Range["A4:D6"];
range.Text = "Border";

range.Style.Borders[BordersLineType.EdgeTop].LineStyle = LineStyleType.Thin;
range.Style.Borders[BordersLineType.EdgeBottom].LineStyle = LineStyleType.Thin;
range.Style.Borders[BordersLineType.EdgeLeft].LineStyle = LineStyleType.Thin;
range.Style.Borders[BordersLineType.EdgeRight].LineStyle = LineStyleType.Thin;
range.Style.Borders[BordersLineType.EdgeTop].Color = Color.Black;
Wrap Text
When cell content exceeds the available column width, wrapping text allows multiple lines to be displayed within the same cell, preventing important information from being truncated.
sheet.Range["A8"].Text = "This is a very long sentence that will automatically wrap within the cell.";

sheet.Range["A8"].Style.WrapText = true;

sheet.SetColumnWidth(1, 20);
sheet.SetRowHeight(8, 60);
Part 2. Format Cell Values
Value formatting changes how data is displayed without modifying the underlying values. This is particularly important for business and financial spreadsheets.
Format Numbers
Numeric formats can control decimal places, thousands separators, scientific notation, and other display rules. Choosing the right format improves accuracy and readability.
sheet.Range["A10"].NumberValue = 1234567.891;
sheet.Range["A10"].NumberFormat = "#,##0.00";
Format Currency
Currency formatting automatically displays monetary symbols and decimal precision according to your requirements. This is commonly used in invoices, budgets, and financial reports.
sheet.Range["A11"].NumberValue = 5999.95;
sheet.Range["A11"].NumberFormat = "$#,##0.00";
Format Dates
Date formatting allows the same date value to be displayed in different styles, such as short dates, long dates, or custom patterns. Consistent date formats make reports easier to interpret.
sheet.Range["A12"].DateTimeValue = DateTime.Now;
sheet.Range["A12"].NumberFormat = "yyyy-MM-dd";
Part 3. Format Ranges and Layout
Instead of formatting cells one by one, you can apply styles to larger worksheet areas to improve efficiency and maintain consistency.
Format Ranges
A range may contain multiple rows and columns. Applying formatting to a range ensures that all cells share the same appearance and reduces repetitive code.
CellRange range = sheet.Range["A14:D18"];

range.Style.Color = Color.LightYellow;
range.Style.Font.IsBold = true;
range.Style.HorizontalAlignment = HorizontalAlignType.Center;
Merge Cells
Merged cells are often used for report titles and section headers. After merging, the content can be centered and styled to create a more professional appearance.
sheet.Range["A20:D20"].Merge();

sheet.Range["A20"].Text = "Monthly Sales Report";
sheet.Range["A20"].Style.Font.Size = 18;
sheet.Range["A20"].Style.Font.IsBold = true;
sheet.Range["A20"].Style.HorizontalAlignment = HorizontalAlignType.Center;
Format Rows and Columns
Formatting entire rows or columns is useful when all cells in a specific area should follow the same style, such as a header row or a currency column.
sheet.Rows[21].Style.Font.IsBold = true;
sheet.Rows[21].Style.Color = Color.LightGray;

sheet.Columns[1].Style.NumberFormat = "$#,##0.00";
AutoFit Rows and Columns
AutoFit automatically adjusts row heights and column widths based on cell content. This helps prevent clipped text and improves the presentation of generated spreadsheets.
sheet.AllocatedRange.AutoFitColumns();
sheet.AllocatedRange.AutoFitRows();
Part 4. Apply Advanced Formatting
Conditional formatting enables Excel to apply styles automatically based on cell values. Instead of manually highlighting data, rules can be configured to identify trends, exceptions, or important values.
For example, you can highlight numbers above a threshold, display data bars, apply color scales, or use icon sets to visualize performance indicators. These features make large datasets easier to analyze and understand.
sheet.Range["A25"].NumberValue = 1200;
sheet.Range["A26"].NumberValue = 800;
sheet.Range["A27"].NumberValue = 1500;

XlsConditionalFormats formats = sheet.ConditionalFormats.Add();
formats.AddRange(sheet.Range["A25:A27"]);
IConditionalFormat format = formats.AddCondition();
format.FormatType = ConditionalFormatType.CellValue;
format.FirstFormula = "1000";
format.Operator = ComparisonOperatorType.Greater;
format.BackColor = Color.LightGreen;
Part 5. Format Excel Tables and Worksheets
Formatting can also be applied at the worksheet level to improve the overall structure and appearance of a workbook.
Format Excel Tables
Excel tables provide built-in styling options such as header formatting, alternating row colors, and predefined themes. Converting a data range into a table can instantly enhance readability and organization.
sheet.Range["A30"].Text = "Product";
sheet.Range["B30"].Text = "Sales";
sheet.Range["A31"].Text = "Laptop";
sheet.Range["B31"].NumberValue = 5000;
sheet.Range["A32"].Text = "Monitor";
sheet.Range["B32"].NumberValue = 2000;

IListObject table = sheet.ListObjects.Create("SalesTable", sheet.Range["A30:B32"]);
table.BuiltInTableStyle = TableBuiltInStyles.TableStyleMedium2;
Configure Page Layout
Page layout settings determine how worksheets appear when printed or exported. Common options include page orientation, margins, print areas, scaling, and repeating header rows.
Proper page setup ensures that reports look professional both on screen and on paper.
sheet.PageSetup.Orientation = PageOrientationType.Landscape;
sheet.PageSetup.LeftMargin = 0.5;
sheet.PageSetup.RightMargin = 0.5;
sheet.PageSetup.TopMargin = 0.75;
sheet.PageSetup.BottomMargin = 0.75;
sheet.PageSetup.FitToPagesWide = 1;
sheet.PageSetup.FitToPagesTall = 1;
Part 6. Create a Professional Report Example
In real-world scenarios, multiple formatting techniques are often used together. A typical report may include a merged title, custom fonts, colored headers, borders, number formats, conditional formatting, and optimized page settings.
By combining these features, you can generate polished Excel documents that are ready for distribution without requiring manual editing.
using Spire.Xls;
using Spire.Xls.Core.Spreadsheet.Collections;
using Spire.Xls.Core;
using System.Drawing;

class Program
{
    static void Main()
    {
        // Create a new workbook
        Workbook workbook = new Workbook();
        Worksheet sheet = workbook.Worksheets[0];

        sheet.Name = "Sales Summary Report";

        // Title Row
        CellRange title = sheet.Range["A1:E1"];
        title.Merge();
        title.Text = "Sales Summary Report";

        title.Style.Font.FontName = "Arial";
        title.Style.Font.Size = 16;
        title.Style.Font.Color = Color.White;
        title.Style.Color = Color.DarkBlue;

        title.Style.HorizontalAlignment = HorizontalAlignType.Center;
        title.Style.VerticalAlignment = VerticalAlignType.Center;

        sheet.Rows[0].RowHeight = 30;

        // Headers
        string[] headers = { "Order ID", "Product", "Region", "Order Date", "Sales Amount" };

        for (int i = 0; i < headers.Length; i++)
        {
            CellRange cell = sheet.Range[2, i + 1];

            cell.Text = headers[i];
            cell.Style.Font.IsBold = true;
            cell.Style.Color = Color.LightGray;

            cell.Style.Borders[BordersLineType.EdgeBottom].LineStyle = LineStyleType.Medium;
            cell.Style.Borders[BordersLineType.EdgeBottom].Color = Color.DarkBlue;
        }

        // Data
        object[][] data =
        {
            new object[] { 1001, "Laptop", "North", "2024-01-15", 15000 },
            new object[] { 1002, "Monitor", "West", "2024-02-10", 12000 },
            new object[] { 1003, "Keyboard", "East", "2024-03-05", 13500 },
            new object[] { 1004, "Mouse", "South", "2024-04-12", 16000 }
        };

        for (int r = 0; r < data.Length; r++)
        {
            for (int c = 0; c < data[r].Length; c++)
            {
                CellRange cell = sheet.Range[r + 3, c + 1];
                var value = data[r][c];

                if (c == 3) // Order Date
                {
                    cell.DateTimeValue = DateTime.Parse(value.ToString());
                    cell.NumberFormat = "yyyy-MM-dd";
                }
                else if (c == 4) // Sales Amount
                {
                    cell.NumberValue = Convert.ToDouble(value);
                    cell.NumberFormat = "$#,##0.00";
                }
                else
                {
                    cell.Text = value.ToString();
                }

                // Alternate row colors
                cell.Style.Color = (r % 2 == 0)
                    ? Color.LightYellow
                    : Color.LightCyan;
            }
        }

        // Borders
        CellRange range = sheet.Range["A2:E6"];

        range.BorderAround(LineStyleType.Medium, Color.Black);
        range.BorderInside(LineStyleType.Thin, Color.Gray);

        // Auto Fit Columns
        for (int i = 1; i <= 5; i++)
        {
            sheet.AutoFitColumn(i);
        }

        // Conditional Formatting
        XlsConditionalFormats formats = sheet.ConditionalFormats.Add();
        formats.AddRange(sheet.Range["E3:E6"]);

        IConditionalFormat condition = formats.AddCondition();
        condition.FormatType = ConditionalFormatType.CellValue;
        condition.Operator = ComparisonOperatorType.Greater;
        condition.FirstFormula = "14000";

        condition.FontColor = Color.Red;
        condition.IsBold = true;

        // Align + Layout Formatting
        CellRange all = sheet.AllocatedRange;

        for (int r = 1; r < all.RowCount; r++)
        {
            all.Rows[r].HorizontalAlignment = HorizontalAlignType.Center;
           // all.Rows[r].VerticalAlignment = VerticalAlignType.Center;
            all.Rows[r].RowHeight = 20;
        }

        for (int c = 0; c < all.ColumnCount; c++)
        {
            all.Columns[c].ColumnWidth = (c == 1) ? 19 : 14;
        }

        // Save
        workbook.SaveToFile("SalesSummaryReport.xlsx", ExcelVersion.Version2016);
        workbook.Dispose();
    }
}
Output:
Conclusion
Formatting is an essential step in creating professional Excel documents. With Spire.XLS for .NET, you can efficiently customize cell appearance, control number and date formats, manage worksheet layouts, apply conditional formatting, and build visually appealing reports entirely in C#.
By using the techniques covered in this guide, you can automate Excel formatting tasks and generate polished spreadsheets suitable for business, reporting, and data analysis scenarios.
FAQs
Can I format Excel files without Microsoft Excel installed?
Yes. Spire.XLS for .NET works independently of Microsoft Excel and can create, edit, and format spreadsheets directly through code.
Does formatting change the actual cell values?
No. Most formatting operations only affect how data is displayed. The underlying values remain unchanged unless explicitly modified.
Can I apply the same style to multiple cells at once?
Yes. Styles can be applied to ranges, rows, columns, or entire worksheets, making it easy to maintain consistent formatting.
Does Spire.XLS support conditional formatting?
Yes. The library supports common conditional formatting features, including highlighting rules, data bars, color scales, and icon sets.
Which Excel formats are supported?
Spire.XLS supports XLS, XLSX, XLSM, CSV, and several other spreadsheet formats for both reading and writing.
How to Duplicate an Excel File (Beyond Ctrl+C & Ctrl+V)
Table of Contents
Everybody knows the classic Ctrl+C and Ctrl+V method to duplicate Excel files. It works, but it’s not always the smartest or fastest way to duplicate an Excel file efficiently. What if you want to create a backup without cluttering your folder with endless “filename - Copy” versions? What if you need to open a safe duplicate Excel file without risking changes to the original? Or what if you need to duplicate Excel files in bulk while automatically adding timestamps or custom names?
This blog post goes beyond basic shortcuts to explore practical manual tricks and powerful automation techniques for duplicating Excel files—methods that many everyday users and even experienced professionals never discover.
On this page:
1. Manual Ways to Duplicate an Excel File
1.1 Method 1: Save As - Create a Versioned Backup
Most users think "Save As" is only for saving changes, but it is actually the safest way to duplicate a file you currently have open. Instead of creating a messy copy in your folder, this method allows you to rename the file and choose its exact location during the save process.
Steps:
- With the Excel file open, click File > Save As.
- Choose a location (OneDrive, This PC, or a specific folder).
- Enter a new name for the duplicate (e.g., "Q1_Report_Backup" instead of "Q1_Report").
- Click Save. The original file remains untouched, and you are now working on the new copy.
Best for: Use this method when you are about to make heavy edits to a critical report. It creates an archived version of the original state without ever leaving Excel.
Limitation: This only works when the file is already open. You cannot use "Save As" on a closed file from File Explorer.
1.2 Method 2: Drag-and-Drop – Duplicate One or Multiple Files
If you need to duplicate several Excel files at once, this is the fastest built-in method in Windows File Explorer or macOS Finder. Instead of opening menus or using copy-paste repeatedly, you can create multiple file duplicates in a single drag action using a modifier key.
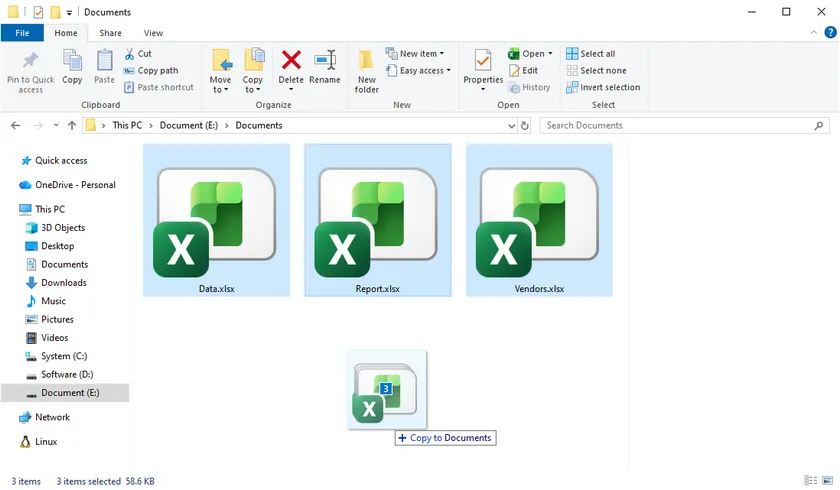
Steps (Windows):
- Open File Explorer and locate the Excel file(s) you want to duplicate.
- Select one file or multiple files (hold Ctrl to multi-select).
- Hold down the Ctrl key on your keyboard.
- While holding Ctrl, drag the selected file(s) to an empty space in the same folder.
- Release the mouse button first, then release Ctrl.
- Copies will appear instantly with names like “filename - Copy.xlsx”.
Steps (Mac):
- Open Finder and locate the Excel file(s).
- Select one or more files.
- Hold down the Option key.
- Drag the file(s) within the same folder.
- Release the mouse button first, then release Option.
- Duplicates will be created immediately.
Best for: Quickly duplicating multiple Excel files in bulk, such as creating backups for reports, datasets, or templates.
Limitation: This method does not allow renaming during the drag-and-drop process. All duplicates will use default names like “filename - Copy”, so you may need to rename them afterward if naming consistency is required.
1.3 Method 3: Open as Copy - Avoid Accidental Edits
Hidden inside Excel's Open dialog is a feature that prevents you from ever accidentally editing an original file. When you select "Open as Copy", Excel opens a temporary clone of your workbook. If you close without saving, the copy vanishes entirely—leaving the original untouched.
Steps:
- Open Microsoft Excel (not the file directly).
- Click File > Open > Browse.
- Navigate to the Excel file you want to duplicate.
- Click the file once to select it, then click the arrow next to the Open button (not the button itself).
- Select Open as Copy from the dropdown menu.
Excel will open a duplicate with the name "Copy of [original filename].xlsx". The original file remains closed and completely untouched.
Best for: This is perfect for reviewing a sensitive file, testing complex formulas, or sharing your screen during a meeting—because even if you make changes and accidentally hit Ctrl+S, you are saving to the temporary copy, not the original.
Limitation: If you intentionally want to keep the changes, you must use File > Save As to save the copy to a permanent location. Simply clicking "Save" will not overwrite the original, but the copy will disappear when you close Excel unless you save it elsewhere.
1.4 Quick Reference Table: Which Manual Method to Use When
| Situation | Best Method (Beyond Ctrl+V) |
|---|---|
| You have the file open and need a clean versioned backup | Save As |
| You want a copy in the same folder without using menus | Ctrl/Option + Drag |
| You want to duplicate multiple files at once (e.g., 10 backups in one motion) | Ctrl/Option + Drag (with multiple files selected) |
| You want to open a file for review without altering the original | Open as Copy |
2. Why Automate?
Manual tricks work well for one-off tasks. But if you find yourself duplicating 50 files every day — or if you wish you could automatically add a timestamp to each copy — automation is the answer. The following section is written for C# developers, but anyone curious about automating Excel copies is welcome to follow along.
3. Automation for Developers
3.1 Method 1: Pure File Copy Using .NET File.Copy
For developers, the .NET framework offers a native way to duplicate Excel files without any external library. This method treats the Excel file as raw binary data, making it incredibly fast for batch operations like nightly backups or archiving.
using System.IO;

File.Copy("source.xlsx", "destination.xlsx", overwrite: true);
Best for: Batch exact duplicates, automated archiving, integration into backend services.
Limitation: You cannot modify any content inside the file—no cell values, no timestamps, no formatting changes. It is a pure "shell" copy.
3.2 Method 2: Copy & Modify Using Spire.XLS
Spire.XLS for .NET is a professional library that allows you to "open" the file during duplication. This means you can copy the template and simultaneously write dynamic data, such as the current timestamp or a new customer name.
using Spire.Xls;

Workbook workbook = new Workbook();
workbook.LoadFromFile("Template.xlsx");

// Modify content during the copy process
Worksheet sheet = workbook.Worksheets[0];
sheet.Range["A1"].Text = DateTime.Now.ToString(); // Add date
sheet.Range["B2"].Text = "Customer Name";             // Update text
sheet.DeleteColumn(5);                                                  // Delete column

workbook.SaveToFile("ModifiedCopy.xlsx");
Best for: Template filling, adding metadata (date, author name), cleaning sensitive data during duplication.
Limitation: Slower than File.Copy because it parses the file's XML structure. Also requires installing the Spire.XLS NuGet package.
You May Also Like: C# Write to Excel Guide
3.3 Comparison at a Glance
| Aspect | File.Copy | Spire.XLS |
|---|---|---|
| Modify cell content? | No | Yes |
| Add timestamp? | No | Yes |
| External library needed? | No (built-in) | Yes (NuGet) |
| Speed | Very fast | Slower |
| Best for | Batch exact duplicates | Copy + intelligent modification |
3.4 Simple Decision Guide for Developers
- Just need many exact copies? → Use File.Copy
- Need to add date, name, or clean data while copying? → Use Spire.XLS
4. Conclusion
Duplicating an Excel file is more than just hitting Ctrl+C and Ctrl+V. For everyday users, mastering "Open as Copy" or the Ctrl + Drag trick saves time and prevents accidental data loss. For developers, the choice is technical: use .NET File.Copy for raw speed and bulk operations, or switch to Spire.XLS when your workflow requires adding data during the duplication process. Look beyond the basic shortcut and pick the method that actually fits your task.
5. FAQs
Q1: What is the difference between "Open as Copy" and simply double-clicking the file?
Double-clicking opens the original file directly. Any change you make saves to the original unless you manually do a "Save As". "Open as Copy" opens a temporary duplicate; if you close without hitting save, the original remains 100% unchanged.
Q2: Will my charts, pivot tables, and formulas break when I duplicate using these methods?
No. All manual methods (Save As, Drag, Open as Copy) preserve every element perfectly. For automation, File.Copy preserves everything because it is a bit-for-bit copy. Spire.XLS also preserves them as long as you use LoadFromFile and SaveToFile without manually removing elements.
Q3: Why would I use C# automation over manual methods?
Manual methods are great for 1-5 files. But if you need to generate 500 customized invoices from a template (adding a new date and invoice number to each copy), manual work is impossible. Automation handles the repetition and precision.
Q4: Is there a risk of corruption when duplicating an open Excel file?
Yes for manual methods – never copy or drag an Excel file while it is actively open and has unsaved changes. For automation, libraries like Spire.XLS can read open files safely, but File.Copy may throw an "access denied" error if the file is locked by another process. Always close the file first for best results.