
Knowledgebase (2370)
Children categories
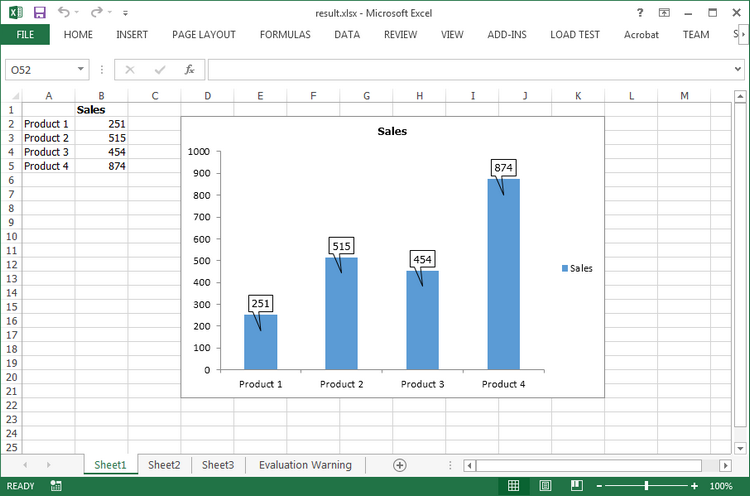
Excel 2013 has provided some new charting features, for example, it enables users to set data callout labels which makes it easier to show the details about the data series or its individual data points in a clear and easy-to-read format. This article is going to introduce how to add data callout labels to a chart using Spire.XLS.
Step 1: Initialize a new instance of Workbook class and set the Excel version as 2013.
Workbook wb = new Workbook();
wb.Version = ExcelVersion.Version2013;
Step 2: Get the first sheet from workbook.
Worksheet ws = wb.Worksheets[0];
Step 3: Insert some data.
ws.Range["A2"].Text = "Product 1";
ws.Range["A3"].Text = "Product 2";
ws.Range["A4"].Text = "Product 3";
ws.Range["A5"].Text = "Product 4";
ws.Range["B1"].Text = "Sales";
ws.Range["B1"].Style.Font.IsBold = true;
ws.Range["B2"].NumberValue = 251;
ws.Range["B3"].NumberValue = 515;
ws.Range["B4"].NumberValue = 454;
ws.Range["B5"].NumberValue = 874;
Step 4: Create a Clustered Column Chart based on the data from range A1:B5.
Chart chart = ws.Charts.Add(ExcelChartType.ColumnClustered);
chart.DataRange = ws.Range["A1:B5"];
chart.SeriesDataFromRange = false;
chart.PrimaryValueAxis.HasMajorGridLines = false;
Step 5: Set the chart position.
chart.LeftColumn = 4;
chart.TopRow = 2;
chart.RightColumn = 12;
chart.BottomRow = 22;
Step 6: Set the HasWedgeCallout property as true to display callout labels in a chart.
foreach (ChartSerie cs in chart.Series)
{
    cs.DataPoints.DefaultDataPoint.DataLabels.HasValue = true;
    cs.DataPoints.DefaultDataPoint.DataLabels.HasWedgeCallout = true;
}
Step 7: Save the file.
wb.SaveToFile("result.xlsx", FileFormat.Version2013);
Output:
Full Code:
using Spire.Xls;
using Spire.Xls.Charts;

namespace AddCalloutLabels
{
    class Program
    {
        static void Main(string[] args)
        {
            Workbook wb = new Workbook();
            wb.Version = ExcelVersion.Version2013;
            Worksheet ws = wb.Worksheets[0];

            ws.Range["A2"].Text = "Product 1";
            ws.Range["A3"].Text = "Product 2";
            ws.Range["A4"].Text = "Product 3";
            ws.Range["A5"].Text = "Product 4";
            ws.Range["B1"].Text = "Sales";
            ws.Range["B1"].Style.Font.IsBold = true;
            ws.Range["B2"].NumberValue = 251;
            ws.Range["B3"].NumberValue = 515;
            ws.Range["B4"].NumberValue = 454;
            ws.Range["B5"].NumberValue = 874;

            Chart chart = ws.Charts.Add(ExcelChartType.ColumnClustered);
            chart.DataRange = ws.Range["A1:B5"];
            chart.SeriesDataFromRange = false;
            chart.PrimaryValueAxis.HasMajorGridLines = false;

            chart.LeftColumn = 4;
            chart.TopRow = 2;
            chart.RightColumn = 12;
            chart.BottomRow = 22;

            foreach (ChartSerie cs in chart.Series)
            {
                cs.DataPoints.DefaultDataPoint.DataLabels.HasValue = true;
                cs.DataPoints.DefaultDataPoint.DataLabels.HasWedgeCallout = true;
            }
            wb.SaveToFile("result.xlsx", FileFormat.Version2013);
        }
    }
}
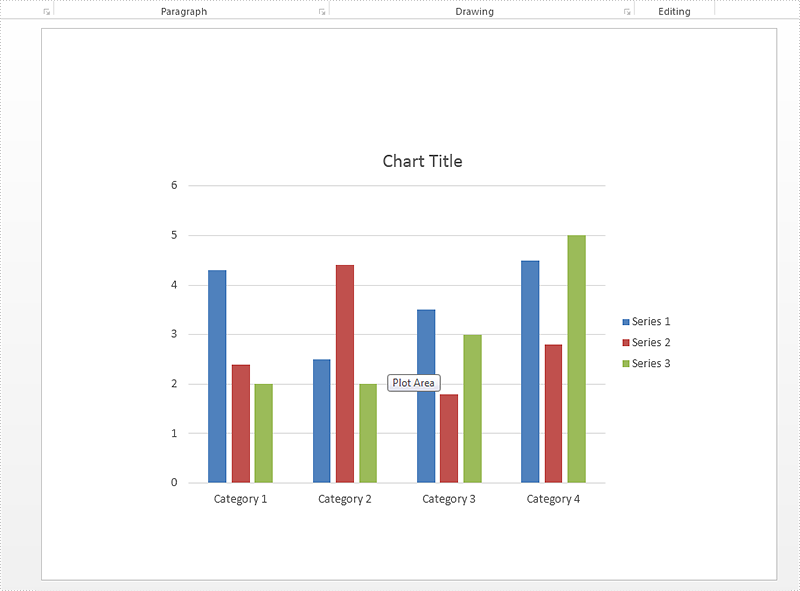
Spire.Presentation offers multiple functions to set the format for the chart elements. We have already shown you how to set the color for datapoints of series and format data labels of chart series in the PowerPoint document. This article will focus on demonstrating how to set font for text on chart legend and chart axis in C#.
Firstly please check the custom chart on presentation slides:
Step 1: Create a presentation instance and load the document from file.
Presentation presentation = new Presentation();
presentation.LoadFromFile("sample.pptx", FileFormat.Pptx2010);
Step 2: Get the chart that need to be formatted the font for the text on chart legend and chart axis.
IChart chart = presentation.Slides[0].Shapes[0] as IChart;
Step 3: Set the font for the text on Chart Legend area.
chart.ChartLegend.TextProperties.Paragraphs[0].DefaultCharacterProperties.Fill.SolidColor.KnownColor = KnownColors.Red;
chart.ChartLegend.TextProperties.Paragraphs[0].DefaultCharacterProperties.LatinFont = new TextFont("Arial Unicode MS");
Step 4: Set the font for the text on Chart Axis area.
chart.PrimaryCategoryAxis.TextProperties.Paragraphs[0].DefaultCharacterProperties.Fill.SolidColor.KnownColor = KnownColors.Red;
chart.PrimaryCategoryAxis.TextProperties.Paragraphs[0].DefaultCharacterProperties.Fill.FillType = FillFormatType.Solid;
chart.PrimaryCategoryAxis.TextProperties.Paragraphs[0].DefaultCharacterProperties.FontHeight = 10;
chart.PrimaryCategoryAxis.TextProperties.Paragraphs[0].DefaultCharacterProperties.LatinFont = new TextFont("Arial Unicode MS");
Step 5: Save the document to file:
presentation.SaveToFile("result.pptx", FileFormat.Pptx2010);
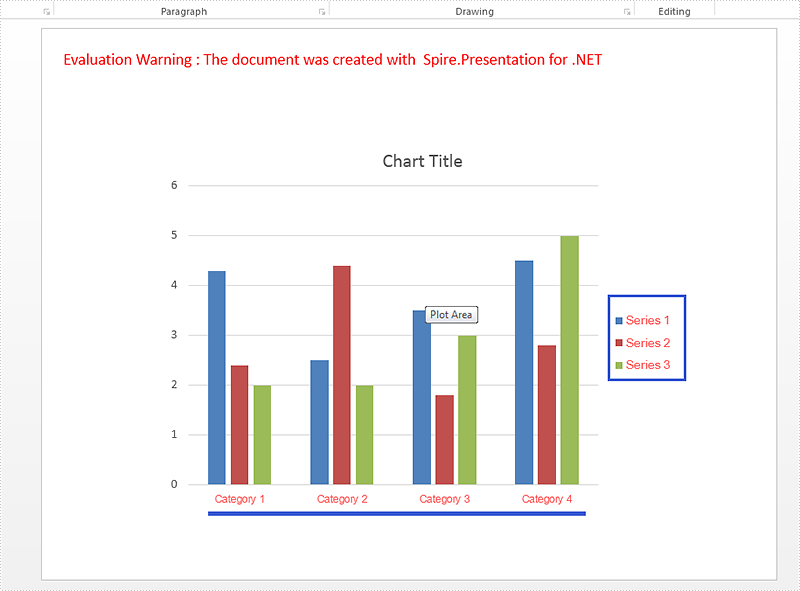
Effective screenshot after formatting the font for the chart legend and chart Axis.
Full codes:
using Spire.Presentation;
using Spire.Presentation.Charts;
using Spire.Presentation.Drawing;

namespace SetFont
{
    class Program
    {
        static void Main(string[] args)
        {
            Presentation presentation = new Presentation();
            presentation.LoadFromFile("sample.pptx", FileFormat.Pptx2010);

            IChart chart = presentation.Slides[0].Shapes[0] as IChart;

            chart.ChartLegend.TextProperties.Paragraphs[0].DefaultCharacterProperties.Fill.SolidColor.KnownColor = KnownColors.Red;
            chart.ChartLegend.TextProperties.Paragraphs[0].DefaultCharacterProperties.LatinFont = new TextFont("Arial Unicode MS");

            chart.PrimaryCategoryAxis.TextProperties.Paragraphs[0].DefaultCharacterProperties.Fill.SolidColor.KnownColor = KnownColors.Red;
            chart.PrimaryCategoryAxis.TextProperties.Paragraphs[0].DefaultCharacterProperties.Fill.FillType = FillFormatType.Solid;
            chart.PrimaryCategoryAxis.TextProperties.Paragraphs[0].DefaultCharacterProperties.FontHeight = 10;
            chart.PrimaryCategoryAxis.TextProperties.Paragraphs[0].DefaultCharacterProperties.LatinFont = new TextFont("Arial Unicode MS");

            presentation.SaveToFile("result.pptx", FileFormat.Pptx2010);

        }
    }
}
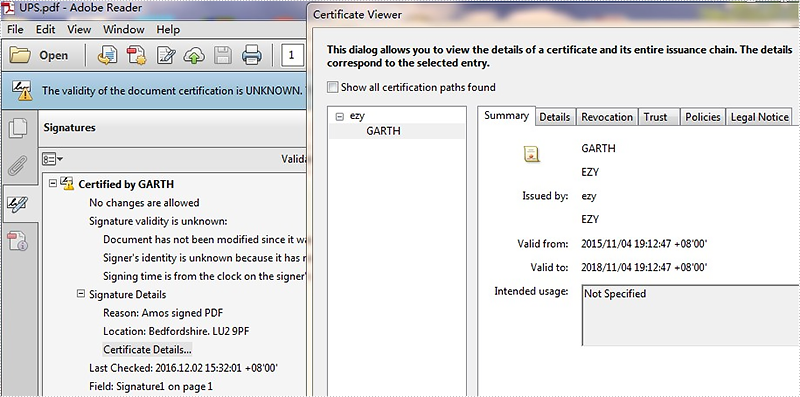
Spire.PDF allows getting and verifying a specific signature in a PDF file, now starts from version 3.8.82, Spire.PDF supports to get all certificates in a PDF signature. In this article, we will show you the steps of how to achieve this task by using Spire.PDF.
For demonstration, we used a template PDF file which contains two certificates:
Code snippets:
Step 1: Instantiate a PdfDocument object and load the PDF file.
PdfDocument doc = new PdfDocument();
doc.LoadFromFile("UPS.pdf");
Step 2: Create a List object.
List<PdfSignature> signatures = new List<PdfSignature>();
Step 3: Get all signatures from the PDF file and add them into the list object.
var form = (PdfFormWidget)doc.Form;
for (int i = 0; i < form.FieldsWidget.Count; ++i)
{
    var field = form.FieldsWidget[i] as PdfSignatureFieldWidget;
    if (field != null && field.Signature != null)
    {
        PdfSignature signature = field.Signature;
        signatures.Add(signature);
    }
}
Step 4: Get the first signature from the list, and then get all the certificates from the signature.
PdfSignature signatureOne = signatures[0];
X509Certificate2Collection collection = signatureOne.Certificates;
Effective screenshot:

Full code:
using System;
using System.Collections.Generic;
using System.Security.Cryptography.X509Certificates;
using Spire.Pdf;
using Spire.Pdf.Security;
using Spire.Pdf.Widget;

namespace Get_all_certificates_in_PDF_signature
{
    class Program
    {
        static void Main(string[] args)
        {
            PdfDocument doc = new PdfDocument();
            doc.LoadFromFile("UPS.pdf");
            List<PdfSignature> signatures = new List<PdfSignature>();
            var form = (PdfFormWidget)doc.Form;
            for (int i = 0; i < form.FieldsWidget.Count; ++i)
            {
                var field = form.FieldsWidget[i] as PdfSignatureFieldWidget;

                if (field != null && field.Signature != null)
                {
                    PdfSignature signature = field.Signature;
                    signatures.Add(signature);
                }
            }
            PdfSignature signatureOne = signatures[0];
            X509Certificate2Collection collection = signatureOne.Certificates;
            foreach (var certificate in collection)
            {
                Console.WriteLine(certificate.Subject);
            }
            Console.ReadKey();
        }
    }
}
