
Knowledgebase (2370)
Children categories
With Spire.Doc for .NET, developers can easily operate the word fields from code. We have already shown how to create an IF field and remove Custom Property Fields in C#. From Spire.Doc V5.8.33, our developers add a new event UpdateFields to handle the Ask Field. This article will focus on demonstrating how to update the ASK field on the word document in C#.
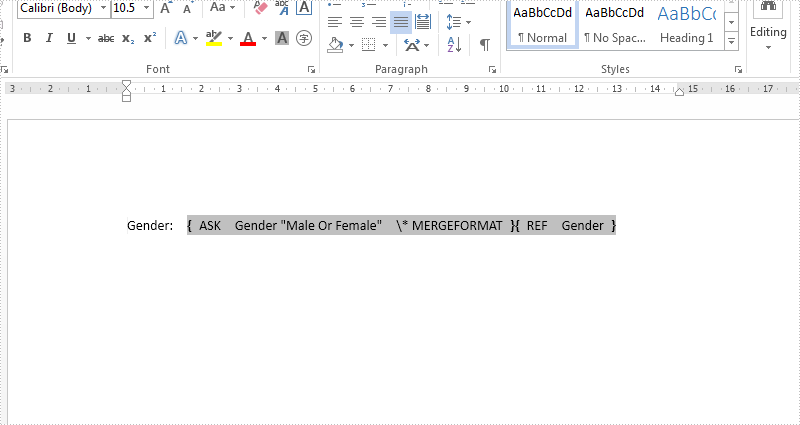
Firstly, please view the sample document with an Ask filed which will be updated later:
Step 1: Create a new instance of Spire.Doc.Document class and load the document from file.
Document doc = new Document();
doc.LoadFromFile("Sample.docx");
Step 2: Call UpdateFieldsHandler event to update the ASK field.
doc.UpdateFields += new UpdateFieldsHandler(doc_UpdateFields);
Step 3: Update the fields in the document.
doc.IsUpdateFields = true;
Step 4: Save the document to file.
doc.SaveToFile("output.docx", FileFormat.Docx);
The following doc_UpdateFields () method shows how to update the ask field:
private static void doc_UpdateFields(object sender, IFieldsEventArgs args)
 {
     if (args is AskFieldEventArgs)
     {
         AskFieldEventArgs askArgs = args as AskFieldEventArgs;

         askArgs.ResponseText = "Female";
     }
 }
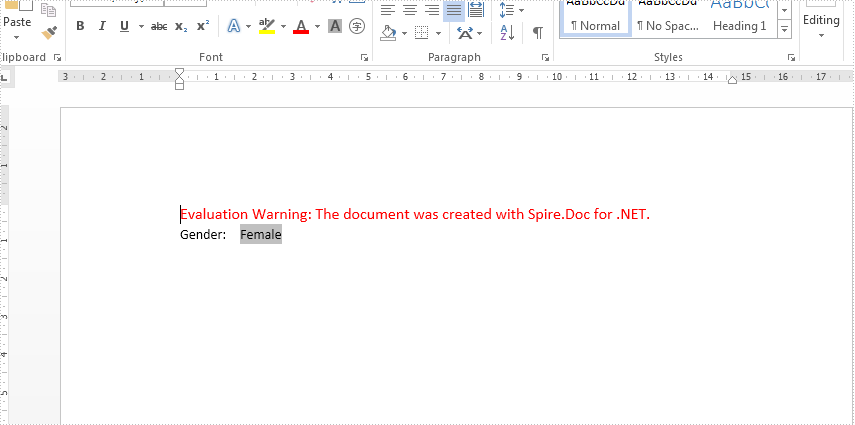
Effective screenshot after updating the Ask Field in C#:
Full codes:
using Spire.Doc;
using Spire.Doc.Fields;
namespace Askfield
{
    class Program
    {
        public void Field()
        {

            Document doc = new Document();
            doc.LoadFromFile("Sample.docx");

            doc.UpdateFields += new UpdateFieldsHandler(doc_UpdateFields);

            doc.IsUpdateFields = true;

            doc.SaveToFile("output.docx", FileFormat.Docx);

        }
        private static void doc_UpdateFields(object sender, IFieldsEventArgs args)
        {
            if (args is AskFieldEventArgs)
            {
                AskFieldEventArgs askArgs = args as AskFieldEventArgs;

                askArgs.ResponseText = "Female";
            }
        }


    }
}
How to Delete Rows and Columns from a Word Table in C#, VB.NET
2016-12-22 09:23:02 Written by AdministratorAdding rows and columns are common tasks in Word table processing, on the contrary, sometimes we also have the requirement of deleting rows or columns from a table. This article demonstrates how to delete a row and a column from an existing Word table using Spire.Doc.
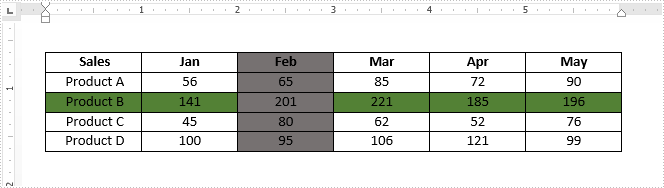
Below is the screenshot of the original table. Afterwards, we will remove the colored row and column from the table.
Detail steps:
Step 1: Instantiate a Document object and load the Word document.
Document doc = new Document();
doc.LoadFromFile("Sample.docx");
Step 2: Get the table from the document.
Table table = doc.Sections[0].Tables[0] as Table;
Step 3: Delete the third row from the table.
table.Rows.RemoveAt(2);
Step 4: Delete the third column from the table.
for (int i = 0; i < table.Rows.Count; i++)
{
    table.Rows[i].Cells.RemoveAt(2);
}
Step 5: Save the document.
doc.SaveToFile("result.docx", FileFormat.Docx2013);
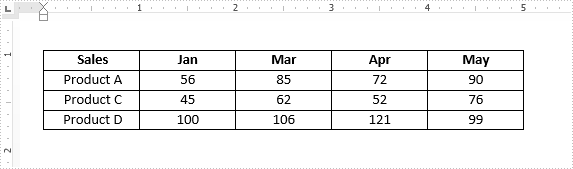
Output:
Full code:
using Spire.Doc;

namespace Delete_Rows_and_Columns
{
    class Program
    {
        static void Main(string[] args)
        {
            Document doc = new Document();
            doc.LoadFromFile("Sample.docx");
            Table table = doc.Sections[0].Tables[0] as Table;
            table.Rows.RemoveAt(2);
            for (int i = 0; i < table.Rows.Count; i++)
            {
                table.Rows[i].Cells.RemoveAt(2);
            }
            doc.SaveToFile("result.docx", FileFormat.Docx2013);
        }
    }
}
Imports Spire.Doc

Namespace Delete_Rows_and_Columns
	Class Program
		Private Shared Sub Main(args As String())
			Dim doc As New Document()
			doc.LoadFromFile("Sample.docx")
			Dim table As Table = TryCast(doc.Sections(0).Tables(0), Table)
			table.Rows.RemoveAt(2)
			For i As Integer = 0 To table.Rows.Count - 1
				table.Rows(i).Cells.RemoveAt(2)
			Next
		        doc.SaveToFile("result.docx", FileFormat.Docx2013);
		End Sub
	End Class
End Namespace
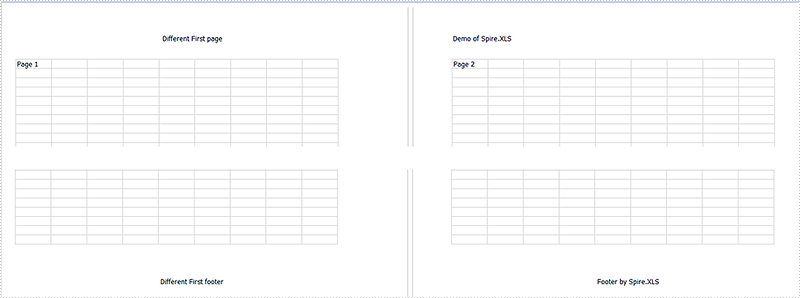
With the help of Spire.XLS, we could easily add header and footer to the excel page; we can also set different Header and Footer for Odd and Even Pages in Excel. This article will demonstrate how to add different header & footer for the first page on the excel worksheet.
Here comes to the code snippets of how to set different header and footer for the first page:
Step 1: Initialize an instance of Workbook and get the first worksheet.
Workbook workbook = new Workbook();
Worksheet sheet = workbook.Worksheets[0];
Step 2: Set the value of DifferentFirst as 1, which indicates that headers/footers for first page are different from the other pages.
Step 3: Set the header and footer for the first page.
sheet.PageSetup.FirstHeaderString = "Different First page";
sheet.PageSetup.FirstFooterString = "Different First footer";
Step 4: Set the other pages' header and footer. If we don't need to set the header and footer for other pages, we can ignore this step.
sheet.PageSetup.LeftHeader = "Demo of Spire.XLS";
sheet.PageSetup.CenterFooter = "Footer by Spire.XLS";
Step 5: Save the document to file.
workbook.SaveToFile("Result.xlsx", FileFormat.Version2010);
Effective screenshot:
Full codes:
using Spire.Xls;
namespace SetDifferentHeaderorFooter
{
    class Program
    {
        static void Main(string[] args)
        {
            Workbook workbook = new Workbook();
            Worksheet sheet = workbook.Worksheets[0];

            sheet.PageSetup.DifferentFirst = 1;

            sheet.PageSetup.FirstHeaderString = "Different First page";
            sheet.PageSetup.FirstFooterString = "Different First footer";

            sheet.PageSetup.LeftHeader = "Demo of Spire.XLS";
            sheet.PageSetup.CenterFooter = "Footer by Spire.XLS";

            workbook.SaveToFile("result.xlsx", FileFormat.Version2010);
        }
    }
}
