
Knowledgebase (2370)
Children categories
Sometimes, we need to extract the OLE Objects that are embedded in a word document. With Spire.Doc, we can easily achieve this task with a few lines of code. This article explains how to extract the embedded PDF document and Excel workbook from a word document using Spire.Doc and C#.
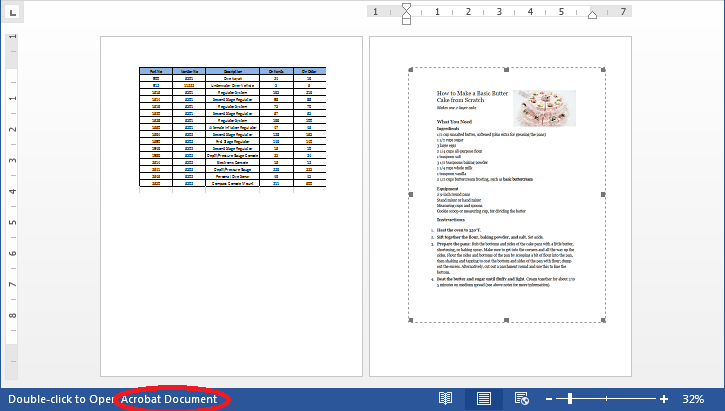
Below is the screenshot of the word document:
Detail steps:
Step 1: Instantiate a Document object and load the word document.
Document doc = new Document();
doc.LoadFromFile("OleObject.docx");
Step 2: Traverse through the word document, find the Ole Objects, then get the Object type of each Ole Object to determine if the Ole Object is PDF document or Excel workbook and write the native data of the Ole object into a new PDF document or an Excel workbook.
//Traverse through all sections of the word document
foreach (Section sec in doc.Sections)
{
    //Traverse through all Child Objects in the body of each section
    foreach (DocumentObject obj in sec.Body.ChildObjects)
    {
        if (obj is Paragraph)
        {
            Paragraph par = obj as Paragraph;
            //Traverse through all Child Objects in Paragraph
            foreach (DocumentObject o in par.ChildObjects)
            {
                //Find the Ole Objects and Extract
                if (o.DocumentObjectType == DocumentObjectType.OleObject)
                {
                    DocOleObject Ole = o as DocOleObject;
                    string s = Ole.ObjectType;
                    //If s == "AcroExch.Document.11", means it’s a PDF document
                    if (s == "AcroExch.Document.11")
                    {
                        File.WriteAllBytes("Result.pdf", Ole.NativeData);
                    }
                    //If s == " Excel.Sheet.12", means it’s an Excel workbook
                    else if (s == "Excel.Sheet.12")
                    {
                        File.WriteAllBytes("Result.xlsx", Ole.NativeData);
                    }
                }
            }
        }
    }
}
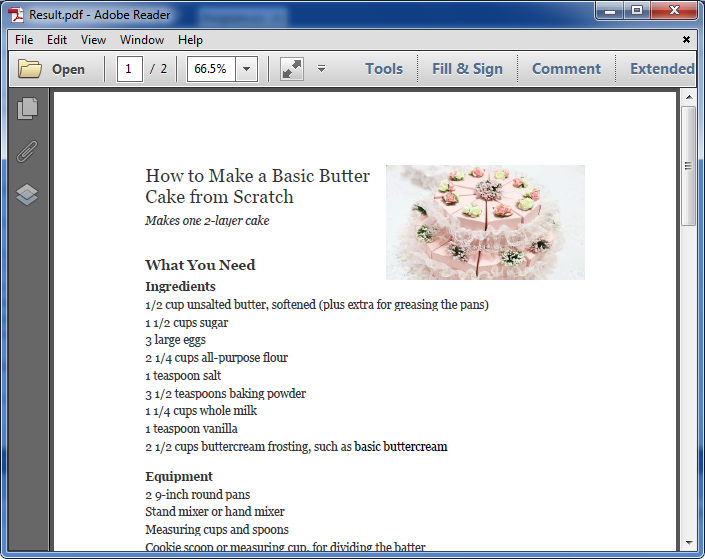
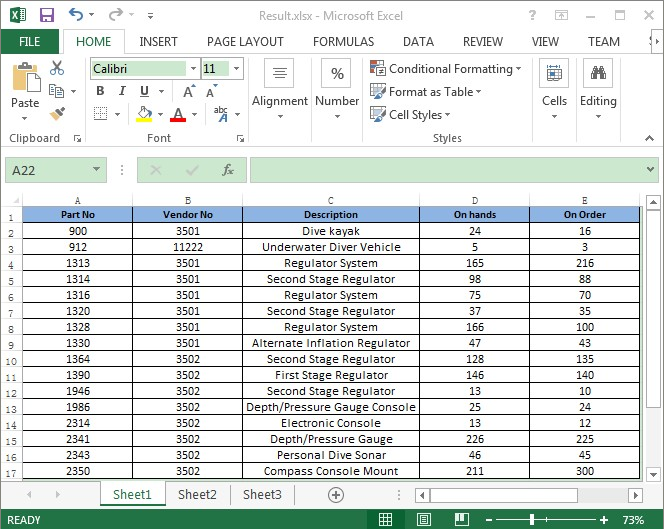
Below is the screenshot of the extracted PDF file and Excel workbook after running the code:
Full codes:
using System.IO;
using Spire.Doc;
using Spire.Doc.Documents;
using Spire.Doc.Fields;

namespace Extract_OLEObjects_from_Word
{
    class Program
    {
        static void Main(string[] args)
        {
            Document doc = new Document();
            doc.LoadFromFile("OleObject.docx");

            foreach (Section sec in doc.Sections)
            {
                foreach (DocumentObject obj in sec.Body.ChildObjects)
                {
                    if (obj is Paragraph)
                    {
                        Paragraph par = obj as Paragraph;
                        foreach (DocumentObject o in par.ChildObjects)
                        {
                            if (o.DocumentObjectType == DocumentObjectType.OleObject)
                            {
                                DocOleObject Ole = o as DocOleObject;
                                string s = Ole.ObjectType;
                                if (s == "AcroExch.Document.11")
                                {
                                    File.WriteAllBytes("Result.pdf", Ole.NativeData);
                                }
                                else if (s == "Excel.Sheet.12")
                                {
                                    File.WriteAllBytes("Result.xlsx", Ole.NativeData);
                                }
                            }
                        }
                    }
                }
            }
        }
    }
}
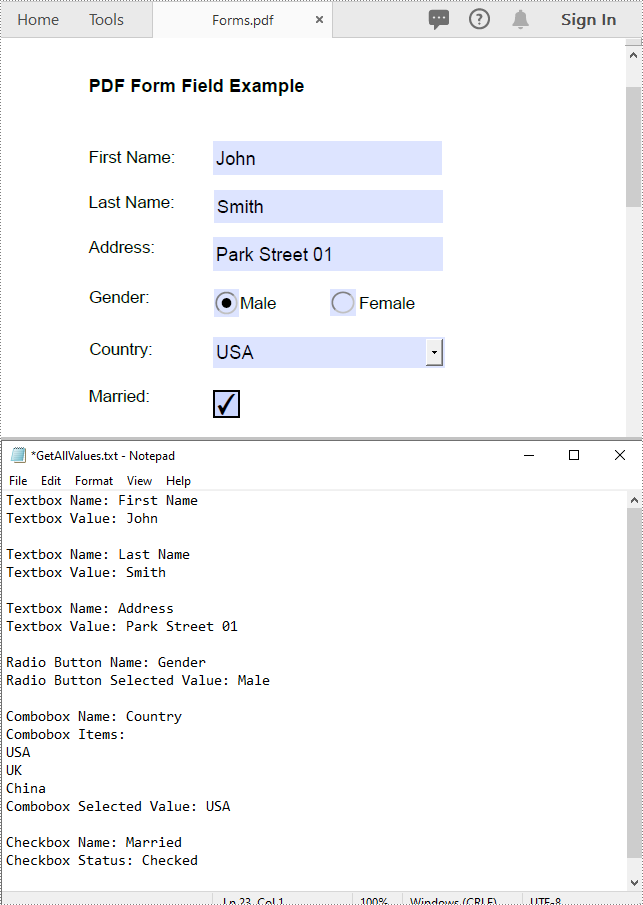
Form fields are often used in documents like surveys, registration forms, or feedback forms to collect data from users. Extracting form field values allows you to gather and consolidate the submitted data for further analysis or processing. In this article, we will demonstrate how to extract form field values from PDF documents in C# and VB.NET using Spire.PDF for .NET.
Install Spire.PDF for .NET
To begin with, you need to add the DLL files included in the Spire.PDF for.NET package as references in your .NET project. The DLLs files can be either downloaded from this link or installed via NuGet.
PM> Install-Package Spire.PDF
Extract Form Field Values from PDF in C# and VB.NET
In a PDF document, you may encounter various types of form fields, such as textboxes, checkboxes, radio buttons, list boxes, and combo boxes (drop-down lists). Before extracting form field values, it is crucial to identify the specific type of each form field. Once identified, you can utilize corresponding properties tailored for each form field type to accurately extract their values. The detailed steps are as follows:
- Initialize an instance of the PdfDocument instance.
- Load a PDF document using PdfDocument.LoadFromFile() method.
- Initialize an instance of the StringBuilder class for storing the extract form field values.
- Get the form from the document using PdfDocument.Form property.
- Iterate through all form fields in the form.
- Determine the types of the form fields, then get the names and values of the form fields using the corresponding properties and append them to the StringBuilder instance.
- Write the content of the StringBuilder instance into a text file.
- C#
- VB.NET
using Spire.Pdf;
using Spire.Pdf.Fields;
using Spire.Pdf.Widget;
using System.IO;
using System.Text;

namespace ExtractFormFieldValues
{
    internal class Program
    {
        static void Main(string[] args)
        {
            //Initialize an instance of the PdfDocument instance
            PdfDocument doc = new PdfDocument();
            //Load a PDF document
            doc.LoadFromFile(@"Forms.pdf");

            //Initialize an instance of the StringBuilder class
            StringBuilder sb = new StringBuilder();

            //Get the form from the document
            PdfFormWidget formWidget = doc.Form as PdfFormWidget;

            //Iterate through all fields in the form
            for (int i = 0; i < formWidget.FieldsWidget.List.Count; i++)
            {
                PdfField field = formWidget.FieldsWidget.List[i] as PdfField;

                //Get the name and value of textbox field
                if (field is PdfTextBoxFieldWidget)
                {
                    PdfTextBoxFieldWidget textBoxField = field as PdfTextBoxFieldWidget;
                    string name = textBoxField.Name;
                    string value = textBoxField.Text;
                    sb.Append("Textbox Name: " + name + "\r\n");
                    sb.Append("Textbox Value: " + value + "\r\n");
                }

                //Get the name, items and selected item of list box field
                if (field is PdfListBoxWidgetFieldWidget)
                {
                    PdfListBoxWidgetFieldWidget listBoxField = field as PdfListBoxWidgetFieldWidget;
                    string name = listBoxField.Name;
                    sb.Append("Listbox Name: " + name + "\r\n");
                    sb.Append("Listbox Items: \r\n");

                    PdfListWidgetItemCollection items = listBoxField.Values;

                    foreach (PdfListWidgetItem item in items)
                    {
                        sb.Append(item.Value + "\r\n");
                    }
                    string selectedValue = listBoxField.SelectedValue;
                    sb.Append("Listbox Selected Value: " + selectedValue + "\r\n");
                }

                //Get the name, items and selected item of combo box field
                if (field is PdfComboBoxWidgetFieldWidget)
                {
                    PdfComboBoxWidgetFieldWidget comBoxField = field as PdfComboBoxWidgetFieldWidget;
                    string name = comBoxField.Name;
                    sb.Append("Combobox Name: " + name + "\r\n");
                    sb.Append("Combobox Items: \r\n");
                    PdfListWidgetItemCollection items = comBoxField.Values;

                    foreach (PdfListWidgetItem item in items)
                    {
                        sb.Append(item.Value + "\r\n");
                    }
                    string selectedValue = comBoxField.SelectedValue;
                    sb.Append("Combobox Selected Value: " + selectedValue + "\r\n");

                }

                //Get the name and selected item of radio button field
                if (field is PdfRadioButtonListFieldWidget)
                {
                    PdfRadioButtonListFieldWidget radioBtnField = field as PdfRadioButtonListFieldWidget;
                    string name = radioBtnField.Name;
                    sb.Append("Radio Button Name: " + name + "\r\n");
                    string selectedValue = radioBtnField.SelectedValue;
                    sb.Append("Radio Button Selected Value: " + selectedValue + "\r\n");
                }

                //Get the name and status of checkbox field
                if (field is PdfCheckBoxWidgetFieldWidget)
                {
                    PdfCheckBoxWidgetFieldWidget checkBoxField = field as PdfCheckBoxWidgetFieldWidget;
                    string name = checkBoxField.Name;
                    sb.Append("Checkbox Name: " + name + "\r\n");
                    bool status = checkBoxField.Checked;
                    if (status)
                    {
                        sb.Append("Checkbox Status: Checked \r\n");
                    }
                    else
                    {
                        sb.Append("Checkbox Status: Unchecked \r\n");
                    }
                }

                sb.Append("\n");
            }

            //Write the content of the StringBuilder into a text file
            File.WriteAllText("GetAllValues.txt", sb.ToString());
            doc.Dispose();
        }
    }
}
Apply for a Temporary License
If you'd like to remove the evaluation message from the generated documents, or to get rid of the function limitations, please request a 30-day trial license for yourself.
An image watermark is usually a logo or sign that appears on the background of digital documents, indicating the copyright owner of the content. Watermarking your PDF document with an image can prevent your data from being reused or modified. This article demonstrates how to add an image watermark to PDF in C# and VB.NET using Spire.PDF for .NET.
Install Spire.PDF for .NET
To begin with, you need to add the DLL files included in the Spire.PDF for.NET package as references in your .NET project. The DLLs files can be either downloaded from this link or installed via NuGet.
- Package Manager
PM> Install-Package Spire.PDF
Add an Image Watermark to PDF
The following are the main steps to add an image watermark to a PDF document.
- Create a PdfDocument object, and load a sample PDF file using PdfDocument.LoadFromFile() method.
- Load an image file using Image.FromFile() method.
- Loop through the pages in the document, and get the specific page through PdfDocument.Pages[] property.
- Set the image as background/watermark image of the current page through PdfPageBase.BackgroundImage property. Set the image position and size through PdfPageBase.BackgroundRegion property.
- Save the document to a different PDF file using PdfDocument.SaveToFile() method.
- C#
- VB.NET
using Spire.Pdf;
using System.Drawing;

namespace AddImageWatermark
{
    class Program
    {
        static void Main(string[] args)
        {
            //Create a PdfDocument object
            PdfDocument document = new PdfDocument();

            //Load a sample PDF document
            document.LoadFromFile(@"C:\Users\Administrator\Desktop\sample.pdf");

            //Load an image
            Image image = Image.FromFile(@"C:\Users\Administrator\Desktop\logo.png");

            //Get the image width and height
            int imgWidth = image.Width;
            int imgHeight = image.Height;

            //Loop through the pages
            for (int i = 0; i < document.Pages.Count; i++)
            {
                //Get the page width and height
                float pageWidth = document.Pages[i].ActualSize.Width;
                float pageHeight = document.Pages[i].ActualSize.Height;

                //Set the background opacity
                document.Pages[i].BackgroudOpacity = 0.3f;

                //Set the background image of current page
                document.Pages[i].BackgroundImage = image;

                //Position the background image at the center of the page
                Rectangle rect = new Rectangle((int)(pageWidth - imgWidth) / 2, (int)(pageHeight - imgHeight) / 2, imgWidth, imgHeight);
                document.Pages[i].BackgroundRegion = rect;
            }

            //Save the document to file
            document.SaveToFile("AddImageWatermark.pdf");
            document.Close();
        }
    }
}
Imports Spire.Pdf
Imports System.Drawing

Namespace AddImageWatermark
    Class Program
        Shared  Sub Main(ByVal args() As String)
            'Create a PdfDocument object
            Dim document As PdfDocument =  New PdfDocument()

            'Load a sample PDF document
            document.LoadFromFile("C:\Users\Administrator\Desktop\sample.pdf")

            'Load an image
            Dim image As Image =  Image.FromFile("C:\Users\Administrator\Desktop\logo.png")

            'Get the image width and height
            Dim imgWidth As Integer =  image.Width
            Dim imgHeight As Integer =  image.Height

            'Loop through the pages
            Dim i As Integer
            For  i = 0 To  document.Pages.Count- 1  Step  i + 1
                'Get the page width and height
                Dim pageWidth As single =  document.Pages(i).ActualSize.Width
                Dim pageHeight As single =  document.Pages(i).ActualSize.Height

                'Set the background opacity
                document.Pages(i).BackgroudOpacity = 0.3f

                'Set the background image of current page
                document.Pages(i).BackgroundImage = image

                Dim rect As Rectangle = New Rectangle(CInt((pageWidth - imgWidth) / 2), CInt((pageHeight - imgHeight) / 2), imgWidth, imgHeight)
                document.Pages(i).BackgroundRegion = rect
            Next

            'Save the document to file
            document.SaveToFile("AddImageWatermark.pdf")
            document.Close()
        End Sub
    End Class
End Namespace
Apply for a Temporary License
If you'd like to remove the evaluation message from the generated documents, or to get rid of the function limitations, please request a 30-day trial license for yourself.
