
Knowledgebase (2370)
Children categories
Spire.Doc for Python is a robust library that enables you to read and write Microsoft Word documents using Python. With Spire.Doc, you can create, read, edit, and convert both DOC and DOCX file formats without requiring Microsoft Word to be installed on your system.
This article demonstrates how to install Spire.Doc for Python on Mac.
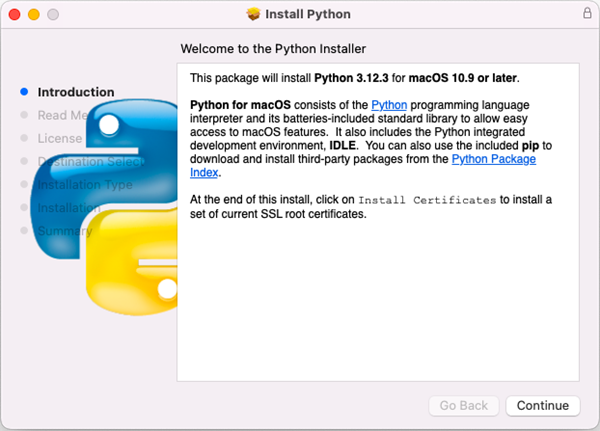
Step 1
Download the most recent version of Python for macOS and install it on your Mac. If you have already completed this step, proceed directly to step 2.
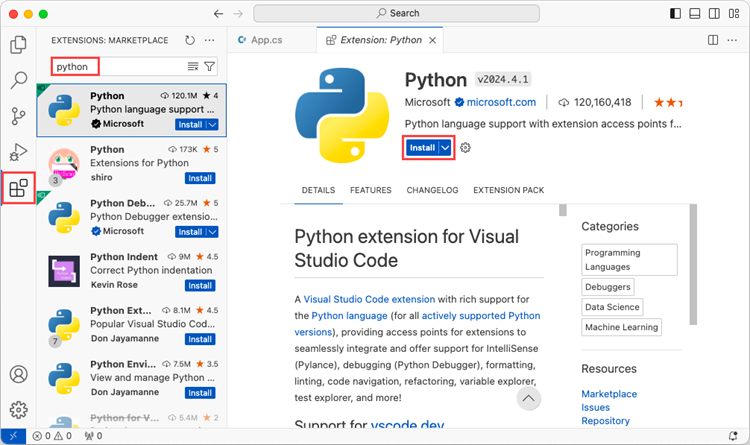
Step 2
Open VS Code and search for 'Python' in the Extensions panel. Click 'Install' to add support for Python in your VS Code.
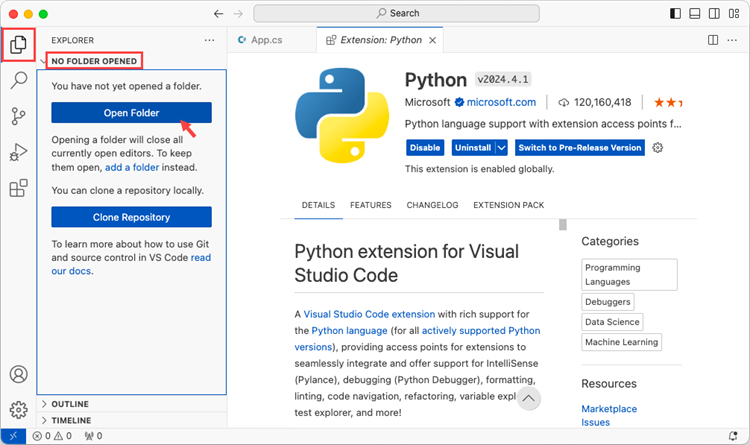
Step 3
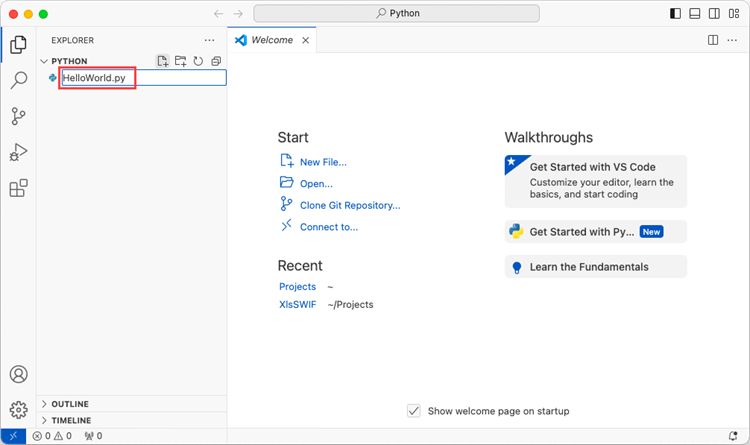
Click 'Explorer' > 'NO FOLRDER OPENED' > 'Open Folder'.
Choose an existing folder as the workspace, or you can create a new folder and then open it.
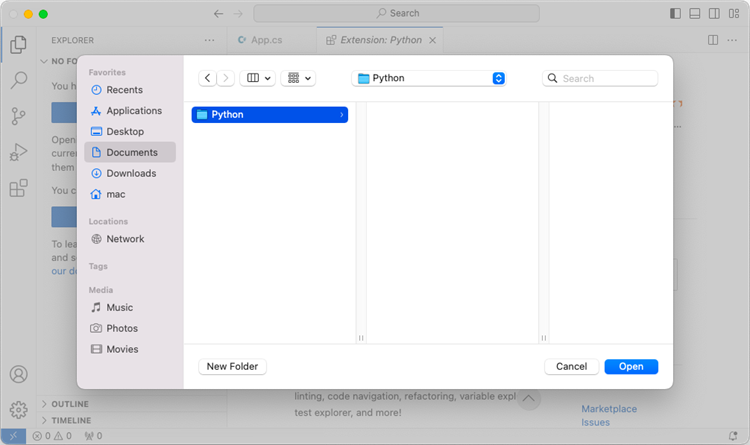
Add a .py file to the folder you just opened and name it whatever you want (in this case, HelloWorld.py).
Step 4
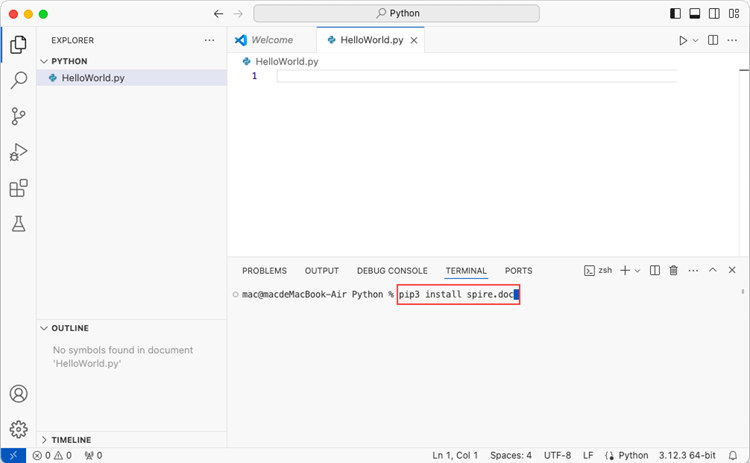
Use the keyboard shortcut Ctrl + ' to open the Terminal. Then, install Spire.Doc for Python by entering the following command line in the terminal.
pip3 install spire.doc
Note that pip3 is a package installer specifically designed for Python 3.x versions, while pip is a package installer for Python 2.x versions. If you are working with Python 2.x, you can use the pip command.
Step 5
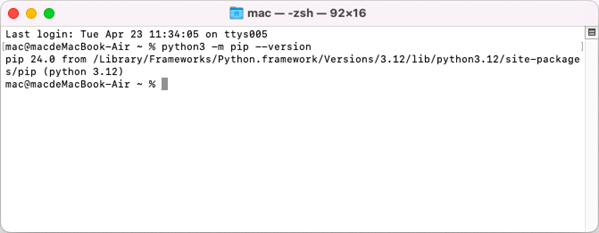
Open a Terminal window on your Mac, and type the following command to obtain the installation path of Python on your system.
python3 -m pip --version
Step 6
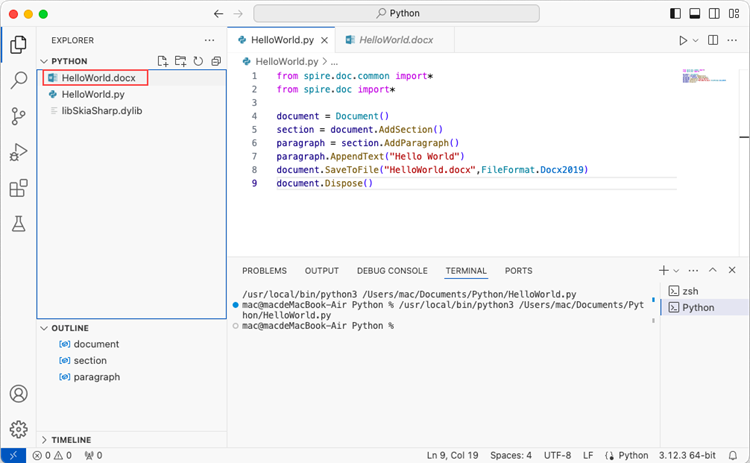
Add the following code snippet to the 'HelloWorld.py' file.
- Python
from spire.doc.common import *
from spire.doc import *

document = Document()
section = document.AddSection()
paragraph = section.AddParagraph()
paragraph.AppendText("Hello World")
document.SaveToFile("HelloWorld.docx", FileFormat.Docx2019)
document.Dispose()
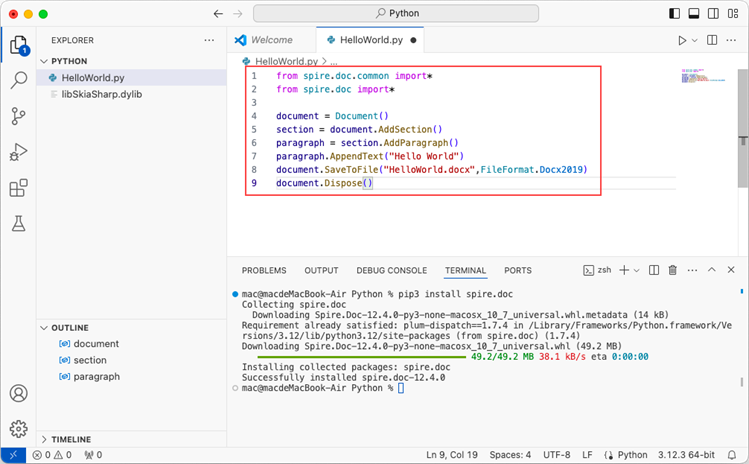
After executing the Python file, you will find the resulting Word document in the 'EXPLORER' panel.
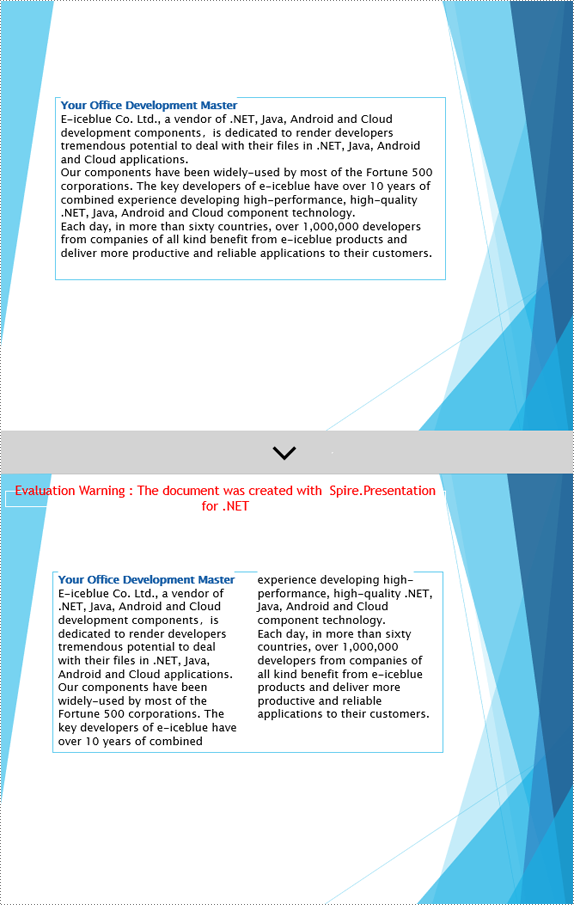
Displaying PowerPoint text box content in multiple columns significantly enhances the presentation of information and audience comprehension. It improves readability by shortening line lengths, making dense text more digestible; optimizes visual layout for an aesthetically pleasing and professional look; and utilizes space efficiently to ensure that information is abundant yet uncluttered. In this article, we will introduce how to add or remove columns in a PowerPoint text box using Spire.Presentation for .NET in C# projects.
Install Spire.Presentation for .NET
To begin with, you need to add the DLL files included in the Spire.Presentation for.NET package as references in your .NET project. The DLL files can be either downloaded from this link or installed via NuGet.
PM> Install-Package Spire.Presentation
Add Columns to a PowerPoint Text Box with C#
Spire.Presentation provides the Shape.TextFrame.ColumnCount property to set the number of columns for content and the Shape.TextFrame.ColumnSpacing property to set the spacing between columns. Below are the detailed steps:
- Create a Presentation object.
- Load a PowerPoint document using the Presentation.LoadFromFile() method.
- Retrieve the first slide using Presentation.Slides[0].
- Obtain the first text box object as IAutoShape.
- Use the Shape.TextFrame.ColumnCount property to set the number of columns for the text box content.
- Use the Shape.TextFrame.ColumnSpacing property to set the spacing between columns.
- Save the document to a specified path using the Presentation.SaveToFile() method.
- C#
using Spire.Presentation;

namespace Spire.PresentationDemo
{
    internal class Program
    {
        static void Main(string[] args)
        {
            // Create a Presentation object
            Presentation presentation = new Presentation();

            // Load the PPTX file
            presentation.LoadFromFile("Sample1.pptx");

            // Get the first slide
            ISlide slide = presentation.Slides[0];

            // Check if the first shape on the slide is of type IAutoShape
            if (slide.Shapes[0] is IAutoShape)
            {
                // Cast the first shape to an IAutoShape object
                IAutoShape shape = (IAutoShape)slide.Shapes[0];

                // Set the number of columns in the shape's text frame to 2
                shape.TextFrame.ColumnCount = 2;

                // Set the column spacing in the shape's text frame to 25 pt
                shape.TextFrame.ColumnSpacing = 25f;
            }

            // Save the modified presentation as a new PPTX file
            presentation.SaveToFile("SetColumns.pptx", Spire.Presentation.FileFormat.Pptx2016);

            // Dispose of the resources used by the Presentation object
            presentation.Dispose();
        }
    }
}
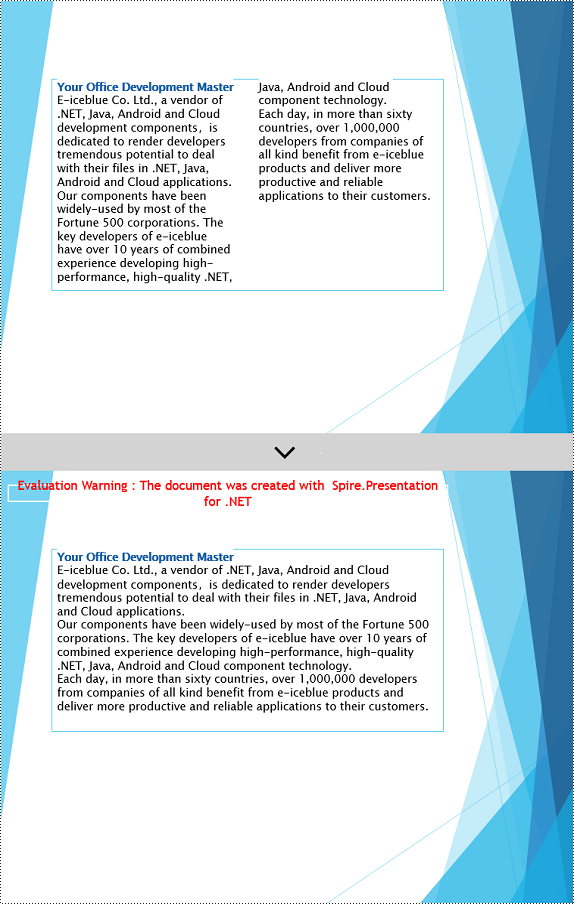
Remove Columns from a PowerPoint Text Box with C#
To remove the columns from the Powerpoint text box, simply set the Shape.TextFrame.ColumnCount property to 1. Below are the detailed steps:
- Create a Presentation object.
- Load a PowerPoint document using the Presentation.LoadFromFile() method.
- Retrieve a slide using the Presentation.Slides[index] property.
- Obtain the text box object as IAutoShape.
- Set Shape.TextFrame.ColumnCount = 1 to remove the columns.
- Save the document to a specified path using the Presentation.SaveToFile() method.
- C#
using Spire.Presentation;

namespace SpirePresentationDemo
{
    internal class Program
    {
        static void Main(string[] args)
        {
            // Create a Presentation object
            Presentation presentation = new Presentation();

            // Load the PPTX file
            presentation.LoadFromFile("Sample2.pptx");

            // Get the first slide
            ISlide slide = presentation.Slides[0];

            // Check if the first shape on the slide is of type IAutoShape
            if (slide.Shapes[0] is IAutoShape)
            {
                // Cast the first shape to an IAutoShape object
                IAutoShape shape = (IAutoShape)slide.Shapes[0];

                // Set the column count of the shape's text frame to 1
                shape.TextFrame.ColumnCount = 1;
            }

            // Save the modified presentation as a new PPTX file
            presentation.SaveToFile("RemoveColumns.pptx", Spire.Presentation.FileFormat.Pptx2016);

            // Dispose of the resources used by the Presentation object
            presentation.Dispose();
        }
    }
}
Apply for a Temporary License
If you'd like to remove the evaluation message from the generated documents, or to get rid of the function limitations, please request a 30-day trial license for yourself.
Section breaks in Word allow users to divide a document into sections, each with unique formatting options. This is especially useful when working with long documents where you want to apply different layouts, headers, footers, margins or page orientations within the same document. In this article, you will learn how to insert or remove section breaks in Word in Python using Spire.Doc for Python.
Install Spire.Doc for Python
This scenario requires Spire.Doc for Python and plum-dispatch v1.7.4. They can be easily installed in your Windows through the following pip commands.
pip install Spire.Doc
If you are unsure how to install, please refer to this tutorial: How to Install Spire.Doc for Python on Windows
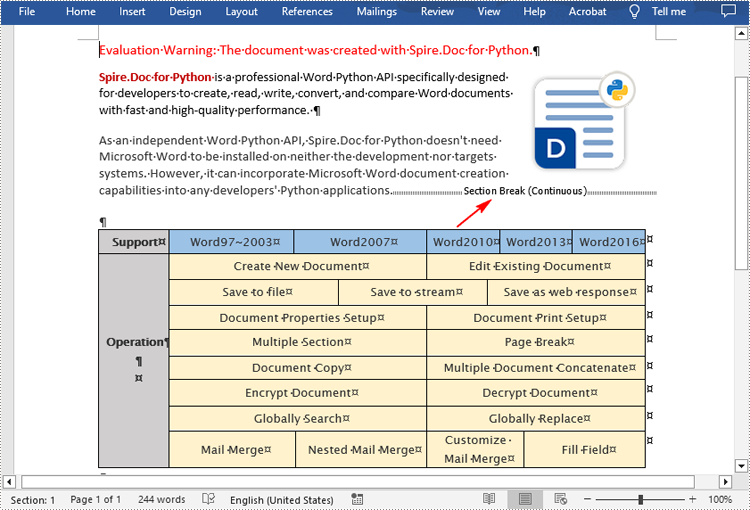
Insert Section Breaks in Word in Python
Spire.Doc for Python provides the Paragraph.InsertSectionBreak(breakType: SectionBreakType) method to insert a specified type of section break to a paragraph. The following table provides an overview of the supported section break types, along with their corresponding Enums and descriptions:
| Section Break | Enum | Description |
| New page | SectionBreakType.New_Page | Start the new section on a new page. |
| Continuous | SectionBreakType.No_Break | Start the new section on the same page, allowing for continuous content flow. |
| Odd page | SectionBreakType.Odd_Page | Start the new section on the next odd-numbered page. |
| Even page | SectionBreakType.Even_Page | Start the new section on the next even-numbered page. |
| New column | SectionBreakType.New_Column | Start the new section in the next column if columns are enabled. |
The following are the detailed steps to insert a continuous section break:
- Create a Document instance.
- Load a Word document using Document.LoadFromFile() method.
- Get a specified section using Document.Sections[] property.
- Get a specified paragraph of the section using Section.Paragraphs[] property.
- Add a section break to the end of the paragraph using Paragraph.InsertSectionBreak() method.
- Save the result document using Document.SaveToFile() method.
- Python
from spire.doc import *
from spire.doc.common import *

inputFile = "sample.docx"
outputFile = "InsertSectionBreak.docx"

# Create a Document instance
document = Document()

# Load a Word document
document.LoadFromFile(inputFile)

# Get a specific section
section = document.Sections.get_Item(0)

# Get a specific paragraph
paragraph = section.Paragraphs.get_Item(0)

# Insert a continuous section break
paragraph.InsertSectionBreak(SectionBreakType.NoBreak)

# Save the result document
document.SaveToFile(outputFile, FileFormat.Docx2016)
document.Close()
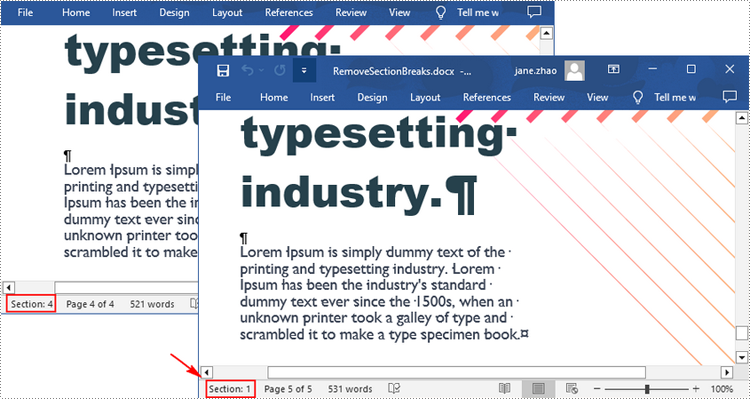
Remove Section Breaks in Word in Python
To delete all sections breaks in a Word document, we need to access the first section in the document, then copy the contents of the other sections to the first section and delete them. The following are the detailed steps:
- Create a Document instance.
- Load a Word document using Document.LoadFromFile() method.
- Get the first section using Document.Sections[] property.
- Iterate through other sections in the document.
- Get the second section, and then iterate through to get its child objects.
- Clone the child objects of the second section and add them to the first section using Section.Body.ChildObjects.Add() method.
- Delete the second section using Document.Sections.Remove() method.
- Repeat the process to copy and delete the remaining sections.
- Save the result document using Document.SaveToFile() method.
- Python
from spire.doc import *
from spire.doc.common import *

inputFile = "Report.docx"
outputFile = "RemoveSectionBreaks.docx"

# Create a Document instance
document = Document()

# Load a Word document
document.LoadFromFile(inputFile)

# Get a specific section
section = document.Sections.get_Item(0)

# Iterate through other sections in the document
for i in range(document.Sections.Count - 1):
    # Get the second section in the document
    section = document.Sections[1]

    # Iterate through all child objects of the second section
    for j in range(section.Body.ChildObjects.Count):
        # Get the child objects
        obj = section.Body.ChildObjects.get_Item(j)
        # Clone the child objects to the first section
        sec.Body.ChildObjects.Add(obj.Clone())
        # Remove the second section
        document.Sections.Remove(section)

# Save the result document
document.SaveToFile(outputFile, FileFormat.Docx2016)
document.Close()
Apply for a Temporary License
If you'd like to remove the evaluation message from the generated documents, or to get rid of the function limitations, please request a 30-day trial license for yourself.
