
Knowledgebase (2370)
Children categories
With the increasing popularity of team collaboration, the track changes function in Word documents has become the cornerstone of version control and content review. However, for developers who pursue automation and efficiency, how to flexibly extract these revision information from Word documents remains a significant challenge. This article will introduce you to how to use Spire.Doc for Python to obtain revision information in Word documents.
Install Spire.Doc for Python
This scenario requires Spire.Doc for Python and plum-dispatch v1.7.4. They can be easily installed in your Windows through the following pip command.
pip install Spire.Doc
If you are unsure how to install, please refer to this tutorial: How to Install Spire.Doc for Python on Windows
Get Revisions of Word Document in Python
Spire.Doc for Python provides the IsInsertRevision and DeleteRevision properties to support determining whether an element in a Word document is an insertion revision or a deletion revision. Here are the detailed steps:
- Create an instance of the Document class and load the Word document that contains revisions.
- Initialize lists to collect insertion and deletion revision information.
- Iterate through the sections of the document and their body elements.
- Obtain the paragraphs in the body and use the IsInsertRevision property to determine if the paragraph is an insertion revision.
- Get the type, author, and associated text of the insertion revision.
- Use the IsDeleteRevision property to determine if the paragraph is a deletion revision, and obtain its revision type, author, and associated text.
- Iterate through the child elements of the paragraph, similarly checking if the TextRange is an insertion or deletion revision, and retrieve the revision type, author, and associated text.
- Define a WriteAllText function to save the insertion and deletion revision information to TXT documents.
- Python
from spire.doc import *
# Function to write text to a file
def WriteAllText(fname: str, text: str):
with open(fname, "w", encoding='utf-8') as fp:
fp.write(text)
# Input and output file names
inputFile = "sample.docx"
outputFile1 = "InsertRevision.txt"
outputFile2 = "DeleteRevision.txt"
# Create a Document object
document = Document()
# Load the Word document
document.LoadFromFile(inputFile)
# Initialize lists to store insert and delete revisions
insert_revisions = []
delete_revisions = []
# Iterate through sections in the document
for k in range(document.Sections.Count):
sec = document.Sections.get_Item(k)
# Iterate through body elements in the section
for m in range(sec.Body.ChildObjects.Count):
# Check if the item is a Paragraph
docItem = sec.Body.ChildObjects.get_Item(m)
if isinstance(docItem, Paragraph):
para = docItem
para.AppendField("",FieldType.FieldDocVariable)
# Check if the paragraph is an insertion revision
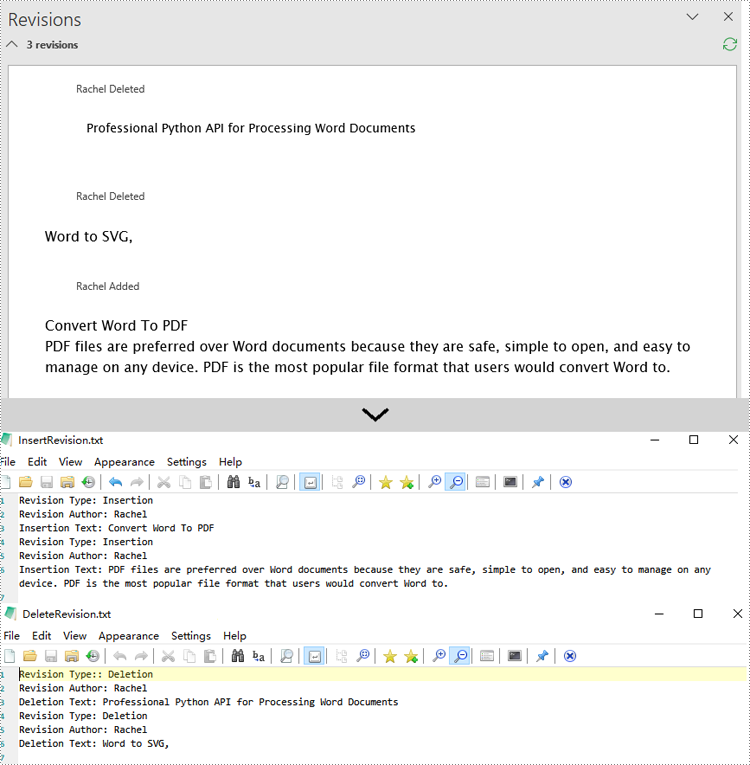
if para.IsInsertRevision:
insRevison = para.InsertRevision
insType = insRevison.Type
insAuthor = insRevison.Author
# Add insertion revision details to the list
insert_revisions.append(f"Revision Type: {insType.name}\n")
insert_revisions.append(f"Revision Author: {insAuthor}\n")
insert_revisions.append(f"Insertion Text: {para.Text}\n")
# Check if the paragraph is a deletion revision
elif para.IsDeleteRevision:
delRevison = para.DeleteRevision
delType = delRevison.Type
delAuthor = delRevison.Author
# Add deletion revision details to the list
delete_revisions.append(f"Revision Type:: {delType.name}\n")
delete_revisions.append(f"Revision Author: {delAuthor}\n")
delete_revisions.append(f"Deletion Text: {para.Text}\n")
else:
# Iterate through all child objects of Paragraph
for j in range(para.ChildObjects.Count):
obj = para.ChildObjects.get_Item(j)
# Check if the current object is an instance of TextRange
if isinstance(obj, TextRange):
textRange = obj
# Check if the textrange is an insertion revision
if textRange.IsInsertRevision:
insRevison = textRange.InsertRevision
insType = insRevison.Type
insAuthor = insRevison.Author
# Add insertion revision details to the list
insert_revisions.append(f"Revision Type: {insType.name}\n")
insert_revisions.append(f"Revision Author: {insAuthor}\n")
insert_revisions.append(f"Insertion Text: {textRange.Text}\n")
# Check if the textrange is a deletion revision
elif textRange.IsDeleteRevision:
delRevison = textRange.DeleteRevision
delType = delRevison.Type
delAuthor = delRevison.Author
# Add deletion revision details to the list
delete_revisions.append(f"Revision Type: {delType.name}\n")
delete_revisions.append(f"Revision Author: {delAuthor}\n")
delete_revisions.append(f"Deletion Text: {textRange.Text}\n")
# Write all the insertion revision details to the 'outputFile1' file
WriteAllText(outputFile1, ''.join(insert_revisions))
# Write all the deletion revision details to the 'outputFile2' file
WriteAllText(outputFile2, ''.join(delete_revisions))
# Dispose the document
document.Dispose()
Apply for a Temporary License
If you'd like to remove the evaluation message from the generated documents, or to get rid of the function limitations, please request a 30-day trial license for yourself.
Bookmarks in PDF function as interactive table of contents, allowing users to quickly jump to specific sections within the document. Extracting these bookmarks not only provides a comprehensive overview of the document's structure, but also reveals its core parts or key information, providing users with a streamlined and intuitive method of accessing content. In this article, you will learn how to extract PDF bookmarks in Java using Spire.PDF for Java.
Install Spire.PDF for Java
First of all, you're required to add the Spire.Pdf.jar file as a dependency in your Java program. The JAR file can be downloaded from this link. If you use Maven, you can easily import the JAR file in your application by adding the following code to your project's pom.xml file.
<repositories>
    <repository>
        <id>com.e-iceblue</id>
        <name>e-iceblue</name>
        <url>https://repo.e-iceblue.com/nexus/content/groups/public/</url>
    </repository>
</repositories>
<dependencies>
    <dependency>
        <groupId>e-iceblue</groupId>
        <artifactId>spire.pdf</artifactId>
        <version>12.7.0</version>
    </dependency>
</dependencies>
Extract Bookmarks from PDF in Java
With Spire.PDF for Java, you can create custom methods GetBookmarks() and GetChildBookmark() to get the title and text styles of both parent and child bookmarks in a PDF file, then export them to a TXT file. The following are the detailed steps.
- Create a PdfDocument instance.
- Load a PDF file using PdfDocument.loadFromFile() method.
- Get bookmarks collection in the PDF file using PdfDocument.getBookmarks() method.
- Call custom methods GetBookmarks() and GetChildBookmark() to get the text content and text style of parent and child bookmarks.
- Export the extracted PDF bookmarks to a TXT file.
- Java
import com.spire.pdf.*;
import com.spire.pdf.bookmarks.*;
import java.io.*;
public class getAllPdfBookmarks {
public static void main(String[] args) throws IOException{
//Create a PdfDocument instance
PdfDocument pdf = new PdfDocument();
//Load a PDF file
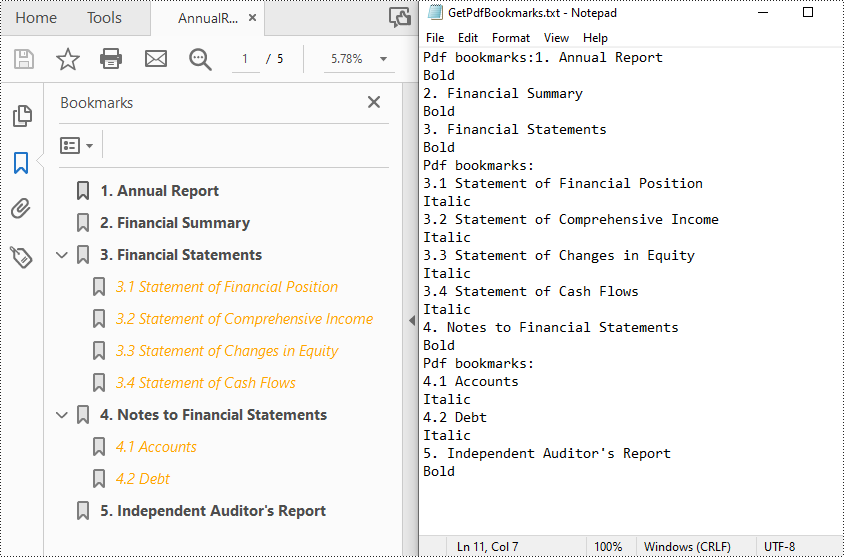
pdf.loadFromFile("AnnualReport.pdf");
//Get bookmarks collections of the PDF file
PdfBookmarkCollection bookmarks = pdf.getBookmarks();
//Get the contents of bookmarks and save them to a TXT file
GetBookmarks(bookmarks, "GetPdfBookmarks.txt");
}
private static void GetBookmarks(PdfBookmarkCollection bookmarks, String result) throws IOException {
//create a StringBuilder instance
StringBuilder content = new StringBuilder();
//Get parent bookmarks information
if (bookmarks.getCount() > 0) {
content.append("Pdf bookmarks:");
for (int i = 0; i < bookmarks.getCount(); i++) {
PdfBookmark parentBookmark = bookmarks.get(i);
content.append(parentBookmark.getTitle() + "\r\n");
//Get the text style
String textStyle = parentBookmark.getDisplayStyle().toString();
content.append(textStyle + "\r\n");
GetChildBookmark(parentBookmark, content);
}
}
writeStringToTxt(content.toString(),result);
}
private static void GetChildBookmark(PdfBookmark parentBookmark, StringBuilder content)
{
//Get child bookmarks information
if (parentBookmark.getCount() > 0)
{
content.append("Pdf bookmarks:" + "\r\n");
for (int i = 0; i < parentBookmark.getCount(); i++)
{
PdfBookmark childBookmark = parentBookmark.get(i);
content.append(childBookmark.getTitle() +"\r\n");
//Get the text style
String textStyle = childBookmark.getDisplayStyle().toString();
content.append(textStyle +"\r\n");
GetChildBookmark(childBookmark, content);
}
}
}
public static void writeStringToTxt(String content, String txtFileName) throws IOException {
FileWriter fWriter = new FileWriter(txtFileName, true);
try {
fWriter.write(content);
} catch (IOException ex) {
ex.printStackTrace();
} finally {
try {
fWriter.flush();
fWriter.close();
} catch (IOException ex) {
ex.printStackTrace();
}
}
}
}
Apply for a Temporary License
If you'd like to remove the evaluation message from the generated documents, or to get rid of the function limitations, please request a 30-day trial license for yourself.
Excel files often contain a wealth of comments that can provide valuable context and insights. These comments may include important text notes, instructions, or even embedded images that can be incredibly useful for various data analysis and reporting tasks. Extracting this information from the comments can be a valuable step in unlocking the full potential of the data. In this article, we will demonstrate how to effectively extract text and images from comments in Excel files in Python using Spire.XLS for Python.
Install Spire.XLS for Python
This scenario requires Spire.XLS for Python and plum-dispatch v1.7.4. They can be easily installed in your Windows through the following pip command.
pip install Spire.XLS
If you are unsure how to install, please refer to this tutorial: How to Install Spire.XLS for Python on Windows
Extract Text from Comments in Excel in Python
You can get the text of comments using the ExcelCommentObject.Text property. The detailed steps are as follows.
- Create an object of the Workbook class.
- Load an Excel file using Workbook.LoadFromFile() method.
- Create a list to store the extracted comment text.
- Get the comments in the worksheet using Worksheet.Comments property.
- Traverse through the comments.
- Get the text of each comment using ExcelCommentObject.Text property and append it to the list.
- Save the content of the list to a text file.
- Python
from spire.xls import *
from spire.xls.common import *
# Create a Workbook object
workbook = Workbook()
# Load an Excel file
workbook.LoadFromFile("Comments.xlsx")
# Get the first worksheet
worksheet = workbook.Worksheets[0]
# Create a list to store the comment text
comment_text = []
# Get all the comments in the worksheet
comments = worksheet.Comments
# Extract the text from each comment and add it to the list
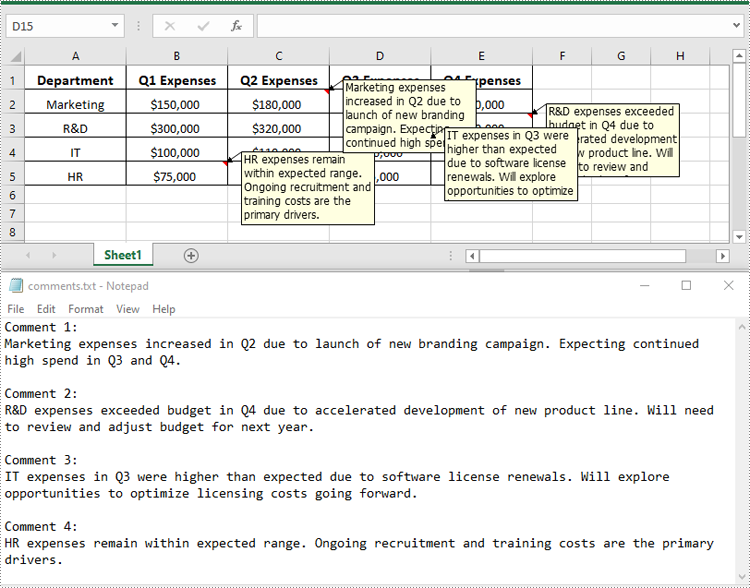
for i, comment in enumerate(comments, start=1):
comment_text.append(f"Comment {i}:")
text = comment.Text
comment_text.append(text)
comment_text.append("")
# Write the comment text to a file
with open("comments.txt", "w", encoding="utf-8") as file:
file.write("\n".join(comment_text))
Extract Images from Comments in Excel in Python
To get the images embedded in Excel comments, you can use the ExcelCommentObject.Fill.Picture property. The detailed steps are as follows.
- Create an object of the Workbook class.
- Load an Excel file using Workbook.LoadFromFile() method.
- Get a specific comment in the worksheet using Worksheet.Comments[index] property.
- Get the embedded image in the comment using ExcelCommentObject.Fill.Picture property.
- Save the image to an image file.
- Python
from spire.xls import *
from spire.xls.common import *
# Create a Workbook object
workbook = Workbook()
# Load an Excel file
workbook.LoadFromFile("ImageComment.xlsx")
# Get the first worksheet
worksheet = workbook.Worksheets[0]
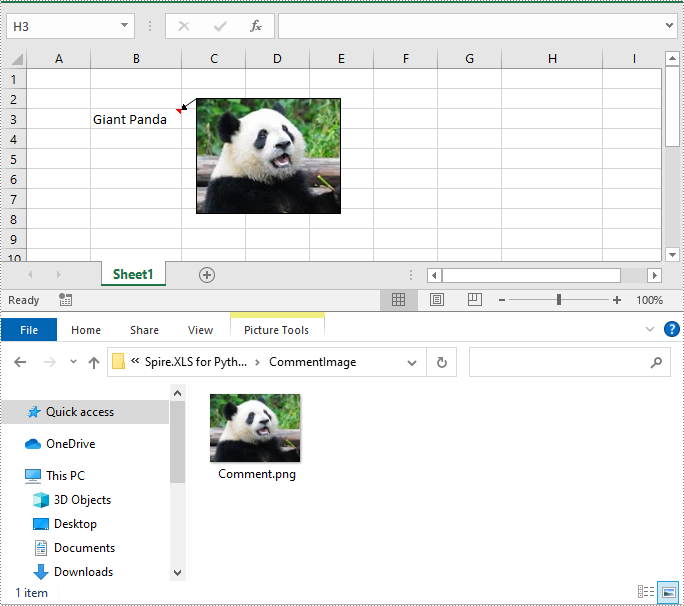
# Get a specific comment in the worksheet
comment = worksheet.Comments[0]
# Extract the image from the comment and save it to an image file
image = comment.Fill.Picture
image.Save("CommentImage/Comment.png")
Apply for a Temporary License
If you'd like to remove the evaluation message from the generated documents, or to get rid of the function limitations, please request a 30-day trial license for yourself.
