
Knowledgebase (2370)
Children categories
Adding gutters on Word document pages can assist users in better page layout and design, especially when preparing documents for printing or creating books that require gutter. Gutter can indicate the gutter position on the page, helping users to design with appropriate blank areas to avoid text or images being cut off. By setting gutter, users can have better control over the appearance and layout of the document, ensuring that the final output meets the expected gutter requirements, enhancing the professionalism and readability of the document. This article shows how to add gutters on Word document pages by programming using Spire.Doc for Java.
- Add a Gutter at the Top of a Word Document Page in Java
- Add a Gutter at the Left of a Word Document Page in Java
Install Spire.Doc for Java
First, you're required to add the Spire.Doc.jar file as a dependency in your Java program. The JAR file can be downloaded from this link. If you use Maven, you can easily import the JAR file in your application by adding the following code to your project's pom.xml file.
<repositories>
    <repository>
        <id>com.e-iceblue</id>
        <name>e-iceblue</name>
        <url>https://repo.e-iceblue.com/nexus/content/groups/public/</url>
    </repository>
</repositories>
<dependencies>
    <dependency>
        <groupId>e-iceblue</groupId>
        <artifactId>spire.doc</artifactId>
        <version>14.7.0</version>
    </dependency>
</dependencies>
Add a Gutter at the Top of a Word Document Page in Java
In a Word document, you can set section.getPageSetup().isTopGutter(true) to place the gutter at the top of the page. By default, the gutter area is displayed as blank without any content. This example also includes steps on how to add content, such as the dash symbol, to the gutter area to customize content around the gutter. Here are the detailed steps:
- Create a Document object.
- Load a document using the Document.loadFromFile() method.
- Iterate through all sections of the document using a for loop and Document.getSections().
- Set Section.getPageSetup().isTopGutter(true) to display the gutter at the top of the page.
- Use Section.getPageSetup().setGutter() to set the width of the gutter.
- Call the custom addTopGutterContent() method to add content to the gutter area.
- Save the document using the Document.saveToFile() method.
- Java
import com.spire.doc.*;
import com.spire.doc.documents.*;
import com.spire.doc.fields.*;
import com.spire.doc.formatting.CharacterFormat;
import java.awt.*;

public class AddTopGutter {
    public static void main(String[] args) {
        // Create a document object
        Document document = new Document();

        // Load the document
        document.loadFromFile("Sample1.docx");

        // Iterate through all sections of the document
        for (int i = 0; i < document.getSections().getCount(); i++) {
            // Get the current section
            Section section = document.getSections().get(i);

            // Set whether to add a gutter at the top of the page to true
            section.getPageSetup().isTopGutter(true);

            // Set the width of the gutter to 100f
            section.getPageSetup().setGutter(100f);

            // Call the method to add content to the top gutter
            addTopGutterContent(section);
        }

        // Save the modified document to a file
        document.saveToFile("AddGutterOnTop.docx", FileFormat.Docx_2016);

        // Release document resources
        document.dispose();
    }

    // Method to add content to the top gutter
    static void addTopGutterContent(Section section) {
        // Get the header of the section
        HeaderFooter header = section.getHeadersFooters().getHeader();

        // Set the width of the text box to the width of the page
        float width = (float) section.getPageSetup().getPageSize().getWidth();

        // Set the height of the text box to 40
        float height = 40;

        // Add a text box to the header
        TextBox textBox = header.addParagraph().appendTextBox(width, height);

        // Set the text box without borders
        textBox.getFormat().setNoLine(true);

        // Set the vertical origin of the text box to the top margin area
        textBox.setVerticalOrigin(VerticalOrigin.Top_Margin_Area);

        // Set the vertical position of the text box
        textBox.setVerticalPosition(140);

        // Set the horizontal alignment of the text box to left
        textBox.setHorizontalAlignment(ShapeHorizontalAlignment.Left);

        // Set the horizontal origin of the text box to the left margin area
        textBox.setHorizontalOrigin(HorizontalOrigin.Left_Margin_Area);

        // Set the text anchor to the bottom
        textBox.getFormat().setTextAnchor(ShapeVerticalAlignment.Bottom);

        // Set the text wrapping style to in front of text
        textBox.getFormat().setTextWrappingStyle(TextWrappingStyle.In_Front_Of_Text);

        // Set the text wrapping type to both sides
        textBox.getFormat().setTextWrappingType(TextWrappingType.Both);

        // Create a paragraph object
        Paragraph paragraph = new Paragraph(section.getDocument());

        // Set the paragraph alignment to center
        paragraph.getFormat().setHorizontalAlignment(HorizontalAlignment.Center);

        // Create a font object
        Font font = new Font("SimSun", Font.PLAIN, 8);

        Graphics graphics = new java.awt.image.BufferedImage(1, 1, java.awt.image.BufferedImage.TYPE_INT_ARGB).getGraphics();
        graphics.setFont(font);
        FontMetrics fontMetrics = graphics.getFontMetrics();
        String text1 = " - ";
        int textWidth1 = fontMetrics.stringWidth(text1);
        int count = (int) (textBox.getWidth() / textWidth1);
        StringBuilder stringBuilder = new StringBuilder();
        for (int i = 1; i < count; i++) {
            stringBuilder.append(text1);
        }
        // Create a character format object
        CharacterFormat characterFormat = new CharacterFormat(section.getDocument());
        characterFormat.setFontName(font.getFontName());
        characterFormat.setFontSize(font.getSize());
        TextRange textRange = paragraph.appendText(stringBuilder.toString());
        textRange.applyCharacterFormat(characterFormat);

        // Add the paragraph to the text box
        textBox.getChildObjects().add(paragraph);
    }
}
Add a Gutter at the Left of a Word Document Page in Java
To set the gutter on the left side of the page, the key is to set Section.getPageSetup().isTopGutter(false). Here are the detailed steps:
- Create a Document object.
- Load a document using the Document.loadFromFile() method.
- Iterate through all sections of the document using a for loop and Document.getSections().
- Set Section.getPageSetup().isTopGutter(false) to display the gutter on the left side of the page.
- Use Section.getPageSetup().setGutter() to set the width of the gutter.
- Call the custom addLeftGutterContent() method to add content to the gutter area.
- Save the document using the Document.saveToFile() method.
- Java
import com.spire.doc.*;
import com.spire.doc.documents.*;
import com.spire.doc.fields.*;
import com.spire.doc.formatting.CharacterFormat;
import java.awt.*;

public class AddLeftGutter {
    public static void main(String[] args) {
        // Create a document object
        Document document = new Document();

        // Load the document
        document.loadFromFile("Sample1.docx");

        // Iterate through all sections of the document
        for (int i = 0; i < document.getSections().getCount(); i++) {
            // Get the current section
            Section section = document.getSections().get(i);

            // Set whether to add a gutter at the top of the page to false, it will be added to the left side of the page
            section.getPageSetup().isTopGutter(false);

            // Set the width of the gutter to 100f
            section.getPageSetup().setGutter(100f);

            // Call the method to add content to the left gutter
            AddLeftGutterContent (section);
        }

        // Save the modified document to a file
        document.saveToFile("AddGutterOnLeft.docx", FileFormat.Docx_2016);

        // Release document resources
        document.dispose();
    }

    // Method to add content to the left gutter
    static void AddLeftGutterContent(Section section) {
        // Get the header of the section
        HeaderFooter header = section.getHeadersFooters().getHeader();

        // Set the width of the text box to 40
        float width = 40;

        // Get the page height
        float height = (float) section.getPageSetup().getPageSize().getHeight();

        // Add a text box to the header
        TextBox textBox = header.addParagraph().appendTextBox(width, height);

        // Set the text box without borders
        textBox.getFormat().setNoLine(true);

        // Set the text direction in the text box from right to left
        textBox.getFormat().setLayoutFlowAlt(TextDirection.Right_To_Left);

        // Set the horizontal starting position of the text box
        textBox.setHorizontalOrigin(HorizontalOrigin.Left_Margin_Area);

        // Set the horizontal position of the text box
        textBox.setHorizontalPosition(140);

        // Set the vertical alignment of the text box to the top
        textBox.setVerticalAlignment(ShapeVerticalAlignment.Top);

        // Set the vertical origin of the text box to the top margin area
        textBox.setVerticalOrigin(VerticalOrigin.Top_Margin_Area);

        // Set the text anchor to the top
        textBox.getFormat().setTextAnchor(ShapeVerticalAlignment.Top);

        // Set the text wrapping style to in front of text
        textBox.getFormat().setTextWrappingStyle(TextWrappingStyle.In_Front_Of_Text);

        // Set the text wrapping type to both sides
        textBox.getFormat().setTextWrappingType(TextWrappingType.Both);

        // Create a paragraph object
        Paragraph paragraph = new Paragraph(section.getDocument());

        // Set the paragraph alignment to center
        paragraph.getFormat().setHorizontalAlignment(HorizontalAlignment.Center);

        // Create a font object, SimSun, size 8
        Font font = new Font("SimSun", Font.PLAIN, 8);

        Graphics graphics = new java.awt.image.BufferedImage(1, 1, java.awt.image.BufferedImage.TYPE_INT_ARGB).getGraphics();
        graphics.setFont(font);
        FontMetrics fontMetrics = graphics.getFontMetrics();
        String text1 = " - ";
        int textWidth1 = fontMetrics.stringWidth(text1);
        int count = (int) (textBox.getHeight() / textWidth1);
        StringBuilder stringBuilder = new StringBuilder();
        for (int i = 1; i < count ; i++) {
            stringBuilder.append(text1);
        }

        // Create a character format object
        CharacterFormat characterFormat = new CharacterFormat(section.getDocument());
        characterFormat.setFontName(font.getFontName());
        characterFormat.setFontSize(font.getSize());
        TextRange textRange = paragraph.appendText(stringBuilder.toString());
        textRange.applyCharacterFormat(characterFormat);

        // Add the paragraph to the text box
        textBox.getChildObjects().add(paragraph);
    }
}
Apply for a Temporary License
If you'd like to remove the evaluation message from the generated documents, or to get rid of the function limitations, please request a 30-day trial license for yourself.
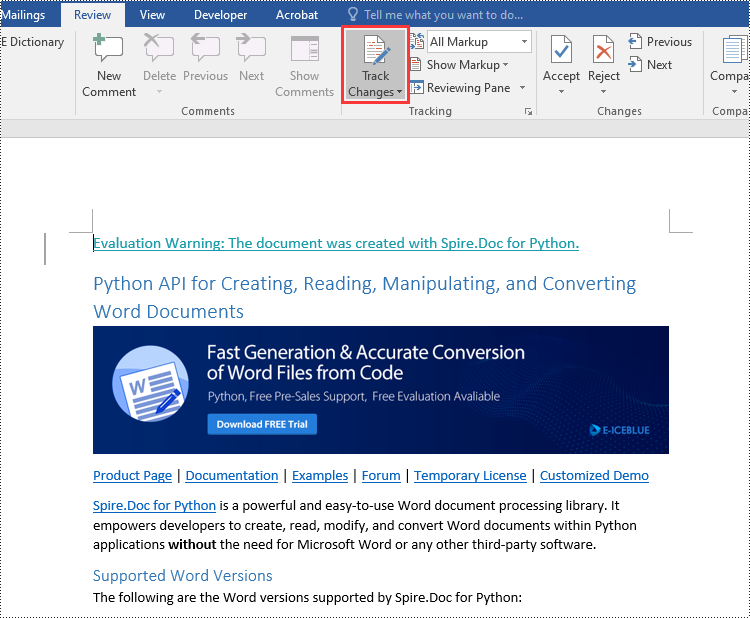
Python: Enable Track Changes, Accept or Reject Tracked Changes in Word
2024-04-07 01:31:37 Written by KoohjiTrack changes in Microsoft Word is a powerful feature that facilitates document collaboration and review processes. When track changes is enabled, any modifications made to the document, such as text additions or deletions, formatting changes, and comments, are visually highlighted. This makes it easier for document editors or collaborators to identify and review the changes made by themselves or others. In this article, we will explain how to enable track changes, as well as accept or reject the tracked changes in Word documents in Python using Spire.Doc for Python.
- Enable Track Changes in Word in Python
- Accept Tracked Changes in Word in Python
- Reject Tracked Changes in Word in Python
Install Spire.Doc for Python
This scenario requires Spire.Doc for Python and plum-dispatch v1.7.4. They can be easily installed in your Windows through the following pip commands.
pip install Spire.Doc
If you are unsure how to install, please refer to this tutorial: How to Install Spire.Doc for Python on Windows
Enable Track Changes in Word in Python
Spire.Doc for Python offers the Document.TrackChanges property to enable the track changes mode for a Word document. The detailed steps are as follows.
- Create an object of the Document class.
- Load a Word document using Document.LoadFromFile() method.
- Enable the track changes mode for the document by setting the Document.TrackChanges property to True.
- Save the result document using Document.SaveToFile() method.
- Python
from spire.doc import *
from spire.doc.common import *

# Create an object of the Document class
doc = Document()
# Load a Word document
doc.LoadFromFile("Sample.docx")

# Enable the track changes mode for the document
doc.TrackChanges = True

# Save the result document
doc.SaveToFile("EnableTrackChanges.docx", FileFormat.Docx2016)
doc.Close()
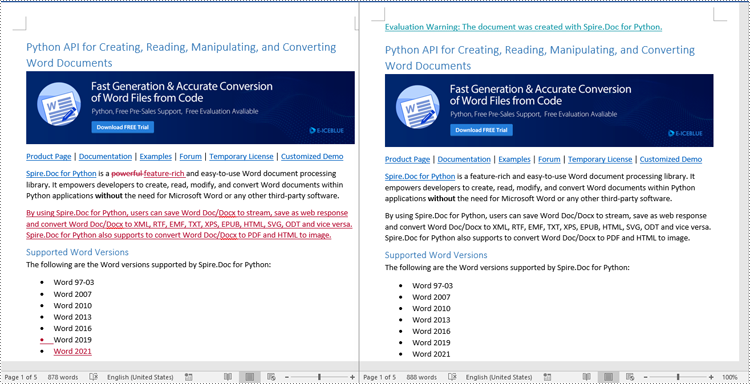
Accept Tracked Changes in Word in Python
Accepting tracked changes allows you to incorporate the suggested modifications permanently into the document. By using the Document.AcceptChanges() method provided by Spire.Doc for Python, you can easily accept all tracked changes in a Word document. The detailed steps are as follows.
- Create an object of the Document class.
- Load a Word document using Document.LoadFromFile() method.
- Check if the document has tracked changes using Document.HasChanges property.
- Accept the tracked changes in the document using Document.AcceptChanges() method.
- Save the result document using Document.SaveToFile() method.
- Python
from spire.doc import *
from spire.doc.common import *

# Create an object of the Document class
doc = Document()
# Load a Word document
doc.LoadFromFile("Sample.docx")

# Check if the document has tracked changes
if(doc.HasChanges):
    # Accept the tracked changes in the document
    doc.AcceptChanges()

# Save the result document
doc.SaveToFile("AcceptChanges.docx", FileFormat.Docx2016)
doc.Close()
Reject Tracked Changes in Word in Python
Sometimes, suggested modifications may not align with your vision or requirements for the document. In such cases, rejecting these changes becomes essential to ensure that the document accurately reflects your intended content and formatting choices.
Spire.Doc for Python offers the Document.RejectChanges() method to reject the tracked changes in a Word document. The detailed steps are as follows.
- Create an object of the Document class.
- Load a Word document using Document.LoadFromFile() method.
- Check if the document has tracked changes using Document.HasChanges property.
- Reject the tracked changes in the document using Document.RejectChanges() method.
- Save the result document using Document.SaveToFile() method.
- Python
from spire.doc import *
from spire.doc.common import *

# Create an object of the Document class
doc = Document()
# Load a Word document
doc.LoadFromFile("Sample.docx")

# Check if the document has tracked changes
if(doc.HasChanges):
    # Reject the tracked changes in the document
    doc.RejectChanges()

# Save the result document
doc.SaveToFile("RejectChanges.docx", FileFormat.Docx2016)
doc.Close()
Apply for a Temporary License
If you'd like to remove the evaluation message from the generated documents, or to get rid of the function limitations, please request a 30-day trial license for yourself.
PDF files often contain bookmarks, which are clickable links that make navigating lengthy documents easier. Extracting these bookmarks can be beneficial for creating an outline of the document, analyzing document structure, or identifying key topics or sections. In this article, you will learn how to extract PDF bookmarks with Python using Spire.PDF for Python.
Install Spire.PDF for Python
This scenario requires Spire.PDF for Python and plum-dispatch v1.7.4. They can be easily installed in your Windows through the following pip command.
pip install Spire.PDF
If you are unsure how to install, please refer to this tutorial: How to Install Spire.PDF for Python on Windows
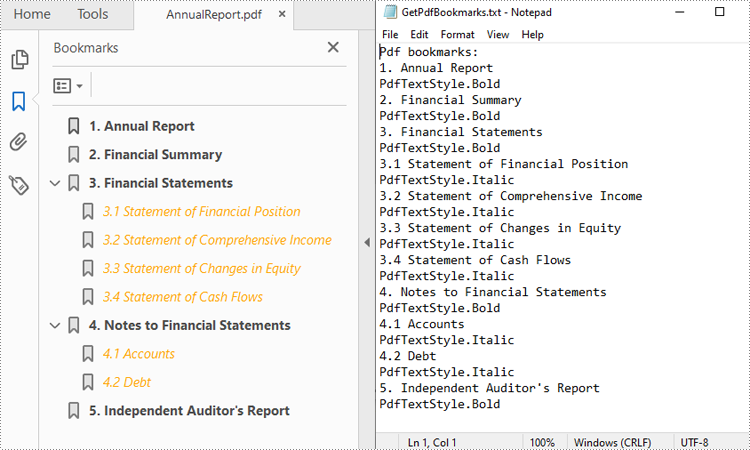
Extract Bookmarks from PDF Using Python
With Spire.PDF for Python, you can create custom methods GetBookmarks() and GetChildBookmark() to get the title and text styles of both parent and child bookmarks in a PDF file, then export them to a TXT file. The following are the detailed steps.
- Create a PdfDocument instance.
- Load a PDF file using PdfDocument.LoadFromFile() method.
- Get bookmarks collection in the PDF file using PdfDocument.Bookmarks property.
- Call custom methods GetBookmarks() and GetChildBookmark() to get the text content and text style of parent and child bookmarks.
- Export the extracted PDF bookmarks to a TXT file.
- Python
from spire.pdf.common import *
from spire.pdf import *

inputFile = "AnnualReport.pdf"
result = "GetPdfBookmarks.txt"

def GetChildBookmark(parentBookmark, content):
    if parentBookmark.Count > 0:
        # Iterate through each child bookmark in the parent bookmarks
        for i in range(parentBookmark.Count):
            childBookmark = parentBookmark.get_Item(i)
            # Get the title
            content.append(childBookmark.Title)
            # Get the text style
            textStyle = str(childBookmark.DisplayStyle)
            content.append(textStyle)
            cldBk = PdfBookmarkCollection(childBookmark)
            GetChildBookmark(cldBk, content)

def GetBookmarks(bookmarks, result):
    # Create an object of StringBuilder
    content = []
    # Get PDF bookmarks information
    if bookmarks.Count > 0:
        content.append("Pdf bookmarks:")
        # Iterate through each parent bookmark
        for i in range(bookmarks.Count):
            parentBookmark = bookmarks.get_Item(i)
            # Get the title
            content.append(parentBookmark.Title)
            # Get the text style
            textStyle = str(parentBookmark.DisplayStyle)
            content.append(textStyle)
            cldBk = PdfBookmarkCollection(parentBookmark)
            GetChildBookmark(cldBk, content)

    # Save to a TXT file
    with open(result, "w") as file:
        file.write("\n".join(content))

# Create a PdfDocument instance
pdf = PdfDocument()

# Load a PDF file from disk.
pdf.LoadFromFile(inputFile)

# Get bookmarks collection of the PDF file
bookmarks = pdf.Bookmarks

# Get the contents of bookmarks and save them to a TXT file
GetBookmarks(bookmarks, result)
pdf.Close()
Apply for a Temporary License
If you'd like to remove the evaluation message from the generated documents, or to get rid of the function limitations, please request a 30-day trial license for yourself.
