
Knowledgebase (2370)
Children categories
Pivot tables provide a flexible way to organize, manipulate, and summarize data from different perspectives, enabling users to gain valuable insights and make informed decisions. With pivot tables, you can easily rearrange and summarize data based on various criteria, such as categories, dates, or numerical values. This feature is particularly useful when dealing with complex datasets or when you need to compare and analyze data from different angles. In this article, you will learn how to create or operate pivot tables in an Excel document using Spire.XLS for Python.
- Create a Pivot Table in Excel in Python
- Sort Pivot Table by Column Values in Python
- Expand or Collapse Rows in Pivot Table in Python
Install Spire.XLS for Python
This scenario requires Spire.XLS for Python and plum-dispatch v1.7.4. They can be easily installed in your Windows through the following pip command.
pip install Spire.XLS
If you are unsure how to install, please refer to this tutorial: How to Install Spire.XLS for Python on Windows
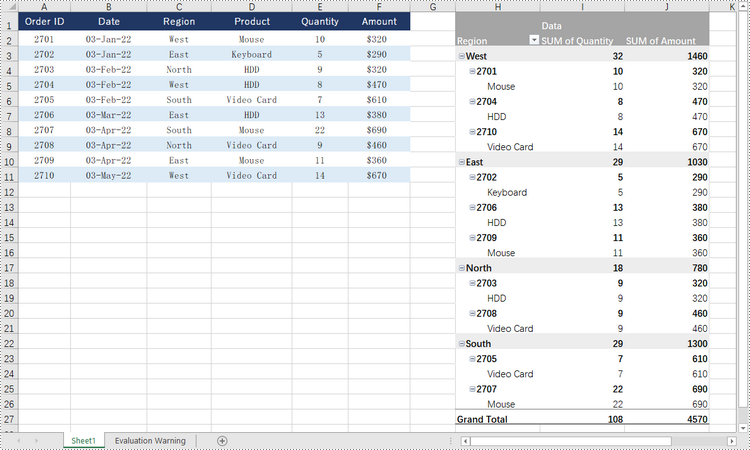
Create a Pivot Table in Excel in Python
Spire.XLS for Python offers the PivotTable class to work with pivot tables in an Excel document. To create a pivot table based on the data in an existing Excel worksheet, follow the steps below.
- Create a Workbook object.
- Load a sample Excel document using Workbook.LoadFromFile() method.
- Get a specified worksheet through Workbook.Worksheets[index] property.
- Specify the range of cells on which the pivot table will be created using Worksheet.Range property
- Create an object of PivotCache using Workbook.PivotCaches.Add() method.
- Add a pivot table to the worksheet using Worksheet.PivotTables.Add() method.
- Add fields to rows area.
- Add fields to values area.
- Save the result document using Workbook.SaveToFile() method.
- Python
from spire.xls import *
from spire.xls.common import *

# Create a Workbook object
workbook = Workbook()

# Load a sample Excel document
workbook.LoadFromFile("C:\\Users\\Administrator\\Desktop\\Data.xlsx")

# Get the first worksheet
sheet = workbook.Worksheets[0]

# Select the data source range
cellRange = sheet.Range["C1:F11"]
piVotCache = workbook.PivotCaches.Add(cellRange)

# Add a PivotTable to the worksheet and set the location and cache of it
pivotTable = sheet.PivotTables.Add("Pivot Table", sheet.Range["H1"], piVotCache)

# Add "Region" and "Product" fields to rows area
regionField = pivotTable.PivotFields["Region"]
regionField.Axis = AxisTypes.Row
pivotTable.Options.RowHeaderCaption = "Region"
productField = pivotTable.PivotFields["Product"]
productField.Axis = AxisTypes.Row

# Add "Quantity" and "Amount" fields to values area
pivotTable.DataFields.Add(pivotTable.PivotFields["Quantity"], "SUM of Quantity", SubtotalTypes.Sum)
pivotTable.DataFields.Add(pivotTable.PivotFields["Amount"], "SUM of Amount", SubtotalTypes.Sum)

# Apply a built-in style to the pivot table
pivotTable.BuiltInStyle = PivotBuiltInStyles.PivotStyleMedium11

# Set column width
sheet.SetColumnWidth(8, 16);
sheet.SetColumnWidth(9, 16);
sheet.SetColumnWidth(10, 16);

# Save the document
workbook.SaveToFile("output/PivotTable.xlsx", ExcelVersion.Version2016)
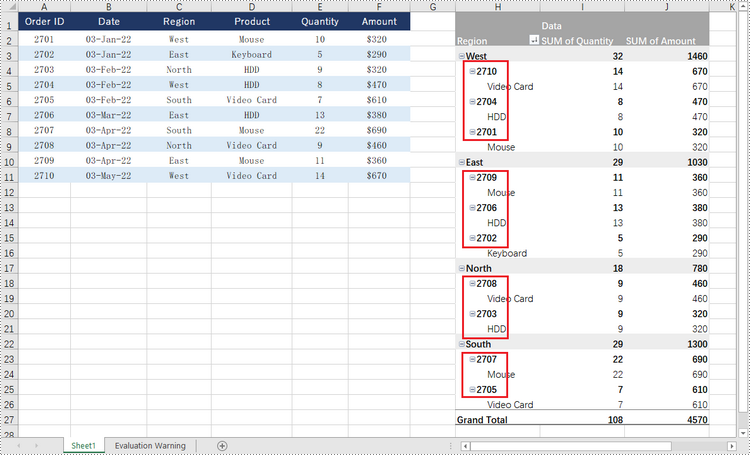
Sort Pivot Table by Column Values in Python
A specific field can be accessed through the PivotTable.PivotFields[index] property, and then you can set its sort type using the PivotField.SortType property. The following are the steps to sort pivot table by the values of a specific field.
- Create a Workbook object.
- Load an Excel document using Workbook.LoadFromFile() method.
- Get a specific worksheet through Workbook.Worksheets[index] property.
- Get a specific pivot table from the worksheet through Worksheet.PivotTables[index] property.
- Get a specific field through PivotTable.PivotFields[fieldName] property.
- Sort data in the field through PivotField.SortType property.
- Save the workbook to a different file using Workbook.SaveToFile() method.
- Python
from spire.xls import *
from spire.xls.common import *

# Create a Workbook object
workbook = Workbook()

# Load an Excel document
workbook.LoadFromFile("C:\\Users\\Administrator\\Desktop\\PivotTable.xlsx");

# Get the first worksheet
sheet = workbook.Worksheets[0]

# Get the specified pivot table
pivotTable = sheet.PivotTables[0]

# Get the specified field
idField = pivotTable.PivotFields["Order ID"]

# Sort data in the column of "Order ID" field
idField.SortType = PivotFieldSortType.Descending

# Save the document
workbook.SaveToFile("output/SortData.xlsx", ExcelVersion.Version2016)
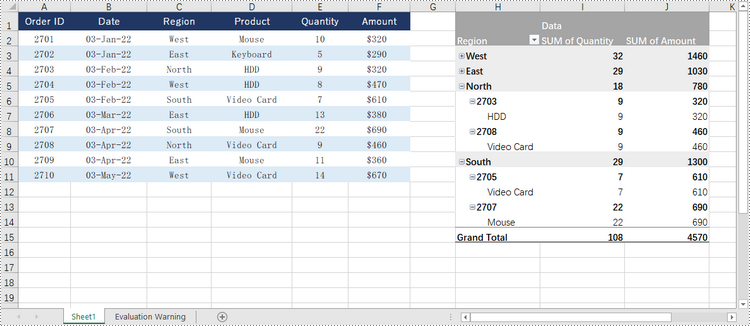
Expand or Collapse Rows in Pivot Table in Python
To collapse the details under a certain pivot field, use PivotField.HideItemDetail(string itemValue, bool isHiddenDetail) method and set the second parameter to true; to show the details, set the second parameter to false. The detailed steps are as follows.
- Create a Workbook object.
- Load an Excel document using Workbook.LoadFromFile() method.
- Get a specific worksheet through Workbook.Worksheets[index] property.
- Get a specific pivot table from the worksheet through Worksheet.PivotTables[index] property.
- Get a specific field through PivotTable.PivotFields[fieldName] property.
- Collapse or expand rows of the field using PivotField.HideItemDetail(string itemValue, bool isHiddenDetail) method.
- Save the workbook to a different file using Workbook.SaveToFile() method.
- Python
from spire.xls import *
from spire.xls.common import *

# Create a Workbook object
workbook = Workbook()

# Load a sample Excel document
workbook.LoadFromFile("C:\\Users\\Administrator\\Desktop\\PivotTable.xlsx");

# Get the first worksheet
sheet = workbook.Worksheets[0]

# Get the specified pivot table
pivotTable = sheet.PivotTables[0]

# Get the specified field
regoinField = pivotTable.PivotFields["Region"]

# Hide details under the selected item of the region
regoinField.HideItemDetail("West", True)
regoinField.HideItemDetail("East", True)

# Save the document
workbook.SaveToFile("output/CollapseRows.xlsx", ExcelVersion.Version2016)
Apply for a Temporary License
If you'd like to remove the evaluation message from the generated documents, or to get rid of the function limitations, please request a 30-day trial license for yourself.
Comments are invaluable tools for collaboration and feedback in Word documents, allowing users to provide insights, suggestions, clarification, and discussions. Whether the goal is to share ideas, respond to existing comments, or remove outdated feedback, mastering the efficient handling of Word document comments can significantly enhance document workflow. This article aims to show how to add, delete, or reply to comments in Word documents using Spire.Doc for Python in Python programs.
- Add Comments to a Paragraph in Word Documents using Python
- Add Comments to Text in Word Documents using Python
- Remove Comments from Word Documents using Python
- Reply to Comments in Word Documents using Python
Install Spire.Doc for Python
This scenario requires Spire.Doc for Python and plum-dispatch v1.7.4. They can be easily installed in your Windows through the following pip command.
pip install Spire.Doc
If you are unsure how to install, please refer to this tutorial: How to Install Spire.Doc for Python on Windows
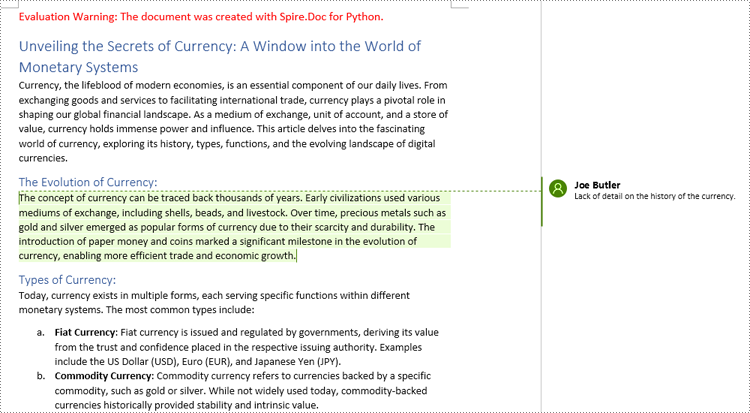
Add Comments to a Paragraph in Word Documents using Python
Spire.Doc for Python provides the Paragraph.AppendComment() method to add a comment to a specified paragraph. And the range of text corresponding to the comment needs to be controlled using the comment start marks and end marks. The detailed steps to add comments on paragraphs are as follows:
- Create an object of Document class and load a Word document using Document.LoadFromFile() method.
- Get the first section using Document.Sections.get_Item() method.
- Get the first paragraph in the section using Section.Paragraphs.get_Item() method.
- Add a comment to the paragraph using Paragraph.AppendComment() method.
- Set the author the comment through Comment.Format.Author property.
- Create a comment start mark and an end mark and set them as the start and end marks of the created comment though CommentMark.CommentId property.
- Insert the comment start mark and end mark at the beginning and end of the paragraph respectively using Paragraph.ChildObjects.Insert() method.
- Save the document using Document.SaveToFile() method.
- Python
from spire.doc import *
from spire.doc.common import *
# Create an object of Document class and load a Word document
doc = Document()
doc.LoadFromFile("Sample.docx")
# Get the first section
section = doc.Sections.get_Item(0)
# Get the forth paragraph
paragraph = section.Paragraphs.get_Item(4)
# Add a comment to the paragraph
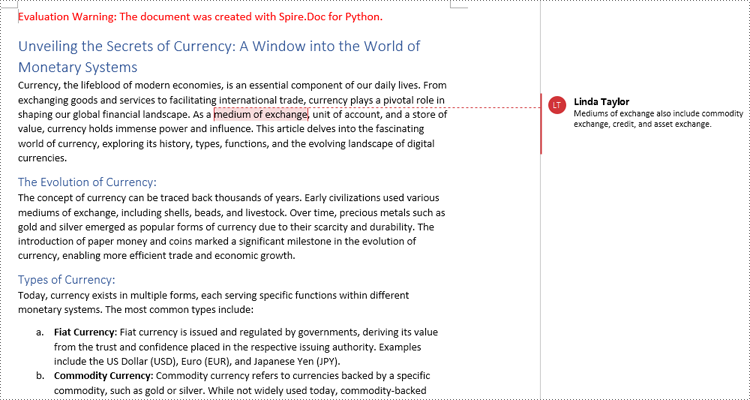
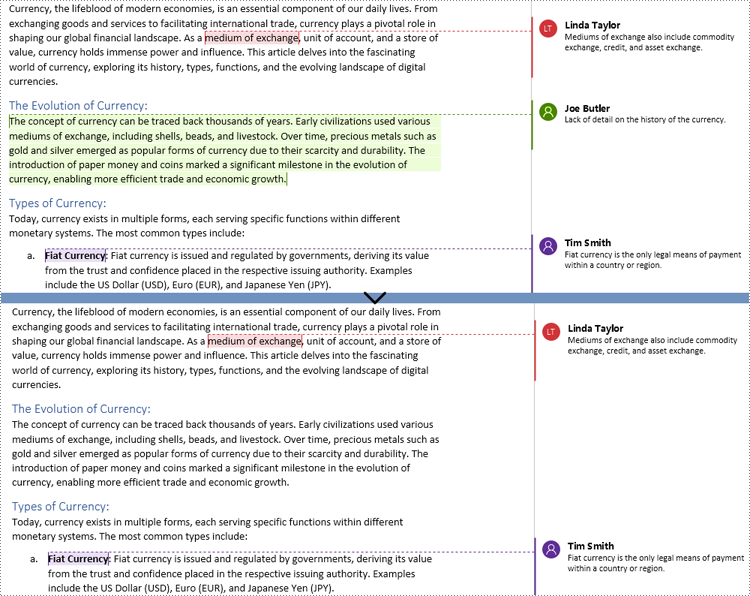
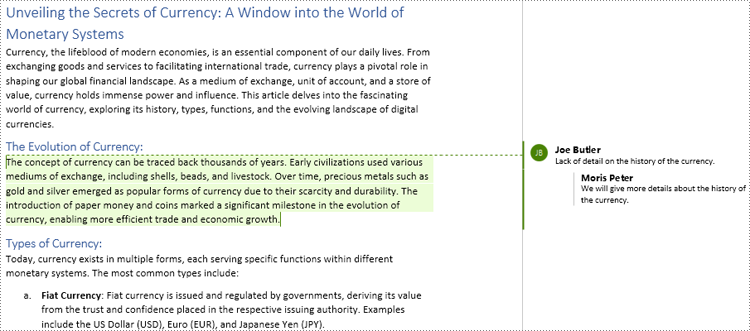
comment = paragraph.AppendComment("Lack of detail on the history of the currency.")
# Set the author of the comment
comment.Format.Author = "Joe Butler"
# Create a comment start mark and an end mark and set them as the start and end marks of the created comment
commentStart = CommentMark(doc, CommentMarkType.CommentStart)
commentEnd = CommentMark(doc, CommentMarkType.CommentEnd)
commentStart.CommentId = comment.Format.CommentId
commentEnd.CommentId = comment.Format.CommentId
# Insert the comment start mark and end mark at the beginning and end of the paragraph respectively
paragraph.ChildObjects.Insert(0, commentStart)
paragraph.ChildObjects.Add(commentEnd)
# Save the document
doc.SaveToFile("output/CommentOnParagraph.docx")
doc.Close()
Add Comments to Text in Word Documents using Python
Spire.Doc for Python also supports finding specified text and adding comments to it. The detailed steps are as follows:
- Create an object of Document class and load a Word document using Document.LoadFromFile() method.
- Find the text to comment on using Document.FindString() method.
- Create an object of Comment class, set the comment content through Comment.Body.AddParagraph().Text property, and set the author of the comment through Comment.Format.Author property.
- Get the text as one text range using TextSelection.GetAsOneRange() method and get the paragraph the text belongs to through TextRange.OwnerParagraph property.
- Insert the comment after the found text using Paragraph.ChildObjects.Insert() method.
- Create a comment start mark and an end mark and set them as the start and end marks of the created comment though CommentMark.CommentId property.
- Insert the comment start mark and end mark before and after found text respectively using Paragraph.ChildObjects.Insert() method.
- Save the document using Document.SaveToFile() method.
- Python
from spire.doc import *
from spire.doc.common import *

# Create an object of Document class and load a Word document
doc = Document()
doc.LoadFromFile("Sample.docx")

# Find the text to comment on
text = doc.FindString("medium of exchange", True, True)

# Create a comment and set the content and author of the comment
comment = Comment(doc)
comment.Body.AddParagraph().Text = "Fiat currency is the only legal means of payment within a country or region."
comment.Format.Author = "Linda Taylor"

# Get the found text as a text range and get the paragraph it belongs to
range = text.GetAsOneRange()
paragraph =  range.OwnerParagraph

# Add the comment to the paragraph
paragraph.ChildObjects.Insert(paragraph.ChildObjects.IndexOf(range) + 1, comment)

# Create a comment start mark and an end mark and set them as the start and end marks of the created comment
commentStart = CommentMark(doc, CommentMarkType.CommentStart)
commentEnd = CommentMark(doc, CommentMarkType.CommentEnd)
commentStart.CommentId = comment.Format.CommentId
commentEnd.CommentId = comment.Format.CommentId

# Insert the created comment start and end tags before and after the found text respectively
paragraph.ChildObjects.Insert(paragraph.ChildObjects.IndexOf(range), commentStart)
paragraph.ChildObjects.Insert(paragraph.ChildObjects.IndexOf(range) + 1, commentEnd)

# Save the document
doc.SaveToFile ("output/CommentOnText.docx")
doc.Close()
Remove Comments from Word Documents using Python
Spire.Doc for Python provides the Document.Comments.RemoveAt() method that can be used to remove a specified comment and the Document.Clear() method that can remove all comments. The detailed steps for removing comments are as follows:
- Create an object of Document class and load a Word document using Document.LoadFromFile() method.
- Delete a specific comment using Document.Comments.RemoveAt() method or delete all the comments using Document.Comments.Clear() method.
- Save the document using Document.SaveToFile() method.
- Python
from spire.doc import *
from spire.doc.common import *

# Create an object of Document class and load a Word document
doc = Document()
doc.LoadFromFile("Sample1.docx")

# Remove the second comment
doc.Comments.RemoveAt(1)

# Remove all comments
#doc.Comments.Clear()

# Save the document
doc.SaveToFile("output/RemoveComments.docx")
doc.Close()
Reply to Comments in Word Documents using Python
Spire.Doc for Python allows users to reply to a comment by setting a comment as a reply to another comment using Comment.ReplyToComment(Comment) method. The detailed steps are as follows:
- Create an object of Document class and load a Word document using Document.LoadFromFile() method.
- Get a comment using Document.Comments.get_Item() method.
- Create a comment and set its content and author through Comment.Body.AddParagraph().Text property and Comment.Format.Author property.
- Set the created comment as a reply to the obtained comment using Comment.ReplyToComment() method.
- Save the document using Document.SaveToFile() method.
- Python
from spire.doc import *
from spire.doc.common import *

# Create an object of Document class and load a Word document
doc = Document()
doc.LoadFromFile("output/CommentOnParagraph.docx")

# Get a comment
comment = doc.Comments.get_Item(0)

# Create a reply comment and set the content and author of it
reply = Comment(doc)
reply.Body.AddParagraph().Text = "We will give more details about the history of the currency."
reply.Format.Author = "Moris Peter"

# Set the created comment as a reply to obtained comment
comment.ReplyToComment(reply)

# Save the document
doc.SaveToFile("output/ReplyToComments.docx")
doc.Close()
Apply for a Temporary License
If you'd like to remove the evaluation message from the generated documents, or to get rid of the function limitations, please request a 30-day trial license for yourself.
Textboxes are versatile tools in Microsoft Word, allowing you to insert and position text or other elements anywhere on a page, giving you the power to create eye-catching flyers, brochures, or reports. Whether you're looking to emphasize a particular section of text, place captions near images, or simply add a decorative touch, the capacity to manipulate textboxes offers a practical and aesthetic advantage in document design. In this article, you will learn how to add or remove textboxes in a Word document in Python using Spire.Doc for Python.
Install Spire.Doc for Python
This scenario requires Spire.Doc for Python and plum-dispatch v1.7.4. They can be easily installed in your Windows through the following pip command.
pip install Spire.Doc
If you are unsure how to install, please refer to this tutorial: How to Install Spire.Doc for Python on Windows
Add a Textbox to a Word Document in Python
Spire.Doc for Python provides the Paragraph.AppendTextBox() method to insert a textbox in a specified paragraph. The content and formatting of the textbox can be set through the properties under the TextBox object. The following are the detailed steps.
- Create a Document object.
- Load a Word document using Document.LoadFromFile() method.
- Get the first section and add a paragraph to the section using Section.AddParagraph() method.
- Add a text box to the paragraph using Paragraph.AppendTextBox() method.
- Get the format of the textbox using TextBox.Format property, and then set the textbox's wrapping type, position, border color and fill color using the properties of TextBoxFormat Class.
- Add a paragraph to the textbox using TextBox.Body.AddParagraph() method.
- Add an image to the paragraph using Paragraph.AppendPicture() method.
- Add text to the textbox using Paragraph.AppendText() method
- Save the document to a different file using Document.SaveToFile() method.
- Python
from spire.doc import *
from spire.doc.common import *
# Create a Document object
document = Document()
# Load a Word document
document.LoadFromFile("C:/Users/Administrator/Desktop/input3.docx")
# Insert a textbox and set its wrapping style
textBox = document.Sections[0].Paragraphs[0].AppendTextBox(135, 300)
textBox.Format.TextWrappingStyle = TextWrappingStyle.Square
# Set the position of the textbox
textBox.Format.HorizontalOrigin = HorizontalOrigin.RightMarginArea
textBox.Format.HorizontalPosition = -145.0
textBox.Format.VerticalOrigin = VerticalOrigin.Page
textBox.Format.VerticalPosition = 120.0
# Set the border style and fill color of the textbox
textBox.Format.LineColor = Color.get_DarkBlue()
textBox.Format.FillColor = Color.get_LightGray()
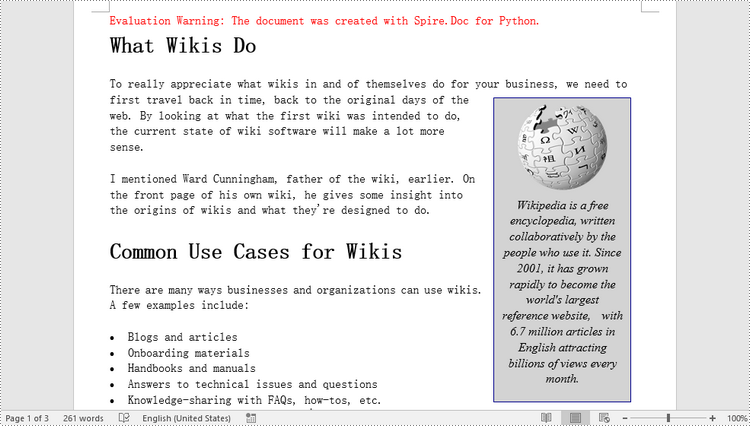
# Insert an image to textbox as a paragraph
para = textBox.Body.AddParagraph();
picture = para.AppendPicture("C:/Users/Administrator/Desktop/Wikipedia_Logo.png")
# Set alignment for the paragraph
para.Format.HorizontalAlignment = HorizontalAlignment.Center
# Set the size of the inserted image
picture.Height = 90.0
picture.Width = 90.0
# Insert text to textbox as the second paragraph
textRange = para.AppendText("Wikipedia is a free encyclopedia, written collaboratively by the people who use it. "
+ "Since 2001, it has grown rapidly to become the world's largest reference website, "
+ "with 6.7 million articles in English attracting billions of views every month.")
# Set alignment for the paragraph
para.Format.HorizontalAlignment = HorizontalAlignment.Center
# Set the font of the text
textRange.CharacterFormat.FontName = "Times New Roman"
textRange.CharacterFormat.FontSize = 12.0
textRange.CharacterFormat.Italic = True
# Save the result file
document.SaveToFile("output/AddTextBox.docx", FileFormat.Docx)
Remove a Textbox from a Word Document in Python
Spire.Doc for Python provides the Document.TextBoxes.RemoveAt(int index) method to delete a specified textbox. To delete all textboxes from a Word document, you can use the Document.TextBoxes.Clear() method. The following example shows how to remove the first textbox from a Word document.
- Create a Document object.
- Load a Word document using Document.LoadFromFile() method.
- Remove the first text box using Document.TextBoxes.RemoveAt(int index) method.
- Save the document to another file using Document.SaveToFile() method.
- Python
from spire.doc import *
from spire.doc.common import *

# Create a Document object
document = Document()

# Load a Word document
document .LoadFromFile("C:/Users/Administrator/Desktop/TextBox.docx")

# Remove the first textbox
document .TextBoxes.RemoveAt(0)

# Remove all textboxes
# document.TextBoxes.Clear()

# Save the result document
document.SaveToFile("output/RemoveTextbox.docx", FileFormat.Docx)
Apply for a Temporary License
If you'd like to remove the evaluation message from the generated documents, or to get rid of the function limitations, please request a 30-day trial license for yourself.
