
Knowledgebase (2370)
Children categories
A hyperlink is a clickable element, usually embedded in text or an image. It can direct users from their current location to a specific location on another web page or document. By adding hyperlinks in PowerPoint presentations, users can easily visit other related pages or slides while presenting slides. In this article, we will demonstrate how to add hyperlinks to PowerPoint presentations in Python using Spire.Presentation for Python.
Install Spire.Presentation for Python
This scenario requires Spire.Presentation for Python and plum-dispatch v1.7.4. They can be easily installed in your Windows through the following pip command.
pip install Spire.Presentation
If you are unsure how to install, please refer to this tutorial: How to Install Spire.Presentation for Python on Windows
Add Hyperlink to Text on Slide in Python
Spire.Presentation for Python allows users to insert hyperlinks to text on slides easily by using TextRange.ClickAction.Address property. The following are detailed steps.
- Create a new PowerPoint presentation.
- Set the background for the first slide of the presentation by using Presentation.Slides[].Shapes.AppendEmbedImageByPath() method.
- Add a new shape to this slide using Presentation.Slides[].Shapes.AppendShape() method.
- Add some paragraphs to it by calling TextParagraph.TextRanges.Append() method.
- Create another TextRange instance to represent a text range and set link address for it by TextRange.ClickAction.Address property.
- Set the font for these paragraphs.
- Save the result file using Presentation.SaveToFile() method.
- Python
from spire.presentation.common import *
from spire.presentation import *
import math
outputFile = "C:/Users/Administrator/Desktop/AddHyperlinkToText.pptx"
#Create a new PowerPoint presentation
presentation = Presentation()
#Set the background for the first slide
ImageFile = "C:/Users/Administrator/Desktop/background.png"
rect = RectangleF.FromLTRB (0, 0, presentation.SlideSize.Size.Width, presentation.SlideSize.Size.Height)
presentation.Slides[0].Shapes.AppendEmbedImageByPath (ShapeType.Rectangle, ImageFile, rect)
#Add a new shape to the first slide
shape = presentation.Slides[0].Shapes.AppendShape(ShapeType.Rectangle, RectangleF.FromLTRB (80, 250, 650, 400))
shape.Fill.FillType = FillFormatType.none
shape.ShapeStyle.LineColor.Color = Color.get_White()
#Add some paragraphs to the shape
para1 = TextParagraph()
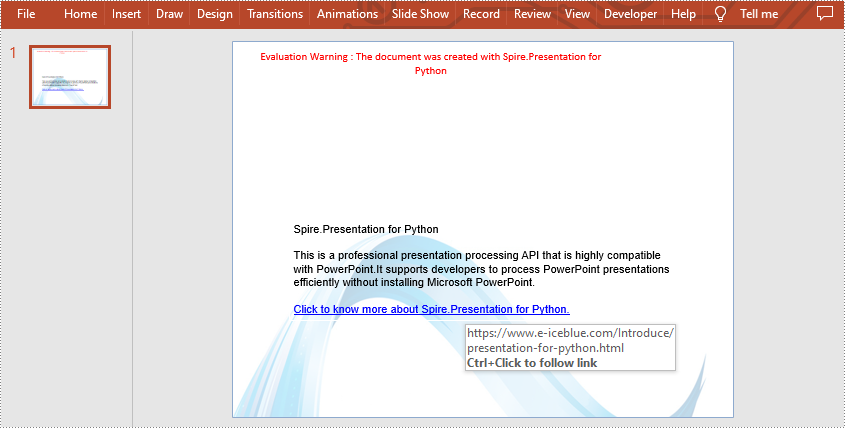
tr = TextRange("Spire.Presentation for Python")
tr.Fill.FillType = FillFormatType.Solid
tr.Fill.SolidColor.Color = Color.get_Black()
para1.TextRanges.Append(tr)
para1.Alignment = TextAlignmentType.Left
shape.TextFrame.Paragraphs.Append(para1)
shape.TextFrame.Paragraphs.Append(TextParagraph())
para2 = TextParagraph()
tr1 = TextRange("This is a professional presentation processing API that is highly compatible with PowerPoint."
+"It supports developers to process PowerPoint presentations efficiently without installing Microsoft PowerPoint.")
tr1.Fill.FillType = FillFormatType.Solid
tr1.Fill.SolidColor.Color = Color.get_Black()
para2.TextRanges.Append(tr1)
shape.TextFrame.Paragraphs.Append(para2)
shape.TextFrame.Paragraphs.Append(TextParagraph())
#Add text with a hyperlink
para3 = TextParagraph()
tr2 = TextRange("Click to know more about Spire.Presentation for Python.")
tr2.ClickAction.Address = "https://www.e-iceblue.com/Introduce/presentation-for-python.html"
para3.TextRanges.Append(tr2)
shape.TextFrame.Paragraphs.Append(para3)
shape.TextFrame.Paragraphs.Append(TextParagraph())
#Set the font for those paragraphs
for para in shape.TextFrame.Paragraphs:
if len(para.Text) != 0:
para.TextRanges[0].LatinFont = TextFont("Arial")
para.TextRanges[0].FontHeight = 16
#Save the result file
presentation.SaveToFile(outputFile, FileFormat.Pptx2010)
presentation.Dispose()
Add Hyperlink to Image on Slide in Python
Spire.Presentation for Python also supports adding a hyperlink to an image. You can create a hyperlink by ClickHyperlink class and then add it to the image using the IEmbedImage.Click property. The related steps are as follows.
- Create a new PowerPoint presentation.
- Load a PowerPoint file using Presentation.LoadFromFile() method.
- Get the first slide by using Presentation.Slides[] property.
- Add an image to this slide using ISlide.Shapes.AppendEmbedImageByPath() method.
- Create a ClickHyperlink object and append the hyperlink to the added image using IEmbedImage.Click property.
- Save the result file using Presentation.SaveToFile() method.
- Python
from spire.presentation.common import *
from spire.presentation import *
inputFile = "C:/Users/Administrator/Desktop/AddHyperlinkToText.pptx"
outputFile = "C:/Users/Administrator/Desktop/AddHyperlinkToImage.pptx"
#Create a new PowerPoint presentation
presentation = Presentation()
#Load a sample file from disk
presentation.LoadFromFile(inputFile)
#Get the first slide
slide = presentation.Slides[0]
#Add an image to this slide
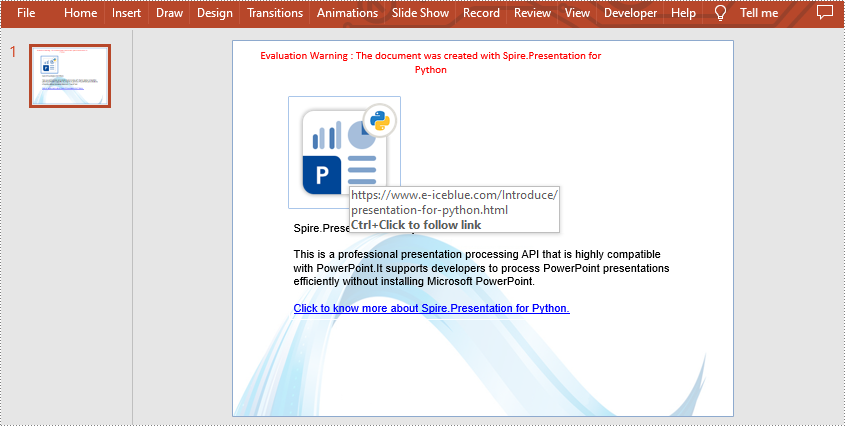
rect = RectangleF.FromLTRB (80, 80, 240, 240)
image = slide.Shapes.AppendEmbedImageByPath (ShapeType.Rectangle, "image.png", rect)
#Add a hyperlink to the image
hyperlink = ClickHyperlink("https://www.e-iceblue.com/Introduce/presentation-for-python.html")
image.Click = hyperlink
#Save the result file
presentation.SaveToFile(outputFile, FileFormat.Pptx2013)
presentation.Dispose()
Apply for a Temporary License
If you'd like to remove the evaluation message from the generated documents, or to get rid of the function limitations, please request a 30-day trial license for yourself.
Conditional formatting is a powerful feature in Microsoft Excel that allows users to apply formatting rules to cells based on specific conditions or criteria. It provides a quick and efficient way to visually highlight and analyze data, making it easier to identify trends, patterns, and outliers. With conditional formatting, users can customize the appearance of cells, such as font color, cell background, and borders, to draw attention to specific data points or results. In this article, you will learn how to programmatically apply conditional formatting in Excel in Python using Spire.XLS for Python.
- Alternate Row Colors in Excel Using Conditional Formatting in Python
- Highlight Top or Bottom Ranked Values in Excel in Python
- Highlight Values Below or Above Average in Excel in Python
- Highlight Values Between Two Numbers in Excel in Python
Install Spire.XLS for Python
This scenario requires Spire.XLS for Python and plum-dispatch v1.7.4. They can be easily installed in your Windows through the following pip command.
pip install Spire.XLS
If you are unsure how to install, please refer to this tutorial: How to Install Spire.XLS for Python on Windows
Alternate Row Colors in Excel Using Conditional Formatting in Python
Apply alternating row colors enhances the readability and visual appeal of a spreadsheet. By using different background colors for adjacent rows, it makes it easier to distinguish and follow individual rows of data. The following are the steps to alternate row colors in Excel using conditional formatting with Spire.XLS for Python.
- Create a Workbook object.
- Load an Excel file using Workbook.LoadFromFile() method.
- Get a specific worksheet from the workbook through Workbook.Worsheets[index] property.
- Add a conditional format to the worksheet using Worksheet.ConditionalFormats.Add() method and return an object of XlsConditionalFormats class.
- Specify the cell range where the conditional formatting will be applied using XlsConditionalFormats.AddRange() method.
- Add a condition using XlsConditionalFormats.AddCondition() method to change the color of even rows.
- Add another condition to change the color of odd rows.
- Save the workbook to an Excel file using Workbook.SaveToFile() method.
- Python
from spire.xls import *
from spire.xls.common import *

# Create a Workbook object
workbook = Workbook()

# Load a file from disk
workbook.LoadFromFile("C:/Users/Administrator/Desktop/input.xlsx")

# Get the first worksheet
sheet = workbook.Worksheets[0]

# Add a conditional format to the worksheet
conditionalFormat = sheet.ConditionalFormats.Add()

# Specify the range where the conditional format will be applied
conditionalFormat.AddRange(sheet.Range[2, 1, sheet.LastRow, sheet.LastColumn])

# Specify the first condition and format the cells that match the condition
condition1 = conditionalFormat.AddCondition()
condition1.FirstFormula = "=MOD(ROW(),2)=0"
condition1.FormatType = ConditionalFormatType.Formula
condition1.BackColor = Color.get_White()

# Specify the second condition and format the cells that match the condition
condition2 = conditionalFormat.AddCondition()
condition2.FirstFormula = "=MOD(ROW(),2)=1"
condition2.FormatType = ConditionalFormatType.Formula
condition2.BackColor = Color.get_LightGray()

# Save to file
workbook.SaveToFile("output/AlternateRowColors.xlsx", ExcelVersion.Version2016)
workbook.Dispose()

Highlight Top or Bottom Ranked Values in Excel
Highlighting top-ranked or bottom-ranked values in Excel can quickly identify the highest or the lowest values within a range or dataset, making it easier to analyze and interpret the data. The following are the steps to highlight top or bottom ranked values in Excel using conditional formatting with Spire.XLS for Python.
- Create a Workbook object.
- Load an Excel file using Workbook.LoadFromFile() method.
- Get a specific worksheet from the workbook through Workbook.Worsheets[index] property.
- Add a conditional format to the worksheet using Worksheet.ConditionalFormats.Add() method and return an object of XlsConditionalFormats class.
- Specify the cell range where the conditional formatting will be applied using XlsConditionalFormats.AddRange() method.
- Add a condition using XlsConditionalFormats.AddCondition() method to change the color of the cells that have top ranked or bottom ranked values.
- Save the workbook to an Excel file using Workbook.SaveToFile() method.
- Python
from spire.xls import *
from spire.xls.common import *
# Create a Workbook object
workbook = Workbook()
# Load a file from disk
workbook.LoadFromFile("C:/Users/Administrator/Desktop/input.xlsx")
# Get the first worksheet
sheet = workbook.Worksheets[0]
# Add a conditional format to the worksheet
conditionalFormat = sheet.ConditionalFormats.Add()
# Specify the range where the conditional format will be applied
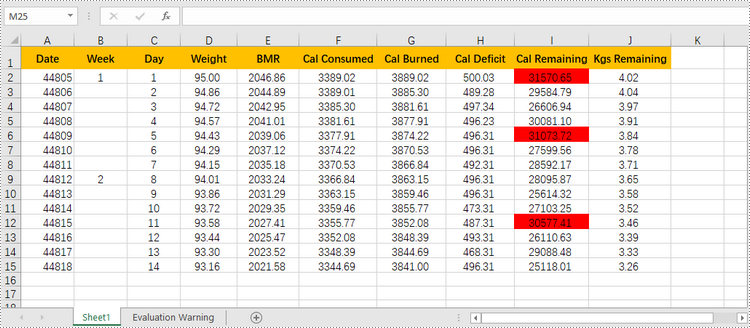
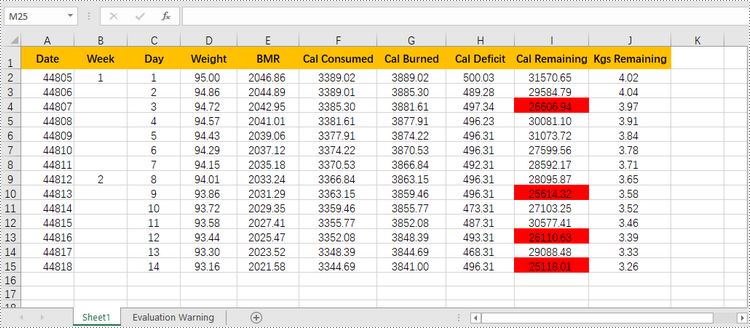
conditionalFormat.AddRange(sheet.Range["I2:I15"])
# Add a condition to highlight the top 3 ranked values
condition1 = conditionalFormat.AddTopBottomCondition(TopBottomType.Top, 3)
condition1.BackColor = Color.get_Red()
# Add a condition to highlight the bottom 3 ranked values
# condition2 = conditionalFormat.AddTopBottomCondition(TopBottomType.Bottom, 3)
# condition2.BackColor = Color.get_Green()
# Save the workbook to an Excel file
workbook.SaveToFile("output/TopOrBottomValues.xlsx", ExcelVersion.Version2016)
Highlight Values Below or Above Average in Excel
To quickly identify data points that are significantly higher or lower than the average, you can use conditional formatting as well. Here are the detailed steps.
- Create a Workbook object.
- Load an Excel file using Workbook.LoadFromFile() method.
- Get a specific worksheet from the workbook through Workbook.Worsheets[index] property.
- Add a conditional format to the worksheet using Worksheet.ConditionalFormats.Add() method and return an object of XlsConditionalFormats class.
- Specify the cell range where the conditional formatting will be applied using XlsConditionalFormats.AddRange() method.
- Add a condition using XlsConditionalFormats.AddCondition() method to change the color of the cells with values above or below the average.
- Save the workbook to an Excel file using Workbook.SaveToFile() method.
- Python
from spire.xls import *
from spire.xls.common import *
# Create a Workbook object
workbook = Workbook()
# Load a file from disk
workbook.LoadFromFile("C:/Users/Administrator/Desktop/input.xlsx")
# Get the first worksheet
sheet = workbook.Worksheets[0]
# Add a conditional format to the worksheet
conditionalFormat = sheet.ConditionalFormats.Add()
# Specify the range where the conditional format will be applied
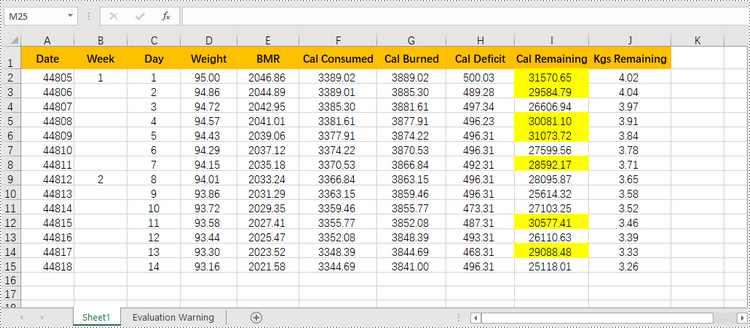
conditionalFormat.AddRange(sheet.Range["I2:I15"])
# Add a condition to highlight the values above average
condition1 = conditionalFormat.AddAverageCondition(AverageType.Above)
condition1.BackColor = Color.get_Yellow()
# Add a condition to highlight the values below average
# condition2 = conditionalFormat.AddAverageCondition(AverageType.Below)
# condition2.BackColor = Color.get_DarkGray()
# Save the workbook to an Excel file
workbook.SaveToFile("output/AboveOrBelowAverage.xlsx", ExcelVersion.Version2016)
Highlight Values Between Two Numbers in Excel
Highlighting values between a specific range helps you quickly identify and focus on the relevant data points that fall within the range. The following are the steps to highlight values between two numbers using conditional formatting with Spire.XLS for Python.
- Create a Workbook object.
- Load an Excel file using Workbook.LoadFromFile() method.
- Get a specific worksheet from the workbook through Workbook.Worsheets[index] property.
- Add a conditional format to the worksheet using Worksheet.ConditionalFormats.Add() method and return an object of XlsConditionalFormats class.
- Specify the cell range where the conditional formatting will be applied using XlsConditionalFormats.AddRange() method.
- Add a condition using XlsConditionalFormats.AddCondition() method to change the color of the cells with values between two specific numbers.
- Save the workbook to an Excel file using Workbook.SaveToFile() method.
- Python
from spire.xls import *
from spire.xls.common import *

# Create a Workbook object
workbook = Workbook()

# Load a file from disk
workbook.LoadFromFile("C:/Users/Administrator/Desktop/input.xlsx")

# Get the first worksheet
sheet = workbook.Worksheets[0]

# Add a conditional format to the worksheet
conditionalFormat = sheet.ConditionalFormats.Add()

# Specify the range where the conditional format will be applied
conditionalFormat.AddRange(sheet.Range["I2:I15"])

# Create a condition and format the cells that meet the condition
condition = conditionalFormat.AddCondition()
condition.FormatType = ConditionalFormatType.CellValue
condition.Operator = ComparisonOperatorType.Between
condition.FirstFormula = "25000"
condition.SecondFormula = "27000"
condition.BackColor = Color.get_Red()

# Save the workbook to an Excel file
workbook.SaveToFile("output/ValuesBetweenTwoNumbers.xlsx", ExcelVersion.Version2016)
Apply for a Temporary License
If you'd like to remove the evaluation message from the generated documents, or to get rid of the function limitations, please request a 30-day trial license for yourself.
Footnotes are a valuable tool in Microsoft Word that allows you to enhance the content of your documents by providing additional information, references, or citations at the bottom of a page. For example, you can use footnotes to provide in-depth explanations of complex concepts, cite sources to support your arguments, or offer tangential information that might be interesting to your readers. Whether you're working on an academic paper, a book, or any document that requires citations or explanations, footnotes offer a convenient way to maintain a clean and organized layout while presenting supplementary details. In this article, we will explain how to insert or remove footnotes in a Word document in Python using Spire.Doc for Python.
- Insert a Footnote for a Specific Paragraph in Word in Python
- Insert a Footnote for a Specific Text in Word in Python
- Remove Footnotes in a Word Document in Python
Install Spire.Doc for Python
This scenario requires Spire.Doc for Python and plum-dispatch v1.7.4. They can be easily installed in your Windows through the following pip command.
pip install Spire.Doc
If you are unsure how to install, please refer to this tutorial: How to Install Spire.Doc for Python on Windows
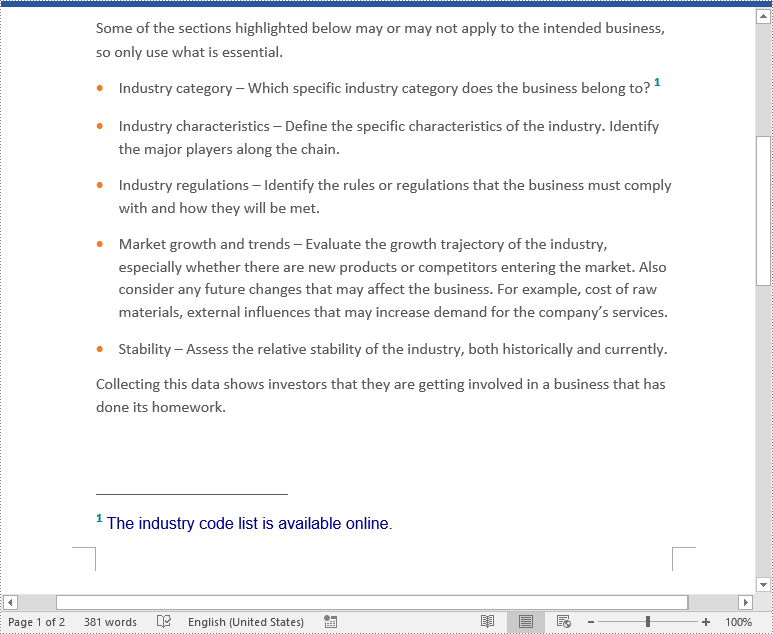
Insert a Footnote for a Specific Paragraph in Word in Python
You can use the Paragraph.AppendFootnote(FootnoteType.Footnote) method provided by Spire.Doc for Python to easily add a footnote for a specific paragraph. The detailed steps are as follows.
- Create an object of the Document class.
- Load a Word document using Document.LoadFromFile() method.
- Get a specific section in the document using Document.Section[int] property and then get a specific paragraph of the section using Section.Paragraphs[int] property.
- Add a footnote at the end of the paragraph using Paragraph.AppendFootnote(FootnoteType.Footnote) method.
- Set the text content of the footnote, and then set the font and color for the footnote text and the footnote reference mark.
- Save the result document using Document.SaveToFile() method.
- Python
from spire.doc import *
from spire.doc.common import *

# Create a Document instance
document = Document()
# Load a sample Word document
document.LoadFromFile("Sample.docx")

# Get a specific section
section = document.Sections.get_Item(0)

# Get a specific paragraph
paragraph = section.Paragraphs.get_Item(3)

# Add a footnote at the end of the paragraph
footnote = paragraph.AppendFootnote(FootnoteType.Footnote)

# Set the text content of the footnote
text = footnote.TextBody.AddParagraph().AppendText("The industry code list is available online.")

# Set the text font and color
text.CharacterFormat.FontName = "Arial"
text.CharacterFormat.FontSize = 12
text.CharacterFormat.TextColor = Color.get_DarkBlue()

# Set the font and color of the footnote reference mark
footnote.MarkerCharacterFormat.FontName = "Calibri"
footnote.MarkerCharacterFormat.FontSize = 15
footnote.MarkerCharacterFormat.Bold = True
footnote.MarkerCharacterFormat.TextColor = Color.get_DarkCyan()

# Save the result document
document.SaveToFile("AddFootnoteForParagraph.docx", FileFormat.Docx2016)
document.Close()
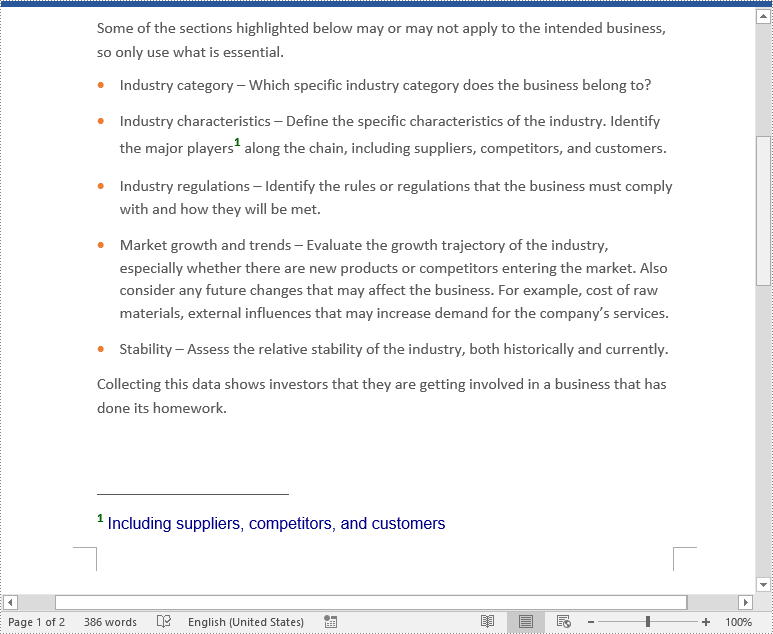
Insert a Footnote for a Specific Text in Word in Python
To add a footnote for a specific text, you need to find the text in the document, get the location of the text in its owner paragraph, and then insert the footnote after the text. The detailed steps are as follows.
- Create an object of the Document class.
- Load a Word document using Document.LoadFromFile() method.
- Find a specific text using Document.FindString() method.
- Get the found text as a single text range using TextSelection.GetAsOneRange() method.
- Get the paragraph where the text range is located using TextRange.OwnerParagraph property.
- Get the index position of the text range in the paragraph using Paragraph.ChildObjects.IndexOf() method.
- Add a footnote to the paragraph using Paragraph.AppendFootnote(FootnoteType.Footnote) method, and then insert the footnote after the specific text using Paragraph.ChildObjects.Insert() method.
- Set the text content of the footnote, and then set the font and color for the footnote text and the footnote reference mark.
- Save the result document using Document.SaveToFile() method.
- Python
from spire.doc import *
from spire.doc.common import *

# Create a Document instance
document = Document()
# Load a sample Word document
document.LoadFromFile("Sample.docx")

# Find a specific text
selection = document.FindString("major players", False, True)

# Get the found text as a single text range
textRange = selection.GetAsOneRange()

# Get the paragraph where the text range is located
paragraph = textRange.OwnerParagraph

# Get the index position of the text range in the paragraph
index = paragraph.ChildObjects.IndexOf(textRange)

# Add a footnote to the paragraph
footnote = paragraph.AppendFootnote(FootnoteType.Footnote)

# Insert the footnote after the text range
paragraph.ChildObjects.Insert(index + 1, footnote)

# Set the text content of the footnote
text = footnote.TextBody.AddParagraph().AppendText("Including suppliers, competitors, and customers")

# Set the text font and color
text.CharacterFormat.FontName = "Arial"
text.CharacterFormat.FontSize = 12
text.CharacterFormat.TextColor = Color.get_DarkBlue()

# Set the font and color of the footnote reference mark
footnote.MarkerCharacterFormat.FontName = "Calibri"
footnote.MarkerCharacterFormat.FontSize = 15
footnote.MarkerCharacterFormat.Bold = True
footnote.MarkerCharacterFormat.TextColor = Color.get_DarkGreen()

# Save the result document
document.SaveToFile("AddFootnoteForText.docx", FileFormat.Docx2016)
document.Close()
Remove Footnotes in a Word Document in Python
When the footnotes of a Word document are no longer needed, you can remove them to make the document neater. The detailed steps are as follows.
- Create an object of the Document class.
- Load a Word document using Document.LoadFromFile() method.
- Get a specific section using Document.Sections[int] property.
- Loop through each paragraph in the section to find the footnotes.
- Remove the footnotes using Paragraph.ChildObjects.RemoveAt() method.
- Save the result document using Document.SaveToFile() method.
- Python
from spire.doc import *
from spire.doc.common import *

# Create a Document instance
document = Document()
# Load a sample Word document
document.LoadFromFile("AddFootnoteForParagraph.docx")

# Get the first section of the document
section = document.Sections[0]

# Loop through the paragraphs in the section
for y in range(section.Paragraphs.Count):
    para = section.Paragraphs.get_Item(y)
    index = -1
    i = 0
    cnt = para.ChildObjects.Count
    while i < cnt:
        pBase = para.ChildObjects[i] if isinstance(para.ChildObjects[i], ParagraphBase) else None
        if isinstance(pBase, Footnote):
            index = i
            break
        i += 1
    if index > -1:
        # Remove the footnotes from the paragraph
        para.ChildObjects.RemoveAt(index)

# Save the result document
document.SaveToFile("RemoveFootnotes.docx", FileFormat.Docx)
document.Close()

Apply for a Temporary License
If you'd like to remove the evaluation message from the generated documents, or to get rid of the function limitations, please request a 30-day trial license for yourself.
