
Knowledgebase (2370)
Children categories
Python: Add, Replace, or Remove Images in a PDF Document
2023-10-17 00:46:55 Written by AdministratorAlongside textual content, images in a PDF play a crucial role in conveying messages effectively. Being able to manipulate images within a PDF document, such as adding, replacing, or removing them, can be incredibly useful for enhancing the visual appeal, updating outdated graphics, or modifying the document's content. In this article, you will learn how to add, replace, or delete images in a PDF document in Python using Spire.PDF for Python.
- Add an Image to a PDF Document in Python
- Replace an Image in a PDF Document in Python
- Remove an Image from a PDF Document in Python
Install Spire.PDF for Python
This scenario requires Spire.PDF for Python and plum-dispatch v1.7.4. They can be easily installed in your Windows through the following pip command.
pip install Spire.PDF
If you are unsure how to install, please refer to this tutorial: How to Install Spire.PDF for Python on Windows
Add an Image to a PDF Document in Python
To add an image to a PDF page, you can use the PdfPage.Canvas.DrawImage() method. The following are the detailed steps.
- Create a PdfDocument object.
- Add a page to the document using PdfDocument.Pages.Add() method.
- Load an image using PdfImage.FromFile() method.
- Draw the image on the page using PdfPageBase.Canvas.DrawImage() method.
- Save the document using PdfDocument.SaveToFile() method.
- Python
from spire.pdf.common import *
from spire.pdf import *

# Create a PdfDocument instance
doc = PdfDocument()

# Set the page margins
doc.PageSettings.SetMargins(30.0, 30.0, 30.0, 30.0)

# Add a page
page = doc.Pages.Add()

# Load an image
image = PdfImage.FromFile('C:/Users/Administrator/Desktop/logo.png')

# Specify the size of the image in the document
width = image.Width * 0.70
height = image.Height * 0.70

# Specify the X and Y coordinates where the image will be drawn
x = 10.0
y = 30.0

# Draw the image at a specified location on the page
page.Canvas.DrawImage(image, x, y, width, height)

# Save the result document
doc.SaveToFile("output/AddImage.pdf", FileFormat.PDF)
Replace an Image in a PDF Document in Python
Spire.PDF for Python offers the PdfImageHelper class to help us get and deal with the images in a certain page. To replace an image with a new one, you can use the PdfImageHelper.ReplaceImage() method. The following are the steps.
- Create a PdfDocument object.
- Load a PDF document using PdfDocument.LoadFromFile() method.
- Get a specific page through PdfDocument.Pages[index] property.
- Load an image using PdfImage.FromFile() method.
- Create a PdfImageHelper object, and get the image information from the specified page using PdfImageHelper.GetImagesInfo() method.
- Replace an existing image in the page with the new image using PdfImageHelper.ReplaceImage() method.
- Save the document using PdfDocument.SaveToFile() method.
- Python
from spire.pdf.common import *
from spire.pdf import *

# Create a PdfDocument instance
doc = PdfDocument()

# Load a PDF document
doc.LoadFromFile('C:/Users/Administrator/Desktop/input.pdf')

# Get the first page
page = doc.Pages.get_Item(0)

# Load an image
image = PdfImage.FromFile('C:/Users/Administrator/Desktop/newImage.png')

# Create a PdfImageHelper instance
imageHelper = PdfImageHelper()

# Get the image information from the page
imageInfo = imageHelper.GetImagesInfo(page)

# Replace the first image on the page with the loaded image
imageHelper.ReplaceImage(imageInfo[0], image)

# Save the result document
doc.SaveToFile("output/ReplaceImage.pdf", FileFormat.PDF)
Remove an Image from a PDF Document in Python
To remove a specific image from a page, use the PdfPageBase.DeleteImage(index) method. The following are the steps.
- Create a PdfDocument object.
- Load a PDF document using PdfDocument.LoadFromFile() method.
- Get a specific page through PdfDocument.Pages[index] property.
- Delete a certain image in the page by its index using PdfPageBase.DeleteImage() method.
- Save the document using PdfDocument.SaveToFile() method.
- Python
from spire.pdf.common import *
from spire.pdf import *

# Create a PdfDocument instance
doc = PdfDocument()

# Load a PDF document
doc.LoadFromFile('C:/Users/Administrator/Desktop/input.pdf')

# Get the first page
page = doc.Pages.get_Item(0)

# Delete the first image on the page
page.DeleteImage(0)

# Save the result document
doc.SaveToFile('output/DeleteImage.pdf', FileFormat.PDF)
Apply for a Temporary License
If you'd like to remove the evaluation message from the generated documents, or to get rid of the function limitations, please request a 30-day trial license for yourself.
Modifying the font in a Word document can significantly impact its visual appearance and overall readability. Whether you want to enhance the document's style or align it with specific formatting requirements, changing the font is a straightforward process that allows you to customize your text. In this article, you will learn how to change font of a paragraph or a piece of text in a Word document in Python using Spire.Doc for Python.
Install Spire.Doc for Python
This scenario requires Spire.Doc for Python and plum-dispatch v1.7.4. They can be easily installed in your Windows through the following pip command.
pip install Spire.Doc
If you are unsure how to install, please refer to this tutorial: How to Install Spire.Doc for Python on Windows
Change the Font of a Paragraph in Python
Using Spire.Doc for Python, you can create a ParagraphStyle object which defines the font information that can be applied to a certain paragraph. The following are the steps to change the font of a paragraph.
- Create a Document instance.
- Load a Word document using Document.LoadFromFile() method.
- Get a specified section through Document.Sections[index] property.
- Get a specified paragraph that you want to change the font through Section.Paragraphs[index] property.
- Create a ParagraphStyle instance, specifying the font name, font color and font style through the properties under it.
- Add the style to the document using Document.Styles.Add() method.
- Apply the style to the paragraph using Paragraph.ApplyStyle() method.
- Save the result document using Document.SaveToFile() method.
- Python
from spire.doc import *
from spire.doc.common import *

# Create a Document instance
document = Document()

# Load a Word document
document.LoadFromFile('C:/Users/Administrator/Desktop/input.docx')

# Get the first section
section = document.Sections[0]

# Get a specific paragraph
paragraph = section.Paragraphs[2]

# Create a paragraph style
style = ParagraphStyle(document)
style.Name = 'NewStyle'
style.CharacterFormat.Bold = True
style.CharacterFormat.Italic = True
style.CharacterFormat.TextColor = Color.get_Red()
style.CharacterFormat.FontName = 'Cambria'
document.Styles.Add(style)

# Apply the style to the paragraph
paragraph.ApplyStyle(style.Name)

# Save the result document
document.SaveToFile('output/ChangeFontOfParagraph.docx', FileFormat.Docx)
Change the Font of Specific Text in Python
To change the font of specific text (letter, phrase or sentence) in a Word document, you need first to find the text from the document and then set a different color or font style for it. The following are the detailed steps.
- Create a Document instance.
- Load a Word document using Document.LoadFromFile() method.
- Find the text that you want to change font color using Document.FindAllString() method.
- Loop through all occurrences of the searched text and change the font color or style for each occurrence through the properties under TextSelection.GetAsOneRange().CharacterFormat object.
- Save the result document using Document.SaveToFile() method.
- Python
from spire.doc import *
from spire.doc.common import *

# Create a Document instance
document = Document()

# Load a Word document
document.LoadFromFile('C:/Users/Administrator/Desktop/input.docx')

# Find the text that you want to change font
textSelections = document.FindAllString('programming language', False, True)

# Change the font style of the text
for selection in textSelections:
    selection.GetAsOneRange().CharacterFormat.TextColor = Color.get_Red()
    selection.GetAsOneRange().CharacterFormat.Bold = True

# Save the result document
document.SaveToFile('output/ChangeFontOfText.docx', FileFormat.Docx)

Apply for a Temporary License
If you'd like to remove the evaluation message from the generated documents, or to get rid of the function limitations, please request a 30-day trial license for yourself.
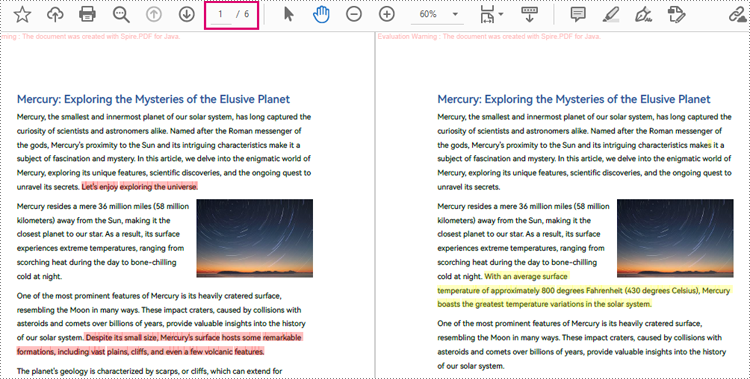
Comparison of PDF documents is essential for effective document management. By comparing PDF documents, users can easily identify differences in document content to have a more comprehensive understanding of them, which will greatly facilitate the user to modify and integrate the document content. This article will introduce how to use Spire.PDF for Java to compare PDF documents and find the differences.
Examples of the two PDF documents that will be used for comparison:
Install Spire.PDF for Java
First of all, you need to add the Spire.Pdf.jar file as a dependency in your Java program. The JAR file can be downloaded from this link. If you use Maven, you can easily import the JAR file by adding the following code to your project's pom.xml file.
<repositories>
    <repository>
        <id>com.e-iceblue</id>
        <name>e-iceblue</name>
        <url>https://repo.e-iceblue.com/nexus/content/groups/public/</url>
    </repository>
</repositories>
<dependencies>
    <dependency>
        <groupId>e-iceblue</groupId>
        <artifactId>spire.pdf</artifactId>
        <version>12.7.0</version>
    </dependency>
</dependencies>
Compare Two PDF Documents
Spire.PDF for Java provides the PdfComparer class for users to create an object with two PDF documents for comparing. After creating the PdfComparer object, users can use PdfComparer.compare(String fileName) method to compare the two documents and save the result as a new PDF file.
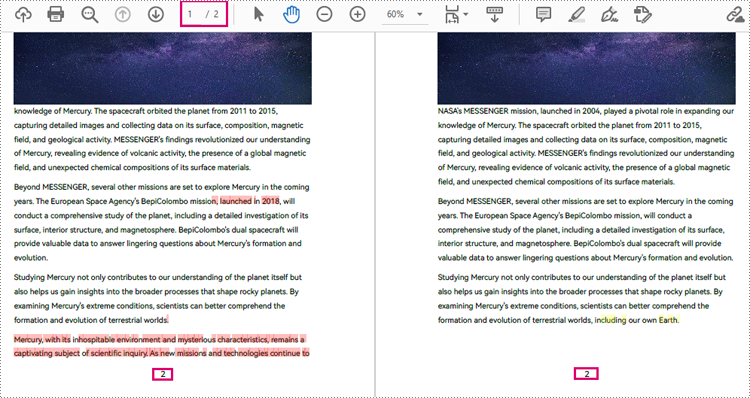
The resulting PDF document displays the two original documents on the left and the right, with the deleted items in red and the added items in yellow.
The detailed steps for comparing two PDF documents are as follows:
- Create two objects of PdfDocument class and load two PDF documents using PdfDocument.loadFromFile() method.
- Create an object of PdfComparer class with the two documents.
- Compare the two documents and save the result as a new PDF document using PdfComparer.compare() method.
- Java
import com.spire.pdf.PdfDocument;
import com.spire.pdf.comparison.PdfComparer;

public class ComparePDFPageRange {
    public static void main(String[] args) {
        //Create an object of PdfDocument class and load a PDF document
        PdfDocument pdf1 = new PdfDocument();
        pdf1.loadFromFile("Sample1.pdf");

        //Create another object of PdfDocument class and load another PDF document
        PdfDocument pdf2 = new PdfDocument();
        pdf2.loadFromFile("Sample2.pdf");

        //Create an object of PdfComparer class
        PdfComparer comparer = new PdfComparer(pdf1,pdf2);

        //Compare the two PDF documents and save the compare results to a new document
        comparer.compare("ComparisonResult.pdf");
    }
}
Compare a Specified Page Range of Two PDF Documents
Before comparing, users can use the PdfComparer.getOptions().setPageRanges() method to limit the page range to be compared. The detailed steps are as follows:
- Create two objects of PdfDocument class and load two PDF documents using PdfDocument.loadFromFile() method.
- Create an object of PdfComparer class with the two documents.
- Set the page range to be compared using PdfComparer.getOptions().setPageRanges() method.
- Compare the two documents and save the result as a new PDF document using PdfComparer.compare() method.
- Java
import com.spire.pdf.PdfDocument;
import com.spire.pdf.comparison.PdfComparer;

public class ComparePDFPageRange {
    public static void main(String[] args) {
        //Create an object of PdfDocument class and load a PDF document
        PdfDocument pdf1 = new PdfDocument();
        pdf1.loadFromFile("G:/Documents/Sample6.pdf");

        //Create another object of PdfDocument class and load another PDF document
        PdfDocument pdf2 = new PdfDocument();
        pdf2.loadFromFile("G:/Documents/Sample7.pdf");

        //Create an object of PdfComparer class
        PdfComparer comparer = new PdfComparer(pdf1,pdf2);

        //Set the page range to be compared
        comparer.getOptions().setPageRanges(1, 1, 1, 1);

        //Compare the two PDF documents and save the compare results to a new document
        comparer.compare("ComparisonResult.pdf");
    }
}
Apply for a Temporary License
If you'd like to remove the evaluation message from the generated documents, or to get rid of the function limitations, please request a 30-day trial license for yourself.
