
Knowledgebase (2370)
Children categories
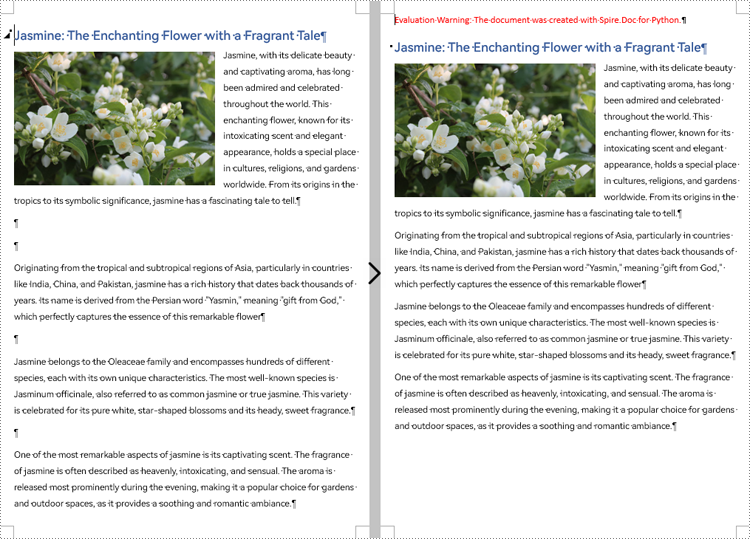
During the process of document creation, it is common to encounter numerous blank lines. These empty spaces can disrupt the flow of the content, clutter the layout, and undermine the overall aesthetic presentation of the document. In order to optimize the reading experience and ensure a well-structured document, it becomes crucial to eliminate the blank lines. This article will demonstrate how to delete blank lines from Word documents through Python programs using Spire.Doc for Python.
Install Spire.Doc for Python
This scenario requires Spire.Doc for Python and plum-dispatch v1.7.4. They can be easily installed in your Windows through the following pip command.
pip install Spire.Doc
If you are unsure how to install, please refer to this tutorial: How to Install Spire.Doc for Python on Windows
Remove Blank Lines from Word Documents
Blank lines in a Word document appear as blank paragraphs, which are child objects of sections. Therefore, removing blank lines simply requires iterating through the sections, identifying and deleting empty paragraphs within them. The detailed steps are as follows:
- Create an object of Document class.
- Load a Word document using Document.LoadFromFile() method.
- Iterate through each section and each child object of the sections.
- First, check if a child object is of paragraph type. If it is, continue to check if the sub-object is an instance of the "Paragraph" class. If it is, further check if the paragraph has no text. If there is no text, delete the paragraph using Section.Body.ChildObjects.Remove() method.
- Save the document using Document.SaveToFile() method.
- Python
from spire.doc import *
from spire.doc.common import *

# Create an object of the Document class
doc = Document()

# Load a Word document
doc.LoadFromFile("Sample.docx")

# Iterate through each section in the document
for i in range(doc.Sections.Count):
    section = doc.Sections.get_Item(i)
    j = 0
    # Iterate through each child object in the section
    while j < section.Body.ChildObjects.Count:
        # Check if the child object is of type Paragraph
        if section.Body.ChildObjects[j].DocumentObjectType == DocumentObjectType.Paragraph:
            objItem = section.Body.ChildObjects[j]
            # Check if the child object is an instance of the Paragraph class
            if isinstance(objItem, Paragraph):
                paraObj = Paragraph(objItem)
                # Check if the paragraph text is empty
                if len(paraObj.Text) == 0:
                    # If the paragraph text is empty, remove the object from the section's child objects list
                    section.Body.ChildObjects.Remove(objItem)
                    j -= 1
        j += 1

# Save the document
doc.SaveToFile("output/RemoveBlankLines.docx")
Apply for a Temporary License
If you'd like to remove the evaluation message from the generated documents, or to get rid of the function limitations, please request a 30-day trial license for yourself.
Hyperlinks are an essential component of creating dynamic and interactive Word documents. By linking specific text or objects to other documents, web pages, email addresses, or specific locations within the same document, hyperlinks allow users to navigate through information seamlessly. In this article, you will learn how to add or remove hyperlinks in a Word document in Python using Spire.Doc for Python.
Install Spire.Doc for Python
This scenario requires Spire.Doc for Python and plum-dispatch v1.7.4. They can be easily installed in your Windows through the following pip command.
pip install Spire.Doc
If you are unsure how to install, please refer to this tutorial: How to Install Spire.Doc for Python on Windows
Add Hyperlinks to Word in Python
Spire.Doc for Python offers the Paragraph.AppendHyperlink() method to add a web link, an email link, a file link, or a bookmark link to a piece of text or an image inside a paragraph. The following are the detailed steps.
- Create a Document object.
- Add a section and a paragraph to it.
- Insert a hyperlink based on text using Paragraph.AppendHyerplink(link: str, text: str, type: HyperlinkType) method.
- Add an image to the paragraph using Paragraph.AppendPicture() method.
- Insert a hyperlink based on the image using Paragraph.AppendHyerplink(link: str, picture: DocPicture, type: HyperlinkType) method.
- Save the result document using Document.SaveToFile() method.
- Python
from spire.doc import *
from spire.doc.common import *
# Create a Word document
doc = Document()
# Add a section
section = doc.AddSection()
# Add a paragraph
paragraph = section.AddParagraph()
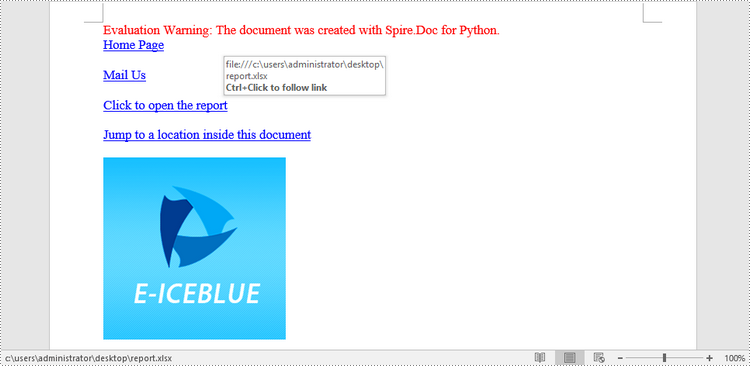
paragraph.AppendHyperlink("https://www-iceblue.com/", "Home Page", HyperlinkType.WebLink)
# Append line breaks
paragraph.AppendBreak(BreakType.LineBreak)
paragraph.AppendBreak(BreakType.LineBreak)
# Add an email link
paragraph.AppendHyperlink("mailto:support@e-iceblue.com", "Mail Us", HyperlinkType.EMailLink)
# Append line breaks
paragraph.AppendBreak(BreakType.LineBreak)
paragraph.AppendBreak(BreakType.LineBreak)
# Add a file link
filePath = "C:\\Users\\Administrator\\Desktop\\report.xlsx"
paragraph.AppendHyperlink(filePath, "Click to open the report", HyperlinkType.FileLink)
# Append line breaks
paragraph.AppendBreak(BreakType.LineBreak)
paragraph.AppendBreak(BreakType.LineBreak)
# Add another section and create a bookmark
section2 = doc.AddSection()
bookmarkParagrapg = section2.AddParagraph()
bookmarkParagrapg.AppendText("Here is a bookmark")
start = bookmarkParagrapg.AppendBookmarkStart("myBookmark")
bookmarkParagrapg.Items.Insert(0, start)
bookmarkParagrapg.AppendBookmarkEnd("myBookmark")
# Link to the bookmark
paragraph.AppendHyperlink("myBookmark", "Jump to a location inside this document", HyperlinkType.Bookmark)
# Append line breaks
paragraph.AppendBreak(BreakType.LineBreak)
paragraph.AppendBreak(BreakType.LineBreak)
# Add an image link
image = "C:\\Users\\Administrator\\Desktop\\logo.png"
picture = paragraph.AppendPicture(image)
paragraph.AppendHyperlink("https://www.e-iceblue.com/", picture, HyperlinkType.WebLink)
# Save to file
doc.SaveToFile("output/CreateHyperlinks.docx", FileFormat.Docx2019);
doc.Dispose()
Remove Hyperlinks from Word in Python
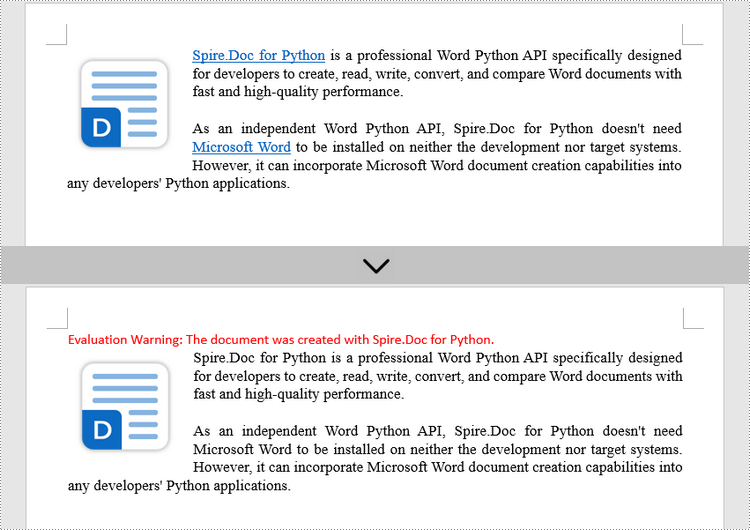
To delete all hyperlinks in a Word document at once, you'll need to find all the hyperlinks in the document and then create a custom method FlattenHyperlinks() to flatten them. The following are the detailed steps.
- Create a Document object.
- Load a sample Word document using Document.LoadFromFile() method.
- Find all the hyperlinks in the document using custom method FindAllHyperlinks().
- Loop through the hyperlinks and flatten all of them using custom method FlattenHyperlinks().
- Save the result document using Document.SaveToFile() method.
- Python
from spire.doc import *
from spire.doc.common import *

# Find all the hyperlinks in a document
def FindAllHyperlinks(document):
    hyperlinks = []
    for i in range(document.Sections.Count):
        section = document.Sections.get_Item(i)
        for j in range(section.Body.ChildObjects.Count):
            sec = section.Body.ChildObjects.get_Item(j)
            if sec.DocumentObjectType == DocumentObjectType.Paragraph:
                for k in range((sec if isinstance(sec, Paragraph) else None).ChildObjects.Count):
                    para = (sec if isinstance(sec, Paragraph)
                            else None).ChildObjects.get_Item(k)
                    if para.DocumentObjectType == DocumentObjectType.Field:
                        field = para if isinstance(para, Field) else None
                        if field.Type == FieldType.FieldHyperlink:
                            hyperlinks.append(field)
    return hyperlinks

# Flatten the hyperlink fields
def FlattenHyperlinks(field):
    ownerParaIndex = field.OwnerParagraph.OwnerTextBody.ChildObjects.IndexOf(
        field.OwnerParagraph)
    fieldIndex = field.OwnerParagraph.ChildObjects.IndexOf(field)
    sepOwnerPara = field.Separator.OwnerParagraph
    sepOwnerParaIndex = field.Separator.OwnerParagraph.OwnerTextBody.ChildObjects.IndexOf(
        field.Separator.OwnerParagraph)
    sepIndex = field.Separator.OwnerParagraph.ChildObjects.IndexOf(
        field.Separator)
    endIndex = field.End.OwnerParagraph.ChildObjects.IndexOf(field.End)
    endOwnerParaIndex = field.End.OwnerParagraph.OwnerTextBody.ChildObjects.IndexOf(
        field.End.OwnerParagraph)

    FormatFieldResultText(field.Separator.OwnerParagraph.OwnerTextBody,
                           sepOwnerParaIndex, endOwnerParaIndex, sepIndex, endIndex)

    field.End.OwnerParagraph.ChildObjects.RemoveAt(endIndex)

    for i in range(sepOwnerParaIndex, ownerParaIndex - 1, -1):
        if i == sepOwnerParaIndex and i == ownerParaIndex:
            for j in range(sepIndex, fieldIndex - 1, -1):
                field.OwnerParagraph.ChildObjects.RemoveAt(j)

        elif i == ownerParaIndex:
            for j in range(field.OwnerParagraph.ChildObjects.Count - 1, fieldIndex - 1, -1):
                field.OwnerParagraph.ChildObjects.RemoveAt(j)

        elif i == sepOwnerParaIndex:
            for j in range(sepIndex, -1, -1):
                sepOwnerPara.ChildObjects.RemoveAt(j)
        else:
            field.OwnerParagraph.OwnerTextBody.ChildObjects.RemoveAt(i)

# Convert fields to text range and clear the text formatting
def FormatFieldResultText(ownerBody, sepOwnerParaIndex, endOwnerParaIndex, sepIndex, endIndex):
    for i in range(sepOwnerParaIndex, endOwnerParaIndex + 1):
        para = ownerBody.ChildObjects[i] if isinstance(
            ownerBody.ChildObjects[i], Paragraph) else None
        if i == sepOwnerParaIndex and i == endOwnerParaIndex:
            for j in range(sepIndex + 1, endIndex):
               if isinstance(para.ChildObjects[j], TextRange):
                 FormatText(para.ChildObjects[j])

        elif i == sepOwnerParaIndex:
            for j in range(sepIndex + 1, para.ChildObjects.Count):
                if isinstance(para.ChildObjects[j], TextRange):
                  FormatText(para.ChildObjects[j])
        elif i == endOwnerParaIndex:
            for j in range(0, endIndex):
               if isinstance(para.ChildObjects[j], TextRange):
                 FormatText(para.ChildObjects[j])
        else:
            for j, unusedItem in enumerate(para.ChildObjects):
                if isinstance(para.ChildObjects[j], TextRange):
                  FormatText(para.ChildObjects[j])

# Format text
def FormatText(tr):
    tr.CharacterFormat.TextColor = Color.get_Black()
    tr.CharacterFormat.UnderlineStyle = UnderlineStyle.none

# Create a Document object
doc = Document()

# Load a Word file
doc.LoadFromFile("C:\\Users\\Administrator\\Desktop\\test.docx")

# Get all hyperlinks
hyperlinks = FindAllHyperlinks(doc)

# Flatten all hyperlinks
for i in range(len(hyperlinks) - 1, -1, -1):
    FlattenHyperlinks(hyperlinks[i])

# Save to a different file
doc.SaveToFile("output/RemoveHyperlinks.docx", FileFormat.Docx)
doc.Close()
Apply for a Temporary License
If you'd like to remove the evaluation message from the generated documents, or to get rid of the function limitations, please request a 30-day trial license for yourself.
Applying a background color or image to a PDF can be an effective way to enhance its visual appeal, create a professional look, or reinforce branding elements. By adding a background, you can customize the overall appearance of your PDF document and make it more engaging for readers. Whether you want to use a solid color or incorporate a captivating image, this feature allows you to personalize your PDFs and make them stand out. In this article, you will learn how to set a background color or image for a PDF document in Python using Spire.PDF for Python.
Install Spire.PDF for Python
This scenario requires Spire.PDF for Python and plum-dispatch v1.7.4. They can be easily installed in your Windows through the following pip command.
pip install Spire.PDF
If you are unsure how to install, please refer to this tutorial: How to Install Spire.PDF for Python on Windows
Set a Background Color for PDF in Python
Spire.PDF for Python offers the PdfPageBase.BackgroundColor property to get or set the background color of a certain page. To add a solid color to the background of each page in the document, follow the steps below.
- Create a PdfDocument object.
- Load a PDF file using PdfDocument.LoadFromFile() method.
- Traverse through the pages in the document, and get a specific page through PdfDocument.Pages[index] property.
- Apply a solid color to the background through PdfPageBase.BackgroundColor property.
- Save the document to a different PDF file using PdfDocument.SaveToFile() method.
- Python
from spire.pdf.common import *
from spire.pdf import *

# Create a PdfDocument object
doc = PdfDocument()

# Load a PDF file
doc.LoadFromFile("C:\\Users\\Administrator\\Desktop\\input.pdf")

# Loop through the pages in the document
for i in range(doc.Pages.Count):

    # Get a particular page
    page = doc.Pages.get_Item(i)

    # Set background color
    page.BackgroundColor = Color.get_LightYellow()

# Save the document to a different file
doc.SaveToFile("output/SetBackgroundColor.pdf")
Set a Background Image for PDF in Python
Likewise, an image can be applied to the background of a specific page via PdfPageBase.BackgroundImage property. The steps to set an image background for the entire document are as follows.
- Create a PdfDocument object.
- Load a PDF file using PdfDocument.LoadFromFile() method.
- Traverse through the pages in the document, and get a specific page through PdfDocument.Pages[index] property.
- Apply an image to the background through PdfPageBase.BackgroundImage property.
- Save the document to a different PDF file using PdfDocument.SaveToFile() method.
- Python
from spire.pdf.common import *
from spire.pdf import *

# Create a PdfDocument object
doc = PdfDocument()

# Load a PDF file
doc.LoadFromFile("C:\\Users\\Administrator\\Desktop\\input.pdf")

# Loop through the pages in the document
for i in range(doc.Pages.Count):

    # Get a particular page
    page = doc.Pages.get_Item(i)

    # Set background image
    page.BackgroundImage = Stream("C:\\Users\\Administrator\\Desktop\\img.jpg")

# Save the document to a different file
doc.SaveToFile("output/SetBackgroundImage.pdf")
Apply for a Temporary License
If you'd like to remove the evaluation message from the generated documents, or to get rid of the function limitations, please request a 30-day trial license for yourself.
