
Knowledgebase (2370)
Children categories
Copying worksheets in Excel is a critical skill to have, especially when you need to create new worksheets based on existing ones. By utilizing the copy function, you can avoid potential errors that may arise from manually recreating the same content. This not only saves time and effort but also ensures that your data remains accurate and reliable. In this article, we will demonstrate how to copy worksheets in Excel in Python using Spire.XLS for Python.
- Copy a Worksheet in the Same Excel Workbook
- Copy a Worksheet to Another Excel Workbook
- Copy Visible Worksheets to a New Excel Workbook
Install Spire.XLS for Python
This scenario requires Spire.XLS for Python and plum-dispatch v1.7.4. They can be easily installed in your Windows through the following pip command.
pip install Spire.XLS
If you are unsure how to install, please refer to this tutorial: How to Install Spire.XLS for Python on Windows
Copy a Worksheet in the Same Excel Workbook in Python
You can copy a worksheet within the same workbook by adding a new worksheet to the workbook and then copying the data from the original worksheet to the new one.
The following steps demonstrate how to copy a worksheet within the same workbook:
- Initialize an instance of the Workbook class.
- Load an Excel workbook using the Workbook.LoadFromFile() method.
- Get a specific worksheet using the Workbook.Worksheets[int index] property.
- Add a new worksheet to the workbook using the Workbook.Worksheets.Add() method.
- Copy the data from the specific worksheet to the new worksheet using the Worksheet.CopyFrom(Worksheet worksheet) method.
- Save the resulting workbook to another file using the Workbook.SaveToFile() method.
- Python
from spire.xls import *
from spire.xls.common import *
#Initialize an instance of the Workbook class
workbook = Workbook()
#Load an Excel workbook
workbook.LoadFromFile("Input.xlsx")
#Get the first worksheet
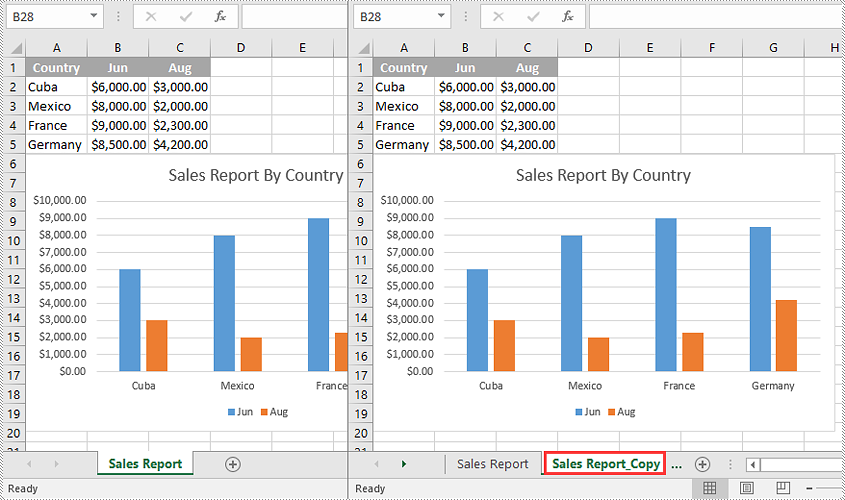
sourceSheet = workbook.Worksheets[0]
sheetName = sourceSheet.Name + "_Copy"
#Add a new worksheet with a specific name to the workbook
destSheet = workbook.Worksheets.Add(sheetName)
#Copy the first worksheet to the newly added worksheet
destSheet.CopyFrom(sourceSheet)
#Save the result workbook to another file
workbook.SaveToFile("CopyInSameWorkbook.xlsx", ExcelVersion.Version2013)
workbook.Dispose()
Copy a Worksheet to Another Excel Workbook in Python
To copy a worksheet from one workbook to another, you need to add a new worksheet to the destination workbook and then copy the data of the worksheet from the source workbook to the new worksheet of the destination workbook. If you want to maintain the source formatting, you can copy the theme of the source workbook to the destination workbook.
The following steps demonstrate how to copy a worksheet from one workbook to another:
- Initialize an instance of the Workbook class.
- Load the source workbook using the Workbook.LoadFromFile() method.
- Get a specific worksheet using the Workbook.Worksheets[int index] property.
- Initialize an instance of the Workbook class.
- Load the destination workbook using the Workbook.LoadFromFile() method.
- Add a new worksheet to the destination workbook using the Workbook.Worksheets.Add() method.
- Copy the specific worksheet of the source workbook to the new worksheet of the destination workbook using the Worksheet.CopyFrom(Worksheet worksheet) method.
- Copy the theme from the source workbook to the destination workbook using the Workbook.CopyTheme (Workbook srcWorkbook) method.
- Save the resulting workbook to another file using the Workbook.SaveToFile() method.
- Python
from spire.xls import *
from spire.xls.common import *
#Initialize an instance of the Workbook class
sourceWorkbook = Workbook()
#Load the source Excel workbook
sourceWorkbook.LoadFromFile("CopyWorksheets-Input.xlsx")
#Get the first worksheet of the source workbook
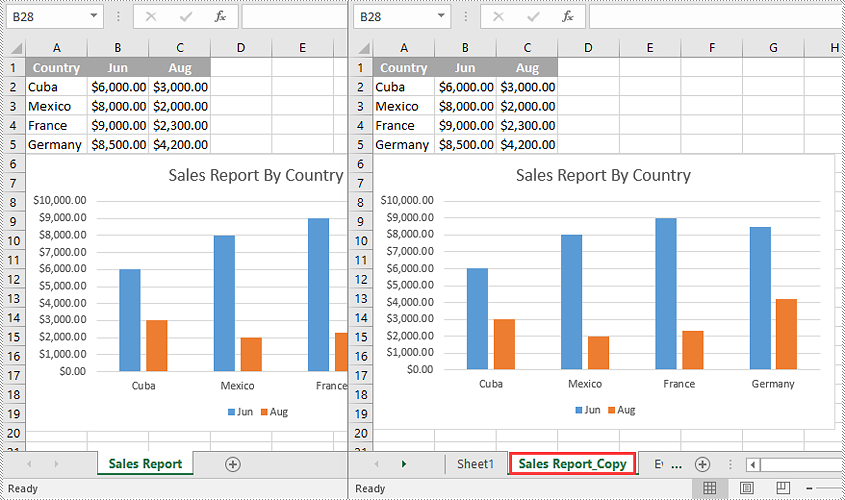
sourceSheet = sourceWorkbook.Worksheets[0]
#Get the name of the first worksheet
sheetName = sourceSheet.Name + "_Copy"
#Initialize an instance of the Workbook class
destWorkbook = Workbook()
#Load the destination Excel workbook
destWorkbook.LoadFromFile("CopyWorksheets-Sample.xlsx")
#Add a new worksheet with a specific name to the destination workbook
destSheet = destWorkbook.Worksheets.Add(sheetName)
#Copy the first worksheet of the source workbook to the new worksheet of the destination workbook
destSheet.CopyFrom(sourceSheet)
#Copy the theme from the source workbook to the destination workbook
destWorkbook.CopyTheme(sourceWorkbook)
#Save the destination workbook to another file
destWorkbook.SaveToFile("CopyToAnotherWorkbook.xlsx", ExcelVersion.Version2013)
sourceWorkbook.Dispose()
destWorkbook.Dispose()
Copy Visible Worksheets to a New Excel Workbook in Python
If you only want to share visible worksheets rather than the entire workbook with others, you can copy the visible worksheets to a new workbook.
The following steps demonstrate how to copy visible worksheets from a workbook to a new workbook:
- Initialize an instance of the Workbook class.
- Load the source workbook using the Workbook.LoadFromFile() method.
- Initialize an instance of the Workbook class to create a new workbook, then clear the default worksheets in the new workbook using the Workbook.Worksheets.Clear() method.
- Iterate through all the worksheets in the source workbook.
- Check if the current worksheet is visible using the Worksheet.Visibility property.
- If the result is true, add a new worksheet to the new workbook using the Workbook.Worksheets.Add() method.
- Copy the worksheet from the source workbook to the new worksheet of the new workbook using the Worksheet.CopyFrom(Worksheet worksheet) method.
- Copy the theme from the source workbook to the new workbook using the Workbook.CopyTheme(Workbook srcWorkbook) method.
- Save the resulting workbook to another file using the Workbook.SaveToFile() method.
- Python
from spire.xls import *
from spire.xls.common import *

#Initialize an instance of the Workbook class
sourceWorkbook = Workbook()
#Load the source Excel workbook
sourceWorkbook.LoadFromFile("CopyWorksheets-Input.xlsx")

#Initialize an instance of the Workbook class to create a new workbook
newWorkbook = Workbook()
newWorkbook.Version = ExcelVersion.Version2013
#Clear the default worksheets in the new workbook
newWorkbook.Worksheets.Clear()

#Iterate through all the worksheets in the source workbook
for sourceSheet in sourceWorkbook.Worksheets:
    #Check if the current worksheet is visible
    if sourceSheet.Visibility == WorksheetVisibility.Visible:
        sheetName = sourceSheet.Name + "_Copy"
        #Add a new worksheet with a specific name to the new workbook
        destSheet = newWorkbook.Worksheets.Add(sheetName)
        #Copy the worksheet from the source workbook to the new worksheet of the new workbook
        destSheet.CopyFrom(sourceSheet)

#Copy the theme from the source workbook to the new workbook
newWorkbook.CopyTheme(sourceWorkbook)

#Save the new workbook to another file
newWorkbook.SaveToFile("CopyVisibleSheetsToNewWorkbook.xlsx", ExcelVersion.Version2013)
sourceWorkbook.Dispose()
newWorkbook.Dispose()
Apply for a Temporary License
If you'd like to remove the evaluation message from the generated documents, or to get rid of the function limitations, please request a 30-day trial license for yourself.
Convert Excel (XLSX/XLS) to CSV in Python – Batch & Multi-Sheet
2023-08-11 00:58:16 Written by Koohji
If you’re looking to convert xlsx to csv in Python, or even handle .xls files, this guide is for you. CSV files are lightweight, easy to parse, and widely supported across databases and data tools—making them ideal for automation and data exchange.
In this article, we’ll show you how to convert Excel to CSV in Python using Spire.XLS for Python. The library supports .xlsx, .xls, and other common Excel spreadsheet formats, and doesn’t rely on any third-party components. You’ll learn how to export the entire workbook, handle multiple worksheets, and ensure encoding—all with clean and efficient Python code.
What’s Covered:
- Convert XLSX to CSV in Python
- Convert Excel (XLS/XLSX) to CSV: All Sheets, Old Files & Batch
- Advanced Conversion: Customize CSV Output in Python
- Bonus Tip: Convert CSV Back to Excel (XLSX)
- Frequently Asked Questions
Convert XLSX to CSV in Python
To follow along, install Spire.XLS for Python (pip install spire.xls) or Free Spire.XLS for Python (pip install spire.xls.free) for lightweight tasks.
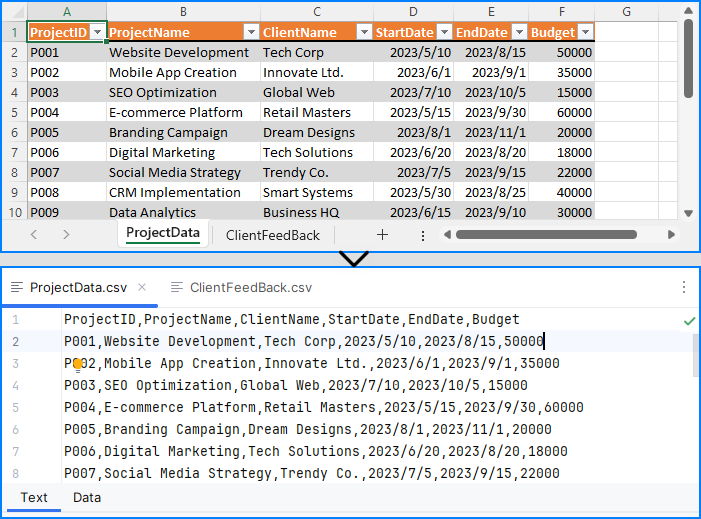
The most common use case is converting .xlsx files to .csv. Here’s a simple script using Spire.XLS:
from spire.xls import Workbook, FileFormat

# Initialize a workbook and load the xlsx file
workbook = Workbook()
workbook.LoadFromFile("Sample.xlsx")

# Save the workbook as a csv file
workbook.SaveToFile("output/XLSXToCSV.csv", FileFormat.CSV)
workbook.Dispose()
Result:
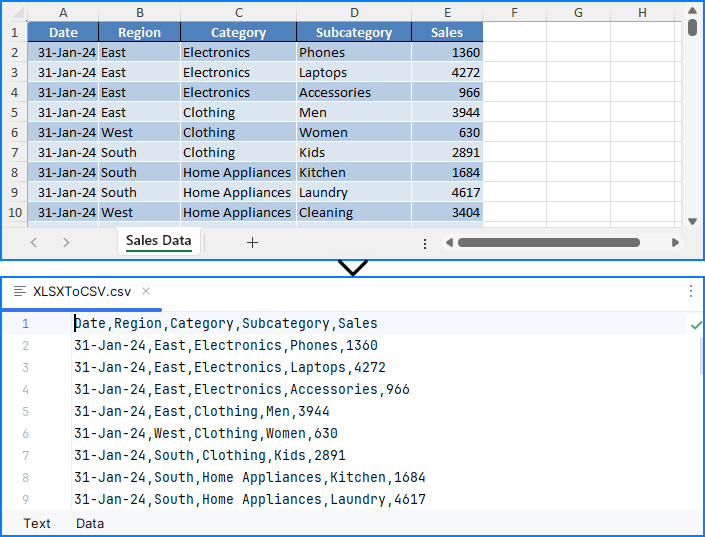
⚠️ Note: The SaveToFile() method saves only the first worksheet. If you need to convert all sheets, see the next section.
This method is perfect for simple, single-sheet Excel-to-CSV conversions in Python.
Convert Excel (XLS/XLSX) to CSV: All Sheets, Old Files & Batch
Whether you're working with modern .xlsx, older .xls, or multi-sheet Excel files, Spire.XLS offers multiple ways to export everything to CSV in Python.
Export All Worksheets to Separate CSV Files
To export every worksheet into its own CSV file—for example, monthly tabs or department data:
from spire.xls import Workbook, Encoding

# Initialize a workbook and load the Excel file
workbook = Workbook()
workbook.LoadFromFile("Sample.xlsx")

# Iterate through each sheet
for i in range(workbook.Worksheets.Count):
    # Save the current sheet to CSV format
    sheet = workbook.Worksheets.get_Item(i)
    sheet.SaveToFile(f"output/Sheets/Sheet{i}.csv", ",", Encoding.get_UTF8())
workbook.Dispose()
Result:
Each worksheet becomes an individual CSV, ideal for segmented data processing and distribution.
Convert XLS to CSV in Python
Legacy Excel files (.xls) are still common in many industries. Fortunately, Spire.XLS fully supports them:
workbook = Workbook()
workbook.LoadFromFile("legacy.xls")
workbook.SaveToFile("legacy_output.csv", FileFormat.CSV)
This converts the first worksheet by default. To convert all .xls sheets, apply the loop method shown above.
You may also like: Convert XLS Files to XLSX Files with Python
Batch Convert Excel Files to CSV
To automate conversion of multiple .xlsx and .xls files stored in a folder:
import os
from spire.xls import Workbook, FileFormat

excel_dir = "./excels"
output_dir = "./csvs"

for file in os.listdir(excel_dir):
    if file.endswith(".xlsx") or file.endswith(".xls"):
        workbook = Workbook()
        workbook.LoadFromFile(os.path.join(excel_dir, file))
        base_name = os.path.splitext(file)
        workbook.SaveToFile(os.path.join(output_dir, base_name + ".csv"), FileFormat.CSV)
Note: This script saves only the first worksheet. Use sheet.SaveToFile() in a loop if you want all sheets.
Advanced Conversion: Customize CSV Output in Python
Need to export only specific cells, rows, or columns from Excel to CSV? You can read worksheet content manually and write customized CSV output:
import csv
from itertools import chain

from spire.xls import Workbook

# Initialize a Workbook object and load the Excel file
workbook = Workbook()
workbook.LoadFromFile("Sample.xlsx")
# Get the first worksheet
sheet = workbook.Worksheets.get_Item(0)

# Export data to CSV
with open("output/FilteredOutput.csv", "w", newline="", encoding="utf-8") as csvfile:
    writer = csv.writer(csvfile)
    for row in range(sheet.AllocatedRange.RowCount):  # Export rows 1 to 5
        row_data = []
        for col in chain(range(0, 2), range(3, sheet.AllocatedRange.ColumnCount)):  # Export columns A to C
            row_data.append(sheet.Range.get_Item(row + 1, col + 1).Value)
        writer.writerow(row_data)
Result:
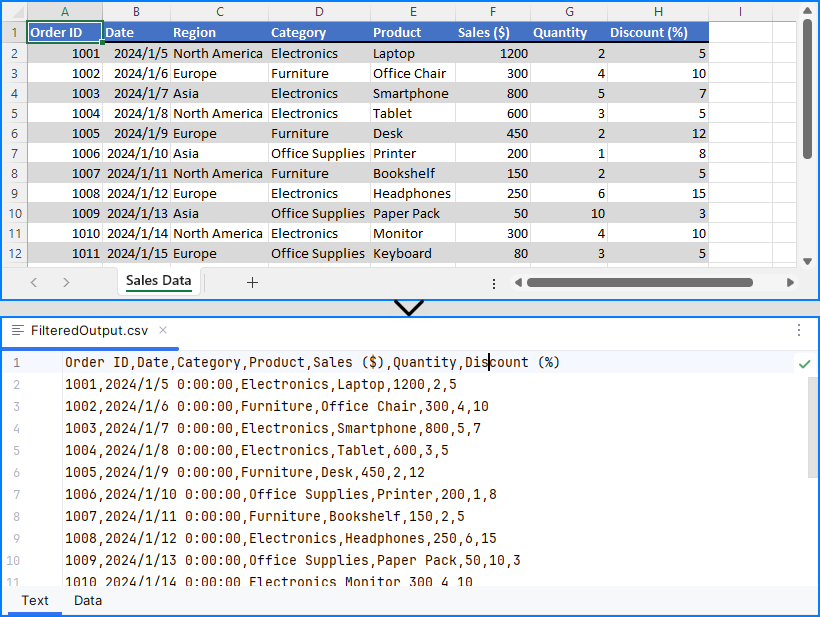
This provides full control for custom Excel to CSV conversion in Python, such as skipping headers or exporting limited ranges.
Explore More: Export & Import Data Between Excel Files and Databases | Python
Bonus Tip: Convert CSV Back to Excel (XLSX)
While this guide focuses on Excel to CSV, you can also convert CSV files back to Excel using Spire.XLS:
from spire.xls import Workbook, FileFormat

workbook = Workbook()
workbook.LoadFromFile("output.csv", ",")
workbook.SaveToFile("restored.xlsx", FileFormat.Version2016)
This is useful for restoring structured Excel files after processing raw CSV data.
Want to explore more? Check out our dedicated guide on how to convert CSV to Excel using Python for more advanced methods, formatting options, and batch conversion tips.
Frequently Asked Questions
Q1: How to convert an XLSX file to CSV in Python?
A: You can use Python libraries like Spire.XLS to load the XLSX file and save it as CSV. See the detailed steps in Convert XLSX to CSV in Python.
Q2: How to convert xlsx into csv?
A: Convert XLSX to CSV by loading the file and exporting to CSV format, either saving the first sheet or iterating through all sheets to save separately. Check Convert Excel (XLS/XLSX) to CSV: All Sheets, Old Files & Batch for multi-sheet and batch examples.
Q3: How to convert xlsx to csv from the command line?
A: While this article focuses on Python, you can create Python scripts using Spire.XLS or other libraries and run them from the command line to batch convert XLSX to CSV files. See the Batch Convert Excel Files to CSV section for related code.
Q4: How to convert Excel to text in Python?
A: Converting Excel to text typically means extracting cell values and saving them as CSV or TXT. Using libraries like Spire.XLS or pandas in Python, you can export Excel data into plain text formats easily. For more advanced output, check Advanced Conversion: Customize CSV Output in Python.
Conclusion
In this guide, you’ve learned effective ways to convert XLSX and XLS files to CSV using Python, including exporting entire workbooks or specific sheets, handling batch conversions, and restoring Excel files from CSV. You also gained insights on customizing CSV outputs by selecting precise cell ranges.
Whether you want to automate your Excel to CSV conversion in Python, process legacy Excel files, or streamline data workflows, Spire.XLS provides a robust, code-friendly solution without requiring Microsoft Excel.
Get a Free License for the Full Version
While the free version of Spire.XLS for Python covers basic Python Excel to CSV tasks, if you need the full features and enhanced performance, you can apply for a temporary free license of the full version. This lets you unlock all capabilities and simplify your Python Excel to CSV processing even further.
Converting Excel files to text files has several benefits. For example, it reduces file size, making data easier to store and share. In addition, text files are usually simple in structure, and converting Excel to text can make the document more straightforward for certain tasks. This article will demonstrate how to programmatically convert Excel to TXT format using Spire.XLS for Java.
Install Spire.XLS for Java
First of all, you're required to add the Spire.Xls.jar file as a dependency in your Java program. The JAR file can be downloaded from this link. If you use Maven, you can easily import the JAR file in your application by adding the following code to your project's pom.xml file.
<repositories>
    <repository>
        <id>com.e-iceblue</id>
        <name>e-iceblue</name>
        <url>https://repo.e-iceblue.com/nexus/content/groups/public/</url>
    </repository>
</repositories>
<dependencies>
    <dependency>
        <groupId>e-iceblue</groupId>
        <artifactId>spire.xls</artifactId>
        <version>16.7.3</version>
    </dependency>
</dependencies>
Create Excel to TXT in Java
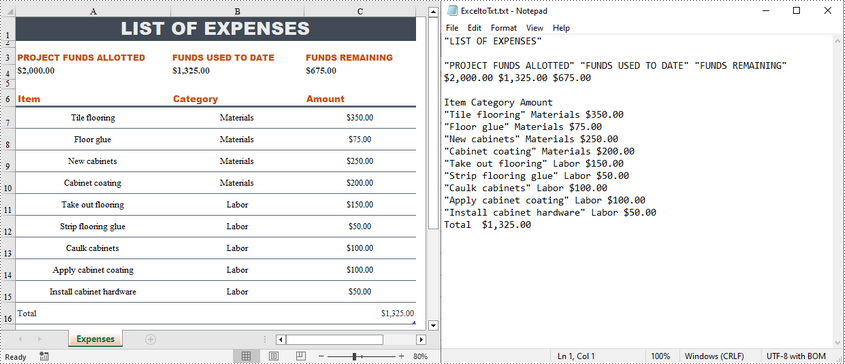
Spire.XLS for Java offers the Worksheet.saveToFile(String fileName, String separator, java.nio.charset.Charset encoding) method to convert a specified worksheet to a txt file. The following are the detailed steps.
- Create a Workbook instance.
- Load a sample Excel file using Workbook.loadFromFile() method.
- Get a specified worksheet by its index using Workbook.getWorksheets().get() method.
- Convert the Excel worksheet to a TXT file using Worksheet.saveToFile() method.
- Java
import com.spire.xls.*;

import java.nio.charset.Charset;

public class toText {
    public static void main(String[] args) {
        //Create a Workbook object
        Workbook workbook = new Workbook();

        //Load a sample Excel file
        workbook.loadFromFile("sample.xlsx");

        //Get the first worksheet
        Worksheet worksheet = workbook.getWorksheets().get(0);

        //Save the worksheet as a txt file
        Charset charset = Charset.forName("utf8");
        worksheet.saveToFile("ExceltoTxt.txt", " ", charset);

    }
}
Apply for a Temporary License
If you'd like to remove the evaluation message from the generated documents, or to get rid of the function limitations, please request a 30-day trial license for yourself.
