
Knowledgebase (2370)
Children categories
Spire.PDF for Python is a Python library for reading, creating, editing and converting PDF files in any Python application. This article shows you how to install Spire.PDF for Python on Windows.
Step 1
Download the latest version of Python and install it on your computer. If you have already installed it, skip to step 2.

Step 2
Click "Extensions" in VS Code, search for "Python" and then install it.

Step 3
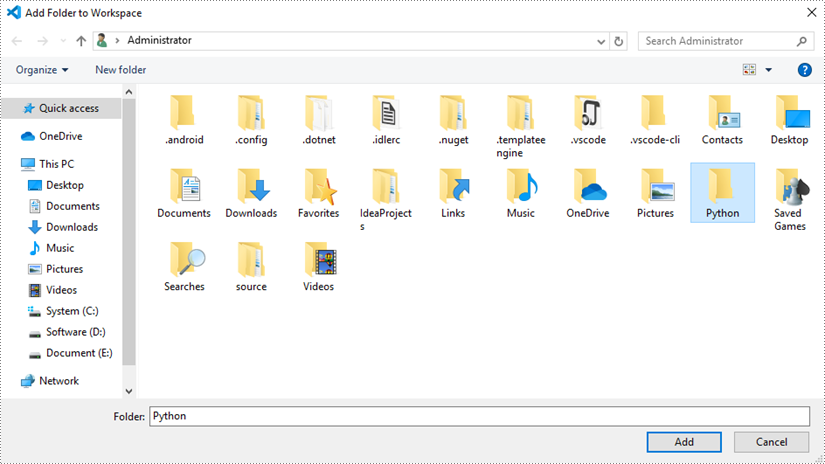
Click "Explorer" - "NO FOLRDER OPENED" - "Open Folder".

Choose an existing folder as the workspace, or you can create a new folder and then select it.
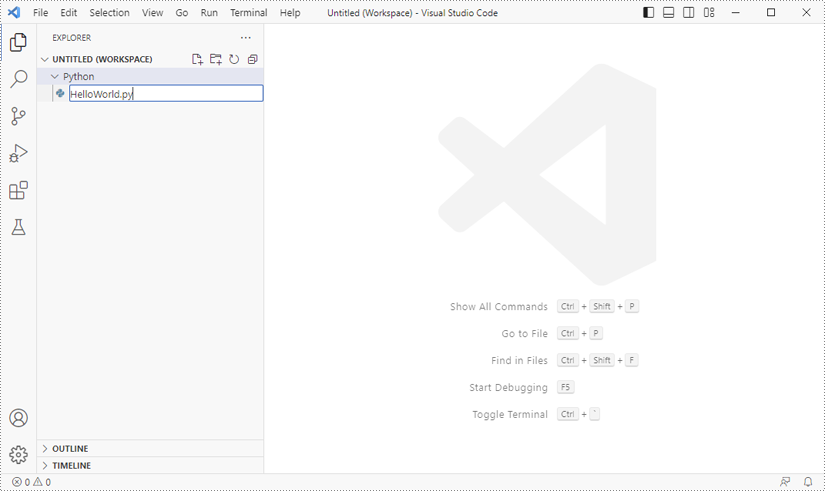
Add a .py file to the folder you just added (Python folder in this case), and name it whatever you like.
Step 4
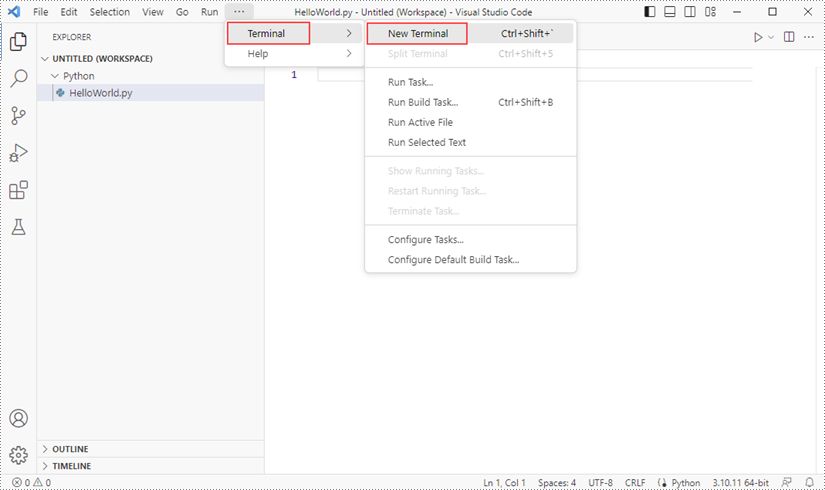
Click "Terminal" and then "New Terminal".
Input the following pip command to install Spire.PDF for Python and plum-dispatch v1.7.4.
pip install Spire.PDF

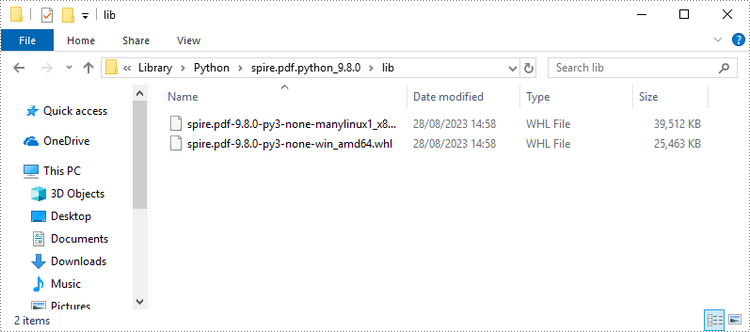
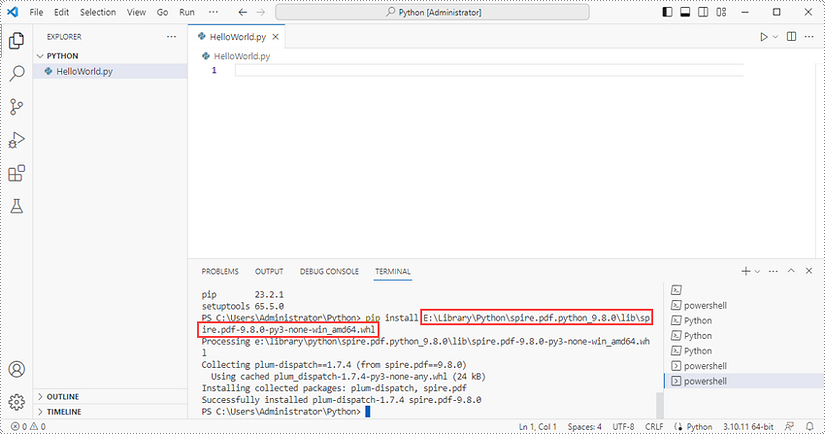
Alternatively, you can download Spire.PDF for Python from our website, and unzip it to get two .whl files from the "lib" folder. They're for Linux and Windows systems, respectively.
Then, install Spire.PDF for Python and plum-dispatch v1.7.4 by running the following pip command.
pip install E:\Library\Python\spire.pdf.python_9.8.0\lib\spire.pdf-9.8.0-py3-none-win_amd64.whl
Step 5
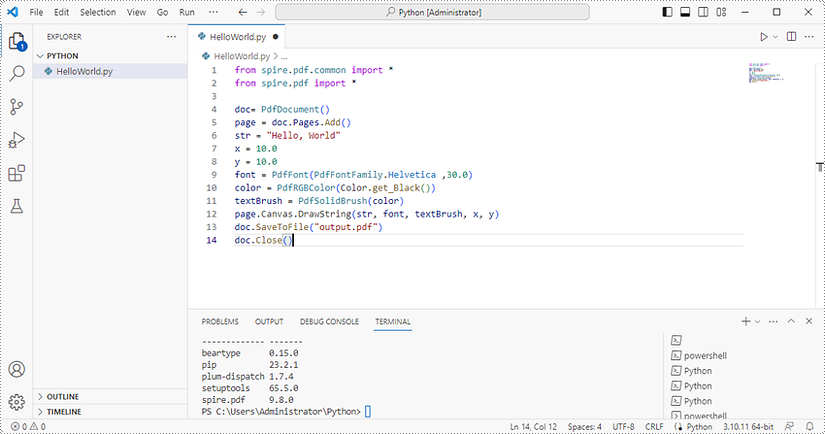
Add the following code snippet to the "HelloWorld.py" file.
- Python
from spire.pdf.common import *
from spire.pdf import *

doc= PdfDocument()
page = doc.Pages.Add()
str = "Hello, World"
x = 10.0
y = 10.0
font = PdfFont(PdfFontFamily.Helvetica ,30.0)
color = PdfRGBColor(Color.get_Black())
textBrush = PdfSolidBrush(color)
page.Canvas.DrawString(str, font, textBrush, x, y)
doc.SaveToFile("output.pdf")
doc.Close()
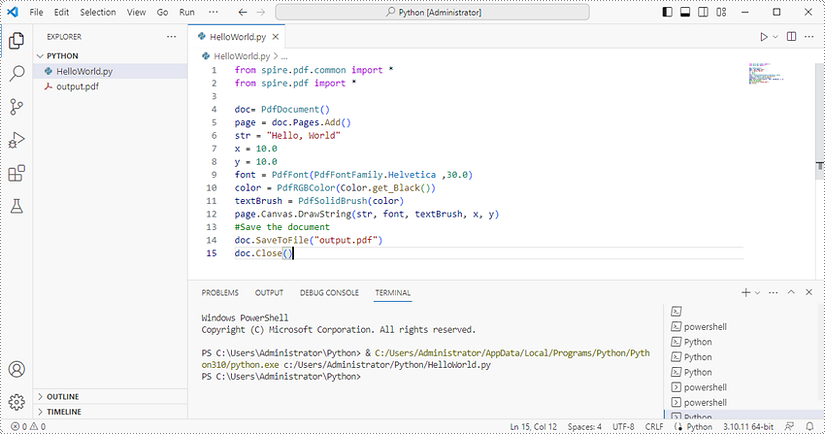
Once you run the Python file, you'll see the result PDF document in the 'EXPORER' panel.
Fonts play a crucial role in enhancing the visual appeal and readability of data in Microsoft Excel. Whether you're creating a spreadsheet, designing a report, or simply organizing information, the ability to set or change fonts can greatly impact the overall presentation. Excel offers a wide range of font options, allowing you to customize the style, size, and formatting to suit your specific needs. In this article, you will learn how to set or change fonts in Excel in Python using Spire.XLS for Python.
- Set Different Fonts for Different Cells in Python
- Apply Multiple Fonts in a Single Cell in Python
- Change the Font Style of a Cell Range in Python
Install Spire.XLS for Python
This scenario requires Spire.XLS for Python and plum-dispatch v1.7.4. They can be easily installed in your Windows through the following pip command.
pip install Spire.XLS
If you are unsure how to install, please refer to this tutorial: How to Install Spire.XLS for Python on Windows
Set Different Fonts for Different Cells in Python
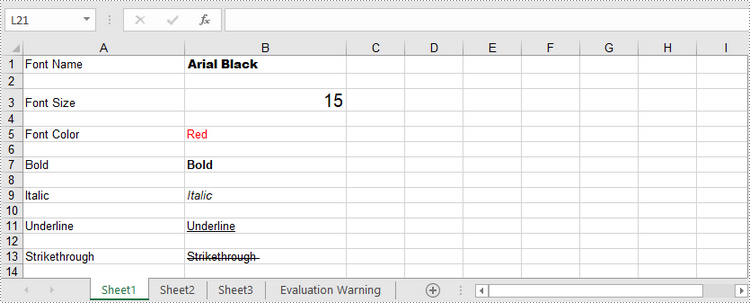
With Spire.XLS for Python, customizing fonts in specific cells becomes a breeze. By utilizing the CellRange.Style.Font property, you gain control over font name, color, size, and style effortlessly. Follow these steps to apply a font style to a particular cell using Spire.XLS for Python.
- Create a Workbook object.
- Get a specific worksheet through Workbook.Worksheets[index] property.
- Get a specific cell through Worksheet.Range[int Row, int Column] property.
- Set the value of the cell through CellRange.Value property.
- Set the font name, color, size and style of the cell value through the properties under the CellRange.Style.Font object.
- Save the workbook to an Excel file using Workbook.SaveToFile() method.
- Python
from spire.xls import *
from spire.xls.common import *

# Create a Workbook object
workbook = Workbook()

# Get the first worksheet
sheet = workbook.Worksheets[0]

# Set font name
row = 1
sheet.Range[row, 1].Value = "Font Name"
sheet.Range[row, 2].Value = "Arial Black"
sheet.Range[row, 2].Style.Font.FontName = "Arial Black"

# Set font size
row += 2
sheet.Range[row, 1].Value = "Font Size"
sheet.Range[row, 2].Value = "15"
sheet.Range[row, 2].Style.Font.Size = 15

# Set font color
row += 2
sheet.Range[row, 1].Value = "Font Color"
sheet.Range[row, 2].Value = "Red"
sheet.Range[row, 2].Style.Font.Color = Color.get_Red()

# Make text bold
row += 2
sheet.Range[row, 1].Value = "Bold"
sheet.Range[row, 2].Value = "Bold"
sheet.Range[row, 2].Style.Font.IsBold = True;

# Make text italic
row += 2
sheet.Range[row, 1].Value = "Italic"
sheet.Range[row, 2].Value = "Italic"
sheet.Range[row, 2].Style.Font.IsItalic = True

# Underline text
row += 2
sheet.Range[row, 1].Value = "Underline"
sheet.Range[row, 2].Value = "Underline"
sheet.Range[row, 2].Style.Font.Underline = FontUnderlineType.Single

# Strikethrough text
row += 2
sheet.Range[row, 1].Value = "Strikethrough "
sheet.Range[row, 2].Value = "Strikethrough "
sheet.Range[row, 2].Style.Font.IsStrikethrough = True

# Set column width
sheet.Columns[0].ColumnWidth = 25
sheet.Columns[1].ColumnWidth = 25

# Save the workbook to an Excel file
workbook.SaveToFile("output/ApplyFontInCell.xlsx", ExcelVersion.Version2016)
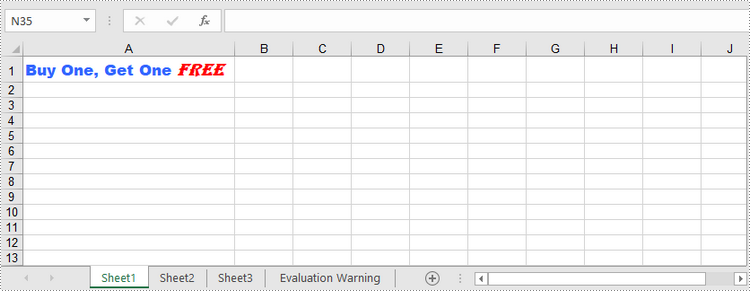
Apply Multiple Fonts in a Single Cell in Python
To emphasize specific characters within a cell, you can mix fonts. Here are the steps to apply multiple fonts in a single cell using Spire.XLS for Python:
- Create a Workbook object.
- Get a specific worksheet through Workbook.Worksheets[index] property.
- Create two ExcelFont objects using Workbook.CreateFont() method.
- Get a specific cell through Worksheet.Range[int Row, int Column] property, and set the rich text content of the cell through CellRange.RichText.Text property.
- Apply the two ExcelFont objects to the rich text using RichText.SetFont() method.
- Save the workbook to an Excel file using Workbook.SaveToFile() method.
- Python
from spire.xls import *
from spire.xls.common import *

# Create a Workbook object
workbook = Workbook()

# Get the first worksheet
sheet = workbook.Worksheets[0]

# Create a font
font1 = workbook.CreateFont()
font1.FontName = "Arial Black"
font1.KnownColor = ExcelColors.LightBlue
font1.IsBold = True
font1.Size = 13

# Create another font
font2 = workbook.CreateFont()
font2.KnownColor = ExcelColors.Red
font2.IsBold = True
font2.IsItalic = True
font2.FontName = "Algerian"
font2.Size = 15;

# Returns a RichText object from a specified cell
richText = sheet.Range["A1"].RichText

# Set the text of RichText object
richText.Text = "Buy One, Get One Free"

# Apply the first font to specified range of characters
richText.SetFont(0, 16, font1)

# Apply the second font to specified range of characters
richText.SetFont(17, 21, font2)

# Set column width
sheet.Columns[0].ColumnWidth = 33

# Save the workbook to an Excel file
workbook.SaveToFile("output/ApplyMultipleFontsInSingleCell.xlsx", ExcelVersion.Version2016)
Change the Font Style of a Cell Range in Python
Spire.XLS for Python offers the CellStyle class, enabling users to handle cell formatting like fill color, text alignment, and font style. By creating a cell style, you can apply it to a specific range of cells using the CellRange.ApplyStyle() method or to an entire worksheet using the Worksheet.ApplyStyle() method. To change the font style of a cell range using Spire.XLS for Python, follow these steps.
- Create a Workbook object.
- Load a sample Excel file using Workbook.LoadFromFile() method.
- Get a specific worksheet using Workbook.Worksheets[index] property.
- Create a CellStyle object using Workbook.Styles.Add() method, and set the font style through the CellStyle.Font property.
- Apply the cell style to a cell range using CellRange.ApplyStyle() method.
- Save the workbook to another Excel file using Workbook.SaveToFile() method.
- Python
from spire.xls import *
from spire.xls.common import *

# Create a Workbook object
workbook = Workbook()

# Load a sample Excel file
workbook.LoadFromFile("C:\\Users\\Administrator\\Desktop\\sample.xlsx")

# Get the first worksheet
sheet = workbook.Worksheets[0]

# Create a CellStyle object
fontStyle = workbook.Styles.Add("headerFontStyle")

# Set the font color, size and style
fontStyle.Font.Color = Color.get_White()
fontStyle.Font.IsBold = True
fontStyle.Font.Size = 12

# Create a CellStyleFlag object, setting the FontColor, FontBold, ad FontSize properties to true
flag = CellStyleFlag()
flag.FontColor = True
flag.FontBold = True
flag.FontSize = True

# Apply the cell style to header row
sheet.Range[1, 1, 1, 8].ApplyStyle(fontStyle, flag)

# Apply the cell style to the whole worksheet
# sheet.ApplyStyle(fontStyle)

# Save the workbook to another Excel file
workbook.SaveToFile("output/ApplyFontToCellRange.xlsx", ExcelVersion.Version2016)

Apply for a Temporary License
If you'd like to remove the evaluation message from the generated documents, or to get rid of the function limitations, please request a 30-day trial license for yourself.
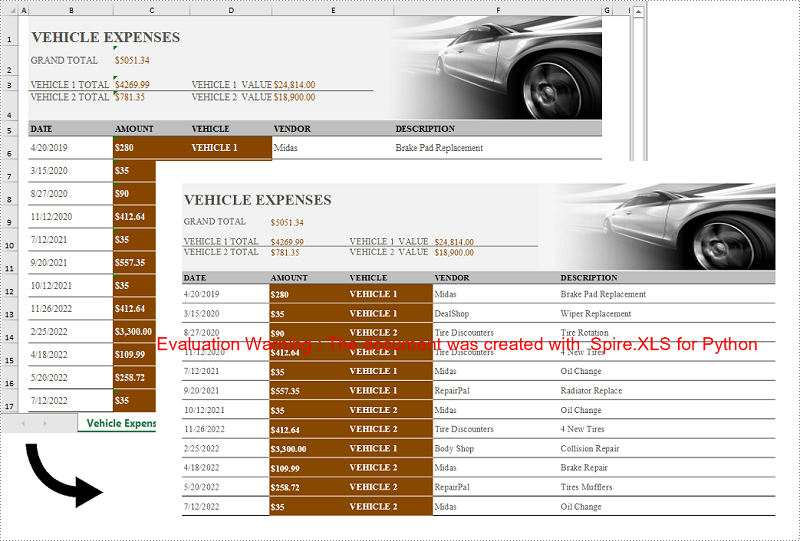
Converting Excel spreadsheets to image formats can be extremely valuable and versatile in a wide range of situations. Whether you need to share data with others who don’t have Excel installed on their devices, present information in a document or presentation, or publish content online, converting Excel to image format offers a convenient solution. In this article, we will introduce how to programmatically convert Excel to images in Python using Spire.XLS for Python.
- Convert an Excel Worksheet to an Image in Python
- Convert an Excel Worksheet to an Image without White Margins in Python
- Convert a Specific Cell Range to an Image in Python
Install Spire.XLS for Python
This scenario requires Spire.XLS for Python and plum-dispatch v1.7.4. They can be easily installed in your Windows through the following pip command.
pip install Spire.XLS
If you are unsure how to install, please refer to this tutorial: How to Install Spire.XLS for Python on Windows
Convert an Excel Worksheet to an Image in Python
You can easily convert a whole Excel worksheet to an image by using the Worksheet.SaveToImage() method provided by Spire.XLS for Python. The detailed steps are as follows:
- Create a Workbook object.
- Load an Excel file using Workbook.LoadFromFile() method.
- Get a specific worksheet by its index using Workbook.Worksheets[int index] property.
- Convert the worksheet to an image using Worksheet.ToImage() method.
- Save the image to a PNG file (you can also save the image as other image formats such as JPG and BMP).
- Python
from spire.xls import *
from spire.xls.common import *

# Create a Workbook object
workbook = Workbook()
# Load an Excel file
workbook.LoadFromFile("Sample.xlsx")

# Get the first worksheet
sheet = workbook.Worksheets[0]

# Save the worksheet to an image
image = sheet.ToImage(sheet.FirstRow, sheet.FirstColumn, sheet.LastRow, sheet.LastColumn)
# Save the image to a PNG file
image.Save("SheetToImage.png")
workbook.Dispose()
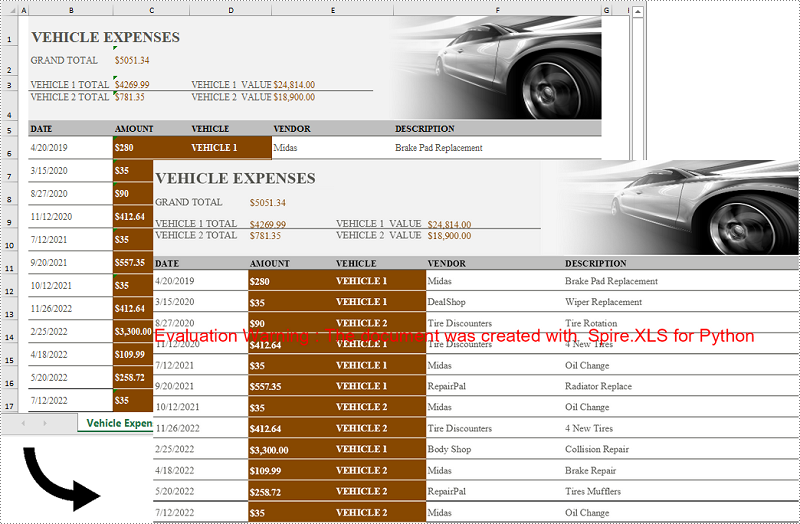
Convert an Excel Worksheet to an Image without White Margins in Python
When converting an Excel worksheet to an image, you may find the resulting image has unwanted white margins surrounding the cells. If you want to convert the worksheet to an image without any extraneous margins, you can remove the page margins set in the original worksheet. The detailed steps are as follows:
- Create a Workbook object.
- Load an Excel file using Workbook.LoadFromFile() method.
- Get a specific worksheet by its index using Workbook.Worksheets[int index] property.
- Remove all margins from the worksheet by setting its left, right, top, and bottom margin values to zero.
- Convert the worksheet to an image using Worksheet.ToImage() method.
- Save the image to a PNG file.
- Python
from spire.xls import *
from spire.xls.common import *

# Create a Workbook object
workbook = Workbook()
# Load an Excel file
workbook.LoadFromFile("Sample.xlsx")

# Get the first worksheet
sheet = workbook.Worksheets[0]

# Set all margins of the worksheet to zero
sheet.PageSetup.LeftMargin = 0
sheet.PageSetup.BottomMargin = 0
sheet.PageSetup.TopMargin = 0
sheet.PageSetup.RightMargin = 0

# Convert the worksheet to an image
image = sheet.ToImage(sheet.FirstRow, sheet.FirstColumn, sheet.LastRow, sheet.LastColumn)
# Save the image to a PNG file
image.Save("SheetToImageWithoutMargins.png")
workbook.Dispose()
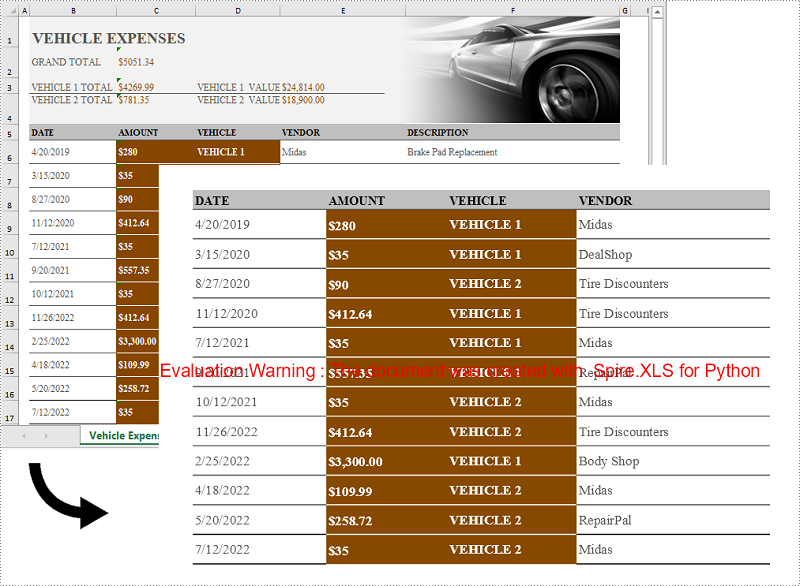
Convert a Specific Cell Range to an Image in Python
In addition to converting a whole worksheet to an image, Spire.XLS for Python also supports converting a specific cell range of a worksheet to an image. The detailed steps are as follows:
- Create a Workbook object.
- Load an Excel file using Workbook.LoadFromFile() method.
- Get a specific worksheet by its index using Workbook.Worksheets[int index] property.
- Convert a specific cell range of the worksheet to an image using Worksheet.ToImage() method and pass the index of the start row, start column, end row, and end column of the cell range to the method as parameters.
- Save the image to a PNG file.
- Python
from spire.xls import *
from spire.xls.common import *

# Create a Workbook object
workbook = Workbook()
# Load an Excel file
workbook.LoadFromFile("Sample.xlsx")

# Get the first worksheet
sheet = workbook.Worksheets[0]

# Convert a specific cell range of the worksheet to an image
image = sheet.ToImage(5, 2, 17, 5)
# Save the image to a PNG file
image.Save("CellRangeToImage.png")
workbook.Dispose()
Apply for a Temporary License
If you'd like to remove the evaluation message from the generated documents, or to get rid of the function limitations, please request a 30-day trial license for yourself.
