
Knowledgebase (2370)
Children categories
Sometimes, certain rows and columns of an Excel file may contain sensitive or confidential information. Before presenting the file to others, it is critical to hide these specific rows and columns to prevent unauthorized people from viewing this information. After the representation, you can show the hidden rows and columns to redisplay the information as needed. In this article, we will demonstrate how to hide or show rows and columns in Excel in C++ using Spire.XLS for C++.
- Hide Specific Rows and Columns in Excel in C++
- Show Specific Hidden Rows and Columns in Excel in C++
- Hide Multiple Rows and Columns at Once in Excel in C++
- Show All Hidden Rows and Columns in Excel in C++
Install Spire.XLS for C++
There are two ways to integrate Spire.XLS for C++ into your application. One way is to install it through NuGet, and the other way is to download the package from our website and copy the libraries into your program. Installation via NuGet is simpler and more recommended. You can find more details by visiting the following link.
Integrate Spire.XLS for C++ in a C++ Application
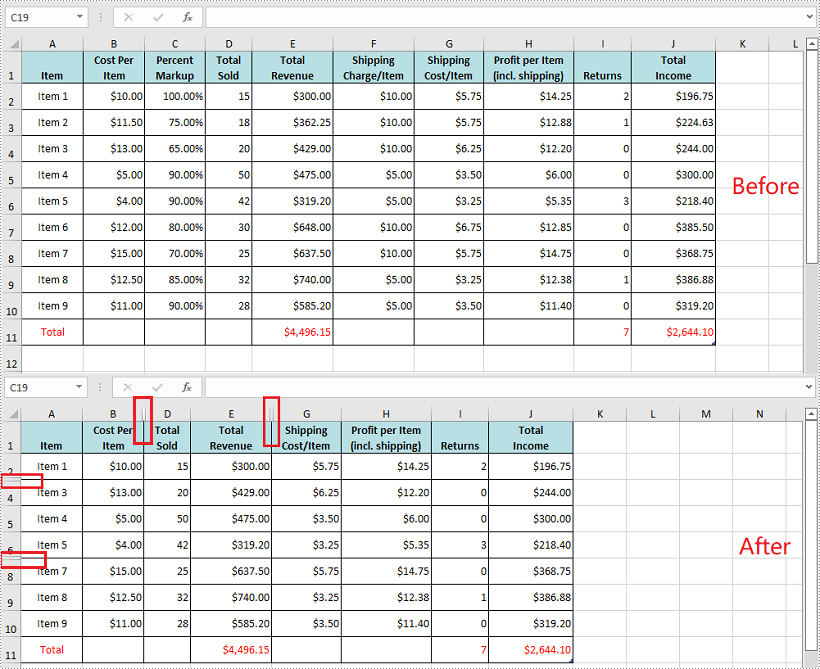
Hide Specific Rows and Columns in Excel in C++
You can hide specific rows and columns in an Excel worksheet by using the XlsWorksheet->HideRow(int rowIndex) and XlsWorksheet->HideColumn(int columnIndex) methods. The detailed steps are as follows:
- Initialize an instance of the Workbook class.
- Load an Excel file using Workbook->LoadFromFile() method.
- Get a specific worksheet using Workbook->GetWorksheets()->Get(int index) method.
- Hide specific rows in the worksheet using XlsWorksheet->HideRow(int rowIndex) method.
- Hide Specific columns in the worksheet using XlsWorksheet->HideColumn(int columnIndex) method.
- Save the result file using Workbook->SaveToFile() method.
- C++
#include "Spire.Xls.o.h";

using namespace Spire::Xls;

int main()
{
	//Initialize an instance of the workbook class
	intrusive_ptr<Workbook> workbook = new Workbook();
	//Load an Excel file
	workbook->LoadFromFile(L"Input.xlsx");

	//Get the first worksheet
	intrusive_ptr<Worksheet> sheet = dynamic_pointer_cast<Worksheet>(workbook->GetWorksheets()->Get(0));

	//Hide the 3rd and the 7th rows
	sheet->HideRow(3);
	sheet->HideRow(7);

	//Hide the 3rd and the 6th columns
	sheet->HideColumn(3);
	sheet->HideColumn(6);

	//Save the result file
	workbook->SaveToFile(L"HideRowsAndColumns.xlsx", ExcelVersion::Version2013);
	workbook->Dispose();
}
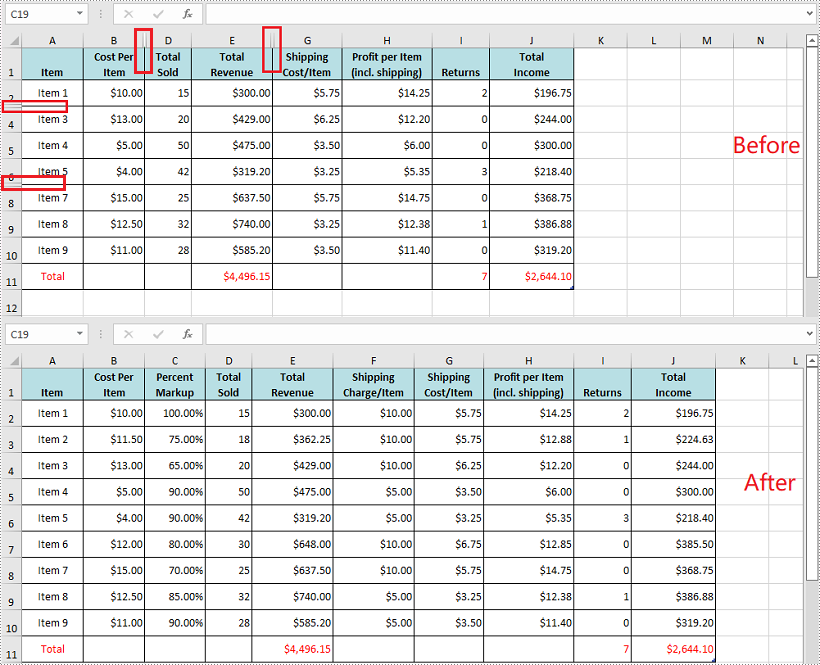
Show Specific Hidden Rows and Columns in Excel in C++
To show specific hidden rows and columns in an Excel worksheet, you can use the XlsWorksheet->ShowRow(int rowIndex) and XlsWorksheet->ShowColumn(int columnIndex) methods. The detailed steps are as follows:
- Initialize an instance of the Workbook class.
- Load an Excel file using Workbook->LoadFromFile() method.
- Get a specific worksheet using Workbook->GetWorksheets()->Get(int index) method.
- Show specific hidden rows in the worksheet using XlsWorksheet->ShowRow(int rowIndex) method.
- Show specific hidden columns in the worksheet using XlsWorksheet->ShowColumn(int columnIndex) method.
- Save the result file using Workbook->SaveToFile() method.
- C++
#include "Spire.Xls.o.h";

using namespace Spire::Xls;

int main()
{
	//Initialize an instance of the workbook class
	intrusive_ptr<Workbook> workbook = new Workbook();
	//Load an Excel file
	workbook->LoadFromFile(L"HideRowsAndColumns.xlsx");

	//Get the first worksheet
	intrusive_ptr<Worksheet> sheet = dynamic_pointer_cast<Worksheet>(workbook->GetWorksheets()->Get(0));

	//Show the 3rd and the 7th rows
	sheet->ShowRow(3);
	sheet->ShowRow(7);

	//Show the 3rd and the 6th columns
	sheet->ShowColumn(3);
	sheet->ShowColumn(6);

	//Save the result file
	workbook->SaveToFile(L"ShowRowsAndColumns.xlsx", ExcelVersion::Version2013);
	workbook->Dispose();
}
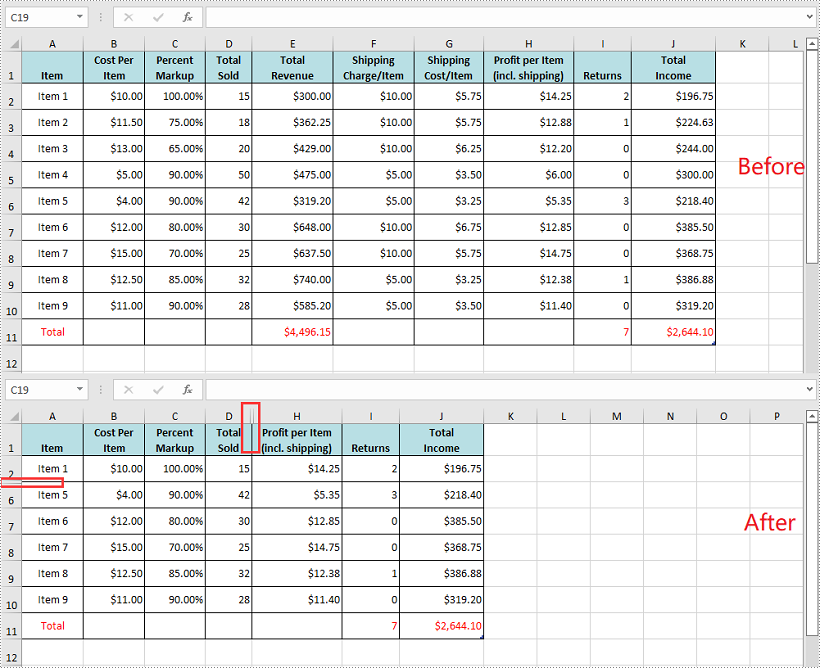
Hide Multiple Rows and Columns at Once in Excel in C++
You can hide multiple adjacent rows and columns at once by using the XlsWorksheet->HideRows(int rowIndex, int rowCount) and XlsWorksheet->HideColumns(int columnIndex, int columnCount) methods. The detailed steps are as follows:
- Initialize an instance of the Workbook class.
- Load an Excel file using Workbook->LoadFromFile() method.
- Get a specific worksheet using Workbook->GetWorksheets()->Get(int index) method.
- Hide multiple adjacent rows in the worksheet at once using XlsWorksheet->HideRows(int rowIndex, int rowCount) method.
- Hide multiple adjacent columns in the worksheet at once using XlsWorksheet->HideColumns(int columnIndex, int columnCount) method.
- Save the result file using Workbook->SaveToFile() method.
- C++
#include "Spire.Xls.o.h";

using namespace Spire::Xls;

int main()
{
	//Initialize an instance of the workbook class
	intrusive_ptr<Workbook> workbook = new Workbook();
	//Load an Excel file
	workbook->LoadFromFile(L"Input.xlsx");

	//Get the first worksheet
	intrusive_ptr<Worksheet> sheet = dynamic_pointer_cast<Worksheet>(workbook->GetWorksheets()->Get(0));

	//Hide the 3rd, 4th and 5th rows
	sheet->HideRows(3, 3);

	//Hide the 5th, 6th and 7th columns
	sheet->HideColumns(5, 3);

	//Save the result file
	workbook->SaveToFile(L"HideMultipleRowsAndColumns.xlsx", ExcelVersion::Version2013);
	workbook->Dispose();
}
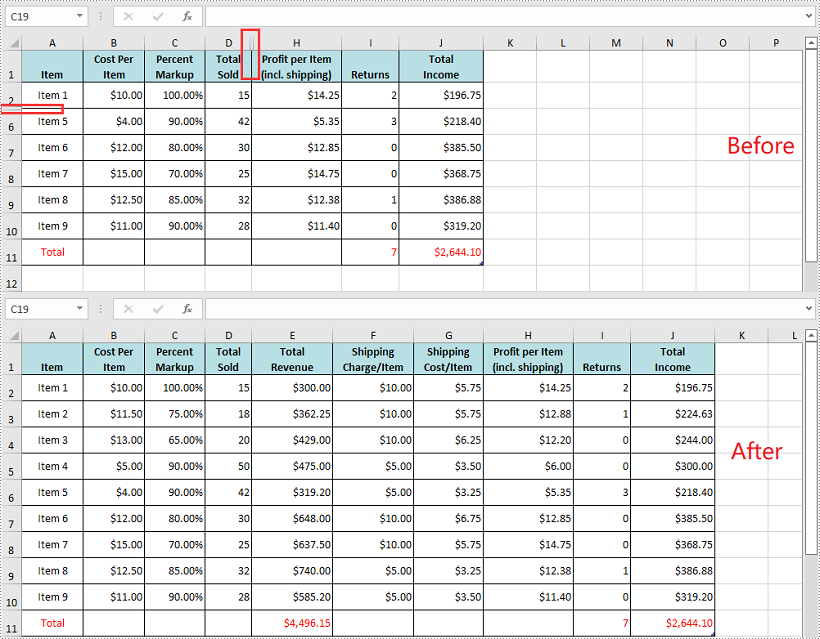
Show All Hidden Rows and Columns in Excel in C++
To show all the hidden rows and columns in an Excel worksheet, you need to iterate through all the rows and columns in the worksheet, then find the hidden rows and columns and call the XlsWorksheet->ShowRow(int rowIndex) and XlsWorksheet->ShowColumn(int columnIndex) methods to redisplay them. The detailed steps are as follows:
- Initialize an instance of the Workbook class.
- Load an Excel file using Workbook->LoadFromFile() method.
- Get a specific worksheet using Workbook->GetWorksheets()->Get(int index) method.
- Iterate through all the rows in the worksheet, then find the hidden rows using XlsWorksheet->GetRowIsHide(int rowIndex) method.
- Show the hidden rows using XlsWorksheet->ShowRow(int rowIndex) method.
- Iterate through all the columns in the worksheet, then find the hidden columns using XlsWorksheet->GetColumnIsHide(int columnIndex) method.
- Show the hidden columns using XlsWorksheet->ShowColumn(int columnIndex) method.
- Save the result file using Workbook->SaveToFile() method.
- C++
#include "Spire.Xls.o.h";

using namespace Spire::Xls;

int main()
{
	//Initialize an instance of the workbook class
	intrusive_ptr<Workbook> workbook = new Workbook();
	//Load an Excel file
	workbook->LoadFromFile(L"HideMultipleRowsAndColumns.xlsx");

	//Get the first worksheet
	intrusive_ptr<Worksheet> sheet = dynamic_pointer_cast<Worksheet>(workbook->GetWorksheets()->Get(0));

	//Iterate through all the rows in the worksheet
	for (int i = 1; i <= sheet->GetLastRow(); i++)
	{
		//Check if the current row is hidden
		if (sheet->GetRowIsHide(i))
		{
			sheet->ShowRow(i);
		}
	}

	//Iterate through all the columns in the worksheet
	for (int j = 1; j <= sheet->GetLastColumn(); j++)
	{
		//Check if the current column is hidden
		if (sheet->GetColumnIsHide(j))
		{
			//Show the hidden column
			sheet->ShowColumn(j);
		}
	}

	//Save the result file
	workbook->SaveToFile(L"ShowAllHiddenRowsAndColumns.xlsx", ExcelVersion::Version2013);
	workbook->Dispose();
}
Apply for a Temporary License
If you'd like to remove the evaluation message from the generated documents, or to get rid of the function limitations, please request a 30-day trial license for yourself.
Margins are the empty and unused spaces between the document's content and edges. The margins generally don't contain any text or image, and their primary purpose is to prevent text from colliding with document boundaries. Depending on your needs, you can change the margins to become wider or narrower. In this article, you will learn how to increase or decrease the page margins of a PDF document in C++ using Spire.PDF for C++.
Install Spire.PDF for C++
There are two ways to integrate Spire.PDF for C++ into your application. One way is to install it through NuGet, and the other way is to download the package from our website and copy the libraries into your program. Installation via NuGet is simpler and more recommended. You can find more details by visiting the following link.
Integrate Spire.PDF for C++ in a C++ Application
Increase the Margins of a PDF Document in C++
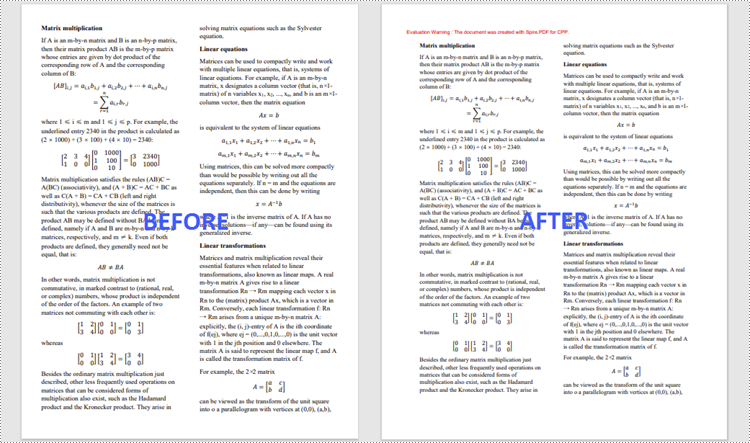
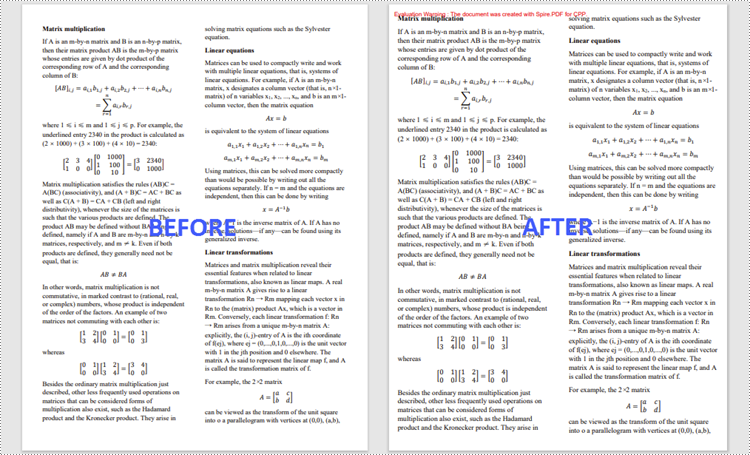
The way to enlarge the margins of a PDF document is to create a new PDF that has a larger page size, and then draw the source page on the large page at the appropriate location. The following are the steps to increase the margins of a PDF document using Spire.PDF for C++.
- Load the original PDF document while initialing the PdfDocument object.
- Create another PdfDocument object, which is used to create a new PDF document that has a larger page size.
- Set the increasing values of the margins.
- Calculate the page size of the new PDF document.
- Loop through the pages in the original document, and create a template based on a specific page using PdfPageBase->CreateTemplate() method.
- Add a page to the new PDF document using PdfDocument->GetPages()->Add() method.
- Draw the template on the page at the coordinate (0, 0) using PdfTemplate->Draw() method.
- Save the new PDF document to file using PdfDocument->SaveToFile() method.
- C++
//Load the original PDF document
 PdfDocument* originalPdf = new PdfDocument(L"C:\\Users\\Administrator\\Desktop\\sample.pdf");

 //Get the first page
 boost::intrusive_ptr<PdfPageBase> firstPage = originalPdf->GetPages()->GetItem(0);

 //Create a new PdfDocument object
 PdfDocument* newPdf = new PdfDocument();

 //Set increasing value of the margins
 boost::intrusive_ptr<PdfMargins> margins = newPdf->GetPageSettings()->GetMargins();
 margins->SetTop(40);
 margins->SetBottom(40);
 margins->SetLeft(40);
 margins->SetRight(40);

 //Calculate the new page size
 SizeF* sizeF = new SizeF(firstPage->GetSize()->GetWidth() + margins->GetLeft() + margins->GetRight(), firstPage->GetSize()->GetHeight() + margins->GetTop() + margins->GetBottom());

 //Loop through the pages in the original document
 for (size_t i = 0; i < originalPdf->GetPages()->GetCount(); i++)
 {
     //Create a template based on a spcific page
     boost::intrusive_ptr<PdfTemplate> pdfTemplate = originalPdf->GetPages()->GetItem(i)->CreateTemplate();

     //Add a page to the new PDF
     boost::intrusive_ptr<PdfPageBase> page = newPdf->GetPages()->Add(sizeF);

     //Draw template on the page
     pdfTemplate->Draw(page, 0.0f, 0.0f);
 }
Decrease the Margins of a PDF Document in C++
The way to decrease the margins of a PDF is to create a new PDF that has a smaller page size, and then draw the source page on the small page at a specified coordinate. The following are the steps to decrease the margins of a PDF document using Spire.PDF for C++.
- Load the original PDF document while initialing the PdfDocument object.
- Create another PdfDocument object, which is used to create a new PDF document that has a smaller page size.
- Set the decreasing values of the margins.
- Calculate the page size of the new PDF document.
- Loop through the pages in the original document, and create a template based on a specific page using PdfPageBase->CreateTemplate() method.
- Add a page to the new PDF document using PdfDocument->GetPages()->Add() method.
- Draw the template on the page at a specified coordinate using PdfTemplate->Draw() method.
- Save the new PDF document to file using PdfDocument->SaveToFile() method.
- C++
#include "Spire.Pdf.o.h";

using namespace Spire::Pdf;

int main() {

    //Load the original PDF document
    PdfDocument* originalPdf = new PdfDocument(L"C:\\Users\\Administrator\\Desktop\\sample.pdf");

    //Get the first page
    PdfPageBase* firstPage = originalPdf->GetPages()->GetItem(0);

    //Create a new PdfDocument object
    PdfDocument* newPdf = new PdfDocument();

    //Set decreasing value
    double left = -20;
    double right = -20;
    double top = -20;
    double bottom = -20;

    //Calculate the new page size
    SizeF* sizeF = new SizeF(firstPage->GetSize()->GetWidth() + left + right, firstPage->GetSize()->GetHeight() + top + bottom);

    //Loop through the pages in the original document
    for (size_t i = 0; i < originalPdf->GetPages()->GetCount(); i++)
    {
        //Create a template based on a specific page
        PdfTemplate* pdfTemplate = originalPdf->GetPages()->GetItem(i)->CreateTemplate();

        //Add a page to the new PDF
        PdfPageBase* page = newPdf->GetPages()->Add(sizeF, new PdfMargins(0));

        //Draw template on the page
        pdfTemplate->Draw(page, left, top);
    }

    //Save the new document
    newPdf->SaveToFile(L"Output/DecreaseMargins.pdf", FileFormat::PDF);
    newPdf->Close();
    delete originalPdf;
    delete newPdf;
}
Apply for a Temporary License
If you'd like to remove the evaluation message from the generated documents, or to get rid of the function limitations, please request a 30-day trial license for yourself.
Changing the font color in a Word document can be an effective way to emphasize important points. For example, if you are creating a report that contains crucial data, changing the font color of the data text to a brighter color can make it stand out from other text and quickly grab your reader's attention. Another benefit of changing the font color is that it can enhance the visual appearance and readability of the document. For instance, when preparing marketing materials, changing the font color of headings and subheadings to a different font color than the rest of the text can help create a clear information hierarchy, making the materials more attractive and easier to read. In this article, we will demonstrate how to change the font color in a Word document in C++ using Spire.Doc for C++.
- Change the Font Color of a Paragraph in Word in C++
- Change the Font Color of a Specific Text in Word in C++
Install Spire.Doc for C++
There are two ways to integrate Spire.Doc for C++ into your application. One way is to install it through NuGet, and the other way is to download the package from our website and copy the libraries into your program. Installation via NuGet is simpler and more recommended. You can find more details by visiting the following link.
Integrate Spire.Doc for C++ in a C++ Application
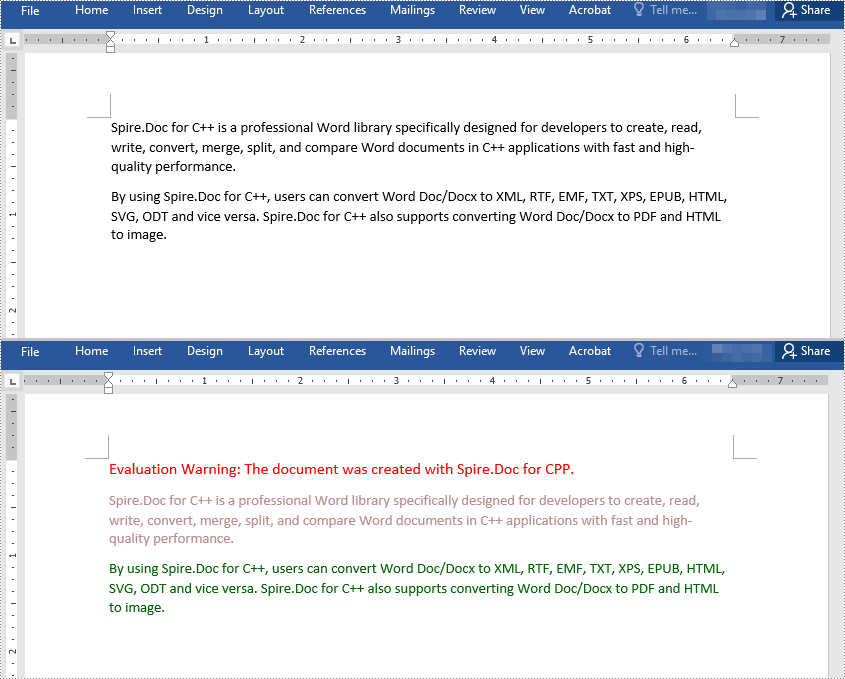
Change the Font Color of a Paragraph in Word in C++
To change the font color of a specific paragraph in a Word document, you can create a custom paragraph style with a specific font color, then add the style to the document and apply it to the paragraph you want to modify. The detailed steps are as follows:
- Create an instance of the Document class.
- Load a Word document using the Document->LoadFromFile() method.
- Access a specific section in the document by its index using the Document->GetSections()->GetItem(int index) method.
- Access the paragraph you want to modify by its index using the Section->GetParagraphs()->GetItem(int index) method.
- Create an instance of the ParagraphStyle class to define a custom paragraph style.
- Set the name and font color of the paragraph style using the ParagraphStyle->SetName() and ParagraphStyle->GetCharacterFormat()->SetTextColor() methods.
- Add the custom paragraph style to the document using the Document->GetStyles()->Add() method.
- Apply the custom paragraph style to the specific paragraph using the Paragraph->ApplyStyle() method.
- Save the modified document using the Document->SaveToFile() method.
- C++
#include "Spire.Doc.o.h";

using namespace Spire::Doc;

int main()
{
    //Create a Document instance
    intrusive_ptr<Document> document = new Document();

    //Load a Word document
    document->LoadFromFile(L"Sample.docx");

    //Get the first section
    intrusive_ptr<Section> section = document->GetSections()->GetItemInSectionCollection(0);

    //Change the font color of the first Paragraph
    intrusive_ptr<Paragraph> p1 = section->GetParagraphs()->GetItemInParagraphCollection(0);
    intrusive_ptr<ParagraphStyle> style1 = new ParagraphStyle(document);
    style1->SetName(L"Color1");
    style1->GetCharacterFormat()->SetTextColor(Color::GetRosyBrown());
    document->GetStyles()->Add(style1);
    p1->ApplyStyle(style1);

    //Change the font color of the second Paragraph
    intrusive_ptr<Paragraph> p2 = section->GetParagraphs()->GetItemInParagraphCollection(1);
    intrusive_ptr<ParagraphStyle> style2 = new ParagraphStyle(document);
    style2->SetName(L"Color2");
    style2->GetCharacterFormat()->SetTextColor(Color::GetDarkGreen());
    document->GetStyles()->Add(style2);
    p2->ApplyStyle(style2);

    //Save the result document
    document->SaveToFile(L"ChangeFontColorForParagraph.docx", FileFormat::Docx2013);
    document->Close();
}
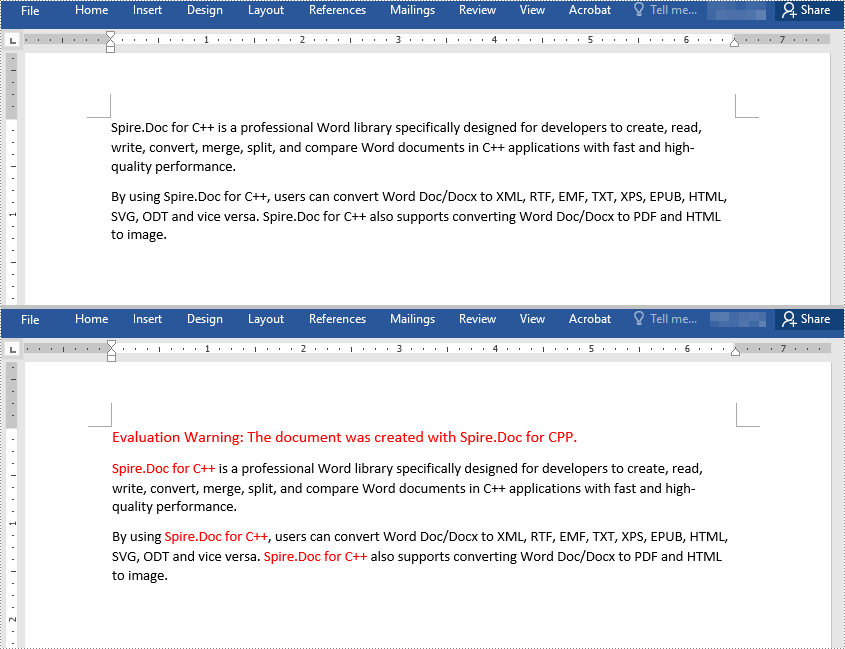
Change the Font Color of a Specific Text in Word in C++
To change the font color of a specific text in a Word document, you need to search for the text in the document, then change the font color of its all occurrences. The detailed steps are as follows:
- Create an instance of the Document class.
- Load a Word document using the Document->LoadFromFile() method.
- Find the text that you want to change the font color of using the Document->FindAllString() method.
- Iterate through all occurrences of the text and change the font color of each occurrence using the TextSelection->GetAsOneRange()->GetCharacterFormat()->SetTextColor() method.
- Save the result document using the Document->SaveToFile() method.
- C++
#include "Spire.Doc.o.h";

using namespace Spire::Doc;
using namespace std;

int main()
{
 //Create a Document instance
 intrusive_ptr<Document> document = new Document();

 //Load a Word document
 document->LoadFromFile(L"Sample.docx");

 //Find the text that you want to change the font color of
 vector<intrusive_ptr<TextSelection>> selection = document->FindAllString(L"Spire.Doc for C++", false, true);

 //Change the font color of all occurrences of the text
 for (auto text : selection)
 {
  text->GetAsOneRange()->GetCharacterFormat()->SetTextColor(Color::GetRed());
 }

 //Save the result document
 document->SaveToFile(L"ChangeFontColorForCertainText.docx", FileFormat::Docx2013);
 document->Close();
}
Apply for a Temporary License
If you'd like to remove the evaluation message from the generated documents, or to get rid of the function limitations, please request a 30-day trial license for yourself.
