
Knowledgebase (2370)
Children categories
Formulas and functions are fundamental features of Microsoft Excel that allow users to perform a variety of mathematical, statistical, and logical operations on data. Formulas are expressions that can be entered into cells to automate calculations, usually consisting of cell references, constants, and operators that specify the calculation to be performed. Functions, on the other hand, are pre-built formulas that perform specific tasks, such as calculating the sum, average, maximum, or minimum value of a range of cells. Both formulas and functions are essential tools for anyone working with data in Excel. Whether you are analyzing financial data, experimental data, or any other dataset, using formulas and functions can help you quickly and accurately perform calculations on your data and gain insights from it. In this article, you will learn how to insert or Read formulas and functions in an Excel file in C++ using Spire.XLS for C++.
Install Spire.XLS for C++
There are two ways to integrate Spire.XLS for C++ into your application. One way is to install it through NuGet, and the other way is to download the package from our website and copy the libraries into your program. Installation via NuGet is simpler and more recommended. You can find more details by visiting the following link.
Integrate Spire.XLS for C++ in a C++ Application
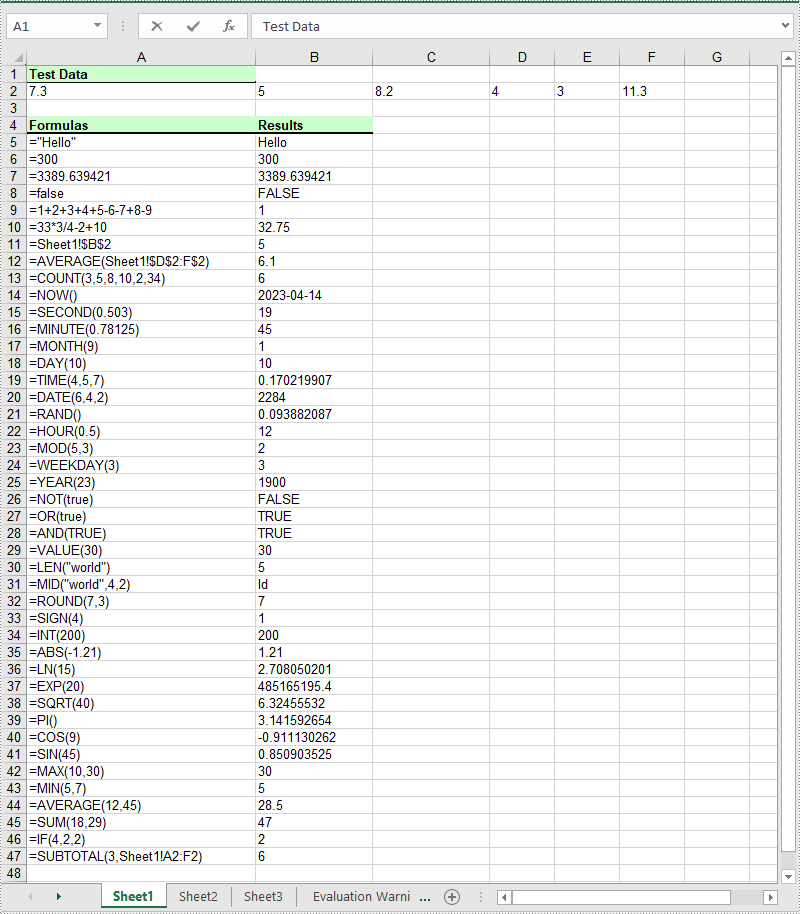
Insert Formulas and Functions into Excel in C++
The Worksheet->GetRange(int row, int column)->SetFormula(LPCWSTR_S value) method in Spire.XLS for C++ is used to add formulas or functions to specific cells in an Excel worksheet. The main steps are as follows:
- Initialize an instance of the Workbook class.
- Get a specific worksheet by its index using the Workbook->GetWorksheets()->Get(int index) method.
- Add some text and numeric data to specific cells of the worksheet using the Worksheet->GetRange(int row, int column)->SetText(LPCWSTR_S value) and Worksheet->GetRange(int row, int column)->SetNumberValue(double value) methods.
- Add text and formulas to specific cells of the worksheet using the Worksheet->GetRange(int row, int column)->SetText(LPCWSTR_S value) and the Worksheet->GetRange(int row, int column)->SetFormula(LPCWSTR_S value) methods.
- Add text and functions to specific cells of the worksheet using the Worksheet->GetRange(int row, int column)->SetText(LPCWSTR_S value) and the Worksheet->GetRange(int row, int column)->SetFormula(LPCWSTR_S value) methods.
- Save the result file using Workbook->SaveToFile(LPCWSTR_S fileName, ExcelVersion version) method.
- C++
#include "Spire.Xls.o.h";

using namespace Spire::Xls;
using namespace std;

int main()
{
    //Initialize an instance of the Workbook class
    intrusive_ptr<Worksheet> workbook = new Workbook();

    //Get the first worksheet
    intrusive_ptr<Worksheet> sheet = dynamic_pointer_cast<Worksheet>(workbook->GetWorksheets()->Get(0));

    //Declare two variables: currentRow, currentFormula
    int currentRow = 1;
    wstring currentFormula = L"";

    //Add text to the worksheet and set cell style
    sheet->GetRange(currentRow, 1)->SetText(L"Test Data:");
    sheet->GetRange(currentRow, 1)->GetStyle()->GetFont()->SetIsBold(true);
    sheet->GetRange(currentRow, 1)->GetStyle()->SetFillPattern(ExcelPatternType::Solid);
    sheet->GetRange(currentRow, 1)->GetStyle()->SetKnownColor(ExcelColors::LightGreen1);
    sheet->GetRange(currentRow, 1)->GetStyle()->GetBorders()->Get(BordersLineType::EdgeBottom)->SetLineStyle(LineStyleType::Medium);

    //Add some numeric data to the worksheet
    sheet->GetRange(++currentRow, 1)->SetNumberValue(7.3);
    sheet->GetRange(currentRow, 2)->SetNumberValue(5);
    sheet->GetRange(currentRow, 3)->SetNumberValue(8.2);
    sheet->GetRange(currentRow, 4)->SetNumberValue(4);
    sheet->GetRange(currentRow, 5)->SetNumberValue(3);
    sheet->GetRange(currentRow, 6)->SetNumberValue(11.3);

    currentRow++;

    //Add text to the worksheet and set cell style
    sheet->GetRange(++currentRow, 1)->SetText(L"Formulas");
    sheet->GetRange(currentRow, 2)->SetText(L"Results");
    sheet->GetRange(currentRow, 1, currentRow, 2)->GetStyle()->GetFont()->SetIsBold(true);
    sheet->GetRange(currentRow, 1, currentRow, 2)->GetStyle()->SetKnownColor(ExcelColors::LightGreen1);
    sheet->GetRange(currentRow, 1, currentRow, 2)->GetStyle()->SetFillPattern(ExcelPatternType::Solid);
    sheet->GetRange(currentRow, 1, currentRow, 2)->GetStyle()->GetBorders()->Get(BordersLineType::EdgeBottom)->SetLineStyle(LineStyleType::Medium);

    //Add text and formulas to the worksheet
    currentFormula = (L"=\"Hello\"");
    sheet->GetRange(++currentRow, 1)->SetText((L"'" + currentFormula).c_str());
    sheet->GetRange(currentRow, 2)->SetFormula(currentFormula.c_str());

    currentFormula = (L"=300");
    sheet->GetRange(++currentRow, 1)->SetText((L"'" + currentFormula).c_str());
    sheet->GetRange(currentRow, 2)->SetFormula(currentFormula.c_str());

    currentFormula = (L"=3389.639421");
    sheet->GetRange(++currentRow, 1)->SetText((L"'" + currentFormula).c_str());
    sheet->GetRange(currentRow, 2)->SetFormula(currentFormula.c_str());

    currentFormula = (L"=false");
    sheet->GetRange(++currentRow, 1)->SetText((L"'" + currentFormula).c_str());
    sheet->GetRange(currentRow, 2)->SetFormula(currentFormula.c_str());

    currentFormula = (L"=1+2+3+4+5-6-7+8-9");
    sheet->GetRange(++currentRow, 1)->SetText((L"'" + currentFormula).c_str());
    sheet->GetRange(currentRow, 2)->SetFormula(currentFormula.c_str());

    currentFormula = (L"=33*3/4-2+10");
    sheet->GetRange(++currentRow, 1)->SetText((L"'" + currentFormula).c_str());
    sheet->GetRange(currentRow, 2)->SetFormula(currentFormula.c_str());

    currentFormula = (L"=Sheet1!$B$2");
    sheet->GetRange(++currentRow, 1)->SetText((L"'" + currentFormula).c_str());
    sheet->GetRange(currentRow, 2)->SetFormula(currentFormula.c_str());

    //Add text and Functions to the worksheet
    //AVERAGE
    currentFormula = (L"=AVERAGE(Sheet1!$D$2:F$2)");
    sheet->GetRange(++currentRow, 1)->SetText((L"'" + currentFormula).c_str());
    sheet->GetRange(currentRow, 2)->SetFormula(currentFormula.c_str());

    //COUNT
    currentFormula = (L"=COUNT(3,5,8,10,2,34)");
    sheet->GetRange(++currentRow, 1)->SetText((L"'" + currentFormula).c_str());
    sheet->GetRange(currentRow, 2)->SetFormula(currentFormula.c_str());

    //NOW
    currentFormula = (L"=NOW()");
    sheet->GetRange(++currentRow, 1)->SetText((L"'" + currentFormula).c_str());
    sheet->GetRange(currentRow, 2)->SetFormula(currentFormula.c_str());
    sheet->GetRange(currentRow, 2)->GetStyle()->SetNumberFormat(L"yyyy-MM-DD");

    //SECOND
    currentFormula = (L"=SECOND(0.503)");
    sheet->GetRange(++currentRow, 1)->SetText((L"'" + currentFormula).c_str());
    sheet->GetRange(currentRow++, 2)->SetFormula(currentFormula.c_str());

    //MINUTE
    currentFormula = (L"=MINUTE(0.78125)");
    sheet->GetRange(currentRow, 1)->SetText((L"'" + currentFormula).c_str());
    sheet->GetRange(currentRow++, 2)->SetFormula(currentFormula.c_str());

    //MONTH
    currentFormula = (L"=MONTH(9)");
    sheet->GetRange(currentRow, 1)->SetText((L"'" + currentFormula).c_str());
    sheet->GetRange(currentRow++, 2)->SetFormula(currentFormula.c_str());

    //DAY
    currentFormula = (L"=DAY(10)");
    sheet->GetRange(currentRow, 1)->SetText((L"'" + currentFormula).c_str());
    sheet->GetRange(currentRow++, 2)->SetFormula(currentFormula.c_str());

    //TIME
    currentFormula = (L"=TIME(4,5,7)");
    sheet->GetRange(currentRow, 1)->SetText((L"'" + currentFormula).c_str());
    sheet->GetRange(currentRow++, 2)->SetFormula(currentFormula.c_str());

    //DATE
    currentFormula = (L"=DATE(6,4,2)");
    sheet->GetRange(currentRow, 1)->SetText((L"'" + currentFormula).c_str());
    sheet->GetRange(currentRow++, 2)->SetFormula(currentFormula.c_str());

    //RAND
    currentFormula = (L"=RAND()");
    sheet->GetRange(currentRow, 1)->SetText((L"'" + currentFormula).c_str());
    sheet->GetRange(currentRow++, 2)->SetFormula(currentFormula.c_str());

    //HOUR
    currentFormula = (L"=HOUR(0.5)");
    sheet->GetRange(currentRow, 1)->SetText((L"'" + currentFormula).c_str());
    sheet->GetRange(currentRow++, 2)->SetFormula(currentFormula.c_str());

    //MOD
    currentFormula = (L"=MOD(5,3)");
    sheet->GetRange(currentRow, 1)->SetText((L"'" + currentFormula).c_str());
    sheet->GetRange(currentRow++, 2)->SetFormula(currentFormula.c_str());

    //WEEKDAY
    currentFormula = (L"=WEEKDAY(3)");
    sheet->GetRange(currentRow, 1)->SetText((L"'" + currentFormula).c_str());
    sheet->GetRange(currentRow++, 2)->SetFormula(currentFormula.c_str());

    //YEAR
    currentFormula = (L"=YEAR(23)");
    sheet->GetRange(currentRow, 1)->SetText((L"'" + currentFormula).c_str());
    sheet->GetRange(currentRow++, 2)->SetFormula(currentFormula.c_str());

    //NOT
    currentFormula = (L"=NOT(true)");
    sheet->GetRange(currentRow, 1)->SetText((L"'" + currentFormula).c_str());
    sheet->GetRange(currentRow++, 2)->SetFormula(currentFormula.c_str());

    //OR
    currentFormula = (L"=OR(true)");
    sheet->GetRange(currentRow, 1)->SetText((L"'" + currentFormula).c_str());
    sheet->GetRange(currentRow++, 2)->SetFormula(currentFormula.c_str());

    //AND
    currentFormula = (L"=AND(TRUE)");
    sheet->GetRange(currentRow, 1)->SetText((L"'" + currentFormula).c_str());
    sheet->GetRange(currentRow++, 2)->SetFormula(currentFormula.c_str());

    //VALUE
    currentFormula = (L"=VALUE(30)");
    sheet->GetRange(currentRow, 1)->SetText((L"'" + currentFormula).c_str());
    sheet->GetRange(currentRow++, 2)->SetFormula(currentFormula.c_str());

    //LEN
    currentFormula = (L"=LEN(\"world\")");
    sheet->GetRange(currentRow, 1)->SetText((L"'" + currentFormula).c_str());
    sheet->GetRange(currentRow++, 2)->SetFormula(currentFormula.c_str());

    //MID
    currentFormula = (L"=MID(\"world\",4,2)");
    sheet->GetRange(currentRow, 1)->SetText((L"'" + currentFormula).c_str());
    sheet->GetRange(currentRow++, 2)->SetFormula(currentFormula.c_str());

    //ROUND
    currentFormula = (L"=ROUND(7,3)");
    sheet->GetRange(currentRow, 1)->SetText((L"'" + currentFormula).c_str());
    sheet->GetRange(currentRow++, 2)->SetFormula(currentFormula.c_str());

    //SIGN
    currentFormula = (L"=SIGN(4)");
    sheet->GetRange(currentRow, 1)->SetText((L"'" + currentFormula).c_str());
    sheet->GetRange(currentRow++, 2)->SetFormula(currentFormula.c_str());

    //INT
    currentFormula = (L"=INT(200)");
    sheet->GetRange(currentRow, 1)->SetText((L"'" + currentFormula).c_str());
    sheet->GetRange(currentRow++, 2)->SetFormula(currentFormula.c_str());

    //ABS
    currentFormula = (L"=ABS(-1.21)");
    sheet->GetRange(currentRow, 1)->SetText((L"'" + currentFormula).c_str());
    sheet->GetRange(currentRow++, 2)->SetFormula(currentFormula.c_str());

    //LN
    currentFormula = (L"=LN(15)");
    sheet->GetRange(currentRow, 1)->SetText((L"'" + currentFormula).c_str());
    sheet->GetRange(currentRow++, 2)->SetFormula(currentFormula.c_str());

    //EXP
    currentFormula = (L"=EXP(20)");
    sheet->GetRange(currentRow, 1)->SetText((L"'" + currentFormula).c_str());
    sheet->GetRange(currentRow++, 2)->SetFormula(currentFormula.c_str());

    //SQRT
    currentFormula = (L"=SQRT(40)");
    sheet->GetRange(currentRow, 1)->SetText((L"'" + currentFormula).c_str());
    sheet->GetRange(currentRow++, 2)->SetFormula(currentFormula.c_str());

    //PI
    currentFormula = (L"=PI()");
    sheet->GetRange(currentRow, 1)->SetText((L"'" + currentFormula).c_str());
    sheet->GetRange(currentRow++, 2)->SetFormula(currentFormula.c_str());

    //COS
    currentFormula = (L"=COS(9)");
    sheet->GetRange(currentRow, 1)->SetText((L"'" + currentFormula).c_str());
    sheet->GetRange(currentRow++, 2)->SetFormula(currentFormula.c_str());

    //SIN
    currentFormula = (L"=SIN(45)");
    sheet->GetRange(currentRow, 1)->SetText((L"'" + currentFormula).c_str());
    sheet->GetRange(currentRow++, 2)->SetFormula(currentFormula.c_str());

    //MAX
    currentFormula = (L"=MAX(10,30)");
    sheet->GetRange(currentRow, 1)->SetText((L"'" + currentFormula).c_str());
    sheet->GetRange(currentRow++, 2)->SetFormula(currentFormula.c_str());

    //MIN
    currentFormula = (L"=MIN(5,7)");
    sheet->GetRange(currentRow, 1)->SetText((L"'" + currentFormula).c_str());
    sheet->GetRange(currentRow++, 2)->SetFormula(currentFormula.c_str());

    //AVERAGE
    currentFormula = (L"=AVERAGE(12,45)");
    sheet->GetRange(currentRow, 1)->SetText((L"'" + currentFormula).c_str());
    sheet->GetRange(currentRow++, 2)->SetFormula(currentFormula.c_str());

    //SUM
    currentFormula = (L"=SUM(18,29)");
    sheet->GetRange(currentRow, 1)->SetText((L"'" + currentFormula).c_str());
    sheet->GetRange(currentRow++, 2)->SetFormula(currentFormula.c_str());

    //IF
    currentFormula = (L"=IF(4,2,2)");
    sheet->GetRange(currentRow, 1)->SetText((L"'" + currentFormula).c_str());
    sheet->GetRange(currentRow++, 2)->SetFormula(currentFormula.c_str());

    //SUBTOTAL
    currentFormula = (L"=SUBTOTAL(3,Sheet1!A2:F2)");
    sheet->GetRange(currentRow, 1)->SetText((L"'" + currentFormula).c_str());
    sheet->GetRange(currentRow++, 2)->SetFormula(currentFormula.c_str());

    //Set width of the 1st, 2nd and 3rd columns
    sheet->SetColumnWidth(1, 32);
    sheet->SetColumnWidth(2, 16);
    sheet->SetColumnWidth(3, 16);

    //Create a cell style
    intrusive_ptr<CellStyle> style = workbook->GetStyles()->Add(L"Style");
    //Set the horizontal alignment as left
    style->SetHorizontalAlignment(HorizontalAlignType::Left);
    //Apply the style to the worksheet
    sheet->ApplyStyle(style);

    //Save the result file
    workbook->SaveToFile(L"InsertFormulasAndFunctions.xlsx", ExcelVersion::Version2016);
    workbook->Dispose();
}
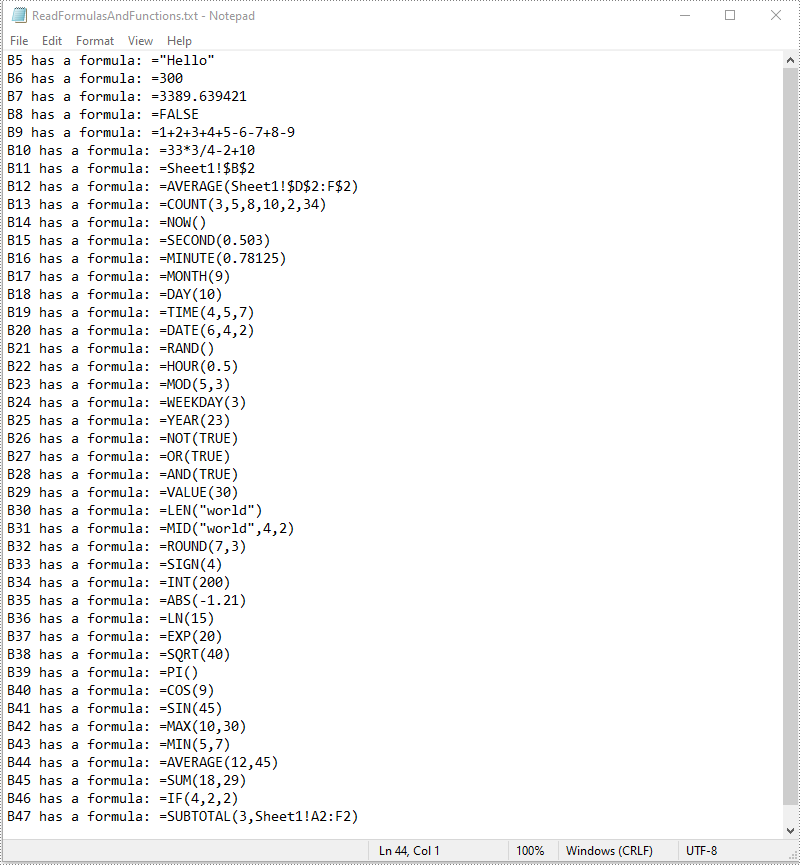
Read Formulas and Functions in Excel in C++
To read formulas and functions in an Excel worksheet, you need to iterate through all the cells in the worksheet, after that, find the cells containing formulas or functions using the Cell->GetHasFormula() method, then get the formulas or functions of the cells using the CellRange->GetFormula() method. The detailed steps are as follows:
- Initialize an instance of the Workbook class.
- Load an Excel file using the Workbook->LoadFromFile() method.
- Get a specific worksheet by its index using the Workbook->GetWorksheets()->Get(int index) method.
- Access the used range of the worksheet using the Worksheet->GetAllocatedRange() method.
- Declare a wstring variable.
- Iterate through all the cells in the used range.
- Find the cells containing formulas/functions using the Cell->GetHasFormula() method.
- Get the names and the formulas/functions of the cells using the CellRange->GetRangeAddressLocal() and CellRange->GetFormula() methods.
- Append the cell names and formulas/functions to the wstring variable.
- Write the content of the wstring variable into a .txt file.
- C++
#include "Spire.Xls.o.h";

using namespace Spire::Xls;
using namespace std;

int main()
{
    //Initialize an instance of the Workbook class
    intrusive_ptr<Worksheet> workbook = new Workbook();
    //Load an Excel file
    workbook->LoadFromFile(L"InsertFormulasAndFunctions.xlsx");

    //Get the first worksheet
    intrusive_ptr<Worksheet> sheet = dynamic_pointer_cast<Worksheet>(workbook->GetWorksheets()->Get(0));

    //Access the used range of the worksheet
    intrusive_ptr<CellRange> usedRange = dynamic_pointer_cast<CellRange>(sheet->GetAllocatedRange());

    //Declare a wstring variable
    wstring buffer = L"";
    //Loop through all the cells in the used range
    for (int i = 0; i < usedRange->GetCells()->GetCount(); i++)
    {
        intrusive_ptr<CellRange> cell = usedRange->GetCells()->GetItem(i);
        //Detect if the current cell has formula/function
        if (cell->GetHasFormula())
        {
            //Get the cell name
            wstring cellName = cell->GetRangeAddressLocal();
            //Get the formula/function
            wstring formula = cell->GetFormula();
            //Append the cell name and formula/function to the wstring variable
            buffer += ((cellName + L" has a formula: " + formula + L"\n").c_str());
        }
    }

    //Write the content of the wstring variable into a .txt file
    wofstream write(L"ReadFormulasAndFunctions.txt");
    auto LocUtf8 = locale(locale(""), new std::codecvt_utf8<wchar_t>);
    write.imbue(LocUtf8);
    write << buffer;
    write.close();
    workbook->Dispose();
}
Apply for a Temporary License
If you'd like to remove the evaluation message from the generated documents, or to get rid of the function limitations, please request a 30-day trial license for yourself.
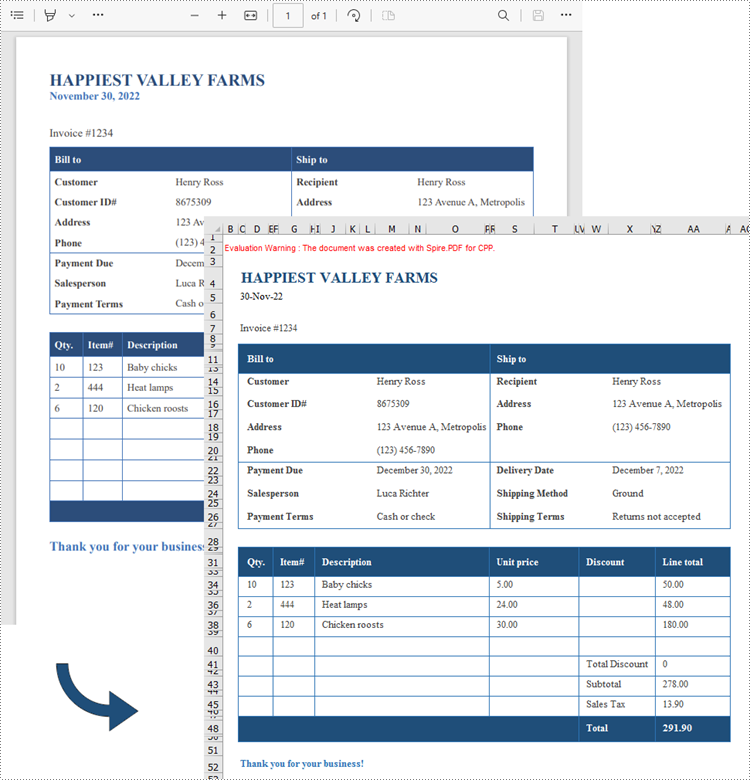
PDF files are great for delivering documents in a standard format that looks exactly the same no matter what device or software you use to view them, but they are difficult to edit. If you have a spreadsheet in PDF format, usually the easiest way to work with the data is to convert the PDF to Excel and edit it there. In this article, you will learn how to convert PDF to Excel in C++ using Spire.PDF for C++.
Install Spire.PDF for C++
There are two ways to integrate Spire.PDF for C++ into your application. One way is to install it through NuGet, and the other way is to download the package from our website and copy the libraries into your program. Installation via NuGet is simpler and more recommended. You can find more details by visiting the following link.
Integrate Spire.PDF for C++ in a C++ Application
Convert PDF to Excel in C++
Spire.PDF for C++ offers the PdfDocument->SaveToFile() method to convert PDF documents to other file formats including XLSX. Before converting, you can set the conversion options by using PdfDocument->GetConvertOptions->SetPdfToXlsxOptions() method. This method takes the XlsxLineLayoutOptions object as a parameter, and the constructor of the XlsxLineLayoutOptions class has the following five parameters, enabling you to control how PDF will be converted to Excel.
- bool convertToMultipleSheet: Indicates whether each page of the PDF will be converted to a worksheet in Excel.
- bool rotatedText: Indicates whether to show rotated text.
- bool splitCell: Indicates whether a PDF table cell containing text spanning several lines will be split into multiple rows in Excel.
- bool wrapText: Indicates whether to wrap text in an Excel cell.
- bool overlapText: Indicates whether to display overlapping text.
- C++
#include "Spire.Pdf.o.h";

using namespace Spire::Pdf;

int main() {

    //Create a PdfDcoument object
    PdfDocument* doc = new PdfDocument();

    //Load a PDF document
    doc->LoadFromFile(L"C:\\Users\\Administrator\\Desktop\\Business sales invoice.pdf");

    //Create a XlsxLineLayoutOptions object
    XlsxLineLayoutOptions* options = new XlsxLineLayoutOptions(true, true, false, true, false);

    //Set PDF to XLSX convert options
    doc->GetConvertOptions()->SetPdfToXlsxOptions(options);

    //Save the PDF document to Excel
    doc->SaveToFile(L"output/PdfToExcel.xlsx", FileFormat::XLSX);
	doc->Close();
	delete doc;
}
Apply for a Temporary License
If you'd like to remove the evaluation message from the generated documents, or to get rid of the function limitations, please request a 30-day trial license for yourself.
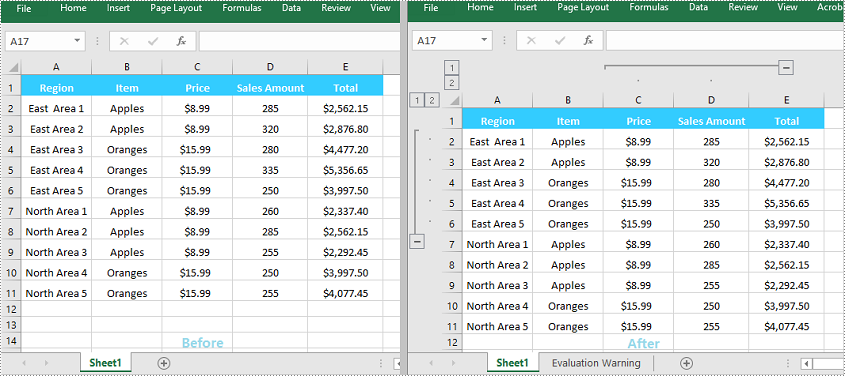
Grouping rows and columns in Excel is a valuable feature that can simplify working with large or complex datasets. This feature enables you to hide or show individual sections of data for better viewing and analysis. For instance, if you have a worksheet with data for various regions or departments, you can group the rows for each region or department together. Once grouped, you can collapse or expand each group as required, which makes it easier for you to focus on specific parts of the data while keeping the rest of the worksheet unaffected. In this article, you will learn how to group or ungroup rows and columns, along with how to expand or collapse groups in Excel in C++ using Spire.XLS for C++.
- Group Rows and Columns in Excel in C++
- Ungroup Rows and Columns in Excel in C++
- Expand or Collapse Groups in Excel in C++
Install Spire.XLS for C++
There are two ways to integrate Spire.XLS for C++ into your application. One way is to install it through NuGet, and the other way is to download the packageThere are two ways to integrate Spire.XLS for C++ into your application. One way is to install it through NuGet, and the other way is to download the package from our website and copy the libraries into your program. Installation via NuGet is simpler and more recommended. You can find more details by visiting the following link.from our website and copy the libraries into your program. Installation via NuGet is simpler and more recommended. You can find more details by visiting the following link.
Integrate Spire.XLS for C++ in a C++ Application
Group Rows and Columns in Excel in C++
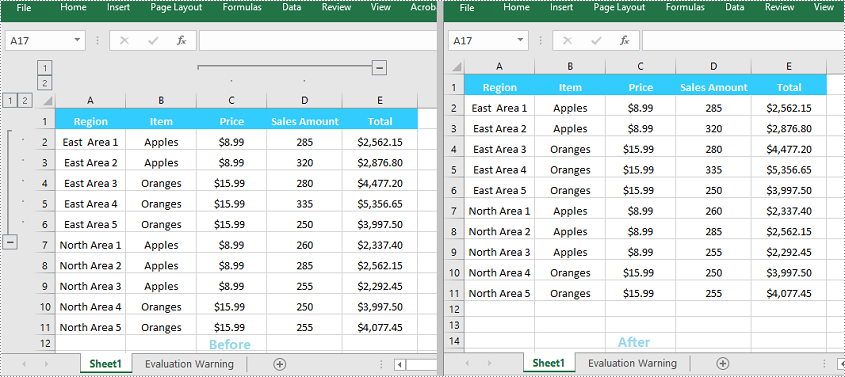
The XlsWorksheet->GroupByRows(int firstRow, int lastRow, bool isCollapsed) and XlsWorksheet->GroupByColumns (int firstColumn, int lastColumn, bool isCollapsed) methods in Spire.XLS for C++ can be used to group specific rows and columns in an Excel worksheet. The detailed steps are as follows:
- Initialize an instance of the Workbook class.
- Load an Excel file using the Workbook->LoadFromFile(LPCWSTR_S fileName) method.
- Get a specific worksheet by its index using the Workbook->GetWorksheets()->Get(int index) method.
- Group specific rows in the worksheet using the XlsWorksheet->GroupByRows(int firstRow, int lastRow, bool isCollapsed) method.
- Group specific columns in the worksheet using the XlsWorksheet->GroupByColumns (int firstColumn, int lastColumn, bool isCollapsed) method.
- Save the result file using the Workbook->SaveToFile (LPCWSTR_S fileName, ExcelVersion version) method.
- C++
#include "Spire.Xls.o.h";

using namespace Spire::Xls;

int main()
{
	//Initialize an instance of the Workbook class
	intrusive_ptr<Workbook> workbook = new Workbook();

	//Load an Excel file
	workbook->LoadFromFile(L"Sample.xlsx");

	//Get the first worksheet
	intrusive_ptr<Worksheet> sheet = dynamic_pointer_cast<Worksheet>(workbook->GetWorksheets()->Get(0));

	//Group the 2nd, 3rd, 4th, 5th and 6th rows
	sheet->GroupByRows(2, 6, false);
	//Group the 3rd and 4th columns
	sheet->GroupByColumns(3, 4, false);

	//Save the result file
	workbook->SaveToFile(L"GroupRowsAndColumns.xlsx", ExcelVersion::Version2013);
	workbook->Dispose();
}
Ungroup Rows and Columns in Excel in C++
By ungrouping rows and columns, you can restore each cell to its initial, standalone state, helping you view the data as it was originally presented.
Spire.XLS for C++ offers the XlsWorksheet->UngroupByRows(int firstRow, int lastRow) and XlsWorksheet->UngroupByColumns (int firstColumn, int lastColumn) methods to help you ungroup rows and columns. The detailed steps are as follows:
- Initialize an instance of the Workbook class.
- Load an Excel file using the Workbook->LoadFromFile(LPCWSTR_S fileName) method.
- Get a specific worksheet by its index using the Workbook->GetWorksheets()->Get(int index) method.
- Ungroup specific rows in the worksheet using the XlsWorksheet->UngroupByRows(int firstRow, int lastRow) method.
- Ungroup specific columns in the worksheet using the XlsWorksheet->UngroupByColumns (int firstColumn, int lastColumn) method.
- Save the result file using the Workbook->SaveToFile (LPCWSTR_S fileName, ExcelVersion version) method.
- C++
#include "Spire.Xls.o.h";

using namespace Spire::Xls;

int main()
{
	//Initialize an instance of the Workbook class
	intrusive_ptr<Workbook> workbook = new Workbook();

	//Load an Excel file
	workbook->LoadFromFile(L" GroupRowsAndColumns.xlsx");

	//Get the first worksheet
	intrusive_ptr<Worksheet> sheet = dynamic_pointer_cast<Worksheet>(workbook->GetWorksheets()->Get(0));

	//Ungroup the 2nd, 3rd, 4th, 5th and 6th rows
	sheet->UngroupByRows(2, 6);

	//Ungroup the 3rd and 4th columns
	sheet->UngroupByColumns(3, 4);

	//Save the result file
	workbook->SaveToFile(L"UngroupRowsAndColumns.xlsx", ExcelVersion::Version2013);
	workbook->Dispose();
}
Expand or Collapse Groups in Excel in C++
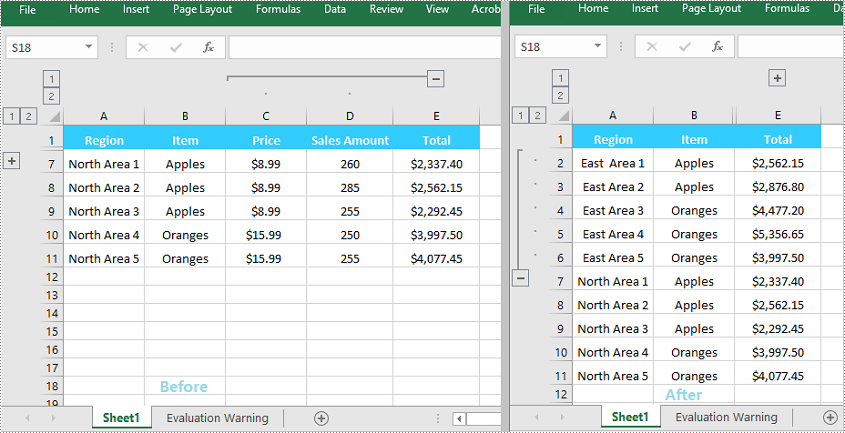
When grouping rows or columns in Excel, you can click the expand (+) or collapse (-) button to show or hide the grouped data. In Spire.XLS for C++, you can use the Worksheet->GetRange(LPCWSTR_S name)->ExpandGroup(GroupByType groupBy) method or the Worksheet->GetRange(LPCWSTR_S name)->CollapseGroup(GroupByType groupBy) method to achieve the same expanding or collapsing effect. The detailed steps are as follows:
- Initialize an instance of the Workbook class.
- Load an Excel file using the Workbook->LoadFromFile(LPCWSTR_S fileName) method.
- Get a specific worksheet by its index using the Workbook->GetWorksheets()->Get(int index) method.
- Expand a specific group using the Worksheet->GetRange(LPCWSTR_S name)->ExpandGroup(GroupByType groupBy) method.
- Collapse a specific group using the Worksheet->GetRange(LPCWSTR_S name)->CollapseGroup(GroupByType groupBy) method.
- Save the result file using the Workbook->SaveToFile (LPCWSTR_S fileName, ExcelVersion version) method.
- C++
#include "Spire.Xls.o.h";

using namespace Spire::Xls;

int main()
{
	//Initialize an instance of the Workbook class
	intrusive_ptr<Workbook> workbook = new Workbook();

	//Load an Excel file
	workbook->LoadFromFile(L"Input.xlsx");

	//Get the first worksheet
	intrusive_ptr<Worksheet> sheet = dynamic_pointer_cast<Worksheet>(workbook->GetWorksheets()->Get(0));

	//Expand a group
	sheet->GetRange(L"A2:E6")->ExpandGroup(GroupByType::ByRows);

	//Collapse a group
	sheet->GetRange(L"C1:D11")->CollapseGroup(GroupByType::ByColumns);

	//Save the result file
	workbook->SaveToFile(L"ExpandOrCollapseGroups.xlsx", ExcelVersion::Version2013);
	workbook->Dispose();
}
Apply for a Temporary License
If you'd like to remove the evaluation message from the generated documents, or to get rid of the function limitations, please request a 30-day trial license for yourself.
