
Knowledgebase (2370)
Children categories
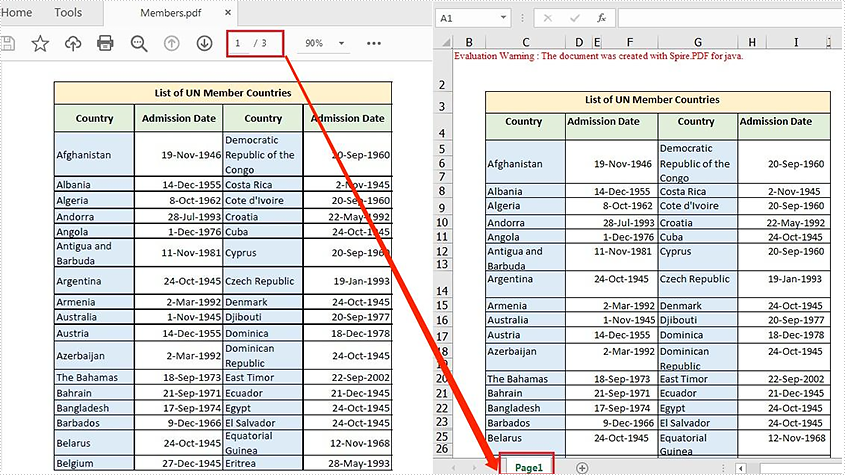
Spire.PDF for Java offers the PdfDocument.saveToFile() method to convert PDF to other file formats such as Word, Excel, HTML, SVG and XPS. When converting PDF to Excel, it allows you to convert each PDF page to a single Excel worksheet or convert multiple PDF pages to one Excel worksheet. This article will demonstrate how to convert a PDF file containing 3 pages to one Excel worksheet.
Install Spire.PDF for Java
First of all, you're required to add the Spire.PDF.jar file as a dependency in your Java program. The JAR file can be downloaded from this link. If you use Maven, you can easily import the JAR file in your application by adding the following code to your project's pom.xml file.
<repositories>
    <repository>
        <id>com.e-iceblue</id>
        <name>e-iceblue</name>
        <url>https://repo.e-iceblue.com/nexus/content/groups/public/</url>
    </repository>
</repositories>
<dependencies>
    <dependency>
        <groupId>e-iceblue</groupId>
        <artifactId>spire.pdf</artifactId>
        <version>12.7.0</version>
    </dependency>
</dependencies>
Convert a Multi-page PDF to One Excel Worksheet
The detailed steps are as follows:
- Create a PdfDocument object.
- Load a sample PDF file using PdfDocument.loadFromFile() method.
- Set the PDF to XLSX conversion options to render multiple PDF pages on a single worksheet using PdfDocument.getConvertOptions().setPdfToXlsxOptions() method.
- Save the PDF file to Excel using PdfDocument.saveToFile() method.
- Java
import com.spire.pdf.*;
import com.spire.pdf.conversion.XlsxLineLayoutOptions;

public class ManyPagesToOneSheet {
    public static void main(String[] args) {

        //Create a PdfDocument object
        PdfDocument pdf = new PdfDocument();

        //Load a sample PDF file
        pdf.loadFromFile("C:\\Users\\Administrator\\Desktop\\Members.pdf");

        //Set the PDF to XLSX conversion options: rendering multiple pages on a single worksheet
        pdf.getConvertOptions().setPdfToXlsxOptions(new XlsxLineLayoutOptions(false,true,true));

        //Save to Excel
        pdf.saveToFile("out/ToOneSheet.xlsx", FileFormat.XLSX);
    }
}
Apply for a Temporary License
If you'd like to remove the evaluation message from the generated documents, or to get rid of the function limitations, please request a 30-day trial license for yourself.
When working with Excel, you may sometimes need to find the common values between two ranges of cells in a worksheet. For this reason, it’s recommended that Java codes can be used to automatically find the intersection of certain ranges. In this article, you'll learn how to achieve the operation using Spire.XLS for Java.
Install Spire.XLS for Java
First of all, you're required to add the Spire.Xls.jar file as a dependency in your Java program. The JAR file can be downloaded from this link. If you use Maven, you can easily import the JAR file in your application by adding the following code to your project's pom.xml file.
<repositories>
    <repository>
        <id>com.e-iceblue</id>
        <name>e-iceblue</name>
        <url>https://repo.e-iceblue.com/nexus/content/groups/public/</url>
    </repository>
</repositories>
<dependencies>
    <dependency>
        <groupId>e-iceblue</groupId>
        <artifactId>spire.xls</artifactId>
        <version>16.7.3</version>
    </dependency>
</dependencies>
Get the Intersection of Two Cell Ranges in Excel
The following are detailed steps to get the intersection of two cell ranges in an Excel worksheet.
- Create a Workbook instance and load a sample Excel file using Workbook.loadFromFile() method.
- Get a specific worksheet of the file using Workbook.getWorksheets().get() method.
- Specify two ranges of cells using Worksheet.getRange().get() method and get their intersection using XlsRange.intersect() method.
- Create a StringBuilder instance.
- Loop through the intersection and obtain cell values using CellRange.getValue() method.
- Append the result to the StringBuilder instance using StringBuilder.append() method.
- Java
import com.spire.xls.*;
public class getIntersectionOfTwoRanges {
public static void main(String[] args) {
//Create a Workbook instance
Workbook workbook = new Workbook();
//Load a sample Excel file
workbook.loadFromFile( "C:\\Users\\Test1\\Desktop\\sample.xlsx");
//Get the first worksheet
Worksheet sheet = workbook.getWorksheets().get(0);
//Specify two cell ranges and get their intersection
CellRange range = sheet.getRange().get("B2:E7").intersect(sheet.getRange().get("C3:D7"));
//Create a StringBuilder instance
StringBuilder content = new StringBuilder();
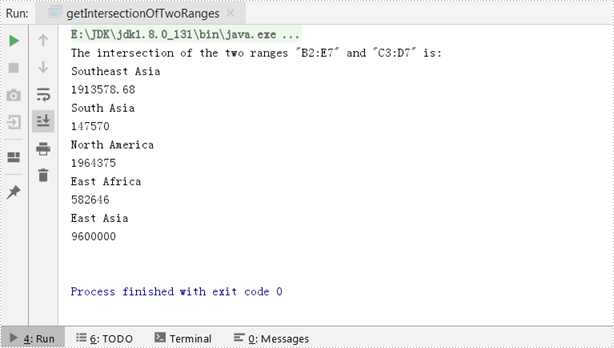
content.append("The intersection of the two ranges \"B2:E7\" and \"C3:D7\" is:"+"\n");
//Loop through the intersection and obtain cell values
for(CellRange r : range.getCellList())
{
content.append(r.getValue()+"\n");
}
//Output the result
System.out.println(content);
}
}
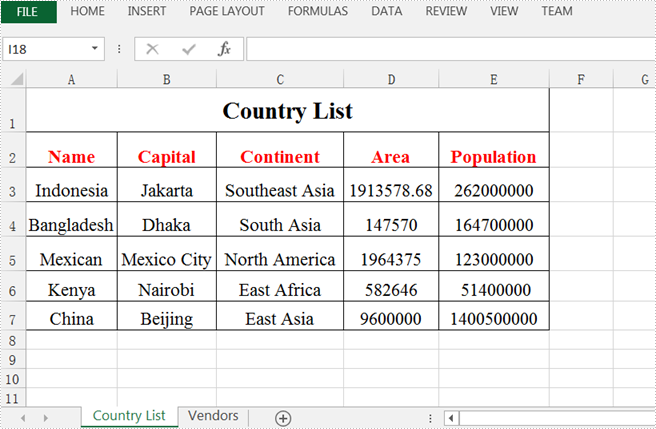
The input Excel:
The output result:
Apply for a Temporary License
If you'd like to remove the evaluation message from the generated documents, or to get rid of the function limitations, please request a 30-day trial license for yourself.
Every paragraph in a Word document uses a paragraph style, either intentionally or unintentionally. The paragraph style can be a built-in style, such as Heading 1 and Heading 2, or it can be a customized style. This article introduces how we can extract paragraphs that use a specific style by using Spire.Doc for Java.
The table below lists the style names in MS Word and their corresponding names in Spire.Doc. A very simple rule is that the style name returned by programming does not contain spaces.
| Style Name in MS Word | Style Name in Spire.Doc |
| Title | Title |
| Subtitle | Subtitle |
| Heading 1 | Heading1 |
| Heading 2 | Heading2 |
| Heading 3 | Heading3 |
| No Spacing | NoSpacing |
| Quote | Quote |
| Intense Quote | IntenseQuote |
| List Paragraph | ListParagraph |
| Normal | Normal |
| Custom Name | CustomName |
Install Spire.Doc for Java
First of all, you're required to add the Spire.Doc.jar file as a dependency in your Java program. The JAR file can be downloaded from this link. If you use Maven, you can easily import the JAR file in your application by adding the following code to your project's pom.xml file.
<repositories>
    <repository>
        <id>com.e-iceblue</id>
        <name>e-iceblue</name>
        <url>https://repo.e-iceblue.com/nexus/content/groups/public/</url>
    </repository>
</repositories>
<dependencies>
    <dependency>
        <groupId>e-iceblue</groupId>
        <artifactId>spire.doc</artifactId>
        <version>14.7.0</version>
    </dependency>
</dependencies>
Extract Paragraphs that Use a Specific Style
The style name of a specific paragraph can be obtained by Paragraph.getStyleName() method. If a paragraph’s style name is exactly what you want to query, you can get the paragraph content using Paragraph.getText() method. The following are the steps to extract paragraphs that use a specific style.
- Load a sample Word document while initializing the Document object.
- Loop through the sections in the document.
- Get a specific paragraph from a certain section using Section.getParagraphs().get() method.
- Get the paragraph's style name using Paragraph.getStyleName() method and determine if the style is "Heading 1".
- If yes, extract the text of the paragraph using Paragraph.getText() method.
- Java
import com.spire.doc.Document;
import com.spire.doc.documents.Paragraph;
public class GetParagraphByStyleName {
public static void main(String[] args) {
//Load a sample Word document while initializing the Document object
Document doc = new Document("C:\\Users\\Administrator\\Desktop\\Styles.docx");
//Declare a variable
Paragraph paragraph;
//Loop through the sections
for (int i = 0; i < doc.getSections().getCount(); i++) {
//Loop through the paragraphs of a specific section
for (int j = 0; j < doc.getSections().get(i).getParagraphs().getCount(); j++) {
//Get a specific paragraph
paragraph = doc.getSections().get(i).getParagraphs().get(j);
//Determine if the paragraph style is "Heading 1"
if (paragraph.getStyleName().equals("Heading1")) {
//Get the text of the paragraph in "Heading 1"
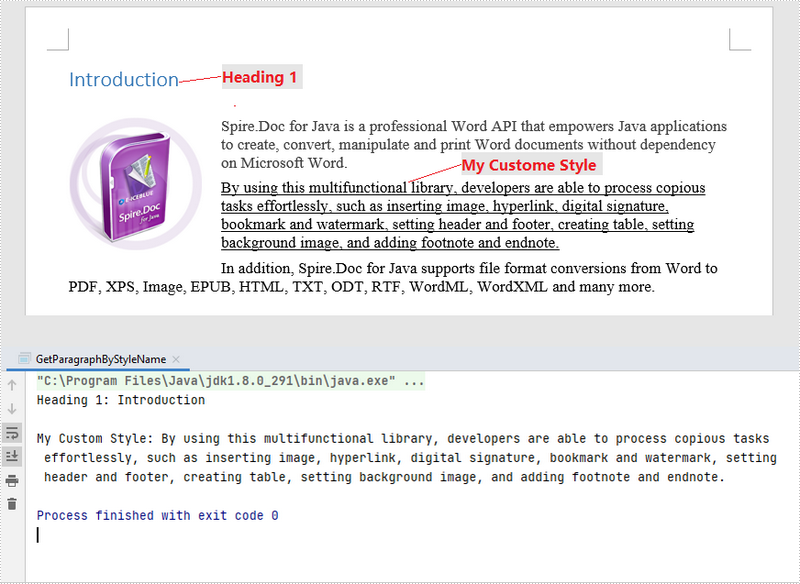
System.out.println("Heading 1: " + paragraph.getText() + "\n");
}
//Determine if the paragraph style is "My Custom Style"
if (paragraph.getStyleName().equals("MyCustomStyle")) {
//Get the text of the paragraph in "My Custom Style"
System.out.println("My Custom Style: " + paragraph.getText());
}
}
}
}
}
Apply for a Temporary License
If you'd like to remove the evaluation message from the generated documents, or to get rid of the function limitations, please request a 30-day trial license for yourself.
