
Knowledgebase (2370)
Children categories
By using Spire.Doc, you can not only retrieve the style names of all paragraphs in a Word document, but also get the paragraphs with a specific style name. This is useful especially when you need to get the text in Title, Heading 1, Subtitle, etc.
| Paragraph Style Names in Word | Paragraph Style Names in Spire.Doc |
| Title | Title |
| Heading 1 | Heading1 |
| Heading 2 | Heading2 |
| Heading 3 | Heading3 |
| Heading 4 | Heading3 |
| Subtitle | Subtitle |
Step 1: Load a sample Word file when initializing the Document object.
Document doc = new Document("sample.docx");
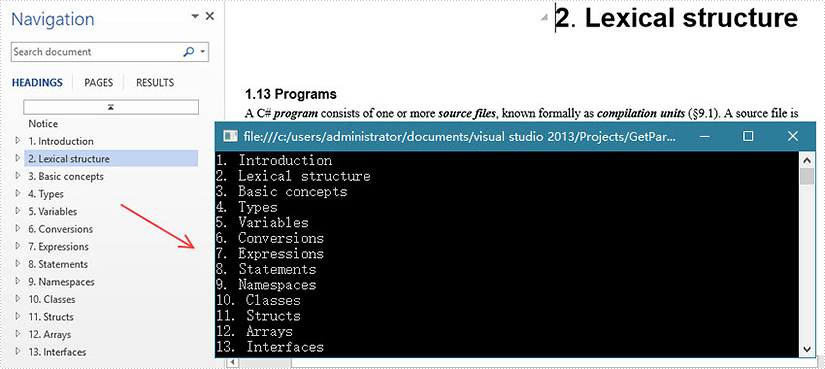
Step 2: Traverse the sections and paragraphs in the document and determine if the paragraph style name is "Heading1", if so, write the paragraph text on screen.
foreach (Section section in doc.Sections)
{
    foreach (Paragraph paragraph in section.Paragraphs)
    {
        if (paragraph.StyleName == "Heading1")
        {
            Console.WriteLine(paragraph.Text);
        }
    }
}
Output:
Full Code:
using Spire.Doc;
using Spire.Doc.Documents;
using System;
namespace GetParagh
{
 class Program
    {

     static void Main(string[] args)
     {
         Document doc = new Document("sample.docx");
         foreach (Section section in doc.Sections)
         {
             foreach (Paragraph paragraph in section.Paragraphs)
             {
                 if (paragraph.StyleName == "Heading1")
                 {
                     Console.WriteLine(paragraph.Text);
                 }
             }
         }
     }

    }
}
Imports Spire.Doc
Imports Spire.Doc.Documents
Namespace GetParagh
	Class Program

		Private Shared Sub Main(args As String())
			Dim doc As New Document("sample.docx")
			For Each section As Section In doc.Sections
				For Each paragraph As Paragraph In section.Paragraphs
					If paragraph.StyleName = "Heading1" Then
						Console.WriteLine(paragraph.Text)
					End If
				Next
			Next
		End Sub

	End Class
End Namespace
Spire.PDF supports to delete rows or columns from a PDF grid before drawing it onto a PDF page. This article demonstrates the detail steps of how to delete a row and a column from a PDF grid using Spire.PDF.
Detail steps:
Step 1: Create a PDF document and add a page to it.
PdfDocument doc = new PdfDocument();
PdfPageBase page = doc.Pages.Add();
Step 2: Create a PDF grid.
PdfGrid grid = new PdfGrid();
//Set cell padding
grid.Style.CellPadding = new PdfPaddings(3, 3, 1, 1);
Step 3: Add 3 rows and 4 columns to the grid.
PdfGridRow row1 = grid.Rows.Add();
PdfGridRow row2 = grid.Rows.Add();
PdfGridRow row3 = grid.Rows.Add();

grid.Columns.Add(4);
Step 4: Set columns' width.
foreach (PdfGridColumn column in grid.Columns)
{
    column.Width = 60f;
}
Step 5: Add values to grid cells.
for (int i = 0; i < grid.Columns.Count; i++)
{
    row1.Cells[i].Value = String.Format("column{0}", i + 1);
    row2.Cells[i].Value = "a";
    row3.Cells[i].Value = "b";
}
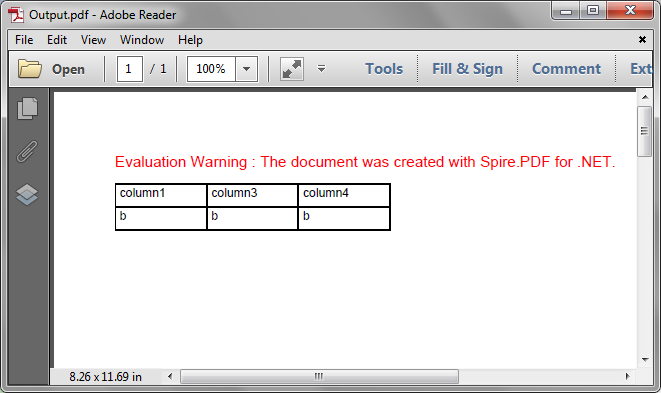
Step 6: Delete the second row and the second column from the grid.
grid.Rows.RemoveAt(1);

grid.Columns.RemoveAt(1);
Step 7: Draw the grid onto the page and save the file.
grid.Draw(page, new PointF(0, 20));

doc.SaveToFile("Output.pdf");
Output:
Full code:
using System;
using System.Drawing;
using Spire.Pdf;
using Spire.Pdf.Grid;

namespace Delete_Row_and_Column_from_PDFGrid
{
    class Program
    {
        static void Main(string[] args)
        {
            //Create a PDF document
            PdfDocument doc = new PdfDocument();

            //Add a page
            PdfPageBase page = doc.Pages.Add();

            //Create a PDF grid
            PdfGrid grid = new PdfGrid();

            //Set cell padding
            grid.Style.CellPadding = new PdfPaddings(3, 3, 1, 1);

            //Add 3 rows and 4 columns to the grid
            PdfGridRow row1 = grid.Rows.Add();
            PdfGridRow row2 = grid.Rows.Add();
            PdfGridRow row3 = grid.Rows.Add();
            grid.Columns.Add(4);

            //Set columns’ width
            foreach (PdfGridColumn column in grid.Columns)
            {
                column.Width = 60f;
            }

            //Add values to grid cells
            for (int i = 0; i < grid.Columns.Count; i++)
            {
                row1.Cells[i].Value = String.Format("column{0}", i + 1);
                row2.Cells[i].Value = "a";
                row3.Cells[i].Value = "b";
            }

            //Delete the second row
            grid.Rows.RemoveAt(1);

            //Delete the second column
            grid.Columns.RemoveAt(1);

            //Draw the grid to the page
            grid.Draw(page, new PointF(0, 20));

            //Save the file
            doc.SaveToFile("Output.pdf");
        }
    }
}
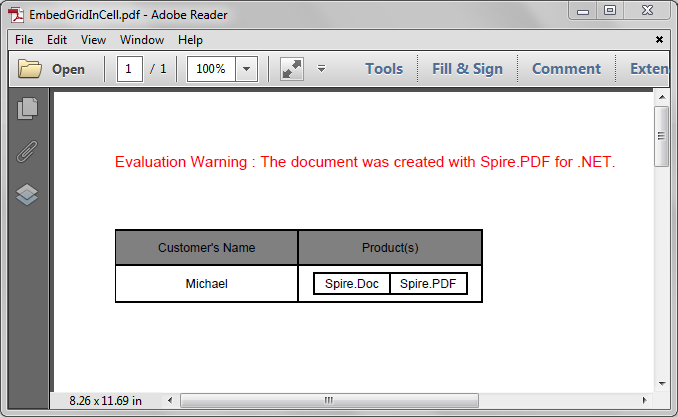
Spire.PDF supports to embed image and grid into a grid cell. We've introduced how to embed an image into a grid cell in the article - How to Insert an Image to PDF Grid Cell in C#, this article is going to show you how to embed a grid into a grid cell in PDF using Spire.PDF.
Detail steps:
Step 1: Create a PDF document and add a page to it.
PdfDocument pdf = new PdfDocument();
PdfPageBase page = pdf.Pages.Add();
Step 2: Create a PDF grid.
//Create a grid
PdfGrid grid = new PdfGrid();

//Add two rows
PdfGridRow row1 = grid.Rows.Add();
PdfGridRow row2 = grid.Rows.Add();

//Set the Top and Bottom cell padding
grid.Style.CellPadding.Top = 5f;
grid.Style.CellPadding.Bottom = 5f;

//Add two columns
grid.Columns.Add(2);

//Set columns' width
grid.Columns[0].Width = 120f;
grid.Columns[1].Width = 120f;
Step 3: Create another PDF grid to embed.
//Create another grid
PdfGrid embedGrid = new PdfGrid();

//Add a row
PdfGridRow newRow = embedGrid.Rows.Add();

//Add two columns
embedGrid.Columns.Add(2);

//Set columns' width
embedGrid.Columns[0].Width = 50f;
embedGrid.Columns[1].Width = 50f;
Step 4: Assign values to the cells of the embed grid and the grid, and set formatting.
//Create a PDFStringFormat instance
PdfStringFormat stringFormat = new PdfStringFormat(PdfTextAlignment.Center, PdfVerticalAlignment.Middle);

//Assign values to the cells of the embedGrid and set formatting
newRow.Cells[0].Value = "Spire.Doc";
newRow.Cells[0].StringFormat = stringFormat;
newRow.Cells[1].Value = "Spire.PDF";
newRow.Cells[1].StringFormat = stringFormat;

//Assign values to the cells of the grid and set formatting
row1.Cells[0].Value = "Customer's Name";
row1.Cells[0].StringFormat = stringFormat;
row1.Cells[0].Style.BackgroundBrush = PdfBrushes.Gray;
row1.Cells[1].Value = "Product(s)";
row1.Cells[1].StringFormat = stringFormat;
row1.Cells[1].Style.BackgroundBrush = PdfBrushes.Gray;
row2.Cells[0].Value = "Michael";
row2.Cells[0].StringFormat = stringFormat;
//Assign the embedGrid to a cell of the grid
row2.Cells[1].Value = embedGrid;
row2.Cells[1].StringFormat = stringFormat;
Step 5: Draw the grid to the new added page.
grid.Draw(page, new PointF(0f, 50f));
Step 6: Save the document.
pdf.SaveToFile("EmbedGridInCell.pdf");
Screenshot:
Full code:
using Spire.Pdf.Grid;
using Spire.Pdf;
using System.Drawing;
using Spire.Pdf.Graphics;

namespace Embed_a_Grid_in_a_Grid_Cell_in_PDF
{
    class Program
    {
        static void Main(string[] args)
        {
            //Create a pdf document
            PdfDocument pdf = new PdfDocument();

            //Add a page
            PdfPageBase page = pdf.Pages.Add();

            //Create a pdf grid
            PdfGrid grid = new PdfGrid();

            //Add two rows
            PdfGridRow row1 = grid.Rows.Add();
            PdfGridRow row2 = grid.Rows.Add();

            //Set Top and Bottom cell padding of the grid
            grid.Style.CellPadding.Top = 5f;
            grid.Style.CellPadding.Bottom = 5f;

            //Add two columns
            grid.Columns.Add(2);

            //Set the columns’ width
            grid.Columns[0].Width = 120f;
            grid.Columns[1].Width = 120f;


            //Create another grid to embed
            PdfGrid embedGrid = new PdfGrid();

            //Add a row
            PdfGridRow newRow = embedGrid.Rows.Add();

            //Add two columns
            embedGrid.Columns.Add(2);

            //Set the columns’ width
            embedGrid.Columns[0].Width = 50f;
            embedGrid.Columns[1].Width = 50f;

            //Create a PDFStringFormat instance
            PdfStringFormat stringFormat = new PdfStringFormat(PdfTextAlignment.Center, PdfVerticalAlignment.Middle);

            //Assign values to the cells of the embedGrid and set formatting
            newRow.Cells[0].Value = "Spire.Doc";
            newRow.Cells[0].StringFormat = stringFormat;
            newRow.Cells[1].Value = "Spire.PDF";
            newRow.Cells[1].StringFormat = stringFormat;

            //Assign values to the cells of the grid and set formatting
            row1.Cells[0].Value = "Customer's Name";
            row1.Cells[0].StringFormat = stringFormat;
            row1.Cells[0].Style.BackgroundBrush = PdfBrushes.Gray;
            row1.Cells[1].Value = "Product(s)";
            row1.Cells[1].StringFormat = stringFormat;
            row1.Cells[1].Style.BackgroundBrush = PdfBrushes.Gray;
            row2.Cells[0].Value = "Michael";
            row2.Cells[0].StringFormat = stringFormat;
            //Assign the embedGrid to the cell of the grid
            row2.Cells[1].Value = embedGrid;
            row2.Cells[1].StringFormat = stringFormat;

            //Draw the grid to the new added page
            grid.Draw(page, new PointF(0f, 50f));

            //Save the pdf document
            pdf.SaveToFile("EmbedGridInCell.pdf");
        }
    }
}
