
Knowledgebase (2370)
Children categories
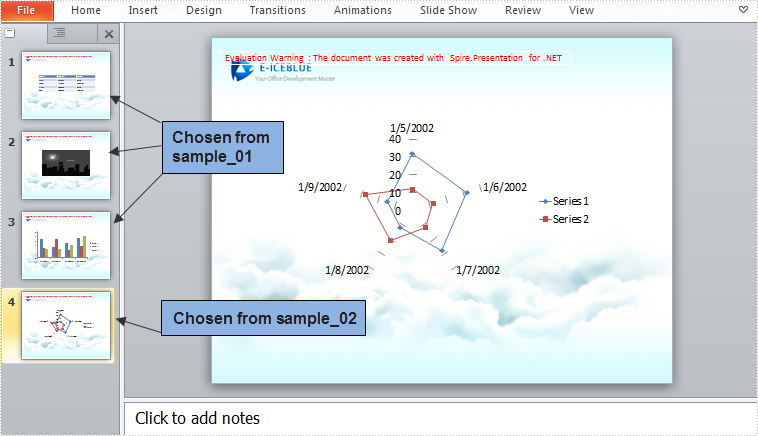
Slide cloning feature provided by Spire.Presentation enables developers to clone one or several slides within one PowerPoint presentation or among multiple presentations. By cloning slide from source presentation to target document, we can easily split a large presentation into small ones and merge multiple presentations to one presentation in reverse. This article presents how to merge selected slides from multiple PowerPoint presentations into one single presentation.
Main Steps
Step 1: Create a new PowerPoint document and remove the default blank slide.
Presentation ppt = new Presentation();
ppt.Slides.RemoveAt(0);
Step 2: Initialize two instances of Presentation class and load the sample PowerPoint file respectively.
Presentation ppt1 = new Presentation("sample_01.pptx",FileFormat.Pptx2010);
Presentation ppt2 = new Presentation("sample_02.pptx", FileFormat.Pptx2010);
Step 3: Append all slides in sample_01 to the new PowerPoint document using method Append(ISlide slide).
for (int i = 0; i < ppt1.Slides.Count; i++)
{
    ppt.Slides.Append(ppt1.Slides[i]);
}
Step 4: Append the second slide in sample_02 to the new presentation.
ppt.Slides.Append(ppt2.Slides[1]);
Step 5: Save and launch the file.
ppt.SaveToFile("result.pptx", FileFormat.Pptx2010);
System.Diagnostics.Process.Start("result.pptx");
Output
Entire Code
using Spire.Presentation;
namespace MergeSlides
{
    class Program
    {
        static void Main(string[] args)
        {
            Presentation ppt = new Presentation();
            Presentation ppt1 = new Presentation("sample_01.pptx", FileFormat.Pptx2010);
            Presentation ppt2 = new Presentation("sample_02.pptx", FileFormat.Pptx2010);
            ppt.Slides.RemoveAt(0);
            //append all slides in ppt1 to ppt
            for (int i = 0; i < ppt1.Slides.Count; i++)
            {
                ppt.Slides.Append(ppt1.Slides[i]);
            }
            //append the second slide in ppt2 to ppt
            ppt.Slides.Append(ppt2.Slides[1]);
            //save and launch the file
            ppt.SaveToFile("result.pptx", FileFormat.Pptx2010);
            System.Diagnostics.Process.Start("result.pptx");

            }
        }
    }
Imports Spire.Presentation
Namespace MergeSlides
	Class Program
		Private Shared Sub Main(args As String())
			Dim ppt As New Presentation()
			Dim ppt1 As New Presentation("sample_01.pptx", FileFormat.Pptx2010)
			Dim ppt2 As New Presentation("sample_02.pptx", FileFormat.Pptx2010)
			ppt.Slides.RemoveAt(0)
			'append all slides in ppt1 to ppt
			For i As Integer = 0 To ppt1.Slides.Count - 1
				ppt.Slides.Append(ppt1.Slides(i))
			Next
			'append the second slide in ppt2 to ppt
			ppt.Slides.Append(ppt2.Slides(1))
			'save and launch the file
			ppt.SaveToFile("result.pptx", FileFormat.Pptx2010)
			System.Diagnostics.Process.Start("result.pptx")

		End Sub
	End Class
End Namespace
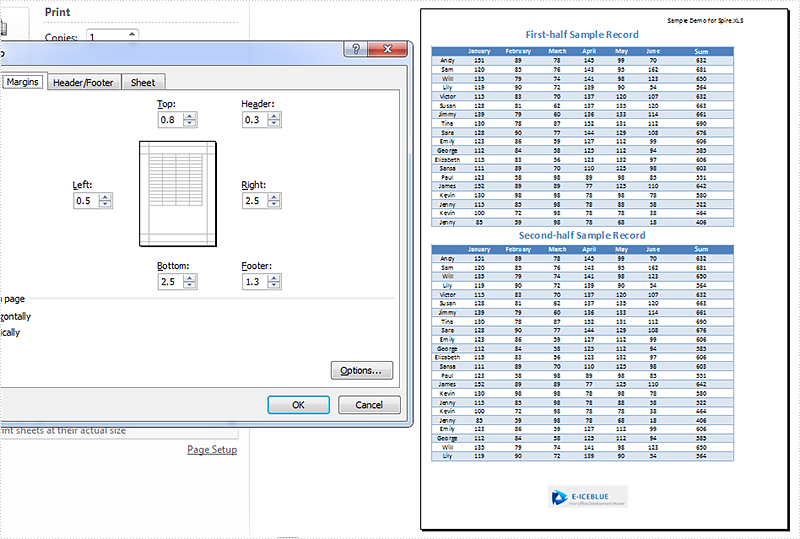
How to set Excel page margins before printing a worksheet in C#
2015-07-14 08:05:16 Written by KoohjiPage margins in Excel are the blank spaces between the worksheet data and the edges of the printed page. It is where we could add headers, footers and page numbers, etc. Before printing a worksheet, it's necessary to specify custom margins for a better layout. In Excel, we could set top margin, bottom margin, left margin, right margin, header margin, and footer margin, which are all supported by Spire.XLS library. This article is going to introduce the method to set Excel page margins in C# using Spire.XLS.
Note: Before start, please download the latest version of Spire.Doc and add the .dll in the bin folder as the reference of Visual Studio.
Step 1: Initial a new workbook and load the sample document.
            Workbook workbook = new Workbook();
            workbook.LoadFromFile("Sample.xlsx");
            Worksheet sheet = workbook.Worksheets[0];
Step 2: Set margins for top, bottom, left and right of the worksheet page. Here the unit of measure is Inch (1 inch=2.54 cm).
            sheet.PageSetup.TopMargin = 0.3;
            sheet.PageSetup.BottomMargin = 1;
            sheet.PageSetup.LeftMargin = 0.2;
            sheet.PageSetup.RightMargin = 1;
Step 3: Set the header margin and footer margin.
            sheet.PageSetup.HeaderMarginInch = 0.1;
            sheet.PageSetup.FooterMarginInch = 0.5;
Step 4: Save the document and launch to see effect.
            workbook.SaveToFile("S3.xlsx", ExcelVersion.Version2010);
            System.Diagnostics.Process.Start("S3.xlsx");
Effect:
Full codes:
using System;
using System.Collections.Generic;
using System.Linq;
using System.Text;
using Spire.Xls;

namespace How_to_set_Excel_margin_to_print
{
    class Program
    {
        static void Main(string[] args)
        {
            Workbook workbook = new Workbook();
            workbook.LoadFromFile("Sample.xlsx");
            Worksheet sheet = workbook.Worksheets[0];

            sheet.PageSetup.TopMargin = 0.3;
            sheet.PageSetup.BottomMargin = 1;
            sheet.PageSetup.LeftMargin = 0.2;
            sheet.PageSetup.RightMargin = 1;

            sheet.PageSetup.HeaderMarginInch = 0.1;
            sheet.PageSetup.FooterMarginInch = 0.5;

            workbook.SaveToFile("S3.xlsx", ExcelVersion.Version2010);
            System.Diagnostics.Process.Start("S3.xlsx");

        }
    }
}
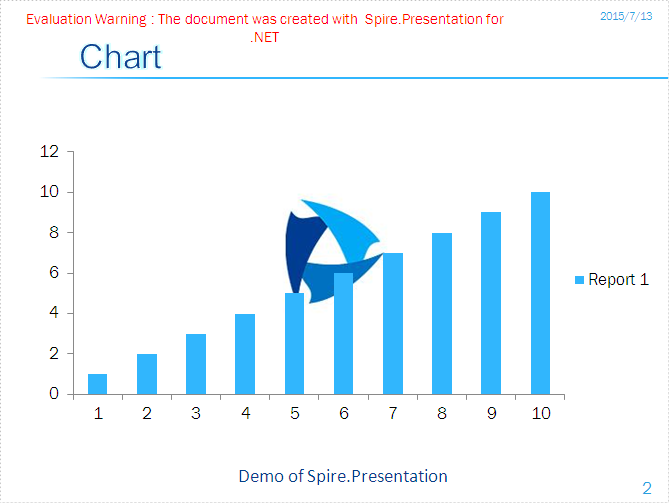
There are two kinds of watermarks in PowerPoint documents we usually used in presentation slides: text watermark and image watermark. Text watermark and image watermark are used to make the presentation slides more attractive and shows the copyright information of the presentation slides. We have already shown you how to add text watermark to presentation slides, this section will show you how to add image watermark in PowerPoint document in C#.
Firstly, please check the effective screenshot of the image watermark in PowerPoint file added by Spire.Presentation.
Here comes to the steps of how to add text watermark in C#:
Step 1: Create a presentation document and load the document from the file
Presentation ppt = new Presentation();
ppt.LoadFromFile("sample.pptx");
Step 2: Set the image background type and style for the second slide in the presentation.
ppt.Slides[1].SlideBackground.Type = Spire.Presentation.Drawing.BackgroundType.Custom;
ppt.Slides[1].SlideBackground.Fill.FillType = FillFormatType.Picture;
ppt.Slides[1].SlideBackground.Fill.PictureFill.FillType = PictureFillType.Stretch;
Step 3: Insert the image as the image watermark.
Image img= Image.FromFile ("logo.png");
IImageData image = ppt.Images.Append(img);
ppt.Slides[1].SlideBackground.Fill.PictureFill.Picture.EmbedImage = image;
Step 4: Save the document.
ppt.SaveToFile("result.pptx", Spire.Presentation.FileFormat.Pptx2007);
Full codes:
using Spire.Presentation;
using Spire.Presentation.Drawing;
using System.Drawing;
namespace AddimageWatermark
{

    class Program
    {

        static void Main(string[] args)
        {
            Presentation ppt = new Presentation();
            ppt.LoadFromFile("sample.pptx");

            ppt.Slides[1].SlideBackground.Type = Spire.Presentation.Drawing.BackgroundType.Custom;
            ppt.Slides[1].SlideBackground.Fill.FillType = FillFormatType.Picture;
            ppt.Slides[1].SlideBackground.Fill.PictureFill.FillType = PictureFillType.Stretch;

            Image img = Image.FromFile("logo.png");
            IImageData image = ppt.Images.Append(img);
            ppt.Slides[1].SlideBackground.Fill.PictureFill.Picture.EmbedImage = image;
            ppt.SaveToFile("result.pptx", Spire.Presentation.FileFormat.Pptx2007);
        }
    }
}
