
Knowledgebase (2370)
Children categories
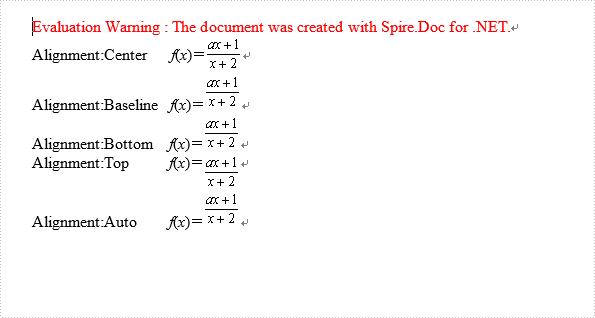
We can set Asian typography for paragraph for .doc files, there are four text alignments: Top, Center, Baseline, Bottom and Auto. In this article let's see how to set alignment when append HTML string code to .doc in C#.
Download Spire.Doc 5.3.83 or upper version, then add reference to your project.
Here are the steps:
Step 1: Create a HTML file contain the following code.
<html>
<body>
<i>f</i>(<i>x</i>)=<img align="middle" src="data:image/png;base64,iVBORw0KGgoAAAANSUhEUgAAACcAAAAlCAYAAADBa/A+AAAAAXNSR0IArs4c6QAAAARnQU1BAACxjwv8YQUAAAAJcEhZcwAADsMAAA7DAcdvqGQAAADvSURBVFhH7ZNbCsUwCES7/03nIkSwRh1rL00+PCCJVaeTPq5xMG2uSpuLuC7fwlZzZOxYc0TZnDwZ76WYzjVRjQnn57oQmdC5x9ses6IHUO7xd3NW8xNzVPPCwrtOLBXdbAlHgpJMX9SzVGQz7fUw55Eo87ZnqVAzh8x5z8jrHpl6pBNPb6bNVWlzVW7m5N+zKyT9Wqu0OYn3fVl8am754IHBz5+cpGxOP3qda9CNLNAMVESmmG3mMjw1lzrwXF0iEap5gUj1zNUlI0Jk+4i05lxNWCR1ysIh0Ixb1SJQCNQJ1pERgRU30uaqHGxujB+eJddCfZBWMwAAAABJRU5ErkJggg==" />
Step 2: Create a new document and add new section.
Document doc2 = new Document();
doc2.AddSection();
Step 3: Create new paragraph p and set its property of TextAlignment as "Center".
p.AppendText("Alignment:Center      ");
p.AppendHTML(File.ReadAllText(@"test.html"));
p.Format.TextAlignment = TextAlignment.Center;
Step 4: Set other options to make a contrast, Auto is Baseline by default.
Paragraph p1 = doc2.Sections[0].AddParagraph();
p1.AppendText("Alignment:Baseline   ");
p1.AppendHTML(File.ReadAllText(@"test.html"));
p1.Format.TextAlignment = TextAlignment.Baseline;

Paragraph p2 = doc2.Sections[0].AddParagraph();
p2.AppendText("Alignment:Bottom    ");
p2.AppendHTML(File.ReadAllText(@"test.html"));
p2.Format.TextAlignment = TextAlignment.Bottom;

Paragraph p3 = doc2.Sections[0].AddParagraph();
p3.AppendText("Alignment:Top          ");
p3.AppendHTML(File.ReadAllText(@"test.html"));
p3.Format.TextAlignment = TextAlignment.Top;

Paragraph p4 = doc2.Sections[0].AddParagraph();
p4.AppendText("Alignment:Auto        ");
p4.AppendHTML(File.ReadAllText(@"test.html"));
p4.Format.TextAlignment = TextAlignment.Auto;
Step 5: Save and review.
doc2.SaveToFile(@"test.doc", FileFormat.Doc);
System.Diagnostics.Process.Start("test.doc");
The screen shot:
Full Code Here:
using Spire.Doc;
using Spire.Doc.Documents;
using System.IO;
namespace SetTextAlignment
{
 class Program
    {

      static void Main(string[] args)
        {
            Document doc2 = new Document();
            doc2.AddSection();
            Paragraph p = doc2.Sections[0].AddParagraph();
            p.AppendText("Alignment:Center      ");
            p.AppendHTML(File.ReadAllText(@"test.html"));
            p.Format.TextAlignment = TextAlignment.Center;

            Paragraph p1 = doc2.Sections[0].AddParagraph();
            p1.AppendText("Alignment:Baseline   ");
            p1.AppendHTML(File.ReadAllText(@"test.html"));
            p1.Format.TextAlignment = TextAlignment.Baseline;

            Paragraph p2 = doc2.Sections[0].AddParagraph();
            p2.AppendText("Alignment:Bottom    ");
            p2.AppendHTML(File.ReadAllText(@"test.html"));
            p2.Format.TextAlignment = TextAlignment.Bottom;

            Paragraph p3 = doc2.Sections[0].AddParagraph();
            p3.AppendText("Alignment:Top          ");
            p3.AppendHTML(File.ReadAllText(@"test.html"));
            p3.Format.TextAlignment = TextAlignment.Top;

            Paragraph p4 = doc2.Sections[0].AddParagraph();
            p4.AppendText("Alignment:Auto        ");
            p4.AppendHTML(File.ReadAllText(@"test.html"));
            p4.Format.TextAlignment = TextAlignment.Auto;

            doc2.SaveToFile(@"test.doc", FileFormat.Doc);
            System.Diagnostics.Process.Start("test.doc");

        }
    }
}
How to Convert Selected Range of Cells to PDF in C#, VB.NET
2015-04-10 01:56:50 Written by AdministratorUsing Spire.XLS, programmers are able to save the whole worksheet as PDF by calling the method SaveToPdf(). However, you may only want to save or export a part of worksheet as PDF. Since Spire.XLS doesn't provide a method to directly convert a range of cells to PDF, we can copy the selected ranges to a new worksheet and then save it as PDF file. This method seems complex, but it is still efficient with Spire.XLS.
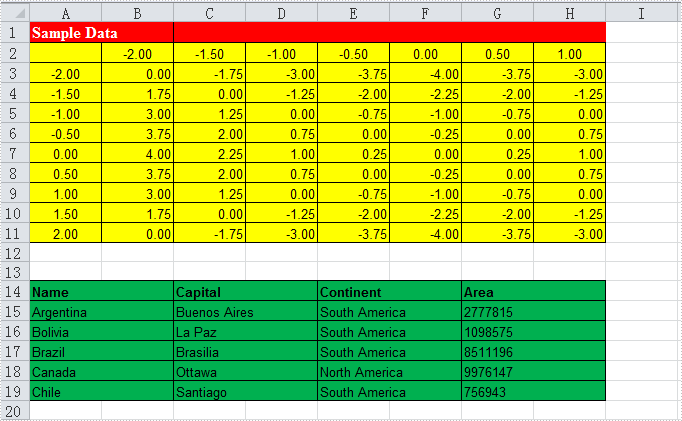
Look at the test file below, we only want the cells from A1 to H11 converted as PDF. We will firstly create a new blank worksheet, copy the selected range to the new sheet using CellRange.Copy() method, then convert the new sheet as PDF.
Code Snippet:
Step 1: Create a new workbook and load the test file.
Workbook workbook = new Workbook();
workbook.LoadFromFile("test.xlsx", ExcelVersion.Version2010);
Step 2: Add a new worksheet to workbook.
workbook.Worksheets.Add("newsheet");
Step 3: Copy the selected range from where it stores to the new worksheet.
workbook.Worksheets[0].Range["A1:H11"].Copy(workbook.Worksheets[1].Range["A1:H11"]);
Step 4: Convert the new worksheet to PDF.
workbook.Worksheets[1].SaveToPdf("result.pdf");
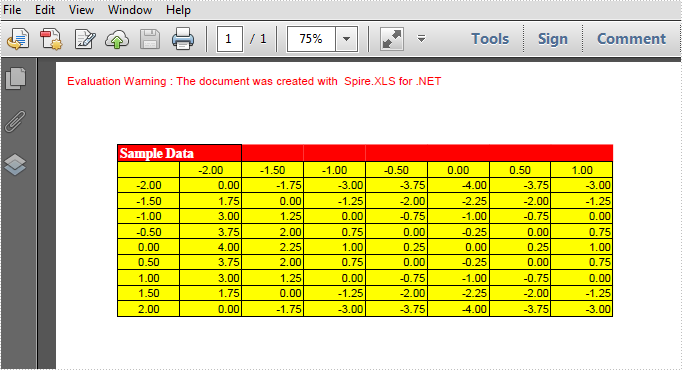
Result:
Full Code:
using Spire.Xls;
namespace Convert
{
    class Program
    {
        static void Main(string[] args)
        {
            Workbook workbook = new Workbook();
            workbook.LoadFromFile("test.xlsx", ExcelVersion.Version2010);
            // add a new sheet to workbook
            workbook.Worksheets.Add("newsheet");
            //Copy your area to new sheet.
            workbook.Worksheets[0].Range["A1:H11"].Copy(workbook.Worksheets[1].Range["A1:H11"]);
            //convert new sheet to pdf
            workbook.Worksheets[1].SaveToPdf("result.pdf");

        }
    }
}
Imports Spire.Xls
Namespace Convert
	Class Program
		Private Shared Sub Main(args As String())
			Dim workbook As New Workbook()
			workbook.LoadFromFile("test.xlsx", ExcelVersion.Version2010)
			' add a new sheet to workbook
			workbook.Worksheets.Add("newsheet")
			'Copy your area to new sheet.
			workbook.Worksheets(0).Range("A1:H11").Copy(workbook.Worksheets(1).Range("A1:H11"))
			'convert new sheet to pdf
			workbook.Worksheets(1).SaveToPdf("result.pdf")

		End Sub

	End Class
End Namespace
PDF form is often used to display, catch and edit data. People can fill blanks with data and submit data to server. Spire.PDF now enables users to add fields and create form in existing PDF document.
Here are the steps:
Step 1: Create PDF document, and load a blank PDF file, then get the first page.
PdfDocument pdf = new PdfDocument("Blank.pdf");
pdf.AllowCreateForm = (pdf.Form == null) ? true : false;
PdfPageBase page = pdf.Pages[0];
Step 2: Set font and font color. Preset coordinate.
PdfFont font = new PdfFont(PdfFontFamily.Helvetica, 13f);
PdfBrush brush = PdfBrushes.Black;
float x = 10;
float y = 10;
float tempX = 0;
float tempY = 0;
Step 3: Draw textbox.
string text = "Textbox: ";
page.Canvas.DrawString(text, font, brush, x, y);
tempX = font.MeasureString(text).Width + 15;
tempY = font.MeasureString(text).Height + 15;
PdfTextBoxField textbox = new PdfTextBoxField(page, "TextBox");
textbox.Bounds = new RectangleF(tempX, y, tempX * 2, 15);
textbox.BorderWidth = 0.75f;
textbox.BorderStyle = PdfBorderStyle.Solid;
pdf.Form.Fields.Add(textbox);
Step 4: Draw checkbox.
text = "Checkbox: ";
y += tempY;
page.Canvas.DrawString(text, font, brush, x, y);
tempX = font.MeasureString(text).Width + 15;
tempY = font.MeasureString(text).Height + 15;
PdfCheckBoxField checkbox = new PdfCheckBoxField(page, "CheckBox");
checkbox.Bounds = new RectangleF(tempX, y, 15, 15);
checkbox.BorderWidth = 0.75f;
checkbox.Style = PdfCheckBoxStyle.Cross;
pdf.Form.Fields.Add(checkbox);
Step 5: Draw Listbox and add content.
//ListBox
text = "Listbox: ";
y += tempY;
page.Canvas.DrawString(text, font, brush, x, y);
tempX = font.MeasureString(text).Width + 15;
tempY = font.MeasureString(text).Height + 15;
PdfListBoxField listbox = new PdfListBoxField(page, "ListBox");
listbox.Bounds = new RectangleF(tempX, y, tempX * 2, tempY * 2);
listbox.BorderWidth = 0.75f;
for (int i = 0; i < 3; i++)
{
     string tempText = string.Format("Text {0}", i);
     string tempValue = string.Format("Value {0}", i);
     listbox.Items.Add(new PdfListFieldItem(tempText, tempValue));
}
pdf.Form.Fields.Add(listbox);
Step 6: Draw RadioButton.
//RadioButton
text = "Radiobutton: ";
y += tempY * 2 + 15;
page.Canvas.DrawString(text, font, brush, x, y);
tempX = font.MeasureString(text).Width + 15;
tempY = font.MeasureString(text).Height + 15;
PdfRadioButtonListField radiobutton = new PdfRadioButtonListField(page, "RadioButton");
for (int i = 0; i < 3; i++)
{
     PdfRadioButtonListItem item = new PdfRadioButtonListItem(string.Format("rb{0}", i));
     item.BorderWidth = 0.75f;
     item.Bounds = new RectangleF(tempX + i * 20, y, 15, 15);
     radiobutton.Items.Add(item);
}
pdf.Form.Fields.Add(radiobutton);
Step 7: Draw combobox and add content.
//ComboBox
text = "ComboBox: ";
y += tempY;
page.Canvas.DrawString(text, font, brush, x, y);
tempX = font.MeasureString(text).Width + 15;
tempY = font.MeasureString(text).Height + 15;
PdfComboBoxField combobox = new PdfComboBoxField(page, "ComboBox");
combobox.Bounds = new RectangleF(tempX, y, tempX, 15);
combobox.BorderWidth = 0.75f;
for (int i = 0; i < 3; i++)
{
    string tempText = string.Format("Text {0}", i);
    string tempValue = string.Format("Value {0}", i);
    combobox.Items.Add(new PdfListFieldItem(tempText, tempValue));
}
pdf.Form.Fields.Add(combobox);
Step 8: Save and review
loDoc.SaveToFile("result.pdf");
System.Diagnostics.Process.Start("result.pdf");
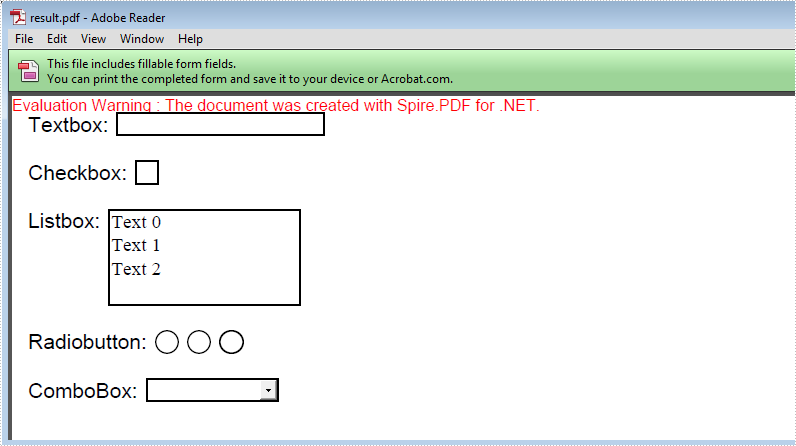
Result screenshot:
Full Code:
using Spire.Pdf;
using Spire.Pdf.Fields;
using Spire.Pdf.Graphics;
using System.Drawing;


namespace AddFormFieldToExistingPDF
{
    class Program
    {
        static void Main(string []args)
        {
            PdfDocument pdf = new PdfDocument("Blank.pdf");
            pdf.AllowCreateForm = (pdf.Form == null) ? true : false;
            PdfPageBase page = pdf.Pages[0];


            PdfFont font = new PdfFont(PdfFontFamily.Helvetica, 13f);
            PdfBrush brush = PdfBrushes.Black;
            float x = 10;
            float y = 10;
            float tempX = 0;
            float tempY = 0;

            //TextBox
            string text = "Textbox: ";
            page.Canvas.DrawString(text, font, brush, x, y);
            tempX = font.MeasureString(text).Width + 15;
            tempY = font.MeasureString(text).Height + 15;
            PdfTextBoxField textbox = new PdfTextBoxField(page, "TextBox");
            textbox.Bounds = new RectangleF(tempX, y, tempX * 2, 15);
            textbox.BorderWidth = 0.75f;
            textbox.BorderStyle = PdfBorderStyle.Solid;
            pdf.Form.Fields.Add(textbox);

            //CheckBox
            text = "Checkbox: ";
            y += tempY;
            page.Canvas.DrawString(text, font, brush, x, y);
            tempX = font.MeasureString(text).Width + 15;
            tempY = font.MeasureString(text).Height + 15;
            PdfCheckBoxField checkbox = new PdfCheckBoxField(page, "CheckBox");
            checkbox.Bounds = new RectangleF(tempX, y, 15, 15);
            checkbox.BorderWidth = 0.75f;
            checkbox.Style = PdfCheckBoxStyle.Cross;
            pdf.Form.Fields.Add(checkbox);

            //ListBox
            text = "Listbox: ";
            y += tempY;
            page.Canvas.DrawString(text, font, brush, x, y);
            tempX = font.MeasureString(text).Width + 15;
            tempY = font.MeasureString(text).Height + 15;
            PdfListBoxField listbox = new PdfListBoxField(page, "ListBox");
            listbox.Bounds = new RectangleF(tempX, y, tempX * 2, tempY * 2);
            listbox.BorderWidth = 0.75f;
            for (int i = 0; i < 3; i++)
            {
                string tempText = string.Format("Text {0}", i);
                string tempValue = string.Format("Value {0}", i);
                listbox.Items.Add(new PdfListFieldItem(tempText, tempValue));
            }
            pdf.Form.Fields.Add(listbox);

            //RadioButton
            text = "Radiobutton: ";
            y += tempY * 2 + 15;
            page.Canvas.DrawString(text, font, brush, x, y);
            tempX = font.MeasureString(text).Width + 15;
            tempY = font.MeasureString(text).Height + 15;
            PdfRadioButtonListField radiobutton = new PdfRadioButtonListField(page, "RadioButton");
            for (int i = 0; i < 3; i++)
            {
                PdfRadioButtonListItem item = new PdfRadioButtonListItem(string.Format("rb{0}", i));
                item.BorderWidth = 0.75f;
                item.Bounds = new RectangleF(tempX + i * 20, y, 15, 15);
                radiobutton.Items.Add(item);
            }
            pdf.Form.Fields.Add(radiobutton);

            //ComboBox
            text = "ComboBox: ";
            y += tempY;
            page.Canvas.DrawString(text, font, brush, x, y);
            tempX = font.MeasureString(text).Width + 15;
            tempY = font.MeasureString(text).Height + 15;
            PdfComboBoxField combobox = new PdfComboBoxField(page, "ComboBox");
            combobox.Bounds = new RectangleF(tempX, y, tempX, 15);
            combobox.BorderWidth = 0.75f;
            for (int i = 0; i < 3; i++)
            {
                string tempText = string.Format("Text {0}", i);
                string tempValue = string.Format("Value {0}", i);
                combobox.Items.Add(new PdfListFieldItem(tempText, tempValue));
            }
            pdf.Form.Fields.Add(combobox);

            pdf.SaveToFile("Result.pdf");
            System.Diagnostics.Process.Start("Result.pdf");
        }
    }
}
