Knowledgebase (2370)
Children categories
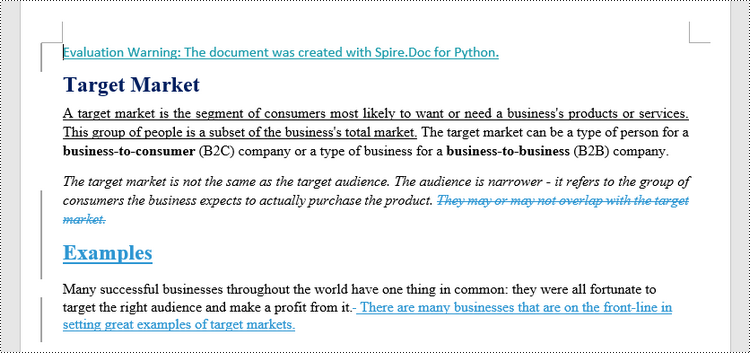
Comparing two Word documents for differences is a crucial task when reviewing changes, ensuring accuracy, and collaborating on content. This process allows you to identify additions, deletions, and modifications made between different document iterations. By comparing versions, you can efficiently track alterations, verify updates, and maintain document integrity. In this article, you will learn how to compare two versions of a Word document in Python using the Spire.Doc for Python library.
- Compare Two Versions of a Word Document in Python
- Compare Two Versions of a Word Document While Ignoring Formatting in Python
Install Spire.Doc for Python
This scenario requires Spire.Doc for Python and plum-dispatch v1.7.4. They can be easily installed in your Windows through the following pip command.
pip install Spire.Doc
If you are unsure how to install, please refer to: How to Install Spire.Doc for Python on Windows
Compare Two Versions of a Word Document in Python
MS Word also offers a "Compare" feature that allows you to directly compare two versions of a document. This feature generates a new document that highlights the differences between the two versions.
To achieve similar results using Spire.Doc for Python, load the original and revised versions into two separate Document objects. Then, use the Compare() method to compare the revised version against the original. Finally, save the comparative document, which highlights the alterations, using the SaveToFile() method.
The steps to compare two version of a Word document using Python are as follows.
- Load the first document (original version) while initializing the Document object.
- Load the second document (revised version) while initializing the Document object.
- Call Compare() method of the first Document object to compare the revised version against the original version.
- Save the comparison results in a new Word document.
- Python
from spire.doc import *
from spire.doc.common import *

# Load the first document while initializing the Document object
firstDoc = Document("C:\\Users\\Administrator\\Desktop\\Original.docx")

# Load the second document while initializing the Document object
secondDoc = Document("C:\\Users\\Administrator\\Desktop\\Revised.docx")

# Compare two documents
firstDoc.Compare(secondDoc, "E-ICEBLUE")

# Save the comparison results in a new document
firstDoc.SaveToFile("Output/Differences.docx", FileFormat.Docx2016)

# Dispose resources
firstDoc.Dispose()
secondDoc.Dispose()
Compare Two Versions of a Word Document While Ignoring Formatting in Python
Comparing two versions of a Word document while ignoring formatting can be useful when you want to focus solely on the textual changes and disregard any formatting modifications.
To customize the comparison options in Spire.Doc for Python, use the CompareOptions class. If you want to exclude formatting from the comparison process, you can set the IgnoreFormatting property of the CompareOptions object to True. When you call the Compare() method, simply pass the CompareOptions object as an argument to achieve the desired comparison behavior.
The following are the steps to compare two versions of a Word document while ignoring formatting using Python.
- Load the first document (original version) while initializing the Document object.
- Load the second document (revised version) while initializing the Document object.
- Create a CompareOptions object and set its IgnoreFormatting property to True.
- Call Compare() method of the first Document object, passing the CompareOptions object as a parameter, to compare the revision against the original while ignoring formatting.
- Save the comparison results in a new Word document.
- Python
from spire.doc import *
from spire.doc.common import *

# Load the first document while initializing the Document object
firstDoc = Document("C:\\Users\\Administrator\\Desktop\\Original.docx")

# Load the second document while initializing the Document object
secondDoc = Document("C:\\Users\\Administrator\\Desktop\\Revised.docx")

# Set compare option to ignore formatting changes
compareOptions = CompareOptions()
compareOptions.IgnoreFormatting = True

# Compare the two Word documents with options
firstDoc.Compare(secondDoc, "E-ICEBLUE", compareOptions)

# Save the comparison results in a new document
firstDoc.SaveToFile("Output/DifferencesWithoutFormattingChanges.docx", FileFormat.Docx2016)

# Dispose resources
firstDoc.Dispose()
secondDoc.Dispose()
Apply for a Temporary License
If you'd like to remove the evaluation message from the generated documents, or to get rid of the function limitations, please request a 30-day trial license for yourself.
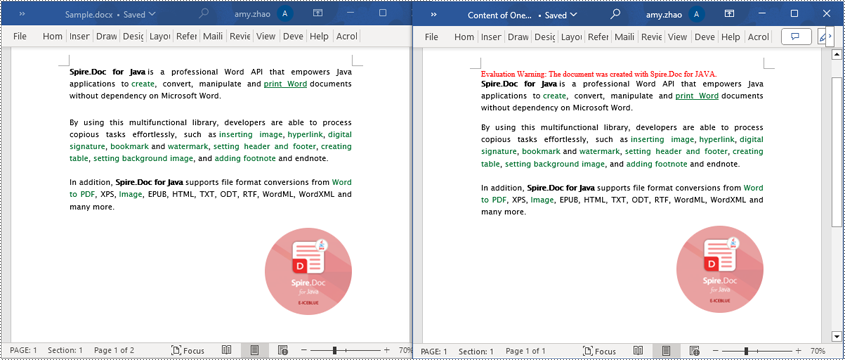
Extracting content from Word documents plays a crucial role in both work and study. Extracting one page of content helps in quickly browsing and summarizing key points, while extracting content from one section aids in in-depth study of specific topics or sections. Extracting the entire document allows you to have a comprehensive understanding of the document content, facilitating deep analysis and comprehensive comprehension. This article will introduce how to use Spire.Doc for Java to read a page, a section, and the entire content of a Word document in a Java project.
- Read a Page from a Word Document in Java
- Read a Section from a Word Document in Java
- Read the Entire Content from a Word Document in Java
Install Spire.Doc for Java
First, you're required to add the Spire.Doc.jar file as a dependency in your Java program. The JAR file can be downloaded from this link. If you use Maven, you can easily import the JAR file in your application by adding the following code to your project's pom.xml file.
<repositories>
    <repository>
        <id>com.e-iceblue</id>
        <name>e-iceblue</name>
        <url>https://repo.e-iceblue.com/nexus/content/groups/public/</url>
    </repository>
</repositories>
<dependencies>
    <dependency>
        <groupId>e-iceblue</groupId>
        <artifactId>spire.doc</artifactId>
        <version>14.7.0</version>
    </dependency>
</dependencies>
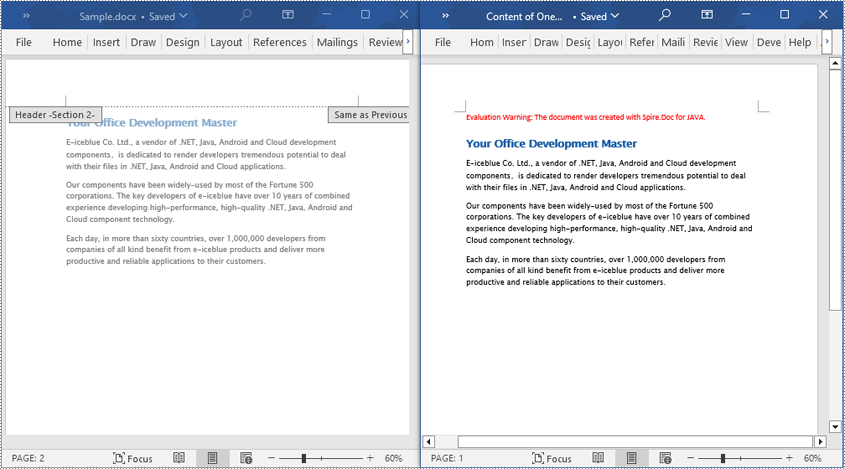
Read a Page from a Word Document in Java
Using the FixedLayoutDocument class and FixedLayoutPage class makes it easy to extract content from a specified page. To facilitate viewing the extracted content, the following example code saves the extracted content to a new Word document. The detailed steps are as follows:
- Create a Document object.
- Load a Word document using the Document.loadFromFile() method.
- Create a FixedLayoutDocument object.
- Obtain a FixedLayoutPage object for a page in the document.
- Use the FixedLayoutPage.getSection() method to get the section where the page is located.
- Get the index position of the first paragraph on the page within the section.
- Get the index position of the last paragraph on the page within the section.
- Create another Document object.
- Add a new section using Document.addSection().
- Clone the properties of the original section to the new section using Section.cloneSectionPropertiesTo(newSection) method.
- Copy the content of the page from the original document to the new document.
- Save the resulting document using the Document.saveToFile() method.
- Java
import com.spire.doc.*;
import com.spire.doc.pages.*;
import com.spire.doc.documents.*;

public class ReadOnePage {
    public static void main(String[] args) {
        // Create a new document object
        Document document = new Document();

        // Load document content from the specified file
        document.loadFromFile("Sample.docx");

        // Create a fixed layout document object
        FixedLayoutDocument layoutDoc = new FixedLayoutDocument(document);

        // Get the first page
        FixedLayoutPage page = layoutDoc.getPages().get(0);

        // Get the section where the page is located
        Section section = page.getSection();

        // Get the first paragraph of the page
        Paragraph paragraphStart = page.getColumns().get(0).getLines().getFirst().getParagraph();
        int startIndex = 0;
        if (paragraphStart != null) {
            // Get the index of the paragraph in the section
            startIndex = section.getBody().getChildObjects().indexOf(paragraphStart);
        }

        // Get the last paragraph of the page
        Paragraph paragraphEnd = page.getColumns().get(0).getLines().getLast().getParagraph();

        int endIndex = 0;
        if (paragraphEnd != null) {
            // Get the index of the paragraph in the section
            endIndex = section.getBody().getChildObjects().indexOf(paragraphEnd);
        }

        // Create a new document object
        Document newdoc = new Document();

        // Add a new section
        Section newSection = newdoc.addSection();

        // Clone the properties of the original section to the new section
        section.cloneSectionPropertiesTo(newSection);

        // Copy the content of the original document's page to the new document
        for (int i = startIndex; i <=endIndex; i++)
        {
            newSection.getBody().getChildObjects().add(section.getBody().getChildObjects().get(i).deepClone());
        }

        // Save the new document to the specified file
        newdoc.saveToFile("Content of One Page.docx", FileFormat.Docx);

        // Close and release the new document
        newdoc.close();
        newdoc.dispose();

        // Close and release the original document
        document.close();
        document.dispose();
    }
}
Read a Section from a Word Document in Java
Using Document.Sections[index], you can access specific Section objects that contain the header, footer, and body content of a document. The following example demonstrates a simple method to copy all content from one section to another document. The detailed steps are as follows:
- Create a Document object.
- Load a Word document using the Document.loadFromFile() method.
- Use Document.getSections().get(1) to retrieve the second section of the document.
- Create another new Document object.
- Clone the default style of the original document to the new document using Document.cloneDefaultStyleTo(newdoc) method.
- Use Document.getSections().add(section.deepClone()) to clone the content of the second section of the original document to the new document.
- Save the resulting document using the Document.saveToFile() method.
- Java
import com.spire.doc.*;

public class ReadOneSection {
    public static void main(String[] args) {
        // Create a new document object
        Document document = new Document();

        // Load a Word document from a file
        document.loadFromFile("Sample.docx");

        // Get the second section of the document
        Section section = document.getSections().get(1);

        // Create a new document object
        Document newdoc = new Document();

        // Clone the default style to the new document
        document.cloneDefaultStyleTo(newdoc);

        // Clone the second section to the new document
        newdoc.getSections().add(section.deepClone());

        // Save the new document to a file
        newdoc.saveToFile("Content of One Section.docx", FileFormat.Docx);

        // Close and release the new document object
        newdoc.close();
        newdoc.dispose();

        // Close and release the original document object
        document.close();
        document.dispose();
    }
}
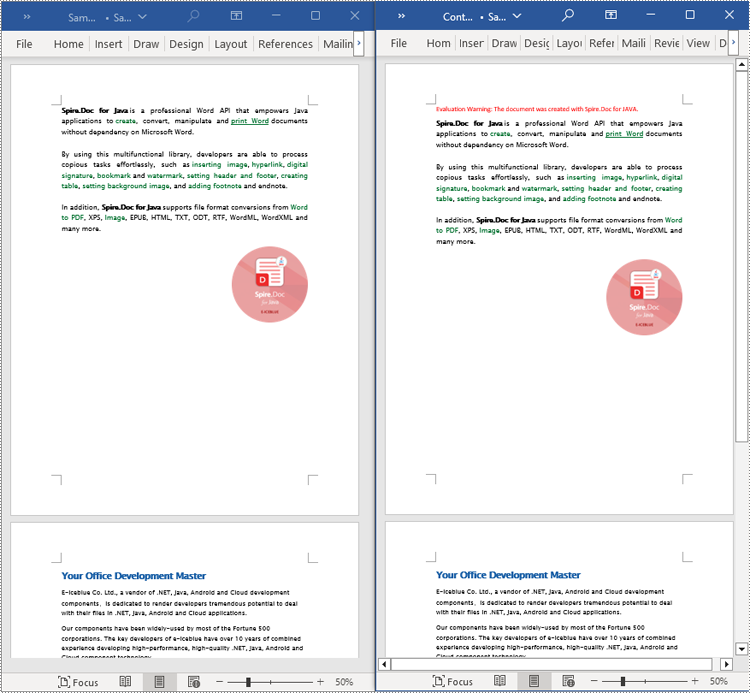
Read the Entire Content from a Word Document in Java
This example demonstrates how to iterate through each section of the original document to read the entire content of the document and clone each section into a new document. This method can help you quickly replicate both the structure and content of the entire document, preserving the format and layout of the original document in the new document. Such operations are very useful for maintaining the integrity and consistency of the document structure. The detailed steps are as follows:
- Create a Document object.
- Load a Word document using the Document.loadFromFile() method.
- Create another new Document object.
- Clone the default style of the original document to the new document using the Document.cloneDefaultStyleTo(newdoc) method.
- Iterate through each section of the original document using a for loop and clone it into the new document.
- Save the resulting document using the Document.saveToFile() method.
- Java
import com.spire.doc.*;

public class ReadOneDocument {
    public static void main(String[] args) {
        // Create a new document object
        Document document = new Document();

        // Load a Word document from a file
        document.loadFromFile("Sample.docx");

        // Create a new document object
        Document newdoc = new Document();

        // Clone the default style to the new document
        document.cloneDefaultStyleTo(newdoc);

        // Iterate through each section in the original document and clone it to the new document
        for (Section sourceSection : (Iterable<Section>) document.getSections()) {
            newdoc.getSections().add(sourceSection.deepClone());
        }
        // Save the new document to a file
        newdoc.saveToFile("Content of the entire document.docx", FileFormat.Docx);

        // Close and release the new document object
        newdoc.close();
        newdoc.dispose();

        // Close and release the original document object
        document.close();
        document.dispose();
    }
}
Apply for a Temporary License
If you'd like to remove the evaluation message from the generated documents, or to get rid of the function limitations, please request a 30-day trial license for yourself.
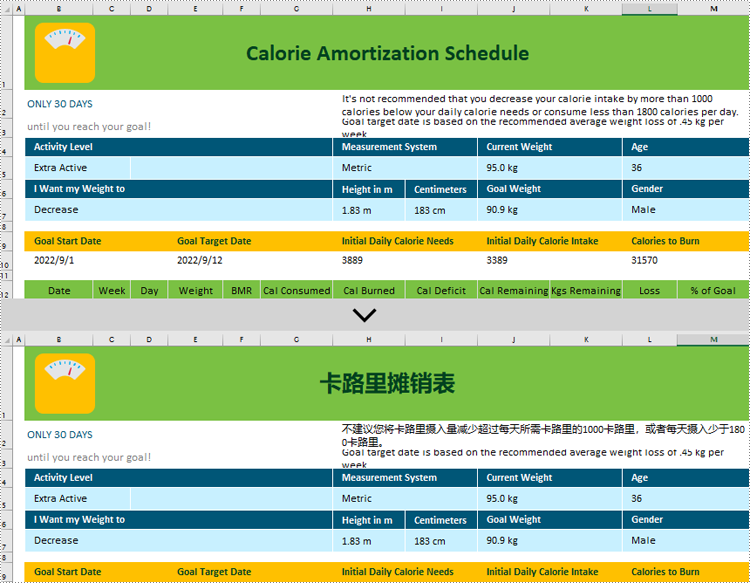
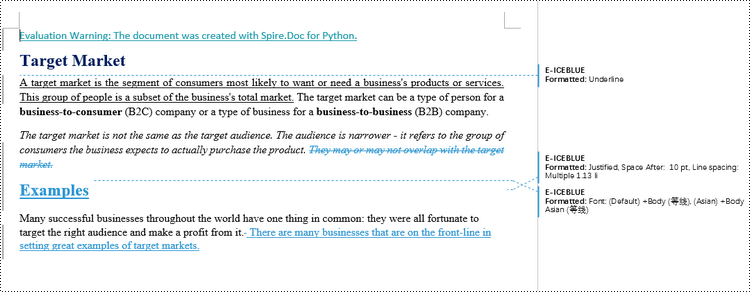
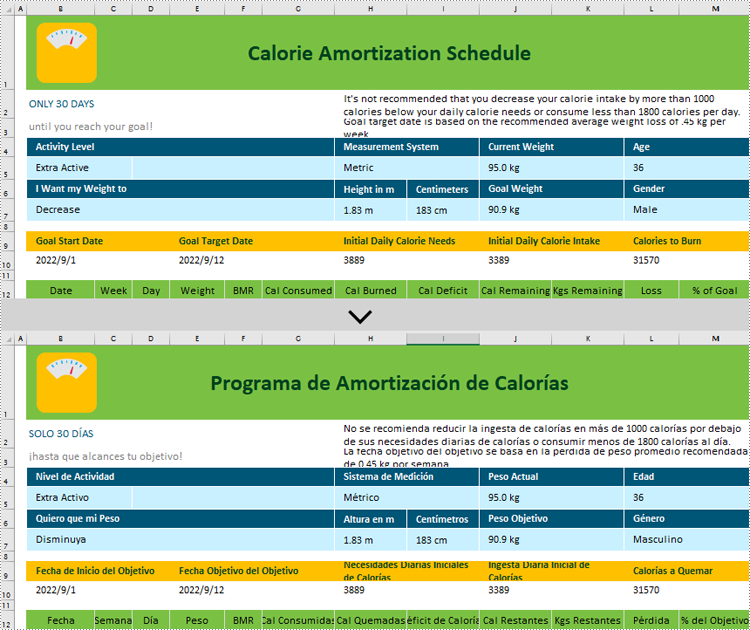
Excel documents, being a widely-used electronic spreadsheet across the globe, often involve multi-language collaboration in various scenarios. Against this backdrop, we introduce AI-powered translation technology, which not only accurately identifies and translates text content but also preserves the original data formats and structures, significantly enhancing work efficiency and accuracy while reducing communication costs incurred by language differences. In this article, we will introduce how to translate Excel using Spire.XLS AI.
Install Spire.XLS for .NET
The Excel AI integrated into Spire.XLS for .NET package, hence to begin with, you need to add the DLL files included in the Spire.XLS for .NET package as references in your .NET project. The DLL files can be either downloaded from this link or installed via NuGet.
PM> Install-Package Spire.XLS
Request a License Key of AI Product
A license key is required to run Spire.XLS AI, please contact our sales department (sales@e-iceblue.com) to request one.
Use AI to Translate Excel
Spire.XLS AI provides the ExcelAI class, which supports intelligent translation of either all content within a worksheet or specific ranges within specific worksheets. Below is an overview of the key methods involved in implementing this functionality:
- UploadWorkbook(Workbook wb): This method is used to upload a Workbook object processed by Spire.XLS to the AI server, facilitating the integration of Excel content with the AI system's data.
- ExcelTranslate(List<CellRange> srcRanges, string language): This method is designed to translate the content within specified cell ranges from worksheets into the specified target language.
- ExcelTranslate(List<Worksheet> srcWorksheets, string language, bool translateSheetName = true): This method is responsible for translating all content across a list of source worksheets, optionally including worksheet names, into the specified target language.
Translate Contents from Worksheets in C#
The following steps introduce how to translate the content within worksheets:
- Create a Workbook class instance.
- Load an Excel document using Workbook.LoadFromFile() method.
- Create an ExcelAI class instance.
- Upload the workbook to AI system using ExcelAI.UploadWorkbook() method.
- Create a list and store all worksheets from workbook.
- Translate content within worksheets into specified language using ExcelTranslate(List<Worksheet> srcWorksheets, string language, bool translateSheetName = true) method.
- Save the translated workbook using Workbook.SaveToFile () method.
- C#
using Spire.Xls;
using Spire.Xls.AI;
using System.Collections.Generic;

// Define the file path of the Excel document
string inputfile = "Input.xlsx";

// Create a new instance of the Workbook
Workbook wb = new Workbook();

// Load the Excel file
wb.LoadFromFile(inputfile);

// Create a new instance of the ExcelAI
ExcelAI excelAI = new ExcelAI();

// Upload the workbook to AI system
excelAI.UploadWorkbook(wb);

// Create a list to store worksheets
List worksheets = new List();

// Iterate through each worksheet
foreach (Worksheet worksheet in wb.Worksheets)
{
    // Add the worksheet to the list
    worksheets.Add(worksheet);
}

// Translate the content of worksheets into Spanish
excelAI.ExcelTranslate(worksheets, "spanish");

// Save the translated workbook to a new Excel file
wb.SaveToFile("output.xlsx", ExcelVersion.Version2016);
Translate Contents from Ranges in C#
The following steps introduce how to translate the content within specified ranges:
- Create a Workbook class instance.
- Load an Excel document using Workbook.LoadFromFile() method.
- Create an ExcelAI class instance.
- Upload the workbook to AI system using ExcelAI.UploadWorkbook() method.
- Create a list to store cell ranges.
- Get the specified worksheet and add some cell ranges into the list.
- Translate content within the ranges into specified language using ExcelTranslate(List<CellRange> srcRanges, string language) method.
- Save the translated workbook using Workbook.SaveToFile () method.
- C#
using Spire.Xls;
using Spire.Xls.AI;
using System.Collections.Generic;

// Define the file path of the Excel document
string inputfile = "Input.xlsx";

// Create a new instance of the Workbook
Workbook wb = new Workbook();

// Load the Excel file
wb.LoadFromFile(inputfile);

// Create a new instance of the ExcelAI
ExcelAI excelAI = new ExcelAI();

// Upload the workbook to AI system
excelAI.UploadWorkbook(wb);

// Get the first worksheet
Worksheet worksheet = wb.Worksheets[0];

// Create a list to store cell ranges
List ranges = new List();

// Add two ranges to the list
ranges.Add(worksheet.Range["B1"]);
ranges.Add(worksheet.Range["H2"]);

// Translate the content of ranges into Chinese
excelAI.ExcelTranslate(ranges, "chinese");

// Save the translated workbook to a new Excel file
wb.SaveToFile("output.xlsx", ExcelVersion.Version2016);