
Python (365)
Handling PDF documents using bytes and bytearray provides an efficient and flexible approach within applications. By processing PDFs directly as byte streams, developers can manage documents in memory or transfer them over networks without the need for temporary file storage, optimizing space and improving overall application performance. This method also facilitates seamless integration with web services and APIs. Additionally, using bytearray allows developers to make precise byte-level modifications to PDF documents.
This article will demonstrate how to save PDFs as bytes and bytearray and load PDFs from bytes and bytearray using Spire.PDF for Python, offering practical examples for Python developers.
Install Spire.PDF for Python
This scenario requires Spire.PDF for Python and plum-dispatch v1.7.4. They can be easily installed in your Windows through the following pip command.
pip install Spire.PDF
If you are unsure how to install, please refer to: How to Install Spire.PDF for Python on Windows
Create a PDF Document and Save It to Bytes and Bytearray
Developers can create PDF documents using the classes and methods provided by Spire.PDF for Python, save them to a Stream object, and then convert it to an immutable bytes object or a mutable bytearray object. The Stream object can also be used to perform byte-level operations.
The detailed steps are as follows:
- Create an object of PdfDocument class to create a PDF document.
- Add a page to the document and draw text on the page.
- Save the document to a Stream object using PdfDocument.SaveToStream() method.
- Convert the Stream object to a bytes object using Stream.ToArray() method.
- The bytes object can be directly converted to a bytearray object.
- Afterward, the byte streams can be used for further operations, such as writing them to a file using the BinaryIO.write() method.
- Python
from spire.pdf import *
# Create an instance of PdfDocument class
pdf = PdfDocument()
# Set the page size and margins of the document
pageSettings = pdf.PageSettings
pageSettings.Size = PdfPageSize.A4()
pageSettings.Margins.Top = 50
pageSettings.Margins.Bottom = 50
pageSettings.Margins.Left = 40
pageSettings.Margins.Right = 40
# Add a new page to the document
page = pdf.Pages.Add()
# Create fonts and brushes for the document content
titleFont = PdfTrueTypeFont("HarmonyOS Sans SC", 16.0, PdfFontStyle.Bold, True)
titleBrush = PdfBrushes.get_Brown()
contentFont = PdfTrueTypeFont("HarmonyOS Sans SC", 13.0, PdfFontStyle.Regular, True)
contentBrush = PdfBrushes.get_Black()
# Draw the title on the page
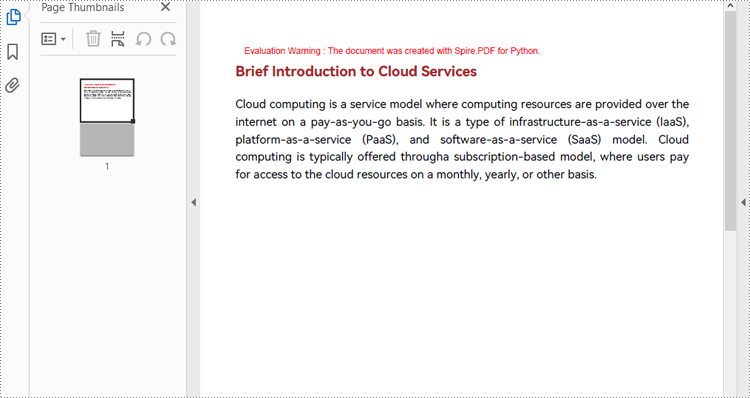
titleText = "Brief Introduction to Cloud Services"
titleSize = titleFont.MeasureString(titleText)
page.Canvas.DrawString(titleText, titleFont, titleBrush, PointF(0.0, 30.0))
# Draw the body text on the page
contentText = ("Cloud computing is a service model where computing resources are provided over the internet on a pay-as-you-go basis. "
"It is a type of infrastructure-as-a-service (IaaS), platform-as-a-service (PaaS), and software-as-a-service (SaaS) model. "
"Cloud computing is typically offered througha subscription-based model, where users pay for access to the cloud resources on a monthly, yearly, or other basis.")
# Set the string format of the body text
contentFormat = PdfStringFormat()
contentFormat.Alignment = PdfTextAlignment.Justify
contentFormat.LineSpacing = 20.0
# Create a TextWidget object with the body text and apply the string format
textWidget = PdfTextWidget(contentText, contentFont, contentBrush)
textWidget.StringFormat = contentFormat
# Create a TextLayout object and set the layout options
textLayout = PdfTextLayout()
textLayout.Layout = PdfLayoutType.Paginate
textLayout.Break = PdfLayoutBreakType.FitPage
# Draw the TextWidget on the page
rect = RectangleF(PointF(0.0, titleSize.Height + 50.0), page.Canvas.ClientSize)
textWidget.Draw(page, rect, textLayout)
# Save the PDF document to a Stream object
pdfStream = Stream()
pdf.SaveToStream(pdfStream)
# Convert the Stream object to a bytes object
pdfBytes = pdfStream.ToArray()
# Convert the Stream object to a bytearray object
pdfBytearray = bytearray(pdfStream.ToArray())
# Write the byte stream to a file
with open("output/PDFBytearray.pdf", "wb") as f:
f.write(pdfBytearray)
Load a PDF Document from Byte Streams
Developers can use a bytes object of a PDF file to create a stream and load it using the PdfDocument.LoadFromStream() method. Once the PDF document is loaded, various operations such as reading, modifying, and converting the PDF can be performed. The following is an example of the steps:
- Create a bytes object with a PDF file.
- Create a Stream object using the bytes object.
- Load the Stream object as a PDF document using PdfDocument.LoadFromStream() method.
- Extract the text from the first page of the document and print the text.
- Python
from spire.pdf import *

# Create a byte array from a PDF file
with open("Sample.pdf", "rb") as f:
    byteData = f.read()

# Create a Stream object from the byte array
stream = Stream(byteData)

# Load the Stream object as a PDF document
pdf = PdfDocument(stream)

# Get the text from the first page
page = pdf.Pages.get_Item(0)
textExtractor = PdfTextExtractor(page)
extractOptions = PdfTextExtractOptions()
extractOptions.IsExtractAllText = True
text = textExtractor.ExtractText(extractOptions)

# Print the text
print(text)
Apply for a Temporary License
If you'd like to remove the evaluation message from the generated documents, or to get rid of the function limitations, please request a 30-day trial license for yourself.
Adding page numbers to a PDF enhances its organization and readability, making it easier for readers to navigate the document. Whether for reports, manuals, or e-books, page numbers provide a professional touch and help maintain the flow of information. This process involves determining the placement, alignment, and style of the numbers within the footer or header.
In this article, you will learn how to add page numbers to the PDF footer using Spire.PDF for Python.
- Add Left-Aligned Page Numbers to PDF Footer
- Add Center-Aligned Page Numbers to PDF Footer
- Add Right-Aligned Page Numbers to PDF Footer
Install Spire.PDF for Python
This scenario requires Spire.PDF for Python and plum-dispatch v1.7.4. They can be easily installed in your Windows through the following pip command.
pip install Spire.PDF
If you are unsure how to install, please refer to this tutorial: How to Install Spire.PDF for Python on Windows
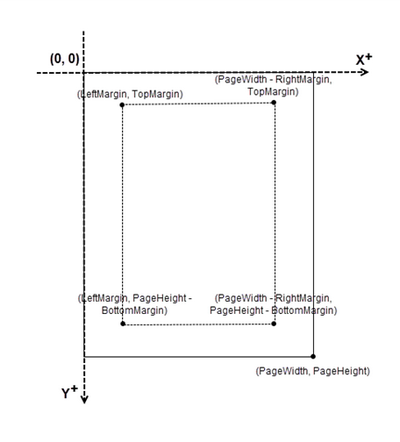
Coordinate System in PDF
When using Spire.PDF for Python to modify a PDF document, the coordinate system's origin is at the top-left corner of the page. The x-axis extends to the right, while the y-axis extends downward.
Page numbers are usually positioned in the header or footer. Thus, it's important to consider the page size and margins when determining the placement of the page numbers.
Classes and Methods for Creating Page Numbers
Spire.PDF for Python provides the PdfPageNumberField and PdfPageCountField classes to retrieve the current page number and total page count. These can be merged into a single PdfCompositeField that formats the output as "Page X of Y", where X represents the current page number and Y indicates the total number of pages.
To position the PdfCompositeField on the page, use the Location property, and render it with the Draw() method.
Add Left-Aligned Page Numbers to PDF Footer
To add left-aligned page numbers in the footer, you need to consider the left and bottom page margins as well as the page height. For example, you can use coordinates such as (LeftMargin, PageHeight – BottomMargin + SmallNumber). This ensures that the page numbers align with the left side of the text while keeping a comfortable distance from both the content and the edges of the page.
The steps to add left-aligned page numbers to PDF footer are as follows:
- Create a PdfDocument object.
- Load a PDF file from a specified path.
- Create a PdfPageNumberField object and a PdfPageCountField object.
- Create a PdfCompositeField object to combine page count field and page number field in a single string.
- Set the position of the composite field through PdfCompositeField.Location property to ensure the page number aligns with the left side of the text.
- Iterate through the pages in the document, and draw the composite field on each page at the specified location.
- Save the document to a different PDF file.
- Python
from spire.pdf.common import *
from spire.pdf import *
# Create a PdfDocument object
doc = PdfDocument()
# Load a PDF file
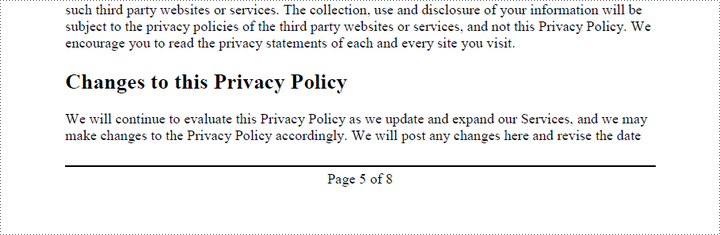
doc.LoadFromFile("C:\\Users\\Administrator\\Desktop\\Privacy Policy.pdf")
# Create font, brush and pen
font = PdfTrueTypeFont("Times New Roman", 12.0, PdfFontStyle.Regular, True)
brush = PdfBrushes.get_Black()
pen = PdfPen(brush, 1.0)
# Create a PdfPageNumberField object and a PdfPageCountField object
pageNumberField = PdfPageNumberField()
pageCountField = PdfPageCountField()
# Create a PdfCompositeField object to combine page count field and page number field in a single string
compositeField = PdfCompositeField(font, brush, "Page {0} of {1}", [pageNumberField, pageCountField])
# Get the page size
pageSize = doc.Pages.get_Item(0).Size
# Specify the blank areas around the page
leftMargin = 54.0
rightMargin = 54.0
bottomMargin = 72.0
# Set the location of the composite field
compositeField.Location = PointF(leftMargin, pageSize.Height - bottomMargin + 18.0)
# Iterate through the pages in the document
for i in range(doc.Pages.Count):
# Get a specific page
page = doc.Pages.get_Item(i)
# Draw a line at the specified position
page.Canvas.DrawLine(pen, leftMargin, pageSize.Height - bottomMargin + 15.0, pageSize.Width - rightMargin, pageSize.Height - bottomMargin + 15.0)
# Draw the composite field on the page
compositeField.Draw(page.Canvas, 0.0, 0.0)
# Save to a different PDF file
doc.SaveToFile("Output/LeftAlignedPageNumbers.pdf")
# Dispose resources
doc.Dispose()
Add Center-Aligned Page Numbers to PDF Footer
To position the page number in the center of the footer, you first need to measure the width of the page number itself. Once you have this measurement, you can calculate the appropriate X coordinate by using the formula (PageWidth - PageNumberWidth) / 2. This ensures the page number is horizontally centered within the footer.
The steps to add center-aligned page numbers to PDF footer are as follows:
- Create a PdfDocument object.
- Load a PDF file from a specified path.
- Create a PdfPageNumberField object and a PdfPageCountField object.
- Create a PdfCompositeField object to combine page count field and page number field in a single string.
- Set the position of the composite field through PdfCompositeField.Location property to ensure the page number is perfectly centered in the footer.
- Iterate through the pages in the document, and draw the composite field on each page at the specified location.
- Save the document to a different PDF file.
- Python
from spire.pdf.common import *
from spire.pdf import *

# Create a PdfDocument object
doc = PdfDocument()

# Load a PDF file
doc.LoadFromFile("C:\\Users\\Administrator\\Desktop\\Privacy Policy.pdf")

# Create font, brush and pen
font = PdfTrueTypeFont("Times New Roman", 12.0, PdfFontStyle.Regular, True)
brush = PdfBrushes.get_Black()
pen = PdfPen(brush, 1.0)

# Specify the blank margins around the page
leftMargin = 54.0
rightMargin = 54.0
bottomMargin = 72.0

# Create a PdfPageNumberField object and a PdfPageCountField object
pageNumberField = PdfPageNumberField()
pageCountField = PdfPageCountField()

# Create a PdfCompositeField object to combine page count field and page number field in a single field
compositeField = PdfCompositeField(font, brush, "Page {0} of {1}", [pageNumberField, pageCountField])

# Iterate through the pages in the document
for i in range(doc.Pages.Count):

    # Get a specific page
    page = doc.Pages.get_Item(i)

    # Get the page size
    pageSize = doc.Pages.get_Item(i).Size

    # Draw a line at the specified position
    page.Canvas.DrawLine(pen, leftMargin, pageSize.Height - bottomMargin + 15.0, pageSize.Width - rightMargin, pageSize.Height - bottomMargin + 15.0)

    # Measure the size the "Page X of Y"
    pageNumberSize = font.MeasureString("Page {} of {}".format(i + 1, doc.Pages.Count))

    # Set the location of the composite field
    compositeField.Location = PointF((pageSize.Width - pageNumberSize.Width)/2, pageSize.Height - bottomMargin + 18.0)

    # Draw the composite field on the page
    compositeField.Draw(page.Canvas, 0.0, 0.0)

# Save to a different PDF file
doc.SaveToFile("Output/CenterAlignedPageNumbers.pdf")

# Dispose resources
doc.Dispose()
Add Right-Aligned Page Numbers to PDF Footer
To add a right-aligned page number in the footer, measure the width of the page number. Then, calculate the X coordinate using the formula PageWidth - PageNumberWidth - RightMargin. This ensures that the page number aligns with the right side of the text.
The following are the steps to add right-aligned page numbers to PDF footer:
- Create a PdfDocument object.
- Load a PDF file from a specified path.
- Create a PdfPageNumberField object and a PdfPageCountField object.
- Create a PdfCompositeField object to combine page count field and page number field in a single string.
- Set the position of the composite field through PdfCompositeField.Location property to ensure the page number aligns with the right side of the text.
- Iterate through the pages in the document, and draw the composite field on each page at the specified location.
- Save the document to a different PDF file.
- Python
from spire.pdf.common import *
from spire.pdf import *

# Create a PdfDocument object
doc = PdfDocument()

# Load a PDF file
doc.LoadFromFile("C:\\Users\\Administrator\\Desktop\\Privacy Policy.pdf")

# Create font, brush and pen
font = PdfTrueTypeFont("Times New Roman", 12.0, PdfFontStyle.Regular, True)
brush = PdfBrushes.get_Black()
pen = PdfPen(brush, 1.0)

# Specify the blank margins around the page
leftMargin = 54.0
rightMargin = 54.0
bottomMargin = 72.0

# Create a PdfPageNumberField object and a PdfPageCountField object
pageNumberField = PdfPageNumberField()
pageCountField = PdfPageCountField()

# Create a PdfCompositeField object to combine page count field and page number field in a single string
compositeField = PdfCompositeField(font, brush, "Page {0} of {1}", [pageNumberField, pageCountField])

# Iterate through the pages in the document
for i in range(doc.Pages.Count):

    # Get a specific page
    page = doc.Pages.get_Item(i)

    # Get the page size
    pageSize = doc.Pages.get_Item(i).Size

    # Draw a line at the specified position
    page.Canvas.DrawLine(pen, leftMargin, pageSize.Height - bottomMargin + 15.0, pageSize.Width - rightMargin, pageSize.Height - bottomMargin + 15.0)

    # Measure the size the "Page X of Y"
    pageNumberSize = font.MeasureString("Page {} of {}".format(i + 1, doc.Pages.Count))

    # Set the location of the composite field
    compositeField.Location = PointF(pageSize.Width - pageNumberSize.Width - rightMargin, pageSize.Height - bottomMargin + 18.0)

    # Draw the composite field on the page
    compositeField.Draw(page.Canvas, 0.0, 0.0)

# Save to a different PDF file
doc.SaveToFile("Output/RightAlignedPageNumbers.pdf")

# Dispose resources
doc.Dispose()
Apply for a Temporary License
If you'd like to remove the evaluation message from the generated documents, or to get rid of the function limitations, please request a 30-day trial license for yourself.
Python: Apply Shadow, Transparent, and 3D Effects to Text in PowerPoint
2024-09-04 00:49:50 Written by KoohjiEnhancing the visual appeal of your PowerPoint presentations is crucial for capturing your audience's attention. One effective way to achieve this is by applying advanced text effects such as shadows, transparency, and 3D effects. These techniques can add depth, dimension, and a modern look to your text, making your slides more engaging and professional. In this article, we'll demonstrate how to apply shadow, transparent and 3D effects to text in PowerPoint in Python using Spire.Presentation for Python.
- Apply Shadow Effect to Text in PowerPoint in Python
- Apply Transparent Effect to Text in PowerPoint in Python
- Apply 3D Effect to Text in PowerPoint in Python
Install Spire.Presentation for Python
This scenario requires Spire.Presentation for Python. It can be easily installed in your Windows through the following pip command.
pip install Spire.Presentation
If you are unsure how to install, please refer to this tutorial: How to Install Spire.Presentation for Python on Windows
Apply Shadow Effect to Text in PowerPoint in Python
Spire.Presentation for Python offers the InnerShadowEffect and OuterShadowEffect classes for creating inner and outer shadow effects. These shadow effects can then be applied to the text within shapes by using the IAutoShape.TextFrame.TextRange.EffectDag.InnerShadowEffect and IAutoShape.TextFrame.TextRange.EffectDag.OuterShadowEffect properties. The detailed steps are as follows.
- Create an object of the Presentation class.
- Get a specific slide in the presentation using the Presentation.Slides[index] property.
- Add a shape to the slide using the ISilde.Shapes.AppendShape() method.
- Add text to the shape using the IAutoShape.AppendTextFrame() method.
- Create an inner or outer shadow effect using the InnerShadowEffect or OuterShadowEffect class.
- Set the blur radius, direction, distance and color, for the inner or outer shadow effect using the properties offered by the InnerShadowEffect or OuterShadowEffect class.
- Apply the inner or outer shadow effect to the text within the shape using the IAutoShape.TextFrame.TextRange.EffectDag.InnerShadowEffect or IAutoShape.TextFrame.TextRange.EffectDag.OuterShadowEffect property.
- Save the resulting presentation using the Presentation.SaveToFile() method.
- Python
from spire.presentation.common import *
from spire.presentation import *
# Create an object of the Presentation class
ppt = Presentation()
# Get the first slide
slide = ppt.Slides[0]
# Add the first rectangular shape to the slide
shape = slide.Shapes.AppendShape(ShapeType.Rectangle, RectangleF.FromLTRB(120, 60, 500, 200))
shape.Fill.FillType = FillFormatType.none
# Add text to the shape
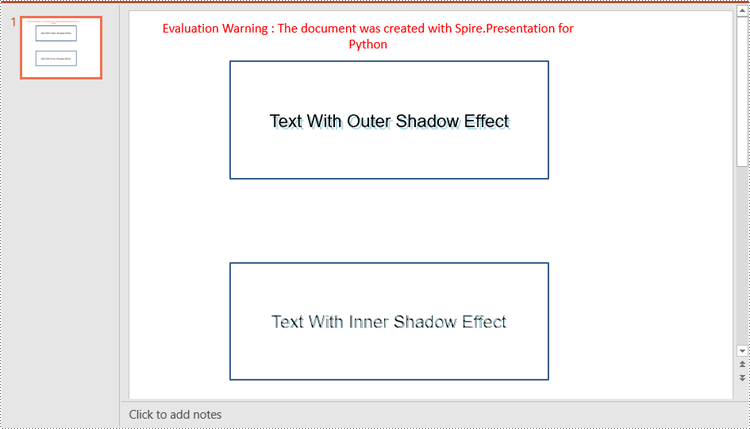
shape.AppendTextFrame("Text With Outer Shadow Effect")
shape.TextFrame.Paragraphs[0].TextRanges[0].LatinFont = TextFont("Arial")
shape.TextFrame.Paragraphs[0].TextRanges[0].FontHeight = 21
shape.TextFrame.Paragraphs[0].TextRanges[0].Fill.FillType = FillFormatType.Solid
shape.TextFrame.Paragraphs[0].TextRanges[0].Fill.SolidColor.Color = Color.get_Black()
# Create an outer shadow effect
outerShadow = OuterShadowEffect()
# Set the blur radius, direction, distance and color for the outer shadow effect
outerShadow.BlurRadius = 0
outerShadow.Direction = 50
outerShadow.Distance = 10
outerShadow.ColorFormat.Color = Color.get_LightBlue()
# Apply the outer shadow effect to the text in the first rectangular shape
shape.TextFrame.TextRange.EffectDag.OuterShadowEffect = outerShadow
# Add the second rectangular shape to the slide
shape = slide.Shapes.AppendShape(ShapeType.Rectangle, RectangleF.FromLTRB(120, 300, 500, 440))
shape.Fill.FillType = FillFormatType.none
# Add text to the shape
shape.AppendTextFrame("Text With Inner Shadow Effect")
shape.TextFrame.Paragraphs[0].TextRanges[0].LatinFont = TextFont("Arial")
shape.TextFrame.Paragraphs[0].TextRanges[0].FontHeight = 21
shape.TextFrame.Paragraphs[0].TextRanges[0].Fill.FillType = FillFormatType.Solid
shape.TextFrame.Paragraphs[0].TextRanges[0].Fill.SolidColor.Color = Color.get_Black()
# Create an inner shadow effect
innerShadow = InnerShadowEffect()
# Set the blur radius, direction, distance and color for the inner shadow effect
innerShadow.BlurRadius = 0
innerShadow.Direction = 50
innerShadow.Distance = 10
innerShadow.ColorFormat.Color = Color.get_LightBlue()
# Apply the inner shadow effect to the text in the second rectangular shape
shape.TextFrame.TextRange.EffectDag.InnerShadowEffect = innerShadow
# Save the resulting presentation
ppt.SaveToFile("SetShadowEffect.pptx", FileFormat.Pptx2013)
ppt.Dispose()
Apply Transparent Effect to Text in PowerPoint in Python
Spire.Presentation for Python does not offer a direct method to apply transparency effect to text, but you can control the transparency by adjusting the alpha value of the text color. The detailed steps are as follows.
- Create an object of the Presentation class.
- Get a specific slide in the presentation using the Presentation.Slides[index] property.
- Add a shape to the slide using the ISilde.Shapes.AppendShape() method.
- Retrieve the paragraph collection from the text frame within the shape using the IAutoShape.TextFrame.Paragraphs property, then remove any default paragraphs from the collection using the ParagraphList.Clear() method.
- Add new paragraphs to the collection using the ParagraphList.Append() method, and insert text into each paragraph using the TextParagraph.TextRanges.Append() method.
- Set the fill type of the text to solid using the TextRange.Fill.FillType property.
- Adjust the transparency of the text by setting the color with varying alpha values using the Color.FromArgb(alpha:int, red:int, green:int, blue:int) method, where the alpha value controls the transparency level—the lower the alpha, the more transparent the text.
- Save the resulting presentation using the Presentation.SaveToFile() method.
- Python
from spire.presentation.common import *
from spire.presentation import *
# Create an object of the Presentation class
ppt = Presentation()
# Get the first slide
slide = ppt.Slides[0]
# Add a rectangular shape to the slide
textboxShape = slide.Shapes.AppendShape(ShapeType.Rectangle, RectangleF.FromLTRB(100, 100, 400, 220))
# Make the border of the shape transparent
textboxShape.ShapeStyle.LineColor.Color = Color.get_Transparent()
# Set the shape's fill to none
textboxShape.Fill.FillType = FillFormatType.none
# Retrieve the paragraph collection from the text frame within the shape
paras = textboxShape.TextFrame.Paragraphs
# Remove any default paragraphs
paras.Clear()
# Add three new paragraphs to the text frame, each with a different transparency level for the text
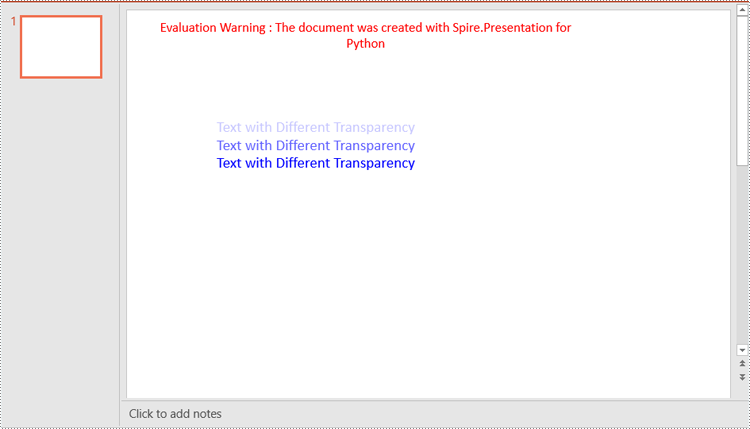
alpha = 55 # Initial alpha value for text transparency
for i in range(3):
# Create and add a new paragraph
paras.Append(TextParagraph())
# Add text to the paragraph
paras[i].TextRanges.Append(TextRange("Text with Different Transparency"))
# Set the text fill type to solid
paras[i].TextRanges[0].Fill.FillType = FillFormatType.Solid
# Set the text color with varying transparency, controlled by the alpha value
paras[i].TextRanges[0].Fill.SolidColor.Color = Color.FromArgb(
alpha,
Color.get_Blue().R,
Color.get_Blue().G,
Color.get_Blue().B
)
# Increase alpha value to reduce transparency for the next paragraph
alpha += 100
# Save the resulting presentation
ppt.SaveToFile("SetTransparency.pptx", FileFormat.Pptx2013)
ppt.Dispose()
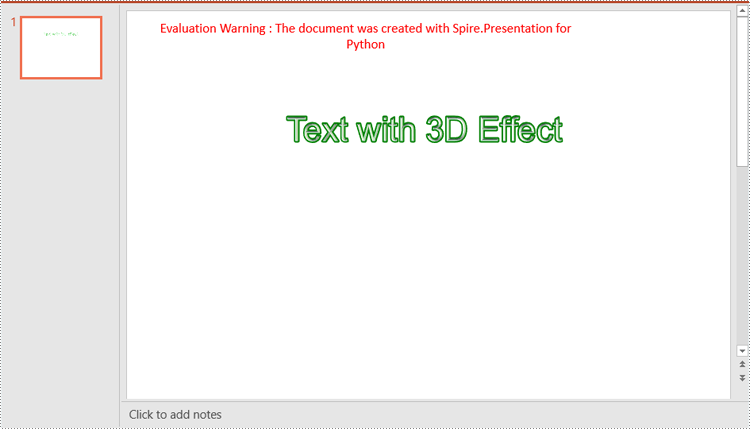
Apply 3D Effect to Text in PowerPoint in Python
The FormatThreeD class in Spire.Presentation for Python is used for creating a 3D effect. You can access the FormatThreeD object using the IAutoShape.TextFrame.TextThreeD property, then use the properties of the FormatThreeD class to configure the settings for the 3D effect. The detailed steps are as follows.
- Create an object of the Presentation class.
- Get a specific slide in the presentation using the Presentation.Slides[index] property.
- Add a shape to the slide using the ISilde.Shapes.AppendShape() method.
- Add text to the shape using the IAutoshape.AppendTextFrame() method.
- Access the FormatThreeD object using the IAutoShape.TextFrame.TextThreeD property.
- Set the material type, top bevel type, contour color and width, and lighting type for the 3D effect through the properties of the FormatThreeD class.
- Save the resulting presentation using the Presentation.SaveToFile() method.
- Python
from spire.presentation.common import *
from spire.presentation import *

# Create an object of the Presentation class
ppt = Presentation()

# Get the first slide
slide = ppt.Slides[0]

# Add a rectangular shape to the slide
shape = slide.Shapes.AppendShape(ShapeType.Rectangle, RectangleF.FromLTRB(30, 40, 680, 240))
# Make the border of the shape transparent
shape.ShapeStyle.LineColor.Color = Color.get_Transparent()
# Set the shape's fill to none
shape.Fill.FillType = FillFormatType.none

# Add text to the shape
shape.AppendTextFrame("Text with 3D Effect")
# Set text color
textRange = shape.TextFrame.TextRange
textRange.Fill.FillType = FillFormatType.Solid
textRange.Fill.SolidColor.Color = Color.get_LightBlue()
# Set font
textRange.FontHeight = 40
textRange.LatinFont = TextFont("Arial")

# Access the FormatThreeD object
threeD = shape.TextFrame.TextThreeD
# Set the material type for the 3D effect
threeD.ShapeThreeD.PresetMaterial = PresetMaterialType.Metal
# Set the top bevel type for the 3D effect
threeD.ShapeThreeD.TopBevel.PresetType = BevelPresetType.Circle
# Set the contour color and width for the 3D effect
threeD.ShapeThreeD.ContourColor.Color = Color.get_Green()
threeD.ShapeThreeD.ContourWidth = 3
# Set the lighting type for the 3D effect
threeD.LightRig.PresetType = PresetLightRigType.Sunrise

# Save the resulting presentation
ppt.SaveToFile("Set3DEffect.pptx", FileFormat.Pptx2013)
ppt.Dispose()
Apply for a Temporary License
If you'd like to remove the evaluation message from the generated documents, or to get rid of the function limitations, please request a 30-day trial license for yourself.
Programmatic editing of Word documents involves using code to alter or modify the contents of these documents. This approach enables automation and customization, making it particularly advantageous for handling large document collections. Through the use of Spire.Doc library, developers can perform a wide range of operations, including text manipulation, formatting changes, and the addition of images or tables.
The following sections will demonstrate how to edit or modify a Word document in Python using Spire.Doc for Python.
- Modify Text in a Word Document
- Change Formatting of Text in a Word Document
- Add New Elements to a Word Document
- Remove Paragraphs from a Word Document
Install Spire.Doc for Python
This scenario requires Spire.Doc for Python and plum-dispatch v1.7.4. They can be easily installed in your Windows through the following pip command.
pip install Spire.Doc
If you are unsure how to install, please refer to this tutorial: How to Install Spire.Doc for Python on Windows
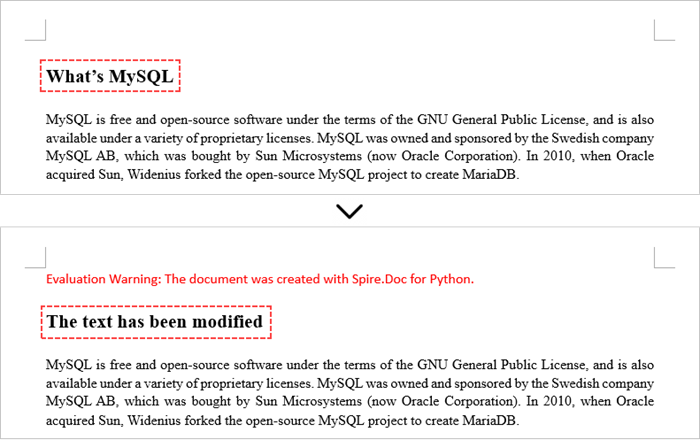
Modify Text in a Word Document in Python
In order to alter the content of a paragraph, the initial step is to obtain the desired paragraph from a specific section through the use of the Section.Paragraphs[index] property. Following this, you can replace the existing text with the new content by assigning it to the Paragraph.Text property of the chosen paragraph.
Here are the steps to edit text in a Word document with Python:
- Create a Document object.
- Load a Word file from the given file path.
- Get a specific section using Document.Sections[index] property.
- Get a specific paragraph using Section.Paragraphs[index] property.
- Reset the text of the paragraph using Paragraph.Text property.
- Save the updated document to a different Word file.
- Python
from spire.doc import *
from spire.doc.common import *

# Create a Document object
document = Document()

# Load an existing Word file
document.LoadFromFile("C:\\Users\\Administrator\\Desktop\\input.docx");

# Get a specific section
section = document.Sections[0]

# Get a specific paragraph
paragraph = section.Paragraphs[0]

# Modify the text of the paragraph
paragraph.Text = "The text has been modified"

# Save the document to a different Word file
document.SaveToFile("output/ModifyText.docx", FileFormat.Docx)

# Dispose resource
document.Dispose()
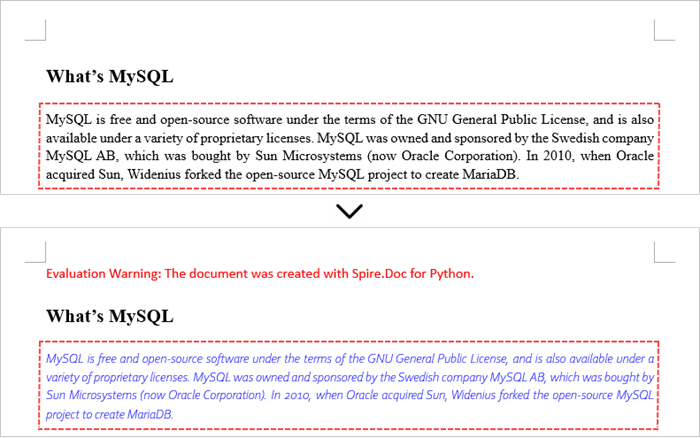
Change Formatting of Text in a Word Document in Python
To alter the text appearance of a particular paragraph, you first need to obtain the specified paragraph. Next, go through its child objects to find the individual text ranges. The formatting of each text range can then be updated using the TextRange.CharacterFormat property.
The steps to change text formatting in a Word document are as follows:
- Create a Document object.
- Load a Word file from the given file path.
- Get a specific section using Document.Sections[index] property.
- Get a specific paragraph using Section.Paragraphs[index] property.
- Iterate through the child objects in the paragraph.
- Determine if a child object is a text range.
- Get a specific text range.
- Reset the text formatting using TextRange.CharacterFormat property.
- Save the updated document to a different Word file.
- Python
from spire.doc import *
from spire.doc.common import *

# Create an object of Document
doc = Document()

# Load a Word document
doc.LoadFromFile("C:\\Users\\Administrator\\Desktop\\input.docx")

# Get a specific section
section = document.Sections.get_Item(0)

# Get a specific paragraph
paragraph = section.Paragraphs.get_Item(0)

# Iterate through the child objects in the paragraph
for i in range(paragraph.ChildObjects.Count):

    # Determine if a child object is text range
    if isinstance(paragraph.ChildObjects[i], TextRange):

        # Get a specific text range
        textRange = paragraph.ChildObjects[i]

        # Reset font name
        textRange.CharacterFormat.FontName = "Corbel Light"

        # Reset font size
        textRange.CharacterFormat.FontSize = 11.0

        # Reset text color
        textRange.CharacterFormat.TextColor = Color.get_Blue()

        # Apply italic to the text range
        textRange.CharacterFormat.Italic = True

# Save the document to a different Word file
doc.SaveToFile("output/ChangeFormatting.docx", FileFormat.Docx2019)

# Dispose resource
doc.Dispose()
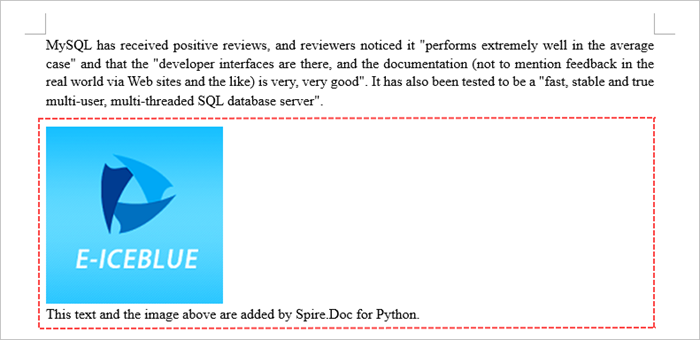
Add New Elements to a Word Document in Python
In a Word document, most elements—such as text, images, lists, and charts—are fundamentally organized around the concept of a paragraph. To insert a new paragraph into a specific section, use the Section.AddParagraph() method.
After creating the new paragraph, you can add various elements to it by leveraging the methods and properties of the Paragraph object.
The steps to add new elements (text and images) to a Word document are as follows:
- Create a Document object.
- Load a Word file from the given file path.
- Get a specific section through Document.Sections[index] property.
- Add a paragraph to the section using Section.AddParagraph() method.
- Add text to the paragraph using Paragraph.AppendText() method.
- Add an image to the paragraph using Paragraph.AppendPicture() method.
- Save the updated document to a different Word file.
- Python
from spire.doc import *
from spire.doc.common import *

# Create an object of Document
doc = Document()

# Load a Word document
doc.LoadFromFile("C:\\Users\\Administrator\\Desktop\\Input.docx")

# Get the last section
lastSection = doc.LastSection

# Add a paragraph to the section
paragraph = lastSection.AddParagraph()

# Add an image to the paragraph
picture = paragraph.AppendPicture("C:\\Users\\Administrator\\Desktop\\logo.png");

# Set text wrap style
picture.TextWrappingStyle = TextWrappingStyle.TopAndBottom

# Add text to the paragraph
paragraph.AppendText("This text and the image above are added by Spire.Doc for Python.")

# Create a paragraph style
style = ParagraphStyle(doc)
style.Name = "FontStyle"
style.CharacterFormat.FontName = "Times New Roman"
style.CharacterFormat.FontSize = 12
doc.Styles.Add(style)

# Apply the style to the paragraph
paragraph.ApplyStyle(style.Name)

# Save the document to a different Word file
doc.SaveToFile("output/AddNewElements.docx", FileFormat.Docx2019)

# Dispose resource
doc.Dispose()
Remove Paragraphs from a Word Document in Python
To eliminate a specific paragraph from a document, simply invoke the ParagraphCollection.RemoveAt() method and supply the index of the paragraph you intend to delete.
The steps to remove paragraphs from a Word document are as follows:
- Create a Document object.
- Load a Word file from the given file path.
- Get a specific section through Document.Sections[index] property.
- Remove a specific paragraph from the section using Section.Paragraphs.RemoveAt() method.
- Save the updated document to a different Word file.
- Python
from spire.doc import *
from spire.doc.common import *

# Create an object of Document
doc = Document()

# Load a Word document
doc.LoadFromFile("C:\\Users\\Administrator\\Desktop\\input.docx")

# Get a specific section
section = doc.Sections[0]

# Remove a specific paragraph
section.Paragraphs.RemoveAt(0)

# Save the document to a different Word file
doc.SaveToFile("output/RemoveParagraph.docx", FileFormat.Docx);

# Dispose resource
doc.Dispose()
Apply for a Temporary License
If you'd like to remove the evaluation message from the generated documents, or to get rid of the function limitations, please request a 30-day trial license for yourself.
Interactive forms in PDFs are valuable tools that allow users to fill in information, complete surveys, or sign documents electronically. However, these forms can also add layers of complexity to a PDF, impacting both file size and the overall user experience. When forms are no longer needed, or when a document needs to be simplified for distribution or archiving, removing these interactive elements can be beneficial. In this article, we will demonstrate how to remove forms from a PDF document in Python using Spire.PDF for Python.
Install Spire.PDF for Python
This scenario requires Spire.PDF for Python and plum-dispatch v1.7.4. They can be easily installed in your Windows through the following pip command.
pip install Spire.PDF
If you are unsure how to install, please refer to this tutorial: How to Install Spire.PDF for Python on Windows
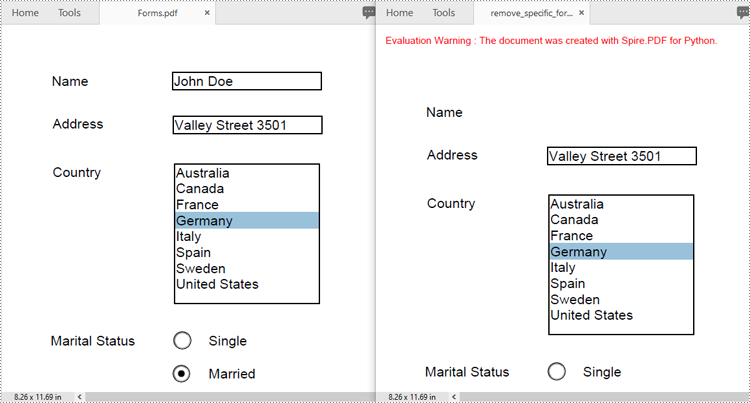
Remove a Specific Form from a PDF Document in Python
Spire.PDF for Python allows you to remove specific form fields from a PDF file by using either the indexes or the names of the form fields. The detailed steps are as follows.
- Create an instance of the PdfDocument class.
- Load a PDF document containing form fields using the PdfDocument.LoadFromFile() method.
- Get the form of the document using the PdfDocument.Form property.
- Get the form field collection using the PdfFormWidget.FieldsWidget property.
- Remove a specific form field by its index using the PdfFormFieldWidgetCollection.RemoveAt(index) method. Or retrieve a form field by its name using the PdfFormFieldWidgetCollection[name] property, and then remove it using the PdfFormFieldWidgetCollection.Remove(field) method.
- Save the resulting document using the PdfDocument.SaveToFile() method.
- Python
from spire.pdf.common import *
from spire.pdf import *

# Create an instance of the PdfDocument class
doc = PdfDocument()
# Load a PDF file
doc.LoadFromFile("Forms.pdf")

# Get the form of the document
pdfForm = doc.Form
formWidget = PdfFormWidget(pdfForm)

# Get the form field collection
field_collection = formWidget.FieldsWidget

# Remove a specific form field by its index
field_collection.RemoveAt(0)

# Or remove a specific form field by its name
# text_box = field_collection["Name"]
# field_collection.Remove(text_box)

# Save the resulting document
doc.SaveToFile("remove_specific_form.pdf")
doc.Close()
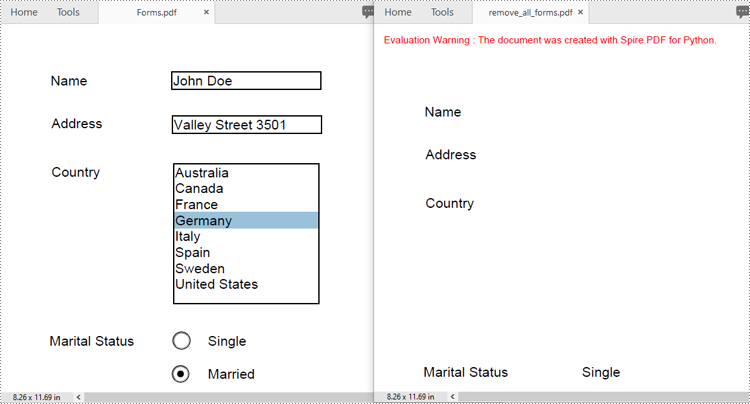
Remove All Forms from a PDF Document in Python
To remove all form fields from a PDF document, you need to iterate through the form field collection, and then remove each form field from the collection using the PdfFormFieldWidgetCollection.RemoveAt(index) method. The detailed steps are as follows.
- Create an instance of the PdfDocument class.
- Load a PDF document containing form fields using the PdfDocument.LoadFromFile() method.
- Get the form of the document using the PdfDocument.Form property.
- Get the form field collection using the PdfFormWidget.FieldsWidget property.
- Iterate through all form fields in the collection.
- Remove each form field from the collection using the PdfFormFieldWidgetCollection.RemoveAt(index) method.
- Save the resulting document using the PdfDocument.SaveToFile() method.
- Python
from spire.pdf.common import *
from spire.pdf import *

# Create an instance of the PdfDocument class
doc = PdfDocument()
# Load a PDF file
doc.LoadFromFile("Forms.pdf")

# Get the form of the document
pdfForm = doc.Form
formWidget = PdfFormWidget(pdfForm)

# Get the form field collection
field_collection = formWidget.FieldsWidget

# Check if there are any form fields in the collection
if field_collection.Count > 0:
    # Iterate through all form fields in the collection
    for i in range(field_collection.Count - 1, -1, -1):
        # Remove the current form field from the collection
        field_collection.RemoveAt(i)

# Save the resulting document
doc.SaveToFile("remove_all_forms.pdf")
doc.Close()
Apply for a Temporary License
If you'd like to remove the evaluation message from the generated documents, or to get rid of the function limitations, please request a 30-day trial license for yourself.
One powerful feature that enhances the interactivity and utility of PDF documents is the actions in these documents. By embedding actions such as document jumping, navigation controls, or even media playing, users can transform static documents into dynamic tools that streamline workflows, improve user engagement, and automate routine tasks, making the use of PDFs more efficient and versatile than ever before. This article will show how to use Spire.PDF for Python to create actions in PDF documents with Python code effortlessly.
- Create a Navigation Action in PDF with Python
- Create a Sound Action in PDF with Python
- Create a File Open Action in PDF with Python
Install Spire.PDF for Python
This scenario requires Spire.PDF for Python and plum-dispatch v1.7.4. They can be easily installed in your Windows through the following pip command.
pip install Spire.PDF
If you are unsure how to install, please refer to: How to Install Spire.PDF for Python on Windows
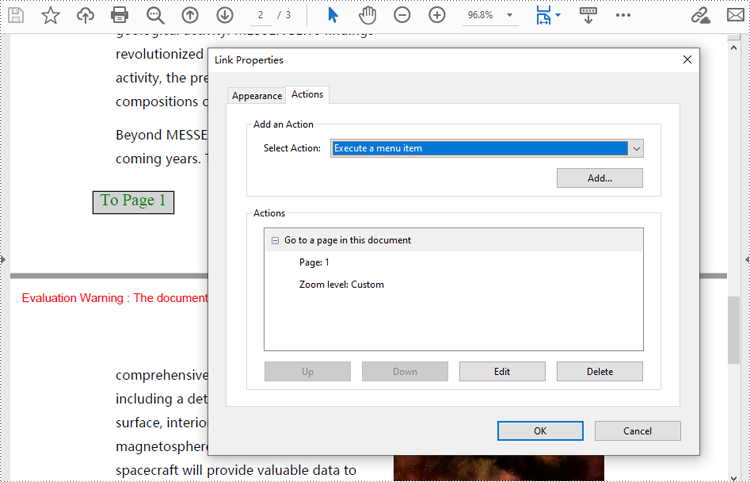
Create a Navigation Action in PDF with Python
A navigation button is an action that allows users to jump to a specified position on a designated page within a document. Developers can create a PdfDestination object, use it to create a PdfGoToAction, and then create an annotation based on this object and add it to the page to complete the creation of the navigation button. The following are the detailed steps:
- Create an object of PdfDocument class and load a PDF document using PdfDocument.LoadFromFile() method.
- Create a PdfDestination object and set its property.
- Create a PdfGoToAction object based on the destination.
- Draw a rectangle on a page using PdfPageBase.Canvas.DrawRectangle() method.
- Create a PdfActionAnnotation object based on the action and add it to the page using PdfPageBase.Annotations.Add() method.
- Save the document using PdfDocument.SaveToFile() method.
- Python
from spire.pdf import *

# Create an instance of PdfDocument class and load a PDF document
pdf = PdfDocument()
pdf.LoadFromFile("Sample.pdf")

# Create a PdfDestination instance and set its properties
destination = PdfDestination(pdf.Pages[0])
destination.Location = PointF(0.0, 0.0)
destination.Mode = PdfDestinationMode.Location
destination.Zoom = 0.8

# Create a rectangle
rect = RectangleF.FromLTRB(70, pdf.PageSettings.Size.Height - 120, 140, pdf.PageSettings.Size.Height - 100)

# Create a PdfGoToAction instance
action = PdfGoToAction(destination)

# Draw a rectangle on the second page
pdf.Pages.get_Item(1).Canvas.DrawRectangle(PdfBrushes.get_LightGray(), rect)

# Draw text of the button
font = PdfFont(PdfFontFamily.TimesRoman, 14.0)
stringFormat = PdfStringFormat(PdfTextAlignment.Center)
pdf.Pages.get_Item(1).Canvas.DrawString("To Page 1", font, PdfBrushes.get_Green(), rect, stringFormat)

# Create a PdfActionAnnotation instance
annotation = PdfActionAnnotation(rect, action)

# Add the annotation to the second page
pdf.Pages.get_Item(1).Annotations.Add(annotation)

# Save the document
pdf.SaveToFile("output/AddPDFNavigationButton.pdf")
pdf.Close()
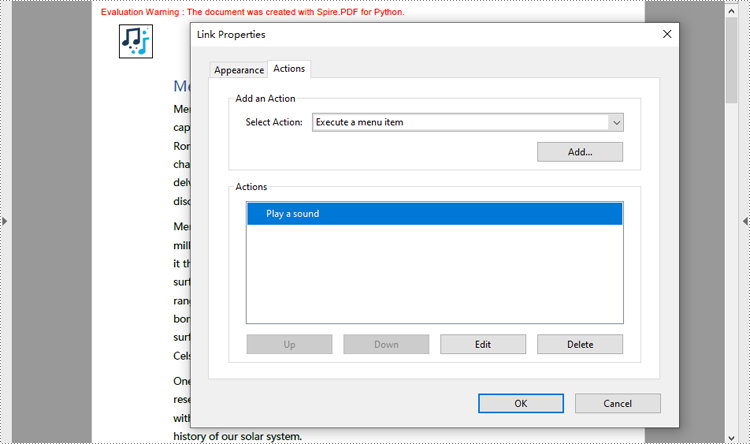
Create a Sound Action in PDF with Python
Developers can embed audio as actions in PDF documents, which allows the audio to play when the user performs a specified action, such as playing when the file opens or when a button is clicked. The following are the steps for creating a sound action:
- Create an instance of PdfDocument class.
- Load a PDF document using PdfDocument.LoadFromFile() method.
- Create an instance of PdfSoundAction class with an audio file.
- Set the audio parameters through properties under PdfSound class.
- Set the playing parameters through properties under PdfSoundAction class.
- Get a page using PdfDocument.Pgaes.get_Item(() method.
- Draw an image on the page using PdfPageBase.Canvas.Draw() method.
- Create a PdfActionAnnotation object with the sound action at the location of the image.
- Add the annotation to the page
- Or you can only set the sound action as the action performed after the document is opened through PdfDocument.AfterOpenAction property. This doesn’t need to add it as an annotation on a PDF page.
- Save the document using PdfDocument.SaveToFile() method.
- Python
from spire.pdf import *

# Create a PdfDocument instance and load a PDF file
pdf = PdfDocument()
pdf.LoadFromFile("Sample.pdf")

# Get the first page of the document
page = pdf.Pages.get_Item(0)

# Create an instance of PdfSoundAction with the sound file path
soundAction = PdfSoundAction("Wave.wav")

# Set the audio parameters
soundAction.Sound.Bits = 16
soundAction.Sound.Channels = PdfSoundChannels.Stereo
soundAction.Sound.Encoding = PdfSoundEncoding.Signed
soundAction.Sound.Rate = 44100

# Set the playing parameters
soundAction.Volume = 0.5
soundAction.Repeat = True
soundAction.Mix = True
soundAction.Synchronous = False

# Draw an image on the page
image = PdfImage.FromFile("Sound.png")
page.Canvas.DrawImage(image, PointF(30.0, 30.0))

# Create an instance of PdfActionAnnotation with the sound action
rect = RectangleF.FromLTRB(30.0, 30.0, image.GetBounds().Width + 30.0, image.GetBounds().Height + 30.0)
annotation = PdfActionAnnotation(rect, soundAction)

# Add the annotation to the page
page.Annotations.Add(annotation)

# Set the sound action to play after the document is opened
# pdf.AfterOpenAction = soundAction

# Save the document
pdf.SaveToFile("output/AddMusicPDF.pdf")
pdf.Close()
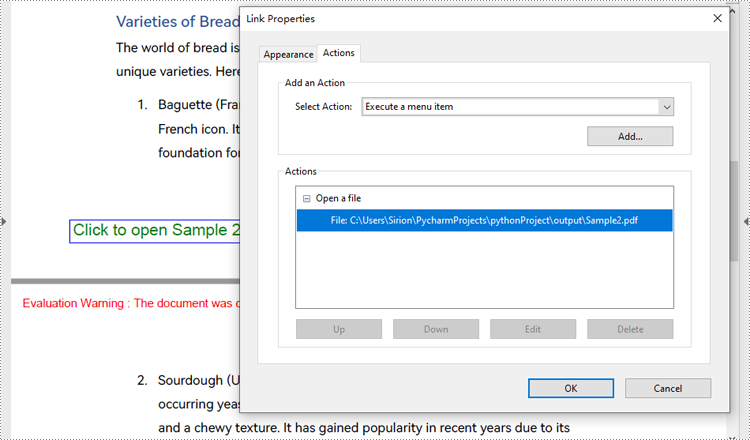
Create a File Open Action in PDF with Python
The PdfLaunchAction class represents a file open action in PDF that allows users to open the corresponding file by clicking on a button on a PDF page. Developers can specify the absolute or relative path of the file to be opened and whether to open in a new window when creating a file open action. The detailed steps for creating a file open action in a PDF document are as follows:
- Create an object of PdfDocument class and load a PDF document using PdfDocument.LoadFromFile() method.
- Get a page of the document using PdfDocument.Pages.get_Item() method.
- Draw a rectangle on the page using PdfPageBase.Canvas.DrawRectangle() method.
- Create an object of PdfLaunchAction class and specify the file path and path type.
- Set the opening mode to new window through PdfLaunchAction.IsNewWindow property.
- Create an object of PdfActionAnnotation class based on the action and set its color through PdfActionAnnotation.Color property.
- Add the annotation to the page using PdfPageBase.Annotations.Add() method.
- Save the document using PdfDocument.SaveToFile() method.
- Python
from spire.pdf import *

# Create an instance of PdfDocument class
pdf = PdfDocument()

# Load a PDF file
pdf.LoadFromFile("Sample.pdf")

# Get the first page of the document
page = pdf.Pages.get_Item(0)

# Draw a rectangle on the page
rect = RectangleF.FromLTRB(50, pdf.PageSettings.Size.Height - 100, 200, pdf.PageSettings.Size.Height - 80)
page.Canvas.DrawRectangle(PdfPens.get_LightGray(), rect)

# Draw text in the rectangle
page.Canvas.DrawString("Click to open Sample 2", PdfFont(PdfFontFamily.Helvetica, 14.0), PdfBrushes.get_Green(), rect, PdfStringFormat(PdfTextAlignment.Center))

# Create a PdfLaunchAction object
action = PdfLaunchAction("Sample2.pdf", PdfFilePathType.Relative)
action.IsNewWindow = True

# Create a PdfActionAnnotation object based on the action
annotation = PdfActionAnnotation(rect, action)
annotation.Color = PdfRGBColor(Color.get_Blue())

# Add the annotation to the page
page.Annotations.Add(annotation)

# Save the document
pdf.SaveToFile("output/CreatePDFLaunchAction.pdf")
pdf.Close()
Apply for a Temporary License
If you'd like to remove the evaluation message from the generated documents, or to get rid of the function limitations, please request a 30-day trial license for yourself.
Python: Detect Page Orientation or Rotation Angle in PDF
2024-08-27 01:00:23 Written by AdministratorProper presentation of a PDF document is critical for maintaining its accuracy and professionalism. By checking the orientation and rotation of each PDF page, you can confirm that all elements, including diagrams and images, are displayed correctly as intended on the viewing device or platform, thus avoiding confusion or misinterpretation of content. In this article, you will learn how to detect the orientation and rotation angle of a PDF page in Python using Spire.PDF for Python.
Install Spire.PDF for Python
This scenario requires Spire.PDF for Python. It can be easily installed in your Windows through the following pip command.
pip install Spire.PDF
If you are unsure how to install, please refer to this tutorial: How to Install Spire.PDF for Python on Windows
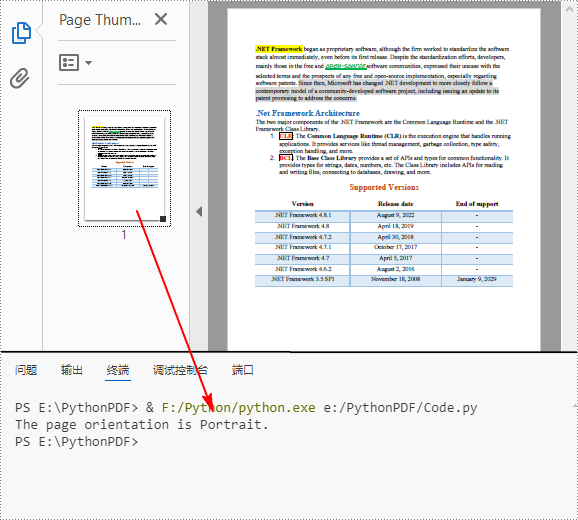
Detect PDF Page Orientation in Python
Page orientation is determined by the relationship between page width and height. Using Spire.PDF for Python, you can compare these two values to detect whether a page is landscape (width greater than height) or portrait (width less than height). The following are the detailed steps.
- Create a PdfDocument instance.
- Load a PDF file using PdfDocument.LoadFromFile() method.
- Get a specified page using PdfDocument.Pages[] property.
- Get the width and height of the PDF page using PdfPageBase.Size.Width and PdfPageBase.Size.Height properties.
- Compare the values of page width and height to detect the page orientation.
- Print out the result.
- Python
from spire.pdf.common import *
from spire.pdf import *

# Create a PdfDocument object
pdf = PdfDocument()

# Load a PDF file from disk
pdf.LoadFromFile("SamplePDF.pdf")

# Get the first page
page = pdf.Pages.get_Item(0)

# Get the width and height of the page
Width = page.Size.Width
Height = page.Size.Height

# Compare the values of page width and height
if Width > Height:
    print("The page orientation is Landscape.")

else:
    print("The page orientation is Portrait.")
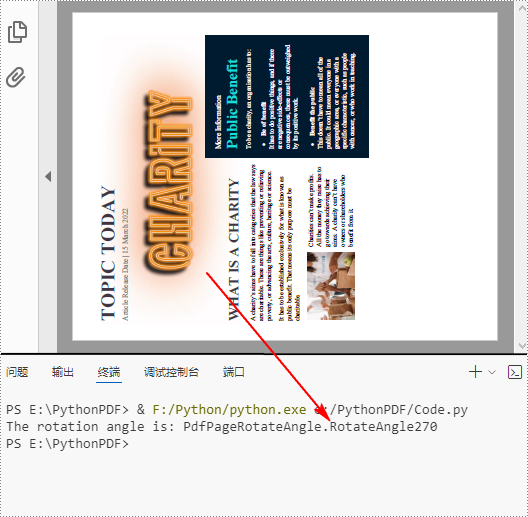
Detect PDF Page Rotation Angle in Python
PDF pages can be rotated by a certain angle. To detect the rotation angle of a PDF page, you can use the PdfPageBase.Rotation property. The following are the detailed steps.
- Create a PdfDocument instance.
- Load a PDF file using PdfDocument.LoadFromFile() method.
- Get a specified page using PdfDocument.Pages[] property.
- Get the rotation angle of the page using PdfPageBase.Rotation property, and then convert it to text string.
- Print out the result.
- Python
from spire.pdf.common import *
from spire.pdf import *

# Create a PdfDocument object
pdf = PdfDocument()

# Load a PDF file from disk
pdf.LoadFromFile("Sample.pdf")

# Get the first page
page = pdf.Pages.get_Item(0)

# Get the rotation angle of the current page
rotationAngle = page.Rotation
rotation = str(rotationAngle)

# Print out the result
print("The rotation angle is: " + rotation)
Apply for a Temporary License
If you'd like to remove the evaluation message from the generated documents, or to get rid of the function limitations, please request a 30-day trial license for yourself.
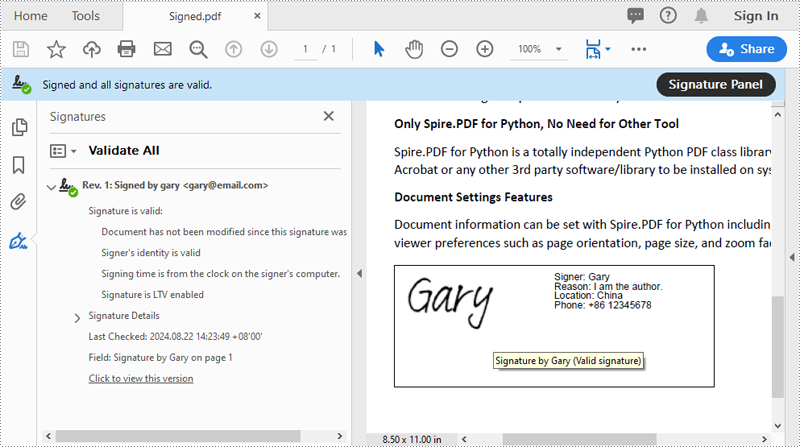
Digital signatures are vital for maintaining the authenticity and integrity of PDF documents. They provide a reliable way to verify the signer's identity and ensure that the document's content has not been tampered with since the signature was applied. By using digital signatures, you can enhance the security and trustworthiness of your documents. In this article, we will explore how to add and remove digital signatures in PDF files in Python using Spire.PDF for Python.
- Add a Digital Signature to PDF in Python
- Add an Invisible Digital Signature to PDF in Python
- Remove Digital Signature from PDF in Python
Install Spire.PDF for Python
This scenario requires Spire.PDF for Python and plum-dispatch v1.7.4. They can be easily installed in your Windows through the following pip command.
pip install Spire.PDF
If you are unsure how to install, please refer to this tutorial: How to Install Spire.PDF for Python on Windows
Add a Digital Signature to PDF in Python
You can use the PdfOrdinarySignatureMaker.MakeSignature(sigFieldName: str, page: PdfPageBase, x: float, y: float, width: float, height: float, signatureAppearance: IPdfSignatureAppearance) method to add a visible digital signature with a custom appearance to a specific page of a PDF document. The detailed steps are as follows.
- Create a PdfDocument instance.
- Load a PDF document using PdfDocument.LoadFromFile() method.
- Create a PdfOrdinarySignatureMaker instance and pass the PdfDocument object, certificate (.pfx) file path and certificate password to the class instructor as parameters.
- Set signature details, such as the signer’s name, contact information, location, and signature reason, using the properties of the PdfOrdinarySignatureMaker class.
- Create a PdfSignatureAppearance instance for the signature, and then customize the labels for the signature and set the signature image.
- Get a specific page in the PDF document using PdfDocument.Pages[] property.
- Call the PdfOrdinarySignatureMaker.MakeSignature(sigFieldName: str, page: PdfPageBase, x: float, y: float, width: float, height: float, signatureAppearance: IPdfSignatureAppearance) method to add the digital signature to a specific location of the page.
- Save the result document using the PdfDocument.SaveToFile() method.
- Python
from spire.pdf.common import *
from spire.pdf import *

# Create a PdfDocument instance
doc = PdfDocument()
# Load a PDF file
doc.LoadFromFile("Sample.pdf")

# Create a signature maker
signatureMaker = PdfOrdinarySignatureMaker(doc, "gary.pfx", "e-iceblue")

# Configure the signature properties like the signer's name, contact information, location and signature reason
signature = signatureMaker.Signature
signature.Name = "Gary"
signature.ContactInfo = "+86 12345678"
signature.Location = "China"
signature.Reason = "I am the author."

# Create a custom signature appearance
appearance = PdfSignatureAppearance(signature)
# Set label for the signer's name
appearance.NameLabel = "Signer: "
# Set label for the contact information
appearance.ContactInfoLabel = "Phone: "
# Set label for the location
appearance.LocationLabel = "Location: "
# Set label for the signature reason
appearance.ReasonLabel = "Reason: "
# Set signature image
appearance.SignatureImage = PdfImage.FromFile("SigImg.png")
# Set the graphic render/display mode for the signature
appearance.GraphicMode = GraphicMode.SignImageAndSignDetail
# Set the layout for the signature image
appearance.SignImageLayout = SignImageLayout.none

# Get the first page
page = doc.Pages.get_Item(0)

# Add the signature to a specified location of the page
signatureMaker.MakeSignature("Signature by Gary", page, 90.0, 600.0, 260.0, 100.0, appearance)

# Save the signed document
doc.SaveToFile("Signed.pdf")
doc.Close()
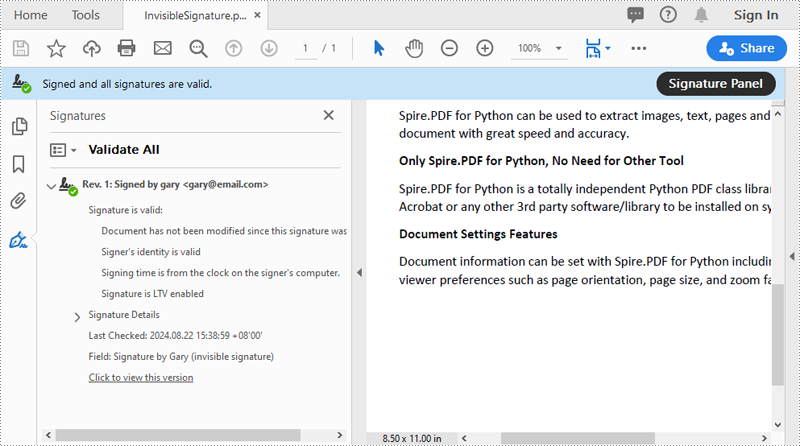
Add an Invisible Digital Signature to PDF in Python
An invisible signature in a PDF is a type of digital signature that provides all the security and authentication benefits of a standard digital signature but does not appear visibly on the document itself. Using the PdfOrdinarySignatureMaker.MakeSignature(sigFieldName: str) method of Spire.PDF for Python, you can add an invisible digital signature to a PDF document. The detailed steps are as follows.
- Create a PdfDocument instance.
- Load a PDF document using PdfDocument.LoadFromFile() method.
- Create a PdfOrdinarySignatureMaker instance and pass the PdfDocument object, certificate (.pfx) file path and password to the class instructor as parameters.
- Add an invisible digital signature to a PDF document using the PdfOrdinarySignatureMaker.MakeSignature(sigFieldName: str) method
- Save the result document using the PdfDocument.SaveToFile() method.
- Python
from spire.pdf.common import *
from spire.pdf import *

# Create a PdfDocument instance
doc = PdfDocument()
# Load a PDF document
doc.LoadFromFile("test2.pdf")

# Create a signature maker
signatureMaker = PdfOrdinarySignatureMaker(doc, "gary.pfx", "e-iceblue")

# Add an invisible signature to the document
signatureMaker.MakeSignature("Signature by Gary")

# Save the signed document
doc.SaveToFile("InvisibleSignature.pdf")
doc.Close()
Remove Digital Signature from PDF in Python
To remove digital signatures from a PDF document, you need to iterate through all form fields in the document, find the form fields that are of PdfSignatureFieldWidget type and then remove them from the document. The detailed steps are as follows.
- Create a PdfDocument instance.
- Load a PDF document using PdfDocument.LoadFromFile() method.
- Get the form field collection of the document using PdfDocument.Form property.
- Iterate through the form fields in the collection from the last to the first.
- Check if the field is a PdfSignatureFieldWidget object.
- If the result is True, remove the field from the document using PdfFormFieldWidgetCollection.FieldsWidget.RemoveAt(index) method.
- Save the result document using the PdfDocument.SaveToFile() method.
- Python
from spire.pdf.common import *
from spire.pdf import *

# Create a PdfDocument instance
doc = PdfDocument()
# Load a PDF document
doc.LoadFromFile("Signed.pdf")

# Get form field collection from the document
pdfForm = doc.Form
formWidget = PdfFormWidget(pdfForm)

# Check if there are any form fields in the collection
if formWidget.FieldsWidget.Count > 0:
    # Loop through all form fields from the last to the first
    for i in range(formWidget.FieldsWidget.Count - 1, -1, -1):
        field = formWidget.FieldsWidget.get_Item(i)
        # Check if the field is a PdfSignatureFieldWidget
        if isinstance(field, PdfSignatureFieldWidget):
            # Remove the field
            formWidget.FieldsWidget.RemoveAt(i)

# Save the document
doc.SaveToFile("RemoveSignature.pdf")
doc.Close()
Apply for a Temporary License
If you'd like to remove the evaluation message from the generated documents, or to get rid of the function limitations, please request a 30-day trial license for yourself.
In Microsoft PowerPoint, animations are not limited to just text; they can also be applied to shapes or other objects to create dynamic and engaging slides. Animations can be used to achieve various effects, such as drawing attention to a specific shape, demonstrating a process, or simply adding a touch of flair to your presentation. For instance, you might want to animate a shape to make it appear, disappear, or move in a particular sequence. Additionally, extracting and reusing animations can save time and ensure consistency across multiple presentations. In this article, we will demonstrate how to add animations to shapes in PowerPoint along with how to extract animation information from slides in PowerPoint in Python using Spire.Presentation for Python.
- Add Animations to Shapes and Text within Shapes in PowerPoint in Python
- Add Exit Animations to Shapes in PowerPoint in Python
- Extract the Animation Information from PowerPoint Slides in Python
Install Spire.Presentation for Python
This scenario requires Spire.Presentation for Python and plum-dispatch v1.7.4. They can be easily installed in your Windows through the following pip command.
pip install Spire.Presentation
If you are unsure how to install, please refer to this tutorial: How to Install Spire.Presentation for Python on Windows
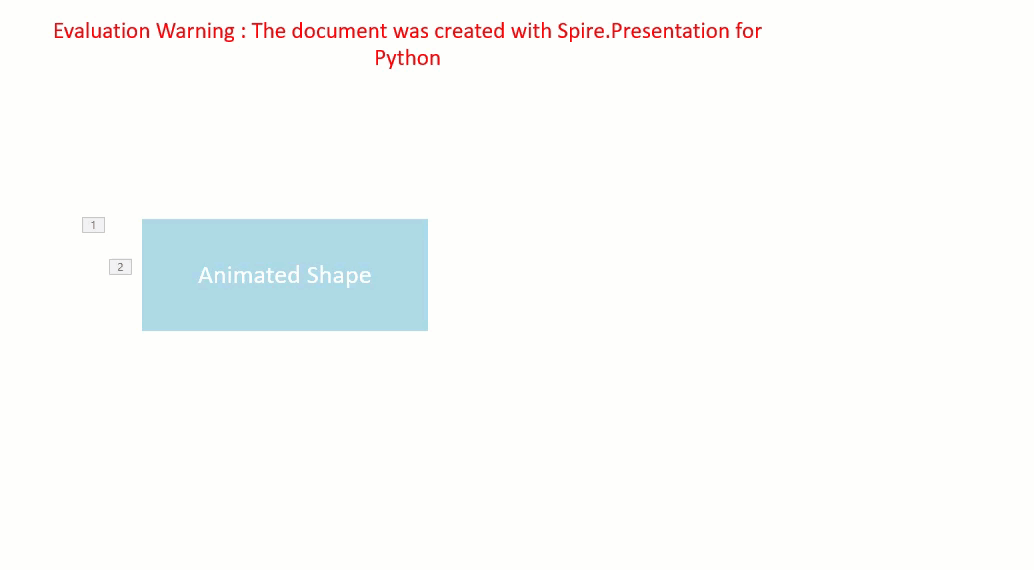
Add Animations to Shapes and Text within Shapes in PowerPoint in Python
You can use the IShape.Slide.Timeline.MainSequence.AddEffect(shape:IShape, animationEffectType:AnimationEffectType) method to add an animation effect to a shape. If you want to apply the animation effect to the text of a specific paragraph(s) within a shape, you can use the AnimationEffect.SetStartEndParagraph(startParaIndex:int, endParaIndex:int) method. The detailed steps are as follows.
- Create an instance of the Presentation class.
- Load a PowerPoint presentation using the Presentation.LoadFromFile() method.
- Access a specific slide using the Presentation.Slides[] property.
- Add a rectangle shape to the slide using the ISlide.Shapes.AppendShape(shapeType:ShapeType, rectangle:RectangleF) method.
- Set the fill type, fill color, and border color for the rectangle.
- Add a text frame to the rectangle using the IShape.AppendTextFrame() method.
- Add an animation effect to the rectangle using IShape.Slide.Timeline.MainSequence.AddEffect(shape:IShape, animationEffectType:AnimationEffectType) method.
- Add another animation effect to the rectangle. Then apply the animation effect to specific paragraph(s) within the rectangle using the AnimationEffect.SetStartEndParagraph(startParaIndex:int, endParaIndex:int) method.
- Save the result presentation using the Presentation.SaveToFile() method.
- Python
from spire.presentation.common import *
from spire.presentation import *

# Create an object of the Presentation class
ppt = Presentation()
# Get the first slide in the presentation
slide = ppt.Slides[0]

# Add a rectangle shape to the slide
shape = slide.Shapes.AppendShape(ShapeType.Rectangle, RectangleF.FromLTRB(100, 150, 300, 230))
# Set an alternative title for the shape (optional)
shape.AlternativeTitle = "Rectangle"

# Set the fill type, fill color and border color for the shape
shape.Fill.FillType = FillFormatType.Solid
shape.Fill.SolidColor.Color = Color.get_LightBlue()
shape.ShapeStyle.LineColor.Color = Color.get_White()

# Add a text frame to the shape and set the text content
shape.AppendTextFrame("Animated Shape")

# Add the 'fade-out swivel' animation effect to the shape
shape.Slide.Timeline.MainSequence.AddEffect(shape, AnimationEffectType.FadedSwivel)

# Add the 'float' animation effect to the shape
animation = shape.Slide.Timeline.MainSequence.AddEffect(shape, AnimationEffectType.Float)
# Set the start and end index of the paragraph(s) to apply the 'float' animation
animation.SetStartEndParagraphs(0, 0)

# Save the presentation to a new file
ppt.SaveToFile("ApplyAnimation.pptx", FileFormat.Pptx2013)
ppt.Dispose()
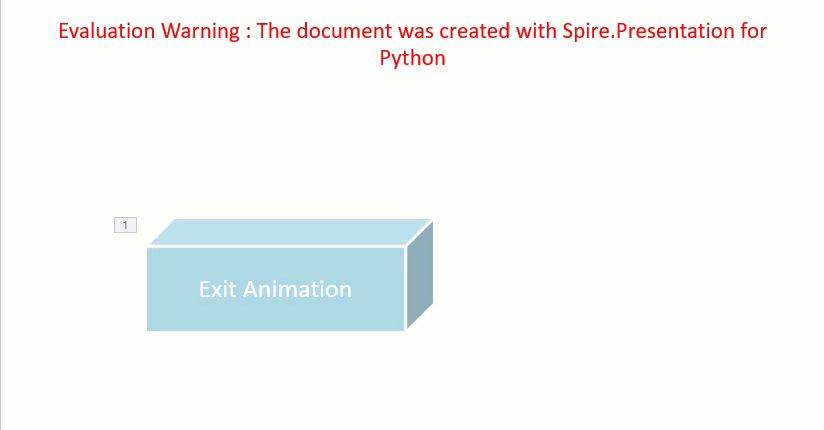
Add Exit Animations to Shapes in PowerPoint in Python
In PowerPoint, animations are categorized into four main types: entrance, emphasis, exit, and motion paths. Some animations, like "fly in" or "fade", can be used as both entrance and exit effects. When using Spire.Presentation to add these animations to shapes in your presentations, these animations are typically set as entrance effects by default. If you want to change the type of the animation to exit, you can use the AnimationEffect.PresetClassType property. The detailed steps are as follows.
- Create an instance of the Presentation class.
- Load a PowerPoint presentation using the Presentation.LoadFromFile() method.
- Access a specific slide using the Presentation.Slides[] property.
- Add a cube shape to the slide using the ISlide.Shapes.AppendShape(shapeType:ShapeType, rectangle:RectangleF) method.
- Set the fill type, fill color, and border color for the cube.
- Add a text frame to the cube using the IShape.AppendTextFrame() method.
- Add an animation effect to the cube using the IShape.Slide.Timeline.MainSequence.AddEffect(shape:IShape, animationEffectType:AnimationEffectType) method.
- Change the animation effect type to exit using the AnimationEffect.PresetClassType property.
- Save the presentation using the Presentation.SaveToFile() method.
- Python
from spire.presentation.common import *
from spire.presentation import *

# Create an object of the Presentation class
ppt = Presentation()
# Get the first slide in the presentation
slide = ppt.Slides[0]

# Add a cube shape to the slide
shape = slide.Shapes.AppendShape(ShapeType.Cube, RectangleF.FromLTRB(100, 150, 300, 230))
# Set an alternative title for the shape (optional)
shape.AlternativeTitle = "Cube"

# Set the fill type, fill color and border color for the shape
shape.Fill.FillType = FillFormatType.Solid
shape.Fill.SolidColor.Color = Color.get_LightBlue()
shape.ShapeStyle.LineColor.Color = Color.get_White()

# Add a text frame to the shape and set the text content
shape.AppendTextFrame("Exit Animation")

# Add a 'random bars' animation effect to the shape
effect = shape.Slide.Timeline.MainSequence.AddEffect(shape, AnimationEffectType.RandomBars)
# Set the animation effect type to exit animation
effect.PresetClassType = TimeNodePresetClassType.Exit

# Save the presentation to a new file
ppt.SaveToFile("ExitAnimation.pptx", FileFormat.Pptx2013)
ppt.Dispose()
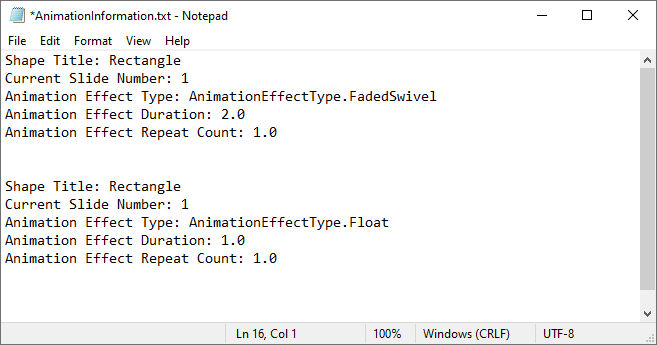
Extract the Animation Information from PowerPoint Slides in Python
To extract animation information from slides in a PowerPoint presentation, you need to iterate through all slides and all animations within each slide, then use the properties of the AnimationEffect class to retrieve the information of the animations. The detailed steps are as follows.
- Create an instance of the Presentation class.
- Load a PowerPoint presentation using the Presentation.LoadFromFile() method.
- Iterate through all slides in the presentation and all animations within each slide.
- Use the AnimationEffect.ShapeTarget.AlternativeTitle property to get the title of the shape affected by the animation.
- Use the ISlide.SlideNumber property to get the number of the current slide.
- Use the AnimationEffect.AnimationEffectType property to get the type of animation effect.
- Use the AnimationEffect.Timing.Duration property to get the duration of the animation effect.
- Use the AnimationEffect.Timing.RepeatCount property to get the number of repetitions of the animation effect.
- Save the retrieved information to a text file.
- Python
from spire.presentation.common import *
from spire.presentation import *

# Create an object of the Presentation class
ppt = Presentation()
# Load a PowerPoint presentation
ppt.LoadFromFile("ApplyAnimation.pptx")

# Create a list to store the extracted animation information
sb = []

# Iterate through all slides in the presentation
for slide in ppt.Slides:
    # Iterate through all animation effects in the slide
    for effect in slide.Timeline.MainSequence:
        # Get the alternative title of the shape affected by the animation
        shapeTitle = effect.ShapeTarget.AlternativeTitle
        sb.append("Shape Title: " + shapeTitle)
        # Get the number of the current slide
        slideNumber = slide.SlideNumber
        sb.append("Current Slide Number: " + str(slideNumber))
        # Get the type of the animation effect
        animationEffectType = effect.AnimationEffectType
        sb.append("Animation Effect Type: " + str(animationEffectType))
        # Get the duration of the animation effect
        duration = effect.Timing.Duration
        sb.append("Animation Effect Duration: " + str(duration))
        # Get the number of repetitions of the animation effect
        count = effect.Timing.RepeatCount
        sb.append("Animation Effect Repeat Count: " + str(count))
        sb.append("\n")

# Save the extracted animation information to a text file
with open("AnimationInformation.txt", "w") as fp:
    for s in sb:
        fp.write(s + "\n")

ppt.Dispose()
Apply for a Temporary License
If you'd like to remove the evaluation message from the generated documents, or to get rid of the function limitations, please request a 30-day trial license for yourself.
Adding annotations to PDFs is a common practice for adding comments, highlighting text, drawing shapes, and more. This feature is beneficial for collaborative document review, education, and professional presentations. It allows users to mark up documents digitally, enhancing communication and productivity.
In this article, you will learn how to add various types of annotations to a PDF document in Python using Spire.PDF for Python.
- Add a Text Markup Annotation to PDF
- Add a Free Text Annotation to PDF
- Add a Popup Annotation to PDF
- Add a Stamp Annotation to PDF
- Add a Shape Annotation to PDF
- Add a Web Link Annotation to PDF
- Add a File Link Annotation to PDF
- Add a Document Link Annotation to PDF
Install Spire.PDF for Python
This scenario requires Spire.PDF for Python and plum-dispatch v1.7.4. They can be easily installed in your Windows through the following pip command.
pip install Spire.PDF
If you are unsure how to install, please refer to this tutorial: How to Install Spire.PDF for Python on Windows
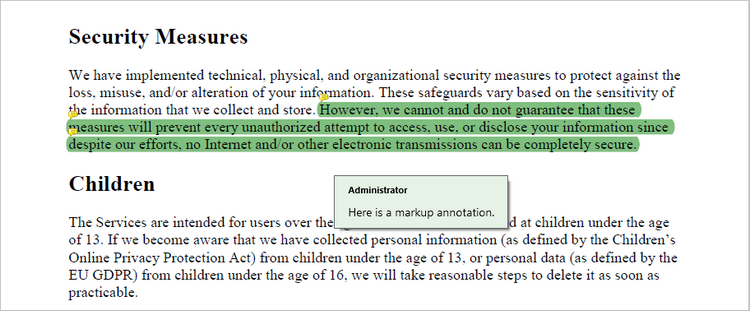
Add a Text Markup Annotation to PDF in Python
Text markup in PDF refers to the ability to emphasize important text by selecting and highlighting it. To add a text markup annotation to a PDF, you first need to locate the specific text within the document with the help of the PdfTextFinder class. Once the text is identified, you can create a PdfTextMarkupAnnotation object and apply it to the document.
The following are the steps to add a text markup annotation to PDF using Python:
- Create a PdfDocument object.
- Load a PDF file from the specified location.
- Get a page from the document.
- Find a specific piece of text within the page using PdfTextFinder class.
- Create a PdfTextMarkupAnnotation object based on the text found.
- Add the annotation to the page using PdfPageBase.AnnotationsWidget.Add() method.
- Save the modified document to a different PDF file.
- Python
from spire.pdf.common import *
from spire.pdf import *

# Create a PdfDocument object
doc = PdfDocument()

# Load a PDF file
doc.LoadFromFile("C:\\Users\\Administrator\\Desktop\\Input.pdf")

# Get a specific page
page = doc.Pages.get_Item(0)

# Create a PdfTextFinder object based on the page
finder = PdfTextFinder(page)

# Set the find options
finder.Options.Parameter = TextFindParameter.WholeWord
finder.Options.Parameter = TextFindParameter.IgnoreCase

# Find the instances of the specified text
fragments = finder.Find("However, we cannot and do not guarantee that these measures will prevent "+
                        "every unauthorized attempt to access, use, or disclose your information since "+
                         "despite our efforts, no Internet and/or other electronic transmissions can be completely secure.");

# Get the first instance
textFragment = fragments[0]

# Specify annotation text
text = "Here is a markup annotation."

# Iterate through the text bounds
for i in range(len(textFragment.Bounds)):

    # Get a specific bound
    rect = textFragment.Bounds[i]

    # Create a text markup annotation
    annotation = PdfTextMarkupAnnotation("Administrator", text, rect)

    # Set the markup color
    annotation.TextMarkupColor = PdfRGBColor(Color.get_Green())

    # Add the annotation to the collection of the annotations
    page.AnnotationsWidget.Add(annotation)

# Save result to file
doc.SaveToFile("output/MarkupAnnotation.pdf")

# Dispose resources
doc.Dispose()
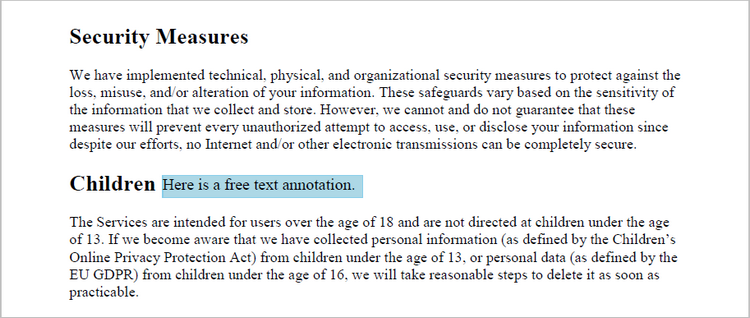
Add a Free Text Annotation to PDF in Python
Free text annotations allow adding freeform text comments directly on a PDF. To add a free text annotation at a specific location, you can use the PdfTextFinder class to obtain the coordinate information of the searched text, then create a PdfFreeTextAnnotation object based on that coordinates and add it to the document.
The following are the steps to add a free text annotation to PDF using Python:
- Create a PdfDocument object.
- Load a PDF file from the specified location.
- Get a page from the document.
- Find a specific piece of text within the page using PdfTextFinder class.
- Create a PdfFreeTextAnnotation object based on the coordinate information of the text found.
- Set the annotation content using PdfFreeTextAnnotation.Text property.
- Add the annotation to the page using PdfPageBase.AnnotationsWidget.Add() method.
- Save the modified document to a different PDF file.
- Python
from spire.pdf.common import *
from spire.pdf import *

# Create a PdfDocument object
doc = PdfDocument()

# Load a PDF file
doc.LoadFromFile("C:\\Users\\Administrator\\Desktop\\Input.pdf")

# Get a specific page
page = doc.Pages.get_Item(0)

# Create a PdfTextFinder object based on the page
finder = PdfTextFinder(page)

# Set the find options
finder.Options.Parameter = TextFindParameter.WholeWord
finder.Options.Parameter = TextFindParameter.IgnoreCase

# Find the instances of the specified text
fragments = finder.Find("Children");

# Get the first instance
textFragment = fragments[0]

# Get the text bound
rect = textFragment.Bounds[0]

# Get the coordinates to add annotation
right = bound.Right
top = bound.Top

# Create a free text annotation
rectangle = RectangleF(right + 5, top + 2, 160.0, 18.0)
textAnnotation = PdfFreeTextAnnotation(rectangle)

# Set the content of the annotation
textAnnotation.Text = "Here is a free text annotation."

# Set other properties of annotation
font = PdfFont(PdfFontFamily.TimesRoman, 13.0, PdfFontStyle.Regular)
border = PdfAnnotationBorder(1.0)
textAnnotation.Font = font
textAnnotation.Border = border
textAnnotation.BorderColor = PdfRGBColor(Color.get_SkyBlue())
textAnnotation.Color = PdfRGBColor(Color.get_LightBlue())
textAnnotation.Opacity = 1.0

# Add the annotation to the collection of the annotations
page.AnnotationsWidget.Add(textAnnotation)

# Save result to file
doc.SaveToFile("output/FreeTextAnnotation.pdf")

# Dispose resources
doc.Dispose()
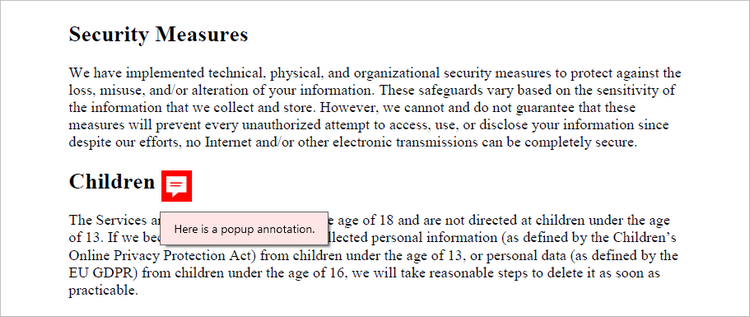
Add a Popup Annotation to PDF in Python
A popup annotation allows for the display of additional information or content in a pop-up window. To get a specific position to add a popup annotation, you can still use the PdfTextFinder class. Once the coordinate information is obtained, you can create a PdfPopupAnnotation object and add it to the document.
The steps to add a popup annotation to PDF using Python are as follows:
- Create a PdfDocument object.
- Load a PDF file from the specified location.
- Get a page from the document.
- Find a specific piece of text within the page using PdfTextFinder class.
- Create a PdfPopupAnnotation object based on the coordinate information of the text found.
- Set the annotation content using PdfPopupAnnotation.Text property.
- Add the annotation to the page using PdfPageBase.AnnotationsWidget.Add() method.
- Save the modified document to a different PDF file.
- Python
from spire.pdf.common import *
from spire.pdf import *

# Create a PdfDocument object
doc = PdfDocument()

# Load a PDF file
doc.LoadFromFile("C:\\Users\\Administrator\\Desktop\\Input.pdf")

# Get a specific page
page = doc.Pages.get_Item(0)

# Create a PdfTextFinder object based on the page
finder = PdfTextFinder(page)

# Set the find options
finder.Options.Parameter = TextFindParameter.WholeWord
finder.Options.Parameter = TextFindParameter.IgnoreCase

# Find the instances of the specified text
fragments = finder.Find("Children");

# Get the first instance
textFragment = fragments[0]

# Get the text bound
bound = textFragment.Bounds[0]

# Get the coordinates to add annotation
right = bound.Right
top = bound.Top

# Create a free text annotation
rectangle = RectangleF(right + 5, top, 30.0, 30.0)
popupAnnotation = PdfPopupAnnotation(rectangle)

# Set the content of the annotation
popupAnnotation.Text = "Here is a popup annotation."

# Set the icon and color of the annotation
popupAnnotation.Icon = PdfPopupIcon.Comment
popupAnnotation.Color = PdfRGBColor(Color.get_Red())

# Add the annotation to the collection of the annotations
page.AnnotationsWidget.Add(popupAnnotation)

# Save result to file
doc.SaveToFile("output/PopupAnnotation.pdf")

# Dispose resources
doc.Dispose()
Add a Stamp Annotation to PDF in Python
Stamp annotations in PDF documents are a type of annotation that allow users to add custom "stamps" or symbols to a PDF file. To define the appearance of a stamp annotation, use the PdfTemplate class. Then, create a PdfRubberStampAnnotation object and apply the previously defined template as its appearance. Finally, add the annotation to the PDF document.
The steps to add a stamp annotation to PDF using Python are as follows:
- Create a PdfDocument object.
- Load a PDF file from the specified location.
- Get a page from the document.
- Create a PdfTemplate object and draw an image on the template.
- Create a PdfRubberStampAnnotation object and apply the template as its appearance.
- Add the annotation to the page using PdfPageBase.AnnotationsWidget.Add() method.
- Save the modified document to a different PDF file.
- Python
from spire.pdf.common import *
from spire.pdf import *

# Create a PdfDocument object
doc = PdfDocument()

# Load a PDF document
doc.LoadFromFile("C:\\Users\\Administrator\\Desktop\\Input.pdf")

# Get a specific page
page = doc.Pages.get_Item(0)

# Load an image file
image = PdfImage.FromFile("C:\\Users\\Administrator\\Desktop\\confidential.png")

# Get the width and height of the image
width = (float)(image.Width)
height = (float)(image.Height)

# Create a PdfTemplate object based on the size of the image
template = PdfTemplate(width, height, True)

# Draw image on the template
template.Graphics.DrawImage(image, 0.0, 0.0, width, height)

# Create a rubber stamp annotation, specifying its location and position
rect = RectangleF((float) (page.ActualSize.Width/2 - width/2), 90.0, width, height)
stamp = PdfRubberStampAnnotation(rect)

# Create a PdfAppearance object
pdfAppearance = PdfAppearance(stamp)

# Set the template as the normal state of the appearance
pdfAppearance.Normal = template

# Apply the appearance to the stamp
stamp.Appearance = pdfAppearance

# Add the stamp annotation to PDF
page.AnnotationsWidget.Add(stamp)

# Save the file
doc.SaveToFile("output/StampAnnotation.pdf")

# Dispose resources
doc.Dispose()
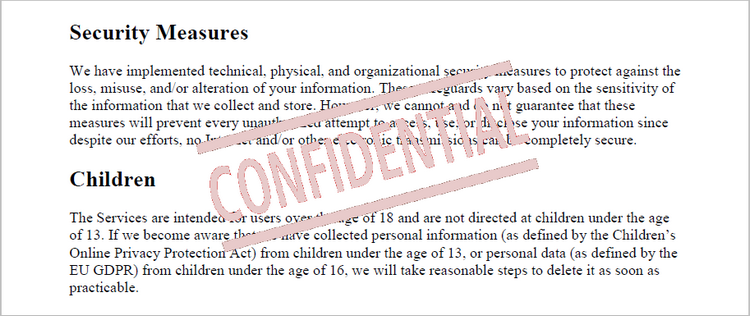
Add a Shape Annotation to PDF in Python
Shape annotations in PDF documents are a type of annotation that allow users to add various geometric shapes to the PDF file. Spire.PDF for Python offers the classes such as PdfPolyLineAnnotation, PdfLineAnnotation, and PdfPolygonAnnotation, allowing developers to add different types of shape annotations to PDF.
The steps to add a shape annotation to PDF using Python are as follows:
- Create a PdfDocument object.
- Load a PDF file from the specified location.
- Get a page from the document.
- Find a specific piece of text within the page using PdfTextFinder class.
- Create a PdfPolyLineAnnotation object based on the coordinate information of the text found.
- Set the annotation content using PdfPolyLineAnnotation.Text property.
- Add the annotation to the page using PdfPageBase.AnnotationsWidget.Add() method.
- Save the modified document to a different PDF file.
- Python
from spire.pdf.common import *
from spire.pdf import *

# Create a PdfDocument object
doc = PdfDocument()

# Load a PDF file
doc.LoadFromFile("C:\\Users\\Administrator\\Desktop\\Input.pdf")

# Get a specific page
page = doc.Pages.get_Item(0)

# Create a PdfTextFinder object based on the page
finder = PdfTextFinder(page)

# Set the find options
finder.Options.Parameter = TextFindParameter.WholeWord
finder.Options.Parameter = TextFindParameter.IgnoreCase

# Find the instances of the specified text
fragments = finder.Find("Children");

# Get the first instance
textFragment = fragments[0]

# Get the text bound
bound = textFragment.Bounds[0]

# Get the coordinates to add annotation
left = bound.Left
top = bound.Top
right = bound.Right
bottom = bound.Bottom

# Create a shape annotation
polyLineAnnotation = PdfPolyLineAnnotation(page, [PointF(left, top), PointF(right, top), PointF(right - 5, bottom), PointF(left - 5, bottom), PointF(left, top)])

# Set the annotation text
polyLineAnnotation.Text = "Here is a shape annotation."

# Add the annotation to the collection of the annotations
page.AnnotationsWidget.Add(polyLineAnnotation)

# Save result to file
doc.SaveToFile("output/ShapeAnnotation.pdf")

# Dispose resources
doc.Dispose()
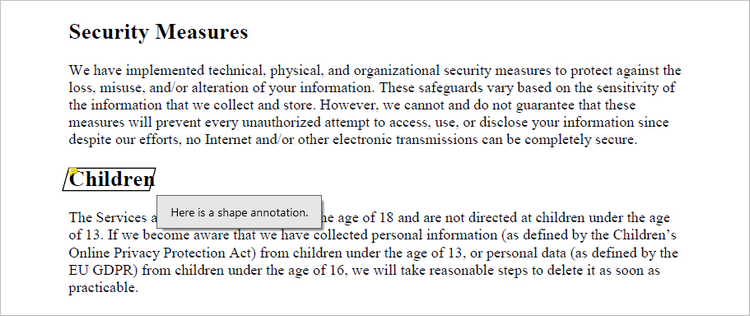
Add a Web Link Annotation to PDF in Python
Web link annotations in PDF documents enable users to embed clickable links to webpages, providing easy access to additional resources or related information online. You can use the PdfTextFinder class to find the specified text in a PDF document, and then create a PdfUriAnnotation object based on that text.
The following are the steps to add a web link annotation to PDF using Python:
- Create a PdfDocument object.
- Load a PDF file from the specified location.
- Get a page from the document.
- Find a specific piece of text within the page using PdfTextFinder class.
- Create a PdfUriAnnotation object based on the bound of the text.
- Add the annotation to the page using PdfPageBase.AnnotationsWidget.Add() method.
- Save the modified document to a different PDF file.
- Python
from spire.pdf.common import *
from spire.pdf import *

# Create a PdfDocument object
doc = PdfDocument()

# Load a PDF file
doc.LoadFromFile("C:\\Users\\Administrator\\Desktop\\Input.pdf")

# Get a specific page
page = doc.Pages.get_Item(0)

# Create a PdfTextFinder object based on the page
finder = PdfTextFinder(page)

# Set the find options
finder.Options.Parameter = TextFindParameter.WholeWord
finder.Options.Parameter = TextFindParameter.IgnoreCase

# Find the instances of the specified text
fragments = finder.Find("Children");

# Get the first instance
textFragment = fragments[0]

# Get the text bound
bound = textFragment.Bounds[0]

# Create a Url annotation
urlAnnotation = PdfUriAnnotation(bound, "https://www.e-iceblue.com/");

# Add the annotation to the collection of the annotations
page.AnnotationsWidget.Add(urlAnnotation)

# Save result to file
doc.SaveToFile("output/WebLinkAnnotation.pdf")

# Dispose resources
doc.Dispose()
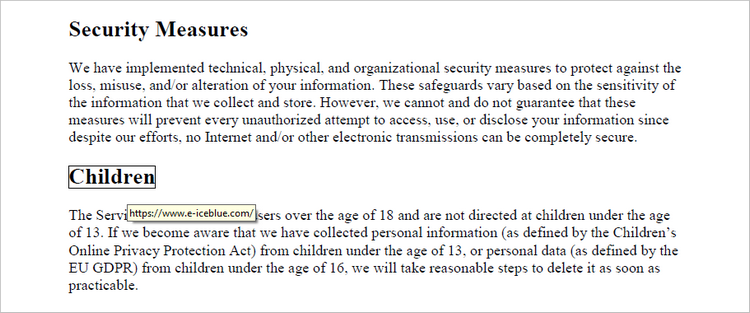
Add a File Link Annotation to PDF in Python
A file link annotation in a PDF document is a type of annotation that allows users to create a clickable link to an external file, such as another PDF, image, or document. Still, you can use the PdfTextFinder class to find the specified text in a PDF document, and then create a PdfFileLinkAnnotation object based on that text.
The following are the steps to add a file link annotation to PDF using Python:
- Create a PdfDocument object.
- Load a PDF file from the specified location.
- Get a page from the document.
- Find a specific piece of text within the page using PdfTextFinder class.
- Create a PdfFileLinkAnnotation object based on the bound of the text.
- Add the annotation to the page using PdfPageBase.AnnotationsWidget.Add() method.
- Save the modified document to a different PDF file.
- Python
from spire.pdf.common import *
from spire.pdf import *

# Create a PdfDocument object
doc = PdfDocument()

# Load a PDF file
doc.LoadFromFile("C:\\Users\\Administrator\\Desktop\\Input.pdf")

# Get a specific page
page = doc.Pages.get_Item(0)

# Create a PdfTextFinder object based on the page
finder = PdfTextFinder(page)

# Set the find options
finder.Options.Parameter = TextFindParameter.WholeWord
finder.Options.Parameter = TextFindParameter.IgnoreCase

# Find the instances of the specified text
fragments = finder.Find("Children");

# Get the first instance
textFragment = fragments[0]

# Get the text bound
bound = textFragment.Bounds[0]

# Create a file link annotation
fileLinkAnnotation = PdfFileLinkAnnotation(bound, "C:\\Users\\Administrator\\Desktop\\Report.docx")

# Add the annotation to the collection of the annotations
page.AnnotationsWidget.Add(fileLinkAnnotation)

# Save result to file
doc.SaveToFile("output/FileLinkAnnotation.pdf")

# Dispose resources
doc.Dispose()
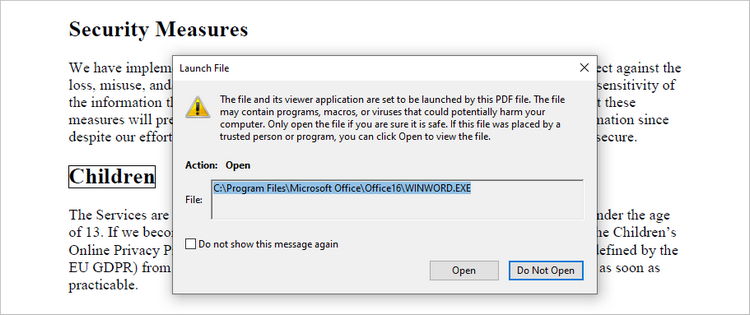
Add a Document Link Annotation to PDF in Python
A document link annotation in a PDF document is a type of annotation that creates a clickable link to a specific location within the same PDF file. To create a document link annotation, you can first use the PdfTextFinder class to identify the target text in the PDF document. Then, a PdfDocumentLinkAnnotation object is instantiated, and its destination property is configured to redirect the user to the specified location in the PDF.
The steps to add a document link annotation to PDF using Python are as follows:
- Create a PdfDocument object.
- Load a PDF file from the specified location.
- Get a page from the document.
- Find a specific piece of text within the page using PdfTextFinder class.
- Create a PdfDocumentLinkAnnotation object based on the bound of the text.
- Set the destination of the annotation using PdfDocumentLinkAnnotation.Destination property.
- Add the annotation to the page using PdfPageBase.AnnotationsWidget.Add() method.
- Save the modified document to a different PDF file.
- Python
from spire.pdf.common import *
from spire.pdf import *

# Create a PdfDocument object
doc = PdfDocument()

# Load a PDF file
doc.LoadFromFile("C:\\Users\\Administrator\\Desktop\\Input.pdf")

# Get a specific page
page = doc.Pages.get_Item(0)

# Create a PdfTextFinder object based on the page
finder = PdfTextFinder(page)

# Set the find options
finder.Options.Parameter = TextFindParameter.WholeWord
finder.Options.Parameter = TextFindParameter.IgnoreCase

# Find the instances of the specified text
fragments = finder.Find("Children");

# Get the first instance
textFragment = fragments[0]

# Get the text bound
bound = textFragment.Bounds[0]

# Create a document link annotation
documentLinkAnnotation = PdfDocumentLinkAnnotation(bound)

# Set the destination of the annotation
documentLinkAnnotation.Destination = PdfDestination(doc.Pages[1]);

# Add the annotation to the collection of the annotations
page.AnnotationsWidget.Add(documentLinkAnnotation)

# Save result to file
doc.SaveToFile("output/DocumentLinkAnnotation.pdf")

# Dispose resources
doc.Dispose()
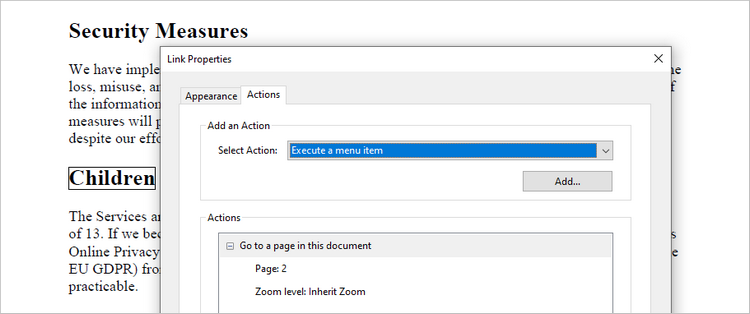
Apply for a Temporary License
If you'd like to remove the evaluation message from the generated documents, or to get rid of the function limitations, please request a 30-day trial license for yourself.
