
Python (365)
CSV (Comma-Separated Values) is one of the most widely used formats for data exchange between applications, databases, and programming languages. For Python developers, the need to convert Python lists to CSV format arises constantly - whether exporting application data, generating reports, or preparing datasets for analysis. Spire.XLS for Python streamlines this critical process with an intuitive, reliable approach that eliminates common conversion pitfalls.
This comprehensive guide will explore how to write lists to CSV in Python. You'll discover how to handle everything from simple one-dimensional lists to complex nested dictionaries, while maintaining data integrity and achieving professional-grade output.
Table of Contents:
- Getting Started with Spire.XLS for Python
- Convert 1D List to CSV in Python
- Convert 2D List to CSV in Python
- Convert List of Dictionaries to CSV in Python
- Advanced: Custom Delimiters and Encoding
- Conclusion
- FAQs
Getting Started with Spire.XLS for Python
Why Use Spire.XLS for List-to-CSV Conversion?
While Python's built-in csv module is excellent for simple CSV operations, Spire.XLS offers additional benefits:
- Handles various data types seamlessly
- Lets you customize CSV output (e.g., semicolon delimiters for European locales).
- Can save in multiple file formats (CSV, XLSX, XLS, etc.)
- Works well with both simple and complex data structures
Install via pip
The Spire.XLS for Python lets you create, modify, and save Excel/CSV files programmatically. To use it, run this command in your terminal or command prompt:
pip install Spire.XLS
This command downloads and installs the latest version, enabling you to start coding immediately.
Convert 1D List to CSV in Python
A 1D (one-dimensional) list is a simple sequence of values (e.g., ["Apple", "Banana", "Cherry"]). The following are the steps to write these values to a single row or column in a CSV.
Step 1: Import Spire.XLS Modules
First, import the necessary classes from Spire.XLS:
from spire.xls import *
from spire.xls.common import *
Step 2: Create a Workbook and Worksheet
Spire.XLS uses workbooks and worksheets to organize data. We’ll create a new workbook and add a new worksheet:
# Create a workbook instance
workbook = Workbook()

# Remove the default worksheet and add a new one
workbook.Worksheets.Clear()
worksheet = workbook.Worksheets.Add()
Step 3: Write 1D List Data to the Worksheet
Choose to write the list to a single row (horizontal) or a single column (vertical).
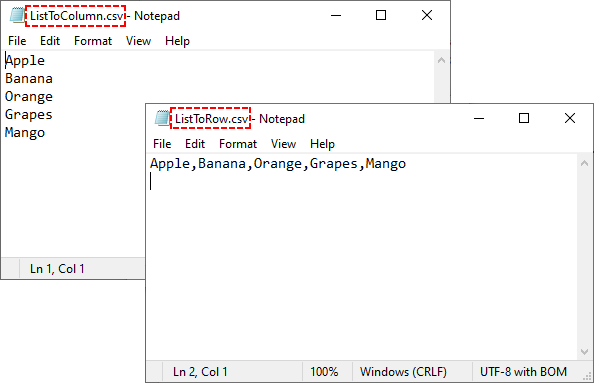
Example 1: Write 1D List to a Single Row
# Sample 1D list
data_list = ["Apple", "Banana", "Orange", "Grapes", "Mango"]

# Write list to row 1
for i, item in enumerate(data_list):
    worksheet.Range[1, i+1].Value = item
Example 2: Write 1D List to a Single Column
# Sample 1D list
data_list = ["Apple", "Banana", "Orange", "Grapes", "Mango"]

# Write list to column 1
for i, item in enumerate(data_list):
    worksheet.Range[i + 1, 1].Value = item
Step 4: Save the Worksheet as CSV
Use SaveToFile() to export the workbook to a CSV file. Specify FileFormat.CSV to ensure proper formatting:
# Save as CSV file
workbook.SaveToFile("ListToCSV.csv", FileFormat.CSV)

# Close the workbook to free resources
workbook.Dispose()
Output:
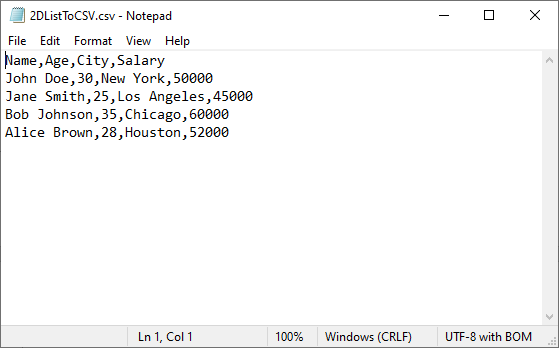
Convert 2D List to CSV in Python
A 2D (two-dimensional) list is a list of lists that represents tabular data. More commonly, you'll work with this type of list, where each inner list represents a row in the CSV file.
Python Code for 2D List to CSV:
from spire.xls import *
from spire.xls.common import *

# Create a workbook instance
workbook = Workbook()

# Remove the default worksheet and add a new one
workbook.Worksheets.Clear()
worksheet = workbook.Worksheets.Add()

# Sample 2D list (headers + data)
data = [
    ["Name", "Age", "City", "Salary"],
    ["John Doe", 30, "New York", 50000],
    ["Jane Smith", 25, "Los Angeles", 45000],
    ["Bob Johnson", 35, "Chicago", 60000],
    ["Alice Brown", 28, "Houston", 52000]
]

# Write 2D list to worksheet
for row_index, row_data in enumerate(data):
    for col_index, cell_data in enumerate(row_data):
        worksheet.Range[row_index + 1, col_index + 1].Value = str(cell_data)

# Save as a CSV file
workbook.SaveToFile("2DListToCSV.csv", FileFormat.CSV)
workbook.Dispose()
Key points:
- Ideal for structured tabular data with headers
- Nested loops handle both rows and columns
- Converting all values to strings ensures compatibility
Output:
The generated CSV can be converted to PDF for secure presentation, or converted to JSON for web/API data exchange.
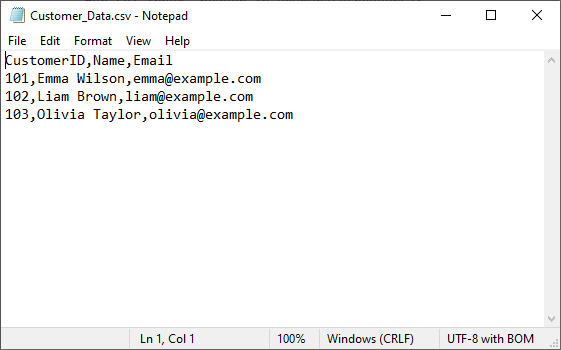
Convert List of Dictionaries to CSV in Python
Lists of dictionaries are ideal when data has named fields (e.g., [{"Name": "Alice", "Age": 30}, {"Name": "Bob", "Age": 25}]). The dictionary keys become CSV headers, and values become rows.
Python Code for List of Dictionaries to CSV
from spire.xls import *
from spire.xls.common import *

# Create a workbook instance
workbook = Workbook()

# Remove the default worksheet and add a new one
workbook.Worksheets.Clear()
worksheet = workbook.Worksheets.Add()

# Sample 2D list (headers + data)
customer_list = [
    {"CustomerID": 101, "Name": "Emma Wilson", "Email": "emma@example.com"},
    {"CustomerID": 102, "Name": "Liam Brown", "Email": "liam@example.com"},
    {"CustomerID": 103, "Name": "Olivia Taylor", "Email": "olivia@example.com"}
]

# Extract headers (dictionary keys) and write to row 1
if customer_list:  # Ensure the list is not empty
    headers = list(customer_list[0].keys())
    # Write headers
    for col_index, header in enumerate(headers):
        worksheet.Range[1, col_index + 1].Value = str(header)

    # Write dictionary values to rows 2 onwards
    for row_index, record in enumerate(customer_list):
        for col_index, header in enumerate(headers):
            # Safely get value, use empty string if key doesn't exist
            value = record.get(header, "")
            worksheet.Range[row_index + 2, col_index + 1].Value = str(value)

# Save as CSV file
workbook.SaveToFile("Customer_Data.csv", FileFormat.CSV)
workbook.Dispose()
Key points:
- Extracts headers from the first dictionary's keys
- Uses .get() method to safely handle missing keys
- Maintains column order based on the header row
Output:
Advanced: Custom Delimiters and Encoding
One of the biggest advantages of using Spire.XLS for Python is its flexibility in saving CSV files with custom delimiters and encodings. This allows you to tailor your CSV output for different regions, applications, and data requirements.
To specify the delimiters and encoding, simply change the corresponding parameter in the SaveToFile() method of the Worksheet class. Example:
# Save with different delimiters and encodings
worksheet.SaveToFile("semicolon_delimited.csv", ";", Encoding.get_UTF8())
worksheet.SaveToFile("tab_delimited.csv", "\t", Encoding.get_UTF8())
worksheet.SaveToFile("unicode_encoded.csv", ",", Encoding.get_Unicode())
Conclusion
Converting Python lists to CSV is straightforward with the right approach. Whether you're working with simple 1D lists, structured 2D arrays, or more complex lists of dictionaries, Spire.XLS provides a robust solution. By choosing the appropriate method for your data structure, you can ensure efficient and accurate CSV generation in any application.
For more advanced features and detailed documentation, you can visit the official Spire.XLS for Python documentation.
Frequently Asked Questions (FAQs)
Q1: What are the best practices for list to CSV conversion?
- Validate input data before processing
- Handle exceptions with try-catch blocks
- Test with sample data before processing large datasets
- Clean up resources using Dispose()
Q2: Can I export multiple lists into separate CSV files in one go?
Yes. Loop through your lists and save each as a separate CSV:
lists = {
    "fruits": ["Apple", "Banana", "Cherry"],
    "scores": [85, 92, 78]
}

for name, data in lists.items():
    wb = Workbook()
    wb.Worksheets.Clear()
    ws = wb.Worksheets.Add(name)
    for i, val in enumerate(data):
        ws.Range[i + 1, 1].Value = str(val)
    wb.SaveToFile(f"{name}.csv", FileFormat.CSV)
    wb.Dispose()
Q3: How to format numbers (e.g., currency, decimals) in CSV?
CSV stores numbers as plain text, so formatting must be applied before saving:
ws.Range["A1:A10"].NumberFormat = "$#,##0.00"
This ensures numbers appear as $1,234.56 in the CSV. For more number formatting options, refer to: Set the Number Format in Python
Q4: Does Spire.XLS for Python work on all operating systems?
Yes! Spire.XLS for Python is cross-platform and supports Windows, macOS, and Linux systems.
When it comes to working with web content and documents, the ability to parse HTML in Python is an essential skill for developers across various domains. HTML parsing involves extracting meaningful information from HTML documents, manipulating content, and processing web data efficiently. Whether you're working on web scraping projects, data extraction tasks, content analysis, or document processing, mastering HTML parsing techniques in Python can significantly enhance your productivity and capabilities.
In this guide, we'll explore how to effectively read HTML in Python using Spire.Doc for Python. You'll learn practical techniques for processing HTML content from strings, local files, and URLs, and implementing best practices for HTML parsing in your projects.
- Why Parse HTML in Python?
- Getting Started: Install HTML Parser in Python
- How Spire.Doc Parses HTML: Core Concepts
- Best Practices for Effective HTML Parsing
- Conclusion
Why Parse HTML in Python?
HTML (HyperText Markup Language) is the backbone of the web, used to structure and present content on websites. Parsing HTML enables you to:
- Extract specific data (text, images, tables, hyperlinks) from web pages or local files.
- Analyze content structure for trends, keywords, or patterns.
- Automate data collection for research, reporting, or content management.
- Clean and process messy HTML into structured data.
While libraries like BeautifulSoup excel at lightweight parsing, Spire.Doc for Python shines when you need to integrate HTML parsing with document creation or conversion. It offers a robust framework to parse and interact with HTML content as a structured document object model (DOM).
Getting Started: Install HTML Parser in Python
Before diving into parsing, you’ll need to install Spire.Doc for Python. The library is available via PyPI, making installation straightforward:
pip install Spire.Doc
This command installs the latest version of the library, along with its dependencies. Once installed, you’re ready to start parsing HTML.
How Spire.Doc Parses HTML: Core Concepts
At its core, Spire.Doc parses HTML by translating HTML’s tag-based structure into a hierarchical document model. This model is composed of objects that represent sections, paragraphs, and other elements, mirroring the original HTML’s organization. Let’s explore how this works in practice.
1. Parsing HTML Strings in Python
If you have a small HTML snippet (e.g., from an API response or user input), parse it directly from a string. This is great for testing or working with short, static HTML.
from spire.doc import *
from spire.doc.common import *
# Define HTML content as a string
html_string = """
<html>
<head>
<title>Sample HTML</title>
</head>
<body>
<h1>Main Heading</h1>
<p>This is a paragraph with <strong>bold text</strong>.</p>
<div>
<p>A nested paragraph inside a div.</p>
</div>
<ul>
<li>List item 1</li>
<li>List item 2</li>
<li>List item 3</li>
</ul>
</body>
</html>
"""
# Initialize a new Document object
doc = Document()
# Add a section and paragraph to the document
section = doc.AddSection()
paragraph = section.AddParagraph()
# Load HTML content from the string
paragraph.AppendHTML(html_string)
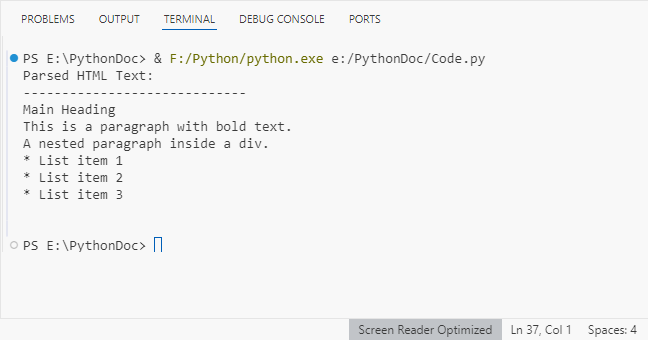
print("Parsed HTML Text:")
print("-----------------------------")
# Extract text content from the parsed HTML
parsed_text = doc.GetText()
# Print the result
print(parsed_text)
# Close the document
doc.Close()
How It Works:
- HTML String: We define a sample HTML snippet with common elements (headings, paragraphs, lists).
- Document Setup: Spire.Doc uses a Word-like structure (sections → paragraphs) to organize parsed HTML.
- Parse HTML:
AppendHTML()converts the string into structured Word elements (e.g.,<h1>becomes a "Heading 1" style,<ul>becomes a list). - Extract Text:
GetText()pulls clean, plain text from the parsed document (no HTML tags).
Output:
Spire.Doc supports exporting parsed HTML content to multiple formats such as TXT, Word via the SaveToFile() method.
2. Parsing HTML Files in Python
For local HTML files, Spire.Doc can load and parse them with a single method. This is useful for offline content (e.g., downloaded web pages, static reports).
from spire.doc import *
from spire.doc.common import *
# Define the path to your local HTML file
html_file_path = "example.html"
# Create a Document instance
doc = Document()
# Load and parse the HTML file
doc.LoadFromFile(html_file_path, FileFormat.Html)
# Analyze document structure
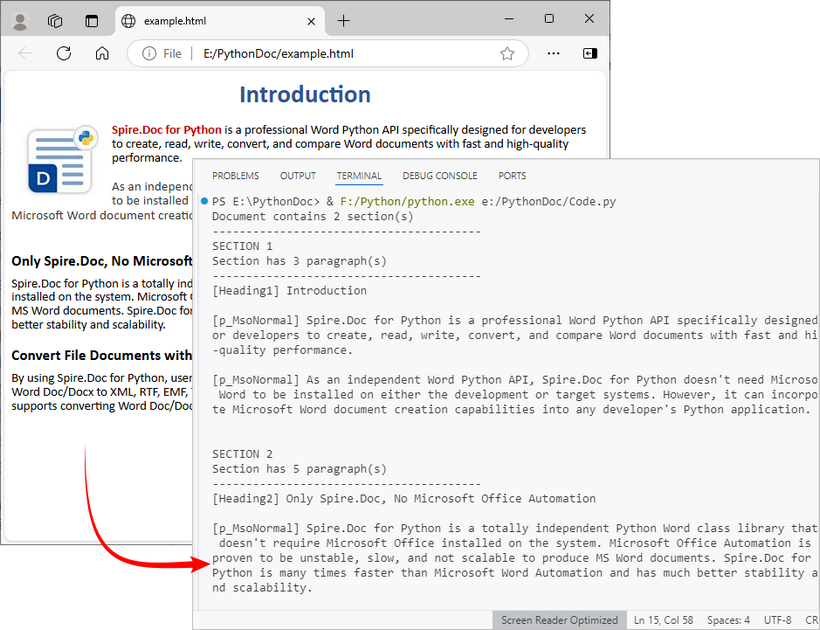
print(f"Document contains {doc.Sections.Count} section(s)")
print("-"*40)
# Process each section
for section_idx in range(doc.Sections.Count):
section = doc.Sections.get_Item(section_idx)
print(f"SECTION {section_idx + 1}")
print(f"Section has {section.Body.Paragraphs.Count} paragraph(s)")
print("-"*40)
# Traverse through paragraphs in the current section
for para_idx in range(section.Paragraphs.Count):
para = section.Paragraphs.get_Item(para_idx)
# Get paragraph style name and text content
style_name = para.StyleName
para_text = para.Text
# Print paragraph information if content exists
if para_text.strip():
print(f"[{style_name}] {para_text}\n")
# Add spacing between sections
print()
# Close the document
doc.Close()
Key Features:
- Load Local Files:
LoadFromFile()reads the HTML file and auto-parses it into a Word structure. - Structure Analysis: Check the number of sections/paragraphs and their styles (critical for auditing content).
- Style Filtering: Identify headings (e.g., "Heading 1") or lists (e.g., "List Paragraph") to organize content.
Output:
After loading the HTML file into the Document object, you can use Spire.Doc to extract specific elements like tables, hyperlinks from HTML.
3. Parsing a URL in Python
To parse HTML directly from a live web page, first fetch the HTML content from the URL using a library like requests, then pass the content to Spire.Doc for parsing. This is core for web scraping and real-time data extraction.
Install the Requests library via pip:
pip install requests
Python code to parse web page:
from spire.doc import *
from spire.doc.common import *
import requests
# Fetch html content from a URL
def fetch_html_from_url(url):
"""Fetch HTML from a URL and handle errors (e.g., 404, network issues)"""
# Mimic a browser with User-Agent (avoids being blocked by websites)
headers = {
"User-Agent": "Mozilla/5.0 (Windows NT 10.0; Win64; x64)"
}
try:
response = requests.get(url, headers=headers)
response.raise_for_status() # Raise exception for HTTP errors
return response.text # Return raw HTML content
except requests.exceptions.RequestException as e:
raise Exception(f"Error fetching HTML: {str(e)}")
# Specify the target URL
url = "https://www.e-iceblue.com/privacypolicy.html"
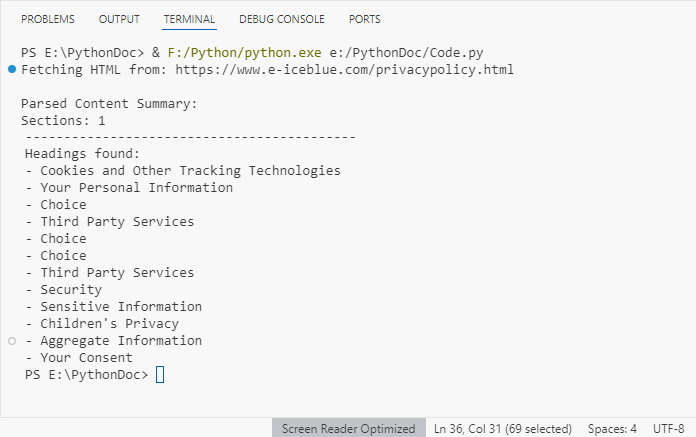
print(f"Fetching HTML from: {url}")
# Get HTML content
html_content = fetch_html_from_url(url)
# Create document and insert HTML content into it
doc = Document()
section = doc.AddSection()
paragraph = section.AddParagraph()
paragraph.AppendHTML(html_content)
# Extract and display summary information
print("\nParsed Content Summary:")
print(f"Sections: {doc.Sections.Count}")
print("-------------------------------------------")
# Extract and display headings
print("Headings found:")
for para_idx in range(section.Paragraphs.Count):
para = section.Paragraphs.get_Item(para_idx)
if isinstance(para, Paragraph) and para.StyleName.startswith("Heading"):
print(f"- {para.Text.strip()}")
# Close the document
doc.Close()
Steps Explained:
- Use requests.get() to fetch the HTML content from the URL.
- Pass the raw HTML text to Spire.Doc for parsing.
- Extract specific content (e.g., headings) from live pages for SEO audits or content aggregation.
Output:
Best Practices for Effective HTML Parsing
To optimize your HTML parsing workflow with Spire.Doc, follow these best practices:
- Validate Input Sources: Before parsing, check that HTML content (strings or files) is accessible and not corrupted. This reduces parsing errors:
import os

html_file = "data.html"
if os.path.exists(html_file):
    doc.LoadFromFile(html_file, FileFormat.Html)
else:
    print(f"Error: File '{html_file}' not found.")
- Handle Exceptions: Wrap parsing operations in try-except blocks to catch catch errors (e.g., missing files, invalid HTML):
try:
    doc.LoadFromFile("sample.html", FileFormat.Html)
except Exception as e:
    print(f"Error loading HTML: {e}")
- Optimize for Large Files: For large HTML files, consider loading content in chunks or disabling non-essential parsing features to improve performance.
- Clean Extracted Data: Use Python’s string methods (e.g., strip(), replace()) to remove extra whitespace or unwanted characters from extracted text.
- Keep the Library Updated: Regularly update Spire.Doc with
pip install --upgrade Spire.Docto benefit from improved parsing logic and bug fixes.
Conclusion
Python makes HTML parsing accessible for all skill levels. Whether you’re working with HTML strings, local files, or remote URLs, the combination of Requests (for fetching) and Spire.Doc (for structuring) simplifies complex tasks like web scraping and content extraction.
By following the examples and best practices in this guide, you’ll turn unstructured HTML into actionable, organized data in minutes. To unlock the full potential of Spire.Doc for Python, you can request a 30-day trial license here.

CSV (Comma-Separated Values) is a widely used format for tabular data. It’s lightweight, easy to generate, and common in reports, logs, exports, and data feeds. However, modern web applications, APIs, and NoSQL databases prefer JSON for its hierarchical structure, flexibility, and compatibility with JavaScript.
Converting CSV to JSON in Python is a practical skill for developers who need to:
- Prepare CSV data for APIs and web services
- Migrate CSV exports into NoSQL databases like MongoDB
- Transform flat CSV tables into nested JSON objects
- Enable data exchange between systems that require hierarchical formats
This step-by-step tutorial shows you how to convert CSV files to JSON in Python, including flat JSON, nested JSON, JSON with grouped data, and JSON Lines (NDJSON). By the end, you’ll be able to transform raw CSV datasets into well-structured JSON ready for APIs, applications, or data pipelines.
Table of Contents
- Why Convert CSV to JSON
- Python CSV to JSON Converter - Installation
- Convert CSV to Flat JSON in Python
- Convert CSV to Nested JSON in Python
- Convert CSV to JSON with Grouped Data in Python
- Convert CSV to JSON Lines (NDJSON) in Python
- Handle Large CSV Files to JSON Conversion
- Best Practices for CSV to JSON Conversion
- Conclusion
- FAQs
Why Convert CSV to JSON?
CSV files are lightweight and tabular, but they lack hierarchy. JSON allows structured, nested data ideal for APIs and applications. Converting CSV to JSON enables:
- API Integration: Most APIs prefer JSON over CSV
- Flexible Data Structures: JSON supports nested objects
- Web Development: JSON works natively with JavaScript
- Database Migration: NoSQL and cloud databases often require JSON
- Automation: Python scripts can process JSON efficiently
Python CSV to JSON Converter – Installation
To convert CSV files to JSON in Python, this tutorial uses Spire.XLS for Python to read CSV files and Python’s built-in json module to handle JSON conversion.
Why Spire.XLS?
It simplifies working with CSV files by allowing you to:
- Load CSV files into a workbook structure for easy access to rows and columns
- Extract and manipulate data efficiently, cell by cell
- Convert CSV to JSON in flat, nested, or NDJSON formats
- Export CSV to Excel, PDF, and other formats if needed
Install Spire.XLS
You can install the library directly from PyPI using pip:
pip install spire.xls
If you need detailed guidance on the installation, refer to this tutorial: How to Install Spire.XLS for Python on Windows.
Once installed, you’re ready to convert CSV data into different JSON formats.
Convert CSV to Flat JSON in Python
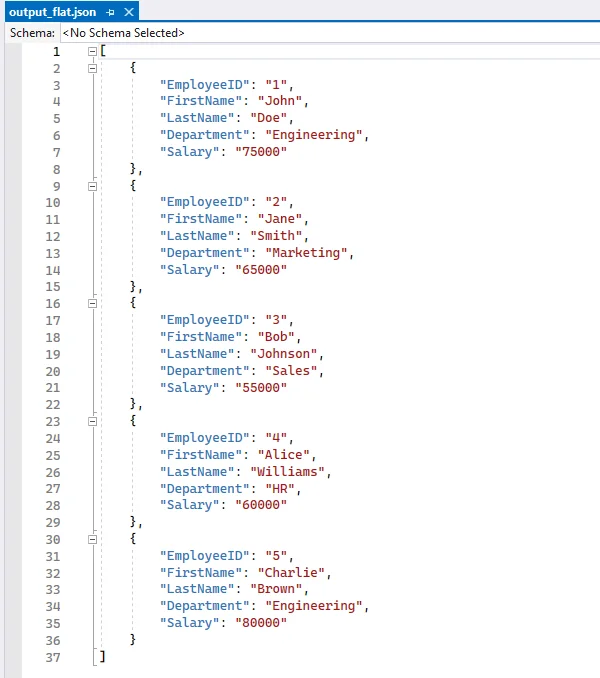
Converting a CSV file to flat JSON turns each row into a separate JSON object and uses the first row as keys, making the data organized and easy to work with.
Steps to Convert CSV to Flat JSON
- Load the CSV file into a workbook using Workbook.LoadFromFile.
- Select the worksheet.
- Extract headers from the first row.
- Iterate through each subsequent row to map values to headers.
- Append each row dictionary to a list.
- Write the list to a JSON file using json.dump.
Code Example
from spire.xls import *
import json

# Load the CSV file into a workbook object
workbook = Workbook()
workbook.LoadFromFile("employee.csv", ",")

# Select the desired worksheet
sheet = workbook.Worksheets[0]

# Extract headers from the first row
headers = [sheet.Range[1, j].Text for j in range(1, sheet.LastColumn + 1)]

# Map the subsequent CSV rows to JSON objects
data = []
for i in range(2, sheet.LastRow + 1):
    row = {headers[j-1]: sheet.Range[i, j].Text for j in range(1, sheet.LastColumn + 1)}
    data.append(row)

# Write JSON to file
with open("output_flat.json", "w", encoding="utf-8") as f:
    json.dump(data, f, indent=4, ensure_ascii=False)

# Clean up resources
workbook.Dispose()
Output JSON
Convert CSV to Nested JSON in Python
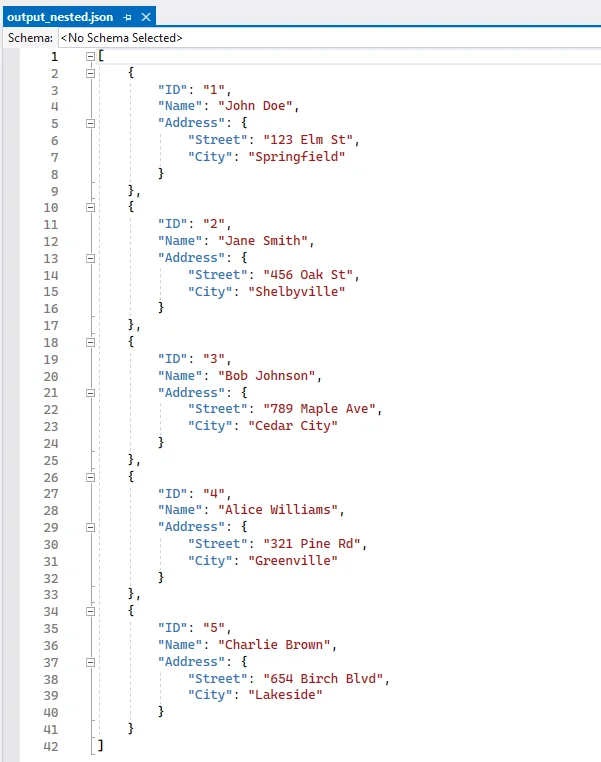
When a single CSV row contains related columns, you can combine these columns into nested JSON objects. For example, merging the Street and City columns into an Address object. Each CSV row produces one JSON object, which can include one or more nested dictionaries. This approach is ideal for scenarios requiring hierarchical data within a single record, such as API responses or application configurations.
Steps to Convert CSV to Nested JSON
- Load the CSV file and select the worksheet.
- Decide which columns should form a nested object (e.g., street and city).
- Iterate over rows and construct each JSON object with a sub-object for nested fields.
- Append each nested object to a list.
- Write the list to a JSON file with json.dump.
Code Example
from spire.xls import *
import json

# Create a Workbook instance and load the CSV file (using comma as the delimiter)
workbook = Workbook()
workbook.LoadFromFile("data.csv", ",")

# Get the first worksheet from the workbook
sheet = workbook.Worksheets[0]

# List to store the converted JSON data
data = []

# Loop through rows starting from the second row (assuming the first row contains headers)
for i in range(2, sheet.LastRow + 1):
    # Map each row into a JSON object, including a nested "Address" object
    row = {
        "ID": sheet.Range[i, 1].Text,         # Column 1: ID
        "Name": sheet.Range[i, 2].Text,       # Column 2: Name
        "Address": {                          # Nested object for address
            "Street": sheet.Range[i, 3].Text, # Column 3: Street
            "City": sheet.Range[i, 4].Text    # Column 4: City
        }
    }
    # Add the JSON object to the list
    data.append(row)

# Write the JSON data to a file with indentation for readability
with open("output_nested.json", "w", encoding="utf-8") as f:
    json.dump(data, f, indent=4, ensure_ascii=False)

# Release resources used by the workbook
workbook.Dispose()
Output Nested JSON
Convert CSV to JSON with Grouped Data
When multiple CSV rows belong to the same parent entity, you can group these rows under a single parent object. For example, an order with multiple items can store all items in an items array under one order object. Each parent object has a unique key (like order_id), and its child rows are aggregated into an array. This method is useful for e-commerce orders, data pipelines, or any scenario requiring grouped hierarchical data across multiple rows.
Steps to Convert CSV to JSON with Grouped Data
- Use defaultdict to group rows by a parent key (order_id).
- Iterate rows and append child items to the parent object.
- Convert the grouped dictionary to a list of objects.
- Write the JSON file.
Code Example
from collections import defaultdict
from spire.xls import *
import json

# Create a Workbook instance and load the CSV file (comma-separated)
workbook = Workbook()
workbook.LoadFromFile("orders.csv", ",")

# Get the first worksheet from the workbook
sheet = workbook.Worksheets[0]

# Use defaultdict to store grouped data
# Each order_id maps to a dictionary with customer name and a list of items
data = defaultdict(lambda: {"customer": "", "items": []})

# Loop through rows starting from the second row (skip header row)
for i in range(2, sheet.LastRow + 1):
    order_id = sheet.Range[i, 1].Text      # Column 1: Order ID
    customer = sheet.Range[i, 2].Text      # Column 2: Customer
    item = sheet.Range[i, 3].Text          # Column 3: Item

    # Assign customer name (same for all rows with the same order_id)
    data[order_id]["customer"] = customer
    # Append item to the order's item list
    data[order_id]["items"].append(item)

# Convert the grouped dictionary into a list of objects
# Each object contains order_id, customer, and items
result = [{"order_id": oid, **details} for oid, details in data.items()]

# Write the grouped data to a JSON file with indentation for readability
with open("output_grouped.json", "w", encoding="utf-8") as f:
    json.dump(result, f, indent=4, ensure_ascii=False)

# Release resources used by the workbook
workbook.Dispose()
Output JSON with Grouped Data

If you're also interested in saving JSON back to CSV, follow our guide on converting JSON to CSV in Python.
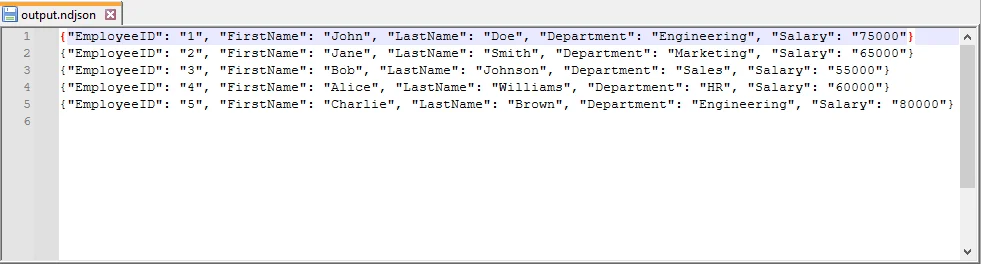
Convert CSV to JSON Lines (NDJSON) in Python
JSON Lines (also called NDJSON – Newline Delimited JSON) is a format where each line is a separate JSON object. It is ideal for large datasets, streaming, and big data pipelines.
Why use NDJSON?
- Streaming-friendly: Process one record at a time without loading the entire file into memory.
- Big data compatibility: Tools like Elasticsearch, Logstash, and Hadoop natively support NDJSON.
- Error isolation: If one line is corrupted, the rest of the file remains valid.
Code Example
from spire.xls import *
import json

# Create a Workbook instance and load the CSV file (comma-separated)
workbook = Workbook()
workbook.LoadFromFile("employee.csv", ",")

# Get the first worksheet from the workbook
sheet = workbook.Worksheets[0]

# Extract headers from the first row to use as JSON keys
headers = [sheet.Range[1, j].Text for j in range(1, sheet.LastColumn + 1)]

# Open a file to write JSON Lines (NDJSON) format
with open("output.ndjson", "w", encoding="utf-8") as f:
    # Loop through each row in the worksheet, starting from the second row
    for i in range(2, sheet.LastRow + 1):
        # Map each header to its corresponding cell value for the current row
        row = {headers[j - 1]: sheet.Range[i, j].Text for j in range(1, sheet.LastColumn + 1)}

        # Write the JSON object to the file followed by a newline
        # Each line is a separate JSON object (NDJSON format)
        f.write(json.dumps(row, ensure_ascii=False) + "\n")

# Release resources used by the workbook
workbook.Dispose()
Output NDJSON
Handle Large CSV Files to JSON Conversion
For large CSV files, it’s not always efficient to load everything into memory at once. With Spire.XLS, you can still load the file as a worksheet, but instead of appending everything into a list, you can process rows in chunks and write them to JSON incrementally. This technique minimizes memory usage, making it suitable for big CSV to JSON conversion in Python.
Code Example
from spire.xls import *
import json

# Create a Workbook instance and load the CSV file (comma-separated)
workbook = Workbook()
workbook.LoadFromFile("large.csv", ",")

# Get the first worksheet from the workbook
sheet = workbook.Worksheets[0]

# Open a JSON file for writing, with UTF-8 encoding
with open("large.json", "w", encoding="utf-8") as json_file:
    json_file.write("[\n")  # Start the JSON array
    first = True  # Flag to handle commas between JSON objects

    # Loop through each row in the worksheet, starting from the second row
    # (skip the header row)
    for i in range(2, sheet.LastRow + 1):
        # Create a dictionary mapping each header to its corresponding cell value
        row = {sheet.Range[1, j].Text: sheet.Range[i, j].Text
               for j in range(1, sheet.LastColumn + 1)}

        # Add a comma before the object if it is not the first row
        if not first:
            json_file.write(",\n")

        # Write the JSON object to the file
        json.dump(row, json_file, ensure_ascii=False)
        first = False  # After the first row, set the flag to False

    json_file.write("\n]")  # End the JSON array

# Release resources used by the workbook
workbook.Dispose()
Best Practices for CSV to JSON Conversion
When converting CSV to JSON in Python, follow these best practices can ensure data integrity and compatibility:
- Always Use CSV headers as JSON keys.
- Handle missing values with null or default values.
- Normalize data types (convert numeric strings to integers or floats).
- Use UTF-8 encoding for JSON files.
- Stream large CSV files row by row to reduce memory usage.
- Validate JSON structure after writing, especially for nested JSON.
Conclusion
Converting CSV to JSON in Python helps you work with data more efficiently and adapt it for modern applications. Using Python and libraries like Spire.XLS for Python, you can:
- Convert flat CSV files into structured JSON objects.
- Organize related CSV data into nested JSON structures.
- Group multiple CSV rows into coherent JSON objects for analysis or APIs.
- Create JSON Lines (NDJSON) for large datasets or streaming scenarios.
- Process large CSV files efficiently without loading everything into memory.
These approaches let you handle CSV data in a way that fits your workflow, making it easier to prepare, share, and analyze data for APIs, applications, or big data pipelines.
FAQs
Q1: How do I convert CSV to JSON with headers in Python?
A1: If your CSV has headers, use the first row as keys and map subsequent rows to dictionaries. With Spire.XLS, you can access sheet.Range[1, j].Text for headers.
Q2: How do I convert CSV to nested JSON in Python?
A2: Identify related columns (e.g., Street and City) and group them into a sub-object when building JSON. See the Nested JSON example above.
Q3: What’s the best way to handle large CSV files when converting to JSON?
A3: Use a streaming approach where each row is processed and written to JSON immediately, instead of storing everything in memory.
Q4: Can Spire.XLS handle CSV files with different delimiters?
A4: Yes, when loading the CSV with Spire.XLS’s LoadFromFile method, specify the delimiter (e.g., "," or ";").
Q5: How to convert JSON back to CSV in Python?
A5: Use Python’s json module to read the JSON file into a list of dictionaries, then write it back to CSV using Spire.XLS for Python for advanced formatting and export options.
Q6: How to convert CSV to JSON Lines (NDJSON) in Python?
A6: JSON Lines (NDJSON) writes each JSON object on a separate line. Stream each CSV row to the output file line by line, which is memory-efficient and compatible with big data pipelines like Elasticsearch or Logstash.
Automate Excel Writing in Python: Professional Reporting Practices
2025-09-18 09:49:49 Written by jie zou
Excel remains one of the most widely used tools for organizing, analyzing, and presenting data. From financial reports to operational dashboards, many workflows require exporting data into Excel for better readability and sharing. Instead of manually entering information, automating Excel file writing with Python makes it faster, more reliable, and more scalable.
This tutorial explains how to write data to Excel files with Python, covering structured data insertion, formatting, and exporting. The examples use a Python Excel library that allows programmatic creation and customization of workbooks.
What's Included in This Tutorial:
- Setting Up the Environment
- Writing Data into Excel Files
- Formatting While Writing
- Working with Multiple Worksheets
- Best Practices
- Conclusion
- FAQ
Setting Up the Environment
Before writing Excel files in Python, you need a library that supports creating, loading, and saving workbooks programmatically. Spire.XLS for Python provides a complete API for these operations, enabling automated report generation and data processing.
Install the package using pip:
pip install spire.xls
Once installed, you can handle Excel files using three core operations:
- Creating a new workbook – initialize a new Excel document with Workbook().
- Loading an existing workbook – open an existing Excel file using LoadFromFile().
- Saving a workbook – export the workbook to the desired format with SaveToFile(), supporting .xlsx, .xls, CSV, and more.
These operations form the foundation for further data writing, formatting, and multi-sheet management in Python.
Writing Data into Excel Files with Python
In real-world business scenarios, you may need to create new Excel files, update existing reports, or write different types of data—such as text, numbers, dates, and formulas. This section demonstrates how to efficiently write and manage data in Excel files with Python across these common use cases.
Appending Data to an Existing Excel File
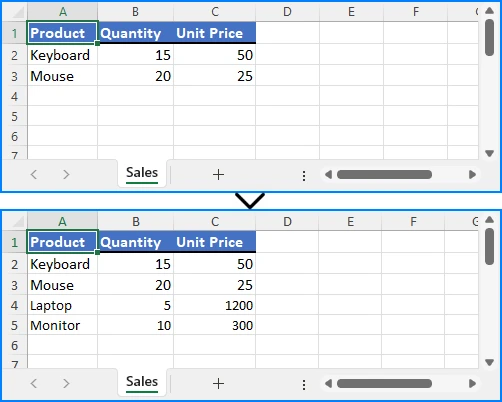
When you need to update an existing Excel workbook with new information—such as adding recent sales records, inventory updates, or additional data rows—you can open the file, append the data programmatically, and save it without overwriting existing content:
from spire.xls import Workbook, ExcelVersion

workbook = Workbook()
workbook.LoadFromFile("Sample.xlsx")
sheet = workbook.Worksheets[0]

# Add new rows
sheet.Range["A4"].Value = "Laptop"
sheet.Range["B4"].NumberValue = 5
sheet.Range["C4"].NumberValue = 1200.00

sheet.Range["A5"].Value = "Monitor"
sheet.Range["B5"].NumberValue = 10
sheet.Range["C5"].NumberValue = 300.00

workbook.SaveToFile("output/updated_excel.xlsx", ExcelVersion.Version2016)
Key elements used:
- LoadFromFile() – loads an existing Excel file into the workbook object.
- Range["CellName"] – references a specific cell in the sheet using its name.
- Value / NumberValue – assigns text or numeric data to cells.
- SaveToFile() – saves the workbook to a file in the specified Excel format.
This method allows continuous updates to reports while preserving existing content.
Example showing appended data:
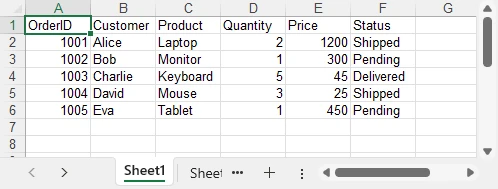
Writing Multiple Rows and Columns to a New Excel File
When dealing with larger datasets, writing multiple rows and columns at once is much more efficient than updating individual cells one by one. This approach not only saves time but also ensures consistent data insertion across the worksheet:
from spire.xls import Workbook, ExcelVersion

# Create a new Excel workbook
workbook = Workbook()
sheet = workbook.Worksheets[0]

orders = [
    ["OrderID", "Customer", "Product", "Quantity", "Price", "Status"],
    [1001, "Alice", "Laptop", 2, 1200.00, "Shipped"],
    [1002, "Bob", "Monitor", 1, 300.00, "Pending"],
    [1003, "Charlie", "Keyboard", 5, 45.00, "Delivered"],
    [1004, "David", "Mouse", 3, 25.00, "Shipped"],
    [1005, "Eva", "Tablet", 1, 450.00, "Pending"]
]

for row_index, row_data in enumerate(orders, start=1):
    for col_index, value in enumerate(row_data, start=1):
        if isinstance(value, (int, float)):
            sheet.Range[row_index, col_index].NumberValue = value
        else:
            sheet.Range[row_index, col_index].Value = value

workbook.SaveToFile("output/orders.xlsx", ExcelVersion.Version2016)
Important elements in this example:
- enumerate() – provides row and column indices for looping.
- Range[row, col] – references a cell in the worksheet by its row and column indexes.
Batch writing ensures efficiency, especially when exporting database query results or operational reports.
Example showing batch data insertion:
Writing Different Data Types
Excel cells can contain various types of data, such as text, numbers, dates, formulas, and more. Using the correct properties and methods ensures that each type is stored and displayed appropriately, allowing accurate calculations and proper formatting:
from spire.xls import Workbook, ExcelVersion, DateTime, TimeSpan

workbook = Workbook()
sheet = workbook.Worksheets[0]

# Set general value
sheet.Range[2, 2].Text = "General Example"
sheet.Range[2, 3].Value = "General 123"

# Set number value
sheet.Range[3, 2].Text = "Number Example"
sheet.Range[3, 3].NumberValue = 1234.56
sheet.Range[3, 3].NumberFormat = "0.000"

# Set datetime value
sheet.Range[4, 2].Text = "Date Example"
sheet.Range[4, 3].DateTimeValue = DateTime.get_UtcNow()

# Set formula value
sheet.Range[5, 2].Text = "Formula Example"
sheet.Range[5, 5].NumberValue = 1234.56
sheet.Range[5, 6].NumberValue = 6543.21
sheet.Range[5, 3].Formula = "=SUM(E5:F5)"

# Set text
sheet.Range[6, 2].Text = "Text Example"
sheet.Range[6, 3].Text = "Text"

# Set boolean value
sheet.Range[7, 2].Text = "Boolean Example"
sheet.Range[7, 3].BooleanValue = True

sheet.AllocatedRange.AutoFitColumns()

workbook.SaveToFile("output/value_types.xlsx", ExcelVersion.Version2016)
Key functions and properties used:
- Value – assigns or retrieves the general value of a cell, suitable for text or mixed content.
- NumberValue – specifically handles numeric values in a cell, ensuring proper number formatting and calculations.
- DateTimeValue – used to input or obtain date and time values in a cell with correct formatting.
- Formula – sets or retrieves the formula expression in a cell to perform dynamic calculations.
- BooleanValue – stores or returns a Boolean (True/False) value in a cell.
- Text – retrieves the displayed text of a cell, including any applied formatting.
Proper handling of different data types is essential for accurate business calculations and reporting. For more details on supported data types, see the XlsRange API reference.
Example showing mixed data types:

Formatting Excel While Writing Data with Python
To make Excel reports clear and professional, it’s important to apply formatting while entering or updating data. This section demonstrates how to enhance readability and presentation by styling cells, setting number formats, and adjusting column widths and row heights as you write data into Excel.
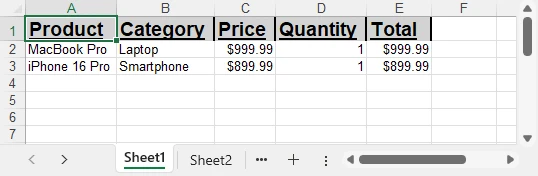
Applying Cell Styles
You can enhance the readability and appearance of your Excel sheet by applying various styles to cells, such as fonts, borders, and background colors:
from spire.xls import Workbook, Color, FontUnderlineType, ExcelVersion

workbook = Workbook()
sheet = workbook.Worksheets[0]
sheet.Range["A1"].Value = "Product"
sheet.Range["B1"].Value = "Category"
sheet.Range["C1"].Value = "Price"
sheet.Range["D1"].Value = "Quantity"
sheet.Range["E1"].Value = "Total"
sheet.Range["A2"].Value = "MacBook Pro"
sheet.Range["B2"].Value = "Laptop"
sheet.Range["C2"].NumberValue = 999.99
sheet.Range["D2"].NumberValue = 1
sheet.Range["E2"].Formula = "=C2*D2"
sheet.Range["A3"].Value = "iPhone 16 Pro"
sheet.Range["B3"].Value = "Smartphone"
sheet.Range["C3"].NumberValue = 899.99
sheet.Range["D3"].NumberValue = 1
sheet.Range["E3"].Formula = "=C3*D3"

# Set header style
header = sheet.Range["A1:E1"]
header.Style.Font.FontName = "Arial"
header.Style.Font.Size = 14.0
header.Style.Font.IsBold = True
header.Style.Font.Underline = FontUnderlineType.Single
header.Style.Interior.Color = Color.get_LightGray()
header.Style.Borders[BordersLineType.EdgeRight].LineStyle = LineStyleType.Medium
Core components demonstrated:
- Style.Font – controls font-related settings such as bold, underline, and more (full list of supported properties can be found in the Style.Font API documentation).
- FontUnderlineType.Single – applies a single underline.
- Interior.Color – fills the cell background with a specified color.
- Borders.LineStyle – adds borders around cells.
Styled cells enhance readability and emphasize critical sections.
Setting Number Formats for Excel Cells
Numbers in Excel often require specific display formats to improve readability and presentation. Using CellRange.NumberFormat, you can control how numeric values appear, such as applying currency, percentage, or integer formats:
# Apply number formats
sheet.Range["C2:C3"].NumberFormat = "$#,##0.00"   # Currency format
sheet.Range["D2:D3"].NumberFormat = "0"           # Integer format
sheet.Range["E2:E3"].NumberFormat = "$#,##0.00"
Key highlights:
- NumberFormat – enables reading and setting Excel cell number formats, controlling how numbers are displayed while keeping the raw data intact.
- Format codes define display rules such as currency symbols, decimal places, or percentage styles, giving you flexibility in presenting numerical data.
With proper number formatting, financial data is easier to interpret and looks more professional. For more details and a full list of format codes, see our dedicated guide on Setting Excel Cell Number Format in Python.
Adjusting Column Widths and Row Heights
Properly adjusting column widths and row heights ensures that all content is clearly visible. You can set them manually or use automatic fitting to match the content:
# Auto-fit column widths and row heights
for col in range(1, 5):
    sheet.AutoFitColumn(col)
for row in range(1, 3):
    sheet.AutoFitRow(row)

# Auto-fit a specific range of cells
#sheet.Range["A1:E3"].AutoFitColumns()
#sheet.Range["A1:E3"].AutoFitRows()

# Set a fixed column width and row height
sheet.Columns[1].Width = 150
sheet.Rows[1].Height = 30

workbook.SaveToFile("output/formatted_excel.xlsx", ExcelVersion.Version2016)
Key highlights:
- AutoFitColumn(colIndex) / AutoFitRow(rowIndex) – automatically adjust a single column or row to fit its content.
- CellRange.AutoFitColumns() / AutoFitRows() – automatically adjust all columns or rows within a specified cell range.
- Columns[colIndex].Width / Rows[rowIndex].Height – manually set a fixed width or height for precise control.
With these options, you can choose between automatic fitting for dynamic data or fixed dimensions for consistent layout, ensuring your Excel worksheets remain both readable and professionally formatted.
Example showing styled and auto-fitted headers:
To explore more advanced techniques for formatting Excel sheets in Python, including fonts, colors, borders, and conditional formatting, check out our dedicated guide on Formatting Excel in Python for detailed instructions.
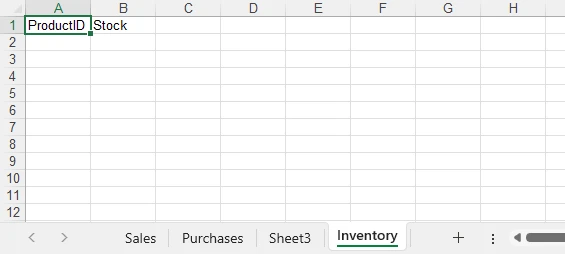
Managing Multiple Worksheets in Excel with Python
In Excel, organizing data into multiple worksheets helps keep related information separated and easy to manage. For example, you can maintain separate sheets for sales, purchases, inventory, or other categories within the same workbook. This section demonstrates how to create, access, and manage multiple worksheets using Python.
from spire.xls import Workbook, ExcelVersion

workbook = Workbook()

sheet = workbook.Worksheets[0]
sheet.Name = "Sales"

sheet1 = workbook.Worksheets["Sheet2"]
sheet1.Name = "Purchases"

sheet2 = workbook.Worksheets.Add("Inventory")
sheet2.Range["A1"].Value = "ProductID"
sheet2.Range["B1"].Value = "Stock"

workbook.SaveToFile("output/multi_sheet.xlsx", ExcelVersion.Version2016)
Main features highlighted:
- Worksheets[Index] – access a worksheet by its position in the workbook (useful for iterating over all sheets or referencing the first/last sheet).
- Worksheets["SheetName"] – access a worksheet by its name, which is more readable and reliable if the sheet order might change.
- Worksheets.Add("SheetName") – create a new worksheet to organize different categories of data such as departments, sales regions, or product lines.
These methods allow you to structure your Excel file efficiently, keeping related data on separate sheets for clarity and easier management.
Example showing multiple worksheets:
Best Practices for Writing Excel Files with Python
When writing Excel files with Python, follow best practices to maintain efficiency, consistency, and usability:
- Use descriptive sheet names like “Sales_2024” instead of “Sheet1.”
- Batch write large datasets instead of individual cell updates to improve performance.
- Apply consistent formatting for headers, totals, and key columns.
- Leverage Excel formulas to maintain dynamic calculations.
- Validate data types to prevent misinterpretation in charts or formulas.
- Choose file formats suited to the audience: .xlsx for modern users, .xls only for legacy compatibility.
- Organize worksheets logically, grouping related datasets for easy navigation.
Implementing these practices avoids common pitfalls and produces professional, reusable reports.
Conclusion
Automating Excel writing in Python significantly streamlines reporting. By creating workbooks, writing data efficiently, applying styles, managing worksheets, and handling diverse data types, developers can ensure consistent, accurate, and professional Excel reports. To explore the library further, you can request a free temporary license or try the Free Spire.XLS for Python edition.
Python Excel Writing FAQ
Q1: Can Python write to an existing Excel file?
Yes, Python can load an existing workbook, append or modify data, and save it while preserving all previously entered content.
Q2: How to efficiently handle large datasets in Python?
Batch writing multiple rows and minimizing formatting during data insertion helps maintain high performance even with thousands of rows.
Q3: Can formulas be included in Excel files?
Yes, you can insert formulas, including =SUM() and more complex calculations, to keep your Excel reports dynamic and automatically updated.
Q4: Which Excel formats are supported?
Spire.XLS for Python can save files in .xlsx, .xls, CSV, and even export to PDF, covering most common use cases and compatibility needs.

CSV is one of the most common formats for exchanging tabular data because of its simplicity and wide support across platforms. However, when working with structured applications, configurations, or hierarchical data, XML often becomes the preferred choice due to its ability to represent nested relationships and enforce stricter data validation.
In this guide, we’ll explore how to convert CSV files into XML using Spire.XLS for Python. You’ll learn how to convert CSV into both Excel XML format (SpreadsheetML) and standard XML for general use. We’ll also cover how to clean and preprocess real-world CSV files—handling issues like invalid headers, missing values, special characters, and nested fields—so that your XML output is always valid and structured correctly.
Table of Contents:
- Why Convert CSV to XML
- Prerequisites
- Convert CSV to Excel XML Format
- Convert CSV to Standard XML
- Handle Real-World CSV Challenges
- Wrap Up
- FAQs
Why Convert CSV to XML
So why should developers care about converting CSV to XML? Here are some real-world use cases:
- Enterprise Data Migration: Many enterprise applications like ERP or CRM systems require XML input for bulk data import.
- Configuration & Metadata: XML is often used to store structured metadata, while raw data may come in CSV form.
- Interoperability: Some APIs, especially in finance, healthcare, and government sectors, still rely heavily on XML payloads.
- Readable Reports: XML can represent hierarchical data, making it more descriptive compared to flat CSV files.
- Validation: XML can be validated against schemas (XSD), ensuring data integrity—something CSV cannot provide out-of-the-box.
CSV is great for simplicity . XML is great for structure . By converting between them, you get the best of both worlds.
Prerequisites
Before diving into the code, let’s ensure we have the right tools:
- Python 3.7+
- Spire.XLS for Python → A professional library that provides powerful Excel manipulation capabilities.
- Standard Python Libraries → xml.etree.ElementTree, csv, and re.
You can install Spire.XLS via pip (assuming you have Python and pip installed on your system):
pip install spire.xls
Additionally, make sure you have a CSV file ready to test. A simple one might look like this:
ID,FirstName,LastName,Age,Department,Salary
1,John,Doe,30,Sales,5000
2,Jane,Smith,28,Marketing,4500
3,Mike,Johnson,35,IT,6000
4,Emily,Brown,32,HR,4800
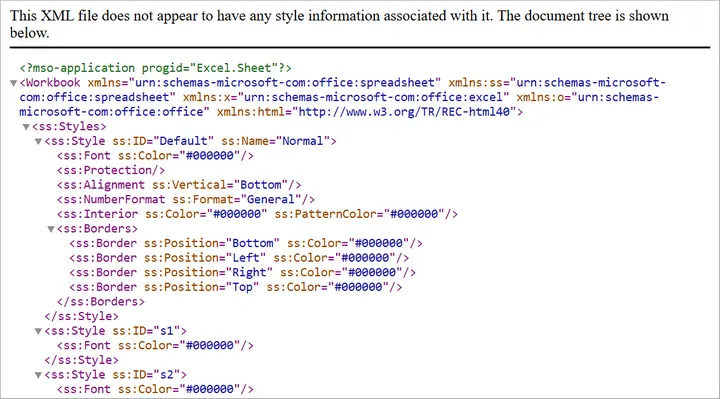
Convert CSV to Excel XML Format in Python
The first approach is to convert CSV into Excel-compatible XML . This format is sometimes called SpreadsheetML , introduced in Excel 2003. It allows CSV data to be transformed into a fully structured XML file that Excel can open directly.
With Spire.XLS, this process is straightforward:
from spire.xls import *

# Create a Workbook
workbook = Workbook()

# Load CSV into the first worksheet
workbook.LoadFromFile("input.csv", ",", 1, 1)

# Save as XML Spreadsheet format
workbook.SaveAsXml("output.xml")

# Dispose resources
workbook.Dispose()
How it Works
- LoadFromFile() – Reads the CSV file into the workbook.
- SaveAsXml() – Saves it as SpreadsheetML XML format.
This approach is best if your end goal is Excel compatibility rather than pure XML processing.
Output:
You may also like: Convert Excel to Excel-Compatible XML in Python
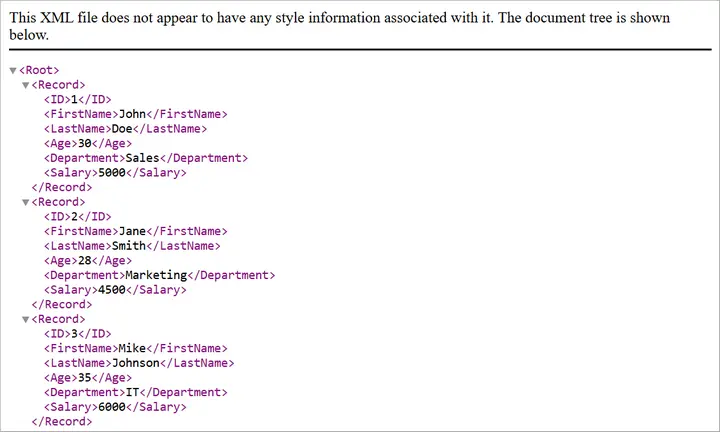
Convert CSV to Standard XML in Python
Sometimes, you need a custom XML format rather than Excel-compatible XML. For instance, you may need an XML structure like:
<Employees>
  <Employee>
    <ID>1</ID>
    <FirstName>John</FirstName>
    <LastName>Doe</LastName>
    <Department>Sales</Department>
    <Salary>5000</Salary>
  </Employee>
</Employees>
Here’s how you can achieve that:
from spire.xls import *
import xml.etree.ElementTree as ET

# Step 1: Load CSV into workbook
workbook = Workbook()
workbook.LoadFromFile("input.csv", ",", 1, 1)
sheet = workbook.Worksheets[0]

# Step 2: Create root element
root = ET.Element("Root")

# Step 3: Loop through rows and build XML
# Assume first row is header
headers = []
for col in range(1, sheet.Columns.Count + 1):
    cell_value = sheet.Range[1, col].Value
    if not cell_value:
        break
    headers.append(cell_value)

# Add data rows
for row in range(2, sheet.Rows.Count + 1):
    # Stop if row is empty
    if not sheet.Range[row, 1].Value:
        break

    record = ET.SubElement(root, "Record")
    for col, header in enumerate(headers, start=1):
        cell_value = sheet.Range[row, col].Value
        field = ET.SubElement(record, header)
        field.text = cell_value if cell_value else ""

# Step 4: Save to XML file
tree = ET.ElementTree(root)
tree.write("output.xml", encoding="utf-8", xml_declaration=True)

# Cleanup
workbook.Dispose()
Explanation
- Step 1: Load the CSV into a worksheet.
- Step 2: Create a root <Root> element for the XML tree.
- Step 3: Extract headers from the first row and use them as XML tags.
- Step 4: Loop through rows and add <Record> elements with child fields.
- Step 5: Save the XML to a file.
This approach is flexible because you can customize the XML schema however you like (e.g., change <Record> to <Employee>).
Output:
You may also like: How to Convert XML to CSV in Python
Handle Real-World CSV Challenges
Converting a “perfect” CSV to XML is easy. But real-world CSVs are rarely perfect. Let’s discuss common issues developers face and how to fix them.
-
Headers with Invalid XML Names
- Problem: CSV headers like Employee ID or 123Name are invalid XML tags since XML element names cannot have spaces, start with numbers, or include special characters.
- Fix: Clean headers by replacing spaces with underscores (_) or prefixing numeric headers with a safe string.
-
Empty or Missing Values
- Problem: Real-world CSVs often have missing cells. When converted to XML, missing cells may create malformed structures.
- Fix: Replace blanks with placeholders (NULL, Unknown, or 0).
-
Special Characters in Data
- Problem: Characters like <, >, & inside CSV values can break XML if not escaped.
- Fix: Always escape XML entities properly (<, >, &).
-
Nested / Hierarchical Data in Flat CSV
- Problem: Some CSV cells contain multiple values or hierarchical information (e.g., lists of products) within a single field. Converting directly to XML will flatten the data, losing the intended hierarchy.
Example:
OrderID,Customer,Products
1001,John,"Laptop;Mouse;Keyboard"
Flattened XML (bad):
<Products>Laptop;Mouse;Keyboard</Products>
- Fix: Detect list-like or nested values and expand them into child XML elements or multiple rows, preserving the structure in XML.
Hierarchical XML (fixed):
<Products>
  <Product>Laptop</Product>
  <Product>Mouse</Product>
  <Product>Keyboard</Product>
</Products>
Automating Fixes with clean_csv
Instead of cleaning data manually, you can automate preprocessing with the following helper function:
import csv
import re
def clean_csv(input_file, output_file, nested_columns=None, nested_delimiter=";"):
if nested_columns is None:
nested_columns = []
cleaned_rows = []
# Escape special characters for XML
def escape_xml(text):
return (text.replace("&", "&")
.replace("<", "<")
.replace(">", ">")
.replace('"', """)
.replace("'", "'"))
with open(input_file, "r", encoding="utf-8") as infile:
reader = csv.reader(infile)
headers = next(reader)
# Clean headers
cleaned_headers = []
for h in headers:
h = h.strip()
h = re.sub(r"\s+", "_", h) # Replace spaces with _
h = re.sub(r"[^a-zA-Z0-9_]", "", h) # Remove invalid chars
if re.match(r"^\d", h): # Cannot start with digit
h = "Field_" + h
cleaned_headers.append(h)
cleaned_rows.append(cleaned_headers)
# Read all rows first
raw_rows = []
for row in reader:
# Handle empty cells
row = [cell if cell.strip() != "" else "NULL" for cell in row]
raw_rows.append(row)
# Expand nested columns
if nested_columns:
expanded_rows = [cleaned_headers] # include header
for row in raw_rows:
row_variants = [row]
for col_name in nested_columns:
if col_name not in cleaned_headers:
continue
col_index = cleaned_headers.index(col_name)
temp = []
for variant in row_variants:
cell_value = variant[col_index]
# Only split on the nested delimiter, not on XML special chars
if nested_delimiter in cell_value:
items = [item.strip() for item in cell_value.split(nested_delimiter)]
for item in items:
new_variant = variant.copy()
new_variant[col_index] = item
temp.append(new_variant)
else:
temp.append(variant)
row_variants = temp
expanded_rows.extend(row_variants)
cleaned_rows = expanded_rows
else:
cleaned_rows.extend(raw_rows)
# Escape special characters after expansion
final_rows = [cleaned_rows[0]] # header
for row in cleaned_rows[1:]:
final_row = [escape_xml(cell) for cell in row]
final_rows.append(final_row)
# Write cleaned CSV
with open(output_file, "w", newline="", encoding="utf-8") as outfile:
writer = csv.writer(outfile)
writer.writerows(final_rows)
print(f"Cleaned CSV saved to {output_file}")
You can invoke the clean_csv function by passing the input CSV file path, output CSV file path, and optionally the columns to expand for nested values.
# File paths
input_file = r"C:\Users\Administrator\Desktop\input.csv"
output_file = r"C:\Users\Administrator\Desktop\cleaned_output.csv"

# Specify columns that may contain nested values
nested_columns = ["Products"]  # you can add more, e.g., ["Products", "Reviews"]

# Call the clean_csv function
clean_csv(input_file, output_file, nested_columns=nested_columns, nested_delimiter=";")
This function ensures your CSV is safe and clean before converting it to XML.
It helps:
- Clean headers (valid XML names)
- Handle empty cells
- Expand nested values in any specified column(s)
- Escape special characters for XML
- Write a clean, UTF-8 CSV ready for XML conversion
Wrap Up
Converting CSV to XML in Python with Spire.XLS is both powerful and flexible. If you only need Excel-readable XML, saving directly to SpreadsheetML is the quickest option. If you need custom XML structures for APIs, migrations, or reporting, you can build standard XML using xml.etree.ElementTree.
Real-world CSVs are messy. They may have missing values, invalid headers, special characters, or nested lists. By integrating a preprocessing step (like the clean_csv function), you ensure that your XML output is both valid and meaningful.
Whether you’re preparing data for enterprise integration, creating structured reports, or exchanging information with legacy systems, this workflow gives you the best of both worlds: the simplicity of CSV and the structure of XML.
FAQs
Q1: Can I convert very large CSV files to XML?
Yes, but for very large files, you should use a streaming approach (processing rows one by one) to avoid memory issues.
Q2: Does Spire.XLS support direct conversion to XML without custom code?
Yes. Saving as SpreadsheetML is built-in. But for custom XML, you’ll need to write Python code as shown.
Q3: How do I handle special characters automatically?
Use the escape_xml helper or Python’s built-in xml.sax.saxutils.escape().
Q4: What if my CSV has nested data in multiple columns?
You can pass multiple column names into nested_columns when calling clean_csv.
Q5: Can I validate the generated XML?
Yes. After generating XML, validate it against an XSD schema if your system requires strict formatting.
Get a Free License
To fully experience the capabilities of Spire.XLS for Python without any evaluation limitations, you can request a free 30-day trial license.

XML is a widely used format for storing structured data, but it’s not ideal for analysis or tabular tools like Excel. Converting XML to CSV allows you to work with the data in a simpler, flat format that’s compatible with spreadsheets and data analysis libraries. By converting XML to CSV, you can easily import data into Excel, perform calculations, or feed it into Python data analysis tools like Pandas.
This approach also helps standardize complex hierarchical data into a format that is easier to read, manipulate, and share across different applications. In this tutorial, we’ll explore how to efficiently transform XML files into CSV using Spire.XLS for Python.
Table of Contents:
- Setting Up Spire.XLS for Python
- Understanding XML Data Structures
- How XML Data Is Extracted and Converted
- Basic Example: Convert XML to CSV with Python
- Advanced Techniques
- Troubleshooting and Common Issues
- Conclusion
- FAQs
Setting Up Spire.XLS for Python
Before we can start, we need to install the Spire.XLS library. The package is available on PyPI , so installation is straightforward. Run the following command:
pip install spire.xls
Once installed, you can import the required classes:
from spire.xls import *
from spire.xls.common import *
Spire.XLS provides the Workbook and Worksheet objects for managing Excel-like files. You’ll use them to create new CSV files and populate them with your XML data.
Understanding XML Data Structures
XML files are organized in a tree-like hierarchy, where elements (or nodes) are enclosed in tags. Each element can contain text, attributes, or even other child elements.
For example, consider this Books.xml:
<catalog>
  <book isbn="9780451524935">
    <title>The Catcher in the Rye</title>
    <author>J.D. Salinger</author>
    <genre>Fiction</genre>
    <reviews>
      <review>Excellent coming-of-age story</review>
      <review>A true classic</review>
    </reviews>
  </book>
  <book isbn="9780439023528">
    <title>The Hunger Games</title>
    <author>Suzanne Collins</author>
    <genre>Adventure</genre>
  </book>
</catalog>
- Root node : <catalog> is the top-level container.
- Child nodes : Each <book> is a child of <catalog>.
- Elements : <title>, <author>, and <genre> are elements inside each <book>.
- Attributes : The isbn in <book isbn="..."> is an attribute attached to the book element.
- Nested elements : The <reviews> node contains multiple <review> sub-nodes.
Challenges when converting XML to CSV:
- Hierarchical data – XML allows nesting (e.g., <reviews> inside <book>), while CSV is flat.
- Attributes vs. elements – Data may be stored as an attribute (isbn) or as a tag (title).
- Optional fields – Not all <book> elements may contain the same tags, which can lead to missing values in the CSV.
A robust converter must be able to handle these differences and map hierarchical XML into a flat, tabular CSV format.
How XML Data Is Extracted and Converted
To load and parse an XML file in Python, you can use the built-in xml.etree.ElementTree library. This library lets you navigate the XML tree, retrieve elements, and access attributes. For example:
import xml.etree.ElementTree as ET

# Load the XML file
tree = ET.parse("Books.xml")
root = tree.getroot()

# Iterate through elements
for book in root.findall("book"):
    title = book.findtext("title", "")
    author = book.findtext("author", "")
    isbn = book.attrib.get("isbn", "")
After extracting the XML data, the next step is to map it to a tabular structure . Using Spire.XLS for Python , you can create a workbook, write the extracted values into worksheet cells, and finally export the worksheet as a CSV file for easy analysis.
General Steps to Convert XML to CSV in Python
- Use xml.etree.ElementTree to load and retrieve data from the XML file.
- Create a Workbook object using Spire.XLS.
- Add a worksheet with Workbook.Worksheets.Add() .
- Write extracted XML data into the worksheet using Worksheet.SetValue() .
- Save the worksheet to a CSV file using Worksheet.SaveToFile() .
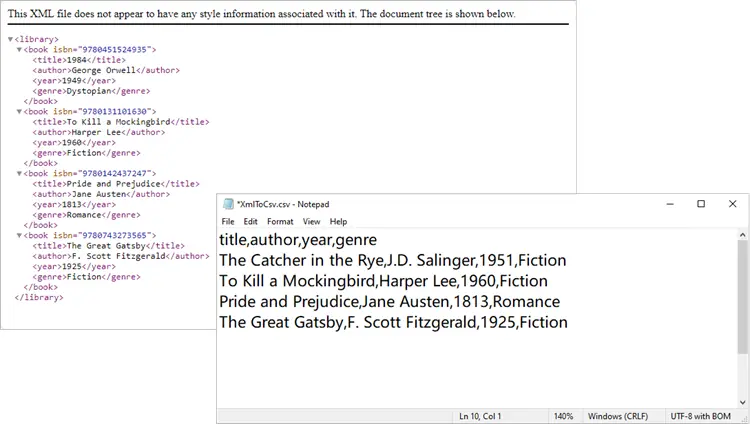
Basic Example: Convert XML to CSV with Python
Let’s start with a basic XML-to-CSV conversion. This example automatically generates headers by inspecting the first <book> element and then exports all child nodes into CSV.
from spire.xls import *
from spire.xls.common import *
import xml.etree.ElementTree as ET

# Create a Workbook object
workbook = Workbook()

# Remove default worksheets
workbook.Worksheets.Clear()

# Add a worksheet and name it
worksheet = workbook.Worksheets.Add("Books")

# Load an XML file
xml_tree = ET.parse("C:\\Users\\Administrator\\Desktop\\Books.xml")

# Get the root element of the XML tree
xml_root = xml_tree.getroot()

# Get the first the "book" element
first_book = xml_root.find("book")

# Extract header information and convert it into a list
header = list(first_book.iter())[1:]

# Write header to Excel
for col_index, header_node in enumerate(header, start=1):
    header_text = header_node.tag
    worksheet.SetValue(1, col_index, header_text)

# Write other data to Excel by iterating over each book element and each data node within it
row_index = 2
for book in xml_root.iter("book"):
    for col_index, data_node in enumerate(list(book.iter())[1:], start=1):
        value = data_node.text
        header_text = list(header[col_index - 1].iter())[0].tag
        worksheet.SetValue(row_index, col_index, value)
    row_index += 1

# Save the document to an Excel file
worksheet.SaveToFile("output/XmlToCsv.csv", ",", Encoding.get_UTF8())

# Dispose resources
workbook.Dispose()
This script works well for simple, flat XML structures. It automatically generates headers (title, author, genre, price) and fills each row with corresponding values.
Output:
You might also be interested in: Convert XML to Excel and PDF in Python
Advanced Techniques
The basic script works in many cases, but XML often isn’t so simple. Let’s go through some advanced techniques to handle real-world scenarios.
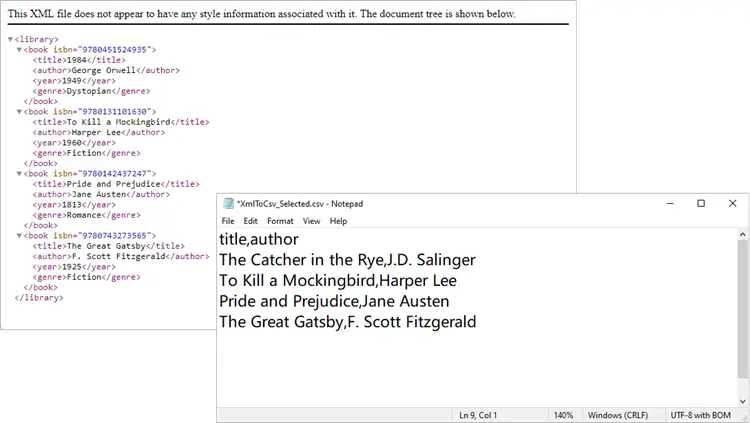
Exporting Only Specific Elements
Sometimes your XML has more data than you need. Maybe you only want to export title and author, ignoring everything else.
from spire.xls import *
from spire.xls.common import *
import xml.etree.ElementTree as ET

# Create a Workbook object
workbook = Workbook()

# Remove default worksheets
workbook.Worksheets.Clear()

# Add a worksheet and name it
worksheet = workbook.Worksheets.Add("Books")

# Load the XML file
xml_tree = ET.parse(r"C:\Users\Administrator\Desktop\Books.xml")
xml_root = xml_tree.getroot()

# Define the elements you want to export
selected_elements = ["title", "author"]

# Write header
for col_index, tag in enumerate(selected_elements, start=1):
    worksheet.SetValue(1, col_index, tag)

# Write data
row_index = 2
for book in xml_root.iter("book"):
    for col_index, tag in enumerate(selected_elements, start=1):
        # Use findtext to handle missing values safely
        worksheet.SetValue(row_index, col_index, book.findtext(tag, ""))
    row_index += 1

# Save the document to a CSV file
worksheet.SaveToFile("output/XmlToCsv_Selected.csv", ",", Encoding.get_UTF8())

# Dispose resources
workbook.Dispose()
This approach ensures your CSV only contains the columns you care about.
Output:
Including XML Attributes in CSV
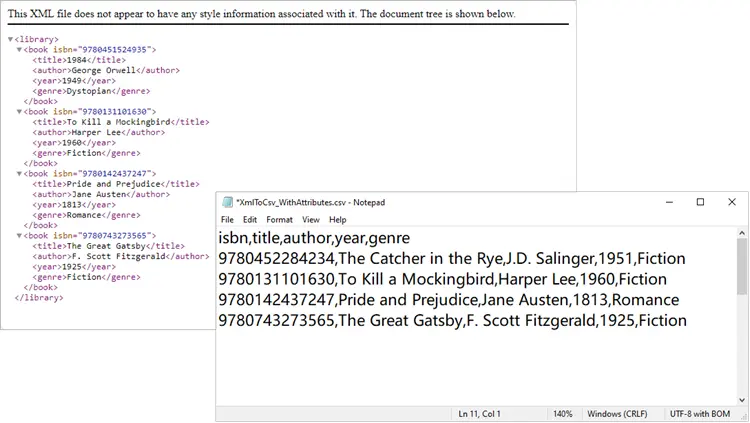
What if your XML contains important data stored as attributes, such as isbn? You can easily include them:
from spire.xls import *
from spire.xls.common import *
import xml.etree.ElementTree as ET

# Create a Workbook object
workbook = Workbook()

# Remove default worksheets
workbook.Worksheets.Clear()

# Add a worksheet and name it
worksheet = workbook.Worksheets.Add("Books")

# Load an XML file
xml_tree = ET.parse(r"C:\Users\Administrator\Desktop\Books.xml")

# Get the root element of the XML tree
xml_root = xml_tree.getroot()

# Get the first the "book" element
first_book = xml_root.find("book")

# Extract header information (child nodes)
header = list(first_book.iter())[1:]

# Write header to Excel
worksheet.SetValue(1, 1, "isbn")   # <-- Add ISBN column first
for col_index, header_node in enumerate(header, start=2):  # start at 2 now
    header_text = header_node.tag
    worksheet.SetValue(1, col_index, header_text)

# Write data
row_index = 2
for book in xml_root.iter("book"):
    # Write isbn as text
    isbn_value = book.attrib.get("isbn", "")
    worksheet.Range[row_index, 1].Text = isbn_value

    # Then write other fields
    for col_index, data_node in enumerate(list(book.iter())[1:], start=2):
        value = data_node.text
        worksheet.SetValue(row_index, col_index, value)

    row_index += 1

# Format the whole ISBN column as text to prevent scientific notation
last_row = row_index - 1
isbn_range = f"A2:A{last_row}"
worksheet.Range[isbn_range].NumberFormat = "@"

# Save the document to an Excel file (CSV format)
worksheet.SaveToFile("output/XmlToCsv_WithAttributes.csv", ",", Encoding.get_UTF8())

# Dispose resources
workbook.Dispose()
Here we explicitly create an ISBN column, extract it from each <book>’s attributes, and format it as text to prevent Excel from displaying it in scientific notation.
Output:
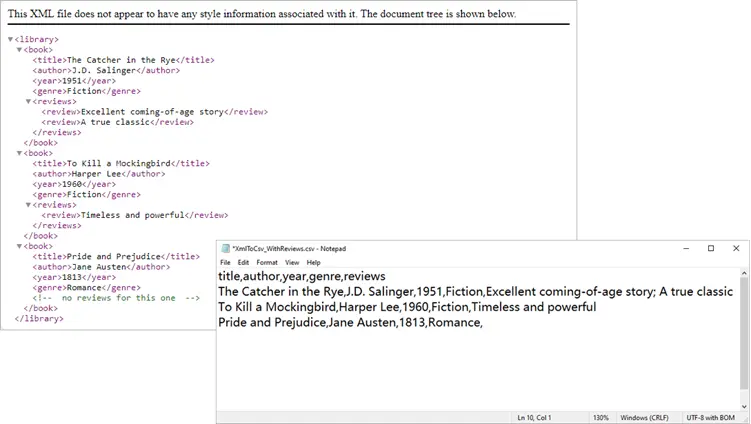
Handling Nested XML Structures
Nested nodes are common. Suppose your XML looks like this:
<catalog>
  <book>
    <title>1984</title>
    <author>George Orwell</author>
    <reviews>
      <review>Excellent read!</review>
      <review>Still relevant today.</review>
    </reviews>
  </book>
</catalog>
Here’s how to collapse multiple <review> entries into a single CSV column:
from spire.xls import *
from spire.xls.common import *
import xml.etree.ElementTree as ET

# Create a Workbook object
workbook = Workbook()

# Remove default worksheets
workbook.Worksheets.Clear()

# Add a worksheet and name it
worksheet = workbook.Worksheets.Add("Books")

# Load an XML file
xml_tree = ET.parse(r"C:\Users\Administrator\Desktop\Nested.xml")
xml_root = xml_tree.getroot()

# Get the first <book> element
first_book = xml_root.find("book")

# Collect headers (auto-detected)
header = []
for child in first_book:
    if child.tag == "reviews":
        header.append("reviews")   # collapse nested <review> into one column
    else:
        header.append(child.tag)

# Write header row
for col_index, header_text in enumerate(header, start=1):
    worksheet.SetValue(1, col_index, header_text)

# Write data rows
row_index = 2
for book in xml_root.iter("book"):
    col_index = 1
    for child in book:
        if child.tag == "reviews":
            # Join all <review> texts into a single cell
            reviews = [r.text for r in child.findall("review") if r.text]
            worksheet.SetValue(row_index, col_index, "; ".join(reviews))
        else:
            worksheet.SetValue(row_index, col_index, child.text if child.text else "")
        col_index += 1
    row_index += 1

# Save to CSV
worksheet.SaveToFile("output/XmlToCsv_WithReviews.csv", ",", Encoding.get_UTF8())

# Dispose resources
workbook.Dispose()
Output:
Spire.XLS not only supports importing data from standard XML files into Excel or CSV, but also allows converting OpenXML (Microsoft's XML-based file format) to Excel. If you're interested, check out this tutorial: How to Convert Excel to OpenXML and OpenXML to Excel in Python.
Troubleshooting and Common Issues
Even with a well-structured script, you may encounter some common issues when converting XML to CSV:
- Scientific notation in Excel
- Problem: Long numeric strings like ISBNs may appear as 9.78045E+12 instead of the full number.
- Solution: Format the column as text before saving, for example:
worksheet.Range["A2:A{last_row}"].NumberFormat = "@" -
Missing values causing errors
- Problem: Some <book> elements may lack optional fields (e.g., <genre>). Attempting to access .text directly can cause errors.
- Solution: Use findtext(tag, "") to safely provide a default empty string.
-
Incomplete or unexpected headers
- Problem: If you generate headers from only the first <book>, you might miss fields that appear later in the XML.
- Solution: Scan multiple elements (or the entire dataset) to build a complete header list before writing data.
-
Encoding issues
- Problem: Special characters (such as accents or symbols) may not display correctly in the CSV.
- Solution: Always save with UTF-8 encoding:
worksheet.SaveToFile("output.csv",",", Encoding.get_UTF8())
Conclusion
Converting XML to CSV in Python doesn’t have to be painful. With Spire.XLS for Python, you can automate much of the process, including header generation, handling attributes, and flattening nested nodes. Whether you’re exporting only a few fields, working with complex hierarchies, or cleaning up messy XML, Spire.XLS gives you the flexibility to handle it.
By integrating these approaches into your workflow, you can turn structured XML datasets into clean, analysis-ready CSV files in just a few lines of code.
FAQs
Q1: Can I export directly to Excel (.xlsx) instead of CSV?
Yes. Simply use workbook.SaveToFile("output.xlsx", ExcelVersion.Version2016).
Q2: How do I handle very large XML files?
Use Python’s iterparse() from xml.etree.ElementTree to stream large files instead of loading them fully into memory.
Q3: What if some <book> elements contain additional tags?
You can enhance the header-building step to scan all <book> nodes and collect unique tags dynamically.
Q4: Can I customize the CSV delimiter (e.g., use ; instead of ,)?
Yes. When calling SaveToFile(), replace the delimiter argument:
worksheet.SaveToFile("output.csv", ";", Encoding.get_UTF8())
Q5: How do I export nested XML structures (e.g., multiple <review> nodes)?
Flatten them into a single cell by joining values. For example:
reviews = [r.text for r in book.find("reviews").findall("review")]
worksheet.SetValue(row_index, col_index, "; ".join(reviews))
Get a Free License
To fully experience the capabilities of Spire.XLS for Python without any evaluation limitations, you can request a free 30-day trial license.
Format Excel with Python: From Basics to Professional Reports
2025-09-11 09:13:41 Written by jie zou
When working with spreadsheets, readability is just as important as the data itself. A well-formatted Excel file makes it easier to analyze, present, and share information. Instead of manually adjusting styles in Excel, you can use Python for Excel formatting to automate the process and save significant time.
This tutorial shows you how to format Excel with Python using the library Spire.XLS for Python. We’ll cover basic styling, advanced formatting, and practical use cases, while also explaining the key classes and properties that make Excel formatting in Python efficient.
Here's What's Covered:
- Why Use Python for Excel Formatting
- Setting Up the Environment and Project
- Basic Excel Formatting in Python
- Extended Excel Formatting in Python
- Key APIs for Excel Styling in Python
- Use Case: Formatting an Excel Report with Python
- Conclusion
- FAQ
Why Use Python for Excel Formatting
Formatting Excel manually is time-consuming, especially when handling large datasets or generating reports dynamically. By using Python Excel formatting, you can:
- Apply consistent formatting to multiple workbooks.
- Automate repetitive tasks like setting fonts, borders, and colors.
- Generate styled reports programmatically for business or research.
- Save time while improving accuracy and presentation quality.
With Python, you can quickly build scripts that apply professional-looking styles to your spreadsheets. Next, let’s see how to set up the environment.
Setting Up the Environment and Project
To follow this tutorial, you need to install Spire.XLS for Python, a library designed for working with Excel files. It supports creating, reading, modifying, and formatting Excel documents programmatically.
Install Spire.XLS for Python
Install the library via pip:
pip install Spire.XLS
Then import it in your Python script:
from spire.xls import *
Creating or Loading an Excel Workbook
Before we start formatting, we need a workbook to work with.
Create a new workbook:
workbook = Workbook()
sheet = workbook.Worksheets[0]
Or load an existing file:
workbook = Workbook()
workbook.LoadFromFile("input.xlsx")
sheet = workbook.Worksheets[0]
After applying formatting, save the result:
workbook.SaveToFile("output/formatted_output.xlsx", ExcelVersion.Version2016)
With the workbook ready, let’s move on to formatting examples.
Basic Excel Formatting in Python
Before diving into advanced operations, it’s important to master the fundamental Excel formatting features in Python. These basic techniques—such as fonts, alignment, borders, background colors, and adjusting column widths or row heights—are the building blocks of clear, professional spreadsheets. Once familiar with them, you can combine and extend these methods to create more complex styles later.
1. Formatting Fonts
Changing font properties is one of the most frequent tasks when working with styled Excel sheets. In Spire.XLS for Python, font settings are accessed through the CellRange.Style.Font object, which lets you control the typeface, size, color, and emphasis (bold, italic, underline).
cell = sheet.Range[2, 2]
cell.Text = "Python Excel Formatting"

cell.Style.Font.FontName = "Arial"
cell.Style.Font.Size = 14
cell.Style.Font.Color = Color.get_Blue()
cell.Style.Font.IsBold = True
This modifies the text appearance directly within the cell by adjusting its style attributes.
2. Alignment and Wrapping
Cell alignment is managed through the HorizontalAlignment and VerticalAlignment properties of the Style object. In addition, the WrapText property ensures that longer text fits within a cell without overflowing.
cell = sheet.Range[4, 2]
cell.Text = "This text is centered and wrapped."

cell.Style.HorizontalAlignment = HorizontalAlignType.Center
cell.Style.VerticalAlignment = VerticalAlignType.Center
cell.Style.WrapText = True
This produces neatly centered text that remains readable even when it spans multiple lines.
3. Adding Borders
Borders are defined through the Borders collection on the Style object, where you can set the line style and color for each edge individually.
cell = sheet.Range[6, 2]
cell.Text = "Border Example"

cell.Style.Borders[BordersLineType.EdgeBottom].LineStyle = LineStyleType.Thin
cell.Style.Borders[BordersLineType.EdgeBottom].Color = Color.get_Black()
This adds a thin black line to separate the cell from the content below.
4. Background Colors
Cell background is controlled by the Style.Color property. This is often used to highlight headers or important values.
cell = sheet.Range[8, 2]
cell.Text = "Highlighted Cell"
cell.Style.Color = Color.get_Yellow()
This makes the cell stand out in the worksheet.
5. Setting Column Widths and Row Heights
Besides styling text and borders, adjusting the column widths and row heights ensures that your content fits properly without overlapping or leaving excessive blank space.
# Set specific column width
sheet.Columns[1].ColumnWidth = 20
# Set specific row height
sheet.Rows[7].RowHeight = 20
In addition to specifying widths and heights, Excel rows and columns can also be automatically adjusted to fit their content:
- Use Worksheet.AutoFitColumn(columnIndex) or Worksheet.AutoFitRow(rowIndex) to adjust a specific column or row.
- Use CellRange.AutoFitColumns() or CellRange.AutoFitRows() to adjust all columns or rows in a selected range.
This helps create well-structured spreadsheets where data is both readable and neatly aligned.
Preview of Basic Formatting Result
Here’s what the basic Excel formatting looks like in practice:
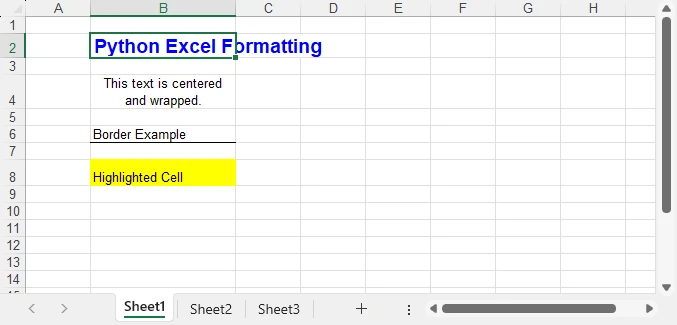
In addition to these visual styles, you can also customize how numbers, dates, or currency values are displayed—see How to Set Excel Number Format in Python for details.
Extended Excel Formatting in Python
Instead of formatting individual cells, you can also work with ranges and reusable styles. These operations typically involve the CellRange object for merging and sizing, and the Workbook.Styles collection for creating reusable Style definitions.
1. Merging Cells
Merging cells is often used to create report titles or section headers that span multiple columns.
range = sheet.Range[2, 2, 2, 4]
range.Merge()
range.Text = "Quarterly Report"
range.Style.HorizontalAlignment = HorizontalAlignType.Center
range.RowHeight = 30
Here, three columns (B2:D2) are merged into one, styled as a bold, centered title with a shaded background—perfect for highlighting key sections in a report.
2. Applying Built-in Styles
Excel comes with a set of predefined styles that can be applied quickly. In Spire.XLS, you can directly assign these built-in styles to ranges.
range.BuiltInStyle = BuiltInStyles.Heading1
This instantly applies Excel’s built-in Heading 1 style, giving the range a consistent and professional appearance without manually setting fonts, borders, or colors.
3. Creating a Custom Style and Applying It
Creating a custom style is useful when you need to apply the same formatting rules across multiple cells or sheets. The Workbook.Styles.Add() method allows you to define a named style that can be reused throughout the workbook.
# Create a custom style
custom_style = workbook.Styles.Add("CustomStyle")
custom_style.Font.FontName = "Calibri"
custom_style.Font.Size = 12
custom_style.Font.Color = Color.get_DarkGreen()
custom_style.Borders[BordersLineType.EdgeTop].LineStyle = LineStyleType.MediumDashDot

# Apply style to a cell
cell = sheet.Range[4, 2]
cell.Text = "Custom Style Applied"
cell.Style = custom_style
This method makes Excel style management in Python more efficient, especially when working with large datasets.
Preview of Advanced Formatting Result
Below is an example showing the results of merged cells, built-in styles, and a custom style applied:
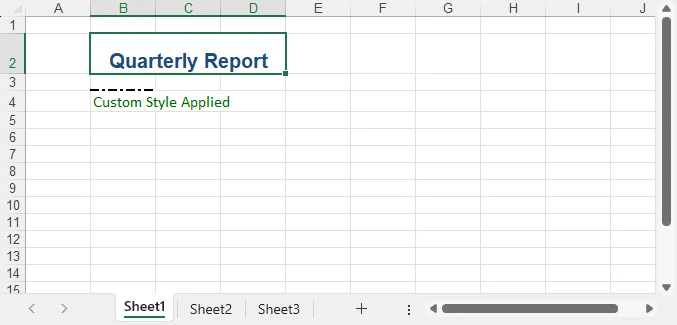
For highlighting data patterns and trends, you can also use conditional rules—see How to Apply Conditional Formatting in Python Excel.
Key APIs for Excel Styling in Python
After exploring both basic and advanced formatting examples, it’s helpful to step back and look at the core classes, properties, and methods that make Excel styling in Python possible. Understanding these elements will give you the foundation to write scripts that are flexible, reusable, and easier to maintain.
The following table summarizes the most important classes, properties, and methods for formatting Excel with Python. You can use it as a quick reference whenever you need to recall the key styling options.
| Class / Property / Method | Description |
|---|---|
| Workbook / Worksheet | Represent Excel files and individual sheets. |
| Workbook.LoadFromFile() / SaveToFile() | Load and save Excel files. |
| Workbook.Styles.Add() | Create and define a custom reusable style that can be applied across cells. |
| CellRange | Represents one or more cells; used for applying styles or formatting. |
| CellRange.Style | Represents formatting information (font, alignment, borders, background, text wrapping, etc.). |
| CellRange.Merge() | Merge multiple cells into a single cell. |
| CellRange.BuiltInStyle | Apply one of Excel’s predefined built-in styles (e.g., Heading1). |
| CellRange.BorderAround() / BorderInside() | Apply border formatting to the outside or inside of a range. |
| CellRange.ColumnWidth / RowHeight | Adjust the width of columns and the height of rows. |
| CellRange.NumberFormat | Defines the display format for numbers, dates, or currency. |
With these building blocks, you can handle common formatting tasks—such as fonts, borders, alignment, colors, and number formats—in a structured and highly customizable way. This ensures that your spreadsheets look professional, remain easy to manage, and can be consistently styled across different Python automation projects. For more details, see the Spire.XLS for Python API reference.
Real-World Use Case: Formatting an Annual Excel Sales Report with Python
Now that we’ve explored both basic and advanced Excel formatting techniques, let’s apply them in a real-world scenario. The following example demonstrates how to generate a comprehensive Excel annual sales report with Python. By combining structured data, regional breakdowns, and advanced formatting, the report becomes much easier to interpret and presents business data in a clear and professional way.
from spire.xls import *

workbook = Workbook()
sheet = workbook.Worksheets[0]
sheet.Name = "Sales Report"

# Report title
title = sheet.Range[1, 1, 1, 7]
title.Merge()
title.Text = "Annual Sales Report - 2024"
title.Style.Font.IsBold = True
title.Style.Font.Size = 16
title.Style.HorizontalAlignment = HorizontalAlignType.Center
title.Style.Color = Color.get_LightGray()
title.RowHeight = 30

# Data
data = [
    ["Product", "Region", "Q1", "Q2", "Q3", "Q4", "Total"],
    ["Laptop", "North", 1200, 1500, 1300, 1600, 5600],
    ["Laptop", "South", 1000, 1200, 1100, 1300, 4600],
    ["Tablet", "North", 800, 950, 1000, 1200, 3950],
    ["Tablet", "South", 700, 850, 900, 1000, 3450],
    ["Phone", "North", 2000, 2200, 2100, 2500, 8800],
    ["Phone", "South", 1800, 1900, 2000, 2200, 7900],
    ["Accessories", "All", 600, 750, 720, 900, 2970],
    ["", "", "", "", "", "Grand Total", 39370]
]

for r in range(len(data)):
    for c in range(len(data[r])):
        sheet.Range[r+2, c+1].Text = str(data[r][c])

# Header formatting
header = sheet.Range[2, 1, 2, 7]
header.Style.Font.IsBold = True
header.Style.Color = Color.get_LightBlue()
header.Style.HorizontalAlignment = HorizontalAlignType.Center
header.Style.Borders[BordersLineType.EdgeBottom].LineStyle = LineStyleType.Thin

# Numeric columns as currency
for row in range(3, 10):
    for col in range(3, 8):
        cell = sheet.Range[row, col]
        if cell.Text.isdigit():
            cell.NumberValue = float(cell.Text)
            cell.NumberFormat = "$#,##0"

# Highlight totals
grand_total = sheet.Range[10, 7]
grand_total.Style.Color = Color.get_LightYellow()
grand_total.Style.Font.IsBold = True

# Freeze the first row and the first two columns
sheet.FreezePanes(2, 3)

# Auto fit columns
sheet.AllocatedRange.AutoFitColumns()

workbook.SaveToFile("output/annual_sales_report.xlsx", ExcelVersion.Version2016)
This script combines several formatting techniques—such as a merged and styled title, bold headers with borders, currency formatting, highlighted totals, and frozen panes—into a single workflow. Applying these styles programmatically improves readability and ensures consistency across every report, which is especially valuable for business and financial data.
Here’s the final styled annual sales report generated with Python:
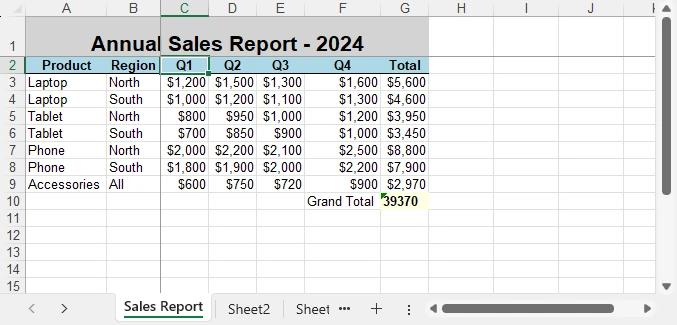
Conclusion
Formatting Excel with Python is a practical way to automate report generation and ensure professional presentation of data. By combining basic styling with advanced techniques like custom styles and column adjustments, you can create clear, consistent, and polished spreadsheets.
Whether you are working on financial reports, research data, or business dashboards, formatting Excel with Python helps you save time while maintaining presentation quality. With the right use of styles, properties, and formatting options, your spreadsheets will not only contain valuable data but also deliver it in a visually effective way.
You can apply for a free temporary license to unlock the full functionality of Spire.XLS for Python or try Free Spire.XLS for Python to get started quickly.
FAQ - Excel Fpormatting in Python
Q1: Can you format Excel with Python?
Yes. Python provides libraries that allow you to apply fonts, colors, borders, alignment, conditional formatting, and more to Excel files programmatically.
Q2: How to do formatting in Python?
For Excel formatting, you can use a library such as Spire.XLS for Python. It lets you change fonts, set alignment, adjust column widths, merge cells, and apply custom or built-in styles through code.
Q3: Can I use Python to edit Excel?
Yes. Python can not only format but also create, read, modify, and save Excel files, making it useful for dynamic reporting and data automation.
Q4: What’s the best way to automate repeated Excel styling tasks?
Define custom styles or reusable functions that standardize formatting rules across multiple workbooks and sheets. This ensures consistency and saves time.
JSON to CSV in Python – Complete Guide for Flat & Nested JSON
2025-09-11 09:05:57 Written by jie zou
JSON (JavaScript Object Notation) is the most widely used format for structured data in web applications, APIs, and configuration files. CSV (Comma-Separated Values) is a popular format for data analysis, reporting, and seamless integration with Excel. Converting JSON to CSV is a common requirement for developers, data engineers, and analysts who need to transform hierarchical JSON data into a tabular format for easier processing, visualization, and automation.
This step-by-step guide demonstrates how to convert JSON to CSV using Python, including techniques for handling flat and nested JSON data, and optimizing performance for large JSON datasets. By following this tutorial, you can streamline your data workflows and efficiently integrate JSON data into Excel or other tabular systems.
What You Will Learn
- Why Convert JSON to CSV
- Understanding JSON Structures
- Python JSON to CSV Converter – Installation
- Step-by-Step JSON to CSV Conversion in Python
- Performance Tips for Exporting Large or Complex JSON Files to CSV
- Conclusion
- FAQs
Why Convert JSON to CSV?
Although JSON is ideal for hierarchical and complex data, CSV offers several practical advantages:
- Spreadsheet Compatibility: CSV files can be opened in Excel, Google Sheets, and other BI tools.
- Ease of Analysis: Tabular data is easier to filter, sort, summarize, and visualize.
- Data Pipeline Integration: Many ETL workflows and reporting systems rely on CSV for seamless data integration.
Real-World Use Cases:
- API Data Extraction: Transform JSON responses from web APIs into CSV for analysis or reporting.
- Reporting Automation: Convert application or system logs into CSV for automated dashboards or scheduled reports.
- Data Analytics: Prepare hierarchical JSON data for Excel, Google Sheets, or BI tools like Tableau to perform pivot tables and visualizations.
- ETL Pipelines: Flatten and export JSON from databases or log files into CSV for batch processing or integration into data warehouses.
Converting JSON files to CSV format bridges the gap between structured storage and table-based analytics, making it a common requirement in reporting, data migration, and analytics pipelines.
Understanding JSON Structures
Before implementing JSON to CSV conversion in Python, it is important to understand the two common structures of JSON data:
- Flat JSON: Each object contains simple key-value pairs.
[
    {"name": "Alice", "age": 28, "city": "New York"},
    {"name": "Bob", "age": 34, "city": "Los Angeles"}
]
- Nested JSON: Objects contain nested dictionaries or arrays.
[
    {
        "name": "Alice",
        "age": 28,
        "contacts": {"email": "alice@example.com", "phone": "123-456"}
    }
]
Flat JSON can be directly mapped to CSV columns, while nested JSON requires flattening to ensure proper tabular representation.
Python JSON to CSV Converter - Installation
To export JSON to CSV in Python, you can use Spire.XLS for Python, a spreadsheet library that enables Python developers to create, read, manipulate, and export spreadsheet files directly from Python. It supports common formats like .xls, .xlsx, .csv, and .ods.
Installation
You can install the library from PyPI via pip:
pip install spire.xls
If you need assistance with the installation, refer to this tutorial: How to Install Spire.XLS for Python on Windows.
Once installed, you can import it into your Python scripts:
from spire.xls import *
This setup allows seamless JSON-to-CSV conversion with complete control over the workbook structure and output format.
Step-by-Step JSON to CSV Conversion in Python
Converting JSON to CSV involves four main steps: loading JSON data, creating a workbook, writing headers and rows, and exporting the final file as CSV. Below, we’ll go through the process for both flat JSON and nested JSON.
Handling Flat JSON Data
Step 1: Load JSON and Create Workbook
First, load your JSON file into Python and create a new workbook where the data will be written.
import json
from spire.xls import *

# Load JSON data
with open('data.json') as f:
    data = json.load(f)

# Create workbook and worksheet
workbook = Workbook()
sheet = workbook.Worksheets[0]
Explanation:
- json.load parses your JSON file into Python objects (lists and dictionaries).
- Workbook() creates a new Excel workbook in memory.
- workbook.Worksheets[0] accesses the first worksheet where data will be written.
Step 2: Write Headers Dynamically
Next, generate column headers from the JSON keys. This ensures that the CSV reflects the structure of your data.
# Extract headers from JSON keys
headers = list(data[0].keys())

# Write headers to the first row
for col, header in enumerate(headers, start=1):
    sheet.Range[1, col].Value = header
Explanation:
- list(data[0].keys()) retrieves all top-level JSON keys.
- sheet.Range[1, col].Value writes headers in the first row, starting from column 1.
Step 3: Write Data Rows
After headers are set, populate the worksheet row by row with values from each JSON object.
# Populate values from each JSON object to the subsequent rows
for row_index, item in enumerate(data, start=2):
    for col_index, key in enumerate(headers, start=1):
        value = item.get(key, "")
        sheet.Range[row_index, col_index].Value = str(value) if value is not None else ""
Explanation:
- Loop starts from row 2 because row 1 is reserved for headers.
- Each JSON object is mapped to a row, and each key is mapped to a column.
Step 4: Save the Worksheet as CSV
Finally, save the worksheet as a CSV file and clean up resources.
# Save the worksheet as a CSV file
sheet.SaveToFile("output.csv", ",", Encoding.get_UTF8())
workbook.Dispose()
Resulting CSV (output.csv):
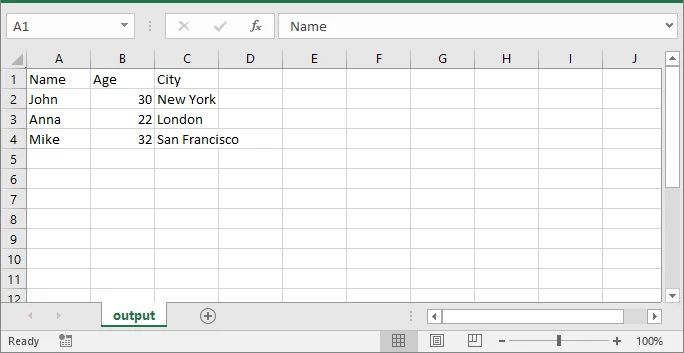
This example uses Python’s built-in json module to parse JSON data. For more details on its functions and usage, refer to the Python json module documentation.
If you also want to implement JSON to Excel conversion, see our guide on converting JSON to/from Excel in Python.
Handling Nested JSON with Dictionaries and Arrays
When JSON objects contain nested dictionaries or arrays, direct CSV export is not possible because CSV is a flat format. To ensure compatibility, nested fields must be flattened to preserve all data in a readable CSV format.
Suppose you have the following JSON file (nested.json) with nested data:
[
    {
        "Name": "Alice",
        "Age": 28,
        "City": "New York",
        "Contacts": {"Email": "alice@example.com", "Phone": "123-456"},
        "Skills": ["Python", "Excel", "SQL"]
    },
    {
        "Name": "Bob",
        "Age": 34,
        "City": "Los Angeles",
        "Contacts": {"Email": "bob@example.com", "Phone": "987-654"},
        "Skills": ["Java", "CSV", "JSON"]
    }
]
This JSON contains:
- Flat fields: Name, Age, City
- Nested dictionary: Contacts
- Array: Skills
To export all fields to CSV, nested dictionaries need to be flattened, and arrays need to be joined into semicolon-separated strings. The following steps show you how to achieve this.
Step 1: Flatten Nested JSON Data
Flattening nested JSON with dictionaries and arrays involves converting nested dictionaries into dot-notation keys and joining array values into a single string. The following helper function performs this flattening:
import json
from spire.xls import *

# ---------------------------
# Step 1: Flatten nested JSON
# ---------------------------
def flatten_json(item):
    flat = {}
    for key, value in item.items():
        if isinstance(value, dict):
            for sub_key, sub_value in value.items():
                flat[f"{key}.{sub_key}"] = sub_value
        elif isinstance(value, list):
            flat[key] = "; ".join(map(str, value))
        else:
            flat[key] = value
    return flat

with open('nested.json') as f:
    data = json.load(f)

flat_data = [flatten_json(item) for item in data]
Explanation:
- flatten_json() checks each field in the JSON object.
- If the value is a dictionary, its keys are prefixed with the parent key (dot notation).
- If the value is a list, all elements are joined into one string separated by semicolons.
- Other values are kept as they are.
- Finally, the original nested JSON is transformed into flat_data, which can now be exported using the same workflow as flat JSON.
Step 2: Export Flattened Data to CSV
After flattening, the export process is the same as flat JSON: create a workbook, generate headers, write rows, and save as CSV.
# ------------------------------------------------
# Step 2: Export flattened data to CSV
# (create workbook, write headers, populate rows, save)
# ------------------------------------------------
workbook = Workbook()
sheet = workbook.Worksheets[0]

# Generate headers from flattened JSON keys
headers = list(flat_data[0].keys())
for col, header in enumerate(headers, start=1):
    sheet.Range[1, col].Value = header

# Populate rows from flat_data
for row_index, item in enumerate(flat_data, start=2):
    for col_index, key in enumerate(headers, start=1):
        value = item.get(key, "")
        sheet.Range[row_index, col_index].Value = str(value) if value is not None else ""

# Save the worksheet as CSV (comma delimiter, UTF-8)
sheet.SaveToFile("output.csv", ",", Encoding.get_UTF8())

# Clean up resources
workbook.Dispose()
Explanation:
- Headers and rows are generated from flat_data (instead of the original data).
- This ensures nested fields (Contacts.Email, Contacts.Phone) and arrays (Skills) are properly included in the CSV.
Resulting CSV (output.csv):
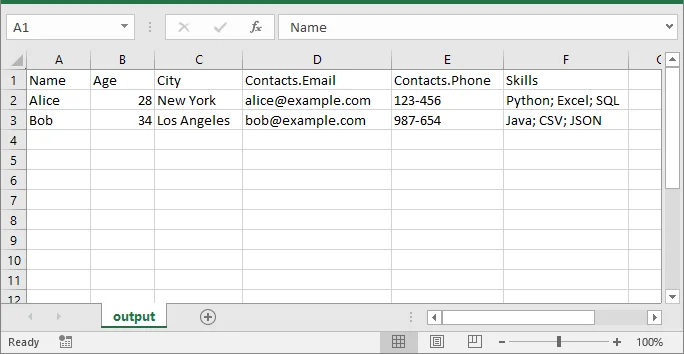
Performance Tips for Exporting Large or Complex JSON Files to CSV
When working with large or complex JSON files, applying a few practical strategies can help optimize memory usage, improve performance, and ensure your CSV output remains clean and accurate.
- For very large datasets, process JSON in chunks to avoid memory issues.
- When arrays are very long, consider splitting into multiple rows instead of joining with semicolons.
- Maintain consistent JSON keys for cleaner CSV output.
- Test the CSV output in Excel to verify formatting, especially for dates and numeric values.
Conclusion
Converting JSON to CSV in Python is essential for developers and data engineers. With Spire.XLS for Python, you can:
- Convert flat and nested JSON into structured CSV.
- Maintain consistent headers and data formatting.
- Handle large datasets efficiently.
- Export directly to CSV or Excel without additional dependencies.
By following this guide, you can seamlessly transform JSON into CSV for reporting, analytics, and integration.
FAQs
Q1: Can Spire.XLS for Python convert nested JSON objects to CSV?
A1: Yes. You can flatten nested JSON objects, including dictionaries and arrays, and export them as readable CSV columns with dynamic headers. This ensures all hierarchical data is preserved in a tabular format.
Q2: How do I install Spire.XLS for Python?
A2: You can install it via pip with the command:
pip install spire.xls
Then import it into your Python script using:
from spire.xls import
This setup enables seamless JSON-to-CSV conversion in Python.
Q3: Can I join array elements from JSON into a single CSV cell?
A3: Yes. You can join array elements from JSON into a single CSV cell using a delimiter like ;. This keeps multiple values readable and consistent in your exported CSV file.
Q4: How can I optimize performance when converting large JSON files to CSV in Python?
A4: To handle large JSON files efficiently: flatten nested JSON before writing, process data row-by-row, and export in batches. This minimizes memory usage and ensures smooth CSV generation.
Q5: Can I customize the CSV delimiter or column order when exporting JSON to CSV?
A5: Yes. Spire.XLS allows you to set custom delimiters (e.g., comma, semicolon, or tab) and manually define the column order, giving you full control over professional CSV output.
How to Convert HTML to Markdown in Python: Step-by-Step Guide
2025-09-05 03:49:00 Written by Administrator
Converting HTML to Markdown using Python is a common task for developers managing web content, documentation, or API data. While HTML provides powerful formatting and structure, it can be verbose and harder to maintain for tasks like technical writing or static site generation. Markdown, by contrast, is lightweight, human-readable, and compatible with platforms such as GitHub, GitLab, Jekyll, and Hugo.
Automating HTML to Markdown conversion with Python streamlines workflows, reduces errors, and ensures consistent output. This guide covers everything from converting HTML files and strings to batch processing multiple files, along with best practices to ensure accurate Markdown results.
What You Will Learn
- Why Convert HTML to Markdown
- Install HTML to Markdown Library for Python
- Convert an HTML File to Markdown in Python
- Convert an HTML String to Markdown in Python
- Batch Conversion of Multiple HTML Files
- Best Practices for HTML to Markdown Conversion
- Conclusion
- FAQs
Why Convert HTML to Markdown?
Before diving into the code, let’s look at why developers often prefer Markdown over raw HTML in many workflows:
- Simplicity and Readability
Markdown is easier to read and edit than verbose HTML tags. - Portability Across Tools
Markdown is supported by GitHub, GitLab, Bitbucket, Obsidian, Notion, and static site generators like Hugo and Jekyll. - Better for Version Control
Being plain text, Markdown makes it easier to track changes with Git, review diffs, and collaborate. - Faster Content Creation
Writing Markdown is quicker than remembering HTML tag structures. - Integration with Static Site Generators
Popular frameworks rely on Markdown as the main content format. Converting from HTML ensures smooth migration. - Cleaner Documentation Workflows
Many documentation systems and wikis use Markdown as their primary format.
In short, converting HTML to Markdown improves maintainability, reduces clutter, and fits seamlessly into modern developer workflows.
Install HTML to Markdown Library for Python
Before converting HTML content to Markdown in Python, you’ll need a library that can handle both formats effectively. Spire.Doc for Python is a reliable choice that allows you to transform HTML files or HTML strings into Markdown while keeping headings, lists, images, and links intact.
You can install it from PyPI using pip:
pip install spire.doc
Once installed, you can automate the HTML to Markdown conversion in your Python scripts. The same library also supports broader scenarios. For example, when you need editable documents, you can rely on its HTML to Word conversion feature to transform web pages into Word files. And for distribution or archiving, HTML to PDF conversion is especially useful for generating standardized, platform-independent documents.
Convert an HTML File to Markdown in Python
One of the most common use cases is converting an existing .html file into a .md file. This is especially useful when migrating old websites, technical documentation, or blog posts into Markdown-based workflows, such as static site generators (Jekyll, Hugo) or Git-based documentation platforms (GitHub, GitLab, Read the Docs).
Steps
- Create a new Document instance.
- Load the .html file into the document using LoadFromFile().
- Save the document as a .md file using SaveToFile() with FileFormat.Markdown.
- Close the document to release resources.
Code Example
from spire.doc import *

# Create a Document instance
doc = Document()

# Load an existing HTML file
doc.LoadFromFile("input.html", FileFormat.Html)

# Save as Markdown file
doc.SaveToFile("output.md", FileFormat.Markdown)

# Close the document
doc.Close()
This converts input.html into output.md, preserving structural elements such as headings, paragraphs, lists, links, and images.
If you’re also interested in the reverse process, check out our guide on converting Markdown to HTML in Python.
Convert an HTML String to Markdown in Python
Sometimes, HTML content is not stored in a file but is dynamically generated—for example, when retrieving web content from an API or scraping. In these scenarios, you can convert directly from a string without needing to create a temporary HTML file.
Steps
- Create a new Document instance.
- Add a Section to the document.
- Add a Paragraph to the section.
- Append the HTML string to the paragraph using AppendHTML().
- Save the document as a Markdown file using SaveToFile().
- Close the document to release resources.
Code Example
from spire.doc import *

# Sample HTML string
html_content = """
<h1>Welcome</h1>
<p>This is a <strong>sample</strong> paragraph with <em>emphasis</em>.</p>
<ul>
  <li>First item</li>
  <li>Second item</li>
</ul>
"""

# Create a Document instance
doc = Document()

# Add a section
section = doc.AddSection()

# Add a paragraph and append the HTML string
paragraph = section.AddParagraph()
paragraph.AppendHTML(html_content)

# Save the document as Markdown
doc.SaveToFile("string_output.md", FileFormat.Markdown)

# close the document to release resources
doc.Close()
The resulting Markdown will look like this:
Batch Conversion of Multiple HTML Files
For larger projects, you may need to convert multiple .html files in bulk. A simple loop can automate the process.
import os
from spire.doc import *

# Define the folder containing HTML files to convert
input_folder = "html_files"

# Define the folder where converted Markdown files will be saved
output_folder = "markdown_files"

# Create the output folder if it doesn't exist
os.makedirs(output_folder, exist_ok=True)

# Loop through all files in the input folder
for filename in os.listdir(input_folder):
    # Process only files with .html extension
    if filename.endswith(".html"):
        # Create a new Document object
        doc = Document()

        # Load the HTML file into the Document object
        doc.LoadFromFile(os.path.join(input_folder, filename), FileFormat.Html)

        # Generate the output file path by replacing .html with .md
        output_file = os.path.join(output_folder, filename.replace(".html", ".md"))

        # Save the Document as a Markdown file
        doc.SaveToFile(output_file, FileFormat.Markdown)

        # Close the Document to release resources
        doc.Close()
This script processes all .html files inside html_files/ and saves the Markdown results into markdown_files/.
Best Practices for HTML to Markdown Conversion
Turning HTML to Markdown makes content easier to read, manage, and version-control. To ensure accurate and clean conversion, follow these best practices:
- Validate HTML Before Conversion
Ensure your HTML is properly structured. Invalid tags can cause incomplete or broken Markdown output. - Understand Markdown Limitations
Markdown does not support advanced CSS styling or custom HTML tags. Some formatting might get lost. - Choose File Encoding Carefully
Always be aware of character encoding. Open and save your files with a specific encoding (like UTF-8) to prevent issues with special characters. - Batch Processing
If converting multiple files, create a robust script that includes error handling (try-except blocks), logging, and skips problematic files instead of halting the entire process.
Conclusion
Converting HTML to Markdown in Python is a valuable skill for developers handling documentation pipelines, migrating web content, or processing data from APIs. With Spire.Doc for Python, you can:
- Convert individual HTML files into Markdown with ease.
- Transform HTML strings directly into .md files.
- Automate batch conversions to efficiently manage large projects.
By applying these methods, you can streamline your workflows and ensure your content remains clean, maintainable, and ready for modern publishing platforms.
FAQs
Q1: Can I convert Markdown back to HTML in Python?
A1: Yes, Spire.Doc supports the conversion of Markdown to HTML, allowing for seamless transitions between these formats.
Q2: Will the conversion preserve complex HTML elements like tables?
A2: While Spire.Doc effectively handles standard HTML elements, it's advisable to review complex layouts, such as tables and nested elements, to ensure accurate conversion results.
Q3: Can I automate batch conversion for multiple HTML files?
A3: Absolutely! You can automate batch conversion using scripts in Python, enabling efficient processing of multiple HTML files at once.
Q4: Is Spire.Doc free to use?
A4: Spire.Doc provides both free and commercial versions, giving developers the flexibility to access essential features at no cost or unlock advanced functionality with a license.
How to Convert Markdown to HTML in Python: Step-by-Step Guide
2025-09-05 02:05:04 Written by Administrator
Markdown (.md) is widely used in web development, documentation, and technical writing. Its simple syntax makes content easy to write and read. However, web browsers do not render Markdown directly. Converting Markdown to HTML ensures your content is structured, readable, and compatible with web platforms.
In this step-by-step guide, you will learn how to efficiently convert Markdown (.md) files into HTML using Python and Spire.Doc for Python, complete with practical code examples, clear instructions, and best practices for both single-file and batch conversions.
Table of Contents
- What is Markdown
- Why Convert Markdown to HTML
- Introducing Spire.Doc for Python
- Step-by-Step Guide: Converting Markdown to HTML in Python
- Automating Batch Conversion
- Best Practices for Markdown to HTML Conversion
- Conclusion
- FAQs
What is Markdown?
Markdown is a lightweight markup language designed for readability and ease of writing. Unlike HTML, which can be verbose and harder to write by hand, Markdown uses simple syntax to indicate headings, lists, links, images, and more.
Example Markdown:
# This is a Heading

This is a paragraph with \*\*bold text\*\* and \*italic text\*.

- Item 1

- Item 2
Even in its raw form, Markdown is easy to read, which makes it popular for documentation, blogging, README files, and technical writing.
For more on Markdown syntax, see the Markdown Guide.
Why Convert Markdown to HTML?
While Markdown is excellent for authoring content, web browsers cannot render it natively. Converting Markdown to HTML allows you to:
- Publish content on websites – Most CMS platforms require HTML for web pages.
- Enhance styling – HTML supports CSS and JavaScript for advanced formatting and interactivity.
- Maintain compatibility – HTML is universally supported by browsers, ensuring content displays correctly everywhere.
- Integrate with web frameworks – Frameworks like React, Vue, and Angular require HTML as the base for rendering components.
Introducing Spire.Doc for Python
Spire.Doc for Python is a robust library for handling multiple document formats. It supports reading and writing Word documents, Markdown files, and exporting content to HTML. The library allows developers to convert Markdown directly to HTML with minimal code, preserving proper formatting and structure.
In addition to HTML, Spire.Doc for Python also allows you to convert Markdown to Word in Python or convert Markdown to PDF in Python, making it particularly useful for developers who want a unified tool for handling Markdown across different output formats.
Benefits of Using Spire.Doc for Python for Markdown to HTML Conversion
- Easy-to-use API – Simple, intuitive methods that reduce development effort.
- Accurate formatting – Preserves all Markdown elements such as headings, lists, links, and emphasis in HTML.
- No extra dependencies – Eliminates the need for manual parsing or third-party libraries.
- Flexible usage – Supports both single-file conversion and automated batch processing.
Step-by-Step Guide: Converting Markdown to HTML in Python
Now that you understand the purpose and benefits of converting Markdown to HTML, let’s walk through a clear, step-by-step process to transform your Markdown files into structured, web-ready HTML.
Step 1: Install Spire.Doc for Python
First, ensure that Spire.Doc for Python is installed in your environment. You can install it directly from PyPI using pip:
pip install spire.doc
Step 2: Prepare Your Markdown File
Next, create a sample Markdown file that you want to convert. For example, example.md:
Step 3: Write the Python Script
Now, write a Python script that loads the Markdown file and converts it to HTML:
from spire.doc import *

# Create a Document object
doc = Document()

# Load the Markdown file
doc.LoadFromFile("example.md", FileFormat.Markdown)

# Save the document as HTML
doc.SaveToFile("example.html", FileFormat.Html)

# Close the document
doc.Close()
Explanation of the code:
- Document() initializes a new document object.
- LoadFromFile("example.md", FileFormat.Markdown) loads the Markdown file into memory.
- SaveToFile("example.html", FileFormat.Html) converts the loaded content into HTML and saves it to disk.
- doc.Close() ensures resources are released properly, which is particularly important when processing multiple files or running batch operations.
Step 4: Verify the HTML Output
Finally, open the generated example.html file in a web browser or HTML editor. Verify that the Markdown content has been correctly converted.

Automating Batch Conversion
You can convert multiple Markdown files in a folder automatically:
import os
from spire.doc import *

# Set the folder containing Markdown files
input_folder = "markdown_files"

# Set the folder where HTML files will be saved
output_folder = "html_files"

# Create the output folder if it doesn't exist
os.makedirs(output_folder, exist_ok=True)

# Loop through all files in the input folder
for filename in os.listdir(input_folder):
    # Process only Markdown files
    if filename.endswith(".md"):
        # Create a new Document object for each file
        doc = Document()

        # Load the Markdown file into the Document object
        doc.LoadFromFile(os.path.join(input_folder, filename), FileFormat.Markdown)

        # Construct the output file path by replacing .md extension with .html
        output_file = os.path.join(output_folder, filename.replace(".md", ".html"))

        # Save the loaded Markdown content as HTML
        doc.SaveToFile(output_file, FileFormat.Html)

        # Close the document to release resources
        doc.Close()
This approach allows you to process multiple Markdown files efficiently and generate corresponding HTML files automatically.
Best Practices for Markdown to HTML Conversion
While the basic steps are enough to complete a Markdown-to-HTML conversion, following a few best practices will help you avoid common pitfalls, improve compatibility, and ensure your output is both clean and professional:
- Use proper Markdown syntax – Ensure headings, lists, links, and emphasis are correctly written.
- Use UTF-8 Encoding: Always save your Markdown files in UTF-8 encoding to avoid issues with special characters or non-English text.
- Batch Processing: If you need to convert multiple files, wrap your script in a loop and process entire folders. This saves time and ensures consistent formatting across documents.
- Enhance Styling: Remember that HTML gives you the flexibility to add CSS and JavaScript for custom layouts, responsive design, and interactivity—something not possible in raw Markdown.
Conclusion
Converting Markdown to HTML using Python with Spire.Doc is simple, reliable, and efficient. It preserves formatting, supports automation, and produces clean HTML output ready for web use. By following this guide, you can implement a smooth Markdown to HTML workflow for both single documents and batch operations.
FAQs
Q1: Can I convert multiple Markdown files to HTML in Python?
A1: Yes, you can automate batch conversions by iterating through Markdown files in a directory and applying the conversion logic to each file.
Q2: Will the HTML preserve all Markdown formatting?
A2: Yes, Spire.Doc effectively preserves all essential Markdown formatting, including headings, lists, bold and italic text, links, and more.
Q3: Is there a way to handle images in Markdown during conversion?
A3: Yes, Spire.Doc supports the conversion of images embedded in Markdown, ensuring they are included in the resulting HTML.
Q4: Do I need additional libraries besides Spire.Doc?
A4: No additional libraries are required. Spire.Doc for Python provides a comprehensive solution for converting Markdown to HTML without any external dependencies.
Q5: Can I use the generated HTML in web frameworks?
A5: Yes, the HTML produced is fully compatible with popular web frameworks such as React, Vue, and Angular, making integration seamless.
