
Python (365)
How to Convert PDF to CSV in Python (Fast & Accurate Table Extraction)
2025-05-19 03:43:16 Written by Administrator
Working with PDFs that contain tables, reports, or invoice data? Manually copying that information into spreadsheets is slow, error-prone, and just plain frustrating. Fortunately, there's a smarter way: you can convert PDF to CSV in Python automatically — making your data easy to analyze, import, or automate.
In this guide, you’ll learn how to use Python for PDF to CSV conversion by directly extracting tables with Spire.PDF for Python — a pure Python library that doesn’t require any external tools.
✅ No Adobe or third-party tools required
✅ High-accuracy table recognition
✅ Ideal for structured data workflows
In this guide, we’ll cover:
- Convert PDF to CSV in Python Using Table Extraction
- Related Use Cases
- Why Use Spire.PDF for PDF to CSV Conversion in Python?
- Frequently Asked Questions
Convert PDF to CSV in Python Using Table Extraction
The best way to convert PDF to CSV using Python is by extracting tables directly — no need for intermediate formats like Excel. This method is fast, clean, and highly effective for documents with structured data such as invoices, bank statements, or reports. It gives you usable CSV output with minimal code and high accuracy, making it ideal for automation and data analysis workflows.
Step 1: Install Spire.PDF for Python
Before writing code, make sure to install the required library. You can install Spire.PDF for Python via pip:
pip install spire.pdfYou can also install Free Spire.PDF for Python if you're working on smaller tasks:
pip install spire.pdf.freeStep 2: Python Code — Extract Table from PDF and Save as CSV
- Python
from spire.pdf import PdfDocument, PdfTableExtractor
import csv
import os
# Load the PDF document
pdf = PdfDocument()
pdf.LoadFromFile("Sample.pdf")
# Create a table extractor
extractor = PdfTableExtractor(pdf)
# Ensure output directory exists
os.makedirs("output/Tables", exist_ok=True)
# Loop through each page in the PDF
for page_index in range(pdf.Pages.Count):
# Extract tables on the current page
tables = extractor.ExtractTable(page_index)
for table_index, table in enumerate(tables):
table_data = []
# Extract all rows and columns
for row in range(table.GetRowCount()):
row_data = []
for col in range(table.GetColumnCount()):
# Get cleaned cell text
cell_text = table.GetText(row, col).replace("\n", "").strip()
row_data.append(cell_text)
table_data.append(row_data)
# Write the table to a CSV file
output_path = os.path.join("output", "Tables", f"Page{page_index + 1}-Table{table_index + 1}.csv")
with open(output_path, "w", newline="", encoding="utf-8") as csvfile:
writer = csv.writer(csvfile)
writer.writerows(table_data)
# Release PDF resources
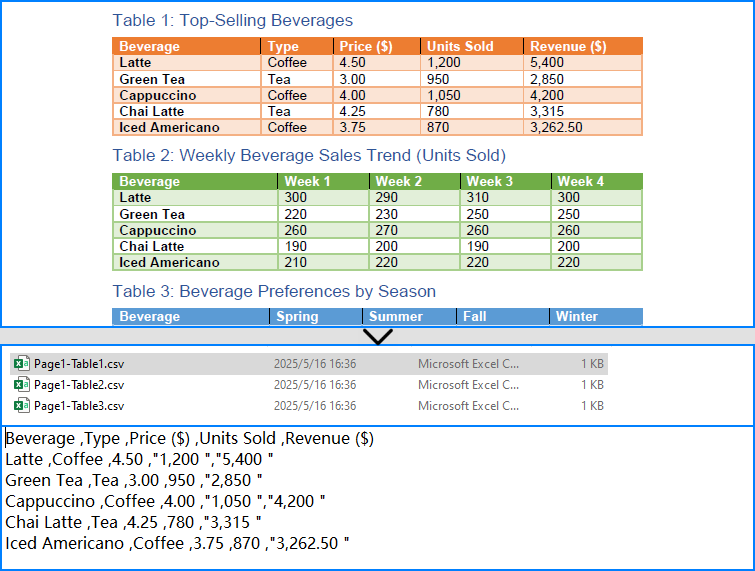
pdf.Dispose()The conversion result:
What is PdfTableExtractor?
PdfTableExtractor is a utility class provided by Spire.PDF for Python that detects and extracts table structures from PDF pages. Unlike plain text extraction, it maintains the row-column alignment of tabular data, making it ideal for converting PDF tables to CSV with clean structure.
Best for:
- PDFs with structured tabular data
- Automated Python PDF to CSV conversion
- Fast Python-based data workflows
Relate Article: How to Convert PDFs to Excel XLSX Files with Python
Related Use Cases
If your PDF doesn't contain traditional tables — such as when it's formatted as paragraphs, key-value pairs, or scanned as an image — the following approaches can help you convert such PDFs to CSV using Python effectively:
Useful when data is in paragraph or report form — format it into table-like CSV using Python logic.
Perfect for image-based PDFs — use OCR to detect and export tables to CSV.
Why Choose Spire.PDF for Python?
Spire.PDF for Python is a robust PDF SDK tailored for developers. Whether you're building automated reports, analytics tools, or ETL pipelines — it just works.
Key Benefits:
- Accurate Table Recognition
Smartly extracts structured data from tables
- Pure Python, No Adobe Needed
Lightweight and dependency-free
- Multi-Format Support
Also supports conversion to text, images, Excel, and more
Frequently Asked Questions
Can I convert PDF to CSV using Python?
Yes, you can convert PDF to CSV in Python using Spire.PDF. It supports both direct table extraction to CSV and an optional workflow that converts PDFs to Excel first. No Adobe Acrobat or third-party tools are required.
What's the best way to extract tables from PDFs in Python?
The most efficient way is using Spire.PDF’s PdfTableExtractor class. It automatically detects tables on each page and lets you export structured data to CSV with just a few lines of Python code — ideal for invoices, reports, and automated processing.
Why would I convert PDF to Excel before CSV?
You might convert PDF to Excel first if the layout is complex or needs manual review. This gives you more control over formatting and cleanup before saving as CSV, but it's slower than direct extraction and not recommended for automation workflows.
Does Spire.PDF work without Adobe Acrobat?
Yes. Spire.PDF for Python is a 100% standalone library that doesn’t rely on Adobe Acrobat or any external software. It's a pure Python solution for converting, extracting, and manipulating PDF content programmatically.
Conclusion
Converting PDF to CSV in Python doesn’t have to be a hassle. With Spire.PDF for Python, you can:
- Automatically extract structured tables to CSV
- Build seamless, automated workflows in Python
- Handle both native PDFs and scanned ones (with OCR)
Get a Free License
Spire.PDF for Python offers a free edition suitable for basic tasks. If you need access to more features, you can also apply for a free license for evaluation use. Simply submit a request, and a license key will be sent to your email after approval.
How to Filter Excel Pivot Tables with Python: Step-by-Step Guide
2025-05-16 10:01:44 Written by Administrator
Introduction
Pivot Tables in Excel are versatile tools that enable efficient data summarization and analysis. They allow users to explore data, uncover insights, and generate reports dynamically. One of the most powerful features of Pivot Tables is filtering, which lets users focus on specific data subsets without altering the original data structure.
What This Tutorial Covers
This tutorial provides a detailed, step-by-step guide on how to programmatically apply various types of filters to a Pivot Table in Excel using Python with the Spire.XLS for Python library. It covers the following topics:
- Benefits of Filtering Data in Pivot Tables
- Install Python Excel Library – Spire.XLS for Python
- Add Report Filter to Pivot Table
- Apply Row Field Filter in Pivot Table
- Apply Column Field Filter in Pivot Table
- FAQs
- Conclusion
Benefits of Filtering Data in Pivot Tables
Filtering is an essential feature of Pivot Tables that provides the following benefits:
- Enhanced Data Analysis: Quickly focus on specific segments or categories of your data to draw meaningful insights.
- Dynamic Data Updates: Filters automatically adjust to reflect changes when the underlying data is refreshed, keeping your analysis accurate.
- Improved Data Organization: Display only relevant data in your reports without altering or deleting the original dataset, preserving data integrity.
Install Python Excel Library – Spire.XLS for Python
Before working with Pivot Tables in Excel using Python, ensure the Spire.XLS for Python library is installed. The quickest way to do this is using pip, Python’s package manager. Simply run the following command in your terminal or command prompt:
pip install spire.xlsOnce installed, you’re ready to start automating Pivot Table filtering in your Python projects.
Add Report Filter to Pivot Table
A report filter allows you to filter the entire Pivot Table based on a particular field and value. This type of filter is useful when you want to display data for a specific category or item globally across the Pivot Table, without changing the layout.
Steps to Add a Report Filter
- Initialize the Workbook: Create a Workbook object to manage your Excel file.
- Load the Excel File: Use Workbook.LoadFromFile() to load an existing file containing a Pivot Table.
- Access the Worksheet: Use Workbook.Worksheets[] to select the desired worksheet.
- Locate the Pivot Table: Use Worksheet.PivotTables[] to access the specific Pivot Table.
- Define the Report Filter: Create a PivotReportFilter object specifying the field to filter.
- Apply the Report Filter: Add the filter to the Pivot Table using XlsPivotTable.ReportFilters.Add().
- Save the Updated File: Use Workbook.SaveToFile() to save your changes.
Code Example
- Python
from spire.xls import *

# Create an object of the Workbook class
workbook = Workbook()

# Load an existing Excel file containing a Pivot Table
workbook.LoadFromFile("Sample.xlsx")

# Access the first worksheet
sheet = workbook.Worksheets[0]

# Access the first Pivot Table in the worksheet
pt = sheet.PivotTables[0]

# Create a report filter for the field "Product"
reportFilter = PivotReportFilter("Product", True)

# Add the report filter to the pivot table
pt.ReportFilters.Add(reportFilter)

# Save the updated workbook to a new file
workbook.SaveToFile("AddReportFilter.xlsx", FileFormat.Version2016)
workbook.Dispose()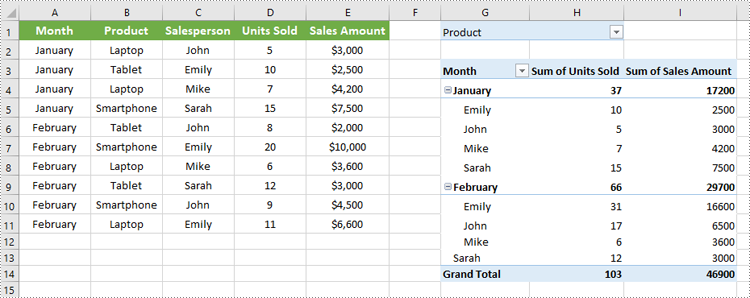
Apply Row Field Filter in Pivot Table
Row field filters allow you to filter data displayed in the row fields of an Excel Pivot Table. These filters can be based on labels (specific text values) or values (numeric criteria).
Steps to Add a Row Field Filter
- Initialize the Workbook: Create a Workbook object to manage the Excel file.
- Load the Excel File: Use Workbook.LoadFromFile() to load your target file containing a Pivot Table.
- Access the Worksheet: Select the desired worksheet using Workbook.Worksheets[].
- Locate the Pivot Table: Access the specific Pivot Table using Worksheet.PivotTables[].
- Add a Row Field Filter: Add a label filter or value filter using
XlsPivotTable.RowFields[].AddLabelFilter() or
XlsPivotTable.RowFields[].AddValueFilter().
- Calculate Pivot Table Data: Use XlsPivotTable.CalculateData() to calculate the pivot table data.
- Save the Updated File: Save your changes using Workbook.SaveToFile().
Code Example
- Python
from spire.xls import *

# Create an object of the Workbook class
workbook = Workbook()

# Load an Excel file
workbook.LoadFromFile("Sample.xlsx")

# Get the first worksheet
sheet = workbook.Worksheets[0]

# Get the first pivot table
pt = sheet.PivotTables[0]

# Add a value filter to the first row field in the pivot table
pt.RowFields[0].AddValueFilter(PivotValueFilterType.GreaterThan, pt.DataFields[0], Int32(5000), None)

# Or add a label filter to the first row field in the pivot table
# pt.RowFields[0].AddLabelFilter(PivotLabelFilterType.Equal, "Mike", None)

# Calculate the pivot table data
pt.CalculateData()

# Save the resulting file
workbook.SaveToFile("AddRowFieldFilter.xlsx", FileFormat.Version2016)
workbook.Dispose()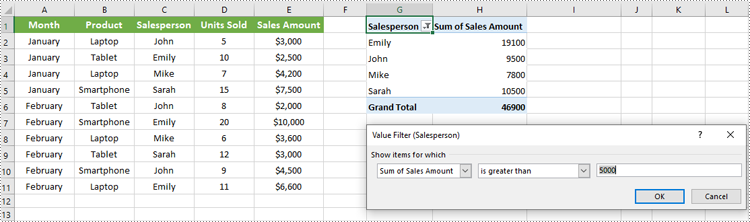
Apply Column Field Filter in Pivot Table
Column field filters in Excel Pivot Tables allow you to filter data displayed in the column fields. Similar to row field filters, column field filters can be based on labels (text values) or values (numeric criteria).
Steps to Add Column Field Filter
- Initialize the Workbook: Create a Workbook object to manage your Excel file.
- Load the Excel File: Use Workbook.LoadFromFile() to open your file containing a Pivot Table.
- Access the Worksheet: Select the target worksheet using Workbook.Worksheets[].
- Locate the Pivot Table: Use Worksheet.PivotTables[] to access the desired Pivot Table.
- Add a Column Field Filter: Add a label filter or value filter using
XlsPivotTable.ColumnFields[].AddLabelFilter() or
XlsPivotTable.ColumnFields[].AddValueFilter().
- Calculate Pivot Table Data: Use XlsPivotTable.CalculateData() to calculate the Pivot Table data.
- Save the Updated File: Save your changes using Workbook.SaveToFile().
Code Example
- Python
from spire.xls import *

# Create an object of the Workbook class
workbook = Workbook()

# Load the Excel file
workbook.LoadFromFile("Sample.xlsx")

# Access the first worksheet
sheet = workbook.Worksheets[0]

# Access the first Pivot Table
pt = sheet.PivotTables[0]

# Add a label filter to the first column field
pt.ColumnFields[0].AddLabelFilter(PivotLabelFilterType.Equal, String("Laptop"), None)

# # Or add a value filter to the first column field
# pt.ColumnFields[0].AddValueFilter(PivotValueFilterType.Between, pt.DataFields[0], Int32(5000), Int32(10000))

# Calculate the pivot table data
pt.CalculateData()

# Save the updated workbook
workbook.SaveToFile("AddColumnFieldFilter.xlsx", FileFormat.Version2016)
workbook.Dispose()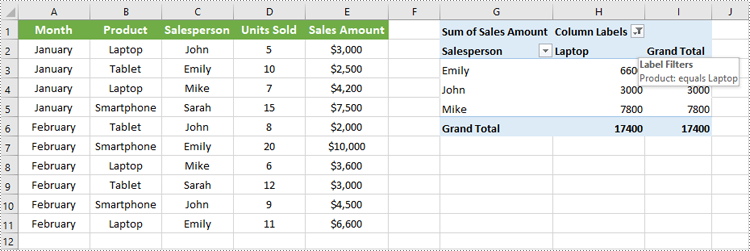
Conclusion
Filtering Pivot Tables in Excel is crucial for effective data analysis, allowing users to zoom in on relevant information without disrupting the table’s structure. Using Spire.XLS for Python, developers can easily automate adding, modifying, and managing filters on Pivot Tables programmatically. This tutorial covered the primary filter types—report filters, row field filters, and column field filters—with detailed code examples to help you get started quickly.
FAQs
Q: Can I add multiple filters to the same Pivot Table?
A: Yes, you can add multiple report filters, row filters, and column filters simultaneously to customize your data views with Spire.XLS.
Q: Do filters update automatically if the source data changes?
A: Yes, after refreshing the Pivot Table or recalculating with CalculateData(), filters will reflect the latest data.
Q: Can I filter based on custom conditions?
A: Spire.XLS supports many filter types including label filters (equals, begins with, contains) and value filters (greater than, less than, between).
Q: Is it possible to remove filters programmatically?
A: Yes, you can remove filters by clearing or resetting the respective filter collections or fields.
Get a Free License
To fully experience the capabilities of Spire.XLS for .NET without any evaluation limitations, you can request a free 30-day trial license.

Barcodes are essential in inventory management, retail systems, logistics, and many other data-driven fields. For Python developers, generating barcodes in Python can be complex—especially when working with multiple formats or large-scale automation. That’s why a reliable Python barcode generator library is necessary to ensure flexible and efficient barcode creation, with support for various barcode types and batch processing.
This article provides an accurate and efficient approach to generating barcodes in Python using Spire.Barcode for Python.
- Get Started with Spire.Barcode for Python
- How to Generate Barcode in Python
- Supported Barcode Types
- Frequently Asked Questions
Get Started with Spire.Barcode for Python
Why Choose Spire.Barcode?
Spire.Barcode for Python is a professional and user-friendly Python Barcode API designed for developers who want to add barcode generation or reading features to their Python applications. Here’s why it stands out:
- Supports multiple barcode symbologies including Code 128, QR Code, EAN-13, UPC, and more
- High-quality image output with complete customization settings
- Comprehensive and easy-to-integrate API
- No need for third-party dependencies
- One library to generate and scan barcodes
Installation and Importing
To install Spire.Barcode for Python, simply run:
pip install spire.barcodeYou can also install Free Spire.Barcode for Python for simple barcode generating tasks:
pip install spire.barcode.freeHow to Generate Barcode in Python
To generate a barcode in Python, you typically need to define the barcode type (such as Code 128 or QR Code) and the content to encode. Using a library like Spire.Barcode, you can configure them in just a few lines of code.
Key Classes and Methods:
- BarcodeSettings: Defines properties such as type, data, color, text, etc.
- BarCodeGenerator: Generates barcode images based on settings.
- GenerateImage(): Outputs barcode as an image stream.
Step 1: Import the Required Modules
To start coding your Python barcode generator, import the necessary classes.
- Python
from spire.barcode import BarcodeSettings, BarCodeType, BarCodeGenerator, Code128SetMode, FontStyle, ColorStep2: Configure Barcode Settings
Create a BarcodeSettings object and define barcode properties:
- Python
# Create a BarcodeSettings object
barcodeSettings = BarcodeSettings()
# Set the barcode type
barcodeSettings.Type = BarCodeType.Code128
# Set the barcode data
barcodeSettings.Data = "ABC123456789"
# Set the barcode code128 set mode
barcodeSettings.Code128SetMode = Code128SetMode.Auto
# Choose the data display position
barcodeSettings.ShowTextOnBottom = True
# Set the bottom text and style
barcodeSettings.BottomText = "Code 128 Example"
barcodeSettings.SetTextFont("Arial", 12.0, FontStyle.Regular)
barcodeSettings.ShowBottomText = True
# Set the background color
barcodeSettings.BackColor = Color.get_Beige()
Step 3: Generate the Barcode Image
Create a BarCodeGenerator object using the configured BarcodeSettings, then generate the barcode image as a stream and save it to a local file:
- Python
# Create a BarCodeGenerator object
barcodeGenerator = BarCodeGenerator(barcodeSettings)
# Generate the barcode image
barcodeImage = barcodeGenerator.GenerateImage()
# Save the image
with open("output/Code 128.png", "wb") as fp:
fp.write(barcodeImage)
The generated barcode:
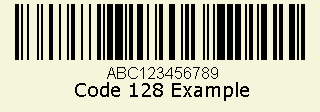
This script allows you to generate a Code 128 barcode and save it as an image. Just replace the BarCodeType and Data value to customize.
Generating Other Barcode Types
Spire.Barcode for Python supports a wide range of barcode symbologies, including the most commonly used types such as Code 39, UPC, QR Code, and EAN-13. This ensures developers can generate barcodes for various applications with compatibility and ease.
Barcode Type Support Overview
| Barcode Category | Barcode Types (Examples) | Free Version | Paid Version |
| 1D Linear Barcodes | Codabar, Code11, Code25, Interleaved25, Code39, Code39Extended, Code93, Code93Extended, Code128, EAN8, EAN13, EAN128, EAN14, UPCA, UPCE, MSI, PostNet, Planet, SCC14, SSCC18, ITF14, ITF6, PZN, OPC | ✅ (Partial) | ✅ (All) |
| 2D Barcodes | QRCode, DataMatrix, Pdf417, Pdf417Macro, Aztec, MicroQR | ✅ (QRCode only) | ✅ (All) |
| Stacked/Composite Codes | RSS14, RSS14Truncated, RSSLimited, RSSExpanded | ❌ | ✅ |
| Postal Barcodes | USPS, SwissPostParcel, DeutschePostIdentcode, DeutschePostLeitcode, RoyalMail4State, SingaporePost4State | ❌ | ✅ |
Advanced: Generate Barcodes in Bulk
You can easily generate multiple barcodes in bulk using Spire.Barcode for Python. This is especially useful for inventory management, batch labeling, or automated systems where each item requires a unique barcode.
Code Example
- Python
# Create a list of barcode data
data = ["Barcode 1", "Barcode 2", "Barcode 3"]
# Loop through the data to generate barcodes
for barcode_data in data:
# Create a BarcodeSettings object
settings = BarcodeSettings()
# Set the barcode type and data
settings.Type = BarCodeType.Code39
settings.Data  = barcode_data
# Create a BarCodeGenerator object
generator = BarCodeGenerator(settings)
# Save the barcode image
barcode_stream = generator.GenerateImage()
with open(f"output/{barcode_data}.png", "wb") as file:
file.write(barcode_stream)
This Python script generates and saves a barcode image for each entry in the list, streamlining barcode creation workflow.
Conclusion
Generating barcodes in Python is simple and efficient with Spire.Barcode for Python. Whether you’re creating a single Code 128 barcode or automating batch QR code generation, this robust and flexible library gives you the control and quality needed for professional barcode integration. From supporting various symbologies to delivering high-quality output with minimal code, this Python barcode generator is an excellent tool for developers across industries.
Frequently Asked Questions
Q: How to create a barcode in Python?
You can create a barcode using libraries like Spire.Barcode for Python, which supports a variety of symbologies like Code 128, QR Code, and more. Just install the package, configure barcode settings, and save the output image.
Q: How is barcode generated?
Barcodes are generated by encoding data into a visual pattern of bars or modules. With Python, this is done through barcode libraries like Spire.Barcode, which translate string input into a corresponding image.
Q: How to create a code generator in Python?
If you're referring to a barcode generator, define the barcode type (e.g., Code 128), provide the data, and use a library like Spire.Barcode to generate and save the image. You can automate this process using loops and functions.
Q: How to generate QR code by Python?
You can use Spire.Barcode for Python to generate QR codes quickly and efficiently. Here's a full example that creates a QR code with embedded data:
- Python
from spire.barcode import BarcodeSettings, BarCodeGenerator, BarCodeType

# Create a BarcodeSettings object
barcodeSettings = BarcodeSettings()
# Set the barcode type to QRCode
barcodeSettings.Type = BarCodeType.QRCode
# Set the barcode data
barcodeSettings.Data = "ABC123456"
# Generate the barcode
barcodeGenerator = BarCodeGenerator(barcodeSettings)
barcodeGenerator.GenerateImage()
with  open("output/QRCode.png", "wb") as f:
f.write(barcodeGenerator.GenerateImage())
Result:

This enables you to embed URLs, text, or IDs into scannable QR images.
See Also: How to Generate and Scan QR Codes with Python
Get a Free License
Spire.Barcode for Python offers a free trial license that removes limitations and watermarking. Get a free license today and explore the full capabilities of this powerful Python barcode library.
Edit PDF Using Python: A Practical Guide to PDF Modification
2025-05-06 03:42:04 Written by Administrator
PDFs are widely used in reports, invoices, and digital forms due to their consistent formatting across platforms. However, their fixed layout makes editing difficult without specialized tools. For developers looking to edit PDF using Python, Spire.PDF for Python provides a comprehensive and easy-to-use solution. This Python PDF editor enables you to modify PDF files programmatically—changing text, replacing images, adding annotations, handling forms, and securing files—without relying on Adobe Acrobat or any external software.
In this article, we will explore how to use Spire.PDF for Python to programmatically edit PDFs in Python applications.
- Why Use Python and Spire.PDF to Edit PDF Documents?
- Getting Started with Spire.PDF for Python
- How to Edit an Existing PDF Using Spire.PDF for Python
- Frequently Asked Questions
Why Use Python and Spire.PDF to Edit PDF Documents?
Python is a highly versatile programming language that provides an excellent platform for automating and managing PDF documents. When it comes to edit PDF Python tasks, Spire.PDF for Python stands out as a comprehensive and easy-to-use solution for all your PDF manipulation needs.
Benefits of Using Python for PDF Editing
- Automation and Batch Processing: Streamline repetitive PDF editing tasks efficiently.
- Cost-Effective: Reduce manual work, saving time and resources when you Python-edit PDF files.
- Integration: Seamlessly incorporate PDF editing into existing Python-based systems and workflows.
Advantages of Spire.PDF for Python
Spire.PDF for Python is a standalone library that enables developers to create, read, edit, convert, and save PDF files without relying on external software. As a trusted Python PDF editor, it offers powerful features such as:
- Text and Image Editing
- Annotations and Bookmark Management
- Form Field Handling
- Security Settings (Encryption and Permissions)
- Conversion to Word, Excel, HTML, and Images
To learn more about these specific features, visit the Spire.PDF for Python tutorials.
With its intuitive API design, Spire.PDF makes it easier than ever to edit PDF files in Python quickly and effectively, ensuring a smooth development experience.
Getting Started with Spire.PDF for Python
Installation:
To install Spire.PDF for Python, simply run the following pip command:
pip install spire.pdf
Alternatively, you can install Free Spire.PDF for Python, a free version suitable for small projects, by running:
pip install spire.pdf.free
You can also download the library manually from the links.
Basic Setup Example:
The following example demonstrates how to create a simple PDF using Spire.PDF for Python:
- Python
from spire.pdf import PdfDocument, PdfFont, PdfBrushes, PdfFontFamily, PdfFontStyle

# Create a new PDF document
pdf = PdfDocument()
# Add a new page to the document
page = pdf.Pages.Add()
# Create a font
font = PdfFont(PdfFontFamily.TimesRoman, 28.0, PdfFontStyle.Bold)
# Create a brush
brush = PdfBrushes.get_Black()
# Draw the string using the font and brush
page.Canvas.DrawString("Hello, World", font, brush, 100.0, 100.0)
# Save the document
pdf.SaveToFile("output/NewPDF.pdf")
pdf.Close()
Result: The generated PDF displays the text "Hello, World" using Times Roman Bold.

With Spire.PDF installed, you're now ready to edit PDFs using Python. The sections below explain how to manipulate structure, content, security, and metadata.
How to Edit an Existing PDF Using Spire.PDF for Python
Spire.PDF for Python provides a simple yet powerful way to edit PDF using Python. With its intuitive API, developers can automate a wide range of PDF editing tasks including modifying document structure, page content, security settings, and properties. This section outlines the core categories of editing and their typical use cases.
Edit PDF Pages and Structure with Python
Structure editing lets you manipulate PDF page order, merge files, or insert/delete pages—ideal for document assembly workflows.
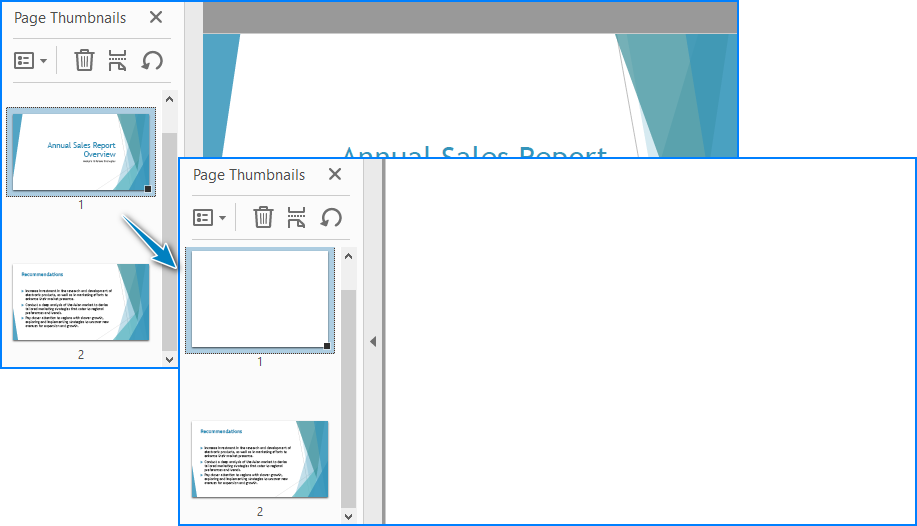
- Insert or Delete Pages
Use the Pages.Insert() and Pages.RemoveAt() methods of the PdfDocument class to insert or delete pages at specific positions.
Code Example
- Python
from spire.pdf import PdfDocument, PdfPageSize, PdfMargins, PdfPageRotateAngle

# Load a PDF document
pdf = PdfDocument()
pdf.LoadFromFile("Sample.pdf")

# Insert and delete pages
# Insert at beginning
pdf.Pages.Insert(0, PdfPageSize.A4(), PdfMargins(50.0, 60.0), PdfPageRotateAngle.RotateAngle90)
# Delete second page
pdf.Pages.RemoveAt(1)

# Save the document
pdf.SaveToFile("output/InsertDeletePage.pdf")
pdf.Close()
Result:
- Merge Two PDF Files
The AppendPage() method allows you to combine PDFs by inserting pages from one document into another.
Code Example
- Python
import os
from spire.pdf import PdfDocument

# Specify the PDF file path
pdfPath = "PDFs/"
# Read the PDF file names from the path and add them to a list
files = [pdfPath + file for file in os.listdir(pdfPath) if file.endswith(".pdf")]

# Load the first PDF file
pdf = PdfDocument()
pdf.LoadFromFile(files[0])
# Iterate through the other PDF files
for i in range(1, len(files)):
    # Load the current PDF file
    pdf2 = PdfDocument()
    pdf2.LoadFromFile(files[i])
    # Append the pages from the current PDF file to the first PDF file
    pdf.AppendPage(pdf2)

# Save the merged PDF file
pdf.SaveToFile("output/MergePDFs.pdf")
pdf.Close()
Result:

You may also like: Splitting PDF Files with Python Code
Edit PDF Content with Python
As a Python PDF editor, Spire.PDF supports a variety of content-level operations, including modifying text, images, annotations, and interactive forms.
- Replace Text in a PDF
The PdfTextReplacer class can be used to find and replace text from a page. Note that precise replacement may require case and layout-aware handling.
Code Example
- Python
from spire.pdf import PdfDocument, PdfTextReplacer, ReplaceActionType, Color

# Load the PDF file
pdf = PdfDocument()
pdf.LoadFromFile("Sample.pdf")

# Iterate through the pages
for i in range(pdf.Pages.Count):
    page = pdf.Pages.get_Item(i)
    # Create a PdfTextReplacer object
    replacer = PdfTextReplacer(page)
    # Set the replacement options
    replacer.Options.ReplaceType = ReplaceActionType.IgnoreCase
    # Replace the text
    replacer.ReplaceAllText("drones", "ROBOTS", Color.get_Aqua()) # Setting the color is optional

# Save the merged PDF file
pdf.SaveToFile("output/ReplaceText.pdf")
pdf.Close()
Result:

- Replace Images in a PDF
Spire.PDF for Python provides the PdfImageHelper class to help you replace images in a PDF file with ease. By retrieving image information from a specific page, you can use the ReplaceImage() method to directly substitute the original image with a new one.
Code Example
- Python
from spire.pdf import PdfDocument, PdfImageHelper, PdfImage

# Load the PDF file
pdf = PdfDocument()
pdf.LoadFromFile("Sample.pdf")

# Get a page
page = pdf.Pages.get_Item(0)

# Create a PdfImageHelper instance
imageHelper = PdfImageHelper()
# Get the image info of the first image on the page
imageInfo = imageHelper.GetImagesInfo(page)[0]
# Load a new image
newImage = PdfImage.FromFile("Image.png")
# Replace the image
imageHelper.ReplaceImage(imageInfo, newImage)

# Save the PDF file
pdf.SaveToFile("output/ReplaceImage.pdf")
pdf.Close()
Result:

- Add Comments or Notes
To add comments or notes with Python, use the PdfTextMarkupAnnotation class and add it to the page’s AnnotationsWidget collection.
Code Example
- Python
from spire.pdf import PdfDocument, PdfTextFinder, PdfTextMarkupAnnotation, PdfRGBColor, Color

# Load the PDF file
pdf = PdfDocument()
pdf.LoadFromFile("Sample.pdf")

# Get a page
page = pdf.Pages.get_Item(0)

#Create a PdfTextFinder instance and set the options
finder = PdfTextFinder(page)
finder.Options.Parameter.IgnoreCase = False
finder.Options.Parameter.WholeWord = True
# Find the text to comment
text = finder.Find("redefining entire industries")[0]

# Get the bound of the text
bound = text.Bounds[0]

# Add comment
commentText = ("This is a powerful expression, but a bit vague. "
                "You might consider specifying which industries are "
                "being redefined and how, to make the claim more "
                "concrete and credible.")
comment = PdfTextMarkupAnnotation("Commenter", commentText, bound)
comment.TextMarkupColor = PdfRGBColor(Color.get_Yellow())
page.AnnotationsWidget.Add(comment)

# Save the PDF file
pdf.SaveToFile("output/CommentNote.pdf")
pdf.Close()
Result:

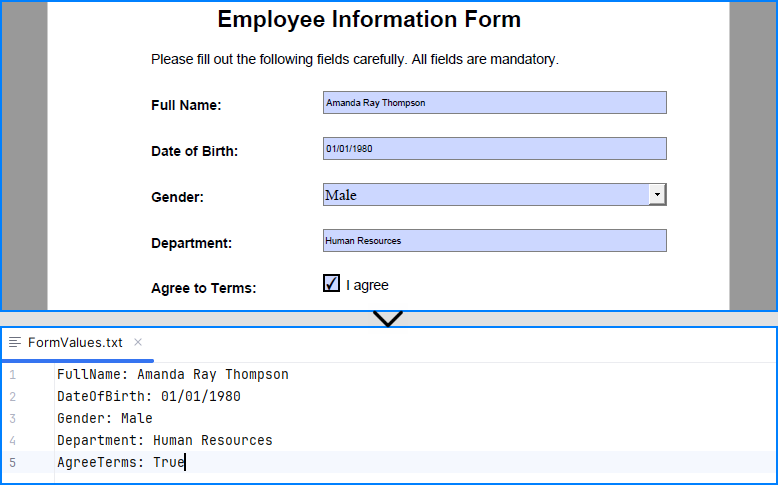
- Edit or Read Form Fields
Spire.PDF for Python allows you to programmatically fill out and read form fields in a PDF document. By accessing the FieldsWidget property of a PdfFormWidget object, you can iterate through all interactive form elements, such as text boxes, combo boxes, and checkboxes, and update or extract their values.
Code Example
- Python
from spire.pdf import PdfDocument, PdfFormWidget, PdfComboBoxWidgetFieldWidget, PdfCheckBoxWidgetFieldWidget, PdfTextBoxFieldWidget

# Load the PDF file
pdf = PdfDocument()
pdf.LoadFromFile("EmployeeInformationForm.pdf")

forms = pdf.Form
formWidgets = PdfFormWidget(forms).FieldsWidget

# Fill the forms
for i in range(formWidgets.Count):
    formField = formWidgets.get_Item(i)
    if formField.Name == "FullName":
        textBox = PdfTextBoxFieldWidget(formField)
        textBox.Text = "Amanda Ray Thompson"
    elif formField.Name == "DateOfBirth":
        textBox = PdfTextBoxFieldWidget(formField)
        textBox.Text = "01/01/1980"
    elif formField.Name == "Gender":
        comboBox = PdfComboBoxWidgetFieldWidget(formField)
        comboBox.SelectedIndex  = [ 1 ]
    elif formField.Name == "Department":
        formField.Value = "Human Resources"
    elif formField.Name == "AgreeTerms":
        checkBox = PdfCheckBoxWidgetFieldWidget(formField)
        checkBox.Checked = True

# Read the forms
formValues = []

for i in range(formWidgets.Count):
    formField = formWidgets.get_Item(i)
    if isinstance(formField, PdfTextBoxFieldWidget):
        formValues.append(formField.Name + ": " + formField.Text)
    elif isinstance(formField, PdfComboBoxWidgetFieldWidget):
        formValues.append(formField.Name + ": " + formField.SelectedValue)
    elif isinstance(formField, PdfCheckBoxWidgetFieldWidget):
        formValues.append(formField.Name + ": " + str(formField.Checked))

# Write the form values to a file
with open("output/FormValues.txt", "w") as file:
    file.write("\n".join(formValues))

# Save the PDF file
pdf.SaveToFile("output/FilledForm.pdf")
pdf.Close()
Result:
Explore more: How to Insert Page Numbers to PDF Using Python
Manage PDF Security with Python
PDF security editing is essential when dealing with sensitive documents. Spire.PDF supports encryption, password protection, digital signature handling, and permission settings.
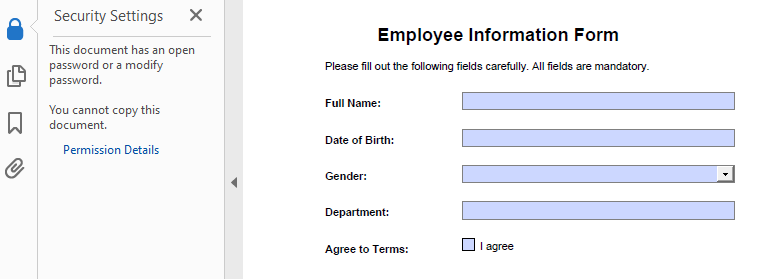
- Add a Password and Set Permissions
The Encrypt() method lets you secure a PDF with user/owner passwords and define allowed actions like printing or copying.
Code Example
- Python
from spire.pdf import PdfDocument, PdfEncryptionAlgorithm, PdfDocumentPrivilege, PdfPasswordSecurityPolicy

# Load the PDF file
pdf = PdfDocument()
pdf.LoadFromFile("EmployeeInformationForm.pdf")

# Create a PdfSecurityPolicy object and set the passwords and encryption algorithm
securityPolicy = PdfPasswordSecurityPolicy("userPSD", "ownerPSD")
securityPolicy.EncryptionAlgorithm = PdfEncryptionAlgorithm.AES_128

# Set the document privileges
pdfPrivileges = PdfDocumentPrivilege.ForbidAll()
pdfPrivileges.AllowPrint = True
pdfPrivileges.AllowFillFormFields  = True
# Apply the document privileges
securityPolicy.DocumentPrivilege = pdfPrivileges

# Encrypt the PDF with the security policy
pdf.Encrypt(securityPolicy)

# Save the PDF file
pdf.SaveToFile("output/EncryptedForm.pdf")
pdf.Close()
Result
- Remove the Password from a PDF
To open a protected file, provide the user password when calling LoadFromFile(), use Decrypt() to decrypt the document, and save it again unprotected.
Code Example
- Python
from spire.pdf import PdfDocument

# Load the encrypted PDF file with the owner password
pdf = PdfDocument()
pdf.LoadFromFile("output/EncryptedForm.pdf", "ownerPSD")

# Decrypt the PDF file
pdf.Decrypt()

# Save the PDF file
pdf.SaveToFile("output/DecryptedForm.pdf")
pdf.Close()
Recommended for you: Use Python to Add and Remove Digital Signature in PDF
Edit PDF Properties with Python
Use Spire.PDF to read and edit PDF metadata and viewer preferences—key features for document presentation and organization.
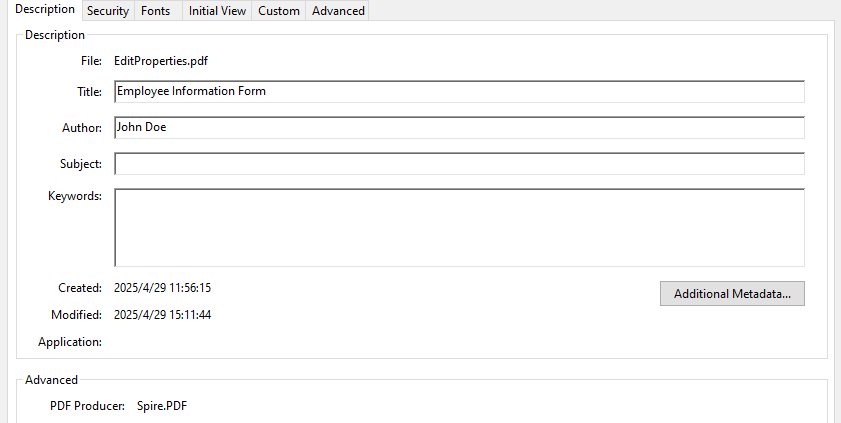
- Update Document Metadata
Update metadata such as title, author, or subject via the DocumentInformation property of the PDF document.
Code Example
- Python
from spire.pdf import PdfDocument

# Load the PDF file
pdf = PdfDocument()
pdf.LoadFromFile("EmployeeInformationForm.pdf")

# Set document metadata
pdf.DocumentInformation.Author = "John Doe"
pdf.DocumentInformation.Title = "Employee Information Form"
pdf.DocumentInformation.Producer  = "Spire.PDF"

# Save the PDF file
pdf.SaveToFile("output/EditProperties.pdf")
pdf.Close()
Result:
- Set View Preferences
The ViewerPreferences property allows you to customize the viewing mode of a PDF (e.g., two-column layout).
Code Example
- Python
from spire.pdf import PdfDocument, PdfPageLayout, PrintScalingMode

# Load the PDF file
pdf = PdfDocument()
pdf.LoadFromFile("EmployeeInformationForm.pdf")

# Set the viewer preferences
pdf.ViewerPreferences.DisplayTitle = True
pdf.ViewerPreferences.HideToolbar = True
pdf.ViewerPreferences.HideWindowUI = True
pdf.ViewerPreferences.FitWindow = False
pdf.ViewerPreferences.HideMenubar = True
pdf.ViewerPreferences.PrintScaling = PrintScalingMode.AppDefault
pdf.ViewerPreferences.PageLayout = PdfPageLayout.OneColumn

# Save the PDF file
pdf.SaveToFile("output/EditViewerPreference.pdf")
pdf.Close()
Result:

Similar topic: Change PDF Version Easily with Python Code
Conclusion
Editing PDFs using Python is both practical and efficient with Spire.PDF for Python. Whether you're building automation tools, editing digital forms, or securing sensitive reports, Spire.PDF equips you with a comprehensive suite of editing features—all accessible via clean and simple Python code.
With capabilities that span content editing, form interaction, document structuring, and security control, this Python PDF editor is a go-to solution for developers and organizations aiming to streamline their PDF workflows.
Frequently Asked Questions
Q: Can I edit a PDF using Python?
A: Yes, Python offers powerful libraries like Spire.PDF for Python that enable you to edit text, images, forms, annotations, and even security settings in a PDF file.
Q: How to edit a PDF using coding?
A: By using libraries such as Spire.PDF for Python, you can load an existing PDF, modify its content or structure programmatically, and save the changes with just a few lines of code.
Q: What is the Python library for PDF editor?
A: Spire.PDF for Python is a popular choice. It offers comprehensive functionalities for creating, reading, editing, converting, and securing PDF documents without the need for additional software.
Q: Can I modify a PDF for free?
A: Yes, you can use the free edition of Spire.PDF for Python to edit PDF files, although it comes with some limitations, such as processing up to 10 pages per document. Additionally, you can apply for a 30-day temporary license that removes all limitations and watermarks for full functionality testing.
PDF documents may occasionally include blank pages. These pages can affect the reading experience, increase the file size and lead to paper waste during printing. To improve the professionalism and usability of a PDF document, detecting and removing blank pages is an essential step.
This article shows how to accurately detect and remove blank pages—including those that appear empty but actually contain invisible elements—using Python, Spire.PDF for Python, and Pillow.
Install Required Libraries
This tutorial requires two Python libraries:
- Spire.PDF for Python: Used for loading PDFs and detecting/removing blank pages.
- Pillow: A library for image processing that helps detect visually blank pages, which may contain invisible content.
You can easily install both libraries using pip:
pip install Spire.PDF Pillow
Need help installing Spire.PDF? Refer to this guide:
How to Install Spire.PDF for Python on Windows
How to Effectively Detect and Remove Blank Pages from PDF Files in Python
Spire.PDF provides a method called PdfPageBase.IsBlank() to check if a page is completely empty. However, some pages may appear blank but actually contain hidden content like white text, watermarks, or background images. These cannot be reliably detected using the PdfPageBase.IsBlank() method alone.
To ensure accuracy, this tutorial adopts a two-step detection strategy:
- Use the PdfPageBase.IsBlank() method to identify and remove fully blank pages.
- Convert non-blank pages to images and analyze them using Pillow to determine if they are visually blank.
⚠️ Important:
If you don’t use a valid license during the PDF-to-image conversion, an evaluation watermark will appear on the image, potentially affecting the blank page detection.
Contact the E-iceblue sales team to request a temporary license for proper functionality.
Steps to Detect and Remove Blank Pages from PDF in Python
Follow these steps to implement blank page detection and removal in Python:
1. Define a custom is_blank_image() Method
This custom function uses Pillow to check whether the converted image of a PDF page is blank (i.e., if all pixels are white).
2. Load the PDF Document
Load the PDF using the PdfDocument.LoadFromFile() method.
3. Iterate Through Pages
Loop through each page to check if it’s blank using two methods:
- If the PdfPageBase.IsBlank() method returns True, remove the page directly.
- If not, convert the page to an image using the PdfDocument.SaveAsImage() method and analyze it with the custom is_blank_image() method.
4. Save the Result PDF
Finally, save the PDF with blank pages removed using the PdfDocument.SaveToFile() method.
Code Example
- Python
import io
from spire.pdf import PdfDocument
from PIL import Image

# Custom function: Check if the image is blank (whether all pixels are white)
def is_blank_image(image):
        # Convert to RGB mode and then get the pixels
        img = image.convert("RGB")
        # Get all pixel points and check if they are all white
        white_pixel = (255, 255, 255)
        return all(pixel == white_pixel for pixel in img.getdata())

# Load the PDF document
pdf = PdfDocument()
pdf.LoadFromFile("Sample1111.pdf")

# Iterate through each page in reverse order to avoid index issues when deleting
for i in range(pdf.Pages.Count - 1, -1, -1):
    page = pdf.Pages.get_Item(i)
    # Check if the current page is completely blank
    if page.IsBlank():
        # If it's completely blank, remove it directly from the document
        pdf.Pages.RemoveAt(i)
    else:
        # Convert the current page to an image
        with pdf.SaveAsImage(i) as image_data:
            image_bytes = image_data.ToArray()
            pil_image = Image.open(io.BytesIO(image_bytes))
            # Check if the image is blank
            if is_blank_image(pil_image):
                # If it's a blank image, remove the corresponding page from the document
                pdf.Pages.RemoveAt(i)

# Save the resulting PDF
pdf.SaveToFile("RemoveBlankPages.pdf")
pdf.Close()

Frequently Asked Questions (FAQs)
Q1: What is considered a blank page in a PDF file?
A: A blank page may be truly empty or contain hidden elements such as white text, watermarks, or transparent objects. This solution detects both types using a dual-check strategy.
Q2: Can I use this method without a Spire.PDF license?
A: Yes, you can run it without a license. However, during PDF-to-image conversion, an evaluation watermark will be added to the output images, which may affect the accuracy of blank page detection. It's best to request a free temporary license for testing.
Q3: What versions of Python are compatible with Spire.PDF?
A: Spire.PDF for Python supports Python 3.7 and above. Ensure that Pillow is also installed to perform image-based blank page detection.
Q4: Can I modify the script to only detect blank pages without deleting them?
A: Absolutely. Just remove or comment out the pdf.Pages.RemoveAt(i) line and use print() or logging to list detected blank pages for further review.
Conclusion
Removing unnecessary blank pages from PDF files is an important step in optimizing documents for readability, file size, and professional presentation. With the combined power of Spire.PDF for Python and Pillow, developers can precisely identify both completely blank pages and pages that appear empty but contain invisible content. Whether you're generating reports, cleaning scanned files, or preparing documents for print, this Python-based solution ensures clean and efficient PDFs.
Get a Free License
To fully experience the capabilities of Spire.PDF for Python without any evaluation limitations, you can request a free 30-day trial license.
Introduction
Digital signatures help verify the authenticity and integrity of PDF documents. However, if a signing certificate expires or is revoked, the signature alone may no longer be considered valid. To solve this, a timestamp can be added to the digital signature, proving that the document was signed at a specific point in time-validated by a trusted Time Stamp Authority (TSA).
In this tutorial, we will introduce how to use the Spire.PDF for Python library to digitally sign a PDF document with a timestamp in Python.
Prerequisites
To follow this tutorial, ensure you have the following:
- Spire.PDF for Python library
- A valid digital certificate (.pfx file)
- A sample PDF file
- An image to display as the signature appearance (optional)
- A reliable Time Stamp Authority (TSA) URL
pip install Spire.PDF
How to Digitally Sign a PDF with a Timestamp in Python
In Spire.PDF for Python, the Security_PdfSignature class is used to create a digital signature, and the ConfigureTimestamp(tsaUrl) method in this class is used to embed a timestamp into the signature. The tsaUrl parameter specifies the address of the TSA server.
Steps to Add a Timestamped Digital Signature
Follow these steps to add a timestamped digital signature to a PDF in Python using Spire.PDF for Python:
- Create a PdfDocument instance and use the LoadFromFile() method to load the PDF you want to sign.
- Create a Security_PdfSignature object, specifying the target page, certificate file path, certificate password, and signature name.
- Configure the signature's appearance, including its position, size, display labels, and signature image.
- Embed a timestamp by calling the ConfigureTimestamp(tsaUrl) method with a valid Time Stamp Authority (TSA) URL.
- Save the signed PDF using the SaveToFile() method.
Code Example
- Python
from spire.pdf import *

inputFile = "Sample.pdf"
inputFile_pfx = "gary.pfx"
inputImage = "E-iceblueLogo.png"
outputFile = "SignWithTimestamp.pdf"

# Create a PdfDocument instance and load the PDF file to be signed
doc = PdfDocument()
doc.LoadFromFile(inputFile)

# Create a digital signature object by specifying the document, target page, certificate file path, certificate password, and signature name
signature = Security_PdfSignature(doc, doc.Pages.get_Item(0), inputFile_pfx, "e-iceblue", "signature")

# Define the position and size of the signature on the page (unit: point)
signature.Bounds = RectangleF(PointF(90.0, 600.0), SizeF(180.0, 90.0))

# Set the labels and content for the signature details
signature.NameLabel = "Digitally signed by: "
signature.Name = "Gary"
signature.LocationInfoLabel = "Location: "
signature.LocationInfo = "CN"
signature.ReasonLabel = "Reason: "
signature.Reason = "Ensure authenticity"
signature.ContactInfoLabel = "Contact Number: "
signature.ContactInfo = "028-81705109"

# Set document permissions: allow form filling, forbid further changes
signature.DocumentPermissions = PdfCertificationFlags.AllowFormFill.value | PdfCertificationFlags.ForbidChanges.value

# Set the graphic mode to include both image and signature details,
# and set the signature image
signature.GraphicsMode = Security_GraphicMode.SignImageAndSignDetail
signature.SignImageSource = PdfImage.FromFile(inputImage)

# Embed a timestamp into the signature using a Time Stamp Authority (TSA) server
url = "http://tsa.cesnet.cz:3161/tsa"
signature.ConfigureTimestamp(url)

# Save the signed PDF and close the document
doc.SaveToFile(outputFile)
doc.Close()
View the Timestamp in PDF
When you open the signed PDF in a viewer like Adobe Acrobat, you can click the Signature Panel to view both the digital signature and the timestamp, which confirm the document’s validity and the signing time:

Get a Free License
To fully experience the capabilities of Spire.PDF for Python without any evaluation limitations, you can request a free 30-day trial license.
Conclusion
Timestamping enhances the reliability of digital signatures by proving when a PDF was signed-even after the certificate has expired. With Spire.PDF for Python, implementing a timestamped digital signature is a straightforward process. Whether you're handling contracts, invoices, or confidential records, this approach ensures long-term document validity and compliance.
PostScript, developed by Adobe, is a page description language known for its high-quality graphics and text rendering capabilities. By converting PDF to PostScript, you can have a precise control over complex graphics, fonts and colors when printing brochures, magazines, advertisements, or other materials.
PCL, on the other hand, is a printer control language developed by Hewlett-Packard. It is designed to be efficient and easy for the printers to interpret. Converting PDF to PCL ensures compatibility with a large number of printers and also optimizes the printing speed for text-heavy documents such as academic reports, letters, or contracts.
This article will demonstrate how to convert PDF to PS or PDF to PCL in Python using Spire.PDF for Python.
Install Spire.PDF for Python
This scenario requires Spire.PDF for Python. It can be easily installed in your Windows through the following pip command.
pip install Spire.PDF
If you are unsure how to install, please refer to this tutorial: How to Install Spire.PDF for Python on Windows
Convert PDF to PostScript in Python
Converting PDF to PS can improve the quality of the printed output. Spire.PDF for .NET allows you to load a PDF file and then converting it to PS format using PdfDocument.SaveToFile(filename: string, FileFormat.POSTSCRIPT) method. The following are the detailed steps.
- Create a PdfDocument instance.
- Load a PDF file using PdfDocument.LoadFromFile() method.
- Save the PDF file to PostScript format using PdfDocument.SaveToFile(filename: string, FileFormat.POSTSCRIPT) method.
- Python
from spire.pdf.common import *
from spire.pdf import *

# Specify the input and output file paths
inputFile = "input1.pdf"
outputFile = "PdfToPostScript.ps"

# Create a PdfDocument instance
pdf = PdfDocument()

# Load a PDF document
pdf.LoadFromFile(inputFile)

# Convert the PDF to a PostScript file
pdf.SaveToFile(outputFile, FileFormat.POSTSCRIPT)
pdf.Close()

Convert PDF to PCL in Python
Converting PDF to PCL can ensure faster printing speed. By using the PdfDocument.SaveToFile(filename: string, FileFormat.PCL) method, you can save a loaded PDF file as a PCL file. The following are the detailed steps.
- Create a PdfDocument instance.
- Load a PDF file using PdfDocument.LoadFromFile() method.
- Save the PDF file to PCL format using PdfDocument.SaveToFile(filename: string, FileFormat.PCL) method.
- Python
from spire.pdf.common import *
from spire.pdf import *

# Specify the input and output file paths
inputFile = "input1.pdf"
outputFile = "ToPCL\\PdfToPcl.pcl"

# Create a PdfDocument instance
pdf = PdfDocument()

# Load a PDF document
pdf.LoadFromFile(inputFile)

# Convert the PDF to a PCL file
pdf.SaveToFile(outputFile, FileFormat.PCL)
pdf.Close()

Get a Free License
To fully experience the capabilities of Spire.PDF for Python without any evaluation limitations, you can request a free 30-day trial license.
In Microsoft Excel, each worksheet acts as a unique space for organizing distinct sets of data, projects, or analyses. Efficient management of these worksheets is crucial for quick navigation and effective data handling. By renaming worksheets, users can create intuitive labels that clearly indicate the content of each sheet, making it easier to locate specific information. Furthermore, customizing tab colors enhances visual organization, allowing users to differentiate between various sections or categories at a glance.
In this article, we will demonstrate how to change worksheet names and set tab colors in Excel using Python and the Spire.XLS for Python library.
Install Spire.XLS for Python
This scenario requires Spire.XLS for Python and plum-dispatch v1.7.4. They can be easily installed in your Windows through the following pip command.
pip install Spire.XLS
If you are unsure how to install, please refer to this tutorial: How to Install Spire.XLS for Python on Windows
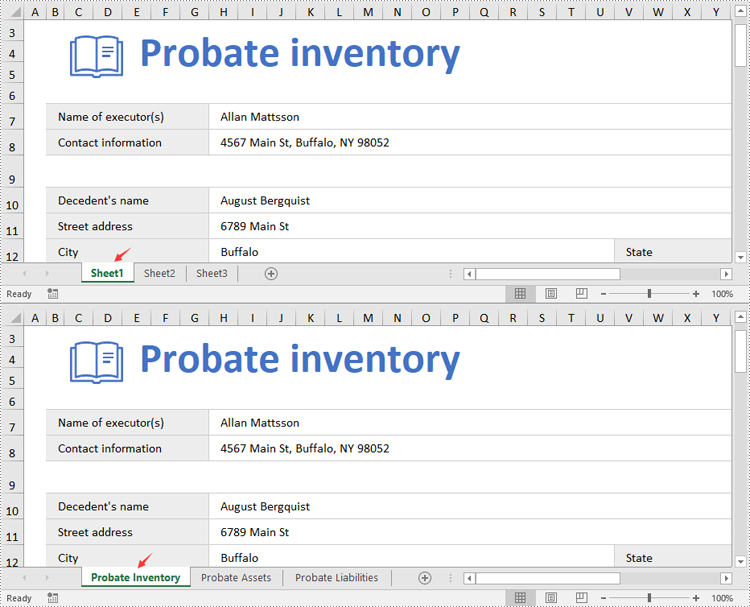
Change Worksheet Names in Excel in Python
Spire.XLS for Python provides the Worksheet.Name property to rename a worksheet in an Excel file. The detailed steps are as follows.
- Create an object of the Workbook class.
- Load a sample Excel file using the Workbook.LoadFromFile() method.
- Get the desired worksheet using the Worbook.Worksheets[] property.
- Rename the worksheet using the Worksheet.Name property.
- Save the result file using the Workbook.SaveToFile() method.
- Python
from spire.xls import *
from spire.xls.common import *

# Specify the input and output file paths
inputFile = "Sample1.xlsx"
outputFile = "RenameWorksheets.xlsx"

# Create an object of the Workbook class
workbook = Workbook()
# Load a sample Excel file
workbook.LoadFromFile(inputFile)

# Rename the first worksheet
sheet = workbook.Worksheets[0]
sheet.Name = "Probate Inventory"

# Rename the second worksheet
sheet = workbook.Worksheets[1]
sheet.Name = "Probate Assets"

# Rename the third worksheet
sheet = workbook.Worksheets[2]
sheet.Name = "Probate Liabilities"

# Save the result file
workbook.SaveToFile(outputFile, ExcelVersion.Version2013)
workbook.Dispose()
Set Worksheet Tab Colors in Excel in Python
The Worksheet.TabColor property allows setting a tab color for a worksheet in an Excel file. The detailed steps are as follows.
- Create an object of the Workbook class.
- Load a sample Excel file using the Workbook.LoadFromFile() method.
- Get the desired worksheet using the Worbook.Worksheets[] property.
- Rename the worksheet using the Worksheet.TabColor property.
- Save the result file using the Workbook.SaveToFile() method.
- Python
from spire.xls import *
from spire.xls.common import *

# Specify the input and output file paths
inputFile = "Sample2.xlsx"
outputFile = "SetTabColor.xlsx"

# Create an object of the Workbook class
workbook = Workbook()
# Load a sample Excel file
workbook.LoadFromFile(inputFile)

# Set the tab color for the first worksheet
worksheet = workbook.Worksheets[0]
worksheet.TabColor = Color.get_Red()

# Set the tab color for the second worksheet
worksheet = workbook.Worksheets[1]
worksheet.TabColor = Color.get_Green()

# Set the tab color for the third worksheet
worksheet = workbook.Worksheets[2]
worksheet.TabColor = Color.get_LightBlue()

# Save the result file
workbook.SaveToFile(outputFile, ExcelVersion.Version2013)
workbook.Dispose()

Get a Free License
To fully experience the capabilities of Spire.XLS for Python without any evaluation limitations, you can request a free 30-day trial license.
Worksheet names can be used as unique identifiers for different collections of data in a workbook. When working with large Excel files that contain multiple worksheets, knowing the name of each worksheet can help you quickly identify where specific types of information are stored. In this article, you will learn how to get worksheet names in Excel in Python using Spire.XLS for Python.
Install Spire.XLS for Python
This scenario requires Spire.XLS for Python and plum-dispatch v1.7.4. They can be easily installed in your Windows through the following pip command.
pip install Spire.XLS
If you are unsure how to install, please refer to this tutorial: How to Install Spire.XLS for Python on Windows
Get All Worksheet Names in Excel in Python
The Worksheet.Name property returns the name of a Worksheet. To retrieve the names of all the worksheets in Excel (including hidden ones), you can iterate through each worksheet and get their names with this property. The following are the detailed steps:
- Create a Workbook instance.
- Load an Excel file using Workbook.LoadFromFile() method.
- Create a list to store the retrieved worksheet names.
- Iterate through each worksheet.
- Get the name of each worksheet through Worksheet.Name property and append it to the list.
- Write the contents of the list to a text file.
- Python
from spire.xls import *
from spire.xls.common import *

# Specifiy the input and output file paths
inputFile = "BudgetSum.xlsx"
outputFile = "GetWorksheetNames.txt"

# Create a Workbook instance
workbook = Workbook()

# Load an Excel file
workbook.LoadFromFile(inputFile)

# Create a list to store the worksheet names
names = []

# Iterate through each worksheet
for sheet in workbook.Worksheets:

    # Get each worksheet name and add it to the list
    names.append(sheet.Name)

# Write to a txt file
with open(outputFile, "w", encoding="utf-8") as file:
    file.write("\n".join(names))

Get Hidden Worksheet Names in Excel in Python
If you only need to retrieve the names of the hidden worksheets, you can first iterate through each worksheet to determine whether a worksheet is hidden, and if so, get its name through the Worksheet.Name property. The following are the detailed steps:
- Create a Workbook instance.
- Load an Excel file using Workbook.LoadFromFile() method.
- Create a list to store the retrieved worksheet names.
- Iterate through each worksheet and find the hidden worksheets.
- Get the names of the hidden worksheets through Worksheet.Name property and append them to the list.
- Write the contents of the list to a text file.
- Python
from spire.xls import *
from spire.xls.common import *

# Specifiy the input and output file paths
inputFile = "BudgetSum.xlsx"
outputFile = "GetHiddenWorksheetNames.txt"

# Create a Workbook instance
workbook = Workbook()

# Load an Excel file
workbook.LoadFromFile(inputFile)

# Create a list to store the worksheet names
names = []

# Iterate through each worksheet
for sheet in workbook.Worksheets:

    # Detect the hidden worksheet
    if sheet.Visibility == WorksheetVisibility.Hidden:

        # Get the hidden worksheet name and add it to the list
        names.append(sheet.Name)

# Write to a txt file
with open(outputFile, "w", encoding="utf-8") as file:
    file.write("\n".join(names))

Get a Free License
To fully experience the capabilities of Spire.XLS for Python without any evaluation limitations, you can request a free 30-day trial license.
In today's data-driven world, efficiently transferring data into Excel is essential. Python's versatile ecosystem automates the process, eliminating manual entry, reducing errors, and handling large datasets beyond Excel's limits. Whether pulling data from APIs, databases, or unstructured sources, Python creates dynamic workflows that ensure consistency and scalability. Its compatibility with various data formats transforms raw data into structured Excel files, bridging complex data pipelines with user-friendly outputs while boosting productivity and enabling professionals to focus on high-value analysis. This article will demonstrate how to use Spire.XLS for Python to import data into Excel workbooks within Python applications.
- How to Write Data into Excel Files with Spire.XLS for Python
- Import CSV Data into Excel Worksheets
- Transfer Data and Worksheets Between Excel Files
- Import JSON Data into Excel Worksheets
- Import XML Data into Excel Worksheets
- Import Database Records into Excel Worksheets
- Import HTML Table Data into Excel Worksheets
Install Spire.XLS for Python
This scenario requires Spire.XLS for Python and plum-dispatch v1.7.4. They can be easily installed in your Windows through the following pip command.
pip install Spire.XLS
If you are unsure how to install, please refer to: How to Install Spire.XLS for Python on Windows
How to Write Data into Excel Files with Spire.XLS for Python
Spire.XLS for Python is an Excel file processing library that supports reading, editing, and writing Excel files. With this library, you can effortlessly write data into Excel worksheets, apply formatting, and save the workbook as a file.
Before writing data into Excel worksheets, Python provides a variety of built-in and third-party libraries-such as json, xml.etree.ElementTree, and BeautifulSoup-that allow you to read and process data from different file formats, including TXT, CSV, JSON, XML, and HTML. These libraries help transform raw or semi-structured data into lists, dictionaries, or dataframes that are easy to work with in Python.
Once the data is extracted and structured, Spire.XLS for Python can be used to write it into Excel workbooks. The library offers precise control over worksheet creation, cell-level data entry, formatting, and file export in Excel-compatible formats.
Steps to Write Data into Excel Using Spire.XLS for Python:
- Initialize a Workbook
Create an instance of the Workbook class to generate a new Excel workbook with three default worksheets, or use the Workbook.LoadFromFile(filePath: str) method to load an existing Excel file. - Create or Clear Worksheets
Use the Workbook.Worksheets.get_Item() method to get worksheets, or the Workbook.Worksheets.Add(sheetName: str) method to add worksheets. - Prepare the Data
Use Python libraries such as json, csv, or xml.etree.ElementTree to extract and organize your data into row and column structures. - Write Headers and Data
Iterate through your data and use the Worksheet.Range.get_Item(row: int, col: int).Value property to assign values to specific cells. - Format the Worksheet (Optional)
Apply styles using the CellRange.ApplyStyle() method, autofit columns using the Worksheet.AutoFitColumn() method, and set borders or colors to improve the appearance and readability of the worksheet. - Save the Workbook
Save the final Excel file using the Workbook.SaveToFile(filePath: str, format: FileFormat) method in your preferred Excel version.
Import CSV Data into Excel Worksheets
Importing data from CSV files into Excel is a fundamental task in data preparation. With Spire.XLS for Python, you can easily load structured data from CSV files using the Workbook.LoadFromFile(filePath: str, separator: str) method of the Workbook class and convert it into a well-formatted Excel workbook. In fact, data from text files can be imported in the same way. This method supports custom cell styling, header addition, and ensures the data is clean and ready for analysis or reporting.
Steps to import CSV data into Excel workbooks:
- Create an instance of the Workbook class.
- Load the CSV table data using the Workbook.LoadFromFile(filePath: str, separator: str) method and specify the file path and the column separator (e.g., comma or tab).
- Access the first worksheet using the Workbook.Worksheets.get_Item(index: int) method.
- Optionally, read the table from the first worksheet and write it into another using the Worksheet.Range.get_Item(row: int, col: int).Value property of the Worksheet class.
- Format the worksheet as needed and save the result using the Workbook.SaveToFile(filePath: str, fileFormat) method.
- Python
from spire.xls import Workbook, FileFormat, BuiltInStyles

# Create a Workbook object
workbook = Workbook()

# Load the table from the CSV or text file
workbook.LoadFromFile("Sample.csv", ",")
# workbook.LoadFromFile("Sample.txt", "\t")

# Get the first worksheet
sheet = workbook.Worksheets.get_Item(0)
# Format the table
sheet.Rows.get_Item(0).BuiltInStyle = BuiltInStyles.Heading4
for i in range(1, sheet.Rows.Count):
    sheet.Rows.get_Item(i).BuiltInStyle = BuiltInStyles.Accent4_20
for j in range(sheet.Columns.Count):
    sheet.AutoFitColumn(j + 1)

# Save the workbook
workbook.SaveToFile("output/TextCSVToExcel.xlsx", FileFormat.Version2016)
workbook.Dispose()

Transfer Data and Worksheets Between Excel Files
Working with multiple Excel files often requires copying data or entire worksheets from one workbook to another. With Spire.XLS for Python, you can perform these operations programmatically using the Workbook and Worksheet classes, allowing you to preserve formatting, formulas, and data structure when consolidating or merging information from different sources.
Steps to copy data and worksheets between Excel workbooks:
- Create a new instance of the Workbook class and load the source Excel file using the Workbook.LoadFromFile(filePath: str) method.
- Create another Workbook instance and clear the default worksheets using the Workbook.Worksheets.Clear() method.
- To copy data only:
- Iterate through worksheets in the source workbook and create new worksheets in the destination using the Workbook.Worksheets.Add(sheetName: str) method.
- Use the Worksheet.Range.get_Item(row, col).Value property to read from the source worksheet and write into the destination worksheet.
- To copy entire worksheets:
- Use the Worksheet.CopyFrom(sourceWorksheet) method to duplicate the content of each source worksheet into a new worksheet.
- Save the new workbook using the Workbook.SaveToFile(filePath: str, ileFormat: FileFormat) method.
- Python
from spire.xls import Workbook, FileFormat

# Create a Workbook object and load an Excel file
workbook = Workbook()
workbook.LoadFromFile("Sample.xlsx")

# Create another Workbook object and load an Excel file
newWorkbook = Workbook()
newWorkbook.Worksheets.Clear()

# Read data from one workbook and insert it into another
for i in range(workbook.Worksheets.get_Item(0).Rows.Count):
    for j in range(workbook.Worksheets.get_Item(0).Columns.Count):
        # Add a new worksheet
        sheet = newWorkbook.Worksheets.Add(workbook.Worksheets.get_Item(0).Name)
        # Write data
        sheet.Range.get_Item(i + 1, j + 1).Value = workbook.Worksheets.get_Item(0).Range.get_Item(i + 1, j + 1).Value

# Copy worksheets from the first workbook to the second workbook
for i in range(workbook.Worksheets.Count):
    # Add a new worksheet
    newSheet = newWorkbook.Worksheets.Add(workbook.Worksheets.get_Item(i).Name + "-Copy")
    # Copy all contents to the new worksheet
    newSheet.CopyFrom(workbook.Worksheets.get_Item(i))

# Save the workbook
newWorkbook.SaveToFile("output/ExcelToExcel.xlsx", FileFormat.Version2016)
workbook.Dispose()
newWorkbook.Dispose()

Import JSON Data into Excel Worksheets
JSON (JavaScript Object Notation) is a popular format for structured data, commonly used in APIs and modern web applications. With Python's built-in json module, you can easily parse JSON files and extract table-like data. This data can then be written into an Excel worksheet using Spire.XLS for Python, which allows you to format, edit, and organize the content for easier analysis, visualization, or sharing.
A code example demonstrates how to import JSON data into Excel files:
- Python
from spire.xls import Workbook, FileFormat, BuiltInStyles
import json

# Load JSON data
with open("Sample.json", "r", encoding="utf-8") as f:
    jsonData = json.load(f)
headers = list(jsonData[0].keys())
rows = [[str(item[key]) for key in headers] for item in jsonData]

# Create a Workbook instance
workbook = Workbook()
# Clear the default worksheets and add new one
workbook.Worksheets.Clear()
sheet = workbook.Worksheets.Add("JSON Data")

# Write headers and rows into the new worksheet
for col, header in enumerate(headers):
    sheet.Range[1, col + 1].Value = header
for row_idx, row_data in enumerate(rows):
    for col_idx, value in enumerate(row_data):
        sheet.Range[row_idx + 2, col_idx + 1].Value = value

# Apply styles and auto-fit columns
sheet.Rows[0].BuiltInStyle = BuiltInStyles.Heading2
for row in range(1, sheet.Rows.Count):
    sheet.Rows[row].BuiltInStyle = BuiltInStyles.Accent2_40
for col in range(sheet.Columns.Count):
    sheet.AutoFitColumn(col + 1)

# Save Excel file
workbook.SaveToFile("output/JSONToExcel.xlsx", FileFormat.Version2016)
workbook.Dispose()

Import XML Data into Excel Worksheets
XML is a widely used format for representing hierarchical data in enterprise systems and data feeds. With Python's xml.etree.ElementTree module, you can navigate and extract the desired elements and attributes. Once the data is retrieved, Spire.XLS for Python allows you to write the data into Excel worksheets, mapping the hierarchical structure into rows and columns. This makes it easier to present, filter, and analyze complex XML content in a tabular format.
The following example shows how to extract XML data and write it into an Excel worksheet with Spire.XLS for Python:
- Python
from spire.xls import Workbook, FileFormat, BuiltInStyles
import xml.etree.ElementTree as ET

# Load XML data
tree = ET.parse("Sample.xml")
root = tree.getroot()
first_order = root.find("order")
headers = [elem.tag.replace('_', ' ').title() for elem in first_order]

rows = [
    [order.find(tag.lower().replace(" ", "_")).text or "" for tag in headers]
    for order in root.findall("order")
]

# Use Spire.XLS for Python to create and write to workbook
workbook = Workbook()
workbook.Worksheets.Clear()
sheet = workbook.Worksheets.Add("XML Data")

# Write headers and rows
for col, header in enumerate(headers):
    sheet.Range[1, col + 1].Value = header

for row_idx, row_data in enumerate(rows):
    for col_idx, value in enumerate(row_data):
        sheet.Range[row_idx + 2, col_idx + 1].Value = value

# Apply styles and auto-fit columns
sheet.Rows[0].BuiltInStyle = BuiltInStyles.Heading4
for row in range(1, sheet.Rows.Count):
    sheet.Rows[row].BuiltInStyle = BuiltInStyles.Accent4_40
for col in range(sheet.Columns.Count):
    sheet.AutoFitColumn(col + 1)

# Save Excel file
workbook.SaveToFile("output/XMLToExcel.xlsx", FileFormat.Version2016)
workbook.Dispose()

Import Database Records into Excel Worksheets
Importing database records into Excel is a common requirement in reporting and business intelligence. You can use database connector libraries in Python, such as sqlite3, pyodbc, or pymysql, to establish connections with various relational databases and retrieve records via SQL queries.
Once data is fetched from the database, it can be written into Excel using the Workbook class and the Worksheet.Range.get_Item().Value property in Spire.XLS. This enables you to convert relational datasets into readable and portable Excel workbooks that are ideal for reports, dashboards, and archival.
An example demonstrates how to fetch rows from a SQLite database and populate an Excel worksheet:
- Python
import sqlite3
from spire.xls import Workbook, FileFormat, BuiltInStyles

# Connect to the SQLite database
conn = sqlite3.connect("Sample.db")
cursor = conn.cursor()

# Get all table names in the database
cursor.execute("SELECT name FROM sqlite_master WHERE type='table';")
tables = [row[0] for row in cursor.fetchall()]

# Create an Excel workbook
workbook = Workbook()
workbook.Worksheets.Clear()  # Clear the default worksheets

# Loop through each table and export to a worksheet
for table_name in tables:
    # Fetch all data from the table
    cursor.execute(f"SELECT * FROM {table_name}")
    rows = cursor.fetchall()
    # Get column names
    column_names = [desc[0] for desc in cursor.description]
    # Add a new worksheet with the table name
    sheet = workbook.Worksheets.Add(table_name)

    # Write header row
    for col_index, column_name in enumerate(column_names):
        cell = sheet.Range.get_Item(1, col_index + 1)
        cell.Value = str(column_name)

    # Write data rows
    for row_index, row in enumerate(rows, start=2):
        for col_index, value in enumerate(row):
            sheet.Range.get_Item(row_index, col_index + 1).Value = str(value)

    # Apply styles
    sheet.Rows.get_Item(0).BuiltInStyle = BuiltInStyles.Heading4
    for i in range(1, sheet.Rows.Count):
        sheet.Rows.get_Item(i).BuiltInStyle = BuiltInStyles.Accent4_20
    for j in range(sheet.Columns.Count):
        sheet.AutoFitColumn(j + 1)

# Close the database connection
conn.close()

# Save the Excel file
workbook.SaveToFile("output/SQDBToExcel.xlsx", FileFormat.Version2016)
workbook.Dispose()

Import HTML Table Data into Excel Worksheets
Many web pages display data in HTML table format. By using the BeautifulSoup library in Python, you can scrape table data from web content and convert it into structured data. This data can then be written into Excel worksheets using the Spire.XLS for Python library.
With optional styling and formatting capabilities, you can preserve the tabular structure and create professional-looking reports from online sources such as stock data, weather updates, or product listings.
A code example demonstrates how to extract table data from HTML and write it into Excel worksheets:
- Python
from bs4 import BeautifulSoup
from spire.xls import Workbook, FileFormat, BuiltInStyles

# Read HTML file
with open("Sample.html", "r", encoding="utf-8") as f:
    soup = BeautifulSoup(f, "html.parser")

# Find the table
table = soup.find("table")
rows = table.find_all("tr")

# Extract data from table as a 2D list
data = []
for row in rows:
    cells = row.find_all(["th", "td"])
    data.append([cell.get_text(strip=True) for cell in cells])

# Create a new Excel workbook
workbook = Workbook()
# Get the first worksheet
sheet = workbook.Worksheets.get_Item(0)

# Iterate through the data
for row_index, row in enumerate(data, start=1):
    for col_index, cell_value in enumerate(row, start=1):
        # Write the table data to the cells in the worksheet
        sheet.Range.get_Item(row_index, col_index).Value = str(cell_value)

# Format the table
sheet.Rows.get_Item(0).BuiltInStyle = BuiltInStyles.Heading4
for i in range(1, sheet.Rows.Count):
    sheet.Rows.get_Item(i).BuiltInStyle = BuiltInStyles.Accent4_20
for j in range(sheet.Columns.Count):
    sheet.AutoFitColumn(j + 1)

# Save the Excel file
workbook.SaveToFile("output/HTMLToExcel.xlsx", FileFormat.Version2016)
workbook.Dispose()

Get a Free License
To fully experience the capabilities of Spire.XLS for Python without any evaluation limitations, you can request a free 30-day trial license.
