
Python (365)
The inclusion of line numbers in Word documents serves as a critical tool for enhancing readability, facilitating reference, and streamlining collaborative editing processes. Whether you're a lawyer marking up contracts, a researcher annotating scientific papers, or a student revising a thesis, line numbers provide a precise way to cite specific lines, making discussions and revisions more efficient.
The powerful Python programming language enables users to batch add or remove line numbers in Word documents, providing a robust means to automate document preparation workflows. This article will demonstrate how to utilize Spire.Doc for Python to add or remove line numbers in Word documents with Python code.
Install Spire.Doc for Python
This scenario requires Spire.Doc for Python and plum-dispatch v1.7.4. They can be easily installed in your Windows through the following pip command.
pip install Spire.Doc
If you are unsure how to install, please refer to: How to Install Spire.Doc for Python on Windows
Add Line Numbers to Word Documents with Python
Spire.Doc for Python provides properties under PageSetup class for line number formatting. The properties and their functions are as follows:
- LineNumberingStep: Used to set the interval of the line number display.
- LineNumberingStartValue: Used to set the start number of the line number.
- LineNumberingDistanceFromText: Used to set the distance between the line number and the text.
- LineNumberingRestartMode: Used to set when the line number restarts, like every page, every section, or continuously without restarting.
It is important to note that line numbers will only be displayed when the PageSetup.LineNumberingStep property is set to a value greater than 0.
The detailed steps for adding line numbers to Word documents are as follows:
- Create an instance of Document class.
- Load a Word document using Document.LoadFromFile() method.
- Iterate through the sections in the document:
- Get the current section using Document.Sections.get_Item() method.
- Get the page setup of the section through Section.PageSetup property.
- Set the display interval of the line numbers through PageSetup.LineNumberingStep property.
- Set the start number of the line numbers through PageSetup.LineNumberingStartValue property.
- Set the distance between line numbers and text through PageSetup.LineNumberingDistanceFromText property.
- Set the restarting mode of the line numbers through PageSetup.LineNumberingRestartMode property.
- Save the document using Document.SaveToFile() method.
- Python
from spire.doc import *
from spire.doc.common import *

# Create an instance of Document class
doc = Document()

# Load a Word document
doc.LoadFromFile("Sample.docx")

# Iterate through the sections
for i in range(0, doc.Sections.Count):
    # Get the current section
    section = doc.Sections.get_Item(i)
    # Get the page setup of the section
    pageSetup = section.PageSetup
    # Set the interval of the line numbering
    pageSetup.LineNumberingStep = 2
    # Set the start number of the line numbering
    pageSetup.LineNumberingStartValue = 1
    # Set the distance between the line number and text
    pageSetup.LineNumberingDistanceFromText = 20
    # Set the restarting mode of the line number
    pageSetup.LineNumberingRestartMode = LineNumberingRestartMode.Continuous

# Save the document
doc.SaveToFile("output/AddLineNumberWord.docx", FileFormat.Docx)
doc.Close()

Remove Line Numbers from Word Documents with Python
Since the value of the PageSetup.LineNumberingStep property directly determines the display of line numbers, developers can simply set the value to 0 to remove the line numbers from Word documents.
The detailed steps for removing line numbers from a Word document are as follows:
- Create an instance of Document class.
- Load a Word document using Document.LoadFromFile() method.
- Iterate through the sections in the document:
- Get the current section using Document.Sections.get_Item() method.
- Set the display interval of the line numbers to 0 through Section.PageSetup.LineNumberingStep property to remove the line numbers.
- Save the document using Document.SaveToFile() method.
- Python
from spire.doc import *
from spire.doc.common import *

# Create an instance of Document class
doc = Document()

# Load a Word document
doc.LoadFromFile("output/AddLineNumberWord.docx")

# Iterate through the sections
for i in range(0, doc.Sections.Count):
    # Get the current section
    section = doc.Sections.get_Item(i)
    # Set the interval of the line numbering to 0 to remove the line numbering
    section.PageSetup.LineNumberingStep = 0

# Save the document
doc.SaveToFile("output/RemoveLineNumberWord.docx", FileFormat.Docx)
doc.Close()

Apply for a Temporary License
If you'd like to remove the evaluation message from the generated documents, or to get rid of the function limitations, please request a 30-day trial license for yourself.
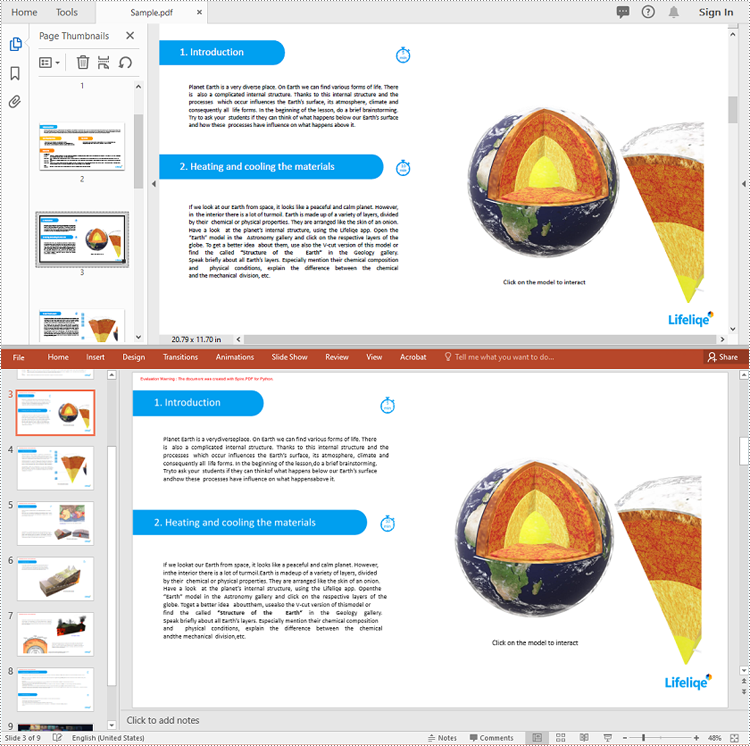
PDF (Portable Document Format) files are widely used for sharing and distributing documents due to their consistent formatting and broad compatibility. However, when it comes to presentations, PowerPoint remains the preferred format for many users. PowerPoint offers a wide range of features and tools that enable the creation of dynamic, interactive, and visually appealing slideshows. Unlike static PDF documents, PowerPoint presentations allow for the incorporation of animations, transitions, multimedia elements, and other interactive components, making them more engaging and effective for delivering information to the audience.
By converting PDF to PowerPoint, you can transform a static document into a captivating and impactful presentation that resonates with your audience and helps to achieve your communication goals. In this article, we will explain how to convert PDF files to PowerPoint format in Python using Spire.PDF for Python.
Install Spire.PDF for Python
This scenario requires Spire.PDF for Python and plum-dispatch v1.7.4. They can be easily installed in your Windows through the following pip command.
pip install Spire.PDF
If you are unsure how to install, please refer to this tutorial: How to Install Spire.PDF for Python on Windows
Convert PDF to PowerPoint in Python
Spire.PDF for Python provides the PdfDocument.SaveToFile(filename:str, FileFormat.PPTX) method to convert a PDF document into a PowerPoint presentation. With this method, each page of the original PDF document will be converted into a single slide in the output PPTX presentation.
The detailed steps to convert a PDF document to PowerPoint format are as follows:
- Create an object of the PdfDocument class.
- Load a sample PDF document using the PdfDocument.LoadFromFile() method.
- Save the PDF document as a PowerPoint PPTX file using the PdfDocument.SaveToFile(filename:str, FileFormat.PPTX) method.
- Python
from spire.pdf.common import *
from spire.pdf import *

# Create an object of the PdfDocument class
pdf = PdfDocument()
# Load a sample PDF document
pdf.LoadFromFile("Sample.pdf")

# Save the PDF document as a PowerPoint PPTX file
pdf.SaveToFile("PdfToPowerPoint.pptx", FileFormat.PPTX)
pdf.Close()
Apply for a Temporary License
If you'd like to remove the evaluation message from the generated documents, or to get rid of the function limitations, please request a 30-day trial license for yourself.
Tables in Word documents can sometimes disrupt the flow of text or the visual balance of a page. Removing these tables can help in creating a more aesthetically pleasing document, which is crucial for reports, presentations, or publications where appearance is important. In this article, you will learn how to remove tables from a Word document in Python using Spire.Doc for Python.
Install Spire.Doc for Python
This scenario requires Spire.Doc for Python and plum-dispatch v1.7.4. They can be easily installed in your Windows through the following pip commands.
pip install Spire.Doc
If you are unsure how to install, please refer to this tutorial: How to Install Spire.Doc for Python on Windows
Remove a Specified Table in Word in Python
Spire.Doc for Python provides the Section.Tables.RemoveAt(int index) method to delete a specified table in a Word document by index. The following are the detailed steps.
- Create a Document instance.
- Load a Word document using Document.LoadFromFile() method.
- Get a specified section using Document.Sections[] property.
- Delete a specified table by index using Section.Tables.RemoveAt() method.
- Save the result document using Document.SaveToFile() method.
- Python
from spire.doc import *
from spire.doc.common import *

inputFile = "Tables.docx"
outputFile = "RemoveTable.docx"

# Create a Document instance
doc = Document()

# Load a Word document
doc.LoadFromFile(inputFile)

# Get the first section in the document
sec = doc.Sections[0]

# Remove the first table in the section
sec.Tables.RemoveAt(0)

# Save the result document
doc.SaveToFile(outputFile, FileFormat.Docx)
doc.Close()

Remove All Tables in Word in Python
To delete all tables from a Word document, you need to iterate through all sections in the document, then iterate through all tables in each section and remove them through the Section.Tables.Remove() method. The following are the detailed steps.
- Create a Document instance.
- Load a Word document using Document.LoadFromFile() method.
- Iterate through all sections in the document.
- Iterate through all tables in each section.
- Delete the tables using Section.Tables.Remove() method.
- Save the result document using Document.SaveToFile() method.
- Python
from spire.doc import *
from spire.doc.common import *

inputFile = "Tables.docx"
outputFile = "RemoveAllTables.docx"

# Create a Document instance
doc = Document()

# Load a Word document
doc.LoadFromFile(inputFile)

# Iterate through all sections in the document
for i in range(doc.Sections.Count):
    sec = doc.Sections.get_Item(i)

    # Iterate through all tables in each section
    for j in range(sec.Tables.Count):
        table = sec.Tables.get_Item(j)
        # Remove the table
        sec.Tables.Remove(table)

# Save the result document
doc.SaveToFile(outputFile, FileFormat.Docx)
doc.Close()
Apply for a Temporary License
If you'd like to remove the evaluation message from the generated documents, or to get rid of the function limitations, please request a 30-day trial license for yourself.
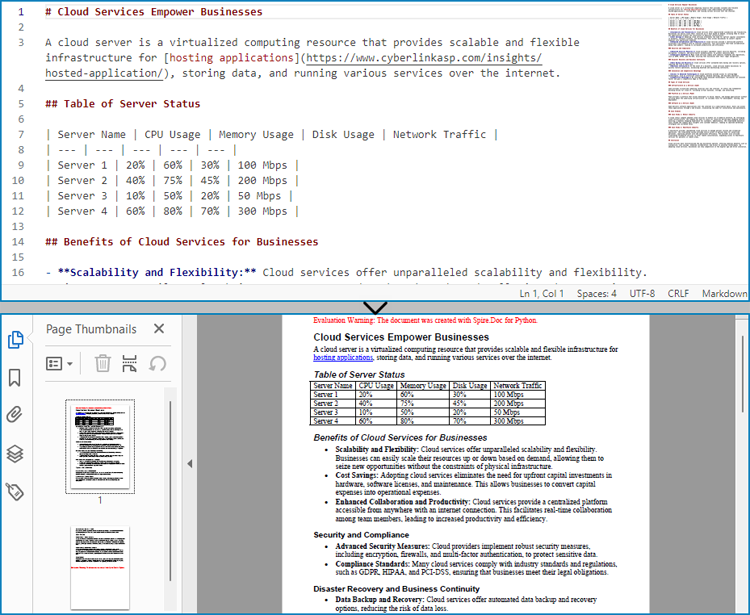
Markdown has become a popular choice for writing structured text due to its simplicity and readability, making it widely used for documentation, README files, and note-taking. However, sometimes there arises a need to present this content in a more universal and polished format, such as PDF, which is compatible across various devices and platforms without formatting inconsistencies. Converting Markdown files to PDF documents not only enhances portability but also adds a professional touch, enabling easier distribution for reports, manuals, or sharing content with non-technical audiences who may not be familiar with Markdown syntax.
This article will demonstrate how to convert Markdown files to PDF documents using Spire.Doc for Python to automate the conversion process.
- Convert Markdown Files to PDF Documents with Python
- Convert Markdown to PDF and Customize Page Settings
Install Spire.Doc for Python
This scenario requires Spire.Doc for Python and plum-dispatch v1.7.4. They can be easily installed in your Windows through the following pip command.
pip install Spire.Doc
If you are unsure how to install, please refer to: How to Install Spire.Doc for Python on Windows
Convert Markdown Files to PDF Documents with Python
With Spire.Doc for Python, developers can load Markdown files using Document.LoadFromFile(string: fileName, FileFormat.Markdown) method, and then save the files to PDF documents using Document.SaveToFile(string: fileName, FileFormat.PDF) method. Besides, developers can also convert Markdown files to HTML, XPS, and SVG formats by specifying enumeration items of the FileFormat enumeration class.
The detailed steps for converting a Markdown file to a PDF document are as follows:
- Create an instance of Document class.
- Load a Markdown file using Document.LoadFromFile(string: fileName, FileFormat.Markdown) method.
- Convert the Markdown file to a PDF document and save it using Document.SaveToFile(string: fileName, FileFormat.PDF) method.
- Python
from spire.doc import *
from spire.doc.common import *

# Create an object of Document class
doc = Document()

# Load a Markdown file
doc.LoadFromFile("Sample.md", FileFormat.Markdown)

# Save the file to a PDF document
doc.SaveToFile("output/MarkdownToPDF.pdf", FileFormat.PDF)

doc.Dispose()
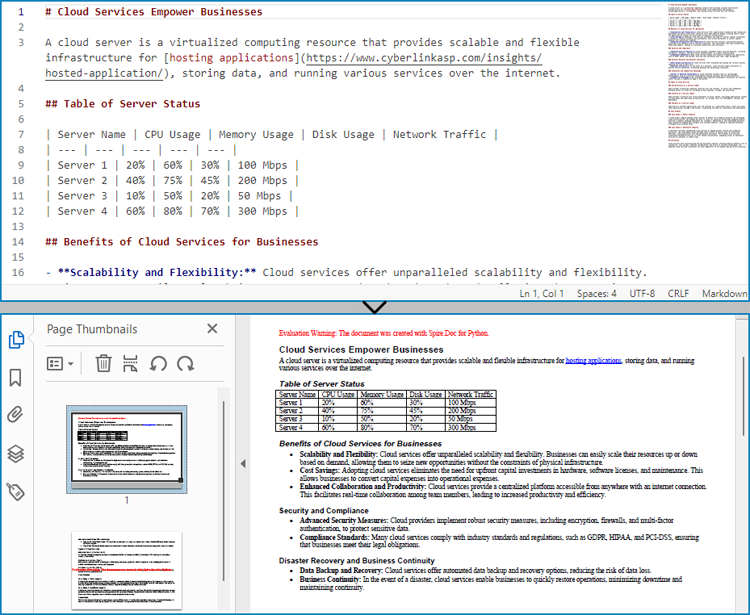
Convert Markdown to PDF and Customize Page Settings
Spire.Doc for Python supports performing basic page setup before converting Markdown files to formats like PDF, allowing for control over the appearance of the converted document.
The detailed steps to convert a Markdown file to a PDF document and customize the page settings are as follows:
- Create an instance of Document class.
- Load a Markdown file using Document.LoadFromFile(string: fileName, FileFormat.Markdown) method.
- Get the default section using Document.Sections.get_Item() method.
- Get the page settings through Section.PageSetup property and set the page size, orientation, and margins through properties under PageSetup class.
- Convert the Markdown file to a PDF document and save it using Document.SaveToFile(string: fileName, FileFormat.PDF) method.
- Python
from spire.doc import *
from spire.doc.common import *

# Create an instance of Document class
doc = Document()
# Load a Word document
doc.LoadFromFile("Sample.md", FileFormat.Markdown)

# Get the default section
section = doc.Sections.get_Item(0)

# Get the page settings
pageSetup = section.PageSetup

# Customize the page settings
pageSetup.PageSize = PageSize.A4()
pageSetup.Orientation = PageOrientation.Landscape
pageSetup.Margins.All = 50

# Save the Markdown document to a PDF file
doc.SaveToFile("output/MarkdownToPDFPageSetup.pdf", FileFormat.PDF)

doc.Dispose()
Get a Free License
To fully experience the capabilities of Spire.Doc for Python without any evaluation limitations, you can request a free 30-day trial license.
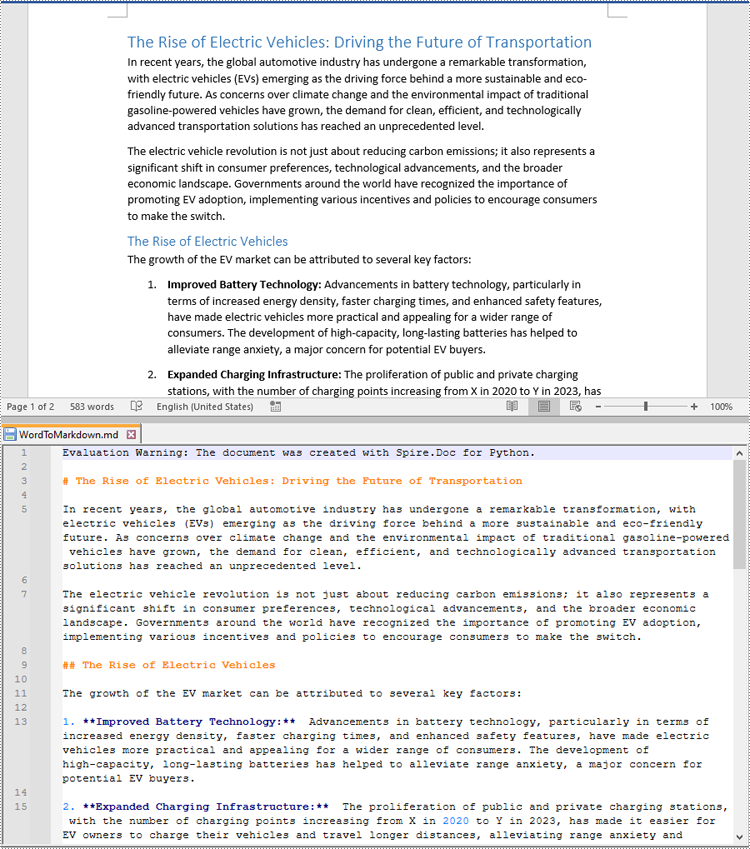
Markdown is a lightweight markup language that is becoming increasingly popular for writing content on the web. It offers a simple and human-readable syntax for formatting text, adding links, images, lists, and more. Many websites and content management systems support Markdown, as it can be easily converted to HTML. On the other hand, Microsoft Word is a widely used word-processing software that utilizes its own proprietary file format. While Word offers robust formatting options, its files are not always compatible with other platforms or content management systems.
In certain scenarios, it is useful to convert between Word and Markdown file formats. It allows you to take advantage of Word's advanced editing tools while also being able to publish your content in a web-friendly Markdown format. In this article, we will demonstrate how to convert Markdown to Word DOC or DOCX and convert Word DOC or DOCX to Markdown in Python using Spire.Doc for Python.
Install Spire.Doc for Python
This scenario requires Spire.Doc for Python and plum-dispatch v1.7.4. They can be easily installed in your Windows through the following pip command.
pip install Spire.Doc
If you are unsure how to install, please refer to this tutorial: How to Install Spire.Doc for Python on Windows
Convert Markdown to Word in Python
You can load a Markdown file using the Document.LoadFromFile(fileName, FileFormat.Markdown) method and then convert it to Word DOC or DOCX format using the Document.SaveToFile(fileName, FileFormat.Doc) or Document.SaveToFile(fileName, FileFormat.Docx) method. The detailed steps are as follows.
- Create an object of the Document class.
- Load a Markdown file using the Document.LoadFromFile(fileName, FileFormat.Markdown) method.
- Save the Markdown file to a Word DOC or DOCX file using Document.SaveToFile(fileName, FileFormat.Doc) or Document.SaveToFile(fileName, FileFormat.Docx) method.
- Python
from spire.doc import *
from spire.doc.common import *

# Create an object of the Document class
document = Document()
# Load a Markdown file
document.LoadFromFile("input.md")

# Save the Markdown file to a Word DOCX file
document.SaveToFile("MdToDocx.docx", FileFormat.Docx)
# Save the Markdown file to a Word DOC file
document.SaveToFile("MdToDoc.doc", FileFormat.Doc)
document.Close()
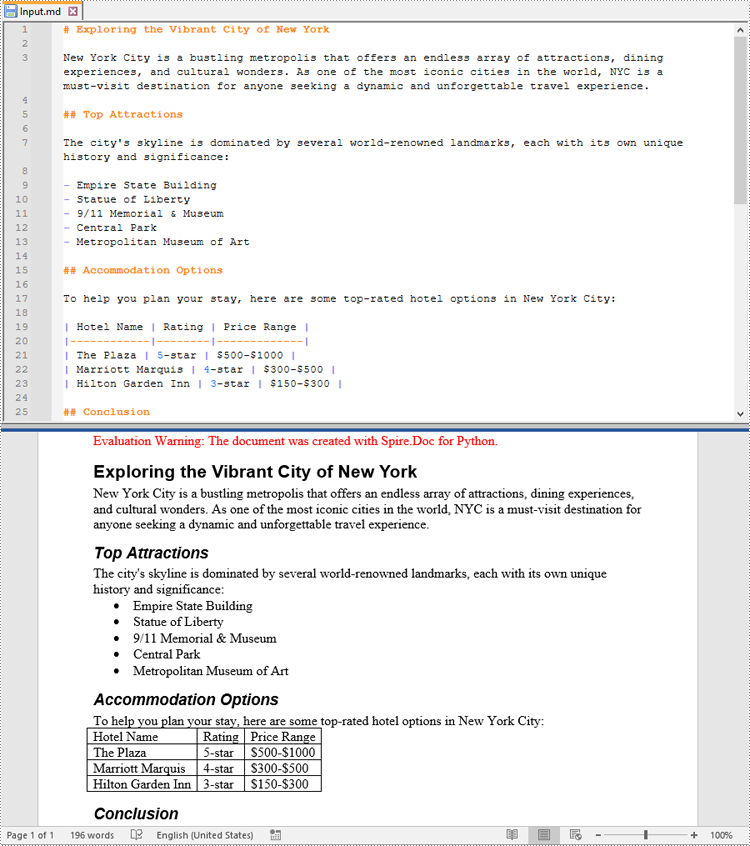
Convert Word to Markdown in Python
You are also able to convert a Word DOC or DOCX file to Markdown format using the Document.SaveToFile(fileName, FileFormat.Markdown) method. The detailed steps are as follows.
- Create an object of the Document class.
- Load a Word DOC or DOCX file using the Document.LoadFromFile(fileName) method.
- Save the Word DOC or DOCX file to a Markdown file using Document.SaveToFile(fileName, FileFormat.Markdown) method.
- Python
from spire.doc import *
from spire.doc.common import *

# Create an object of the Document class
document = Document()
# Load a Word DOCX file
document.LoadFromFile("input.docx")
# Or load a Word DOC file
#document.LoadFromFile("input.doc")

# Save the Word file to a Markdown file
document.SaveToFile("WordToMarkdown.md", FileFormat.Markdown)
document.Close()
Get a Free License
To fully experience the capabilities of Spire.Doc for Python without any evaluation limitations, you can request a free 30-day trial license.
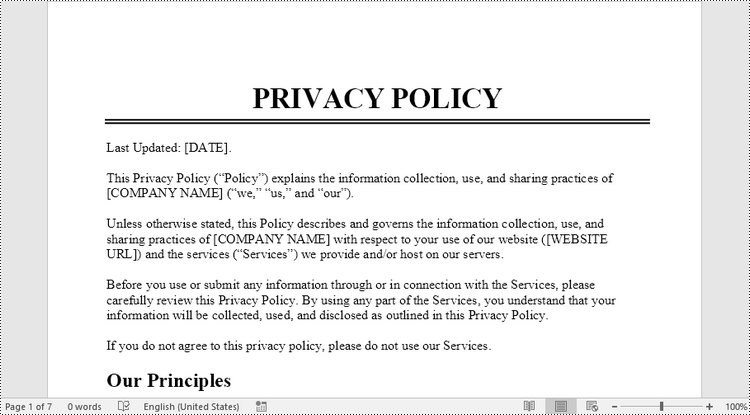
Converting a document from Word to TIFF can be useful when you need to share the content as an image file, such as for electronic forms, presentations, or publishing. The TIFF format preserves the visual layout and appearance of the document. Conversely, converting a TIFF image to a Word document can be helpful when you want to present information in the Word format.
This article demonstrates how to convert Word to TIFF and TIFF to Word (non-editable) using Python and the Spire.Doc for Python library.
Install the Required Libraries
This situation relies on the combination of Spire.Doc for Python and Pillow (PIL). Spire.Doc is used to read, create and convert Word documents, while the PIL library is used for handling TIFF files and accessing their frames.
The libraries can be easily installed on your device through the following pip commands.
pip install Spire.Doc
pip install pillow
Convert Word to TIFF in Python
To convert a Word document into a TIFF image, the initial step is to use the Spire.Doc library to load the Word document and transform the individual pages into image data streams. Then, you can leverage the functionality provided by the PIL to merge these separate image streams into a unified TIFF image.
The following are the steps to convert Word to TIFF using Python.
- Create a Document object.
- Load a Word document from a specified file path.
- Iterate through the pages in the document.
- Convert each page into an image stream using Document.SaveImageToSteams() method.
- Convert the image stream into a PIL image.
- Combine these PIL images into a single TIFF image.
- Python
from spire.doc import *
from spire.doc.common import *

from PIL import Image
from io import BytesIO

# Create a Document object
doc = Document()

# Load a Word document
doc.LoadFromFile("C:\\Users\\Administrator\\Desktop\\Input.docx")

# Create an empty list to store PIL Images
images = []

# Iterate through pages in the document
for i in range(doc.GetPageCount()):

    # Convert a specific page to image stream
    with doc.SaveImageToStreams(i, ImageType.Bitmap) as imageData:

        # Open a specific image stream as a PIL image
        img = Image.open(BytesIO(imageData.ToArray()))

        # Append the PIL image to list
        images.append(img)

# Save the PIL Images as a multi-page TIFF file
images[0].save("Output/ToTIFF.tiff", save_all=True, append_images=images[1:])

# Dispose resources
doc.Dispose()
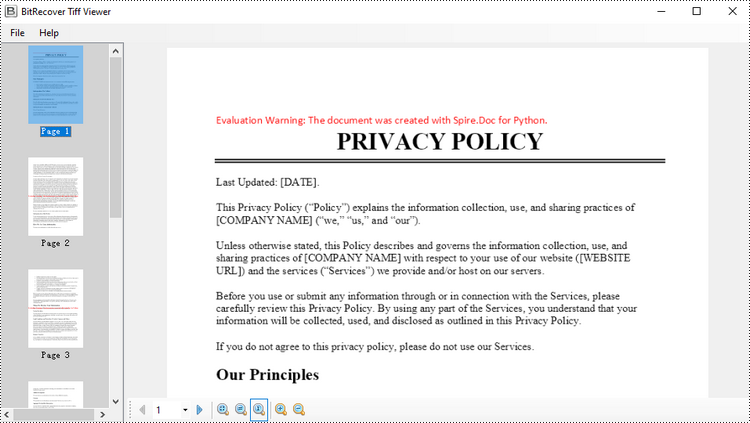
Convert TIFF to Word in Python
By utilizing PIL library, you can load a TIFF file and break it down into separate PNG images for each frame. You can then utilize the Spire.Doc library to incorporate these separate PNG files as distinct pages within a Microsoft Word document.
To convert a TIFF image to a Word document using Python, follow these steps.
- Create a Document object.
- Add a section to it and set the page margins to zero.
- Load a TIFF image.
- Iterate though the frames in the TIFF image.
- Get a specific frame, and save it as a PNG file.
- Add a paragraph to the section.
- Append the image file to the paragraph.
- Set the page size to be the same as the image size.
- Save the document to a Word file.
- Python
from spire.doc import *
from spire.doc.common import *

from PIL import Image
import io

# Create a Document object
doc = Document()

# Add a section
section = doc.AddSection()

# Set margins to 0
section.PageSetup.Margins.All = 0.0

# Load a TIFF image
tiff_image = Image.open("C:\\Users\\Administrator\\Desktop\\TIFF.tiff")

# Iterate through the frames in it
for i in range(tiff_image.n_frames):

    # Go to the current frame
    tiff_image.seek(i)

    # Extract the image of the current frame
    frame_image = tiff_image.copy()

    # Save the image to a PNG file
    frame_image.save(f"temp/output_frame_{i}.png")

    # Add a paragraph
    paragraph = section.AddParagraph()

    # Append image to the paragraph
    image = paragraph.AppendPicture(f"temp/output_frame_{i}.png")

    # Get image width and height
    width = image.Width
    height  = image.Height

    # Set the page size to be the same as the image size
    section.PageSetup.PageSize = SizeF(width, height)

# Save the document to a Word file
doc.SaveToFile("Output/ToWord.docx",FileFormat.Docx2019)

# Dispose resources
doc.Dispose()
Get a Free License
To fully experience the capabilities of Spire.Doc for Python without any evaluation limitations, you can request a free 30-day trial license.
Python: Export and Import Data Between Excel Files and Databases
2024-06-28 01:05:53 Written by KoohjiThe ability to export data from Excel files to databases, and vice versa, has become a crucial functionality in data management. Exporting data from an Excel file to a database offers scalability and enhanced security, enabling efficient handling of large datasets and facilitating collaboration with concurrency control. Conversely, importing data from databases into Excel provides the familiar spreadsheet interface for data analysis, visualization, and presentation, making complex information accessible to users. With the powerful Python language, developers can easily automate the transfer of data between databases and spreadsheets.
This article demonstrates how to use Spire.XLS for Python to export data from a database to Excel files and import data from Excel files to a database with simple Python code, taking the SQLite database as the example.
- Export Data from a Database to an Excel File with Python
- Export Data from an Excel Worksheet to a Database with Python
Install Spire.XLS for Python
This scenario requires Spire.XLS for Python and plum-dispatch v1.7.4. They can be easily installed in your Windows through the following pip command.
pip install Spire.XLS
If you are unsure how to install, please refer to: How to Install Spire.XLS for Python on Windows
Export Data from a Database to an Excel File with Python
Spire.XLS for Python offers a range of classes, methods, and properties to create, read, and edit Excel workbooks. Developers can use the sqlite3 module from the Python standard library to read data from databases and utilize Spire.XLS for Python to create Excel files and write data into them, thereby enabling the export of database data to Excel worksheets.
The detailed steps are as follows:
- Connect to a database.
- Create an instance of Workbook class and clear the default worksheets.
- Iterate through the tables in the database to get all the column names and the data in the columns.
- Create a worksheet for each table using Workbook.Worksheets.Add() method, write the column names to the header row of the worksheet, and then write data to other rows through Worksheet.Range[].Value property.
- Format the worksheet.
- Save the workbook using Workbook.SaveToFile() method.
- Python
from spire.xls import *
from spire.xls.common import *
import sqlite3

# Connect to database
conn = sqlite3.connect("Sales Data.db")
cursor = conn.cursor()

# Get all the table names in the database
cursor.execute("SELECT name FROM sqlite_master WHERE type='table';")
tableNames = [name[0] for name in cursor.fetchall()]

# Create an Excel file
workbook = Workbook()
workbook.Worksheets.Clear()

# Iterate through each table in the database
for tableName in tableNames:
    # Get the column names of the table
    cursor.execute(f"PRAGMA table_info('{tableName}')")
    columnsInfo = cursor.fetchall()
    columnNames = [columnInfo[1] for columnInfo in columnsInfo]

    # Get the data of the table
    cursor.execute(f"SELECT * FROM {tableName}")
    rows = cursor.fetchall()

    # Create a worksheet
    sheet = workbook.Worksheets.Add(tableName)

    # Write the header to the worksheet
    for i in range(len(columnNames)):
        sheet.Range[1, i + 1].Value = columnNames[i]

    # Write the data to the worksheet
    for j in range(1, len(rows)):
        column = rows[j]
        for k in range(len(column)):
            sheet.Range[j + 1, k + 1].Value = column[k]

    # Format the worksheet
    sheet.AllocatedRange.Style.Font.FontName = "Times New Roman"
    sheet.AllocatedRange.Style.Font.Size = 12.0
    sheet.AllocatedRange.AutoFitRows()
    sheet.AllocatedRange.AutoFitColumns()

# Save the Excel file
workbook.SaveToFile("output/DataBaseToExcel.xlsx", FileFormat.Version2016)
workbook.Dispose()
conn.close()
Export Data from an Excel Worksheet to a Database with Python
Spire.XLS for Python can also assist developers in reading various types of data from Excel files, and then developers can use sqlite3 to write the data to a database. Below are the detailed steps:
- Create an instance of Workbook class.
- Load an Excel workbook using Workbook.LoadFromFile() method.
- Connect to a database.
- Iterate through the worksheets in the workbook.
- Get a worksheet using Workbook.Worksheets.get_Item() method and get the name of the worksheet using Worksheet.Name property.
- Get the data in the header row through Worksheet.Range[].Value property.
- Create a table in the database with the worksheet name as the table name and create columns in the table with the header row data as the column names.
- Get the values from the worksheet cells through Worksheet.Range[].Value property and write them to the corresponding position in the database table.
- Commit the changes and close the connection.
- Python
from spire.xls import *
from spire.xls.common import *
import sqlite3

# Create an instance of Workbook
workbook = Workbook()

# Load an Excel file
workbook.LoadFromFile("Sample.xlsx")

# Connect to database
conn = sqlite3.connect("output/Report.db")
cursor = conn.cursor()

for s in range(workbook.Worksheets.Count):
    # Get a worksheet
    sheet = workbook.Worksheets.get_Item(s)

    # Get the sheet name
    sheetName = sheet.Name
    sheetName = sheetName.replace(" ", "")

    # Get the data in the header row
    header = []
    for i in range(sheet.AllocatedRange.ColumnCount):
        headerValue = sheet.Range[1, i + 1].Value
        headerValue = headerValue.replace(" ", "")
        header.append(headerValue)

    # Create a database table
    createTableSql = f"CREATE TABLE IF NOT EXISTS {sheetName} ({', '.join([f'{header[i]} TEXT' for i in range(len(header))])})"
    cursor.execute(createTableSql)

    # Insert data into the database table
    for row in range(1, sheet.AllocatedRange.RowCount):
        data = []
        for col in range(sheet.AllocatedRange.ColumnCount):
            # Get the cell value
            value = sheet.Range[row + 1, col + 1].Value
            data.append(value)
        # Insert the cell values into the database table
        insertSql = f"INSERT INTO {sheetName} ({', '.join(header)}) VALUES ({', '.join(['?' for _ in data])})"
        cursor.execute(insertSql, data)

# Commit the changes and close the connection
conn.commit()
conn.close()

workbook.Dispose()
Apply for a Temporary License
If you'd like to remove the evaluation message from the generated documents, or to get rid of the function limitations, please request a 30-day trial license for yourself.
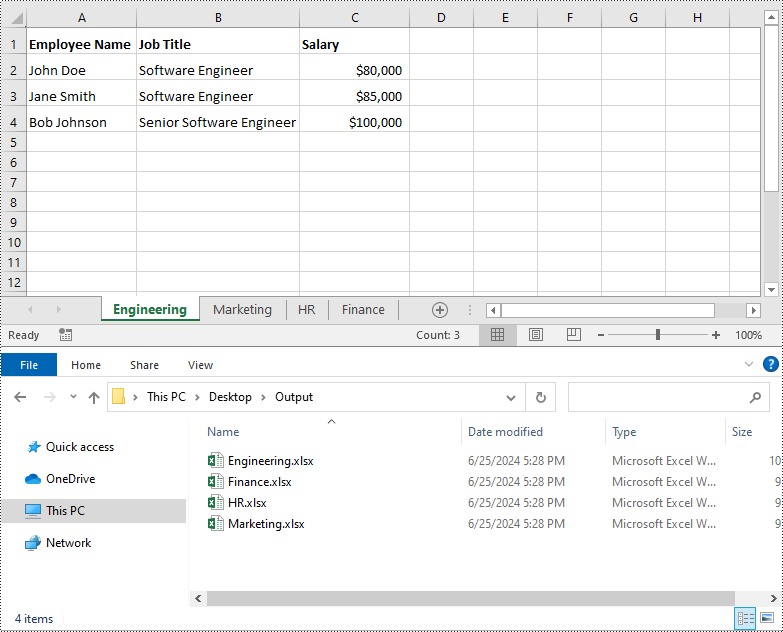
Working with large Excel workbooks can sometimes become unwieldy, especially when you need to share or distribute parts of the data independently. In these cases, it can be helpful to split your Excel file into multiple smaller files. This not only makes the individual files more manageable, but also allows you to better organize and share your data. In this article, we will demonstrate how to split an Excel file in Python using Spire.XLS for Python.
Install Spire.XLS for Python
This scenario requires Spire.XLS for Python and plum-dispatch v1.7.4. They can be easily installed in your Windows through the following pip command.
pip install Spire.XLS
If you are unsure how to install, please refer to this tutorial: How to Install Spire.XLS for Python on Windows
Split Excel by Worksheets in Python
If your Excel file contains multiple worksheets, you can easily split each sheet into an Excel file by using the Workbook.Worksheets.AddCopy() method provided by Spire.XLS for Python. The detailed steps are as follows.
- Create an object of the Workbook class.
- Load an Excel file using Workbook.LoadFromFile() method.
- Iterate through the worksheets in the Excel file.
- For each worksheet, create a new Workbook object for it.
- Remove the default worksheets in the new workbook using Workbook.Worksheets.Clear() method.
- Copy the worksheet to the new workbook using Workbook.Worksheets.AddCopy() method.
- Save the new workbook to an Excel file using Workbook.SaveToFile() method.
- Python
from spire.xls import *
from spire.xls.common import *

# Create an object of the Workbook class
workbook = Workbook()
# Load an Excel file
workbook.LoadFromFile("Sample.xlsx")

# Specify the folder path for the generated Excel files
folderPath = "C:\\Users\\Administrator\\Desktop\\Output\\"

# Iterate through all worksheets in the Excel file
for worksheet in workbook.Worksheets:
    # For each worksheet, create a new Workbook object
    newWorkbook = Workbook()
    # Remove the worksheets from the new workbook
    newWorkbook.Worksheets.Clear()

    # Copy the worksheet from the Excel file to the new workbook
    newWorkbook.Worksheets.AddCopy(worksheet)

    # Save the new workbook to the specified folder
    newWorkbook.SaveToFile(folderPath + worksheet.Name + ".xlsx", FileFormat.Version2016)

workbook.Dispose()
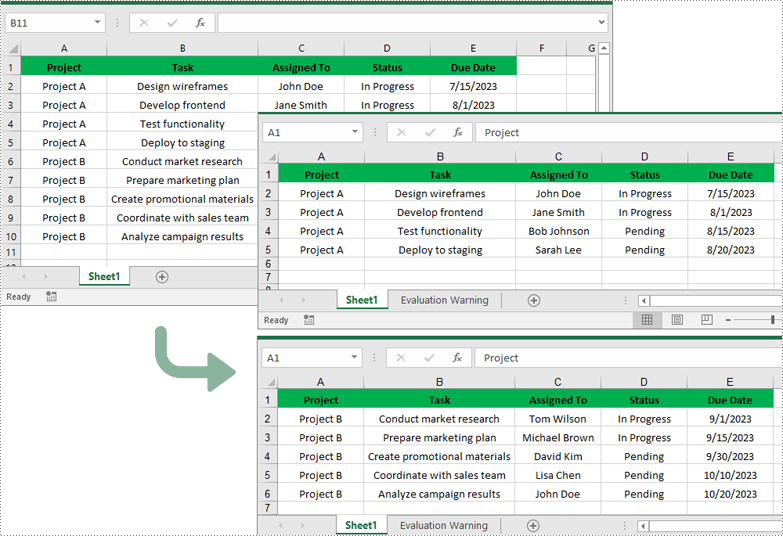
Split Excel by Rows in Python
If you have a large worksheet where a specific number of rows represent a unique record or entry, you can extract these individual rows or records into separate Excel files for focused data analysis using the Worksheet.CopyRow() method. The detailed steps are as follows.
- Create an object of the Workbook class.
- Load an Excel file using Workbook.LoadFromFile() method.
- Get the original worksheet where you want to copy rows from using Workbook.Worksheets[index] property.
- Create a new Workbook object and remove the default worksheets from the new workbook using Workbook.Worksheets.Clear() method.
- Add a new Worksheet to the new workbook using Workbook.Worksheets.Add() method.
- Copy specific rows from the original worksheet to the new worksheet using Worksheet.CopyRow() method.
- Copy Column widths from the original worksheet to the new worksheet.
- Save the new workbook to an Excel file using Workbook.SaveToFile() method.
- Python
from spire.xls import *
from spire.xls.common import *

# Create a Workbook object and load an Excel file
workbook = Workbook()
workbook.LoadFromFile("Sample.xlsx")
# Get the original (the 1st) worksheet
worksheet = workbook.Worksheets[0]
# Get the header row
header = worksheet.Rows[0]

# Specify the folder path for the generated Excel files
folderPath = "C:\\Users\\Administrator\\Desktop\\Output\\"

# Create a new Workbook object
newWorkbook1 = Workbook()
# Remove the default worksheets
newWorkbook1.Worksheets.Clear()
# Add a new worksheet
newWorksheet1 = newWorkbook1.Worksheets.Add("Sheet1")
# Copy rows 1-5 from the original worksheet to the new worksheet
for i in range(1, 6):
    worksheet.CopyRow(worksheet.Rows[i - 1], newWorksheet1, newWorksheet1.LastDataRow + 1, CopyRangeOptions.All)
# Copy column widths from the original worksheet to the new worksheet
for i in range(worksheet.Columns.Count):
    newWorksheet1.SetColumnWidth(i + 1, worksheet.GetColumnWidth(i + 1))
# Save the new workbook to the specified folder
newWorkbook1.SaveToFile(folderPath + "Rows1-5.xlsx", FileFormat.Version2016)
newWorkbook1.Dispose()

# Create a new Workbook object
newWorkbook2 = Workbook()
# Remove the default worksheets
newWorkbook2.Worksheets.Clear()
# Add a new worksheet
newWorksheet2 = newWorkbook2.Worksheets.Add("Sheet1")
# Copy header row from the original worksheet to the new worksheet
worksheet.CopyRow(worksheet.Rows[0], newWorksheet2, newWorksheet2.LastDataRow + 1, CopyRangeOptions.All)
# Copy rows 6-10 from the original worksheet to the new worksheet
for i in range(6, 11):
    worksheet.CopyRow(worksheet.Rows[i - 1], newWorksheet2, newWorksheet2.LastDataRow + 1, CopyRangeOptions.All)
# Copy column widths from the original worksheet to the new worksheet
for i in range(worksheet.Columns.Count):
    newWorksheet2.SetColumnWidth(i + 1, worksheet.GetColumnWidth(i + 1))
# Save the new workbook to the specified folder
newWorkbook2.SaveToFile(folderPath + "Rows6-10.xlsx", FileFormat.Version2016)
newWorkbook2.Dispose()
Split Excel by Columns in Python
In addition to splitting by rows, you can also split an Excel file by columns using the Worksheet.CopyColumn() method. The detailed steps are as follows.
- Create an object of the Workbook class.
- Load an Excel file using Workbook.LoadFromFile() method.
- Get the original worksheet where you want to copy columns from using Workbook.Worksheets[index] property.
- Create a new Workbook object and remove the default worksheets from the new workbook using Workbook.Worksheets.Clear() method.
- Add a new Worksheet to the new workbook using Workbook.Worksheets.Add() method.
- Copy specific columns from the original worksheet to the new worksheet using Worksheet.CopyColumn() method.
- Copy row heights from the original worksheet to the new worksheet.
- Save the new workbook to an Excel file using Workbook.SaveToFile() method.
- Python
from spire.xls import *
from spire.xls.common import *

# Create a Workbook object and load an Excel file
workbook = Workbook()
workbook.LoadFromFile("Sample.xlsx")
# Get the original (the 1st) worksheet
worksheet = workbook.Worksheets[0]

# Specify the folder path for the generated Excel files
folderPath = "C:\\Users\\Administrator\\Desktop\\Output\\"

# Create a new Workbook object
newWorkbook1 = Workbook()
# Remove the default worksheets
newWorkbook1.Worksheets.Clear()
# Add a new worksheet
newWorksheet1 = newWorkbook1.Worksheets.Add("Sheet1")
# Copy columns 1-2 from the original worksheet to the new worksheet
for i in range(1, 3):
    worksheet.CopyColumn(worksheet.Columns[i-1], newWorksheet1, newWorksheet1.LastDataColumn + 1, CopyRangeOptions.All)
# Copy row heights from the original worksheet to the new worksheet
for i in range(worksheet.Rows.Count):
    newWorksheet1.SetRowHeight(i + 1, worksheet.GetRowHeight(i + 1))
# Save the new workbook to the specified folder
newWorkbook1.SaveToFile(folderPath + "Columns1-2.xlsx", FileFormat.Version2016)
newWorkbook1.Dispose()

# Create a new Workbook object
newWorkbook2 = Workbook()
# Remove the default worksheets
newWorkbook2.Worksheets.Clear()
# Add a new worksheet
newWorksheet2 = newWorkbook2.Worksheets.Add("Sheet1")
# Copy columns 3-5 from the original worksheet to the new worksheet
for i in range(3, 6):
    worksheet.CopyColumn(worksheet.Columns[i-1], newWorksheet2, newWorksheet2.LastDataColumn + 1, CopyRangeOptions.All)

# Copy row heights from the original worksheet to the new worksheet
for i in range(worksheet.Rows.Count):
    newWorksheet2.SetRowHeight(i + 1, worksheet.GetRowHeight(i + 1))
# Save the new workbook to the specified folder
newWorkbook2.SaveToFile(folderPath + "Columns3-5.xlsx", FileFormat.Version2016)
newWorkbook2.Dispose()
Apply for a Temporary License
If you'd like to remove the evaluation message from the generated documents, or to get rid of the function limitations, please request a 30-day trial license for yourself.
Comparing PDF documents is a common task when collaborating on projects or tracking changes. This allows users to quickly review and understand what has been modified, added, or removed between revisions. Effective PDF comparison streamlines the review process and ensures all stakeholders are aligned on the latest document content.
In this article, you will learn how to compare two PDF documents using Python and the Spire.PDF for Python library.
Install Spire.PDF for Python
This scenario requires Spire.PDF for Python and plum-dispatch v1.7.4. They can be easily installed in your Windows through the following pip command.
pip install Spire.PDF
If you are unsure how to install, please refer to this tutorial: How to Install Spire.PDF for Python on Windows
Compare Two PDF Documents in Python
Spire.PDF for Python provides the PdfComparer.Compare() method allowing developers to compare two PDF documents and save the comparison result to another PDF document. Here are the detailed steps.
- Load the first PDF document while initializing the PdfDocument object.
- Load the second PDF document while initializing another PdfDocument object.
- Initialize an instance of PdfComparer class, passing the two PdfDocument objects are the parameter.
- Call Compare() method of the PdfComparer object to compare the two PDF documents and save the result to a different PDF document.
- Python
from spire.pdf.common import *
from spire.pdf import *

# Load the first document
doc_one = PdfDocument("C:\\Users\\Administrator\\Desktop\\PDF_ONE.pdf")

# Load the section document
doc_two = PdfDocument("C:\\Users\\Administrator\\Desktop\\PDF_TWO.pdf")

# Create a PdfComparer object
comparer = PdfComparer(doc_two, doc_one)

# Compare two documents and save the comparison result in a pdf document
comparer.Compare("output/CompareResult.pdf")

# Dispose resources
doc_one.Dispose()
doc_two.Dispose()
Compare Selected Pages in PDF Documents in Python
Instead of comparing two entire documents, you can specify the pages to compare using the PdfComparer.PdfCompareOptions.SetPageRanges() method. The following are the detailed steps.
- Load the first PDF document while initializing the PdfDocument object.
- Load the second PDF document while initializing another PdfDocument object.
- Initialize an instance of PdfComparer class, passing the two PdfDocument objects are the parameter.
- Specify the page range to compare using PdfComparer.PdfCompareOptions.SetPageRanges() method
- Call PdfComparer.Compare() method to compare the selected pages and save the result to a different PDF document.
- Python
from spire.pdf.common import *
from spire.pdf import *

# Load the first document
doc_one = PdfDocument("C:\\Users\\Administrator\\Desktop\\PDF_ONE.pdf")

# Load the section document
doc_two = PdfDocument("C:\\Users\\Administrator\\Desktop\\PDF_TWO.pdf")

# Create a PdfComparer object
comparer = PdfComparer(doc_two, doc_one)

# Set page range for comparison
comparer.PdfCompareOptions.SetPageRanges(1, 3, 1, 3)

# Compare the selected pages and save the comparison result in a pdf document
comparer.Compare("output/CompareResult.pdf")

# Dispose resources
doc_one.Dispose()
doc_two.Dispose()
Apply for a Temporary License
If you'd like to remove the evaluation message from the generated documents, or to get rid of the function limitations, please request a 30-day trial license for yourself.
When working with large amounts of information, the ability to quickly sort data can be very beneficial at times. By arranging data in ascending, descending, or customized order, users can easily spot trends, analyze relationships, and extract valuable insights. In this article, you will learn how to sort columns or rows in Excel in Python using Spire.XLS for Python.
- Sort By Columns in Excel in Python
- Sort By Custom List in Excel in Python
- Sort By Rows in Excel in Python
Install Spire.XLS for Python
This scenario requires Spire.XLS for Python and plum-dispatch v1.7.4. They can be easily installed in your Windows through the following pip command.
pip install Spire.XLS
If you are unsure how to install, please refer to this tutorial: How to Install Spire.XLS for Python on Windows
Sort By Columns in Excel in Python
The Workbook.DataSorter.SortColumns.Add(key: int, sortComparsionType: SortComparsionType, orderBy: OrderBy) method provided by Spire.XLS for Python allows users to sort data based on different criteria. For example, you can sort cell values, cell colors or font colors in ascending, descending, or other order.
The following are the steps to sort the values in a specified column:
- Create a Workbook instance.
- Load an Excel file using Workbook.LoadFromFile() method.
- Get a specified worksheet using Workbook.Worksheets[] property.
- Specify the sorting mode using Workbook.DataSorter.SortColumns.Add() method.
- Sort data in a specified cell range using Workbook.DataSorter.Sort() method.
- Save the result file using Workbook.SaveToFile() method.
- Python
from spire.xls.common import *
from spire.xls import *

# Create a Workbook instance
workbook = Workbook()

# Load an Excel file
workbook.LoadFromFile("Budget.xlsx")

# Get the first worksheet
worksheet = workbook.Worksheets[0]

# Sort values in the specified column in ascending order
workbook.DataSorter.SortColumns.Add(0, SortComparsionType.Values, OrderBy.Ascending)

# Sort in the specified cell range
workbook.DataSorter.Sort(worksheet["A1:E7"])

# Save the result file
workbook.SaveToFile("SortByColumns.xlsx", ExcelVersion.Version2016)
workbook.Dispose()
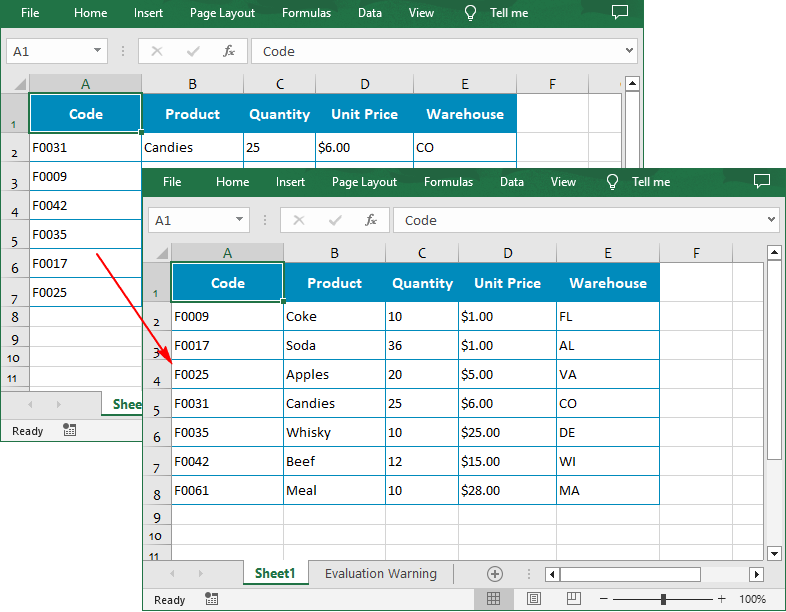
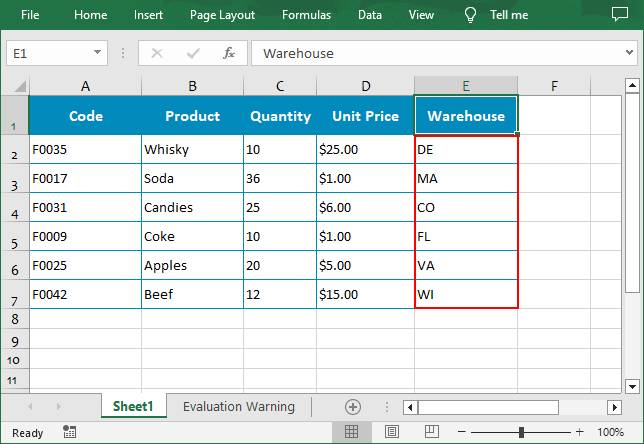
Sort By Custom List in Excel in Python
You can also create a custom list and then sort data based on it using the Workbook.DataSorter.SortColumns.Add(key: int, customSortOrder: List[str]) method.
The following are the steps to sort data using a custom list:
- Create a Workbook instance.
- Load an Excel file using Workbook.LoadFromFile() method.
- Get a specified worksheet using Workbook.Worksheets[] property.
- Create a custom sort list, and then sort a specified column using it though Workbook.DataSorter.SortColumns.Add() method.
- Sort data in a specified cell range using Workbook.DataSorter.Sort() method.
- Save the result file using Workbook.SaveToFile() method.
- Python
from spire.xls.common import *
from spire.xls import *

# Create a Workbook instance
workbook = Workbook()

# Load an Excel file
workbook.LoadFromFile("Budget.xlsx")

# Get the first worksheet
worksheet = workbook.Worksheets[0]

# Create a custom sort list
customList = ["DE","MA", "CO", "FL", "VA", "WI"]

# Sort a specified column using the custom list
workbook.DataSorter.SortColumns.Add(4, customList )

# Sort in the specified cell range
workbook.DataSorter.Sort(worksheet["A1:E7"])

# Save the result file
workbook.SaveToFile("CustomSortList.xlsx", ExcelVersion.Version2016)
workbook.Dispose()
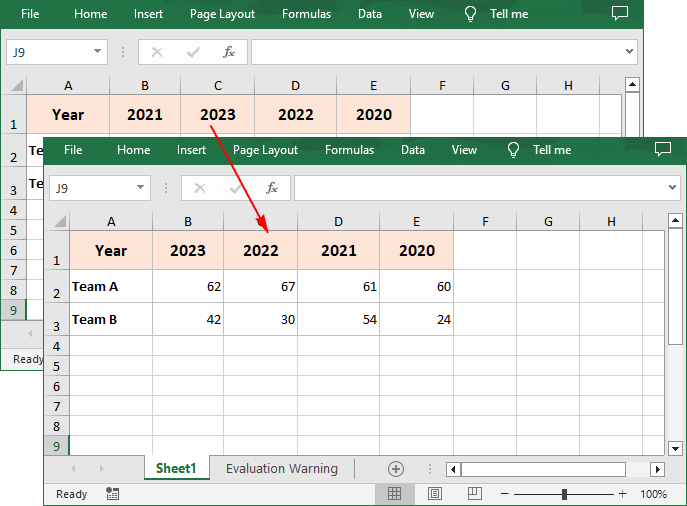
Sort By Rows in Excel in Python
To sort a specified row in Excel, you need to set the sort orientation to LeftToRight, specify the sort mode and sort row data accordingly.
The following are the steps to sort the values in a specified row:
- Create a Workbook instance.
- Load an Excel file using Workbook.LoadFromFile() method.
- Get a specified worksheet using Workbook.Worksheets[] property.
- Set whether to include titles when sorting using Workbook.DataSorter.IsIncludeTitle property.
- Set the sort orientation using Workbook.DataSorter.Orientation property.
- Specify the sorting mode, and then sort data in the first row using Workbook.DataSorter.Sort(Worksheet.Rows[0]) method.
- Save the result file using Workbook.SaveToFile() method.
- Python
from spire.xls.common import *
from spire.xls import *

# Create a Workbook instance
workbook = Workbook()

# Load an Excel file
workbook.LoadFromFile("Year.xlsx")

# Get the first worksheet
sheet = workbook.Worksheets[0]

# Set whether to include titles when sorting
workbook.DataSorter.IsIncludeTitle = True

# Set the sort orientation
workbook.DataSorter.Orientation = SortOrientationType.LeftToRight

# Specify the sorting mode
workbook.DataSorter.SortColumns.Add(0,SortComparsionType.Values,OrderBy.Descending)

# Sort data in the first row
workbook.DataSorter.Sort(sheet.Rows[0])

# Save the result file
workbook.SaveToFile("SortByRows.xlsx", ExcelVersion.Version2016)
workbook.Dispose()
Apply for a Temporary License
If you'd like to remove the evaluation message from the generated documents, or to get rid of the function limitations, please request a 30-day trial license for yourself.
