
Python (365)
Python: Insert, Retrieve, Reorder, and Remove Slides in PowerPoint Sections
2024-11-26 01:20:18 Written by AdministratorPowerPoint presentations are a powerful tool for presenting information in an organized and engaging manner. To further enhance the organization of slides, PowerPoint allows users to group slides into sections. This feature makes navigating and managing large presentations much easier. In this article, we'll show you how to manage slides within PowerPoint sections in Python using Spire.Presentation for Python. Specifically, we'll cover how to add, retrieve, reorder, and remove slides in these sections.
- Insert Slides into a PowerPoint Section in Python
- Retrieve Slides from a PowerPoint Section in Python
- Reorder Slides in a PowerPoint Section in Python
- Remove Slides from a PowerPoint Section in Python
Install Spire.Presentation for Python
This scenario requires Spire.Presentation for Python and plum-dispatch v1.7.4. They can be easily installed in your Windows through the following pip command.
pip install Spire.Presentation
If you are unsure how to install, please refer to this tutorial: How to Install Spire.Presentation for Python on Windows
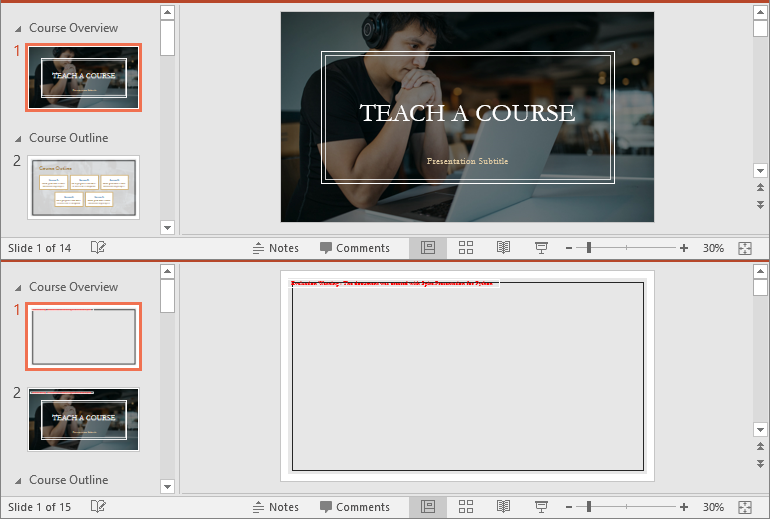
Insert Slides into a PowerPoint Section in Python
Inserting slides is essential when you want to introduce new content to a section. Using Spire.Presentation for Python, you can quickly insert a slide into a section with the Section.Insert() method. The detailed steps are as follows.
- Create an instance of the Presentation class.
- Load a PowerPoint presentation using the Presentation.LoadFromFile() method.
- Get a specific section through its index (0-based) using the Presentation.SectionList(index) property.
- Add a new slide to the presentation, then insert it into the section using the Section.Insert() method.
- Remove the added slide from the presentation.
- Save the resulting presentation using the Presentation.SaveToFile() method.
- Python
from spire.presentation import *

# Create an instance of the Presentation class
presentation = Presentation()
# Load a PowerPoint presentation
presentation.LoadFromFile("Example.pptx")

# Access the first section
first_section = presentation.SectionList.get_Item(0)

# Add a new slide to the presentation and insert it at the start of the section
slide = presentation.Slides.Append()
first_section.Insert(0, slide)

# Remove the added slide from the presentation
presentation.Slides.Remove(slide)

# Save the modified presentation
presentation.SaveToFile("InsertSlidesInSection.pptx", FileFormat.Pptx2016)
# Close the Presentation object
presentation.Dispose()
Retrieve Slides from a PowerPoint Section in Python
Retrieving slides from a specific section allows you to focus on a smaller group of slides for tasks such as reordering or applying custom formatting. Using the Section.GetSlides() method in Spire.Presentation for Python, you can easily access all the slides in a particular section. The detailed steps are as follows.
- Create an instance of the Presentation class.
- Load a PowerPoint presentation using the Presentation.LoadFromFile() method.
- Get a specific section through its index (0-based) using the Presentation.SectionList(index) property.
- Retrieve the slides within the section using the Section.GetSlides() method.
- Iterate through the retrieved slides and get the slide number (1-based) of each slide.
- Python
from spire.presentation import *

# Create an instance of the Presentation class
presentation = Presentation()
# Load a PowerPoint presentation
presentation.LoadFromFile("Example.pptx")

# Retrieve the slides in the 3rd section
section = presentation.SectionList.get_Item(2)
slides = section.GetSlides()

output_content = "The slide numbers in this section are:\n"

# Get the slide number of each slide in the section
for slide in slides:
    output_content += str(slide.SlideNumber) + " "

# Save the slide number to a text file
with open("slide_numbers.txt", "w") as file:
    file.write(output_content)

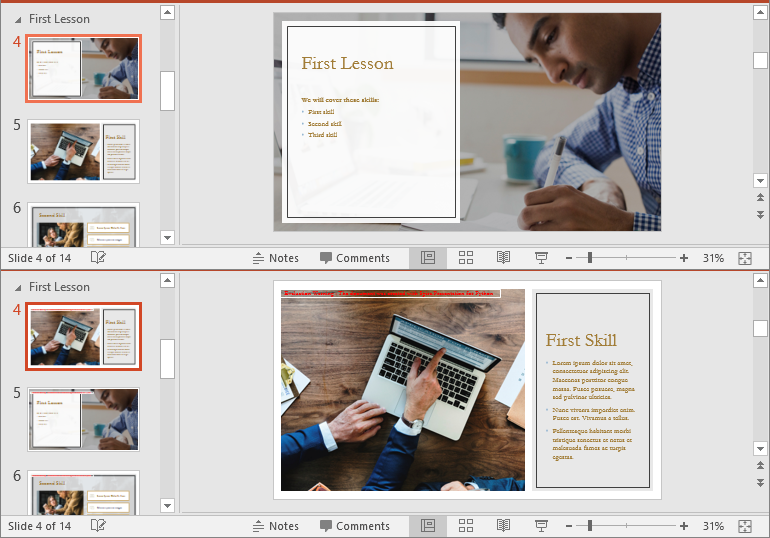
Reorder Slides in a PowerPoint Section in Python
Reordering slides is important to ensure related content is in the right order. Spire.Presentation for Python offers the Section.Move() method, which allows you to move a slide to a new position within a section. The detailed steps are as follows.
- Create an instance of the Presentation class.
- Load a PowerPoint presentation using the Presentation.LoadFromFile() method.
- Get a specific section through its index (0-based) using the Presentation.SectionList(index) property.
- Move a specific slide in the section to another position using the Section.Move() method.
- Save the resulting presentation using the Presentation.SaveToFile() method.
- Python
from spire.presentation import *

# Create an instance of the Presentation class
presentation = Presentation()
# Load a PowerPoint presentation
presentation.LoadFromFile("Example.pptx")

# Access the 3rd section
section = presentation.SectionList.get_Item(2)

# Retrieve the slides in the section
slides = section.GetSlides()

# Move the 1st slide in the section to the specified position
section.Move(2, slides[0])

# Save the modified presentation
presentation.SaveToFile("ReorderSlidesInSection.pptx", FileFormat.Pptx2016)
# Close the Presentation object
presentation.Dispose()
Remove Slides from a PowerPoint Section in Python
Removing slides from a section streamlines your presentation, particularly when some slides become outdated or unnecessary. With Spire.Presentation for Python, you can easily remove a single slide or multiple slides from a section using the Section.RemoveAt() or Section.RemoveRange() method. The detailed steps are as follows.
- Create an instance of the Presentation class.
- Load a PowerPoint presentation using the Presentation.LoadFromFile() method.
- Get a specific section through its index (0-based) using the Presentation.SectionList(index) property.
- Remove a specific slide or a range of slides from the presentation using the Section.RemoveAt() or Section.RemoveRange() method.
- Save the resulting presentation using the Presentation.SaveToFile() method.
- Python
from spire.presentation import *

# Create an instance of the Presentation class
presentation = Presentation()
# Load a PowerPoint presentation
presentation.LoadFromFile("Example.pptx")

# Access the 3rd section
section = presentation.SectionList.get_Item(2)

# Remove the first slide from the section
section.RemoveAt(0)

# Or remove a range of slides from the section
# section.RemoveRange(0, 2)

# Save the modified presentation
presentation.SaveToFile("RemoveSlidesInSection.pptx", FileFormat.Pptx2016)
# Close the Presentation object
presentation.Dispose()
Apply for a Temporary License
If you'd like to remove the evaluation message from the generated documents, or to get rid of the function limitations, please request a 30-day trial license for yourself.
Annotations in PDF documents play a crucial role in enhancing collaboration, emphasizing key points, or providing additional context. Extracting annotations is essential for efficiently analyzing PDF content, but manual extraction can be tedious. This guide demonstrates how to extract annotations from PDF with Python using Spire.PDF for Python, providing a faster and more flexible solution to access important information.
- Extract Specified Annotations from PDF Documents
- Extract All Annotations from a PDF Page
- Extract All Annotations from PDF Files
Install Spire.PDF for Python
This scenario requires Spire.PDF for Python and plum-dispatch v1.7.4. They can be easily installed in your Windows through the following pip command.
pip install Spire.PDF
If you are unsure how to install it, please refer to this tutorial: How to Install Spire.PDF for Python on Windows.
Extract Specified Annotations from PDF Documents
Although Adobe Acrobat offers a built-in one-click annotation extraction feature, it lacks flexibility when handling specific annotations. If you only need to extract one or a few annotations, you must manually locate and copy them, which can be inefficient, especially when working with PDFs containing multiple annotations. Spire.PDF (short for Spire.PDF for Python), however, provides the PdfAnnotationCollection.get_item() method, enabling targeted extraction of specific annotations, making PDF annotation management more flexible and efficient.
Steps to extract specified annotations from PDF:
- Create an object of PdfDocument class.
- Load a PDF document from the local storage with PdfDocument.LoadFromFile() method.
- Get a page using PdfDocument.Pages[] property, and access the annotations collection with PdfPageBase.AnnotationsWidget property.
- Create a list to store annotation information.
- Access the specified annotation using PdfAnnotationCollection.get_Item() method.
- Append annotation details to the list.
- Save the list as a Text file.
Here is the code example of exporting the first annotation on the third page:
- Python
from spire.pdf.common import *
from spire.pdf import *

# Create a new PDF document
pdf = PdfDocument()

# Load the file from disk
pdf.LoadFromFile( "Sample.pdf")

# Get the third page
page = doc.Pages.get_Item(2)

# Access the annotations on the page
annotations = page.AnnotationsWidget

# Create a list to save information of annotations
sb = []

# Access the first annotation on the page
annotation = annotations.get_Item(0)

# Append the annotation details to the list
sb.append("Annotation information: ")
sb.append("Text: " + annotation.Text)
modifiedDate = annotation.ModifiedDate.ToString()
sb.append("ModifiedDate: " + modifiedDate)

# Save the list as a Text file
with open("GetSpecificAnnotation.txt", "w", encoding="utf-8") as file:
    file.write("\n".join(sb))

# Close the PDF file
pdf.Close()

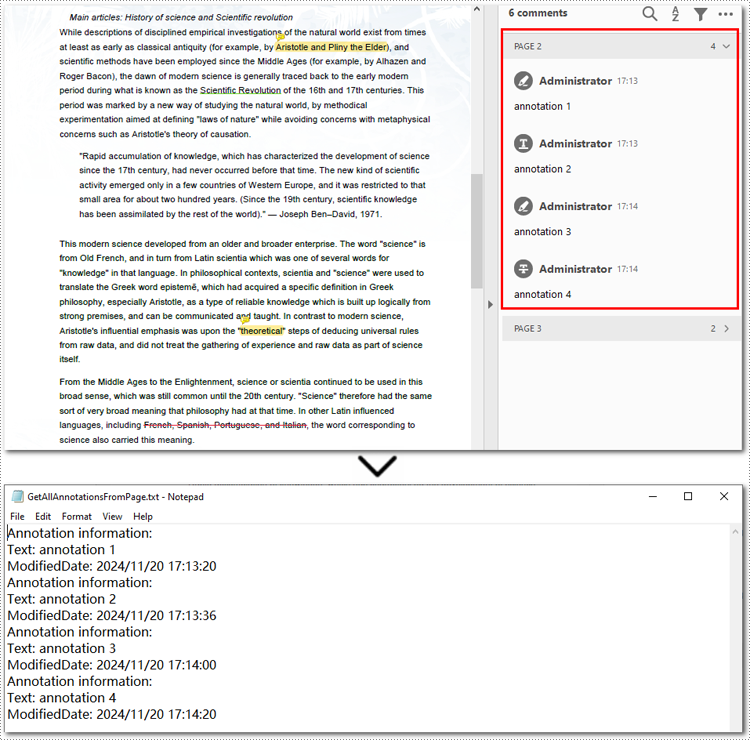
Extract All Annotations from a PDF Page
To export all annotations from a specified PDF page, you can still use the PdfPageBase.AnnotationsWidget property along with the PdfAnnotationCollection.get_item() method. However, you will need to iterate through all the annotations on the page to ensure none are missed. Below are the steps and code examples to guide you through the process.
Steps to extract annotations from PDF pages:
- Create a PdfDocument instance.
- Read a PDF document from the local storage with PdfDocument.LoadFromFile() method.
- Access the annotation collection on the specified page using PdfDocument.Pages.AnnotationsWidget property.
- Create a list to store annotation information.
- Loop through annotations on a certain page.
- Retrieve each annotation using PdfAnnotationCollection.get_Item() method.
- Add annotation details to the list.
- Save the list as a Text file.
Below is the code example of extracting all annotations on the second page:
- Python
from spire.pdf.common import *
from spire.pdf import *

# Create a new PDF document
pdf = PdfDocument()

# Load the file from disk
pdf.LoadFromFile("Sample.pdf")

# Get all annotations from the second page
annotations = pdf.Pages.get_Item(1).AnnotationsWidget

# Create a list to maintain annotation details
sb = []

# Loop through annotations on the page
if annotations.Count > 0:
    for i in range(annotations.Count):
        # Get the current annotation
        annotation = annotations.get_Item(i)

        # Get the annotation details
        if isinstance(annotation, PdfPopupAnnotationWidget):
            continue
        sb.append("Annotation information: ")
        sb.append("Text: " + annotation.Text)
        modifiedDate = annotation.ModifiedDate.ToString()
        sb.append("ModifiedDate: " + modifiedDate)

# Save annotations as a Text file
with open("GetAllAnnotationsFromPage.txt", "w", encoding="utf-8") as file:
    file.write("\n".join(sb))

# Release resources
pdf.Close()
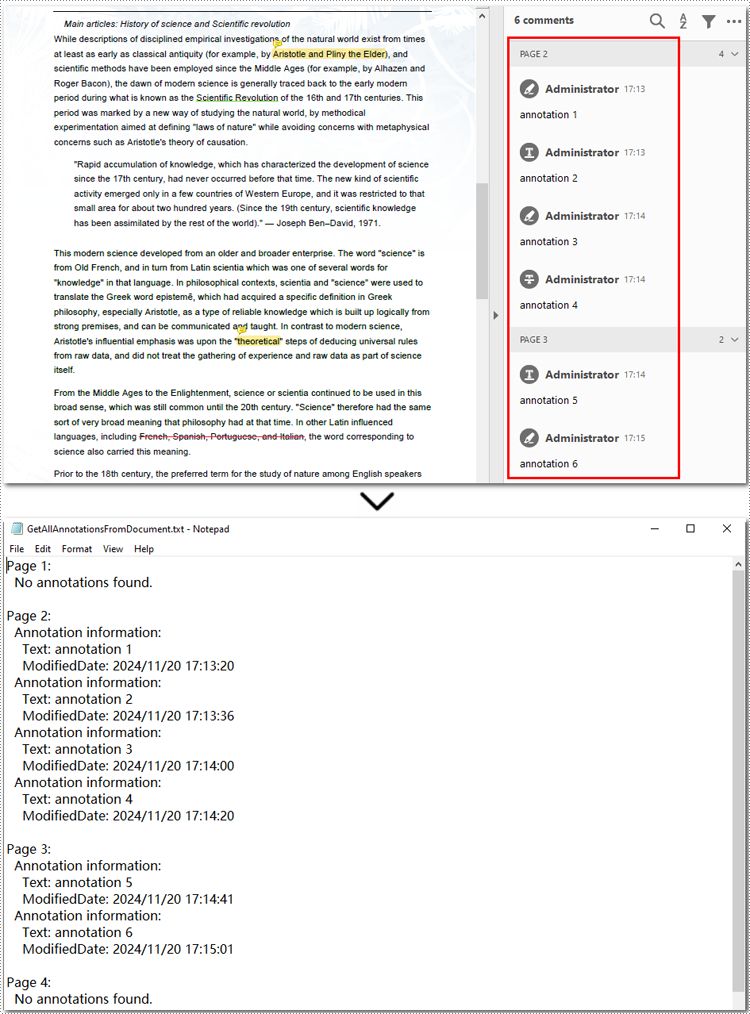
Extract All Annotations from PDF Files
The final section of this guide illustrates how to extract all annotations from a PDF document using Python. The process is similar to exporting annotations from a single page but involves iterating through each page, traversing all annotations, and accessing their details. Finally, the extracted annotation details are saved to a text file for further use. Let’s take a closer look at the detailed steps.
Steps to extract all annotations from a PDF document:
- Create an instance of PdfDocument class.
- Read a PDF document from the disk with PdfDocument.LoadFromFile() method.
- Initialize a list to store annotation information.
- Loop through all pages and access the annotation collection with PdfDocument.Pages.AnnotationsWidget property.
- Iterate each annotation in the collection and get annotations using PdfAnnotationCollection.get_item() method.
- Append annotation details to the list.
- Output the list as a Text file.
Here is an example of exporting all annotations from a PDF file:
- Python
from spire.pdf.common import *
from spire.pdf import *

# Create a new PDF document
pdf = PdfDocument()

# Load the file from disk
pdf.LoadFromFile("Sample.pdf")

# Create a list to save annotation details
sb = []

# Iterate through all pages in the PDF document
for pageIndex in range(pdf.Pages.Count):
    sb.append(f"Page {pageIndex + 1}:")

    # Access the annotation collection of the current page
    annotations = pdf.Pages.get_Item(pageIndex).AnnotationsWidget

    # Loop through annotations in the collection
    if annotations.Count > 0:
        for i in range(annotations.Count):
            # Get the annotations of the current page
            annotation = annotations.get_Item(i)

            # Skip invalid annotations (empty text and default date)
            if not annotation.Text.strip() and annotation.ModifiedDate.ToString() == "0001/1/1 0:00:00":
                continue

            # Extract annotation information
            sb.append("Annotation information: ")
            sb.append("Text: " + (annotation.Text.strip() or "N/A"))
            modifiedDate = annotation.ModifiedDate.ToString()
            sb.append("ModifiedDate: " + modifiedDate)
    else:
        sb.append("No annotations found.")

    # Add a blank line after each page
    sb.append("")

# Save all annotations to a file
with open("GetAllAnnotationsFromDocument.txt", "w", encoding="utf-8") as file:
    file.write("\n".join(sb))

# Close the PDF document
pdf.Close()
Apply for a Temporary License
If you'd like to remove the evaluation message from the generated documents, or to get rid of the function limitations, please request a 30-day trial license for yourself.
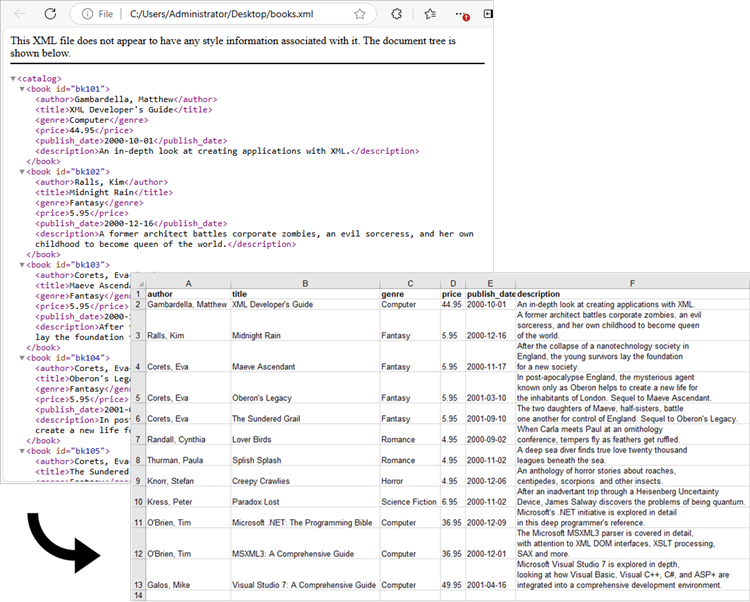
XML is widely used for storing and exchanging data due to its flexibility and self-descriptive nature. However, many users find it challenging to work with XML files directly. Excel, on the other hand, is a familiar and user-friendly tool for data analysis. Converting XML to Excel not only makes data more accessible but also enhances its usability for various applications.
In this article, you will learn how to convert XML to Excel as well as XML to PDF in Python using Spire.XLS for Python.
Install Spire.XLS for Python
This scenario requires Spire.XLS for Python and plum-dispatch v1.7.4. They can be easily installed in your Windows through the following pip command.
pip install Spire.XLS
If you are unsure how to install, please refer to this tutorial: How to Install Spire.XLS for Python on Windows
Understanding XML Structure: Elements, Attributes, and Data
Before converting XML to Excel, it's crucial to understand the structure of XML files. XML is a markup language that uses tags to define elements, attributes, and data. Here’s a breakdown of these components:
- Elements: These are the building blocks of XML. They are defined by start and end tags and can contain data or other elements.
<person>
    <name>John Doe</name>
    <age>30</age>
</person>
- Attributes: These provide additional information about elements. They are specified within the start tag of an element.
<person id="1">
    <name>John Doe</name>
    <age>30</age>
</person>
- Data: This is the content enclosed within the start and end tags of an element.
Understanding these components will help you map XML data to Excel effectively.
Convert XML to Excel in Python
To load an XML file into Python, you can use the xml.etree.ElementTree library, which is included in Python's standard library. This library provides methods to navigate and manipulate the XML tree. Here is an example:
import xml.etree.ElementTree as ET

# Load the XML file
tree = ET.parse('data.xml')
root = tree.getroot()

# Iterate through elements
for person in root.findall('person'):
    name = person.find('name').text
    age = person.find('age').text
After parsing the XML data, the next step is to map it to an Excel worksheet. You can utilize Spire.XLS for Python to create a new workbook, input data into specific cells, and apply styles and formatting to the worksheet. These formatting options include auto-fitting column widths, adjusting text alignment and making the header bold.
To convert XML to Excel in Python, follow these steps:
- Use the xml.etree.ElementTree library to retrieve data from an XML file.
- Create a Workbook object.
- Add a worksheet using the Workbook.Worksheets.Add() method.
- Write data extracted from the XML file into the cells of the worksheet using the Worksheet.SetValue() method.
- Apply styles and formatting to enhance the worksheet appearance.
- Save the workbook to an Excel file.
The following code provides a more intelligent and advanced way to read data from XML and import it into an Excel file.
- Python
from spire.xls import *
from spire.xls.common import *
import xml.etree.ElementTree as ET

# Create a Workbook object
workbook = Workbook()

# Remove default worksheets
workbook.Worksheets.Clear()

# Add a worksheet and name it
worksheet = workbook.Worksheets.Add("Books")

# Load an XML file
xml_tree = ET.parse("C:\\Users\\Administrator\\Desktop\\Books.xml")

# Get the root element of the XML tree
xml_root = xml_tree.getroot()

# Get the first the "book" element
first_book = xml_root.find("book")

# Extract header information and convert it into a list
header = list(first_book.iter())[1:]

# Write header to Excel
for col_index, header_node in enumerate(header, start=1):
    header_text = header_node.tag
    worksheet.SetValue(1, col_index, header_text)

# Write other data to Excel by iterating over each book element and each data node within it
row_index = 2
for book in xml_root.iter("book"):
    for col_index, data_node in enumerate(list(book.iter())[1:], start=1):
        value = data_node.text
        header_text = list(header[col_index - 1].iter())[0].tag
        worksheet.SetValue(row_index, col_index, value)
    row_index += 1

# Set column width
worksheet.AllocatedRange.AutoFitColumns()

# Set alignment
worksheet.AllocatedRange.HorizontalAlignment = HorizontalAlignType.Left

# Set font style
worksheet.Range["A1:F1"].Style.Font.IsBold = True

# Save the workbook to an Excel file
workbook.SaveToFile("output/XmlToExcel.xlsx")

# Dispose resources
workbook.Dispose()
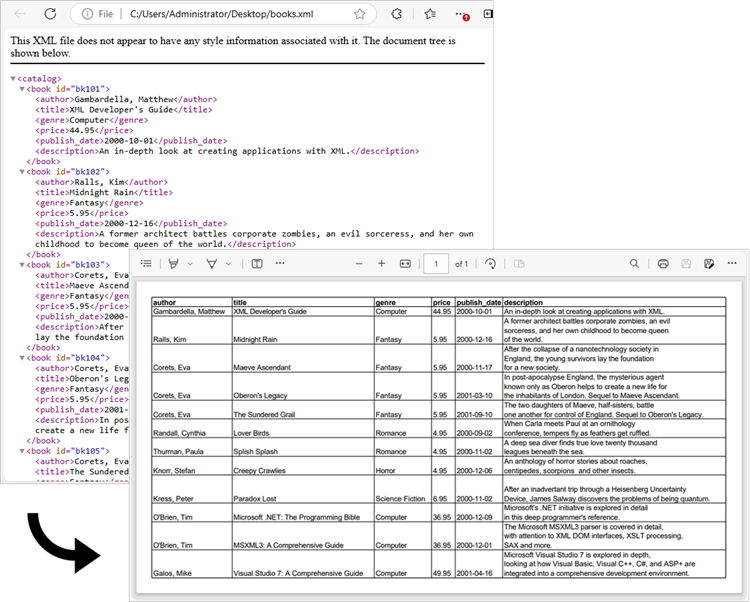
Convert XML to PDF in Python
The previous example successfully imports data from an XML file into an Excel worksheet. You can convert this worksheet to a PDF using the Worksheet.SaveToPdf() method. To create a well-structured PDF, consider adjusting page layout settings, such as margins and gridline preservation, during the conversion process.
The steps to convert XML to PDF using Python are as follows:
- Use the xml.etree.ElementTree library to retrieve data from an XML file.
- Create a Workbook object.
- Add a worksheet using the Workbook.Worksheets.Add() method.
- Write data extracted from the XML file into the cells of the worksheet using the Worksheet.SetValue() method.
- Apply styles and formatting to enhance the worksheet appearance.
- Configure page settings using the properties under the PageSetup object, which is returned by the Worksheet.PageSetup property.
- Save the worksheet as a PDF file using the Worksheet.SaveToPdf() method.
The following code snippet demonstrates how to import data from XML into a worksheet and save that worksheet as a PDF file.
- Python
from spire.xls import *
from spire.xls.common import *
import xml.etree.ElementTree as ET

# Create a Workbook object
workbook = Workbook()

# Remove default worksheets
workbook.Worksheets.Clear()

# Add a worksheet and name it
worksheet = workbook.Worksheets.Add("Books")

# Load an XML file
xml_tree = ET.parse("C:\\Users\\Administrator\\Desktop\\Books.xml")

# Get the root element of the XML tree
xml_root = xml_tree.getroot()

# Get the first the "book" element
first_book = xml_root.find("book")

# Extract header information and convert it into a list
header = list(first_book.iter())[1:]

# Write header to Excel
for col_index, header_node in enumerate(header, start=1):
    header_text = header_node.tag
    worksheet.SetValue(1, col_index, header_text)

# Write other data to Excel by iterating over each book element and each data node within it
row_index = 2
for book in xml_root.iter("book"):
    for col_index, data_node in enumerate(list(book.iter())[1:], start=1):
        value = data_node.text
        header_text = list(header[col_index - 1].iter())[0].tag
        worksheet.SetValue(row_index, col_index, value)
    row_index += 1

# Set column width
worksheet.AllocatedRange.AutoFitColumns()

# Set alignment
worksheet.AllocatedRange.HorizontalAlignment = HorizontalAlignType.Left

# Set font style
worksheet.Range["A1:F1"].Style.Font.IsBold = True

# Fit worksheet on one page
workbook.ConverterSetting.SheetFitToPage = True

# Get the PageSetup object
pageSetup = worksheet.PageSetup

# Set page margins
pageSetup.TopMargin = 0.3
pageSetup.BottomMargin = 0.3
pageSetup.LeftMargin = 0.3
pageSetup.RightMargin = 0.3

# Preserve gridlines
pageSetup.IsPrintGridlines = True

# Save the worksheet to a PDF file
worksheet.SaveToPdf("output/XmlToPdf.pdf")

# Dispose resources
workbook.Dispose()
Apply for a Temporary License
If you'd like to remove the evaluation message from the generated documents, or to get rid of the function limitations, please request a 30-day trial license for yourself.
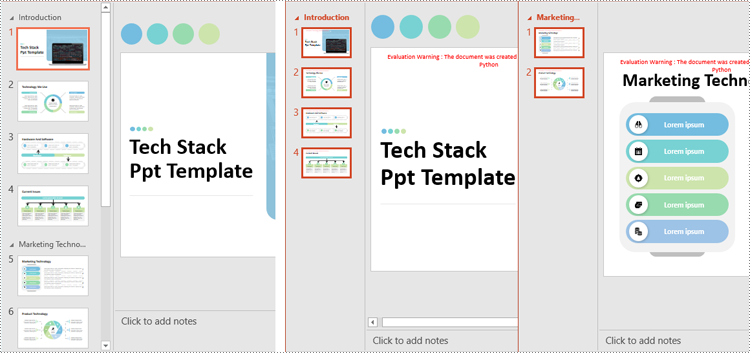
Splitting a PowerPoint presentation into smaller files or individual sections can be useful in various situations. For instance, when collaborating with a team, each member may only need a specific section of the presentation to work on. Additionally, breaking a large presentation into smaller parts can simplify sharing over email or uploading to platforms with file size restrictions. In this article, we'll show you how to split PowerPoint presentations by slides, slide ranges, and sections in Python using Spire.Presentation for Python.
- Split PowerPoint Presentations by Slides in Python
- Split PowerPoint Presentations by Slide Ranges in Python
- Split PowerPoint Presentations by Sections in Python
Install Spire.Presentation for Python
This scenario requires Spire.Presentation for Python and plum-dispatch v1.7.4. They can be easily installed in your Windows through the following pip command.
pip install Spire.Presentation
If you are unsure how to install, please refer to this tutorial: How to Install Spire.Presentation for Python on Windows
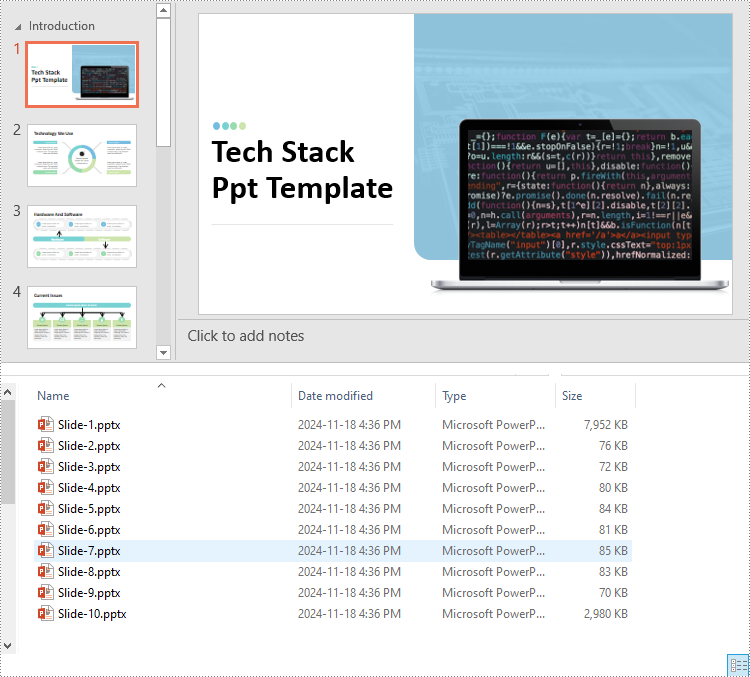
Split PowerPoint Presentations by Slides in Python
Developers can use Spire.Presentation for Python to split a PowerPoint presentation into individual slides by iterating through the slides in the presentation and adding each slide to a new presentation. The detailed steps are as follows.
- Create an instance of the Presentation class.
- Load a PowerPoint presentation using the Presentation.LoadFromFile() method.
- Iterate through all slides in the presentation:
- Access the current slide through the Presentation.Slides[index] property.
- Create a new PowerPoint presentation using the Presentation class and remove its default slide using the Presentation.Slides.RemoveAt(0) method.
- Append the current slide to the new presentation using the Presentation.Slides.AppendBySlide() method.
- Save the new presentation as a file using the ISlide.SaveToFile() method.
- Python
from spire.presentation.common import *
from spire.presentation import *

# Create an instance of the Presentation class
presentation = Presentation()
# Load a PowerPoint presentation
presentation.LoadFromFile("Sample.pptx")

# Iterate through all slides in the presentation
for i in range(presentation.Slides.Count):
    # Get the current slide
    slide = presentation.Slides[i]

    # Create a new PowerPoint presentation and remove its default slide
    newPresentation = Presentation()
    newPresentation.Slides.RemoveAt(0)

    # Append the current slide to the new presentation
    newPresentation.Slides.AppendBySlide(slide)

    # Save the new presentation as a file
    newPresentation.SaveToFile(f"output/Presentations/Slide-{i + 1}.pptx", FileFormat.Pptx2013)
    newPresentation.Dispose()

presentation.Dispose()
Split PowerPoint Presentations by Slide Ranges in Python
Apart from splitting a PowerPoint presentation into individual slides, developers can also divide it into specific ranges of slides by adding the desired slides to new presentations. The detailed steps are as follows.
- Create an instance of the Presentation class.
- Load a PowerPoint presentation using the Presentation.LoadFromFile() method.
- Create new PowerPoint presentations using the Presentation class and remove the default slides within them using the Presentation.Slides.RemoveAt(0) method.
- Append specified ranges of slides to the new presentations using the Presentation.Slides.AppendBySlide() method.
- Save the new presentations as files using the Presentation.SaveToFile() method.
- Python
from spire.presentation.common import *
from spire.presentation import *

# Create an instance of the Presentation class
presentation = Presentation()
# Load a PowerPoint presentation
presentation.LoadFromFile("Sample.pptx")

# Create two new PowerPoint presentations and remove their default slides
presentation1 = Presentation()
presentation2 = Presentation()
presentation1.Slides.RemoveAt(0)
presentation2.Slides.RemoveAt(0)

# Append slides 1-3 to the first new presentation
for i in range(3):
    presentation1.Slides.AppendBySlide(presentation.Slides[i])
# Append the remaining slides to the second new presentation
for i in range(3, presentation.Slides.Count):
    presentation2.Slides.AppendBySlide(presentation.Slides[i])

# Save the new presentations as files
presentation1.SaveToFile("output/Presentations/SlideRange1.pptx", FileFormat.Pptx2013)
presentation2.SaveToFile("output/Presentations/SlideRange2.pptx", FileFormat.Pptx2013)

presentation1.Dispose()
presentation2.Dispose()
presentation.Dispose()
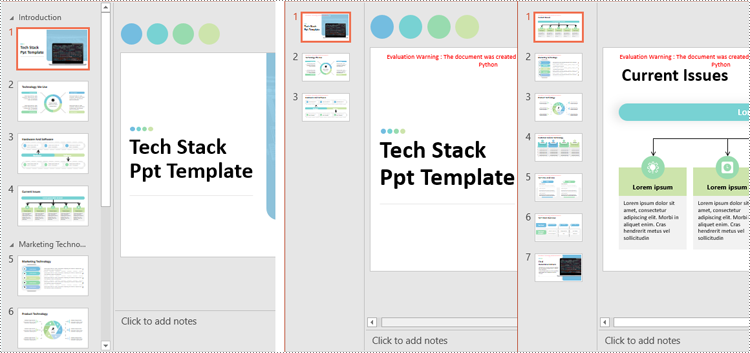
Split PowerPoint Presentations by Sections in Python
Sections in PowerPoint are often used to organize slides into manageable groups. With Spire.Presentation for Python, developers can split a PowerPoint presentation into sections by iterating through the sections in the presentation and adding the slides within each section to a new presentation. The detailed steps are as follows.
- Create an instance of the Presentation class.
- Load a PowerPoint presentation using the Presentation.LoadFromFile() method.
- Iterate through all sections in the presentation:
- Access the current section through the Presentation.SectionList[] property.
- Create a new PowerPoint presentation using the Presentation class and remove its default slide using the Presentation.Slides.RemoveAt(0) method.
- Add a section to the new presentation with the same name using the Presentation.SectionList.Append() method.
- Retrieve the slides of the current section using the Section.GetSlides() method.
- Iterate through the retrieved slides and add them to the section of the new presentation using the Section.Insert() method.
- Save the new presentation as a file using the Presentation.SaveToFile() method.
- Python
from spire.presentation.common import *
from spire.presentation import *

# Create an instance of the Presentation class
presentation = Presentation()
# Load a PowerPoint presentation
presentation.LoadFromFile("Sample.pptx")

# Iterate through all sections
for i in range(presentation.SectionList.Count):
    # Get the current section
    section = presentation.SectionList.get_Item(0)

    # Create a new PowerPoint presentation and remove its default slide
    newPresentation = Presentation()
    newPresentation.Slides.RemoveAt(0)
    # Add a section to the new presentation
    newSection = newPresentation.SectionList.Append(section.Name)

    # Retrieve the slides of the current section
    slides = section.GetSlides()

    # Insert each retrieved slide into the section of the new presentation
    for slide_index, slide in enumerate(slides):
        newSection.Insert(slide_index, slide)

    # Save the new presentation as a file
    newPresentation.SaveToFile(f"output/Presentations/Section-{i + 1}.pptx", FileFormat.Pptx2019)
    newPresentation.Dispose()

presentation.Dispose()
Apply for a Temporary License
If you'd like to remove the evaluation message from the generated documents, or to get rid of the function limitations, please request a 30-day trial license for yourself.
Python: Convert Excel Data to Word Table with Formatting
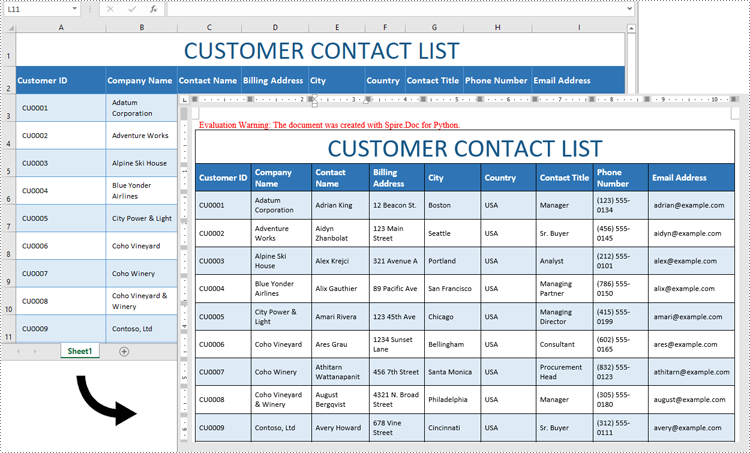
2024-11-18 01:07:09 Written by AdministratorExcel is ideal for data calculations, analysis, and organization, while Word shines at creating polished, well-formatted documents and reports. Transferring data from Excel to Word is often necessary for professionals preparing reports or presentations, as it allows for advanced formatting options that enhance readability and create a more professional look. In this guide, you will learn how to convert data in an Excel sheet to a Word table with formatting in Python using Spire.Office for Python.
Install Spire.Office for Python
This scenario requires Spire.Office for Python and plum-dispatch v1.7.4. They can be easily installed in your Windows through the following pip command.
pip install Spire.Office
Convert Excel Data to Word Table with Formatting in Python
This process uses two libraries in the Spire.Office for Python package. They’re Spire.XLS for Python and Spire.Doc for Python. The former is used to read data and formatting from an Excel worksheet, and the latter is used to create a Word document and write data, including formatting, into a table. To make this code example easy to understand, we have defined the following two custom methods that handle specific tasks:
- MergeCells() - Merge the corresponding cells in the Word table based on the merged cells in the Excel sheet.
- CopyStyle() - Copy various cell styles from the Excel worksheet to the Word table, including font style, background color, and text alignment.
The following steps demonstrate how to convert data from an Excel sheet to a Word table with formatting using Spire.Office for Python.
- Create an object of the Workbook class and load a sample Excel file using the Workbook.LoadFromFile() method.
- Get a specific worksheet through the Workbook.Worksheets[index] property.
- Create a new Word document using the Document class, and add a section to it.
- Add a table to the Word document using the Section.AddTable() method.
- Detect the merged cells in the worksheet and merge the corresponding cells in the Word tale using the custom method MergeCells().
- Iterate through the cells in the worksheet, read the data of the cells through the CellRange.Value property and add the data to Word table cells using the TableCell.AddParagraph().AppendText() method.
- Copy the cell styles from the Excel worksheet to the Word table using the custom method CopyStyle().
- Save the Word document to a file using the Document.SaveToFile() method.
- Python
from spire.xls import *
from spire.doc import *

def MergeCells(sheet, table):
    """Merge cells in the Word table based on merged cells in the Excel sheet."""
    if sheet.HasMergedCells:
        ranges = sheet.MergedCells
        for i in range(len(ranges)):
            startRow = ranges[i].Row
            startColumn = ranges[i].Column
            rowCount = ranges[i].RowCount
            columnCount = ranges[i].ColumnCount

            if rowCount > 1 and columnCount > 1:
                for j in range(startRow, startRow + rowCount):
                    table.ApplyHorizontalMerge(j - 1, startColumn - 1, startColumn - 1 + columnCount - 1)
                table.ApplyVerticalMerge(startColumn - 1, startRow - 1, startRow - 1 + rowCount - 1)

            if rowCount > 1 and columnCount == 1:
                table.ApplyVerticalMerge(startColumn - 1, startRow - 1, startRow - 1 + rowCount - 1)

            if columnCount > 1 and rowCount == 1:
                table.ApplyHorizontalMerge(startRow - 1, startColumn - 1, startColumn - 1 + columnCount - 1)

def CopyStyle(wTextRange, xCell, wCell):
    """Copy cell styling from Excel to Word."""
    # Copy font style
    wTextRange.CharacterFormat.TextColor = Color.FromRgb(xCell.Style.Font.Color.R, xCell.Style.Font.Color.G, xCell.Style.Font.Color.B)
    wTextRange.CharacterFormat.FontSize = float(xCell.Style.Font.Size)
    wTextRange.CharacterFormat.FontName = xCell.Style.Font.FontName
    wTextRange.CharacterFormat.Bold = xCell.Style.Font.IsBold
    wTextRange.CharacterFormat.Italic = xCell.Style.Font.IsItalic

    # Copy background color
    if xCell.Style.FillPattern is not ExcelPatternType.none:
        wCell.CellFormat.Shading.BackgroundPatternColor=Color.FromRgb(xCell.Style.Color.R, xCell.Style.Color.G, xCell.Style.Color.B)


        # Copy horizontal alignment
    if xCell.HorizontalAlignment == HorizontalAlignType.Left:
        wTextRange.OwnerParagraph.Format.HorizontalAlignment = HorizontalAlignment.Left
    elif xCell.HorizontalAlignment == HorizontalAlignType.Center:
        wTextRange.OwnerParagraph.Format.HorizontalAlignment = HorizontalAlignment.Center
    elif xCell.HorizontalAlignment == HorizontalAlignType.Right:
        wTextRange.OwnerParagraph.Format.HorizontalAlignment = HorizontalAlignment.Right

    # Copy vertical alignment
    if xCell.VerticalAlignment == VerticalAlignType.Bottom:
        wCell.CellFormat.VerticalAlignment = VerticalAlignment.Bottom
    elif xCell.VerticalAlignment == VerticalAlignType.Center:
        wCell.CellFormat.VerticalAlignment = VerticalAlignment.Middle
    elif xCell.VerticalAlignment == VerticalAlignType.Top:
        wCell.CellFormat.VerticalAlignment = VerticalAlignment.Top

# Load an Excel file
workbook = Workbook()
workbook.LoadFromFile("Contact list.xlsx")

# Get the first worksheet
sheet = workbook.Worksheets[0]

# Create a Word document
doc = Document()
section = doc.AddSection()
section.PageSetup.Orientation = PageOrientation.Landscape

# Add a table
table = section.AddTable(True)
table.ResetCells(sheet.LastRow, sheet.LastColumn)

# Merge cells
MergeCells(sheet, table)

# Export data and styles from Excel to Word table
for r in range(1, sheet.LastRow + 1):
    table.Rows[r - 1].Height = float(sheet.Rows[r - 1].RowHeight)

    for c in range(1, sheet.LastColumn + 1):
        xCell = sheet.Range[r, c]
        wCell = table.Rows[r - 1].Cells[c - 1]

        # Add text from Excel to Word table cell
        textRange = wCell.AddParagraph().AppendText(xCell.NumberText)

        # Copy font and cell style
        CopyStyle(textRange, xCell, wCell)

# Save the document to a Word file
doc.SaveToFile("ConvertExcelDataToWordTable.docx", FileFormat.Docx)
Apply for a Temporary License
If you'd like to remove the evaluation message from the generated documents, or to get rid of the function limitations, please request a 30-day trial license for yourself.
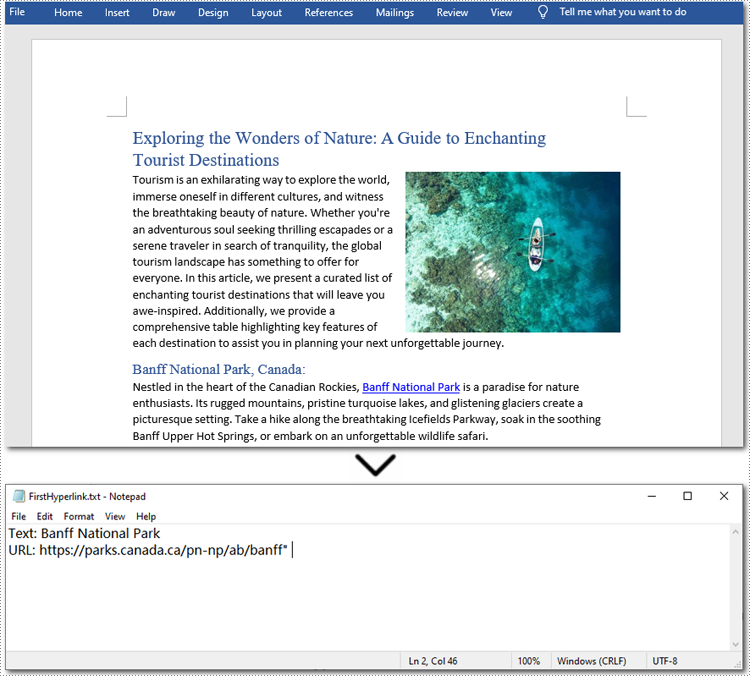
MS Word allows users to view hyperlinks but lacks a built-in feature for extracting hyperlinks with a single click. This limitation makes extracting multiple links from a document time-consuming. Thankfully, Python can streamline this process significantly. In this article, we'll show you how to use Spire.Doc for Python to easily extract hyperlinks from Word documents with Python, either individual or batch, saving you time and effort.
Install Spire.Doc for Python
This scenario requires Spire.Doc for Python and plum-dispatch v1.7.4. They can be easily installed in your Windows through the following pip command.
pip install Spire.Doc
If you are unsure how to install, please refer to this tutorial: How to Install Spire.Doc for Python on Windows.
Extract Hyperlinks from Word Documents: Specified Links
Whether you're looking to retrieve just one important link or filter out certain URLs, this section will guide you through the process step by step. Using the Field.FieldText and the Field.Code properties provided by Spire.Doc, you can efficiently target and extract specified hyperlinks, making it easier to access the information you need.
Steps to extract specified hyperlinks from Word documents:
- Create an instance of Document class.
- Read a Word document from files using Document.LoadFromFile() method.
- Iterate through elements to find all hyperlinks in this Word document.
- Get a certain hyperlink from the hyperlink collection.
- Retrieve the hyperlink text with Field.FieldText property.
- Extract URLs from the hyperlink in the Word document using Field.Code property.
Here is the code example of extracting the first hyperlink in a Word document:
- Python
from spire.doc import *
from spire.doc.common import *

# Create a Document object
doc = Document()

# Load a Word file
doc.LoadFromFile("/sample.docx")

# Find all hyperlinks in the Word document
hyperlinks = []
for i in range(doc.Sections.Count):
    section = doc.Sections.get_Item(i)
    for j in range(section.Body.ChildObjects.Count):
        sec = section.Body.ChildObjects.get_Item(j)
        if sec.DocumentObjectType == DocumentObjectType.Paragraph:
            for k in range((sec if isinstance(sec, Paragraph) else None).ChildObjects.Count):
                para = (sec if isinstance(sec, Paragraph) else None).ChildObjects.get_Item(k)
                if para.DocumentObjectType == DocumentObjectType.Field:
                    field = para if isinstance(para, Field) else None
                    if field.Type == FieldType.FieldHyperlink:
                        hyperlinks.append(field)

# Get the first hyperlink text and URL
if hyperlinks:
    first_hyperlink = hyperlinks[0]
    hyperlink_text = first_hyperlink.FieldText
    hyperlink_url = first_hyperlink.Code.split('HYPERLINK ')[1].strip('"')

    # Save to a text file
    with open("/FirstHyperlink.txt", "w") as file:
        file.write(f"Text: {hyperlink_text}\nURL: {hyperlink_url}\n")

# Close the document
doc.Close()
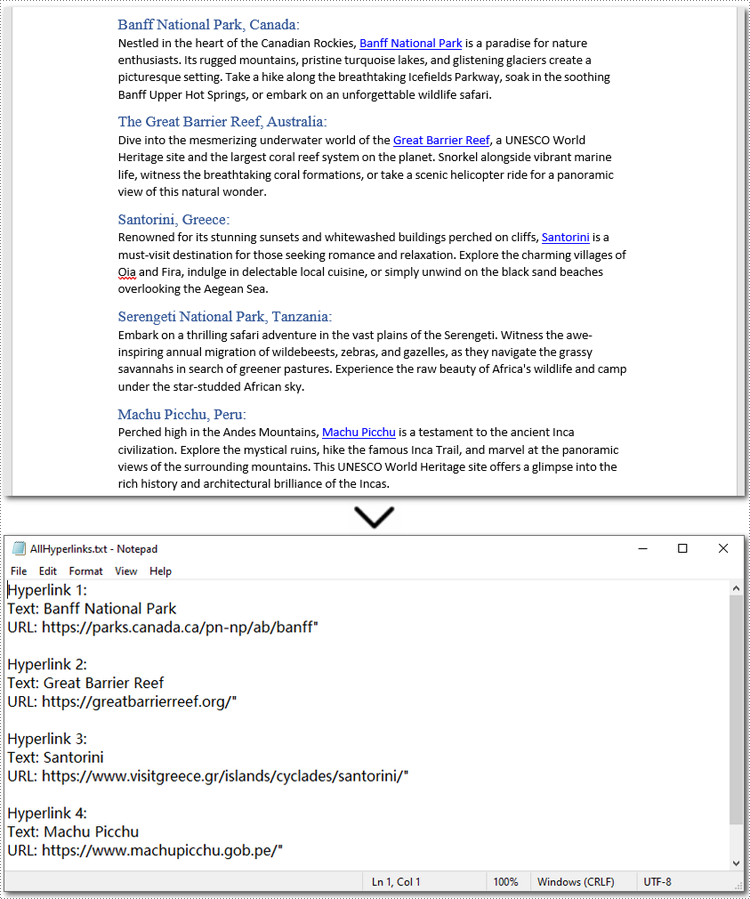
Extract All Hyperlinks from Word Documents
After checking out how to extract specified hyperlinks, let's move on to extracting all hyperlinks from your Word documents. This is especially helpful when you need a list of all links, whether to check for broken ones or for other purposes. By automating this process with Spire.Doc(short for Spire Doc for Python), you can save time and ensure accuracy. Let's take a closer look at the steps and code example. Steps to extract all hyperlinks from Word documents:
- Create a Document object.
- Load a Word document from the local storage with Document.LoadFromFile() method.
- Loop through elements to find all hyperlinks in the Word document.
- Iterate through all hyperlinks in the collection.
- Use Field.FieldText property to extract the hyperlink text from each link.
- Use Field.Code property to get URLs from hyperlinks.
Below is a code example of extracting all hyperlinks from a Word document:
- Python
from spire.doc import *
from spire.doc.common import *

# Create a Document object
doc = Document()

# Load a Word file
doc.LoadFromFile("/sample.docx")

# Find all hyperlinks in the Word document
hyperlinks = []
for i in range(doc.Sections.Count):
    section = doc.Sections.get_Item(i)
    for j in range(section.Body.ChildObjects.Count):
        sec = section.Body.ChildObjects.get_Item(j)
        if sec.DocumentObjectType == DocumentObjectType.Paragraph:
            for k in range((sec if isinstance(sec, Paragraph) else None).ChildObjects.Count):
                para = (sec if isinstance(sec, Paragraph) else None).ChildObjects.get_Item(k)
                if para.DocumentObjectType == DocumentObjectType.Field:
                    field = para if isinstance(para, Field) else None
                    if field.Type == FieldType.FieldHyperlink:
                        hyperlinks.append(field)

# Save all hyperlinks text and URL to a text file
with open("/AllHyperlinks.txt", "w") as file:
    for i, hyperlink in enumerate(hyperlinks):
        hyperlink_text = hyperlink.FieldText
        hyperlink_url = hyperlink.Code.split('HYPERLINK ')[1].strip('"')
        file.write(f"Hyperlink {i+1}:\nText: {hyperlink_text}\nURL: {hyperlink_url}\n\n")

# Close the document
doc.Close()
Apply for a Temporary License
If you'd like to remove the evaluation message from the generated documents, or to get rid of the function limitations, please request a 30-day trial license for yourself.
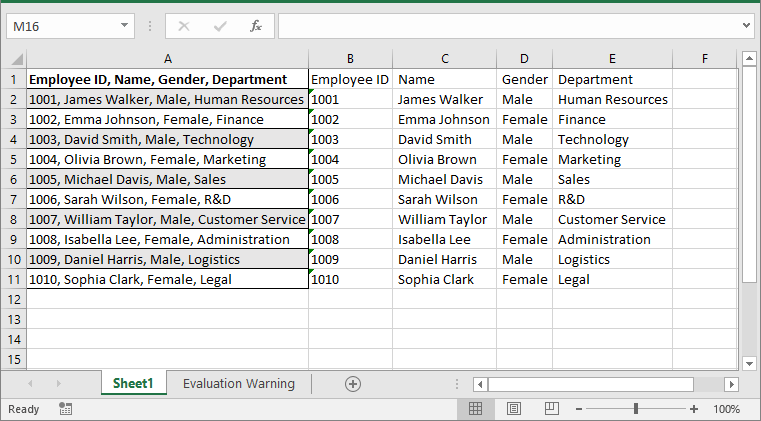
When importing data from external sources or pasting large volumes of information into Excel, it's common for the data to be placed in a single column. This can make the data difficult to work with, especially when you need to separate it for in-depth analysis. By converting the text into multiple columns, you can create a clearer structure that allows for easier sorting, filtering, and analysis. In this article, we will introduce how to convert text to multiple columns in Excel in Python using Spire.XLS for Python.
Install Spire.XLS for Python
This scenario requires Spire.XLS for Python and plum-dispatch v1.7.4. They can be easily installed in your Windows through the following pip command.
pip install Spire.XLS
If you are unsure how to install, please refer to this tutorial: How to Install Spire.XLS for Python on Windows
Convert Text to Multiple Columns in Excel in Python
Spire.XLS for Python does not offer a direct method for converting text in a cell into multiple columns. However, you can accomplish this by first retrieving the cell content using the CellRange.Text property. Next, use the str.split() method to split the text based on a specified delimiter, such as a comma, space, or semicolon. Finally, write the split data into individual columns. The detailed steps are as follows:
- Create an object of the Workbook class.
- Load an Excel workbook using the Workbook.LoadFromFile() method.
- Access a specific worksheet using the Workbook.Worksheets[index] property.
- Loop through each row in the sheet.
- Get the content of the first cell in the current row using the CellRange.Text property. Next, split the content based on a specified delimiter using the str.split() method, and finally, write the split data into separate columns.
- Automatically adjust column widths in the worksheet using the Worksheet.AllocatedRange.AutoFitColumns() method.
- Save the modified workbook to a new file using the Workbook.SaveToFile() method.
- Python
from spire.xls import *
from spire.xls.common import *

# Specify the input and output Excel File paths
inputFile = "Template.xlsx"
outputFile = "ConvertTextToColumns.xlsx"

# Create an object of the Workbook class
workbook = Workbook()
# Load the Excel file
workbook.LoadFromFile(inputFile)

# Get the first worksheet in the file
sheet = workbook.Worksheets[0]

# Loop through each row in the worksheet
for i in range(sheet.LastRow):
    # Get the text of the first cell in the current row
    text = sheet.Range[i + 1, 1].Text
    # Split the text by comma
    splitText = text.split(',')
    # Write the split data into individual columns
    for j in range(len(splitText)):
        sheet.Range[i + 1, j + 2].Text = splitText[j]

# Automatically adjust column widths in the worksheet
sheet.AllocatedRange.AutoFitColumns()

# Save the modified Excel file
workbook.SaveToFile(outputFile, ExcelVersion.Version2013)
workbook.Dispose()
Apply for a Temporary License
If you'd like to remove the evaluation message from the generated documents, or to get rid of the function limitations, please request a 30-day trial license for yourself.
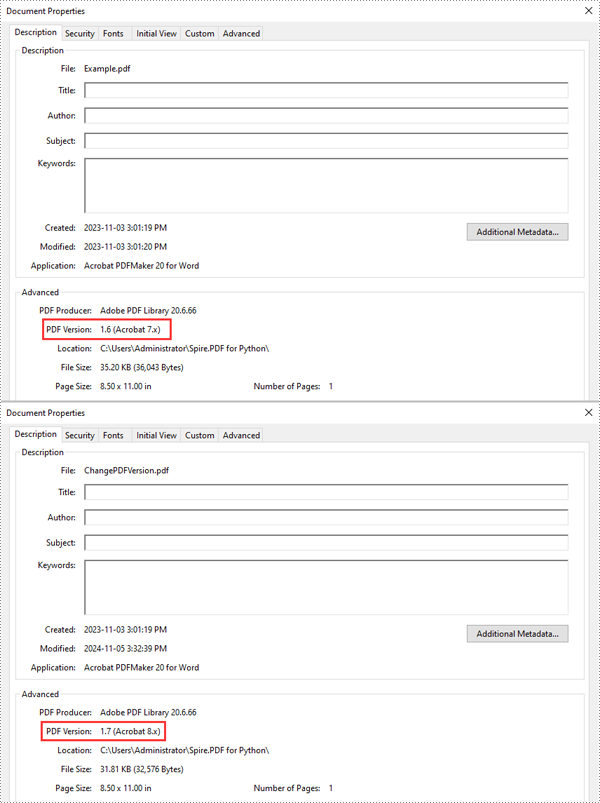
PDF files have different versions, each with unique features and compatibility standards. Changing the version of a PDF can be important when specific versions are required for compatibility with certain devices, software, or regulatory requirements. For instance, you may need to use an older PDF version when archiving or sharing files with users using older software. This article will introduce how to change the version of a PDF document in Python using Spire.PDF for Python.
Install Spire.PDF for Python
This scenario requires Spire.PDF for Python and plum-dispatch v1.7.4. They can be easily installed in your Windows through the following pip command.
pip install Spire.PDF
If you are unsure how to install, please refer to this tutorial: How to Install Spire.PDF for Python on Windows
Change PDF Version in Python
Spire.PDF for Python supports PDF versions ranging from 1.0 to 1.7. To convert a PDF file to a different version, simply set the desired version using the PdfDocument.FileInfo.Version property. The detailed steps are as follows.
- Create an object of the PdfDocument class.
- Load a sample PDF document using the PdfDocument.LoadFromFile() method.
- Change the version of the PDF document to a newer or older version using the PdfDocument.FileInfo.Version property.
- Save the resulting document using the PdfDocument.SaveToFile() method.
- Python
from spire.pdf.common import *
from spire.pdf import *

# Create an object of the PdfDocument class
pdf = PdfDocument()
# Load a PDF document
pdf.LoadFromFile("Example.pdf")

# Change the version of the PDF to version 1.7
pdf.FileInfo.Version = PdfVersion.Version1_7

# Save the resulting document
pdf.SaveToFile("ChangePDFVersion.pdf")
pdf.Close()
Apply for a Temporary License
If you'd like to remove the evaluation message from the generated documents, or to get rid of the function limitations, please request a 30-day trial license for yourself.
Python: Remove Backgrounds from PowerPoint Slide or Slide Masters
2024-11-06 01:03:12 Written by KoohjiA well-chosen background can enhance a presentation's appeal, but overly elaborate colors or images may distract viewers and obscure the main message. Additionally, when reusing templates, the original background may not suit the new content. In these cases, removing the background becomes essential to keep your slides clear and focused. This article will show you how to remove backgrounds from PowerPoint slides or slide masters in Python with Spire.Presentation for Python, giving you the flexibility to create clean, professional presentations that keep the audience's attention on what matters.
- Remove Backgrounds from the Specified Slide
- Remove Backgrounds from All Slides
- Remove Backgrounds from PowerPoint Slide Masters
Install Spire.Presentation for Python
This scenario requires Spire.Presentation for Python and plum-dispatch v1.7.4. They can be easily installed in your Windows through the following pip command.
pip install Spire.Presentation
If you are unsure how to install, please refer to this tutorial: How to Install Spire.Presentation for Python on Windows
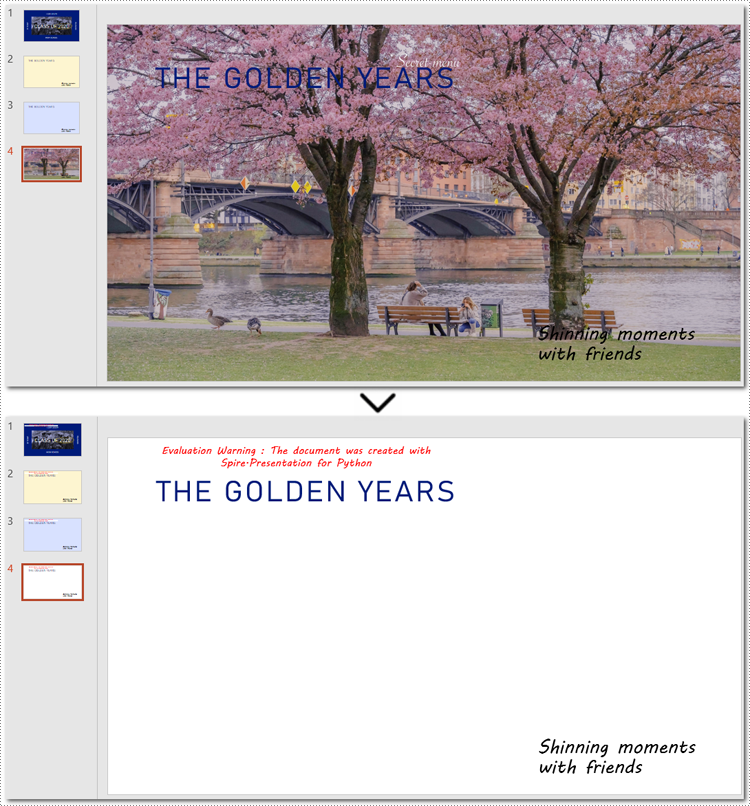
Remove Backgrounds from the Specified Slide
There are typically two types of backgrounds in PowerPoint: background colors and background images. Although these backgrounds differ in their setup, the method to clear them is the same - using the BackgroundType property provided by Spire.Presentation for Python. Let's take a closer look at how to remove backgrounds from a PowerPoint slide with it.
Steps to remove background from a specified slide:
- Create an object for the Presentation class.
- Load a PowerPoint presentation from the local storage using Presentation.LoadFromFile() method.
- Get a certain slide with Presentation.Slides[] method.
- Remove the background by configuring BackgroundType property to none.
- Save the modified PowerPoint presentation using Presentation.SaveToFile() method, and release the memory.
Here is the code example of removing the background on the fourth slide:
- Python
from spire.presentation import *

# Create a Presentation document object
presentation = Presentation()
# Read the presentation document from file
presentation.LoadFromFile("imagebackground.pptx")

# Get the fourth slide
slide = presentation.Slides[3]

# Remove the background by setting the background type
slide.SlideBackground.Type = BackgroundType.none

# Save the modified presentation
presentation.SaveToFile("RemoveBackground.pptx", FileFormat.Pptx2010)

# Release resource
presentation.Dispose()
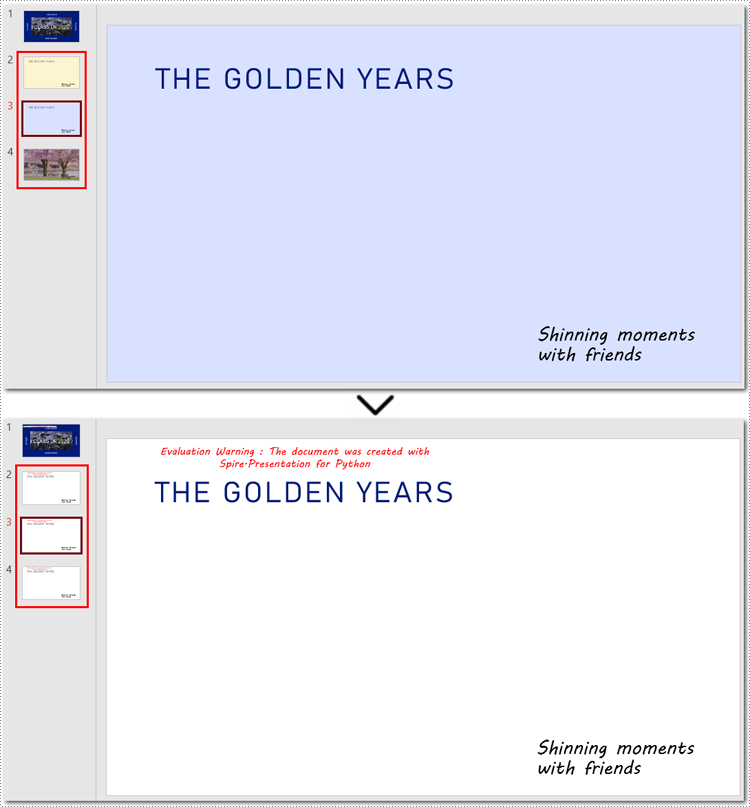
Remove Backgrounds from All Slides
Batch-deleting all slide backgrounds follows nearly the same steps as deleting a single slide background. The main difference is that you'll need to loop through each slide before setting the background type to ensure no slides are missed.
Steps to remove backgrounds from PowerPoint slides in a batch:
- Instantiate a Presentation class.
- Specify the file path to read a PowerPoint presentation using Presentation.LoadFromFile() method.
- Loop through each slide in the presentation.
- Remove all backgournds by applying BackgroundType.none property to each slide.
- Save the updated PowerPoint presentation as a new file with Presentation.SaveToFile() method, and release the resource.
Below is the code example for removing each background from PowerPoint slides:
- Python
from spire.presentation import *

# Create a Presentation document object
presentation = Presentation()
# Read the presentation document from file
presentation.LoadFromFile("presentation.pptx")

# Loop through each slide
for slide in presentation.Slides:
    # Remove the background image or color by setting the background type
    slide.SlideBackground.Type = BackgroundType.none

# Save the modified presentation
presentation.SaveToFile("RemoveBackground_allSlides.pptx", FileFormat.Pptx2010)

# Release resource
presentation.Dispose()
How to Remove Backgrounds from PowerPoint Slide Masters
If the slide background still exists after using the above method, you may need to remove the slide master's background instead. Unlike individual slides, setting the background of a slide master applies changes across all slides, so removing the slide master background can efficiently clear all backgrounds at once.
Steps to remove backgrounds from PowerPoint slide masters:
- Create an instance of the Presentation class.
- Load a presentation from the disk with Presentation.LoadFromFile() method.
- Retrieve a specified slide master using Presentation.Masters[] method.
- Access the background of the slide master with Masters.SlideBackground property.
- Remove the background by setting BackgroundType property to none.
- Save the newly modified PowerPoint presentation with Presentation.SaveToFile() method.
Note: Since the process of batch-removing slide master backgrounds is almost similar to deleting background from a slide master, this section will show the steps in the code comments rather than listing them separately.
Here is an example of removing the background from the third slide master:
- Python
from spire.presentation import *


# Create a Presentation object
presentation = Presentation()

# Load the sample file from the disk
presentation.LoadFromFile("presentation.pptx")

# Get the third slide master
master = presentation.Masters[2]

# Access the background of the slide master
SlideBackground = master.SlideBackground

# Clear the background by setting the slide master background style to none
master.SlideBackground.Type = BackgroundType.none

# Loop through each slide master
#for master in presentation.Masters:
    # Set the background type to none to remove it
    #master.SlideBackground.Type = BackgroundType.none

# Save the result presentation
presentation.SaveToFile("remove_background.pptx", FileFormat.Pptx2013)

# Release resources
presentation.Dispose()
Apply for a Temporary License
If you'd like to remove the evaluation message from the generated documents, or to get rid of the function limitations, please request a 30-day trial license for yourself.
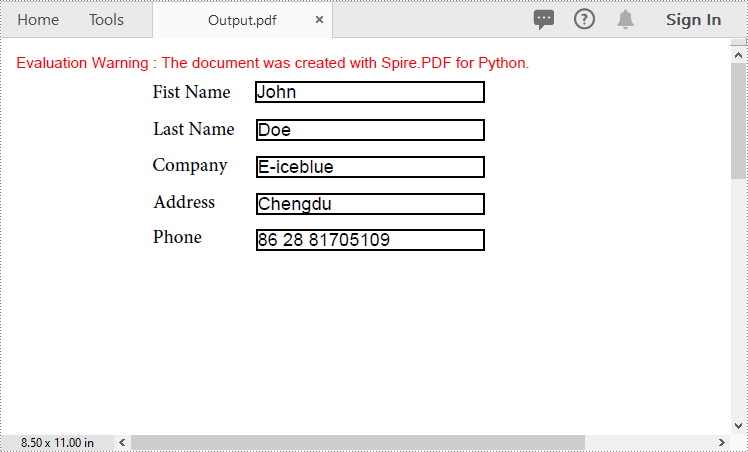
PDF forms are essential tools for collecting information across various industries. Understanding how to import and export this data in different formats like FDF, XFDF, and XML can greatly enhance your data management processes. For instance, importing form data allows you to update or pre-fill PDF forms with existing information, saving time and increasing accuracy. Conversely, exporting form data enables you to share collected information effortlessly with other applications, facilitating seamless integration and minimizing manual entry errors. In this article, we will introduce how to import and export PDF form data in Python using Spire.PDF for Python.
- Import PDF Form Data from FDF, XFDF or XML Files in Python
- Export PDF Form Data to FDF, XFDF or XML Files in Python
Install Spire.PDF for Python
This scenario requires Spire.PDF for Python and plum-dispatch v1.7.4. They can be easily installed in your Windows through the following pip command.
pip install Spire.PDF
If you are unsure how to install, please refer to this tutorial: How to Install Spire.PDF for Python on Windows
Import PDF Form Data from FDF, XFDF or XML Files in Python
Spire.PDF for Python offers the PdfFormWidget.ImportData() method for importing PDF form data from FDF, XFDF, or XML files. The detailed steps are as follows.
- Create an object of the PdfDocument class.
- Load a PDF document using PdfDocument.LoadFromFile() method.
- Get the form of the PDF document using PdfDocument.Form property.
- Import form data from an FDF, XFDF or XML file using PdfFormWidget.ImportData() method.
- Save the resulting document using PdfDocument.SaveToFile() method.
- Python
from spire.pdf.common import *
from spire.pdf import *
# Create an object of the PdfDocument class
pdf = PdfDocument()
# Load a PDF document
pdf.LoadFromFile("Forms.pdf")
# Get the form of the document
pdfForm = pdf.Form
formWidget = PdfFormWidget(pdfForm)
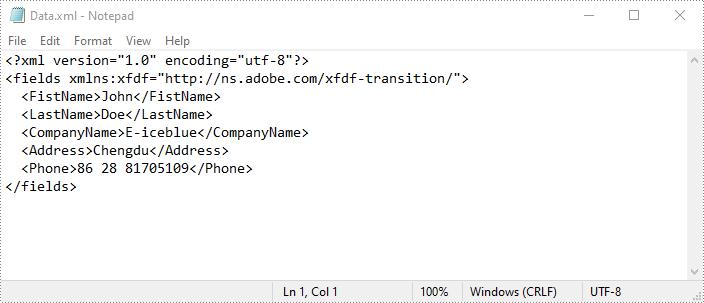
# Import PDF form data from an XML file
formWidget.ImportData("Data.xml", DataFormat.Xml)
# Import PDF form data from an FDF file
# formWidget.ImportData("Data.fdf", DataFormat.Fdf)
# Import PDF form data from an XFDF file
# formWidget.ImportData("Data.xfdf", DataFormat.XFdf)
# Save the resulting document
pdf.SaveToFile("Output.pdf")
# Close the PdfDocument object
pdf.Close()
Export PDF Form Data to FDF, XFDF or XML Files in Python
Spire.PDF for Python also enables developers to export PDF form data to FDF, XFDF, or XML files by using the PdfFormWidget.ExportData() method. The detailed steps are as follows.
- Create an object of the PdfDocument class.
- Load a PDF document using PdfDocument.LoadFromFile() method.
- Get the form of the PDF document using PdfDocument.Form property.
- Export form data to an FDF, XFDF or XML file using PdfFormWidget.ExportData() method.
- Python
from spire.pdf.common import *
from spire.pdf import *

# Create an object of the PdfDocument class
pdf = PdfDocument()
# Load a PDF document
pdf.LoadFromFile("Forms.pdf")

# Get the form of the document
pdfForm = pdf.Form
formWidget = PdfFormWidget(pdfForm)

# Export PDF form data to an XML file
formWidget.ExportData("Data.xml", DataFormat.Xml, "Form")

# Export PDF form data to an FDF file
# formWidget.ExportData("Data.fdf", DataFormat.Fdf, "Form")

# Export PDF form data to an XFDF file
# formWidget.ExportData("Data.xfdf", DataFormat.XFdf, "Form")

# Close the PdfDocument object
pdf.Close()
Apply for a Temporary License
If you'd like to remove the evaluation message from the generated documents, or to get rid of the function limitations, please request a 30-day trial license for yourself.
