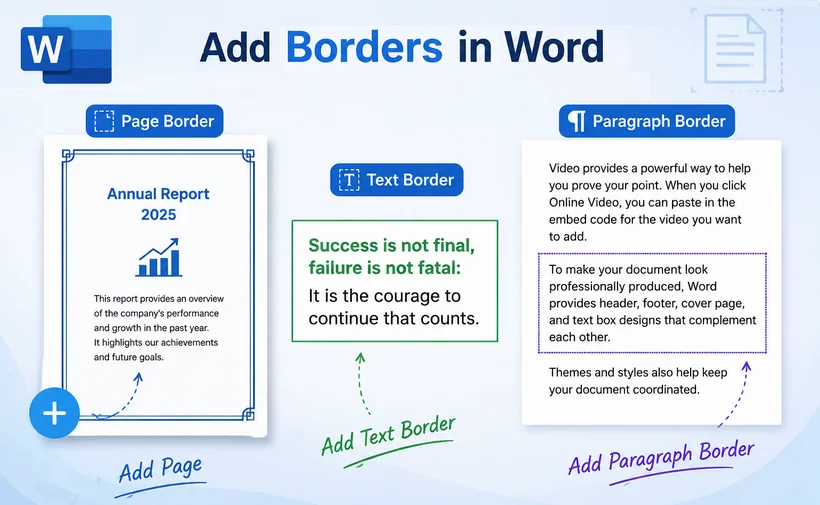
Borders are among the most powerful visual anchors in document design. They do more than just decorate a page—they guide the reader's eye, establish a clear information hierarchy, frame critical content, and provide a sense of closure and completeness to your layouts.
Whether you are designing a high-stakes business proposal, a celebratory certificate, an instructional handout, or simply trying to make a key statistic stand out, knowing how to insert a border in Word is a fundamental skill for any professional.
This guide covers three distinct approaches to adding borders in Word: manual formatting through the Word ribbon, programmatic automation with Python, and AI-assisted editing.
- Types of Borders in Word
- How to Add a Border in Microsoft Word
- How to Insert a Border in Word Using Python
- How to Add Borders Using an AI Document Agent
- Which Method Should You Use?
- Frequently Asked Questions (FAQs)
Types of Borders in Word
Microsoft Word supports three core border types, each designed for specific use cases and accessed through different ribbon menus.
- Page Borders: Decorative frame around the entire page or document.
- Paragraph Borders: A frame around one or more full paragraphs, spanning the text width.
- Text Borders: A tight frame only around selected text within a paragraph
Understanding the difference between these is key to applying the right effect. For example, a page border is great for a certificate, while a paragraph border is perfect for highlighting a key takeaway or a section header.
How to Add a Border in Microsoft Word
MS Word's native UI gives you direct visual control over every border setting. This is ideal for quick, design-centric edits where you want to see changes instantly and tweak visual aesthetics on the fly.
Example 1: Add a Page Border in Word
Page borders apply a full frame to one or more pages, and support both standard line styles and decorative graphic designs.
- Open your document in Microsoft Word.
- Go to the Design tab (Word 2013 and newer) or the Page Layout tab (Word 2010).
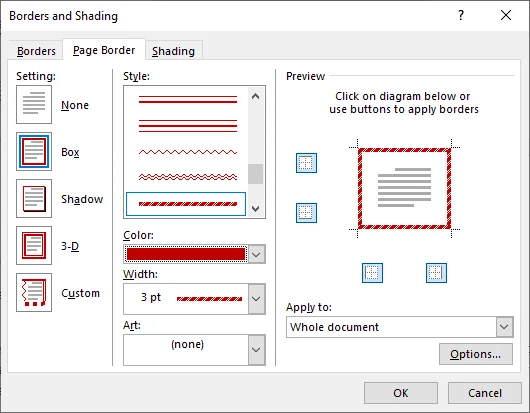
- In the Page Background group, click Page Borders.

- In the Borders and Shading dialog box, select the Page Border tab.
- Under Setting, choose a style:
- None: Removes the border
- Box: A simple rectangular border
- Shadow: Adds a drop-shadow effect
- 3-D: Gives a three-dimensional look
- Custom: Lets you apply borders to specific sides only
- Under Style, scroll through the line options — from solid lines to dashes, dots, and double lines.
- Use the Color and Width dropdowns to customize your border's appearance.
- (Optional) For decorative borders, open the Art dropdown and choose from dozens of graphic designs like stars, hearts, trees, and more.
- Under Apply to, select where the border should appear:
- Whole document
- This section only
- This section – first page only
- This section – all except first page
- Click OK to apply the border.
✅ Pro Tip
Click the Options button in the Page Border tab to adjust the margin between the border and the page edge. The default is 24 points, but reducing it to 12-18 points makes the border look tighter and more professional.
Example 2: Add a Text or Paragraph Border in Word
Text and paragraph borders are used to highlight inline content or block-level content respectively. The setup process is nearly identical, with the key difference being the Apply to setting.
- Select the text you want to border. To border an entire paragraph, click anywhere inside it — you don't need to highlight every word.
- Go to the Home tab and locate the Paragraph group in the middle of the ribbon.
- Click the small arrow next to the Borders button (the icon looks like a square grid).

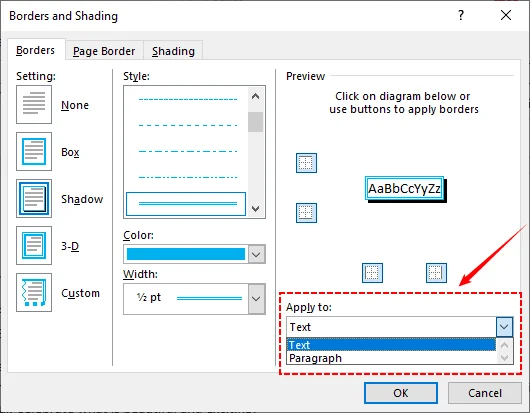
- Select Borders and Shading at the bottom of the dropdown to open the full dialog.
- On the Borders tab, choose a setting (Box, Shadow, 3-D, or Custom).
- Pick your preferred line style, color, and width from the center column.
- Under Apply to, select:
- Text - if you highlighted specific words.
- Paragraph - if you want the border to span the full width of the page around the entire paragraph.
- Click OK to apply the border to your selection.
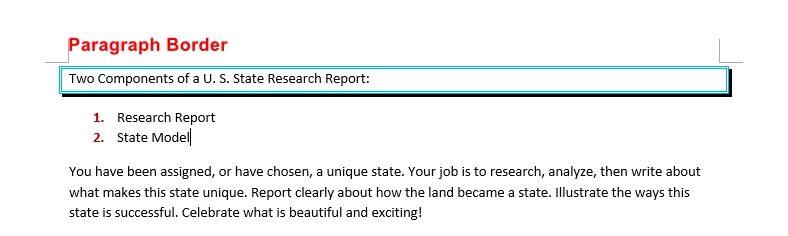
⚠️ Important: Text borders and paragraph borders look different. A text border wraps tightly around the selected words.
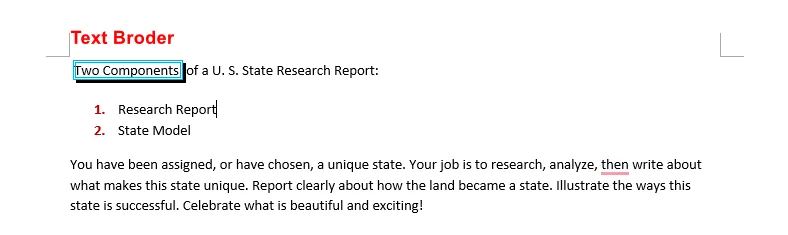
A paragraph border stretches the full-page width, creating a box that looks more like a container.
For an additional layer of visual branding or document security, explore our step-by-step guide: How to Add Watermarks in Word.
How to Insert a Border in Word Using Python
If you need to add borders to multiple documents in bulk, automate document generation, or integrate border formatting into a larger document workflow, doing it programmatically with Python is far more efficient than manual formatting.
Free Spire.Doc for Python is a free and powerful library that lets you create, read, and manipulate Word documents entirely in code — no Microsoft Word installation required.
Install the Free Python Library
Install the library via pip before running the code examples below:
pip install Spire.Doc.Free
Example Python Code to Insert a Page Border in Word
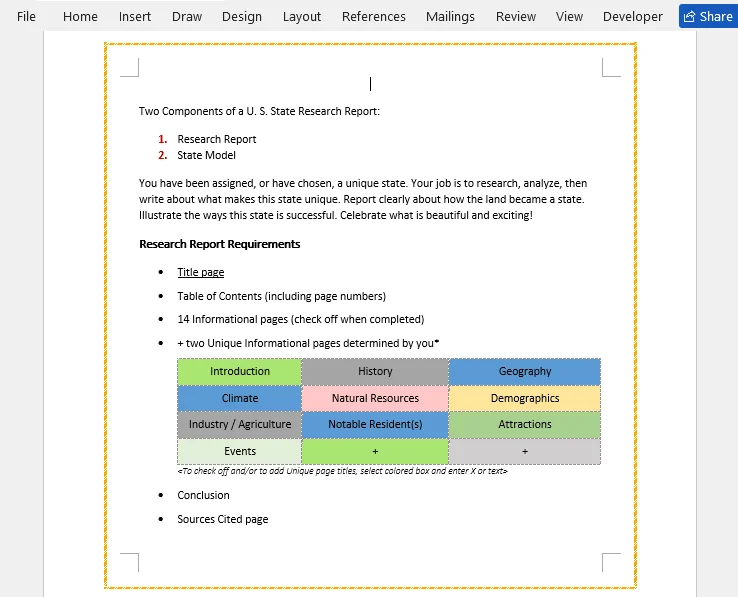
The following script loads an existing Word document, iterates through all sections, and applies a customized page border (dash-dot style, orange color, 2pt width, with 30-point spacing from the page content).
from spire.doc import *
from spire.doc.common import *

# Create a Document object
doc = Document()

# Load an existing Word document
doc.LoadFromFile("Sample.docx")

# Iterate through all sections in the document
for i in range(doc.Sections.Count):
    # Get a specific section
    section = doc.Sections[i]

    # Get page setup object
    pageSetup = section.PageSetup

    # Set borders for all pages
    pageSetup.PageBordersApplyType = PageBordersApplyType.AllPages

    # Set border style
    pageSetup.Borders.BorderType(BorderStyle.DashDotStroker)

    # Set border width
    pageSetup.Borders.LineWidth(2)

    # Set border color
    pageSetup.Borders.Color(Color.get_Orange())

    # Set the spacing between borders and text within them
    pageSetup.Borders.Top.Space = 30.0
    pageSetup.Borders.Bottom.Space = 30.0
    pageSetup.Borders.Left.Space = 30.0
    pageSetup.Borders.Right.Space = 30.0

# Save the result to a new file
doc.SaveToFile("AddWordPageBorders.docx", FileFormat.Docx)

# Release resources
doc.Dispose()
Core Code Parameters
- PageBordersApplyType: Controls which pages get borders (AllPages, FirstPage, or AllPagesExceptFirst).
- BorderStyle: Defines the line pattern — options include Single, Double, Dot, Thick, DotDash, and many more.
- LineWidth(): Sets border thickness in points.
- Color(): Sets the border color using RGB or named color methods like get_Orange(), get_Blue(), etc.
- Space property: Controls the margin (in points) between each border edge and the page content area.
Result:
Beyond the page border, Free Spire.Doc also allows you to add text or paragraph borders with Python.
✅ When to Use Python vs Manual Formatting
- Use manual formatting (the Word ribbon method above) for one-off documents or when you need full visual control.
- Use Python with Spire.Doc when you need to process dozens or hundreds of documents, generate documents from templates programmatically, or integrate border formatting into an automated document pipeline.
How to Add Borders Using an AI Document Agent
If you want to add borders without navigating Word's ribbon or writing Python code, an AI document agent offers a third path. CloudXDocs AI Agent is a skills-enhanced AI assistant that reads Word, Excel, PowerPoint, and PDF files and processes them through natural-language commands entirely in your browser, with no software installation required.
How It Works
The AI agent understands your document's structure (headings, paragraphs, sections, tables) and can apply formatting changes based on plain-English instructions. This makes it ideal for users who aren't familiar with Word's border settings or who want to apply complex border configurations in one step.
- Open the CloudXDocs AI Agent in your web browser and sign up for a free account.
- Upload your Word document by clicking the "Upload document" button or dragging and dropping your .docx file into the agent interface. The agent automatically detects the file type and loads it for processing.
-
Type a natural-language instruction in the chat input. For example:
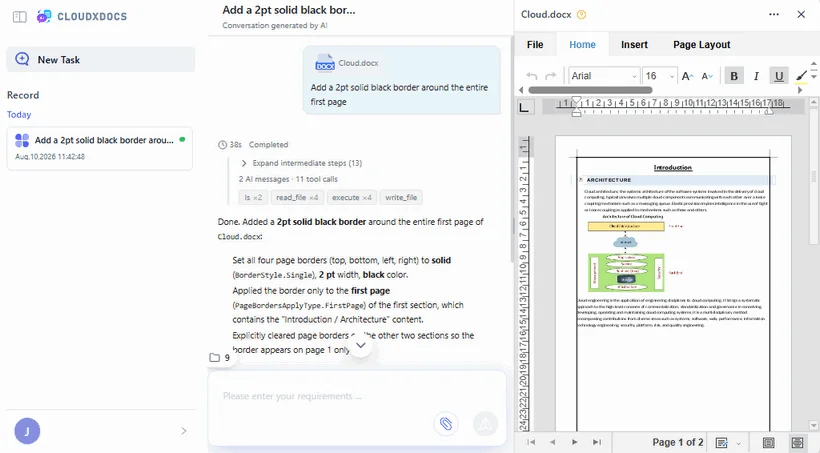
- "Add a 2pt solid black border around the entire first page"
- "Add a decorative page border with a dashed orange line to all pages"
- "Add a blue single-line border around the heading 'Introduction'"
- "Add a shadow border to every paragraph in section 2"
- Wait for AI processing. The agent parses your request, identifies the target elements in the document, and applies the border formatting — typically in a few seconds.
- Review and download. View the result in the agent interface. If the border isn't quite right, you can send a follow-up message to adjust it (e.g., "make the border thicker" or "change the color to green"). Once satisfied, download the updated .docx file.
✅ Pro Tip
The AI is context-aware. You can refer to specific sections, headings, or paragraphs by name. This is particularly useful for users unfamiliar with Word's interface, or for applying multiple formatting changes in a single request.
Which Method Should You Use?
Use the table below to select the best approach to create a border in Word.
| Scenario | Best Method | Why |
|---|---|---|
| Quick, one-off border adjustment | MS Word ribbon | Fastest for single changes; no upload or extra tools required |
| Complex or multi-step border requests | AI Document Agent | Plain-language input; no knowledge of Word menu paths needed |
| Batch processing multiple files | Python (Free Spire.Doc) | Fully automated pipeline; no per-file manual interaction |
| No Word installed / non-technical user | AI Document Agent | Browser-based, natural-language interface, no installation |
| Integrate into an app or workflow | Python (Free Spire.Doc) | Programmatic API for custom pipelines |
Final Thoughts
Adding a border to Word documents is a simple but effective way to improve readability and give your work a professional edge. As outlined throughout this guide, the optimal approach depends on your specific use case: use the built-in Word ribbon for precise hands-on control, leverage Python for scalable bulk automation, or turn to an AI document agent for intuitive, natural-language formatting.
Each method delivers distinct strengths across different scenarios — choose the one that aligns best with your workflow to maximize efficiency. For more advanced Word formatting techniques, explore our full document processing tutorials.
Frequently Asked Questions (FAQs)
Q1. Why is my page border not showing in Word?
A: Page borders may not appear if your margins are too small (the border falls outside the printable area). Go to Design › Page Borders › Options and reduce the "Measure from: Edge of page" margin, or switch to "Measure from: Text."
Q2: Can I apply a page border and a paragraph border to the same page?
A: Absolutely. They operate on different formatting layers. The page border frames the entire sheet, while the paragraph border frames the specific text block inside. They stack visually without conflict.
Q3. Can I add borders to multiple Word documents at once?
A: Yes. Using Python with Free Spire.Doc, you can loop through a folder of .docx files, load each with Document.LoadFromFile(), apply borders programmatically, and save. This is much faster than opening each document manually in Word.
Q4. What is the easiest way to add borders in Word without coding?
A: For a single document, use Word's built-in ribbon. If you don't have Word installed or prefer natural-language instructions, the CloudXDocs AI Document Agent is a browser-based alternative that requires no installation.