
Knowledgebase (2370)
Children categories
Pivot charts are a powerful tool in Excel that allows you to visualize data from pivot tables in an easy-to-understand format. They enable users to summarize large datasets, highlight trends, and make data-driven decisions through interactive graphs. Whether you're analyzing sales figures, performance metrics, or any other form of data, pivot charts provide a dynamic way to represent complex data visually. In this article, we will demonstrate how to create pivot charts in Excel in Python using Spire.XLS for Python.
- Create Pivot Charts in Excel in Python
- Show or Hide Field Buttons in Pivot Charts in Excel in Python
- Format Pivot Chart Series in Excel in Python
Install Spire.XLS for Python
This scenario requires Spire.XLS for Python and plum-dispatch v1.7.4. They can be easily installed in your Windows through the following pip command.
pip install Spire.XLS
If you are unsure how to install, please refer to this tutorial: How to Install Spire.XLS for Python on Windows
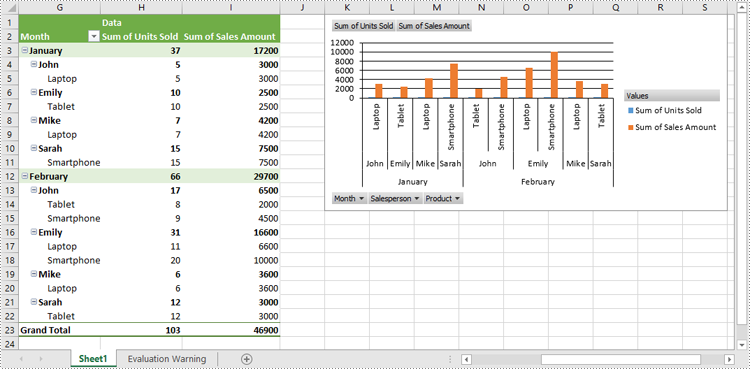
Create Pivot Charts in Excel in Python
Spire.XLS for Python provides the Worksheet.Charts.Add(pivotChartType:ExcelChartType, pivotTable:IPivotTable) method to create a pivot chart based on a specific pivot table in Excel. The detailed steps are as follows:
- Create an object of the Workbook class.
- Load an Excel file using Workbook.LoadFromFile() method.
- Get a specific worksheet in the Excel file using Workbook.Worksheets[index] property.
- Get a specific pivot table in the worksheet using Worksheet.PivotTables[index] property.
- Add a pivot chart based on the pivot table to the worksheet using Worksheet.Charts.Add(pivotChartType:ExcelChartType, pivotTable:IPivotTable) method.
- Set the position and title of the pivot chart.
- Save the resulting file using Workbook.SaveToFile() method.
- Python
from spire.xls import *
from spire.xls.common import *

# Create a Workbook object
workbook = Workbook()
# Load an Excel file
workbook.LoadFromFile("PivotTable.xlsx")

# Get the first worksheet
sheet = workbook.Worksheets[0]

# Get the first pivot table in the worksheet
pivotTable = sheet.PivotTables[0]

# Create a clustered column chart based on the pivot table
pivotChart = sheet.Charts.Add(ExcelChartType.ColumnClustered, pivotTable)
# Set chart position
pivotChart.TopRow = 1
pivotChart.LeftColumn = 11
pivotChart.RightColumn = 20
pivotChart.BottomRow = 15

# Set chart title to null
pivotChart.ChartTitle = ""

# Save the resulting file
workbook.SaveToFile("CreatePivotChart.xlsx", ExcelVersion.Version2013)
workbook.Dispose()
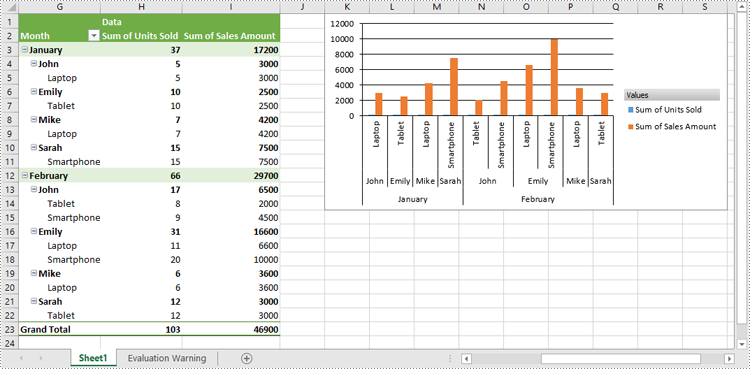
Show or Hide Field Buttons in Pivot Charts in Excel in Python
You can show or hide the following field buttons in a pivot chart with Spire.XLS for Python:
- Entire Field Buttons
- Report Filter Field Buttons
- Legend Field Buttons
- Axis Field Buttons
- Value Field Buttons
The detailed steps are as follows:
- Create an object of the Workbook class.
- Load an Excel file using Workbook.LoadFromFile() method.
- Get a specific worksheet in the Excel file using Workbook.Worksheets[index] property.
- Get a specific pivot table in the worksheet using Worksheet.PivotTables[index] property.
- Add a pivot chart based on the pivot table to the worksheet using Worksheet.Charts.Add(pivotChartType:ExcelChartType, pivotTable:IPivotTable) method.
- Set the position and title of the pivot chart.
- Hide specific field buttons in the pivot chart, such as the axis field buttons and the value field buttons, using Chart.DisplayAxisFieldButtons and Chart.DisplayValueFieldButtons properties.
- Save the resulting file using Workbook.SaveToFile() method.
- Python
from spire.xls import *
from spire.xls.common import *

# Create a Workbook object
workbook = Workbook()
# Load an Excel file
workbook.LoadFromFile("CreatePivotChart.xlsx")

# Get the first worksheet
sheet = workbook.Worksheets[0]

# Get the first pivot table in the worksheet
pivotTable = sheet.PivotTables[0]

# Create a clustered column chart based on the pivot table
pivotChart = sheet.Charts.Add(ExcelChartType.ColumnClustered, pivotTable)
# Set chart position
pivotChart.TopRow = 1
pivotChart.LeftColumn = 11
pivotChart.RightColumn = 20
pivotChart.BottomRow = 15

# Set chart title to null
pivotChart.ChartTitle = ""

# Hide specific field buttons
pivotChart.DisplayAxisFieldButtons = False
pivotChart.DisplayValueFieldButtons = False
# pivotChart.DisplayLegendFieldButtons = False
# pivotChart.ShowReportFilterFieldButtons = False
# pivotChart.DisplayEntireFieldButtons = False

# Save the resulting file
workbook.SaveToFile("HideFieldButtons.xlsx", ExcelVersion.Version2013)
workbook.Dispose()
Format Pivot Chart Series in Excel in Python
When generating a pivot chart using a pivot table as the data source with Spire.XLS for Python, the chart series are not automatically created. You need to add the series to the pivot chart and then apply the desired formatting. The detailed steps are as follows.
- Create an object of the Workbook class.
- Load an Excel file using Workbook.LoadFromFile() method.
- Get a specific worksheet in the Excel file using Workbook.Worksheets[index] property.
- Get a specific pivot table in the worksheet using Worksheet.PivotTables[index] property.
- Add a pivot chart based on the pivot table to the worksheet using Worksheet.Charts.Add(pivotChartType:ExcelChartType, pivotTable:IPivotTable) method.
- Set the position and title of the pivot chart.
- Add series to the chart using Chart.Series.Add() method and then apply the desired formatting to the series.
- Save the resulting file using Workbook.SaveToFile() method.
- Python
from spire.xls import *
from spire.xls.common import *

# Create a Workbook object
workbook = Workbook()
# Load an Excel file
workbook.LoadFromFile("CreatePivotChart.xlsx")

# Get the first worksheet
sheet = workbook.Worksheets[0]

# Get the first pivot table in the worksheet
pivotTable = sheet.PivotTables[0]

# Create a clustered column chart based on the pivot table
pivotChart = sheet.Charts.Add(ExcelChartType.ColumnClustered, pivotTable)
# Set chart position
pivotChart.TopRow = 1
pivotChart.LeftColumn = 11
pivotChart.RightColumn = 20
pivotChart.BottomRow = 15

# Set chart title to null
pivotChart.ChartTitle = ""

# Add chart series
series = pivotChart.Series.Add(ExcelChartType.ColumnClustered)
# Set bar width
series.GetCommonSerieFormat().GapWidth = 10
# Set overlap
# series.GetCommonSerieFormat().Overlap = 100

# Save the resulting file
workbook.SaveToFile("FormatChartSeries.xlsx", ExcelVersion.Version2013)
workbook.Dispose()

Apply for a Temporary License
If you'd like to remove the evaluation message from the generated documents, or to get rid of the function limitations, please request a 30-day trial license for yourself.
Converting text to numbers and vice versa in Excel is crucial for efficient data management. When you convert text to numbers, you enable accurate calculations and data processing, which is essential for tasks like financial reporting and statistical analysis. On the other hand, converting numbers to text can be beneficial for formatting outputs, creating clear and readable labels, and presenting data in a more user-friendly manner.
In this article, you will learn how to convert text to numbers and numbers to text in Excel using Spire.XLS for Python.
Install Spire.XLS for Python
This scenario requires Spire.XLS for Python and plum-dispatch v1.7.4. They can be easily installed in your Windows through the following pip command.
pip install Spire.XLS
If you are unsure how to install, please refer to this tutorial: How to Install Spire.XLS for Python on Windows
Convert Text to Numbers in Excel
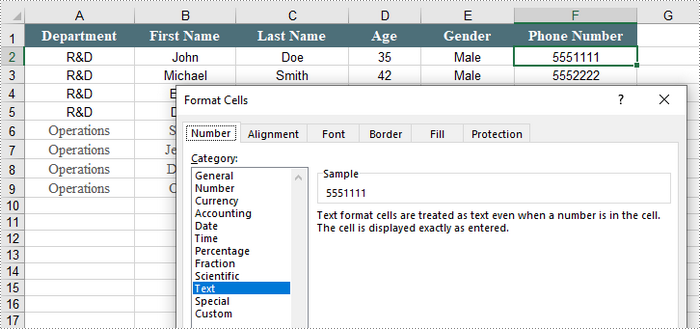
If you import data from another source into Excel, a small green triangle may appear in the upper-left corner of the cell. This error indicator indicates that the number is stored as text. Numbers that are stored as text can cause unexpected results, like an uncalculated formula showing instead of a result.
To convert numbers stored as text to numbers, you can simply use the CellRange.ConvertToNumber() method. The CellRange object can represent a single cell or a range of cells.
The steps to convert text to numbers in Excel are as follows:
- Create a Workbook object.
- Load an Excel file using Workbook.LoadFromFile() method.
- Get a specific worksheet using Workbook.Worksheets[index] property.
- Get a cell or a range of cells using Worksheet.Range property.
- Convert the text in the cell(s) into numbers using CellRange.ConvertToNumber() method.
- Save the document to a different Excel file.
- Python
from spire.xls import *
from spire.xls.common import *

# Create a Workbook object
workbook = Workbook()

# Load an Excel document
workbook.LoadFromFile("C:\\Users\\Administrator\\Desktop\\Input.xlsx")

# Get a specific worksheet
worksheet = workbook.Worksheets[0]

# Get a cell range
range = worksheet.Range["D2:G13"]

# Convert text to number
range.ConvertToNumber()

# Save the workbook to a different Excel file
workbook.SaveToFile("output/TextToNumbers.xlsx", ExcelVersion.Version2013)

# Dispose resources
workbook.Dispose()
Convert Numbers to Text in Excel
When working with numerical data in Excel, you might encounter situations where you need to convert numbers to text. This is particularly important when dealing with data that requires specific formatting, such as IDs or phone numbers that must retain leading zeros.
To convert the number in a cell into text, you can set the CellRange.NumberFormat to @. The CellRange object represents a single cell or a range of cells.
The detailed steps to convert numbers to text in Excel are as follows:
- Create a Workbook object.
- Load an Excel file using Workbook.LoadFromFile() method.
- Get a specific worksheet using Workbook.Worksheets[index] property.
- Get a specific cell or a range of cells using Worksheet.Range property.
- Convert the numbers in the cell(s) into text by setting CellRange.NumberFormat to @.
- Save the document to a different Excel file.
- Python
from spire.xls import *
from spire.xls.common import *

# Create a Workbook object
workbook = Workbook()

# Load an Excel document
workbook.LoadFromFile("C:\\Users\\Administrator\\Desktop\\Employee.xlsx")

# Get a specific worksheet
worksheet = workbook.Worksheets[0]

# Get a cell range
cellRange = worksheet.Range["F2:F9"]

# Convert numbers in the cell range to text
cellRange.NumberFormat = "@"

# Save the workbook to a different Excel file
workbook.SaveToFile("output/NumbersToText.xlsx", ExcelVersion.Version2013)

# Dispose resources
workbook.Dispose()
Apply for a Temporary License
If you'd like to remove the evaluation message from the generated documents, or to get rid of the function limitations, please request a 30-day trial license for yourself.
When dealing with PDF files, you might sometimes need to crop pages in the PDF to remove unnecessary margins, borders, or unwanted content. By doing so, you can make the document conform to specific design requirements or page sizes, ensuring a more aesthetically pleasing or functionally optimized output. This article will introduce how to crop pages in PDF in Python using Spire.PDF for Python.
Install Spire.PDF for Python
This scenario requires Spire.PDF for Python. It can be easily installed in your Windows through the following pip command.
pip install Spire.PDF
If you are unsure how to install, please refer to this tutorial: How to Install Spire.PDF for Python on Windows
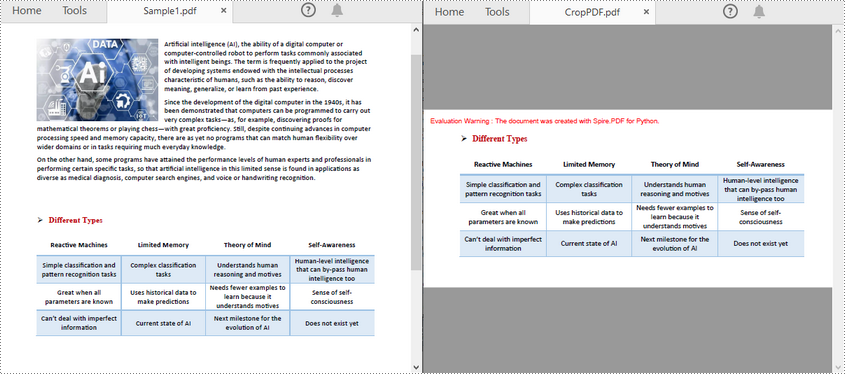
Crop a PDF Page in Python
Spire.PDF for Python allows you specify a rectangular area, and then use the PdfPageBase.CropBox property to crop page to the specified area. The following are the detailed steps.
- Create a PdfDocument instance.
- Load a PDF file using PdfDocument.LoadFromFile() method.
- Get a specified page using PdfDocument.Pages[] property.
- Crop the page to the specified area using PdfPageBase.CropBox property.
- Save the result file using PdfDocument.SaveToFile() method.
- Python
from spire.pdf.common import *
from spire.pdf import *

# Create a PdfDocument object
pdf = PdfDocument()

# Load a PDF file from disk
pdf.LoadFromFile("Sample1.pdf")

# Get the first page
page = pdf.Pages.get_Item(0)

# Crop the page by the specified area
page.CropBox = RectangleF(0.0, 300.0, 600.0, 260.0)

# Save the result file
pdf.SaveToFile("CropPDF.pdf")
pdf.Close()
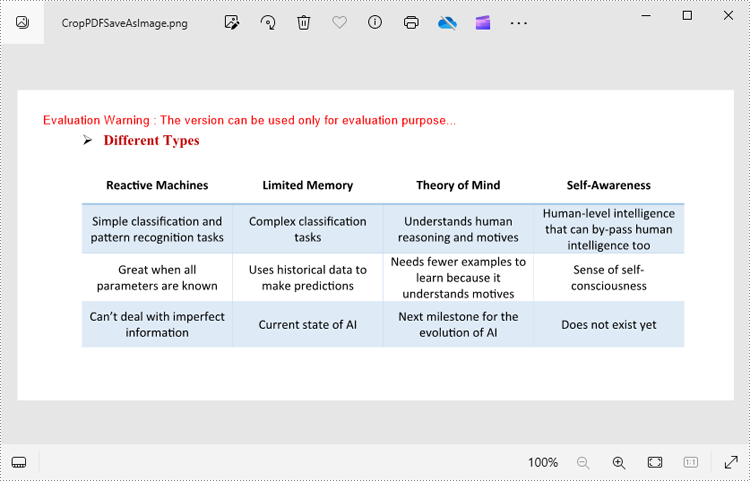
Crop a PDF Page and Export as an Image in Python
To accomplish this task, you can use the PdfDocument.SaveAsImage(pageIndex: int) method to convert a cropped PDF page to an image stream. The following are the detailed steps.
- Create a PdfDocument instance.
- Load a PDF file using PdfDocument.LoadFromFile() method.
- Get a specified page using PdfDocument.Pages[] property.
- Crop the page to the specified area using PdfPageBase.CropBox property.
- Convert the cropped page to an image stream using PdfDocument.SaveAsImage() method.
- Save the image as a PNG, JPG or BMP file using Stream.Save() method.
- Python
from spire.pdf.common import *
from spire.pdf import *

# Create a PdfDocument object
pdf = PdfDocument()

# Load a PDF file from disk
pdf.LoadFromFile("Sample1.pdf")

# Get the first page
page = pdf.Pages.get_Item(0)

# Crop the page by the specified area
page.CropBox = RectangleF(0.0, 300.0, 600.0, 260.0)

# Convert the page to an image
with pdf.SaveAsImage(0) as imageS:

    # Save the image as a PNG file
    imageS.Save("CropPDFSaveAsImage.png")
pdf.Close()
Apply for a Temporary License
If you'd like to remove the evaluation message from the generated documents, or to get rid of the function limitations, please request a 30-day trial license for yourself.
