
Knowledgebase (2370)
Children categories
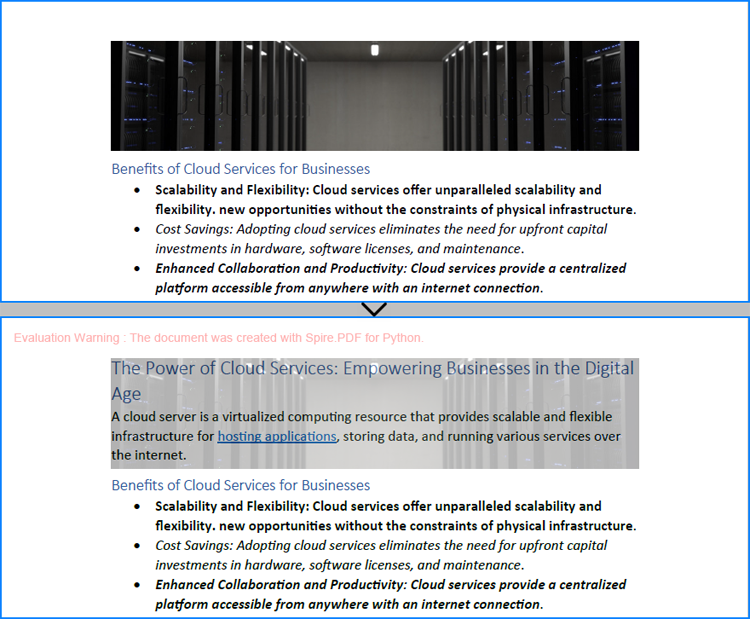
Setting the transparency of images in PDF documents is crucial for achieving professional-grade output, which allows for layering images without hard edges and creating a seamless integration with the background or underlying content. This not only enhances the visual appeal but also creates a polished and cohesive look, especially in graphics-intensive documents. This article will demonstrate how to effectively set the transparency of PDF images using Spire.PDF for Python in Python programs.
Install Spire.PDF for Python
This scenario requires Spire.PDF for Python and plum-dispatch v1.7.4. They can be easily installed in your Windows through the following pip command.
pip install Spire.PDF
If you are unsure how to install, please refer to: How to Install Spire.PDF for Python on Windows
Add Images with Specified Transparency to PDF
Developers can utilize the PdfPageBase.Canvas.DrawImage() method in Spire.PDF for Python to draw an image at a specified location on a PDF page. Before drawing, developers can set the transparency of the canvas using PdfPageBase.Canvas.SetTransparency() method, which in turn sets the transparency level of the image being drawn. Below are the detailed steps:
- Create an object of PdfDocument class and load a PDF document using PdfDocument.LoadFromFile() method.
- Get a page in the document using PdfDocument.Pages.get_Item() method.
- Load an image using PdfImage.FromFile() method.
- Set the transparency of the canvas using PdfPageBase.Canvas.SetTransparency() method.
- Draw the image on the page using PdfPageBase.Canvas.DrawImage() method.
- Save the document using PdfDocument.SaveToFile() method.
- Python
from spire.pdf import *

# Create a PdfDocument instance
pdf = PdfDocument()

# Load a PDF file
pdf.LoadFromFile("Sample.pdf")

# Get the first page
page = pdf.Pages.get_Item(0)

# Load an image
image = PdfImage.FromFile("Screen.jpg")

# Set the transparency of the canvas
page.Canvas.SetTransparency(0.2)

# Draw the image at the specified location
page.Canvas.DrawImage(image, PointF(80.0, 80.0))

# Save the document
pdf.SaveToFile("output/AddTranslucentPicture.pdf")
pdf.Close()

Adjust the Transparency of Existing Images in PDF
To adjust the transparency of an existing image on a PDF page, developers can retrieve the image along with its bounds, delete the image, and finally redraw the image in the same location with the specified transparency. This process allows for the adjustment of the image's opacity while maintaining its original placement. The detailed steps are as follows:
- Create an object of PdfDocument class and load a PDF document using PdfDocument.LoadFromFile() method.
- Get a page in the document using PdfDocument.Pages.get_Item() method.
- Get an image on the page as a stream through PdfPageBase.ImagesInfo[].Image property and get the bounds of the image through PdfPageBase.ImagesInfo[].Bounds property.
- Remove the image from the page using PdfPageBase.DeleteImage() method.
- Create a PdfImage instance with the stream using PdfImage.FromStream() method.
- Set the transparency of the canvas using PdfPageBase.Canvas.SetTransparency() method.
- Redraw the image in the same location with the specified transparency using PdfPageBase.Canvas.DrawImage() method.
- Save the document using PdfDocument.SaveToFile() method.
- Python
from spire.pdf import *

# Create a PdfDocument instance
pdf = PdfDocument()

# Load a PDF file
pdf.LoadFromFile("Sample1.pdf")

# Get the first page
page = pdf.Pages.get_Item(0)

# Get the first image on the page as a stream and the bounds of the image
imageHelper = PdfImageHelper()
imageInformation = imageHelper.GetImagesInfo(page)
bounds = imageInformation[0].Bounds
imageStream =imageInformation[0].Image

# Delete the original image
imageHelper.DeleteImage(imageInformation[0])

# Create a PdfImage instance using the image stream
image = PdfImage.FromStream(imageStream)

# Create a PdfImage instance using the image stream
image = PdfImage.FromStream(imageStream)

# Set the transparency of the canvas
page.Canvas.SetTransparency(0.3)

# Draw the new image at the same location using the canvas
page.Canvas.DrawImage(image, bounds)

# Save the document
pdf.SaveToFile("output/SetExistingImageTransparency.pdf")
pdf.Close()
Apply for a Temporary License
If you'd like to remove the evaluation message from the generated documents, or to get rid of the function limitations, please request a 30-day trial license for yourself.
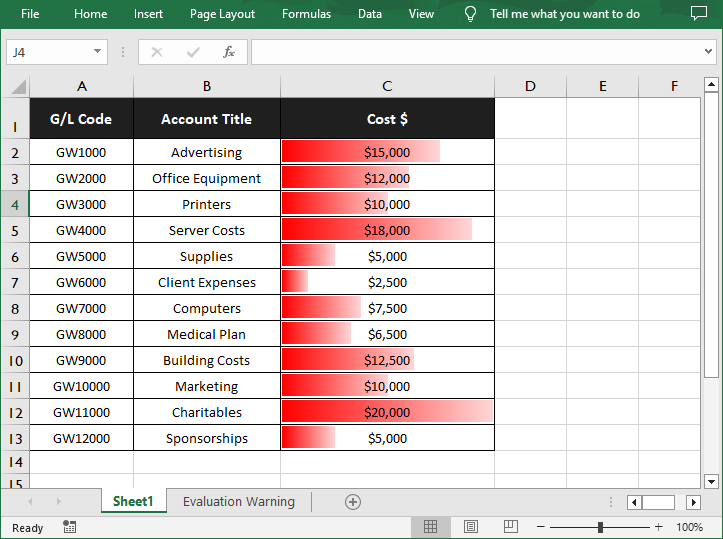
Data Bars in Excel is a feature within the Conditional Formatting tool that allows you to visually represent numerical data through a series of bars. This feature is particularly useful for comparing values at a glance, as the length of the bar corresponds to the magnitude of the value it represents. In this article, you will learn how to add data bars in an Excel cell range in Python using Spire.XLS for Python.
Install Spire.XLS for Python
This scenario requires Spire.XLS for Python and plum-dispatch v1.7.4. They can be easily installed in your Windows through the following pip command.
pip install Spire.XLS
If you are unsure how to install, please refer to this tutorial: How to Install Spire.XLS for Python on Windows
Add Data Bars in Excel in Python
With Spire.XLS for Python, you are allowed to add a data bar to a specified data range and also set its format. The following are the detailed steps.
- Create a Workbook instance.
- Load a sample Excel document using Workbook.LoadFromFile() method.
- Get a specified worksheet using Workbook.Worsheets[index] property.
- Add a conditional formatting to the worksheet using Worksheet.ConditionalFormats.Add() method and return an object of XlsConditionalFormats class.
- Set the cell range where the conditional formatting will be applied using XlsConditionalFormats.AddRange() method.
- Add a condition using XlsConditionalFormats.AddCondition() method, and then set its format type to DataBar using IConditionalFormat.FormatType property.
- Set the fill effect and color of the data bars using IConditionalFormat.DataBar.BarFillType and IConditionalFormat.DataBar.BarColor properties.
- Save the result document using Workbook.SaveToFile() method.
- Python
from spire.xls import *
from spire.xls.common import *

# Create a Workbook instance
workbook = Workbook()

# Load a sample Excel document
workbook.LoadFromFile("sample.xlsx")

# Get the first worksheet
sheet = workbook.Worksheets[0]

# Add a conditional format to the worksheet
xcfs = sheet.ConditionalFormats.Add()

# Set the range where the conditional format will be applied
xcfs.AddRange(sheet.Range["C2:C13"])

# Add a condition and set its format type to DataBar
format = xcfs.AddCondition()
format.FormatType = ConditionalFormatType.DataBar

# Set the fill effect and color of the data bars
format.DataBar.BarFillType = DataBarFillType.DataBarFillGradient
format.DataBar.BarColor = Color.get_Red()

# Save the result document
workbook.SaveToFile("ApplyDataBarsToCellRange.xlsx", ExcelVersion.Version2016)
workbook.Dispose()
Apply for a Temporary License
If you'd like to remove the evaluation message from the generated documents, or to get rid of the function limitations, please request a 30-day trial license for yourself.
When printing Excel spreadsheets, particularly those containing complex datasets or detailed reports, configuring the page setup properly is crucial. Excel’s page setup options enable you to adjust key factors such as page margins, orientation, paper size, and scaling, ensuring your documents are tailored to fit various printing needs. By customizing these settings, you can control how your content is displayed on the page, making sure it appears polished and professional. In this article, we will demonstrate how to set page setup options in Excel in C# using Spire.XLS for .NET.
- Set Page Margins in Excel in C#
- Set Page Orientation in Excel in C#
- Set Paper Size in Excel in C#
- Set Print Area in Excel in C#
- Set Scaling Factor in Excel in C#
- Set Fit-to-Pages Options in Excel in C#
- Set Headers and Footers in Excel in C#
Install Spire.XLS for .NET
To begin with, you need to add the DLL files included in the Spire.XLS for .NET package as references in your .NET project. The DLL files can be either downloaded from this link or installed via NuGet.
PM> Install-Package Spire.XLS
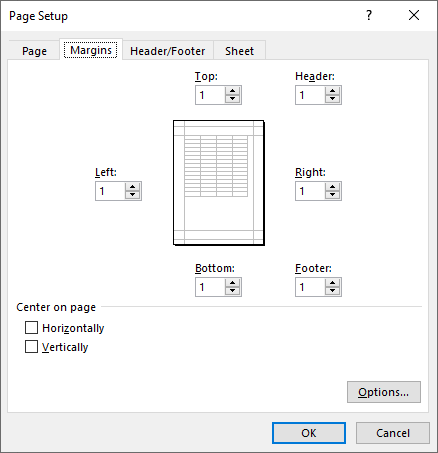
Set Page Margins in Excel in C#
The PageSetup class in Spire.XLS for .NET is used to configure page setup options for Excel worksheets. You can access the PageSetup object of a worksheet through the Worksheet.PageSetup property. Then, use properties like PageSetup.TopMargin, PageSetup.BottomMargin, PageSetup.LeftMargin, PageSetup.RightMargin, PageSetup.HeaderMarginInch, and PageSetup.FooterMarginInch to set the corresponding margins for the worksheet. The detailed steps are as follows.
- Create an object of the Workbook class.
- Load an Excel file using Workbook.LoadFromFile() method.
- Get a specific worksheet using Workbook.Worksheets[index] property.
- Access the PageSetup object of the worksheet using Worksheet.PageSetup property.
- Set the top, bottom, left, right, header, and footer margins using PageSetup.TopMargin, PageSetup.BottomMargin, PageSetup.LeftMargin, PageSetup.RightMargin, PageSetup.HeaderMarginInch, and PageSetup.FooterMarginInch properties.
- Save the modified workbook to a new file using Workbook.SaveToFile() method.
- C#
using Spire.Xls;

namespace SetPageMargins
{
    internal class Program
    {
        static void Main(string[] args)
        {
            // Create a Workbook object
            Workbook workbook = new Workbook();

            // Load an Excel file
            workbook.LoadFromFile("Sample.xlsx");

            // Get the first worksheet
            Worksheet sheet = workbook.Worksheets[0];

            // Get the PageSetup object of the worksheet
            PageSetup pageSetup = sheet.PageSetup;

            // Set top, bottom, left, and right page margins for the worksheet
            // The measure of the unit is Inch (1 inch = 2.54 cm)
            pageSetup.TopMargin = 1;
            pageSetup.BottomMargin = 1;
            pageSetup.LeftMargin = 1;
            pageSetup.RightMargin = 1;
            pageSetup.HeaderMarginInch = 1;
            pageSetup.FooterMarginInch = 1;

            // Save the modified workbook to a new file
            workbook.SaveToFile("SetPageMargins.xlsx", ExcelVersion.Version2016);
            workbook.Dispose();
        }
    }
}
Set Page Orientation in Excel in C#
The PageSetup.Orientation property lets you determine how the page should be oriented when printed. You can choose between two options: portrait mode or landscape mode. The detailed steps are as follows.
- Create an object of the Workbook class.
- Load an Excel file using Workbook.LoadFromFile() method.
- Get a specific worksheet using Workbook.Worksheets[index] property.
- Access the PageSetup object of the worksheet using Worksheet.PageSetup property.
- Set the page orientation using PageSetup.Orientation property.
- Save the modified workbook to a new file using Workbook.SaveToFile() method.
- C#
using Spire.Xls;

namespace SetPageOrientation
{
    internal class Program
    {
        static void Main(string[] args)
        {
            // Create a Workbook object
            Workbook workbook = new Workbook();

            // Load an Excel file
            workbook.LoadFromFile("Sample.xlsx");

            // Get the first worksheet
            Worksheet sheet = workbook.Worksheets[0];

            // Get the PageSetup object of the worksheet
            PageSetup pageSetup = sheet.PageSetup;

            // Set the page orientation for printing the worksheet to landscape mode
            pageSetup.Orientation = PageOrientationType.Landscape;

            // Save the modified workbook to a new file
            workbook.SaveToFile("SetPageOrientation.xlsx", ExcelVersion.Version2016);
            workbook.Dispose();
        }
    }
}
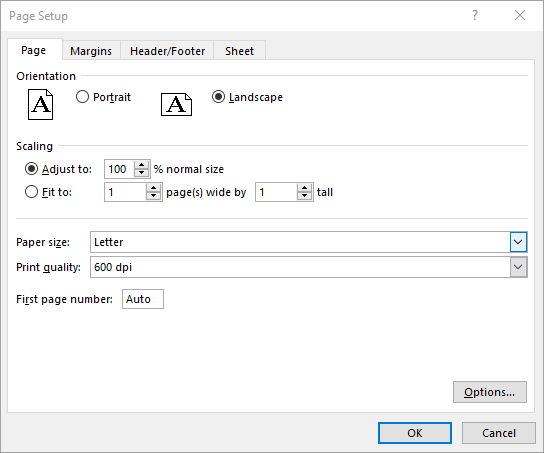
Set Paper Size in Excel in C#
The PageSetup.PaperSize property enables you to select from a variety of paper sizes for printing your worksheet. These options include A3, A4, A5, B4, B5, letter, legal, tabloid, and more. The detailed steps are as follows.
- Create an object of the Workbook class.
- Load an Excel file using Workbook.LoadFromFile() method.
- Get a specific worksheet using Workbook.Worksheets[index] property.
- Access the PageSetup object of the worksheet using Worksheet.PageSetup property.
- Set the paper size using PageSetup.PaperSize property.
- Save the modified workbook to a new file using Workbook.SaveToFile() method.
- C#
using Spire.Xls;

namespace SetPaperSize
{
    internal class Program
    {
        static void Main(string[] args)
        {
            // Create a Workbook object
            Workbook workbook = new Workbook();

            // Load an Excel file
            workbook.LoadFromFile("Sample.xlsx");

            // Get the first worksheet
            Worksheet sheet = workbook.Worksheets[0];

            // Get the PageSetup object of the worksheet
            PageSetup pageSetup = sheet.PageSetup;

            // Set the paper size to A4
            pageSetup.PaperSize = PaperSizeType.PaperA4;

            // Save the modified workbook to a new file
            workbook.SaveToFile("SetPaperSize.xlsx", ExcelVersion.Version2016);
            workbook.Dispose();
        }
    }
}
Set Print Area in Excel in C#
You can specify the exact area that you want to print using the PageSetup.PringArea property. The detailed steps are as follows.
- Create an object of the Workbook class.
- Load an Excel file using Workbook.LoadFromFile() method.
- Get a specific worksheet using Workbook.Worksheets[index] property.
- Access the PageSetup object of the worksheet using Worksheet.PageSetup property.
- Set the print area using PageSetup.PringArea property.
- Save the modified workbook to a new file using Workbook.SaveToFile() method.
- C#
using Spire.Xls;

namespace SetPrintArea
{
    internal class Program
    {
        static void Main(string[] args)
        {
            // Create a Workbook object
            Workbook workbook = new Workbook();

            // Load an Excel file
            workbook.LoadFromFile("Sample.xlsx");

            // Get the first worksheet
            Worksheet sheet = workbook.Worksheets[0];

            // Get the PageSetup object of the worksheet
            PageSetup pageSetup = sheet.PageSetup;

            // Set the print area of the worksheet to "A1:E5"
            pageSetup.PrintArea = "A1:E5";

            // Save the modified workbook to a new file
            workbook.SaveToFile("SetPrintArea.xlsx", ExcelVersion.Version2016);
            workbook.Dispose();
        }
    }
}

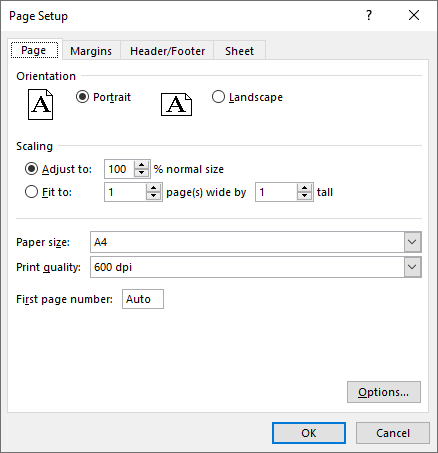
Set Scaling Factor in Excel in C#
If you want to scale the content of your worksheet to a specific percentage of its original size, use the PageSetup.Zoom property. The detailed steps are as follows.
- Create an object of the Workbook class.
- Load an Excel file using Workbook.LoadFromFile() method.
- Get a specific worksheet using Workbook.Worksheets[index] property.
- Access the PageSetup object of the worksheet using Worksheet.PageSetup property.
- Set the scaling factor using PageSetup.Zoom property.
- Save the modified workbook to a new file using Workbook.SaveToFile() method.
- C#
using Spire.Xls;

namespace SetScalingFactor
{
    internal class Program
    {
        static void Main(string[] args)
        {
            // Create a Workbook object
            Workbook workbook = new Workbook();

            // Load an Excel file
            workbook.LoadFromFile("Sample.xlsx");

            // Get the first worksheet
            Worksheet sheet = workbook.Worksheets[0];

            // Get the PageSetup object of the worksheet
            PageSetup pageSetup = sheet.PageSetup;

            // Set the scaling factor of the worksheet to 90%
            pageSetup.Zoom = 90;

            // Save the modified workbook to a new file
            workbook.SaveToFile("SetScalingFactor.xlsx", ExcelVersion.Version2016);
            workbook.Dispose();
        }
    }
}

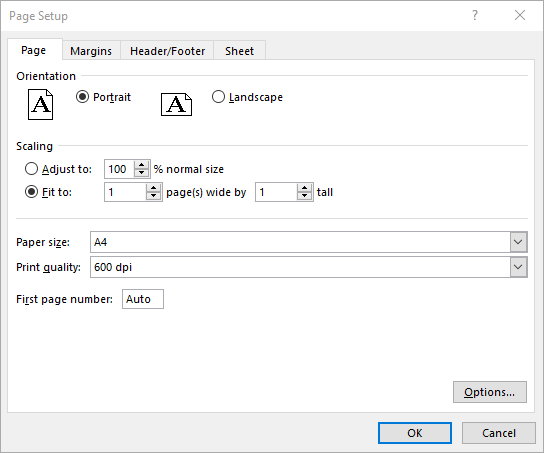
Set Fit-to-Pages Options in Excel in C#
Spire.XLS also enables you to fit your worksheet content to a specific number of pages by using the PageSetup.FitToPagesTall and PageSetup.FitToPagesWide properties. The detailed steps are as follows.
- Create an object of the Workbook class.
- Load an Excel file using Workbook.LoadFromFile() method.
- Get a specific worksheet using Workbook.Worksheets[index] property.
- Access the PageSetup object of the worksheet using Worksheet.PageSetup property.
- Fit the content of the worksheet to one page using PageSetup.FitToPagesTall and PageSetup.FitToPagesWide properties.
- Save the modified workbook to a new file using Workbook.SaveToFile() method.
- C#
using Spire.Xls;

namespace SetFitToPages
{
    internal class Program
    {
        static void Main(string[] args)
        {
            // Create a Workbook object
            Workbook workbook = new Workbook();

            // Load an Excel file
            workbook.LoadFromFile("Sample.xlsx");

            // Get the first worksheet
            Worksheet sheet = workbook.Worksheets[0];

            // Get the PageSetup object of the worksheet
            PageSetup pageSetup = sheet.PageSetup;

            // Fit the content of the worksheet within one page vertically (i.e., all rows will fit on a single page)
            pageSetup.FitToPagesTall = 1;
            // Fit the content of the worksheet within one page horizontally (i.e., all columns will fit on a single page)
            pageSetup.FitToPagesWide = 1;

            // Save the modified workbook to a new file
            workbook.SaveToFile("FitToPages.xlsx", ExcelVersion.Version2016);
            workbook.Dispose();
        }
    }
}
Set Headers and Footers in Excel in C#
For setting headers and footers in Excel, please check this article: C#/VB.NET: Add Headers and Footers to Excel.
Apply for a Temporary License
If you'd like to remove the evaluation message from the generated documents, or to get rid of the function limitations, please request a 30-day trial license for yourself.
